
Malware has different purposes. Banking malware needs to stay in the system and monitor browser activities. A keylogger needs to stay in the system to monitor keystrokes. Ransomware encrypts files on the disk. All the various goals of malware cannot be achieved instantly in a minute, maybe not even in days. In the case of APTs (advanced persistent threats), the malware might need months, if not years, to carry out their desired goals. To run for long periods of time, malware needs to make sure that it persists across system reboots, multiple user logins, system shutdowns, and so forth. To provide this kind of resilience, malware implements various persistence mechanisms.
Resources Used for Persistence
All operating systems, including Windows, have provisions to start certain processes automatically when the system boots up or when the user logs in. Linux has init files as one such mechanism, while Windows has various other mechanisms, such as registry keys, startup folders, services, and so forth, also known as autostart extensibility points (ASEP). These mechanisms are used by various benign services and software that autostart on bootup to set up the user’s system and to provide a better user experience. This also allows users to enable software they need to automatically start when they log in.
But malware also makes use of these very same autostart techniques so that they can persist across reboots and system shutdowns. For example, malware can make a startup registry entry pointing to its file path on disk or place a copy of itself into the startup folders, so that when the system boots, the OS automatically starts the malware.
The persistence mechanism used by malware also depends on the type and the purpose of the malware. For example, a malware PE file can either be an executable or a DLL file or even a kernel module. Malware that tries to steal data from your browser needs to be coded as a browser module, which is loaded as a plugin when the browser starts. Persistence, in this case, requires the malware to register itself as a browser plugin. Alternatively, if it is a binary executable, it can make an entry in one of the run registry keys or place the executable in one of the startup folders.
Before we can investigate persistence mechanisms, let’s first run through the two tools—Autoruns and ProcMon, which are very useful in detecting persistence mechanisms as we dynamically analyze malware samples.
Analysis Tools
We now introduce you to two very important tools: ProcMon and Autoruns. ProcMon is very important during the analysis process. We use these tools throughout this book to analyze malware samples. We recommended you to thoroughly play with these tools with our various hands-on exercises in this chapter and throughout the book.
Autoruns
Autoruns is a tool that scans the system and lists all the programs and services making use of any kind of autostart persistence mechanism. This is a very valuable tool that one can use while analyzing samples and complements other tools like APIMiner and Sandboxes that also helps us identify some of the persistence mechanisms used by malware.

AutoRuns tool listing all the software and services using a Persistence Mechanism
Autoruns has multiple tabs at the top that segregates and lists the software and services based on the type of persistence mechanism that is being used. For example, the Logon tab lists the software that persists/autostarts when a user logs into the system. The Services tab lists all the services that are registered on the system. Do note that Autoruns hides entries for software that belong to Microsoft/Windows by default. To view all entries, including signed Microsoft software, you can go to Options and deselect Hide Windows Entries. We recommend you to take your time and get comfortable with the interface and go through the various tabs and roughly go through the various entries Autoruns shows.
ProcMon
Process creation and shutdown
Thread creation and shutdown
File creation and deletions
Registry entry creations, deletions, and modifications
Network activity

ProcMon in action, with its quick access filter buttons for event types
As you can see, ProcMon provides four quick access buttons that let you filter events based on the different high-level categories of events: registry, file, network, process and threads, and profiling events. ProcMon also provides two shortcut buttons (as seen in Figure 8-2) that let you start/stop event capture, and another button to Clear the Events. These two buttons can also be accessed via keyboard shortcuts CTRL+E and CTRL+X, respectively.
While analyzing malware samples with ProcMon, you can stop the capture of events and clear the events. But just before you execute the malware sample, you can start the capture of events. Once the sample has run, you can stop the capture of events; otherwise, you’d have far too many events, and the ProcMon UI can lag when dealing with a deluge of events.
ProcMon has a lot more features, including some very important ones that let you filter(exclude/include) events based on various event metainformation. You must get comfortable with this tool. We suggest you go through the resource links we have specified in the file Procmon-Guide.txt in our samples repo that covers in detail the various other aspects of this tool and gets your hands dirty with its various features.
In the next set of sections, we go through the various persistence mechanisms in detail. All the sections are very hands-on with corresponding images and step-by-step guides, including ones that cover how to use analysis tools. We recommend you to try out the exercises in the sections as and when you are reading through the section. It won’t be possible for us to add pictures and steps for every mechanism, but as an exercise, you should try out all the various mechanisms using the procedures that we provide for some of the common ones.
Startup Shell Directories
Startup Folders Provided by Windows
HKCUSoftwareMicrosoftWindowsCurrentVersionExplorerUser Shell Folders
HKCUSoftwareMicrosoftWindowsCurrentVersionExplorerShell Folders
HKLMSoftwareMicrosoftWindowsCurrentVersionExplorerShell Folders
HKLMSoftwareMicrosoftWindowsCurrentVersionExplorerUser Shell Folders

The Startup Shell Folder Path as seen in the Registry
Shortcut Commands to Access the Two Startup Folders Provided by Windows
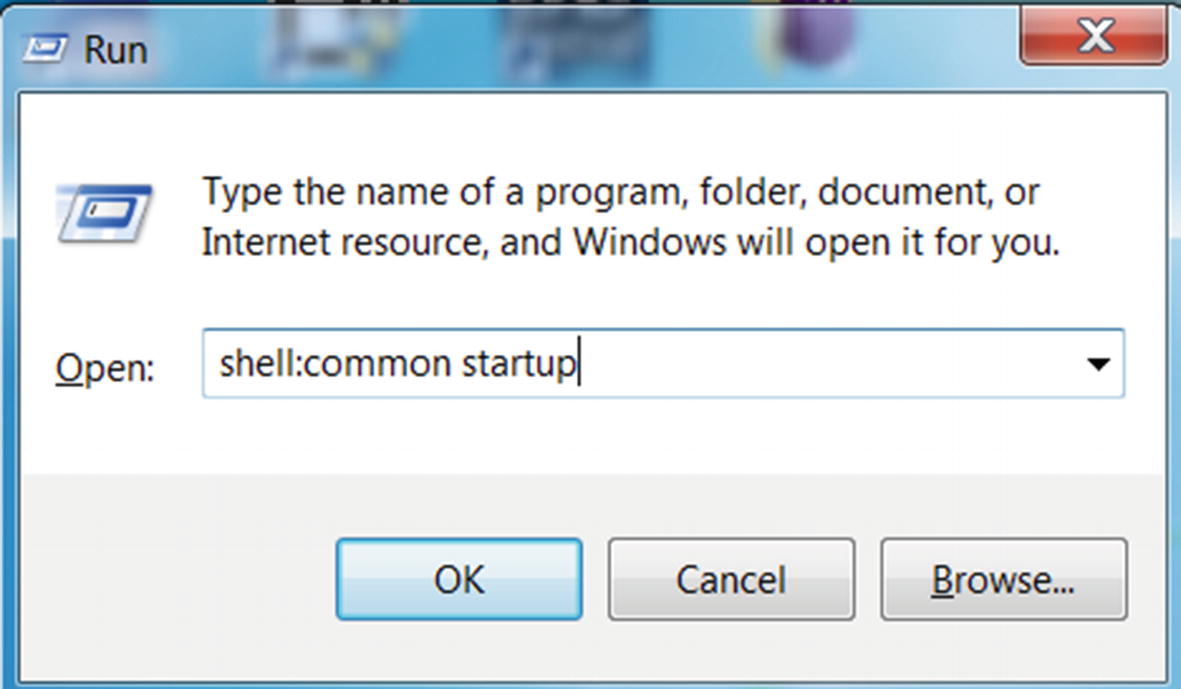
Accessing one of the startup folders using the shortcut command from RUN

The startup folder which now holds the sample which we want the OS to autostart

Post reboot, OS has autostarted Sample-8-1.exe program

Autoruns detects Sample-8-1.exe as an autostart application.
- 1.
Reset the VM to your baseline clean snapshot.
- 2.
Start ProcMon.
- 3.
Stop Capture of Events using CTRL+E.
- 4.
Clear any existing events using CTRL+X.
- 5.
Start Capture of Events using CTRL+E.
- 6.
Repeat the steps from earlier in the section by opening the startup folder using shell:common startup. Copy Sample-8-1.exe into the startup folder.
- 7.
Stop Capture of Events using CTRL+E.

ProcMon detects the persistence created for Sample-8-1.exe using Startup folder
Also, note the process name and PID of the process that generated this event. While you are analyzing malware, you have to note the events that are generated by the malware process or any of the child processes that it created or any other process that it might have injected itself into using code injection (covered in Chapter 10).
As an exercise, you can now repeat all the steps using Autoruns and ProcMon for the same sample Sample-8-1.exe but for the other startup folder accessible using the shell:startup shortcut. We recommend that you play around and exercise as much as possible, as these steps are very fundamental to the malware analysis process.
Registry RUN
The Windows Registry is a database of configurations and settings, many of which are used by the OS for system setup during bootup. The Windows OS also provides registry keys, also called RUN entries that can autostart programs on system startup. Clean software creates these RUN entries so that they are autostarted when the system starts up, a good example being antivirus software. Malware similarly creates RUN entries so they can persist across system boots, and the system autostarts them when it boots up. The RUN entry is the technique more commonly used by malware to persist on the system.
HKLMSoftwareMicrosoftWindowsCurrentVersionRun
HKLMSoftwareMicrosoftWindowsCurrentVersionRunOnce
HKLMSoftwareMicrosoftWindowsCurrentVersionRunOnceEx
HKLMSoftwareMicrosoftWindowsCurrentVersionPoliciesExplorerRun
HKCUSoftwareMicrosoftWindowsCurrentVersionPoliciesExplorerRun

RUN entry added for Sample-8-1.exe

Autoruns shows the RUN entry added for Sample-8-1.exe
Now restart the system and login back into the system. Notice that Sample-8-1.exe has been automatically launched as a process, similar to Figure 8-6.
- 1.
Reset the VM to your baseline clean snapshot.
- 2.
Start ProcMon.
- 3.
Stop Capture of Events using CTRL+E.
- 4.
Clear any existing events using CTRL+X.
- 5.
Start Capture of Events using CTRL+E.
- 6.
Repeat the steps from earlier in the section by creating a RUN entry for Sample-8-1.exe.
- 7.
Stop Capture of Events using CTRL+E.

ProcMon detects the persistence RUN entry created for Sample-8-1.exe

The Properties window for an event in ProcMon that shows the value added
As an exercise, you can now repeat all the steps using Autoruns and ProcMon for Sample-8-1.exe. Try to memorize the RUN keys so that you can easily identify them when scrolling through the event logs in ProcMon during malware analysis.
Services
Windows services is a widely used technique by malware. One of the top advantages that malware gains by registering as a service is the autostart mechanism it provides. Windows services can be registered to automatically be started by the OS on system startup. It also provides resilience against crashes by restarting the service if it exits or crashes, which is a bonus.
You can read about the various techniques that malware use to register itself as service in the “Windows Services” and “Malware as Windows Services” sections.
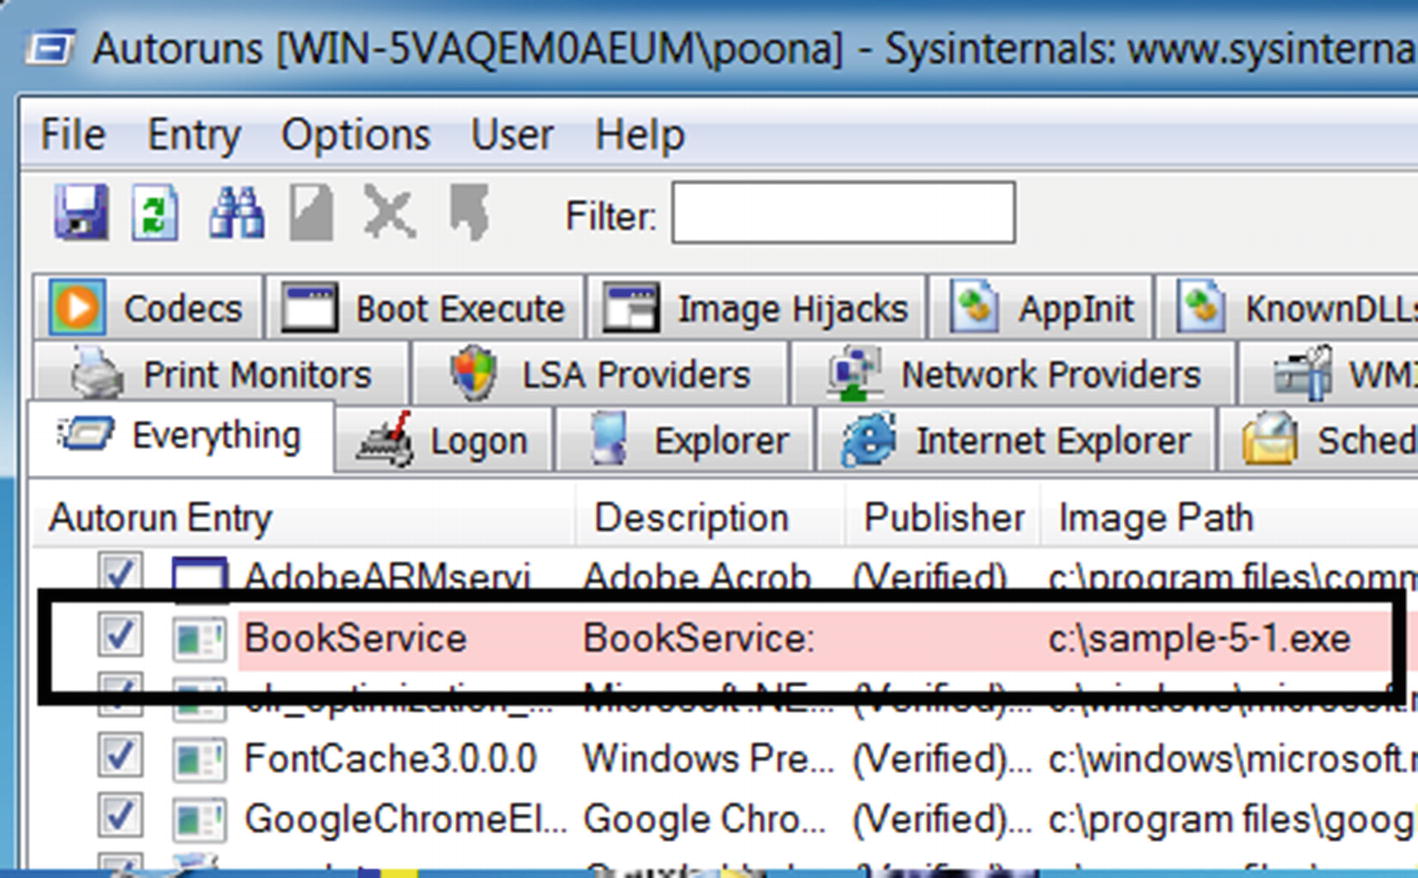
Autoruns shows the persistence for Sample-5-1.exe created using services
Now restart the machine and log back in. Open ProcessHacker, and you notice that Sample-5-1.exe has been started as a process under services.exe as the parent process, thereby showing us the success of this persistence mechanism.
- 1.
Reset the VM to your baseline clean snapshot.
- 2.
Start ProcMon.
- 3.
Stop Capture of Events using CTRL+E.
- 4.
Clear any existing events using CTRL+X.
- 5.
Start Capture of Events using CTRL+E.
- 6.
Repeat the steps from earlier in the section, by creating and running the service.
- 7.
Stop Capture of Events using CTRL+E.

ProcMon capture the registry key creation event for our new service BookService
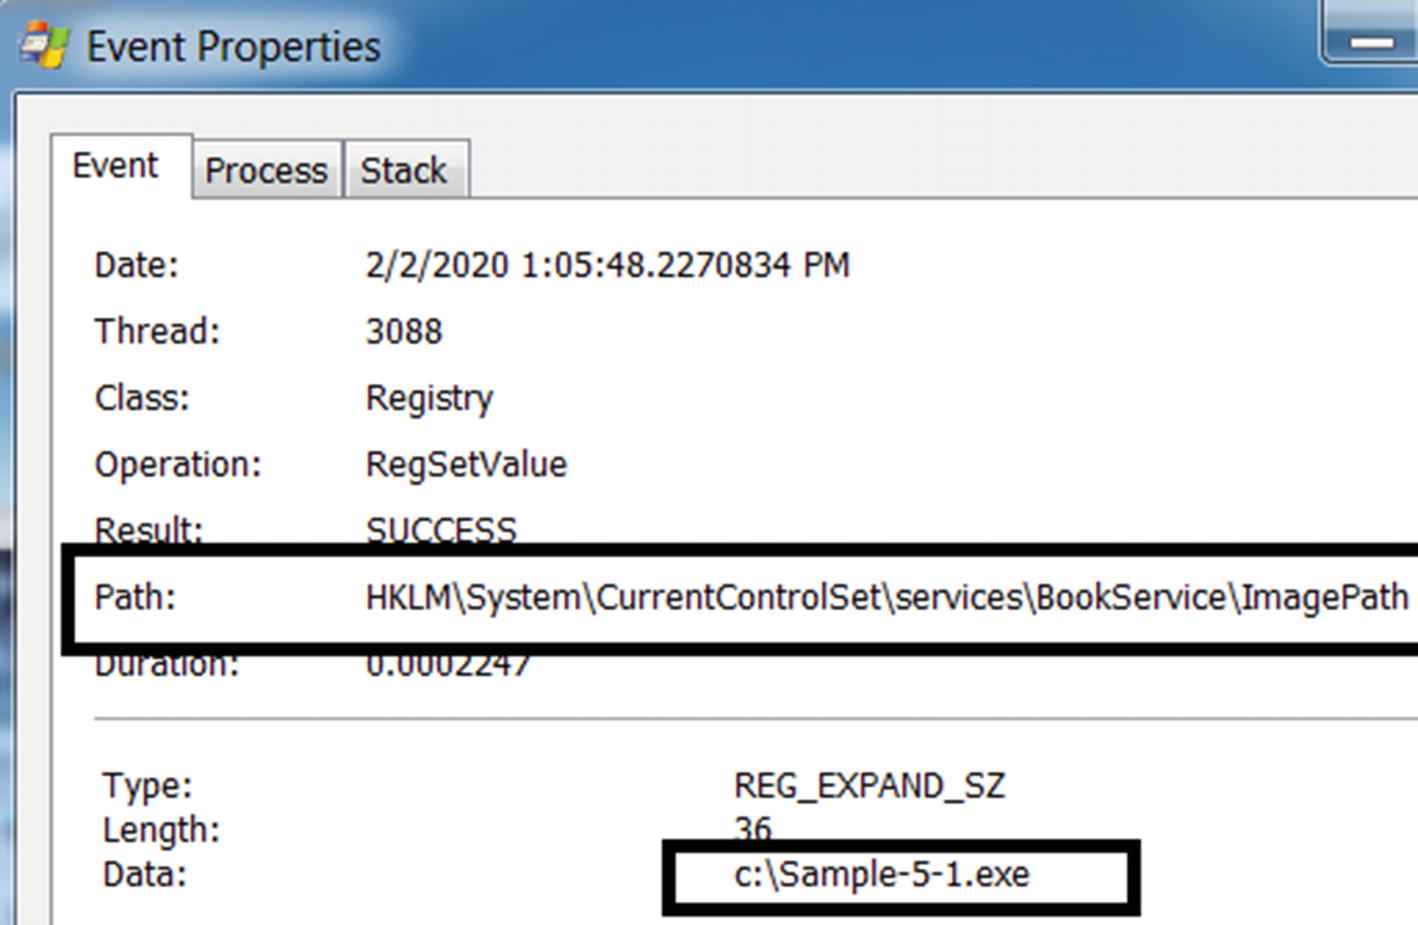
Double-clicking the event in ProcMon shows the data of the key

The process creation event of sc.exe that registered our service

Double-clicking the event in ProcMon shows the full command line for sc.exe
File Infection
Executable files can be used as persistence mechanisms using a technique called file infection . The malware that uses this technique is also called a file infector or a virus. Viruses infect healthy files on the system and alter the code of the host executable by adding their malicious code into the file. When the infected host executable file starts as a process, it automatically starts the malware or malicious code that is now inserted within it. When a virus infection strikes, it infects every executable on the system.
Identifying this technique is easily done with dynamic analysis. To detect if malware is using this technique, one can check if the sample is making any modifications to executable files on the system. A stronger indicator is if the target files which the sample is modifying are system files located in the system32 folder, since these files shouldn’t be altered by nonsystem processes. ProcMon is the ideal tool for this detection task because it shows you all the file-related activity, including modifications to any file on the disk.
Virus is a technique to infect healthy files on the system. You can consider this as a persistence mechanism as the virus uses other healthy files on the system as a host to persist themselves. But the same technique can also be considered as a propagation mechanism.
DLL Hijacking
In Chapter 4, you learned that executable files depend on DLL files to function. This includes a dependency on the system-provided DLLs and third-party DLLs. Most executable on Windows needs some well-known system provided DLLs to execute like msvcrt.dll, advap32.dll, and so forth. When an executable has a dependency on any DLL, the Windows loader needs to find and load them into the process’s memory as it is staring the process. But how does the Windows loader know where on the disk these DLLs are located?
- 1.
The directory containing the executable file which is launched as the process
- 2.
C:windowssystem32
- 3.
C:windowssystem
- 4.
C:windows
- 5.
The current working directory (usually the same as step 1 but can be different)
- 6.
Directories in the PATH environment variable
Malware is known to misuse this feature of the Windows loader to run using a method known as DLL hijacking, also known as DLL search order hijacking. The malware places a malicious DLL file in a search order directory where the actual clean DLL is located. For example, consider a case where Adobe Acrobat PDF Reader has a dependency on advapi32.dll, which is a system DLL located in C:windowssystem32. To persist, the malware DLL can rename a malicious payload of it as advapi32.dll and place it in the same folder as the Adobe Acrobat PDF Reader executable file. Now since the directory of the executable file is searched first before the system32 folder, the Windows loader loads the malicious advapi32.dll instead of the clean one located in the system32 folder, thereby loading the malware DLL into the clean process.
Winlogon
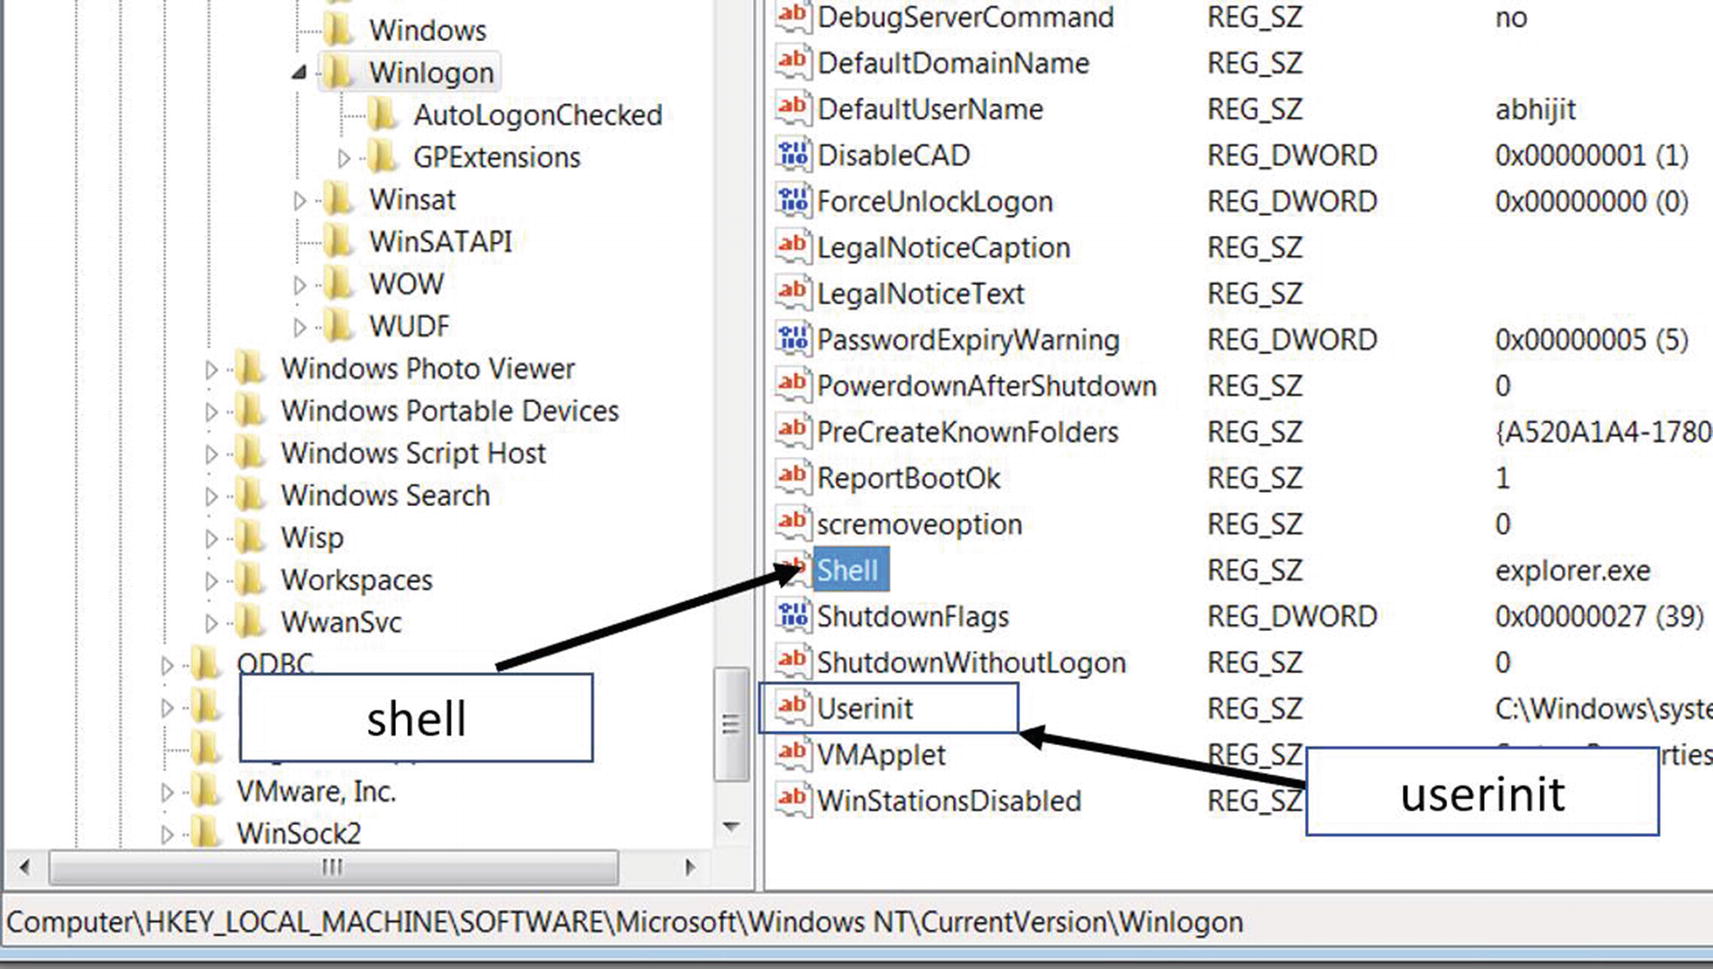
WinLogon registry key that holds system startup programs under various names
The Shell entry holds the value of Explorer.exe by default. It is the Windows File Explorer that we fondly use to browse the folders and files on our system. Malware can modify the value of this entry to add malicious executables of its own that that starts on system startup.
The Userinit value similarly can be modified by malware by adding the path to their malicious executables, that is autostarted on system startup. The paths to the programs in this value should be comma-separated with a trailing comma at the end of the value.
Task Scheduler
Similar to the cron jobs facility in Linux, the Windows Task Scheduler is a feature provided by Windows OS that allows one to schedule the launch of programs and software at fixed times or fixed intervals. Many malware, including the notorious Shamoon malware family, are known to use this mechanism to persist on the system by scheduling tasks that run them.
A Scheduled Task That Launches a Calculator Every Minute After 10:15 PM

Windows Task Scheduler tool showing us the test task we scheduled
While analyzing samples, we can detect malware that uses this technique very similar to how we did for services, by using a combination of ProcMon and Autoruns. Using ProcMon, you should be able to catch a Process Event by the process SchTasks along with the command line from the command you ran in Listing 8-3. We leave this as an exercise for you to try.
Debuggers
To facilitate software developers to debug applications, Microsoft provides various options in the registry that allows one to open an application under the control of a debugger. Let’s go through some of these options made available by Microsoft.
Image File Execution Option (IFEO)
IFEO is a popular debugging facility made available on Windows as a key at HKLMSOFTWAREMicrosoftWindowsNTCurrentVersionImage file execution options. To use this facility, you need to add a value to the application key they want to debug at the registry key location.

Setting the Debugger value as the calculator application for Internet Explorer
You can now verify this by opening Internet Explorer, which would end up starting the Calculator(calc.exe) program instead, as we specified in the registry.
Malware often uses the same facility to persist themselves, by setting themselves as the debugger to various applications. As an analyst to catch this mechanism while analyzing samples, you can use ProcMon and AutoRuns. As an exercise, you can reset your VM to try the steps, and use ProcMon and Autoruns to identify this mechanism.
SilentProcessExit
There are other options that launch executables. You saw that by using IFEO, you could launch the calc.exe executable when we tried to launch iexplore.exe. Similarly, we can have Windows launch programs when other processes exit.
One option is SilentProcessExit, which uses registry key entries at both HKLMSOFTWAREMicrosoftWindowsNTCurrentVersionSilentProcessExit and HKLMSOFTWAREMicrosoftWindowsNTCurrentVersionImage file execution options to achieve this.
Setting Registry Values That Autostarts Notepad When Internet Explorer Exits
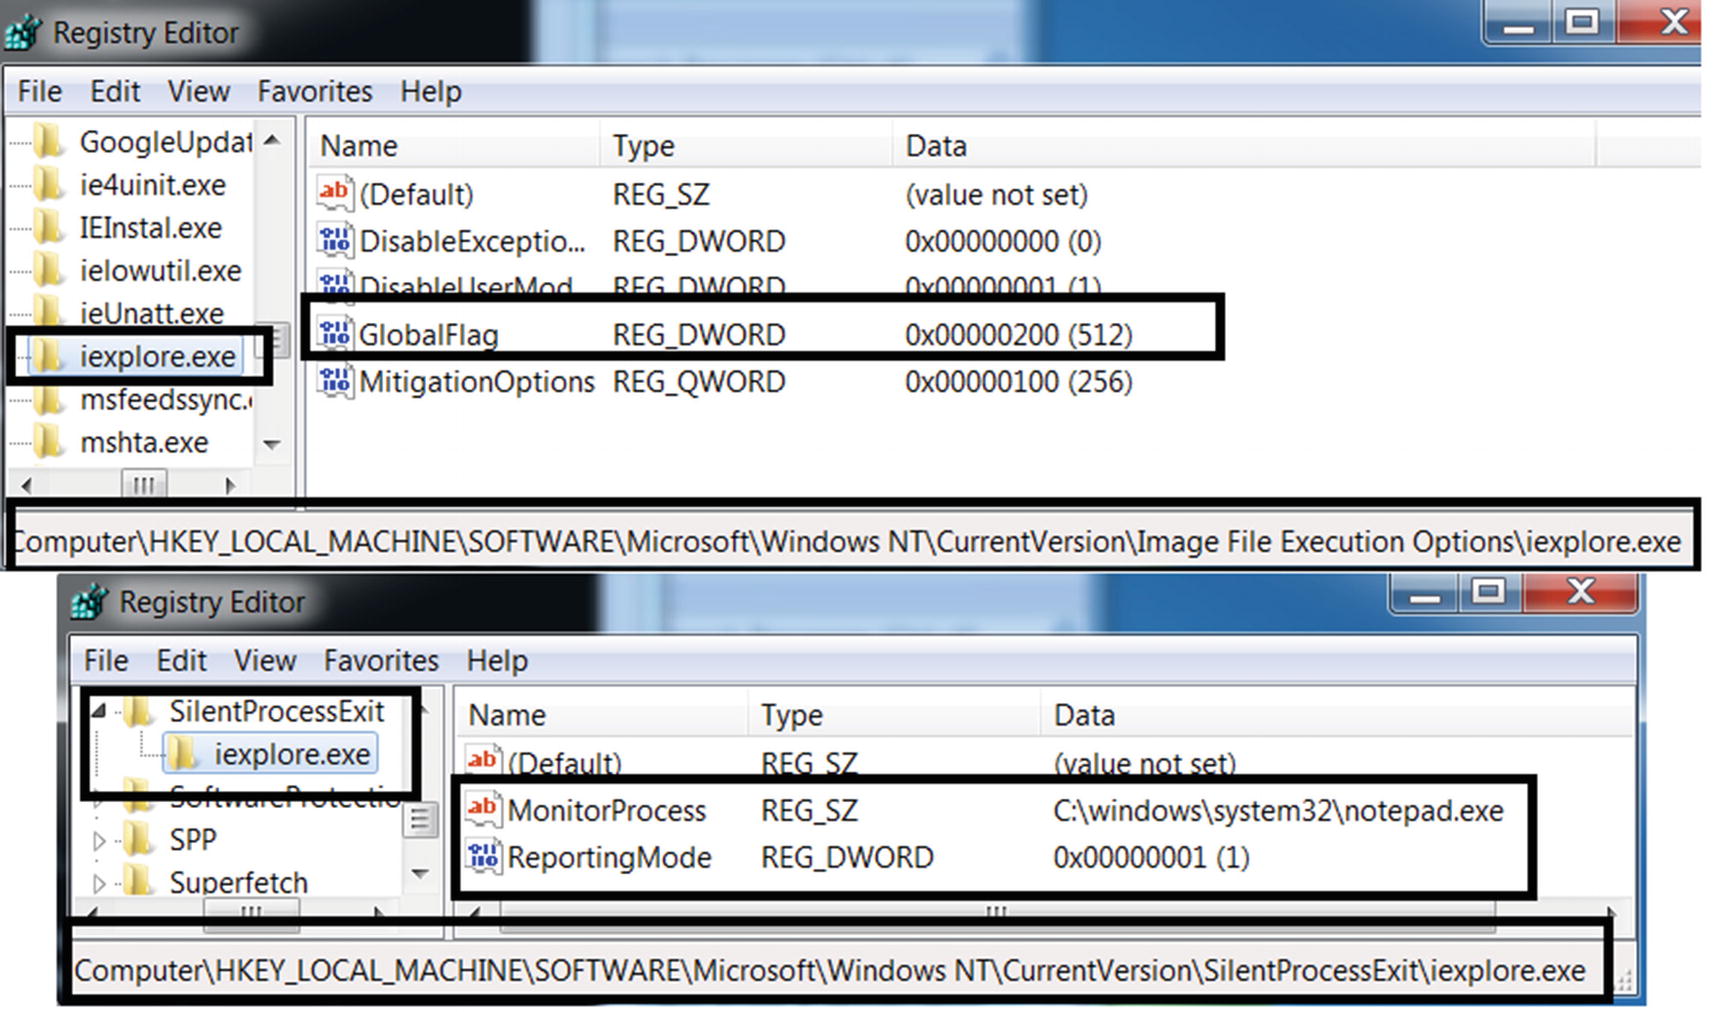
Setting up calculator application to be autostarted when Internet Explorer exits
Very similar to what we did in the previous section, we can catch this persistence mechanism by using Autoruns and ProcMon. As an exercise, you can use these tools to detect this mechanism while you set these registry keys.
HKLMSOFTWAREMicrosoft.NETFrameworkDbgManagedDebugger
HKLMSOFTWAREMicrosoftWindows NTCurrentVersionAeDebugDebugger
Summary
Persistence is a very important feature that is widely used by malware so that they can survive system reboots and shutdowns. We covered various well-known persistence mechanisms that malware uses to persist itself, including registry RUN, startup folders, services, scheduled tasks, debuggers—all of which various malware have used to enable persistence. You also learned how to use two new dynamic analysis tools—Autoruns and ProcMon. We were able to catch these various persistence mechanisms using hands-on exercises.