
Antiviruses were the first security software developed to deal with viruses, including detecting their presence on systems, quarantining them, and even reversing the damage they do to the system. These days antiviruses have gone beyond running on desktop workstations and laptops. They are even targeted for other kinds of endpoints like servers, and mobile devices like cell phones and tablets.
With malware evolving and getting more complex over time, antiviruses have also evolved technologically to stay in lockstep with the malware advancement. These days new anti-malware technologies like EDRs have come up, which are touted as the next generation replacements for antiviruses, providing features that antiviruses provide plus more. Though these new technologies might include more advanced detection mechanisms, still a lot of their components are derived from traditional antiviruses. In this chapter, we talk about various components of antiviruses and how they work internally to detect the presence of malware on our system.
Main Components of Antiviruses
Signature module and signature database
File scanner
Unpacker module
Memory scanner
Hook scanner
Remediation module
Disassembler
Emulator
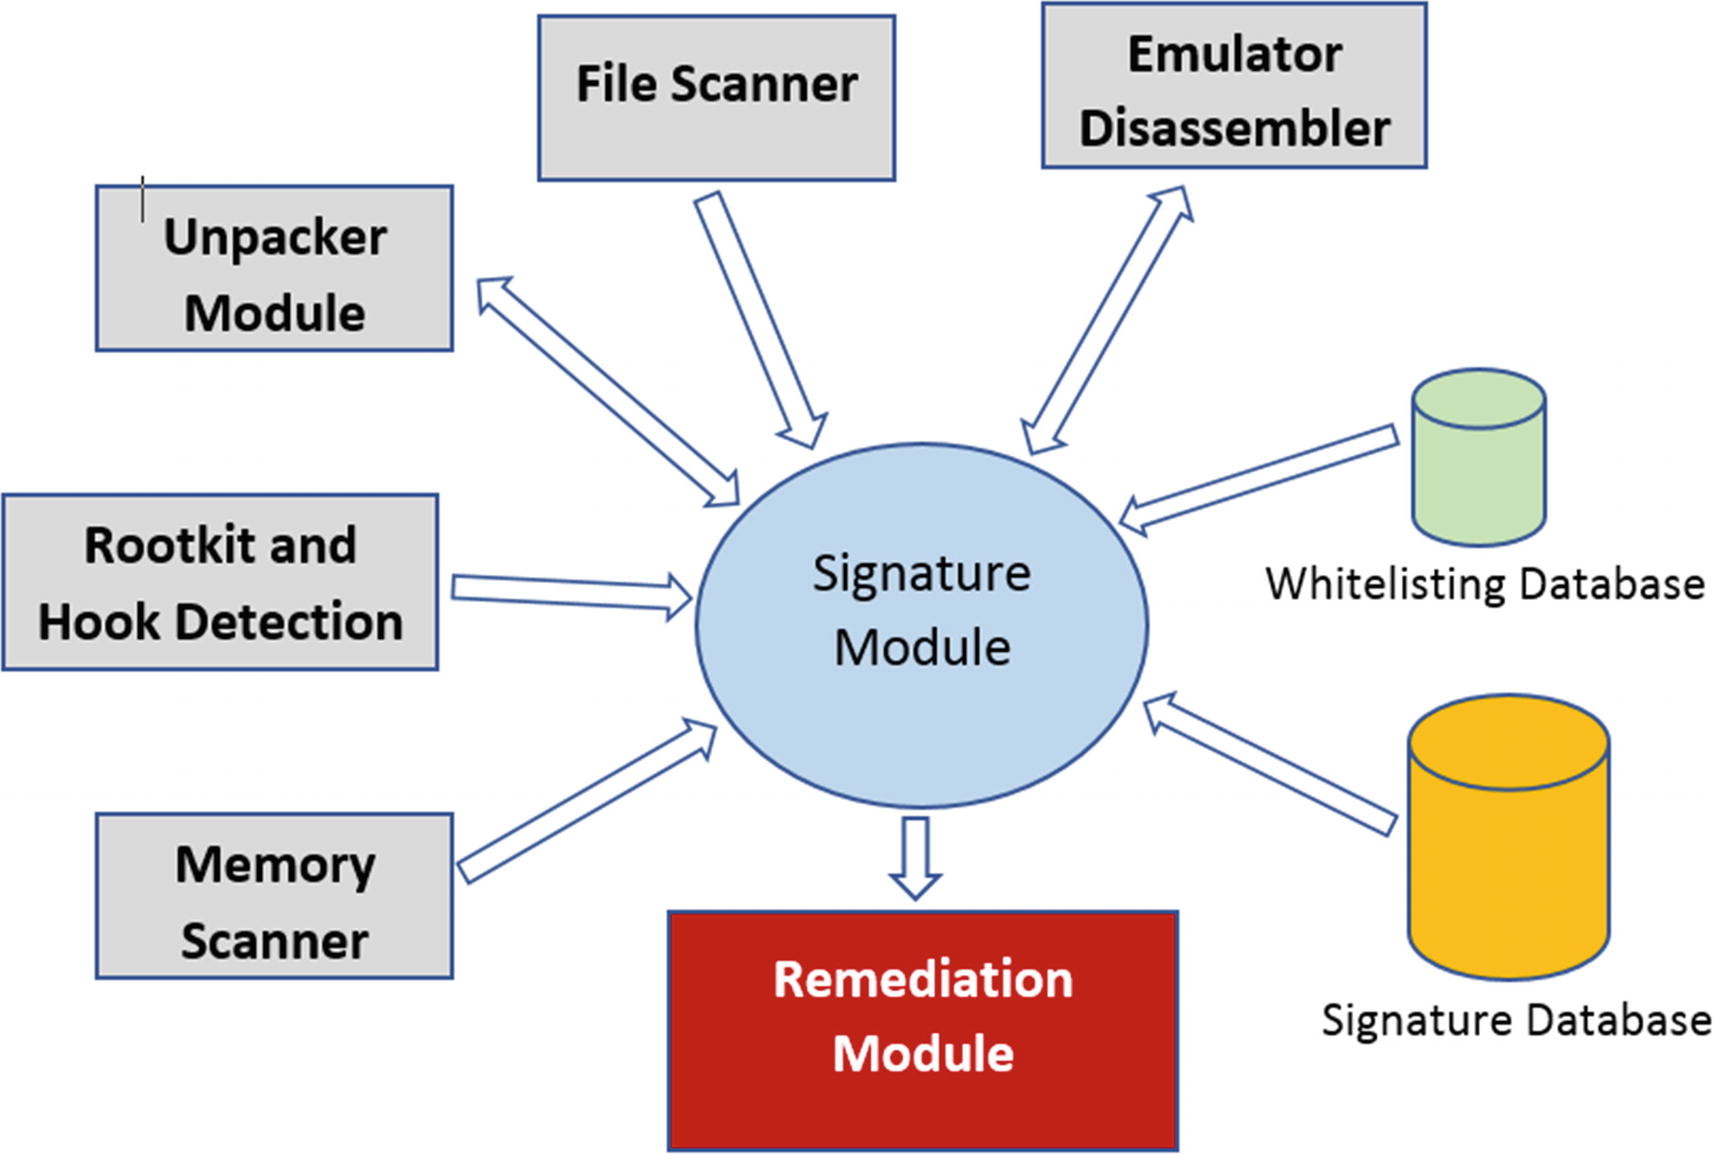
High-level description of various components that make up most antiviruses, and the interaction between them
An antivirus can be made up of modules that run both in the user space as well as the kernel space. While user-mode components can deal with scanning files, memory, registry, and so forth for patterns, kernel-mode components can monitor for kernel-mode malware infections and to provide infection prevention functionalities. For example, file system filter drivers used by antiviruses in the kernel intercept file system activities on the system. Other than that, kernel-mode components scan for kernel-mode rootkits, since a user-mode scanner can’t do the same.
Coding an antivirus requires a good amount of knowledge about the underlying operating system that the antivirus is developed to protect. Also, the code should be heavily optimized to not to slow down the system and hinder any end-user activities. And finally, the product must be extensively tested on all versions, releases, and updates of the OS. The last thing you need is for an antivirus to have false positives (FPs) detecting and deleting clean files as malicious, and in worse cases, crash your system with some buggy kernel-mode code.
In the next set of sections, we discuss the internals of these various antivirus components and what it takes to develop them. While we go through these topics, you might have to refer to some of the concepts that we covered in our earlier chapters, including file formats, disassemblers, virtual memory, hooking, and so forth.
Signatures and Signature Module
Signatures work like a fuel to the antivirus without which the engine is rendered useless. Signatures are patterns or a combination of patterns that are run and matched against various kinds of data related to the OS like files, registries, process memory, kernel data, and so forth. But the power and the feature richness of the signature language to write these signatures are dependent on the support provided by the antivirus component that understands and runs these signatures (i.e., the signature module).
The signature module is a powerful component that makes itself available for use via an expressive signature language, using which we can write signatures to match various things. For example, it can help us write loose signatures that can match on a myriad of things. At the same time, it can help us write very fine-tuned specific signatures that can search and match on very specific fields in the data it scans. For example, we can write signatures to specifically search for content only in specific file types like PDFs and .doc files. Similarly, we can write signatures to detect packers, installers, cryptors, and so forth.
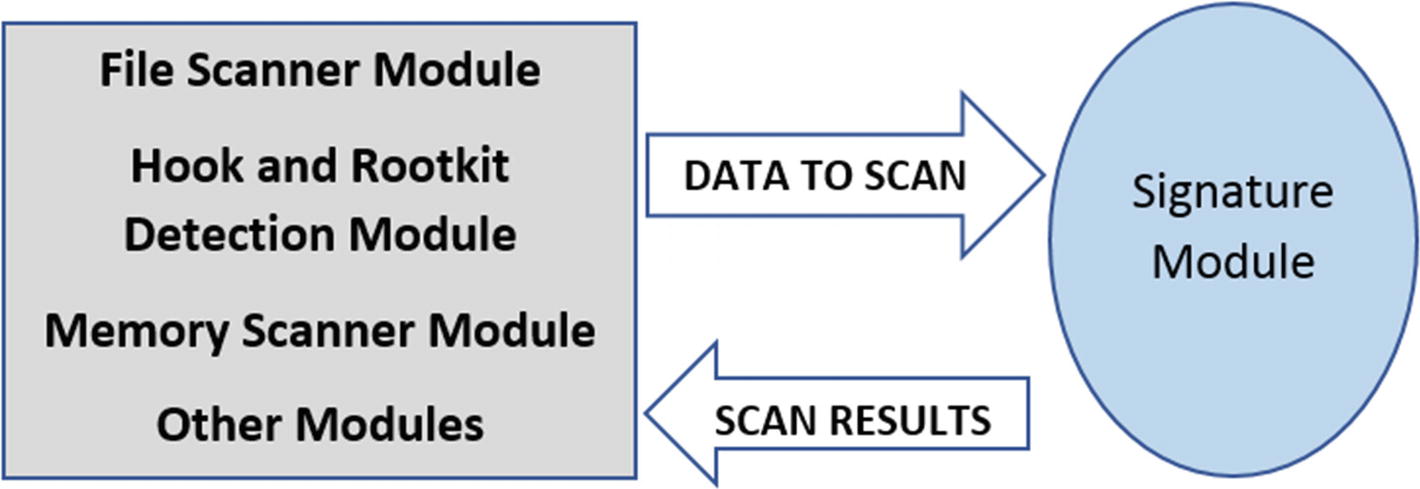
Signature module is used by every other module in the antivirus, which feeds it data to be scanned and the signature module scan it and return the scan results
We previously mentioned that the signatures are a combination of patterns that the signature module looks for in the scan buffers. But depending on the expressiveness and the power of the signature language and the features it provides, it can be a lot more than a bunch of patterns. Signatures can be written to contain instructions for the signature module to dissect the scan buffer in specific ways, including communicating with other antivirus modules to decode the data or disassemble the data and so forth. For example, if the signature module discovers the data in the scan buffer to be packed, it can contact the unpacker module, supply it the packed scan buffer and ask it to unpack it and return the unpacked data which it can then scan. Similarly, it can ask the disassembler module to decode instructions in the scan buffer on which it can then run its signatures.
YARA Signature That Matches on PE Files Sections Names and Alerts If Its .rdata
Antivirus signature modules can carry out more complex instructions, where they can interact with other modules, including disassembling the data if the data in question is machine code, and even emulate the instructions. In the next sections, we look at different types of signatures one can write and look at ways to optimize signatures for better performance and accuracy.
Signature Categories
Signatures are the most integral part of an antivirus, consisting of patterns the antivirus looks in various kinds of data to detect malware. There have been several claims that signature-based antiviruses are going to disappear soon and taken over by behavior-based antivirus and machine learning. While the new behavior-based techniques to identify the presence of a malware infection helps, the traditional signature-based detection of malware isn’t going away anytime soon. At the same time, the models one builds for machine learning and behavior detection are also based on patterns seen from malware and are not entirely different from the traditional signatures. The whole topic is debatable, but let’s not get into those details. Any new technique to identify malware is always welcome.
Signatures can be separated into various categories based on various use-cases. Let’s now look at some of these categorizations.
Based on the strictness and accuracy needed off the signatures, there are two types: strict signatures and heuristic signatures.
Strict signatures are meant to detect specific sets of malware and are expected to have lesser false positives. Heuristics signatures are loosely written signatures and are meant to cover a wider variety of malware. Heuristics tend to cause more false positives, and hence most often, the antiviruses may not take any action if they detect an alert from them. Many times, heuristics signatures are written for intelligence gathering and can track down unknown malware. The intelligence collected can improve the detection of other signatures and reduce their false positives.
Based on the state of the data that the signatures are matched against, signatures can be distinguished as static based signatures or dynamic based signatures.
Static-based signatures are meant to run on data obtained from static sources, like suspicious files on disk. Behavior-based signatures are meant to run on data obtained from changes induced by the malware when running on the system, for example, the memory of processes, API hook related data, rootkit hook related data in both user space and kernel space data and code.
The hash of an entire file
The partial hash of a file; for example, the import table hash (also known as ImpHash)
Unique attributes of files like file size, extension, section names, and so forth
Strings from file contents or process memory or any other kind of data.
Code instructions after disassembly
In the next set of sections, let’s look at how some of the signatures are composed. For our exercise, we use the YARA tool, which is a great approximation of a signature module in an antivirus. However, the signature module in an antivirus has a lot more features and support from other modules, compared to a tool like YARA.
Hash-Based Signatures
You learned in Chapter 3 that its hash can uniquely identify every file. A hash for a file is calculated by considering the entire content of the file. What this allows us to do is search for specific files by using its hash. Given a hash value that we intend to search, we can calculate the hashes of files we come across and verify if any of them match against the hash value we are searching for.
YARA Signature That Searches for Files Bearing a Specific Granccrab Malware Hash
When run by YARA against other files on the system, the rule results in YARA generating the hash of the files that it is scanning and comparing the generated hashes against the md5 hash in the rule. YARA rule language also supports matching on sha1 and sha256 hashes.
Using hashes to detect objects is not limited to files. You can have hashes for specific fields or sets of fields of a file or any other object or block/chunk of data for that matter, and use it to identify other objects that match the same hash. For example, ImpHash or Import Hash is a hash of the APIs in the IAT (import address table) of PE Files, including the order in which they appear in the IAT. By using signatures that use ImpHashes of currently trending malware threats, one can scan and search for the presence of other files and malicious payloads that have an ImpHash covered by our signatures, possibly indicating the presence of an infection. You can read more about ImpHash on the web. But using hashes is not limited to these use-cases we mentioned. We can extend it to all sorts of features and events from the system from which we can generate hashes to create a baseline and detect anything anomalous.
Demerits of Hash-Based Detection
There are hundreds of millions of malware out there in the wild, most of which a single antivirus vendor may not have access to, which means we don’t have hashes for every malware out there.
The issue is further exacerbated by polymorphic malware, which we covered in Chapter 7, where a single malware payload is taken by a polymorphic packer, which then spits out multiple packed malware files all of them with different hashes but internally containing the same malware payload.
From a performance standpoint inside an antivirus, generating a hash is a fairly compute intensive operation. It is not always preferable, especially with low computer powered battery devices like laptops and mobile phones.
It is practically not possible to cover every single malware out there and write a signature for it since the signature database used by antiviruses to hold signatures grow very large.
Matching a hash against a set of malware hashes in the antivirus signature database is pretty much a string comparison operation, which is computer-intensive. Using a multipattern matcher algorithm to make this hash string comparison can reduce the compute time needed. Still, these algorithms only work well with a small number of patterns/hashes, since their memory needs grow dramatically with more patterns/hashes.
All of these drawbacks are the reason why antiviruses use other kinds of generic detection signatures, which we cover in the next set of sections. But despite the drawback, hash-based detection is still useful and used by antiviruses and anti-malware products because when every other malware identification and detection technique fails, the hash-based detection technique comes in as a good final resort to detect malware on our systems.
Hash Signatures Generation Process
From an antivirus vendor , perspective signatures are generated pretty much every day and deployed to the antivirus via updates, to be stored in the signature database to be used by the antivirus. On the antivirus side, antivirus engineers and researchers add new signatures every day, including hash-based signatures.
But not every malware an antivirus company comes across is added as a hash-based signature for obvious reasons and demerits, ones which we listed in the previous section. The addition of a malware file as a hash-based signature is highly filtered and comes in as a last resort when no other type of signature can detect that malware.
Most of the time, the process employed for generating new hash-based signatures are automated. Usually, the process consists of an automation engine that is fed millions of malware samples. The automation engine takes each malware sample and tests it against the antivirus engine. If the antivirus engine fails to detect it, but antivirus products of other vendors detect it as malware, the automation engine automatically generates a hash-based signature for that malware sample and add it to the signature database to be deployed via an update.
Now antivirus engineers continuously inspect new malware files that the antivirus engine fails to detect as malicious. To counter these false negatives, engineers might introduce new feature improvements to the antivirus engine that might improve its efficacy in detecting malware samples that it previously didn’t detect. Alternatively, they might write new generic signatures or modify some of the existing signatures so that the antivirus engine now detects these previously undetected malware samples. When either of these things happens, the antivirus engineer updates the signature database and remove any hash-based signature for that malware sample, if there is one. This constant update of the signature database, including the addition of new hash-based signatures, and then removal of older ones, is what helps keep the size of the signature database in control.
Generic Signatures
You learned that hash-based signatures aren’t used unless necessary, where there’s no other mechanism to detect a malware sample, and there is no other way to write a signature to detect it. As a first attempt, antivirus signature writers always resort to other methods to write signatures to detect malware, one mechanism being writing Generic Detection on them using strings.
You learned how to use strings to identify and classify malware in Chapter 7 and Chapter 12 and Chapter 13, by observing the strings in both files and a process’s memory using static analysis tools like BinText and dynamic analysis tools like Process Hacker. The same methods are extended to write generic detection signatures in antiviruses using strings.
As an exercise, take four samples Sample-22-1, Sample-22-2, Sample-22-3, Sample-22-4 from our samples repo. All these four samples belong to the GandCrab ransomware family, but they are four different files and have unique hashes to identify each of them. But these four samples belonging to the same malware family have some strings common to them. The sets of samples that share common features are known as clusters (concept covered in Chapter 15).
Some Strings Present in Our Four Samples Samples-22-1, Sample-22-2, Sample-22-3, and Sample-22-4
Now strings (1), (2), (3), and (4) are common to all the four files, but they are common to a lot of other PE files as well, including clean PE files. Using only these four strings to write a signature and running it against other samples can cause false positives. But we have strings (5), (6) that are also common to all the four files. String (5) looks very specific to the GandCrab ransomware family. But string (6) may be found in other ransomware too since it indicates something related to a ransom , which is a common functionality of all ransomware.
One YARA Rule to Detect the GandCrab Malware Cluster of 4 Malware

Our YARA rule from Listing 22-4 matches against all the four GandCrab samples

BinText tells you if the string is ASCII or Unicode by using the letters A and U
If you want to make your string-matching encoding-insensitive, you can use ASCII wide instead of in your rules. Similarly, if you do not care about the case, then you can also use the keyword nocase. Now with our YARA rule, we match against all these four GandCrab samples, plus it might match against other GandCrab samples as well, if not all, at least some of them that have features similar to the sample cluster of ours.
You don’t need to write only one rule to catch all the samples in a cluster. You might need one rule, or maybe a couple of rules to cover all the samples in a cluster. Sometimes you may not be able to cover every single sample in the cluster, and you might have to skip covering certain samples in the cluster. In these exception samples, you might have to figure out other detection methods inside your antivirus to detect them as malicious, and if nothing works, finally resort to hash-based signatures, which we covered in the previous section.
Also, while dealing with writing rules for new clusters, you don’t necessarily have to write new rules to detect new samples in new clusters. A lot of times, all you need to do is tweak existing rules for the same malware family in your signature database so that they cover these new samples. For better maintenance and readability, rules should be versioned and properly commented .
Signatures on Disassembly Code
In the previous section, we used unique human-readable strings from malware sample clusters to write signatures. Unique human-readable strings are great to write signatures. But you learned in Chapter 7 that most malware is packed, and these human-readable strings are not visible in packed malware files on disk and are only decrypted and visible in memory once the malware sample runs. We can still write signatures using strings present in the process’ memory, as you learn later in this chapter when we talk about the unpacker module and memory scanner.
Coming back to packed malware files that don’t have unique human-readable strings that we can write signatures against, we can now instead rely on unique instructions in the malware assembly code to write signatures against. To write detection on assembly code, you should be well versed with disassembly and how an assembly instruction looks and their various encodings. At the same time, you should also be aware of what sets of instruction codes you can convert into signatures without having it match falsely on other samples, clean ones included.

Option in IDA PRO that needs to tweaked to view instruction opcodes
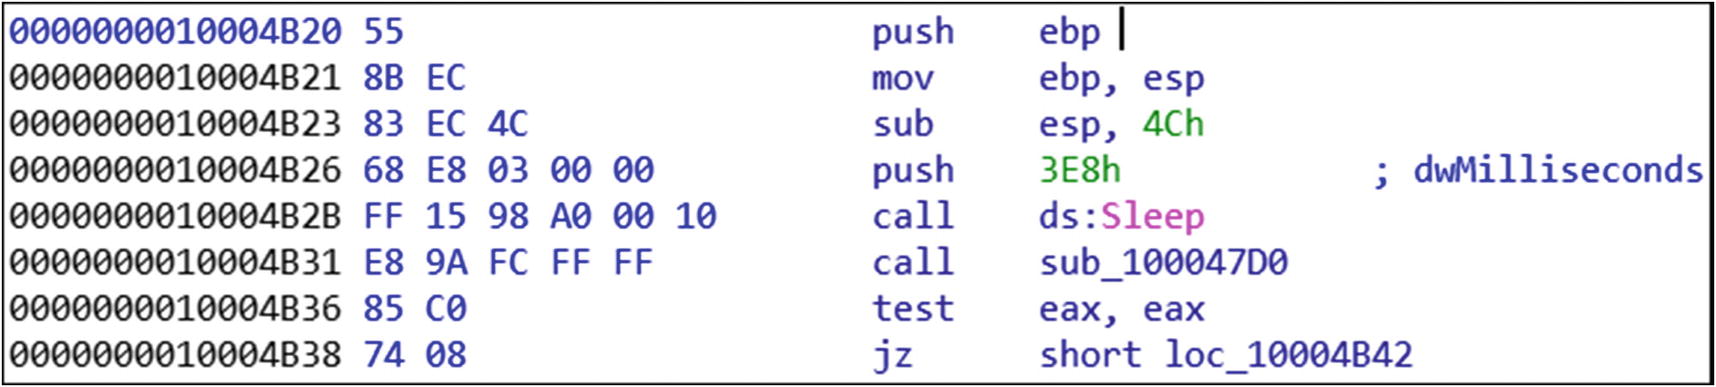
The disassembly instructions from the entry point of Sample-22-4
Assembly Instructions Picked Up from the Entrypoint of Sample-22-4
The instructions at lines 1, 2, and 3 assign space for some variables. Line 4 sets up the argument value of 0x3E8 to be used by the CALL instruction line 5. Line 5 holds the CALL instruction, which invokes the Win32 Sleep API with a parameter value of 0x3E8 milliseconds, which was set up in line 4.
Do note that IDA Pro can identify that the instruction at line 5 is not just a CALL instruction, which is identified by the opcode FF 15, but also a CALL instruction specifically to the Sleep Win32 API. It can figure this by resolving the reference made by the instruction opcode values with the values present in the IAT. We don’t have to worry about those details, though. The next instruction at line 6 invokes some other function in the malware. It looks like the call at line 6 returns some value in the EAX register, which is verified for a nonzero value at line 7 using the test instruction.
C Pseudo-Code for Lines 4–8 of the Assembly Instructions from Listing 22-5
Now do keep in mind that every assembly instruction has two parts: the opcode and the operands. The opcode is fixed, and that’s what’s used by the disassembler to determine what kind of instruction it is. The opcode part is in bold. The operand value, though, can vary based on the needs.
YARA Signature That Makes Use of the Assembly Instructions from Listing 22-5 to Detect Sample-22-1, Sample-22-2, Sample-22-3 and Sample-22-4
Scan this rule using YARA, against all the samples in our GandCrab cluster: Sample-22-1, Sample-22-2, Sample-22-3, Sample-22-4. You see that all the four samples have a match against the rule. But is the rule good enough yet?
Modified YARA Signature for the One in Listing 22-7 That Uses Wildcards to Account for Variability in the Instruction Operand Values
This makes the YARA rule more generic and is more likely to detect more GandCrab samples. With time you might get more GandCrab samples and clusters, and it may so happen that new clusters may not have these set of instructions in the same order. You then must identify new patterns in them and update the rule accordingly.
Caveats
While you can consider disassembly code inside an executable to write a signature, you need to be sure that it is less likely to be present in clean files. Remember, while writing string-based detection, we did not use strings that could be present in all clean files, since they could end up causing false positives. We need to do the same here. The most common mistake you might commit is writing detection on entry points instructions. But code in the entry point can also belong to compiler code. We talked about this in Chapter 16. We suggest you not to pick up random assembly code and use it in a signature. Understand the code properly by disassembling and debugging and be sure that the chosen code is unique to the malware family and also that it doesn’t belong to any other clean files as well.
Writing signatures for antiviruses may not be more complex than writing these YARA rules. End of the day, it is all about picking unique patterns that can be in any form to uniquely identify malware samples. The signature modules in antiviruses have the support of various other modules like disassemblers, emulators, and unpackers and many file format parsers, which is probably even more powerful and helpful to rule writers than using YARA to write the same rules.
Signature Optimization
Consider the GandCrab detection rule from Listing 22-4. There is nothing wrong with the detection logic as we can detect all the GandCrab malware files we have in the clusters. But is it production-grade yet? Can it perform well when we deploy them in real customer machines? Will it take so much computing power that it consumes all the CPU and battery power of the device?
The trouble with these rules is that the signature module tries to match them against every file in the system. In a real system infected by GandCrab malware, there might be a single GandCrab malware executable on the system, while the rest of the files on the system are clean. And needless to say, there could be millions of clean files on the system from various software installed by the user on the system. Add to that the user’s documents and image files, and the number of files on the system increases even more.
Think about how much time it takes for the antivirus signature module to scan the huge no of files with these rules. Also, a real antivirus has many more rules in its signature database; maybe hundreds of thousands meant to identify other malware. Now think of how much system resources the antivirus process consumes if each file is scanned top to bottom and scanned against every signature in the signature database.
Any performance degradation from an antivirus can be disastrous, and customers can complain about the slowing down of the system when the antivirus is running. The even more dangerous case is savvy customers disabling the antivirus on the system stating system slowdown as the reason. That’s the last thing we need the customer to do, as that opens up the floodgates for malware infections to creep into the system.
Keeping all these things in mind, writing an antivirus signature that detects malware samples is not the only important thing. Optimizing them to minimize system resource usage is important. One very well-known technique that can improve the signatures is to place pre-filters for the signatures. The pre-filters like the same suggests filters a file or any other kind of data against a set of conditions, and only if the conditions match a signature be matched against the data/file.
For example, the file size can be considered as a filter as it is easy to figure out the file size from the OS without having to read the contents of the full file. We can place a filter in our GandCrab signature that it should only be run on files with a size range of 69–71 KB. We arrived at this file size range based on the file sizes we obtained for the samples in the cluster. When you are writing rules for a cluster, you can employ the same technique to obtain the file size filter range for your rule, by analyzing the size of files in your cluster.
Pseudo-code That Describes the Pre-Filters That Are Checked Before Finally Scanning the Signature Against the File
Optimized Variant of the Rule in Listing 22-4, Which Now Uses Pre-Filters to Improve Performance
More Optimizations Added to Our Rule from Listing 22-10, That Uses PE Header Attributes As Pre-Filter
The new pre-filter that we just added, only needs to look at the PE header and doesn't need to scan the entire file’s contents, which makes it very efficient for the signature module to run.
We have illustrated writing and optimizing signatures for antivirus using YARA as an approximation of an antivirus signature module. But writing signatures for antiviruses with their signature rule language is like what we did here in the sections, including the optimizations we had to put in place. But the general process of identifying good unique strings and pre-filters to write signature rules is something that you develop with experience. The more you play and investigate malware samples, the more you learn about writing good signatures. Also, you can automate investigating new malware samples for unique common patterns in clusters to speed up your investigation process before writing a new signature.
Risk Minimization
The duty of an antivirus engineer doesn’t end at writing a new malware signature and pushing it out to the antiviruses. He has to make sure the signature deployed is of top quality. In a malware outbreak, as an antivirus engineer, you might write a new signature or detection method quickly. You might not get enough time to debug through malware or a set of malware in the cluster and write a good signature. This can have bad consequences if the signature you come up with has false positives since a bad signature or detection technique might block an extremely important clean file at your customer premises. Not a pretty scenario for an antivirus vendor!!
Also, while writing signatures, you should make sure that the signature you write should at least detect the malware sample set, which it is intended to detect. You should also test to check that the signature doesn’t overly slow down the antivirus signature matching process. If it does, you should investigate putting filters to optimize the signature, as we saw in the previous section.
Another important thing we covered earlier is false positives. We wouldn’t want any of our signatures to match on clean files. If a signature detects clean files or rather files, it is not supposed to match on, technically they are known as false positives. While choosing strings and disassembly instructions for signatures, be sure that they are less likely to be present in clean files. You might find it hard to choose good patterns initially, but believe us that practice makes you perfect.
To reduce false positives, it’s extremely important to periodically collect clean programs, including their hash values. This clean file related information is collectively stored in a database called Whitelisting Database. Before deploying your new signature, you should scan it against the files in this database and make sure it doesn’t match against any clean files. If it does match, it is time to go back and re-tune the rule, and the cycle continues till you have a good signature ready.
Antiviruses also use the whitelisting database on the system it is installed, so that it can ignore clean files on the system and avoid scanning them. Antiviruses also use other mechanisms, in general, to filter out clean files, for example, using signer info, which we covered in Chapter 12. If a well-known software vendor signs a file, the antivirus knows that the software/program is not malware and skips inspecting it. This improves efficiency and avoids unnecessary false positives, as well.
File Scanner
File scanners are modules in antiviruses that are tasked with the job of capturing a file or part of a file for scanning. The complete file or the part of the file obtained by the file scanner is then sent to the signature module, which scans it against signatures in the signature database.
The file scanner can identify the file type and forward it to the signature module, where it then scan the file against the signatures that are meant for the file type.
Scheduled scans that the antivirus runs on the system, which can be daily, for example
On-demand scans initiated by a user
When a file is accessed for reading, writing, copying, moving, new file creation events, and so forth
For on-demand scans and scheduled scans from, implementing a file scanner module is trivial, and it only involves parsing through the file system and picking up all files and feeding it to the signature module for scanning. The whole of it can be implemented by a couple of directory and file traversal Win32 APIs—FindFirstFile and FindNextFile—while APIs like CreateFile and ReadFile, SetFilePointer can read the contents of the file for reading and feeding the contents of the files to the signature module for signature scanning.
Coming to point (3) from the list, another instance where a file scanner can pick a file to be scanned and needs no direct intervention from the user or any kind of scheduling. This happens when a program or a user accesses a file. Real-time scanning is triggered when the file is written to the disk for the first time as it is copied or downloaded. This is a kind of prevention mechanism which can stop a malware executable from getting written to the disk in the first place. Microsoft Defender calls this feature real-time protection. You can try out this feature in your analysis VM by enabling real-time protection in Microsoft Defender Antivirus and either copying a malware file into a folder or if you already have a malware file in the VM, selecting the file by single-clicking it. You notice that Microsoft Defender Antivirus immediately pick the file up and detect it as malware and quarantine it.
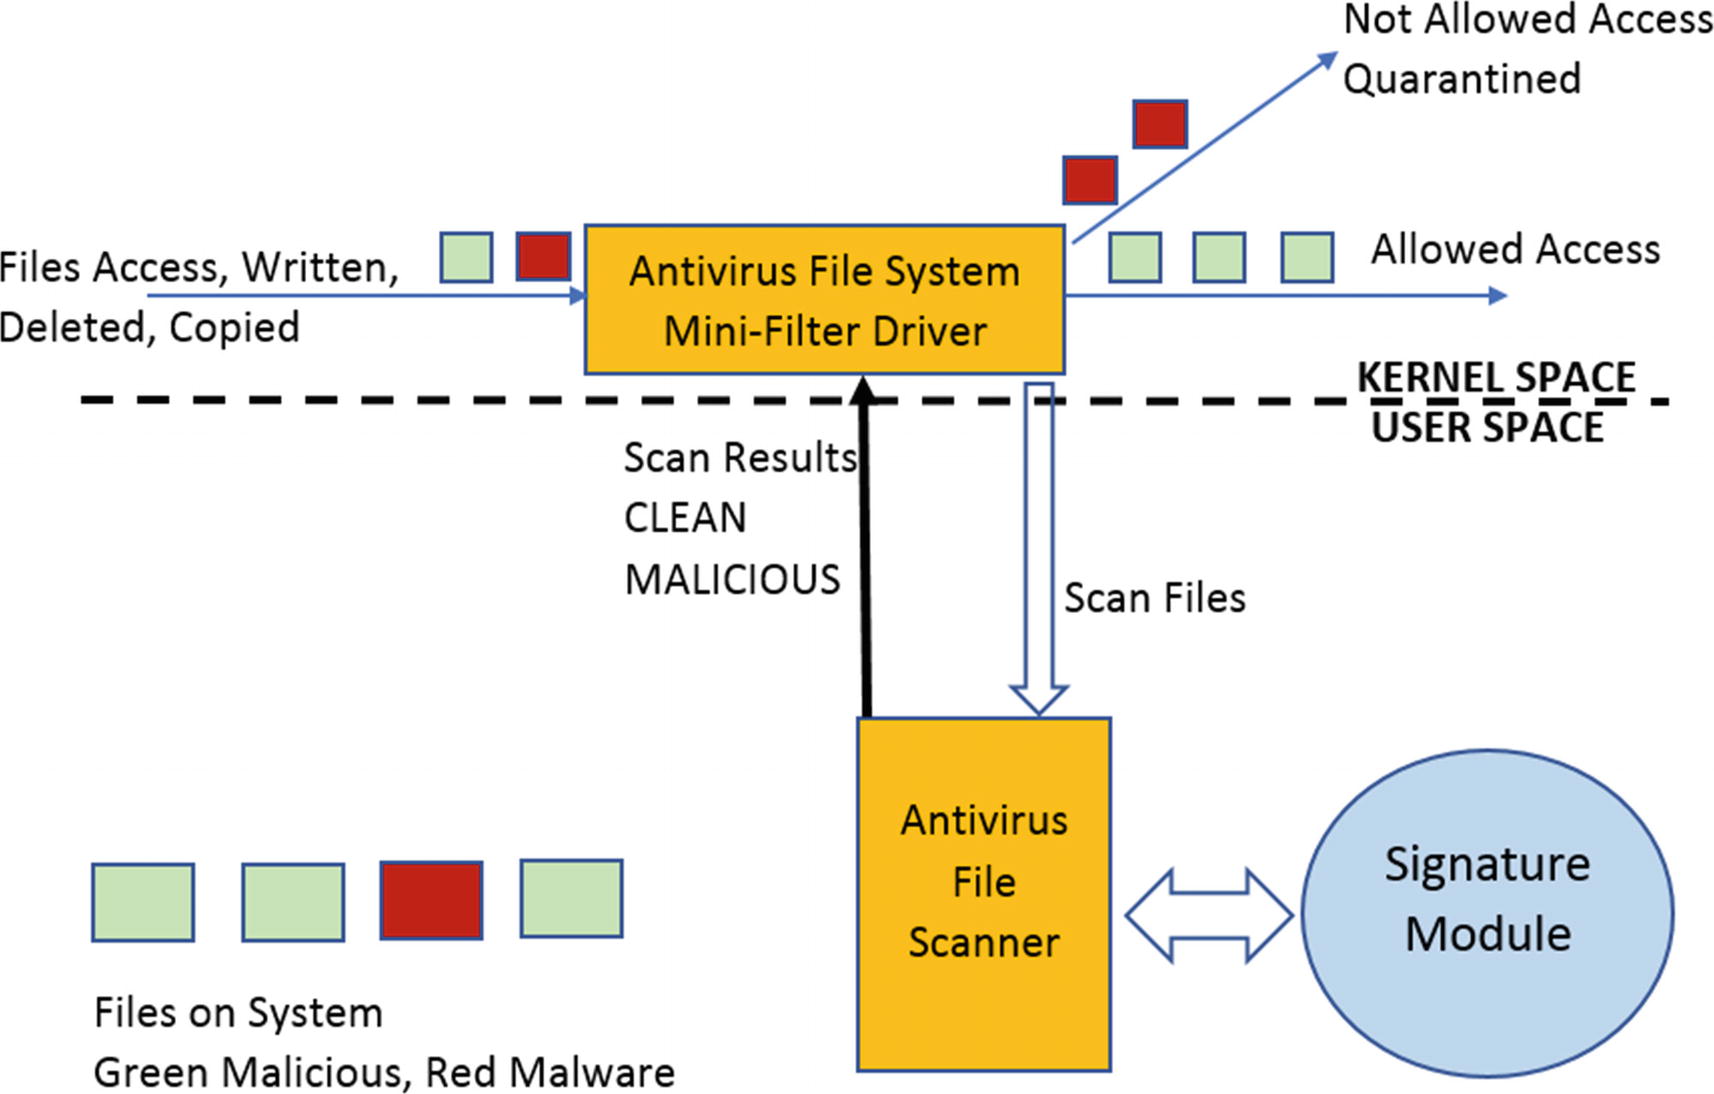
Real-time file monitoring and scanning provided by the file scanner module using the help of a file system mini-filter driver and the signature module
Covering how to write a full-fledged mini-filter driver is out of the scope of this book. But you can refer to the mini-filter driver samples provided by Microsoft on their developer network.
Unpacker Module
Once installed on our machines, an antivirus looks at thousands of samples every day—both clean and malware. Coming back to malware samples, most of the malware is packed. Many of the malware is packed by well-known packers, which may also be used by software vendors to pack clean executables.
In Chapter 7, we talked about packers and how to figure out both statically and dynamically if a sample is packed or not, and even identify the type of packer used using signatures. Similarly, an antivirus signature module can identify if a sample is packed or not and identify the packer used to pack the sample, by using signatures that identify certain attributes of packers, like code around the PE entry point, PE section names, entropy and so forth. Once a sample is identified as packed, the signature module then asks the unpacker module to unpack the packed executable and give back the unpacked data/payload, after which it then scans it with its signatures.
Now unpacking a packed sample can be done both statically and dynamically. Dynamic unpacking requires you to execute a sample so that the sample automatically unpacks itself in memory. From an antivirus use-case perspective, this can be highly risky because if it turns out that the packed sample is malware, then the malware can do damage to the system by the time the antivirus figures that it is malware and tries to quarantine it. It gets even worse if the antivirus can’t detect it as malware at all. Because of this, dynamic unpacking is not a viable option, which leaves static unpacking as the best method.
Before we get to how static unpacking works, let’s reiterate how a packer works. A PE packer works by compressing a PE executable so that the output packed executable occupies less space on the hard disk and can be transferred easily over the Internet. Packers also provide the additional advantage that the output packed sample appears obfuscated, deterring any easy static analysis. Now when a packed sample is run, for the original code to execute, the original code needs to be decompressed into the virtual memory. So to achieve unpacking at runtime, at the time of packing, the PE Packer embeds the decompression algorithm in the packed output file it generates. When the packed executable executes, it first runs the decompression algorithm code, which decrypts the packed code into the virtual memory. It then transfers execution control to the decompressed code, thereby executing it. You can read more about the details in Chapter 7 and Chapter 17.
Now that we know how unpacking works, how do we implement a static unpacker? To statically unpack a packed file, we need to reverse engineer the sample and figure out the decompression algorithm used to unpack the sample. We can then convert this algorithm into code to which we can feed the compressed packed data, which it then decompresses, and this now decompressed contents (code/data) the antivirus can then use and scan in other modules like the signature module.
- 1.
Identify the packer used in malware.
- 2.
Collect similar files packed with the same packer as (1) and put them in a cluster.
- 3.
Reverse-engineer some of the samples from the cluster to identify the unpacking decompression algorithm.
- 4.
Find out if the decompression algorithm is already implemented as code in the unpacker module of your antivirus. If not, convert it into code and add it to the unpacker module as the static unpacker for the packer identified in step 1.
- 5.
Test to make sure the unpacker code works against all the samples from the cluster.
From steps 1 and 2, if you want the unpacker that you write to be generic, you need a larger set of samples using the same packer. With the unpacker in place, signatures can now be written on the unpacked code, which contains the real code and data of the actual malware, which results in high accuracy and more effective antivirus detection, and also lower false positives.
Writing an unpacker is time-consuming, not to mention complex, and requires thorough reverse engineering skills to identify the decompression algorithm and locating the compressed data in the packed file. Also, a lot of malware uses custom packers making this job highly time and effort-intensive. As an exercise, you can browse through UPX, a well-known open source packer, and understand how a packer works and how packed code is generated. As an additional exercise, you can also try writing an unpacker for UPX-packed samples.
Memory Scanner
Throughout this book, we spoke about virtual memory used by a process and how it holds a wealth of information about the sample that is being run. This is even more important for packed samples that unpack when executed in memory. In Chapter 13 and Chapter 15, we used the strings from unpacked contents in memory to identify samples as malicious and also classify the malware.
An antivirus uses the same logic of scanning a process’ memory using signatures to identify if the process is malicious or not. Previously, we covered signatures that can run on files and other objects. Now the very same signatures are also run by the memory scanner module along with the help of the signature module against the process’s memory.
Scheduled scans which the antivirus runs on our systems
On-demand scans initiated by a user. This usually happens if the user or an admin suspects an infection and scans the system for any malware.
On certain events like process creation and so forth.
OpenProcess opens a handle to a remote process whose memory we intend to scan.
VirtualQuery retrieves information about all the memory pages and the address ranges owned by the process.
ReadProcessMemory read the contents of memory into a buffer, which our memory scanner can then scan using the help of the signature module.
We have implemented a proof-of-concept memory scanner using the same set of Win32s APIS, the source code for which is located in the file Sample-22-5-Memory-Scanner-Source.c in our samples repo. The same file we have compiled into an executable Sample-22-5-Memory-Scanner.exe also available in our samples repo as Sample-22-5-Memory-Scanner to which you can add the .exe file extension suffix.
As an exercise, run Sample-13-4 from Chapter 13. In Figure 13-15, the sample unpacks in memory, and you can find the string FtpUserName in its memory. On our system, after running the malware Sample-13-4.exe, it results in a new process called coherence.exe, as seen in Figure 13-14 in Chapter 13. On our system this process has a PID of 3440. Note the PID of this process coherence.exe on your system and run the memory scanner against this PID and scan for the string FtpUserName, and as seen in Figure 22-8, it can locate this string in memory. Yay!!

Hook and Rootkit Detection Modules
In Chapters 10, 11, and 15, we saw malware create hooks for various purposes, including intercepting API calls to steal banking credentials, to protect itself and its artifacts using rootkits, and so forth.
We have two types of hooking : IAT and Inline. IAT hooking works by patching the IAT table in the main process, whereas Inline hooks are created by patching the code itself at the start of the API calls that are intended to be hooked. You can read more about how these two hooking techniques work in Chapter 10. Finally, whatever the API hook technique used, with API hooks in place by the malware, the API calls are now redirected to the malware’s code where it can carry out its stealthy malicious activities.
Now antiviruses have an API hook and rootkit detection module that scans for the presence of hooks and rootkits on the system. Implementing an API hook and rootkit scanner requires the same techniques we would otherwise use if we were to do this detection manually.
When a program calls a Win32 API and with no hooks set yet, the code flows from the caller of the API to the callee, which is the Win32 API that is located in memory in a module that belongs to a Win32 System DLL. But when Win32 APIs are hooked, the code flow goes from the caller to some other memory module/region and not to the API code in a Win32 System DLL module. Figuring out this broken anomalous code flow to some other memory region and not a Win32 System DLL module is the technique that detects the presence of user space API hooks.
To extend the logic into actual code that detects IAT hooks, the hook scanner verify every address of Win32 APIs in the IAT and trace its location in memory to see if it lies in a Win32 System DLL and not some other memory region.
Similarly, to trace inline hooks, which is slightly more complicated, the hook scanner has to check the first few bytes in memory of every Win32 API used by the process and compare these bytes to the bytes of the same API call present in a disk in the DLL file. If there is a difference, it is an indication that the bytes have been modified in the process for reasons of hooking. One thing that the hook scanner must keep in mind while trying to detect inline hooks is that sometimes the first few bytes of an API call might be changed by the Windows loader due to address relocations. To deal with that, it must disassemble the instructions and account for any address relocations that have modified the bytes in memory.
Another method to find out if an API is hooked inline is by writing signatures for the code bytes used by malware hooks. For example, some malware uses the same bytes at the start of an API hook. By writing a signature and scanning the starting few bytes of every Win32 API used by a program , the signature module can detect the presence of malicious hooks.
The technique to identify user-space hooks can be extended to identify hooks in kernel mode. For this, the hook scanner needs a kernel module, which can scan the SSDT and the Service Functions for any hooks by kernel malware. For example, the service function addresses in the SSDT are in specific kernel modules like ntoskrnl.exe and so forth. If the hook scanner sees an entry for an SSDT index that is not pointing to the right kernel module, it probably indicates an SSDT hook in place.
Viral Polymorphism and Emulators
Two Assembly Instructions That Can Be Replaced by One Instruction MOVSD
The instruction set moves a DWORD at the address pointed by ESI to an address pointed by EDI. The machine code equivalent of the set of instructions is 8B 06 89 07.
An equivalent operation as the instructions can be performed by a simple single MOVSD instruction, whose machine code equivalent is A5.
If you go back to Listing 22-7 and Listing 22-8, we wrote signatures on the machine code that aimed to detect GandCrab malware. Similarly, let’s say we try to detect malware by using a signature code pattern 8B 06 89 07 for the instructions in Listing 22-12. This works for catching that specific malware. But this signature can be easily bypassed if those two instructions are replaced by the instruction MOVSD.
With the points in mind, malware writers have generated so-called polymorphic engines that can generate equivalent machine code. Both the machine codes result in the same functionality operation, but the building machine code bytes are different. This can generate multiple binaries from a single binary which have different file hash values and different combinations of instructions, but finally carrying out the same functionality. An antivirus signature writer cannot catch hold of every variant of the said malware and write an assembly signature for each of them.
To deal with the situation, emulators have been created, which can simulate the execution of instructions. An emulator is logically very similar to a virtual machine we use but are meant to handle only limited operations. Using emulators, the execution of code between two points in an executable is simulated, and various parameters like registers state and content of emulated memory are used to run signatures against. But the emulation process is resource-intensive; hence appropriate filters should be created before running the emulator.
Remediation Module
The antivirus detects malware. Now what? This is where the remediation module comes into repair and reverse the damages caused by the malware. Different kinds of malware inflict different kinds of change to the system. A banking trojan hooks APIs in the browser. Ransomware encrypts files. A PE file infector infects healthy files on the system with its malicious code. Creating persistence mechanisms like run entry is common across most malware families.
The signature engine and the other modules in the antivirus can identify the malware family and type. The remediation module now must take care of the rest. It needs to revert hooks, delete run entries. If a PE file is infected, it needs to disinfect it.
Implementing remediation mechanisms for some of the things like resetting/reverting/removing registry run entries are simple and can be done by the antivirus using registry editing APIs. Restoring hooks can be more difficult, but unhooking can be generically written and triggered when signatures identify a hook in place.
But disinfecting infected PE files can be harder as the infection algorithm techniques vary across malware families. So a generic disinfection routine cannot be written to disinfect all kinds of infected PE files. The same stands for ransomware. Today there are thousands of ransomware, each using different mechanisms and algorithms to encrypt files. Writing a decryptor for every ransomware is not possible since they might use crypto algorithms that won’t work without a private key. Brute forcing the decryption key is practically impossible since there are way too many combinations. So reversing the damages of ransomware is achieved rather through prevention and periodic backups of system files and contents, which we can then revert to in case of a ransomware infection.
Next-Gen Antiviruses
Antiviruses need to adapt themselves with the change in the threat landscape. With an increase in packers and obfuscation technologies, the effect of file scanning techniques is becoming less effective in identifying this malware. All of these have led to the development of new next-generation antivirus solutions on endpoints that can detect malware by their behavior. Memory scanning, which we covered in this chapter, is one of the oldest techniques which can be categorized under behavior detection.
Another behavior detection technology that can be added to detect malware is Deception. Honey files are one technique in which decoy document files are placed in different locations on the system. If some process alters the file, the process is treated as malicious, most likely a ransomware process.
Another behavior detection technology developed by us is HoneyProcs technology, which works by detecting malware that injects their code into other processes on the systems. HoneyProcs places various dummy processes on the system with the same name as various other well-known software like web-browsers as Chrome, Firefox, Internet Explorer, and system processes like svchost.exe and explorer.exe. These dummy processes not only resemble the original processes by name but also in various other attributes like DLLs loaded by them, basically mimicking the original process to the best extent possible.
Once these decoy processes are started by HoneyProcs, the HoneyProcs Scanner constantly monitor them for any changes, including changes to their memory. You learned in Chapter 10, Chapter 11, and Chapter 15 that malware injects code into other processes' memory, by remotely allocating memory in them or using any other memory mapping techniques, which ends up altering their memory state. HoneyProcs similarly checks if any change in the process’s memory state occurs, and if it does, it indicates some sort of code injection by malware on the system. Using HoneyProcs, we can easily identify malware like banking trojans and ones that use user-space rootkits or any other malware that use code injection for stealth and any other purposes. You can try out a proof-of-concept we developed for HoneyProcs, released under GPLv3 license in GitHub at https://github.com/Juniper/HoneyProcs. You can also search for a blog post titled “HoneyProcs: Going Beyond Honeyfiles for Deception on Endpoints,” which describes how HoneyProcs works.
Another technology that has made its way into antivirus engines too is machine learning. With machine learning, one can build models that build baselines for both malicious behavior and clean behavior. New detection technologies are devised every day. An effective detection environment on our system won’t be possible with one solution. You need multiple solutions that work and interact with each other, with a layered defense to both detect and prevent malware.
Summary
Antiviruses are among the first software that strived to detect and deal with viruses on our systems. In this chapter, we cover antiviruses and the various components that make up an antivirus and how they interact with each other to effectively detect malware on the system. We cover how the signature module works in the antivirus. Using the YARA tool as an approximation for the antivirus signature module, we play with various hands-on exercises that show us how signatures are written for antiviruses. We also cover how signatures can be optimized by using various pre-filters, that improves the efficiency of antiviruses and reduces system load. We also cover some of the new up and coming technologies that complement and supersede traditional antiviruses to create new next-gen antivirus solutions that aim to deal with new advanced malware that we see today.