
Malware can drop new files on the system, create new registry keys and values, initiate network connections, create new processes, insert new kernel modules, and so forth. Malware can also force/inject/insert itself into and modify existing running processes, including OS processes and the underlying kernel. But most of these techniques used by the malware for this are not the ones discovered or invented by malware attackers but are techniques used by many of the legitimate software, especially anti-malware products.
In this chapter, we explain various techniques used by malware to inject themselves and execute code in other remote processes running on the system. We also cover in detail various other well-known topics like API hooking and process hollowing.
What Is Code Injection?
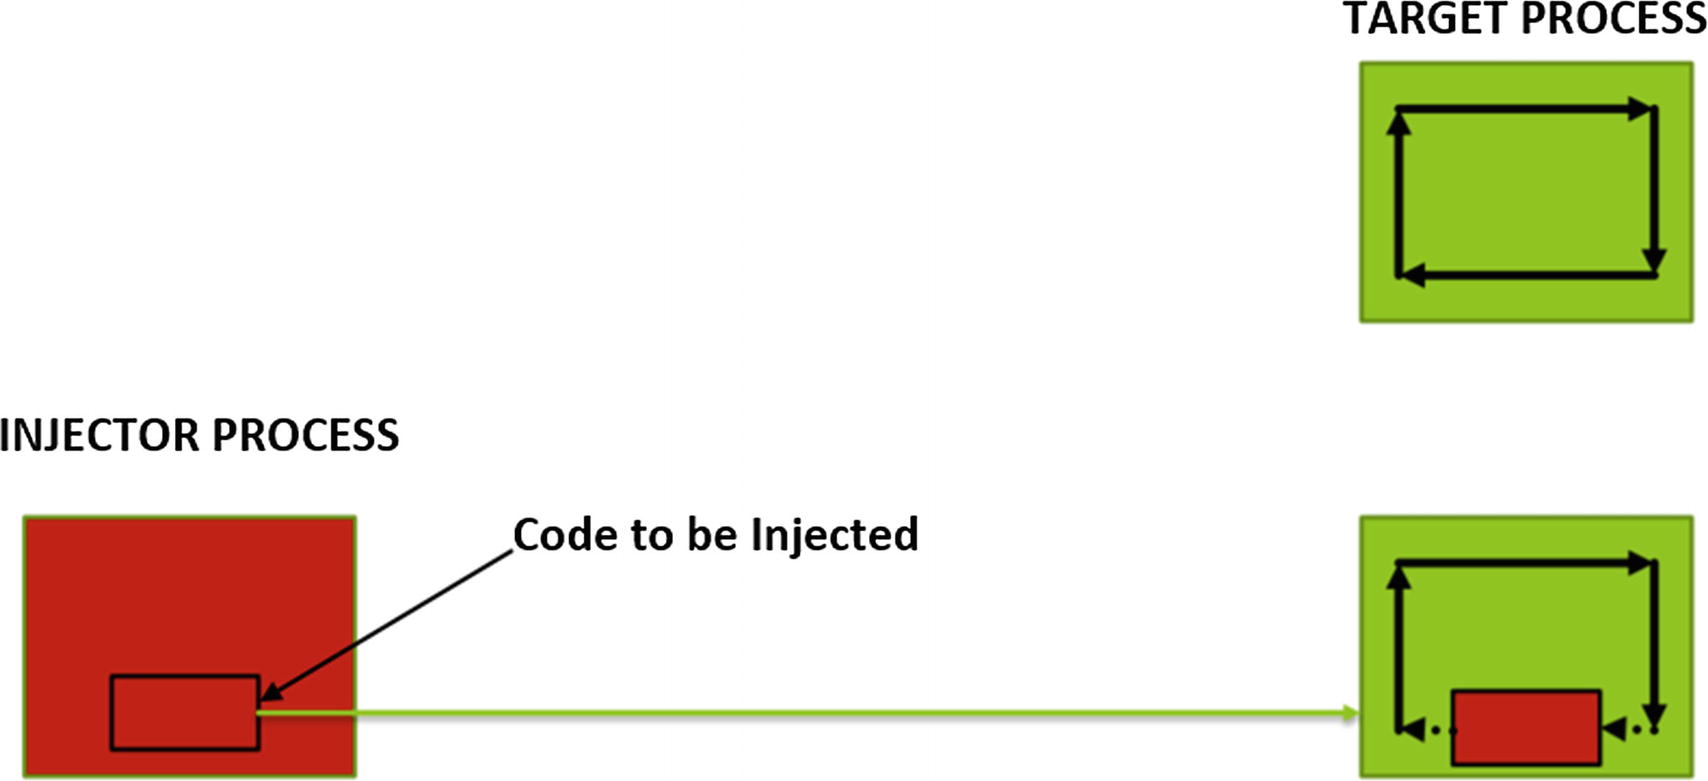
Injector process injecting part or all of its code into the target process and executing it
Code Injection Motives
Hiding their presence, also known as stealth
Process piggybacking
Altering functionality of another process or entire OS
Let’s discuss what these motives mean.
Hiding
A malware process wants to avoid easy identification if someone were to check the list of processes running on the system using a Task Manager, and an odd-looking process meets their eye. Similarly, malware might also want to hide from anti-malware products.

Code injection used by malware to provide Stealth/Hiding
Process Piggybacking
If malware wants to connect to the Internet, a firewall on the system might block this from happening, if it tries to connect from its own created process. The reason could be the firewall on the system might allow only a few well-known processes on the system to connect to the Internet. So how can the malware bypass the firewall?

Malware piggybacking other legitimate processes to bypass restrictions by OS
Altering Functionality
Another motive of code injection is to alter the functionality of certain processes or maybe even the entire OS/system. This is largely used by malware for code hooking, rootkits, and API interceptions in attacks such as man-in-the-browser.
Let’s take an example of malware that drops/creates certain files on the system disk, which has the name MalwareFile.exe and it doesn’t want either the user or any anti-malware products to delete it. To delete files on the system, the OS provides the DeleteFile()Win32 API, which is called by the antivirus or users to delete a file on disk.

Malware carrying out code injection for API hooking to alter API functionality
Code Injection Target
Before injecting code, malware must figure out who and where it wants to inject its code. Malware can inject its code into existing processes running on the system, as well as into the kernel. Alternatively, it can create/spawn a new process off itself in a suspended state and inject code into it.
For user space, we already know that each process has its own private virtual memory space split into user mode and kernel mode address space, as you learned in Chapter 4. The user-mode space of the virtual memory is tampered by another process, even though it is private to the process. If malware injects code into the user-mode part of any other process, only that process is affected by the malware.
Modifying the kernel impacts all processes on the system. But again, injecting into the kernel by adding a kernel module or altering an existing kernel module is not a child’s play. A programmer needs to be extremely careful while playing around with any kernel code, as a small mistake can dramatically impact the system and may lead to a system crash. On the other hand, the kernel is highly protected and not that easy to modify, making it not the most sought-after destination for malware.
Popular Code Injection Techniques
Process hollowing
Thread injection
- DLL injection
Classical DLL injection
Reflective DLL injection
Shellcode injection
Code cave
QueueUserAPC
Atom bombing
Steps for Code Injection
- 1.
Locate the target for code injection.
- 2.Inject the code.
- a.
Allocate/create memory/space in the target process of virtual memory.
- b.
Write/inject code into the allocated memory/space in the target
- a.
- 3.
Execute the injected code in the target.
In the next set of sections, we run through the technical details. We also list various details, tips, and important points we need to remember as analysts so that we can correlate them with similar activity when we analyze malware.
Steps for Process User-Mode Code Injection
- 1.
An injector process selects the target process into which it wants to inject its code, as described by Figure 10-5. You can also see that the current instruction pointer in the target process is pointing to and executing the target process’s code.

The injector process selects a target process to Inject Into
- 2.
Now that the target process has been figured out, the injector process allocates memory in the target process, and it does so by calling an API MemAlloc() , as seen in Figure 10-6.
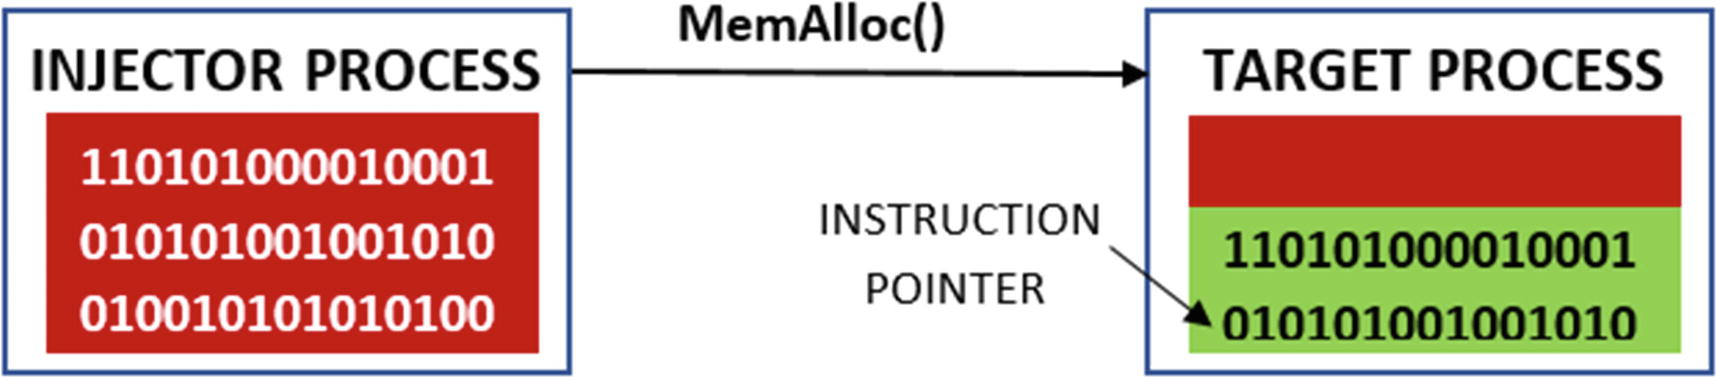
The injector process allocating memory in the remote target process
- 3.
Now that memory has been allocated in the target process, the injector process copies its code into the allocated space using the WriteRemoteMemory()API , as seen in Figure 10-7.
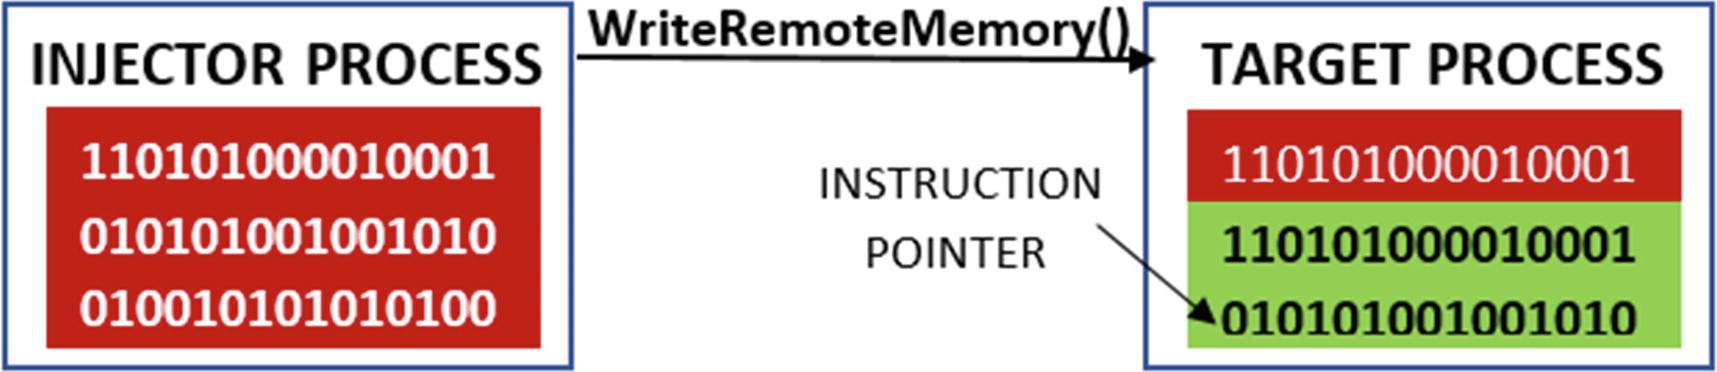
The injector process copies its code into the remote allocated memory
- 4.
After copying the code into the target process, the injector process needs to make sure that the target process runs its injected code and that the instruction pointer point to its code. It does so by calling the ExecuteInjectedCode() API. As you can see in Figure 10-8, the instruction pointer now points to and executes the injected code.

The injector process executes the injected code in the remote target process
This should give you a high-level overview of how code injection works in User Space. In the next set of subsections, we go into detailed technical details on how code injection works and work with hands-on exercises to see the whole process in action.
Step 1: Locating the Target Process
Malware may want to inject its code into system processes like Explorer or svchost or browsers like Chrome and Firefox. To inject code into a process, it first needs to open the process using an OpenProcess()Win32 API, which takes the PID of the process as a parameter. But how does the malware know the PID of its target process?
For this, malware uses a set of APIs available on Windows to search for the target process by name and, once found, retrieve its PID. The APIs in question are CreateTool32HelpSnapshot(), Process32First() and Process32Next().
Malware first wants to get a list of all processes running on the system, which it gets using the help of the CreateTool32HelpSnapshot()API. This API returns a linked list of processes, where each node represents details of the process, represented by a structure called PROCESSENTRY32.
The PROCESSENTRY32 structure contains various details of the process, including the name and the PID of the process. The returned linked list of processes is then iterated using the help of the Process32First() and Process32Next()APIs. For each node in the list, if the name of the process matches the name of the process that the malware intends to inject into, the malware uses the PID of that process for its subsequent operations and APIs, including in the call to OpenProcess().
Sample Code Snippet That Obtains the List of Processes Running on the System

Sample-10-1 outputs the list of process names and their PID on the system
Instead of the malware picking a target process from a set of existing processes running on a system, malware is also known to spawn/create a new process out of a native clean program on the system but in a suspended state. After creating this suspended process, it then injects its code into this suspended process and then resume the process but from its injected code. In this case, you see two new sets of additional APIs: CreateProcess() or its variations in step 1, and ResumeThread() or its variations in step 4.
CreateToolhelp32Snapshot
Process32First
Process32Next
CreateProcessA
CreateProcessW
CreateProcessInternalW
CreateProcessInternalA
Step 2: Allocating Memory in a Remote Target Process
Sample Code That Opens a Handle to a Process with Debug Privileges
You do need to be aware of the fact that every process is treated like an object on Windows. A process object has certain attributes, which include privilege level. A security token is associated with a process that decides which resources a process can access. Certain APIs cannot be successfully called by the process if it does not have the required privileges. The injector process can obtain these privileges by adjusting the security tokens. This is done by the injector process by using a sequence of API calls, which include OpenProcessToken(), LookupPrivilegeValue(), and AdjustTokenPrivileges(). Using these APIs, the injector process can adjust its privilege. For more information on the API, you can look it up on MSDN.
Sample Code That Allocates Memory in Remote Process
VirtualAllocEx() allocates memory of the requested size(size_to_allocate) in the remote target process identified by the process HANDLE. Another thing that you may have noticed is the permission of the memory above PAGE_EXECUTE_READWRITE. You learned about page permissions in Chapter 4. When you are specifying VirtualAllocEx() API, you can specify the permissions to assign to the allocated memory or rather to the pages in allocated memory. In this particular case, it is all read, write, and execute permissions because the injector process wants to first write code into the memory; hence, it has write permissions. After that, since it wants to execute the written/injected code, it has execute permissions.
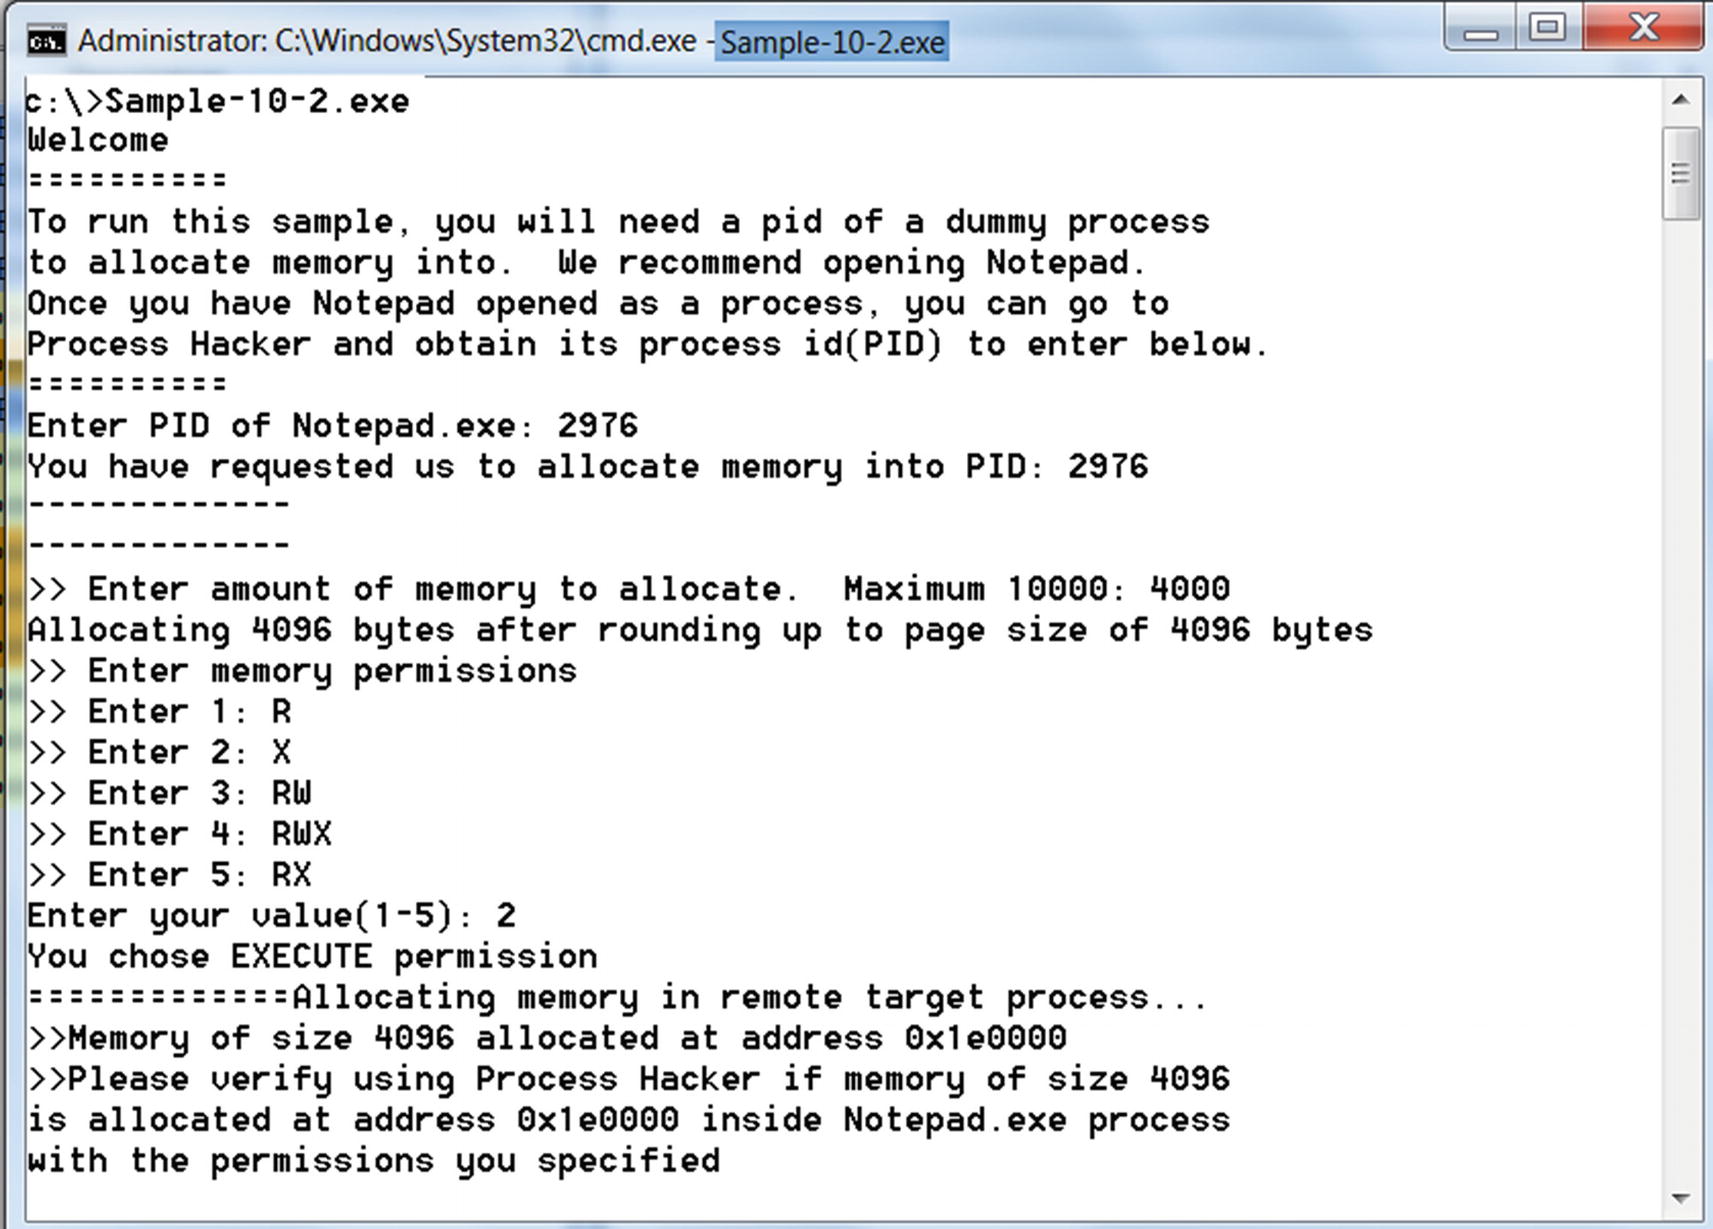
Output from interactive Sample-10-2 that allocates memory in a remote process
An alternate method to VirtualAllocEx() and WriteProcessMemory() that is used in steps 2 and 3. In this method, the malware uses sections and views, where it maps a part of its memory to the target process, basically creating a reflection of a part of its memory in the target process. To do so, it uses another set of APIs.
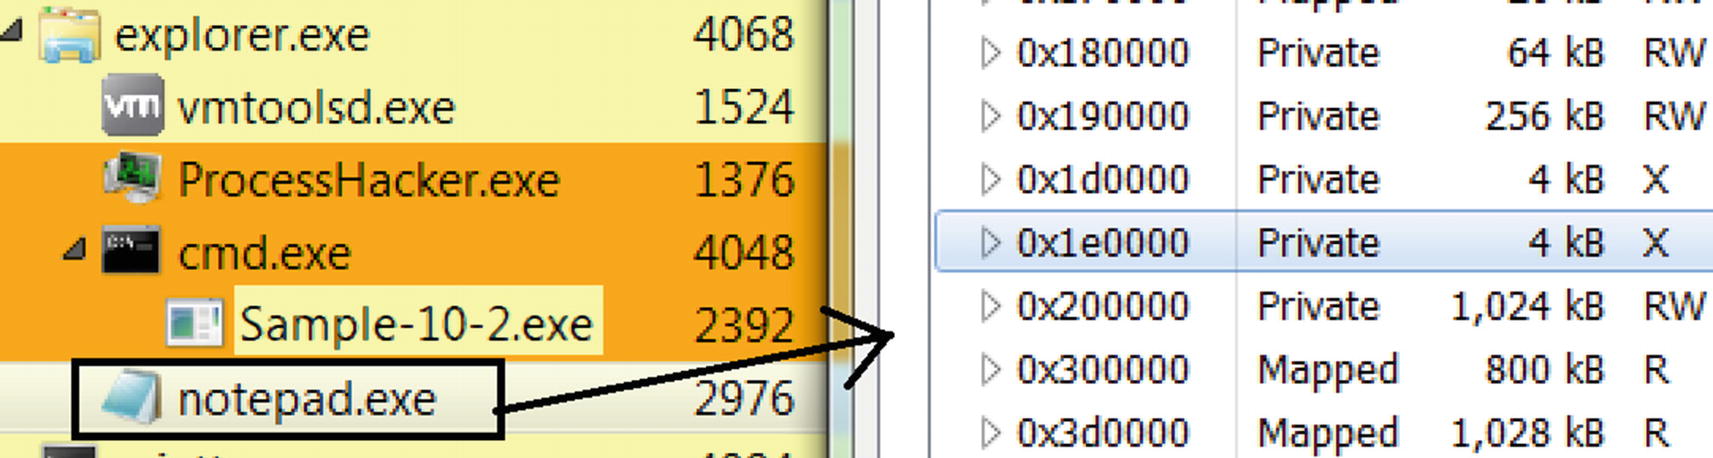
Verifying that the memory was allocated by Sample-10-2 in Notepad.exe
We recommend that you play around more with Sample-10-2, trying out various other memory permissions (1–5) and memory sizes, and verifying in Process Hacker that memory is allocated in the remote process.
An alternative to setting EXECUTE permissions while allocating memory, the malware can first allocate memory but using just READ_WRITE permissions and later after step 3, but before we enter step 4, manually change the permissions of the allocated memory to EXECUTE as well using the API VirtualProtect(). So while analyzing malware samples, you have to watch out not just for VirtualAllocEx() API but also VirtualProtect(). If you see a combination of these two APIs operating against a remote process, there’s something fishy going on, and it deserves more investigation from the point of view of code injection and malware infection.
OpenProcess
VirtualAllocEx
LookupPrivilegeValue
AdjustTokenPrivileges
OpenProcessToken
VirtualProtect
Step 3: Writing into Remote Target Memory
Sample Code That Allocates Memory in Remote Process
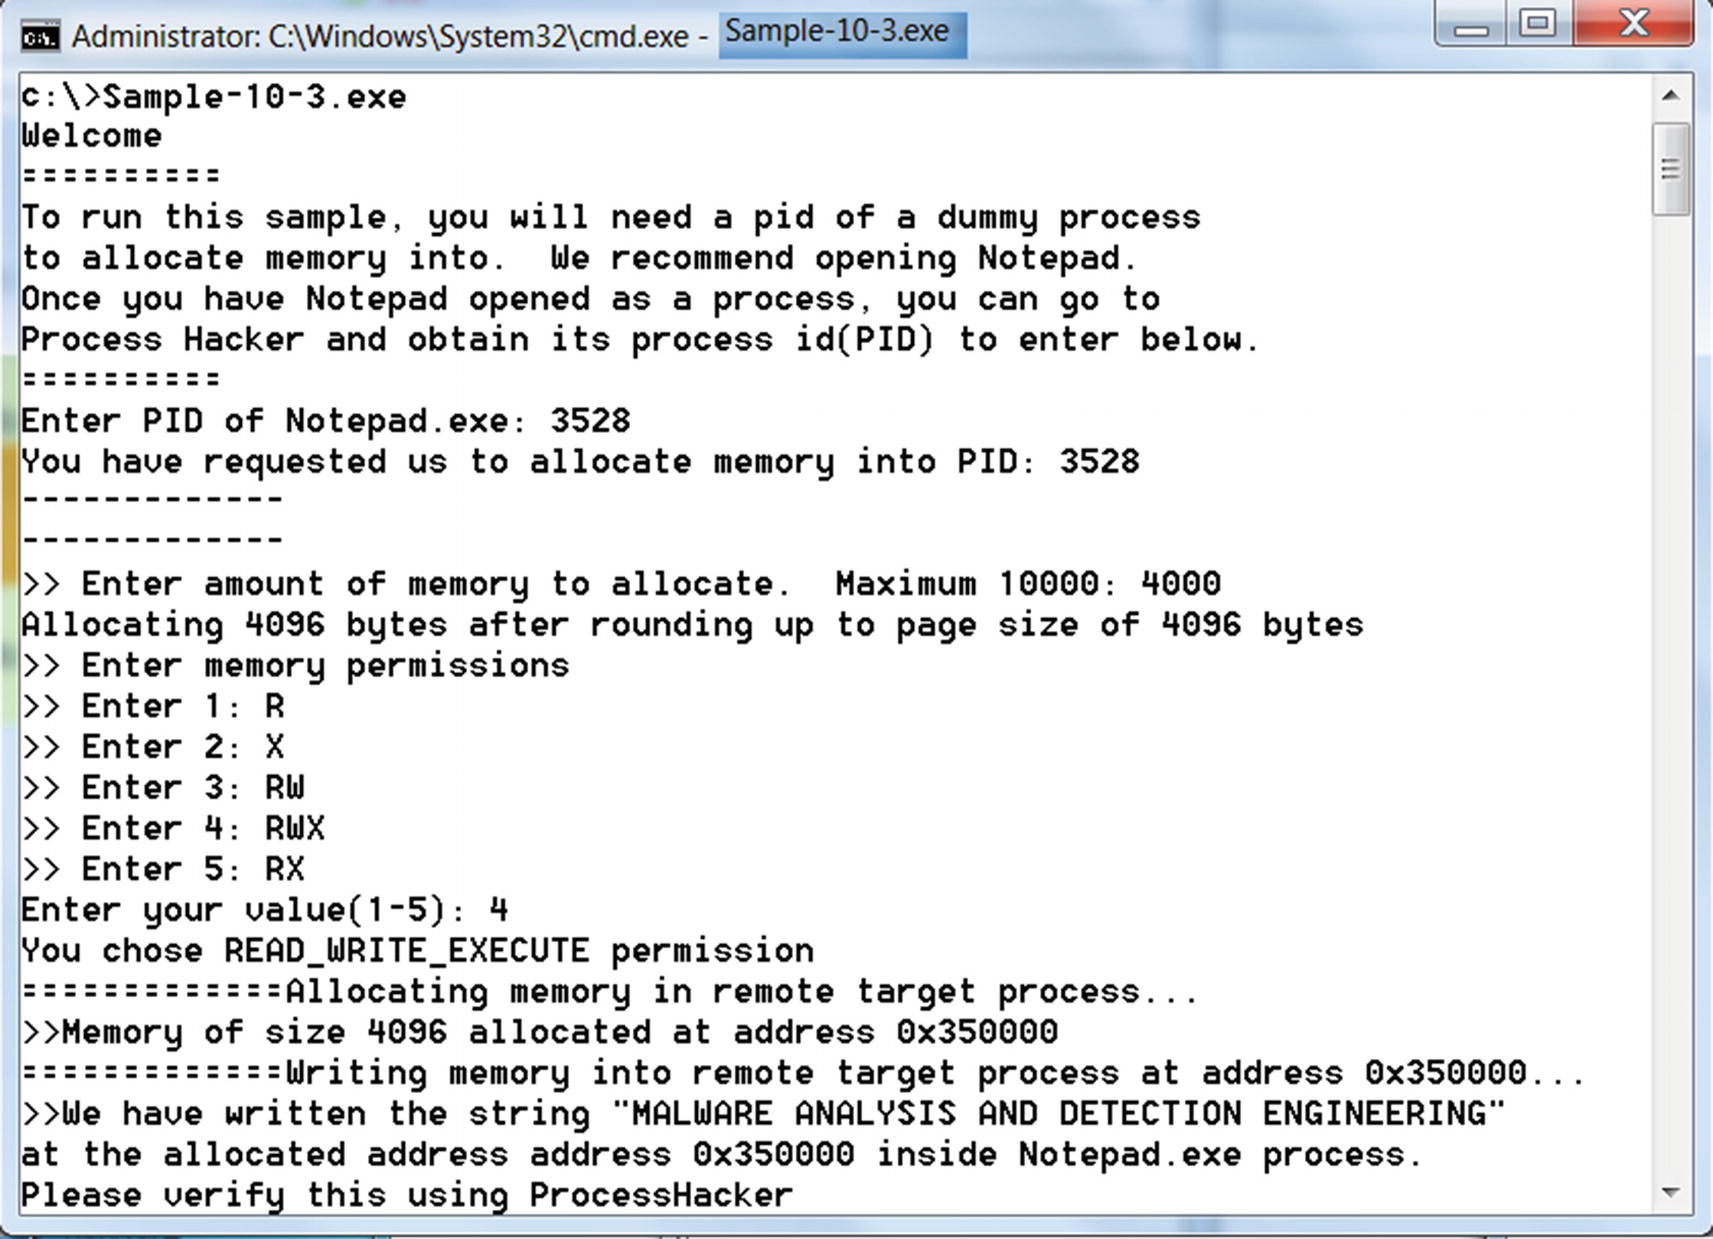
Output from Sample-10-3 that allocates memory and writes into remote process

Verifying that memory was written into Notepad as seen in Sample-10-3 output
The method mentioned in step 2 and step 3, which uses VirtualAllocEx() and WriteProcessMemory() to allocate memory and code into the target process, is quite common in most malware.
There exists another method of allocating memory and copying code from the injector process into the target process, which involves section objects and views. Before we head into step 4, let’s investigate this alternate technique.
Section Object and Section Views
Section objects and views is a provision by Windows in which a portion of virtual memory belonging to a process is shared/mapped with/into other processes.

The injector process creating a section
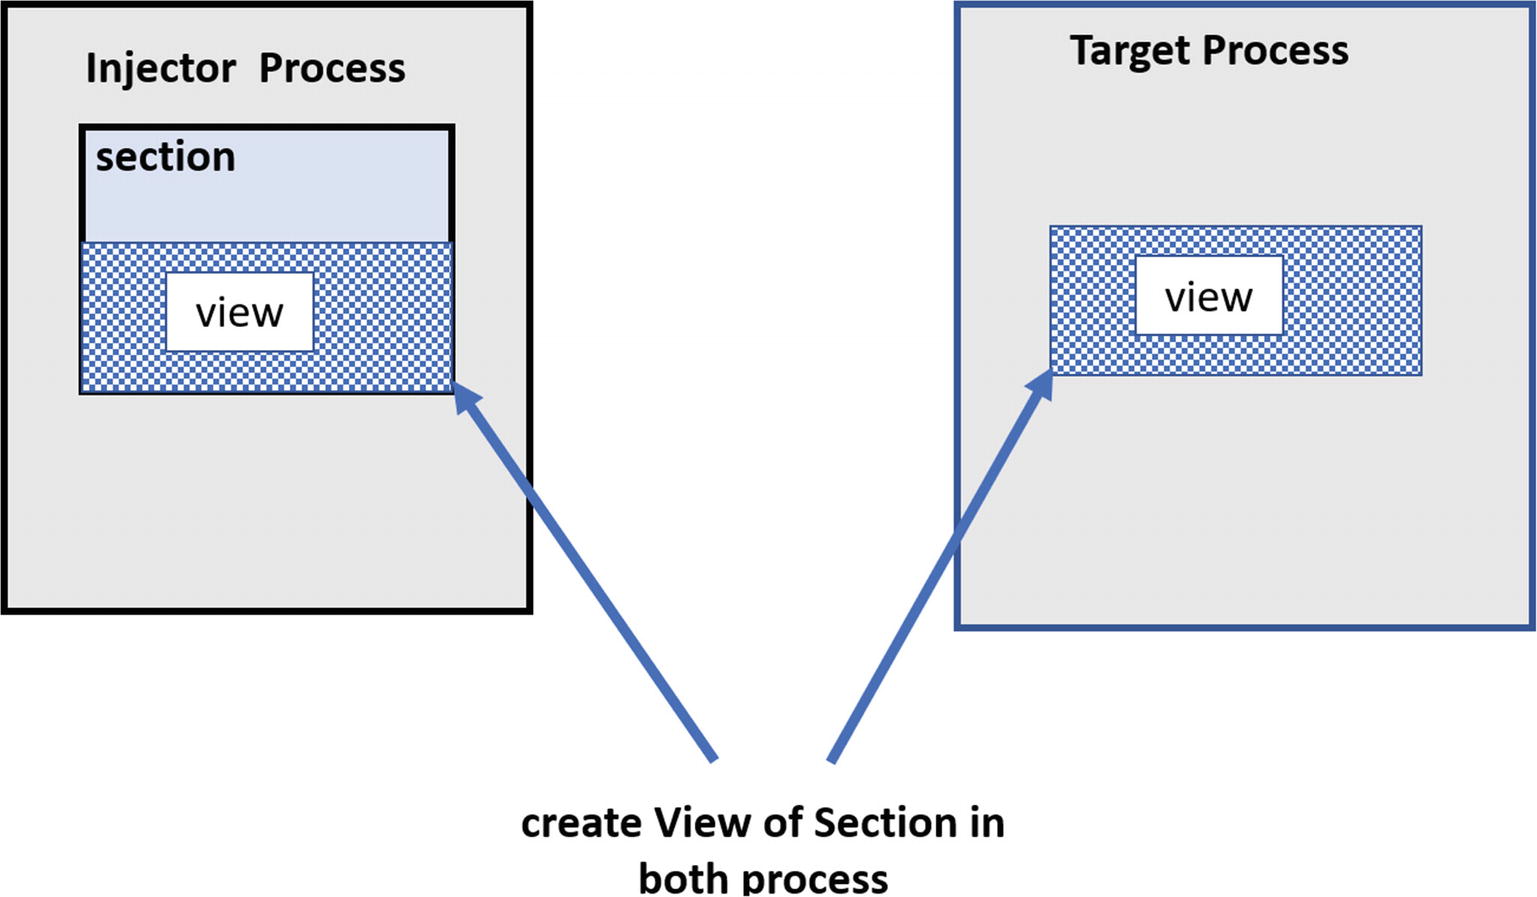
View of a section in both the Injector and target process

Contents of a view automatically are copied into views in other processes
Malware is known to use this feature to inject code into a target process, instead of always relying on APIs like VirtualAllocEx() and WriteProcessMemory(), where malware using sections and views writes its malicious injected code in its own view, and it automatically is copied/reflected in the view of the target process. While any code injection technique can use this method, it is more commonly used in a technique called process hollowing (also called RunPE), which we cover in detail in a later section.
WriteProcessMemory
NtUnmapViewOfSection
NtCreateSection
NtMapViewOfSection
Step 4: Executing Code in Remote Process
Remote thread creation APIs. Using APIs like CreateRemoteThread() and other similar APIs, the injector process can create threads in the target process.
Asynchronous procedure call (APC) queues
Altering thread context. The instruction pointer of an existing current thread in the remote/target process is made to point to the injected code, using the GetThreadContext() and SetThreadContext()APIs.
Remote Thread Creation API
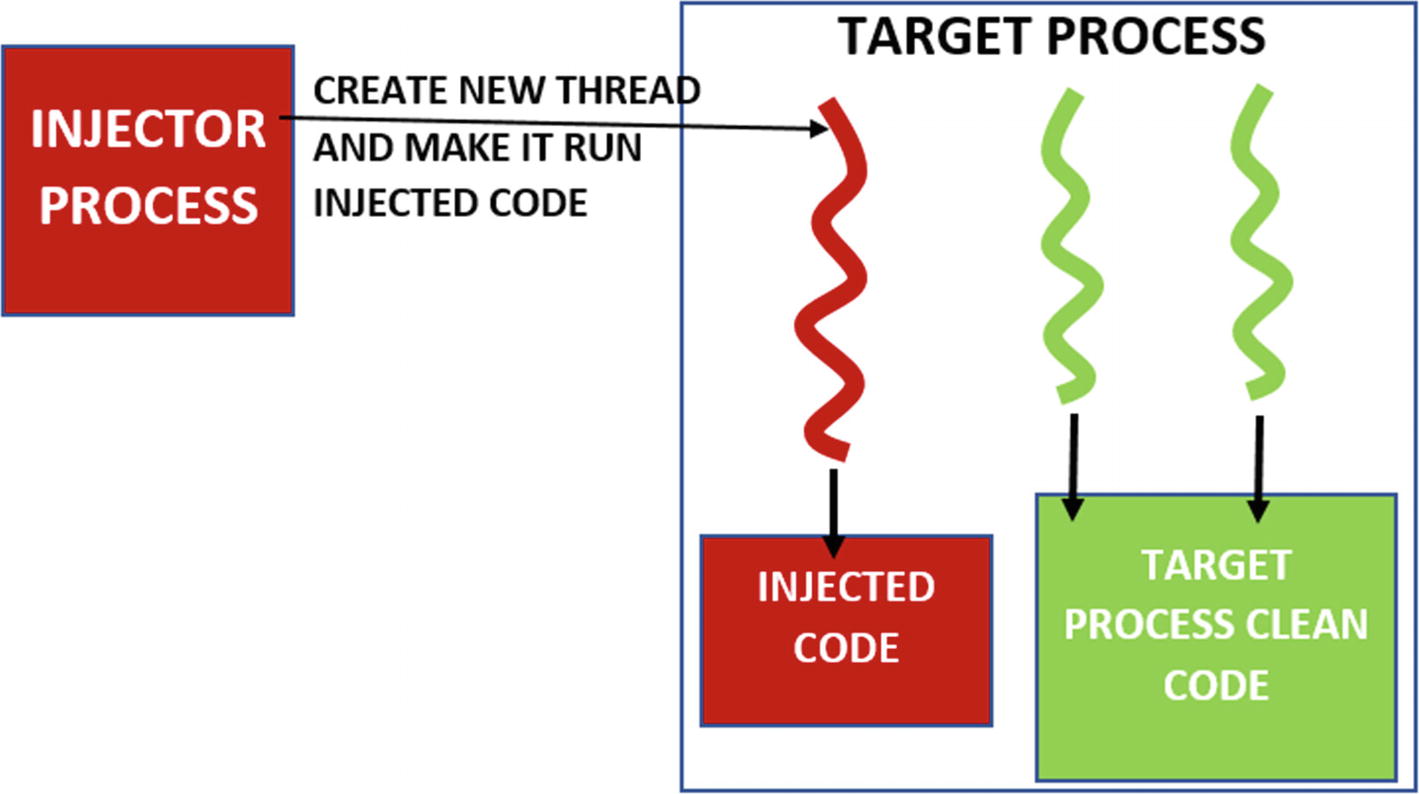
Injector process creating a remote thread in the target process to run injected code
Some of the APIs that are used by malware to create a remote thread are CreateRemoteThread(), RtlCreateUserThread(), and NtCreateThreadEx().
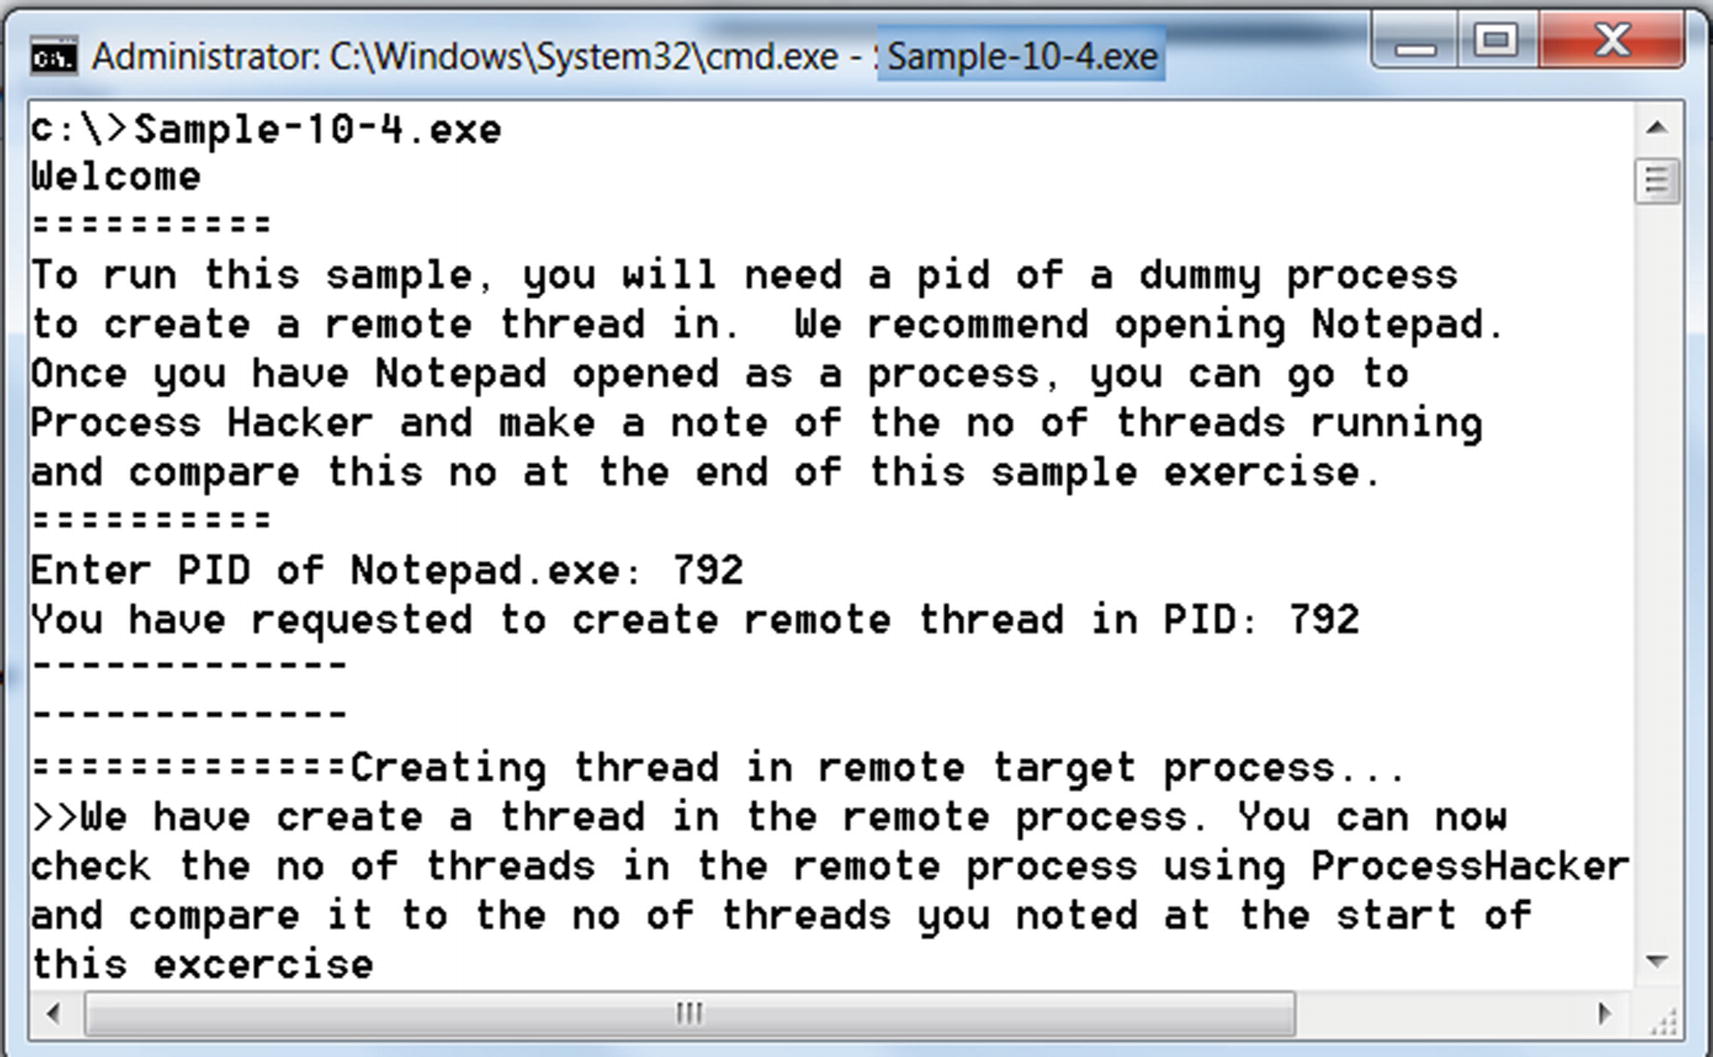
Output from Sample-10-14 which creates a thread in remote process Notepad

Verifying the remote thread created in Notepad.exe target process
As seen in Figure 10-19, you can see an extra thread created, which has been created by the injector process.
Asynchronous Procedure Call (APC) Queues
Creating a new thread is sometimes an overhead as new resources need to be allocated to start the thread. Creating a new thread in a remote thread can easily be detected by anti-malware products that are listening to the event log and logs such an event as suspicious.
So instead of creating a remote thread to execute the injected code, we can request one of the existing running threads in the remote target process to run the injected code. This is done using an asynchronous procedure call (APC) queue. Let’s now look at how it works.
APC is a method for already executing threads within an application to take a break from their current tasks and perform another queued task or function asynchronously, and then return and continue from where it left off. But a thread can’t just randomly run these tasks/functions that are queued to it. It can only run these tasks when it enters an alertable state.

injector process Using APCs to execute injected code in the target process
To queue a task into the APC queue of the target process, the injector process calls the QueueUserAPC()API.
Malware misuses this Windows feature by injecting a malicious code that contains a function in a remote/target process’ memory, then queue that injected function as APC into the remote process’ APC queue.
Altering the Thread Context
Every thread in a process has an EIP or instruction pointer, which holds the address of the code/instruction the thread is currently executing. The EIP of a thread is held in the thread’s context. Once the code is injected into the remote target process, an injector process can reset the EIP of a thread on the target process to point to the injected code, thereby forcing the target process to run its injected code.
- 1.
The remote thread whose context must be modified should be suspended first. If the thread is not suspended already, it is suspended by calling the SuspendThread()API.
- 2.
The current context of the remote thread is obtained using the GetThreadContext()API, which returns the context structure, which holds the context of the thread, including the current EIP of the thread.
- 3.
The EIP field in the context structure is modified to point to the address of the injected code that should be executed.
- 4.
With the modified context, the injector process then calls SetThreadContext() to reset the instruction pointer of the remote thread to the value set in the EIP field of the context.
- 5.
Call ResumeThread() to resume the suspended thread, which now executes from the injected code.
CONTEXT Struct Holds the State of a Thread, Including EIP, the Instruction Pointer
QueueUserAPC
SuspendThread
ResumeThread
CreateRemoteThread
RtlCreateUserThread
NtCreateThreadEx
GetThreadContext
SetThreadContext
In the next set of sections, we stitch together what you learned and run more hands-on exercises that detail full-fledged code injection techniques.
Classical DLL Injection
Malware is usually delivered as multiple components, where there is a main component like a downloader/loader whose main job is to download secondary components or payloads either from the C2 server or its own resource section and load/run them. These secondary components are an executable PE file, DLL files, and so forth. If it is an executable PE file, the loader can easily run it. With DLLs, it is not that straightforward. Although there are tools like rundll32.exe that can simulate loading and running a DLL, most often with malware, these secondary payload DLLs are rather injected, loaded, and run from another clean target process.

Same DLLs loaded at different image base in different process

Kernel32.dll loaded at the same image base in all process’s virtual memory
- 1.
DLL lies on the hard disk as a file that needs to be loaded into the target process’s memory.
- 2.
The injector process first allocates memory in the target process, with the size of memory allocation, which is equal to the length of the path of the DLL file. For example, if the path of the DLL file on the disk is C:Malware.dll, the size it allocates is 15 characters (including the trailing NULL character in the string).
- 3.
It copies the path of the DLL file (i.e., C:Malware.dll) to the memory allocated in the target process from step 2. Figure 10-23 illustrates steps 1, 2, and 3.
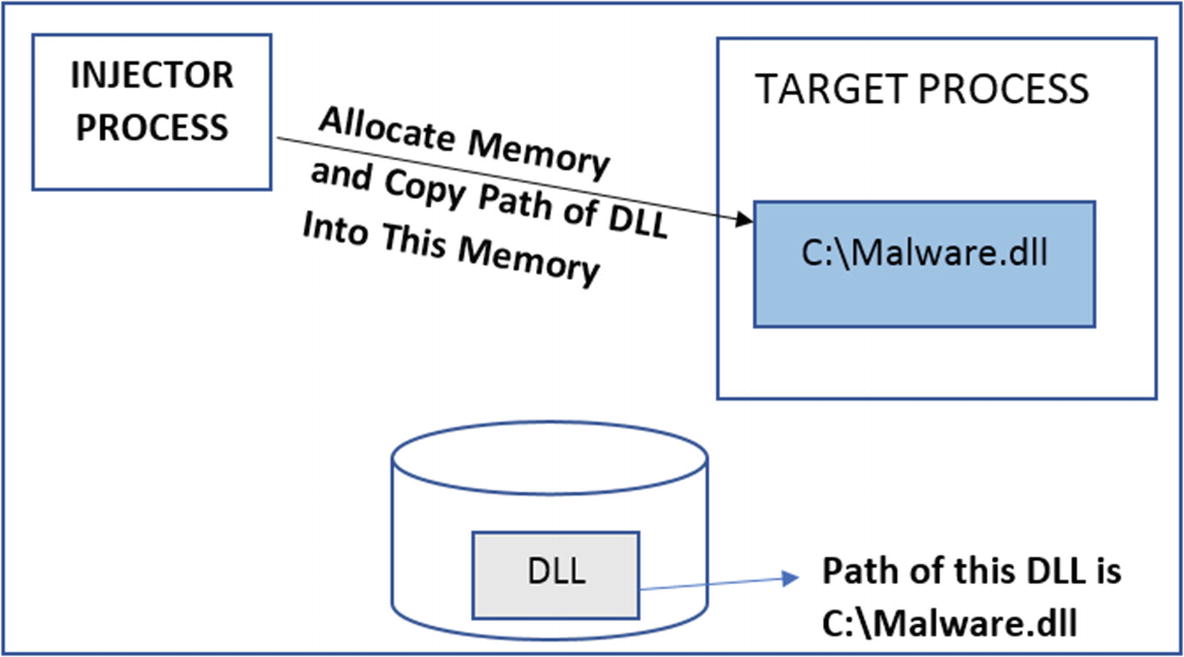
Injector allocates memory in the target and copies the path of the DLL into it
- 4.
The LoadLibrary() API is implemented inside Kernel32.dll, which loads a DLL from disk into a process’s memory. The injector process needs to somehow force the target process to invoke LoadLibrary() while passing to it the path of the DLL so that the DLL is loaded into its address space.
- 5.
The injector process exploits the fact that KERNEL32.DLL has the same image base address in both the injector process and target process, which in turn means the address of LoadLibrary() API is the same in both the processes. So the injector process just has to obtain the address of LoadLibrary() API from its own address space.
- 6.
The injector process obtains the address of LoadLibrary() API from its own address space using the code in Listing 10-6.
Obtaining the Address of LoadLibrary() API using GetProcessAddress() API
- 7.
Now that the Injector has the address of LoadLibrary(), it can use either CreateRemoteThread() or QueueUserAPC() to force the target process to run LoadLibrary(). An additional argument is also supplied to CreateRemoteThread() or QueueUserAPC() , which in turn pass this argument to LoadLibrary() API when they invoke it. The additional argument that is passed is the memory location/buffer in the target process containing the DLL path from step 2. Figure 10-24 illustrates steps 4–7.
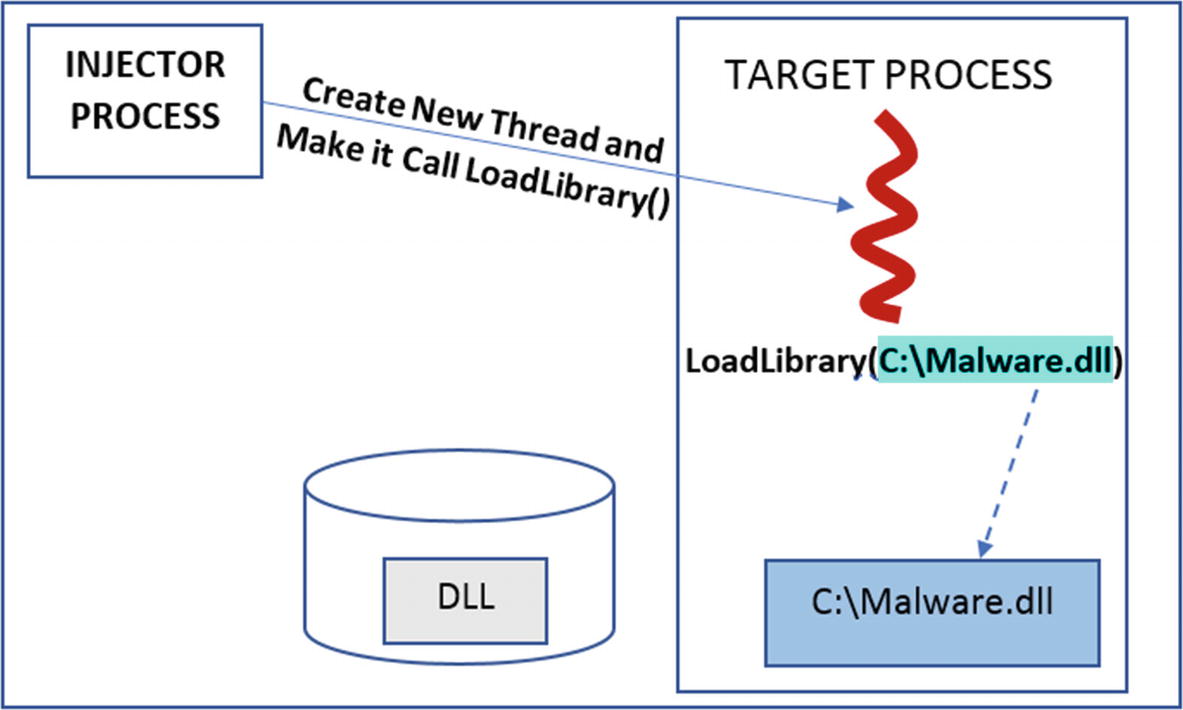
The injector creates a remote thread in target and makes it invoke LoadLibrary()

The output from running Sample-10-5.exe, which injects Sample-10-5b.dll into Notepad.exe

Sample-10-5.dll has been loaded into Notepad.exe’s memory
Process Hollowing
One of the big requirements of malware is that they need stealth/hiding. If a malware process runs on its own and if a user casually browses the Task Manager, they notice a weirdly named malware process running, which might raise their suspicions that it is not a benign process. To counter this, the malware might rename itself as svchost.exe, explorer.exe, or with the name of any other system/clean process to beat the scrutiny of a casual observer. But just renaming the malware filename doesn’t change the true properties of the malware. For example, by default, system programs like svchost.exe, are in the C:Windowssystem32 directory. If you verify the properties of any of the malware file which has renamed it as svchost.exe, you still notice that the path of this process is not C:Windowssystem32svchost.exe, because of which a highly observant user or even anti-malware products can easily catch such malware.
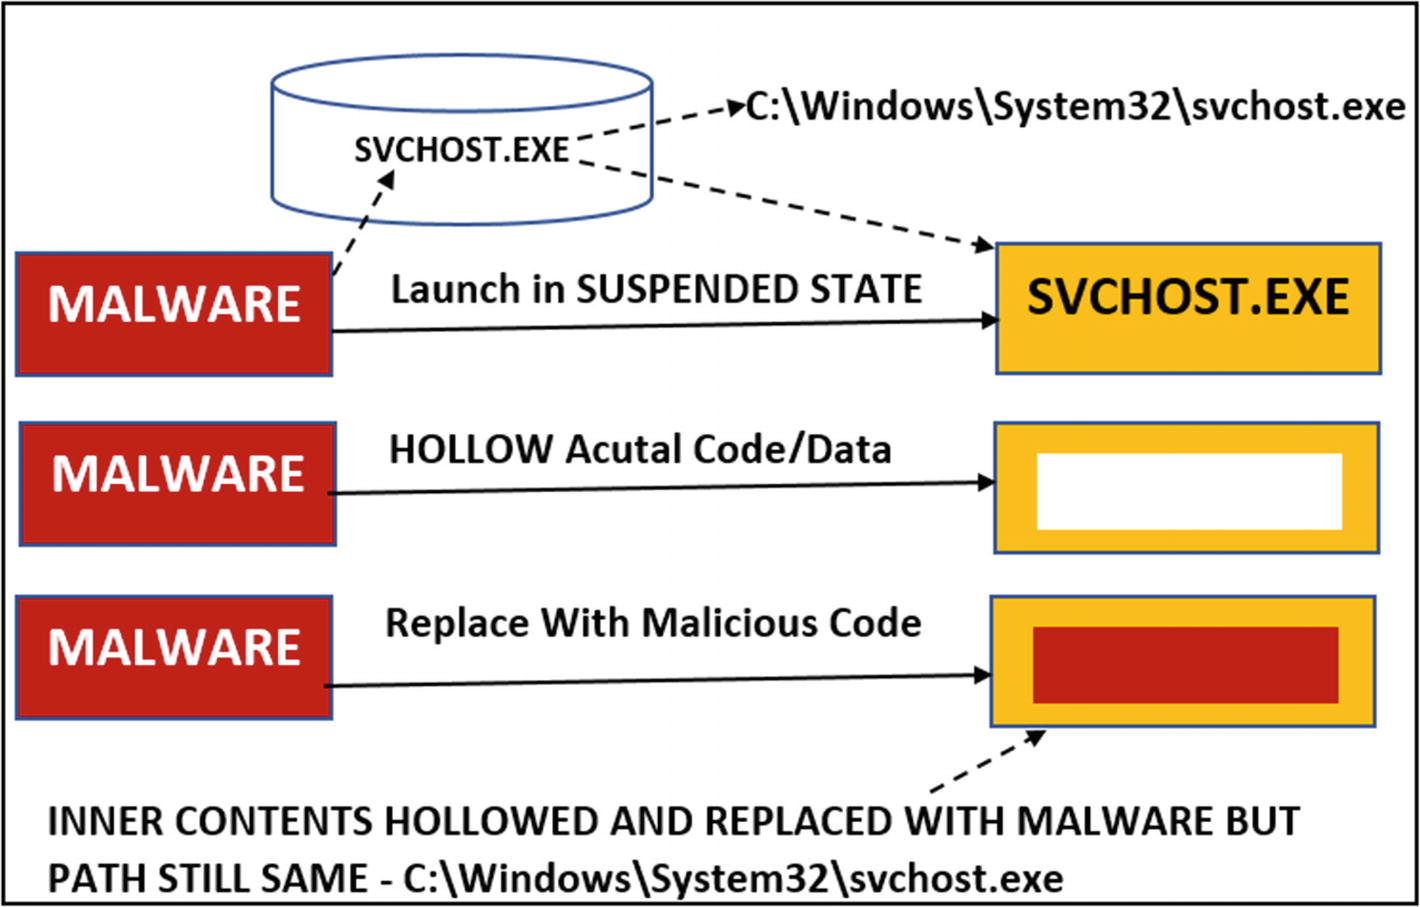
High-level overview of the process hollowing technique

Sample program that hollows out calc.exe process injects code into it and runs it

Sample-10-6.exe starts calc.exe in suspended state as seen in the gray background
- 2.
Press any key to continue. The sample then creates a section and a view of the section in the calc.exe process . As seen in the output of the sample in Figure 10-28, the view is mapped at address 0x3b0000 in Sample-10-6.exe and address 0xa0000 in calc.exe. You can verify this using Process Hacker, as seen in Figure 10-30. Do note that the addresses might be different when you run the sample, and you can obtain your addresses from the output of your sample run (see Figure 10-28). The NtCreateSection() API creates a section and NtMapViewOfSection()creates a view.
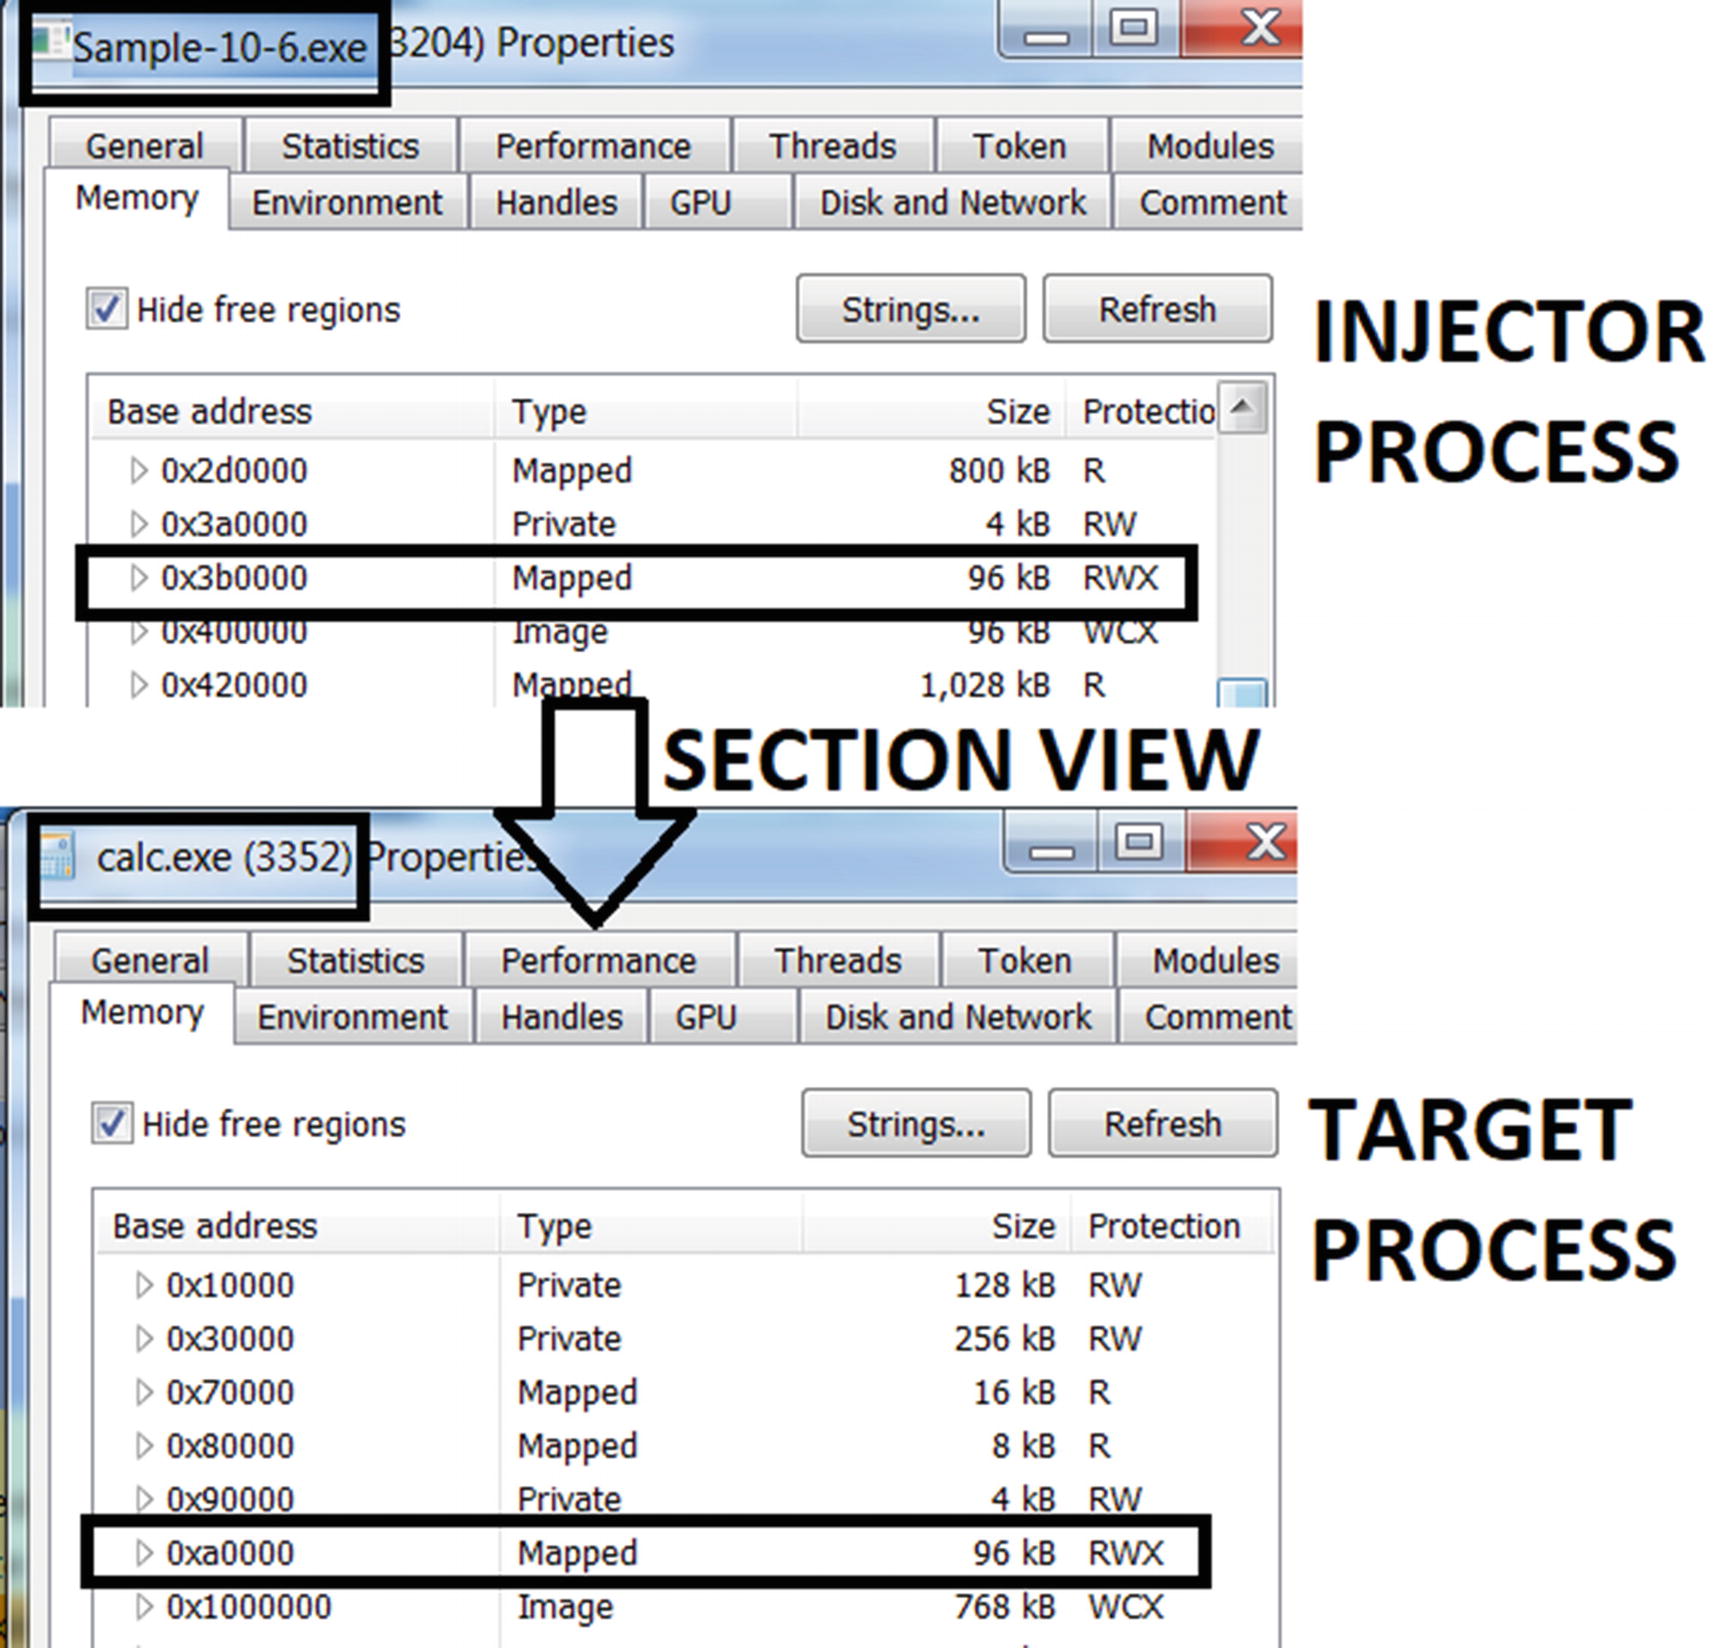
Sample creates two views of the section, one in itself and other in calc.exe
- 3.
You can now press any key to continue. This should continue with the hollowing process, and the sample now copies/injects its code into its local view, which automatically reflects/maps it into the view of calc.exe. Alternatively, do note that the malware can allocate memory in calc.exe and copy/inject its code using VirtualAllocEx() and WriteProcessMemory() , instead of using Section and View.
- 4.
With the hollowing process complete and code injection/copying done, the sample now reset the instruction pointer of the suspended process calc.exe by having it point to the newly injected code in its view, after which it resumes the suspended calc.exe process/thread, which should run the injected code. To reset the instruction pointer to the injected code, the sample uses the GetThreadContext() and SetThreadContext() APIs. To resume the suspended thread, it uses the ResumeThread()API .

Injected code running from within calc.exe
Classical Shellcode Injection
In classical DLL injection, the DLL is injected via a LoadLibrary(). The end goal of the injector is to inject a full DLL PE file into the target process. We know that with a DLL PE file, it starts with the PE header, and then the code is located somewhere further down, which is what is executed by the Injector using LoadLibrary(). But at the start of the PE file, it is the PE header before the code that holds the information for LoadLibrary() on how to set up the code in memory, including fixing the import table and relocation table.
Shellcode is simply straight code, like the code in a PE file like a DLL or an executable, but there is no PE header accompanying this shellcode. It can’t be loaded by LoadLibrary() or the Windows loader. It has no headers that contain any information that can help a loader for any address relocations fixes or other API dependencies resolution.
From a technique and APIs usage perspective, classical shellcode injection works very similarly to the injection technique we mentioned in the section steps of code injection or classical DLL injection. Memory is allocated in the target process. The shellcode is copied over instead of a full DLL PE file or an executable PE file, and the shellcode is executed directly in the target process. The injector process after injecting the shellcode must do any relocations, and import table fixes manually since there is no Windows loader to do that job.

Difference between DLL/PE injection vs. shellcode injection
Reflective DLL Injection
Malware consists of multiple components, and usually the primary downloader/loader component of the malware downloads secondary components like a malicious DLL/EXE from the C2 server over the network, or its resource section. These malicious DLLs are then injected into other target processes. But with classical DLL injection, the DLL component injected into the target process is a file on the disk, which is loaded using the LoadLibrary() API. The fact that it is a file on disk and you also use LoadLibrary() API to inject into a target process isn’t very stealthy and is easily caught.
Only if there was a way where after obtaining the DLL PE file over the network or from its resource section the malware downloader/loader component could inject and load it directly into the target process without having to write it to file on the disk and without having to use LoadLibrary(). Yes, this is still possible with another technique called reflective DLL injection.
Reflective DLL injection works by having the downloader/loader, double as a Windows loader. So instead of relying on the Windows loader via the call to LoadLibrary() API, the injector process does the job of loading the DLL as a module in memory of a target process. Also, it needs to carry out two important operations otherwise carried out by the Windows loader—fixing the relocation table and the import table which you learned in Chapter 4. We won’t go into the depths of how each of these steps in reflective DLL injection works. As an exercise, there are various resources on the web that you can refer to, to learn how this technique works.
Important APIs to Remember
As analysts, we can easily catch these malware samples under dynamic analysis. We can catch malware that uses these code injection techniques a lot of times using mere common sense. We cover these techniques more in Chapter 13. But another easy and important way to catch these techniques used by malware is by using the APIs they use. By using an API Logger like APIMiner, we can easily identify the APIs used by the malware and help identify such code injection techniques. It is important to remember all the various APIs that are used by malware for code injection. At the end of this chapter, we cover APIMiner and use it in conjunction with one of the exercises. As an exercise, we recommend running all the exercises in this chapter using APIMiner and inspect the API log files generated by the tool and use these API logs to identify all these various code injection techniques.
CreateProcessA
CreateProcessW
CreateProcessInternalW
CreateProcessInternalA
Process32Next
Process32First
CreateToolhelp32Snapshot
OpenProcess
VirtualAllocEx
LookupPrivilegeValue
AdjustTokenPrivileges
OpenProcessToken
VirtualProtect
WriteProcessMemory
NtUnmapViewOfSection
NtCreateSection
NtMapViewOfSection
QueueUserAPC
SuspendThread
ResumeThread
CreateRemoteThread
RtlCreateUserThread
NtCreateThreadEx
GetThreadContext
SetThreadContext
Why Do These Malicious APIs Exist?
You might be wondering why Microsoft and Windows (Win32) have made these APIs that aid techniques like code injection and that is used by malware to meddle with other processes, access their memory, write into their memory. Does Microsoft support writing malware?
The reason why Microsoft provides these APIs is that they are meant for legitimate use by clean software, like debuggers, but unfortunately, these very same APIs are misused by malware. Debuggers use these APIs to manipulate the virtual memory of remote processes so that breakpoints are set, instructions in memory are altered so on and so forth.
In the next section, you learn about one of the most important techniques used by malware that relies on remote code injection and code/API hooking.
Code/API Hooking
One of the motives behind code injection is API hooking, which is a way to intercept a call made to a legitimate API by a program, just like a middle-man. The intention is varied depending on the needs of the malware. For example, malware might want to prevent the deletion of its file, and to do so, it might intercept calls to API that deletes files. It might want to intercept calls that pass credentials to the API. It might want to intercept calls that hide its presence in the list of processes in the Task Manager. The list goes on.
- 1.
The malware that is the injector process first identifies the target process whose APIs it wants to intercept/hook.
- 2.
Now that the target process has been identified, the malware/injector process first injects its code into the target process using code injection. This is where code injection techniques come in.
- 3.
The injected code is run within the target process.
- 4.
The injected code, which is now run inside the target process, locates various APIs within the target process and places hooks into them. After placing the hooks, all the calls made to those hooked APIs by the target process are redirected to the malware’s injected code.
Identify Hooking Point/Target

Flow of control from a Win32 call made by our program all the way to the kernel
When our process makes a call to a Win32 API (DeleteFile() in our case), it takes multiple hops via its own IAT, which holds the address of the DeleteFile() function located in Kernel32.dll. This DLL then redirects it to another function, NtDeleteFile(), located in ntdll.dll. This DLL then redirects it into the kernel via a syscall, which finally talks to the file system driver.
Now there are multiple locations where a hook is placed. It is highlighted in yellow: 1, 2, 3, 4, 5, and 6. At a high level, locations 1, 2, and 3 are user space hook locations and 4, 5, and 6 are kernel space hook locations.
In the next section, we explain the various techniques of placing hooks in the user space.
Placing Hooks in User Space
IAT hooking
Inline hooking
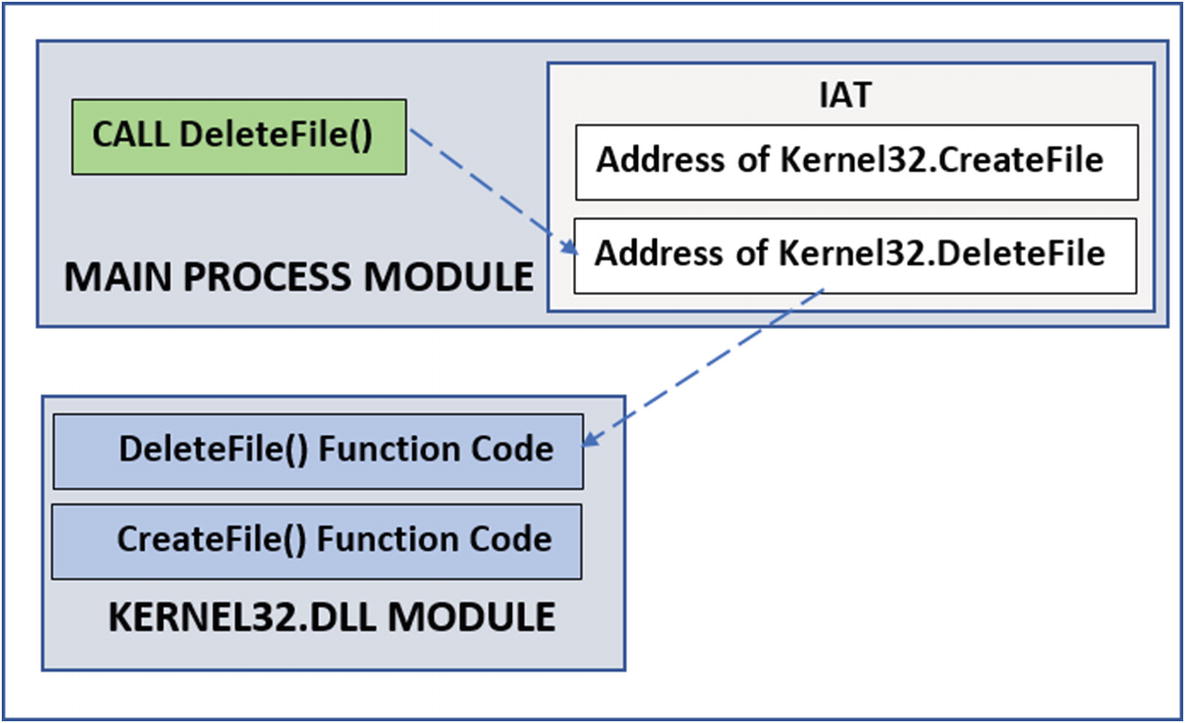
Flow of control from a Win32 API call made to the actual function code for the API
As you can see in the diagram, when a process calls an API like DeleteFile(), which is located in another module (Kernel32.dll), the process obtains the address of Kernel32.DeleteFile() by referring to its IAT (import address table). The IAT acts like a jump table. Using the address obtained from the IAT, the process can jump and reach the function code for DeleteFile() located in Kernel32.dll.
This is pretty much how the code flows for every API call. Now let’s investigate the two hooking techniques that malware can use to plug itself into the code flow to place its hook.
IAT Hooking
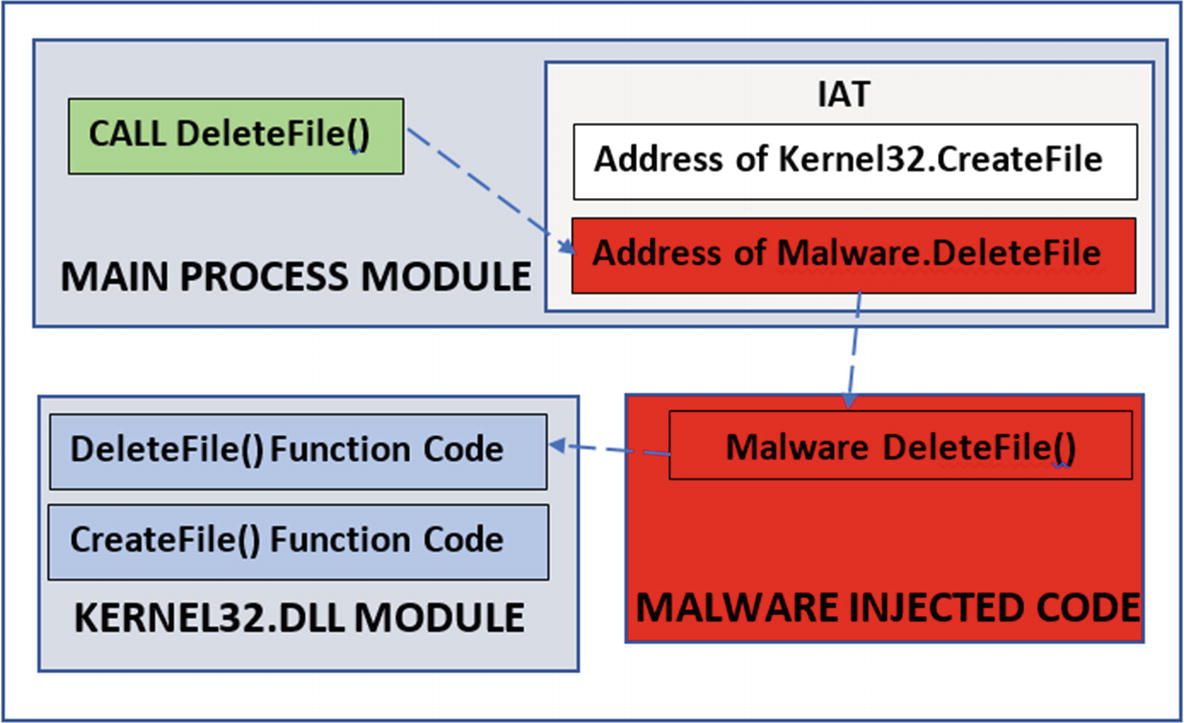
IAT hooking for API code hooking
Inline Hooking
One of the defects of IAT hooking is that sometimes the code in a process might call an API in another DLL without needing to obtain the address of the API it needs from the IAT. So malware modifying the IAT with the address of its malicious code is useless. This defect can be solved by using inline hooking.
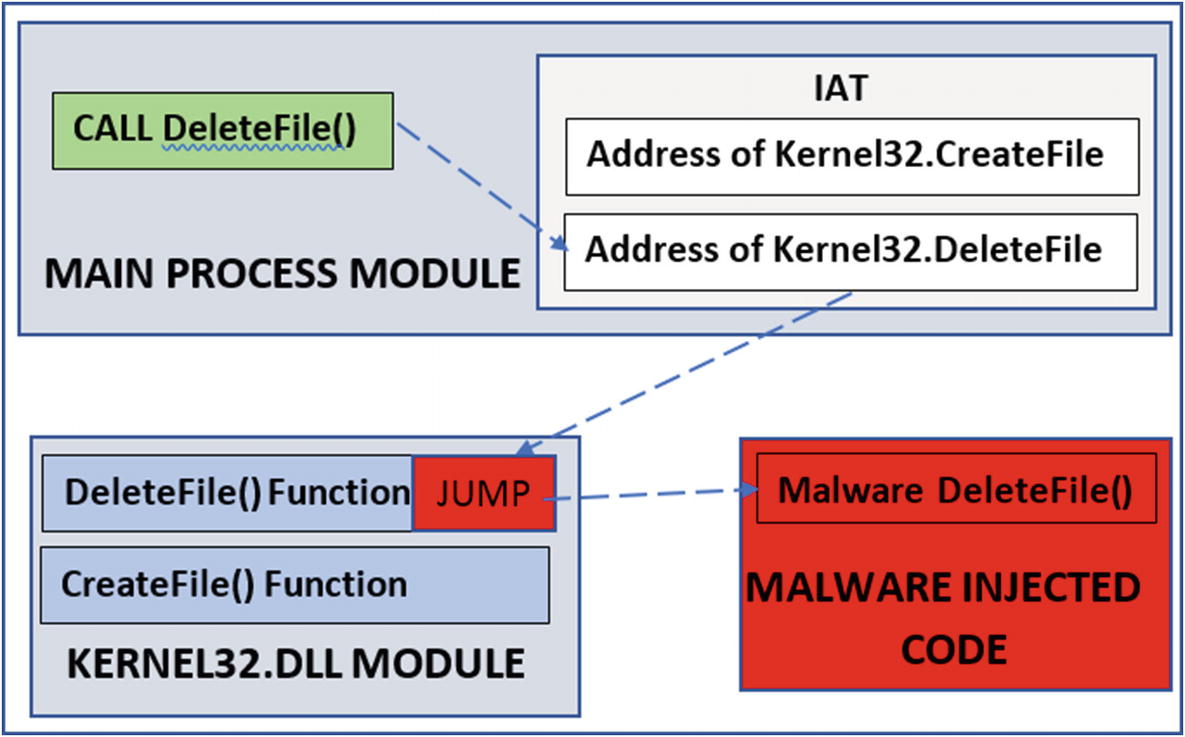
Inline hooking for API Code hooking

How the modified API looks post inline API hooking
So far, we have seen now how the code hooks can be placed in user mode. But code hooks can also be placed in kernel mode. For user-mode hooks, the injector process first injects code into the target process, and when the injected code runs in the target process, it places the hooks. For kernel-mode hooks, similarly, a kernel module needs to be injected into the kernel, which creates the hooks in kernel space. We cover kernel-mode hooks in Chapter 11.
Why a Malware Hooks?
- 1.File Operation
- a.
File Creation
- b.
File Deletion
- c.
Writing to file
- a.
- 2.Registry Operations
- a.
Registry Key Creation
- b.
Registry Key Deletion
- c.
Setting a value in the registry key
- a.
- 3.Process Operations
- a.
Process Creation
- b.
Process Termination
- c.
Thread Creation
- d.
Thread Termination
- a.
- 4.Network Communication
- a.
Sending data
- b.
Receiving data
- a.
All these operations can be intercepted and manipulated by API hooking. Let’s see some of the implications. We give you the list of APIs as well that are commonly hooked by malware for each of the malware use cases.
Self-Protection
self-protection is important to malware. Malware wants to protect its files, processes, and registry entries. For example, the DeleteFile() malware hook and any file deletion APIs to prevent the deletion of its files. Malware is known to hook the TerminateProcess() API and other variants of this API in Windows Task Manager, that terminates/kills a process so that a user is not able to kill any of its processes via the Task Manager.
Rootkits/Stealth
Rootkits are techniques used by malware to hide their presence and presence of any of their artifacts like files, registry keys, processes, DLLs, network connections created by the malware. Most of the rootkit mechanisms use some form of API hooking to achieve stealth. The next chapter talks about rootkits in detail.
Data Stealing
Some of the Win32 APIs used by KeyLogger Malware
DLL name | API Name |
|---|---|
user32.dll | TranslateMessage |
user32.dll | DispatchMessage |
user32.dll | getAsyncKeyState |
user32.dll | GetKeyBoardState |
user32.dll | PeekMessage |
user32.dll | GetMessage |
Intercept Network Communication
We obviously can’t leave out network communication. Network APIs can be hooked to intercept the data sent over to the network by legitimate applications. Most of the network communication APIs on Windows resides in the DLL ws2_32.dll, wininet.dll, and wsock32.dll.
Some Network-Related Win32 APIs Hooked by Malware to Intercept DNS Traffic
DLL name | API Name |
|---|---|
ws2_32.dll | gethostbyname |
ws2_32.dll | getaddrinfo |
Other Network Related Win32 APIs Hooked to Intercept Network Communication
DLL name | API Name |
|---|---|
ws2_32.dll | send |
ws2_32.dll | connect |
ws2_32.dll | WSASend |
wsock32.dll | send |
wsock32.dll | connect |
Wininet.dll | InternetConnectA |
Wininet.dll | InternetConnectW |
Man in Browser Attacks: The Banking Malware
Very similar to network communication, banking transactions are done through web browsers using an HTTP protocol. To carry out an HTTP transaction, the web browser which is the client that we use, uses a sequence of API calls like InternetOpen(), InternetConnect(), HttpOpenRequest(), HttpSendRequest() and InternetReadFile().
HTTPSendRequest() is the API used to carry the data from the user and the browser to the banking server, including our valuable credentials (i.e., the username and password). So if malware wants to tap the credentials sent to the server from the browser, it hooks HTTPSendRequest() API. When a victim tries to log in to the banking site using his credentials, the API now hooked by the malware be intercepted by the malware, which gets the banking credentials from the intercepted data. The malware keeps a copy of the credentials before passing on the data to the server, oblivious to the user. The stolen credentials from the malware are then shared by the malware with its attacker for other nefarious purposes. This technique is called form grabbing.
There is a similar kind of attack tactic called Web Inject. InternetReadFile() that the API used by the web browser to receive the data sends from the server to the user. Very similar to the form grabbing technique, malware can hook this API to intercept the data sent back from the server before it can reach you in the browser. The goal of intercepting this data is to modify the data/web_page_contents before handing it off the browser where you view it. Can you think of why it modifies the received response data/web_page from the server?
Well, one well-known example is when the victim tries to open a banking website, the first thing the browser does is, it sends an HTTP/HTTPS request to the banking website, and the server responds with a login web page which has fields for the user’s banking credentials. Malware is known to intercept this login page sent back from the server to the user/browser through the InternetReadFile()hook it has placed and modify the login page before passing it on to the browser. The modifications can include extra fields, like ATM PIN. Now inside the browser, the victim sees the fields for the user credentials and, in addition to that, sees the extra field for ATM PIN added by the malware via the hook interception. Now when the user fills in the data including the ATM PIN, the malware again intercepts the data, including the much sought after ATM PIN by intercepting the communication via the HTTPSendRequest() API like it did earlier.
Network Win32 APIs Hooked to Intercept Web Communication in Internet Explorer
DLL Name | API Name |
|---|---|
wininet.dll | InternetConnectA |
wininet.dll | InternetConnectW |
wininet.dll | HttpOpenRequestA |
wininet.dll | HttpOpenRequestW |
wininet.dll | HttpSendRequestA |
wininet.dll | HttpSendRequestW |
wininet.dll | HttpSendRequestExA |
wininet.dll | HttpSendRequestExW |
wininet.dll | InternetReadFile |
wininet.dll | InternetReadFileExA |
Networking APIs Hooked to Intercept Web Communication in Chrome and Firefox
DLL name | API Name |
|---|---|
nspr4.dll | PR_OpenTCPSocket |
nspr4.dll | PR_Connect |
nspr4.dll | PR_Close |
nspr4.dll | PR_Write |
nspr4.dll | PR_Read |
chrome.dll | ssl_read |
chrome.dll | ssl_write |
Now you might be wondering that using a secure protocol like HTTPS can protect your data even though the malware can intercept it via hooks. This is not true. HTTPS is useful to protect the traffic after encryption of the data, thereby preventing any snooping of the traffic even if they manage to intercept it. But malware can always intercept the traffic via hooks even before they are even encrypted by your browser, rendering HTTPS useless to main-in-the-browser attacks.
Application of Hooks in Security Software
Security software needs to monitor system activities for any malware infections. Very similar to malware, many of the antiviruses and anti-malware products hook on APIs to monitor file, registry, and network activity. Security software also needs to protect themselves from getting deleted, or their processes getting killed, or their processes being injected by malware code. All these require these anti-malware products to hook APIs in both user and kernel space by using the same hooking procedures we explained earlier.
Apart from products like antiviruses, another well-known tool that uses hooks extensively is an API logger like APIMiner. API loggers hook both user space Win32 APIs, and also system calls in kernel space to identify the various APIs used by a process. API loggers are largely used by malware sandboxes to identify the behavior of malware by logging the Win32 APIs the malware uses. Some of the well known free and open source API loggers are APIMiner and Cuckoo Sandbox.
Hook Scanning Tools
Most of the tools called rootkit scanners are actually hook scanners. GMER is one of the most popular ones. Another popular one is the Ring3 API Hook Scanner from www.novirusthanks.com. The installation of both tools was covered in Chapter 2. Running these hook scanner tools can help us identify if any of the APIs in the system are hooked and thereby identify any malware infection that relies on API hooking.
As we described in the previous section, an important point to remember is that many security software, as well as malware analysis tools, may create hooks in the system. Running your hook scanning tools might pop up these hooks from this security software on your system, which are real hooks, but they can be ignored. It’s good practice to take note of these hook entries from these clean software in case you are performing forensic analysis so that you can learn to ignore them when you look at these entries later on when you are analyzing a malware infection.

GMER hook scanning tools when running with Internet Explorer running

Structure of GMER hook scanning tools logs
Process image path This the path of the image of the hooked process
PID PID of the hooked process
DLL Name of the DLL in the process whose API is hooked
API This is the name of the hooked API in the DLL
API address This is the address of the hooked API
Jump target This the address of the memory location where the hook redirects the API to
Jump module This is the module where the jump target hook is located. This displays the location of the DLL module on disk. If this is not displayed, then it is an unknown module and may lie in injected code in memory, which you can use as a method to identify malicious code injected hooks.
The GMER logs on your system might be different from the one you see in the screenshot.
The right way to use hook scanning tools like GMER and Ring3 API Hook Scanner is to first run these tools before you execute malware to analyze it, make a note of the GMER logs and save the logs. Now you run the malware and re-run GMER and save the logs. Now compare the difference in GMER logs before and after running the malware to identify any hooks by the malware.
You can now retry the steps to see how the Ring3 API Hook Scanner logs look in comparison to GMER.
Case Study: DeleteFile() Hooked

Contents of the folder for running Sample-10-7.exe hook case study
Double-click Sample-10-7.exe to run it. Sample-10-7 is a hooking sample that injects code into the Explorer.exe process of your system. You might remember that Explorer.exe is the Windows file browser that you use to browse the files on your system. To view a folder’s contents, you use the Windows file browser.
Sample-10-7.exe injects code into Explorer.exe using one of the code injection techniques we covered earlier in the chapter and then inline hooks the DeleteFileW() API in Kernel32.dll module in Explorer.exe. With the hook in place, it redirects all API calls to Kernel32.DeleteFileW() to its own version of FakeDeleteFile() that checks if the user is trying to delete a file that has the word malware in it. If it does, it blocks the user from deleting the file. If the user tries to delete any file that doesn’t have the word malware in it, it allows the user to delete the file.

Shift+Delete on malware.txt shows a message box to permanently delete the file

The hook put in place by Sample-10-7.exe blocks deletion of malware.txt

The hook put in place by Sample-10-7.exe doesn’t block deletion of hello.txt

Ring3 API Hook Scanner detects the hook in Explorer.exe put by Sample-10-7.exe
Case Study: Internet Explorer Hooked
Let’s now explore a malware sample that hooks some network related APIs in the Internet Explorer browser. You can open the text file Sample-10-8.txt from the samples repo. This is just a text file that contains the hash and instructions on how to download the actual malware sample from various sources on the web. Once you download the malware sample, rename it as Sample-10-8.exe. Please note all downloads of malware and handling of these samples should be done inside your analysis VM only.

GMER tool scan showing the hooks after running Sample-10-8.exe

GMER tool scan showing the identified malware hooks after running Sample-10-8.exe
We give you hints on which of the GMER entries are actual hooks placed by the malware, and the rest are just false positives. But as you gain more experience, you learn to skim through these entries and easily identify the malicious hooks from GMER and other such tools’ logs.
To scan GMER looks and try to identify hooks that are not from the malware Sample-10-8.exe, look for jump targets that don’t lie in an unknown module. Also another way to find the actual hooks is by the process of elimination (i.e., you run GMER with Internet Explorer open before you run the malware sample, obtain the logs and save them). Now execute the malware sample with Internet Explorer open and re-run GMER and save the logs and compare it with the logs you saved earlier. The new entries point to hooks placed by the malware sample you ran.
We found that the hooks are in the HTTPSendRequestA and HTTPSendRequestW APIs, and it possibly indicates that we are dealing with malware, which is some sort of banking trojan that possibly intercepts user credentials via these hooks. More accurate details about the malware can only be found out by reverse-engineering the sample.
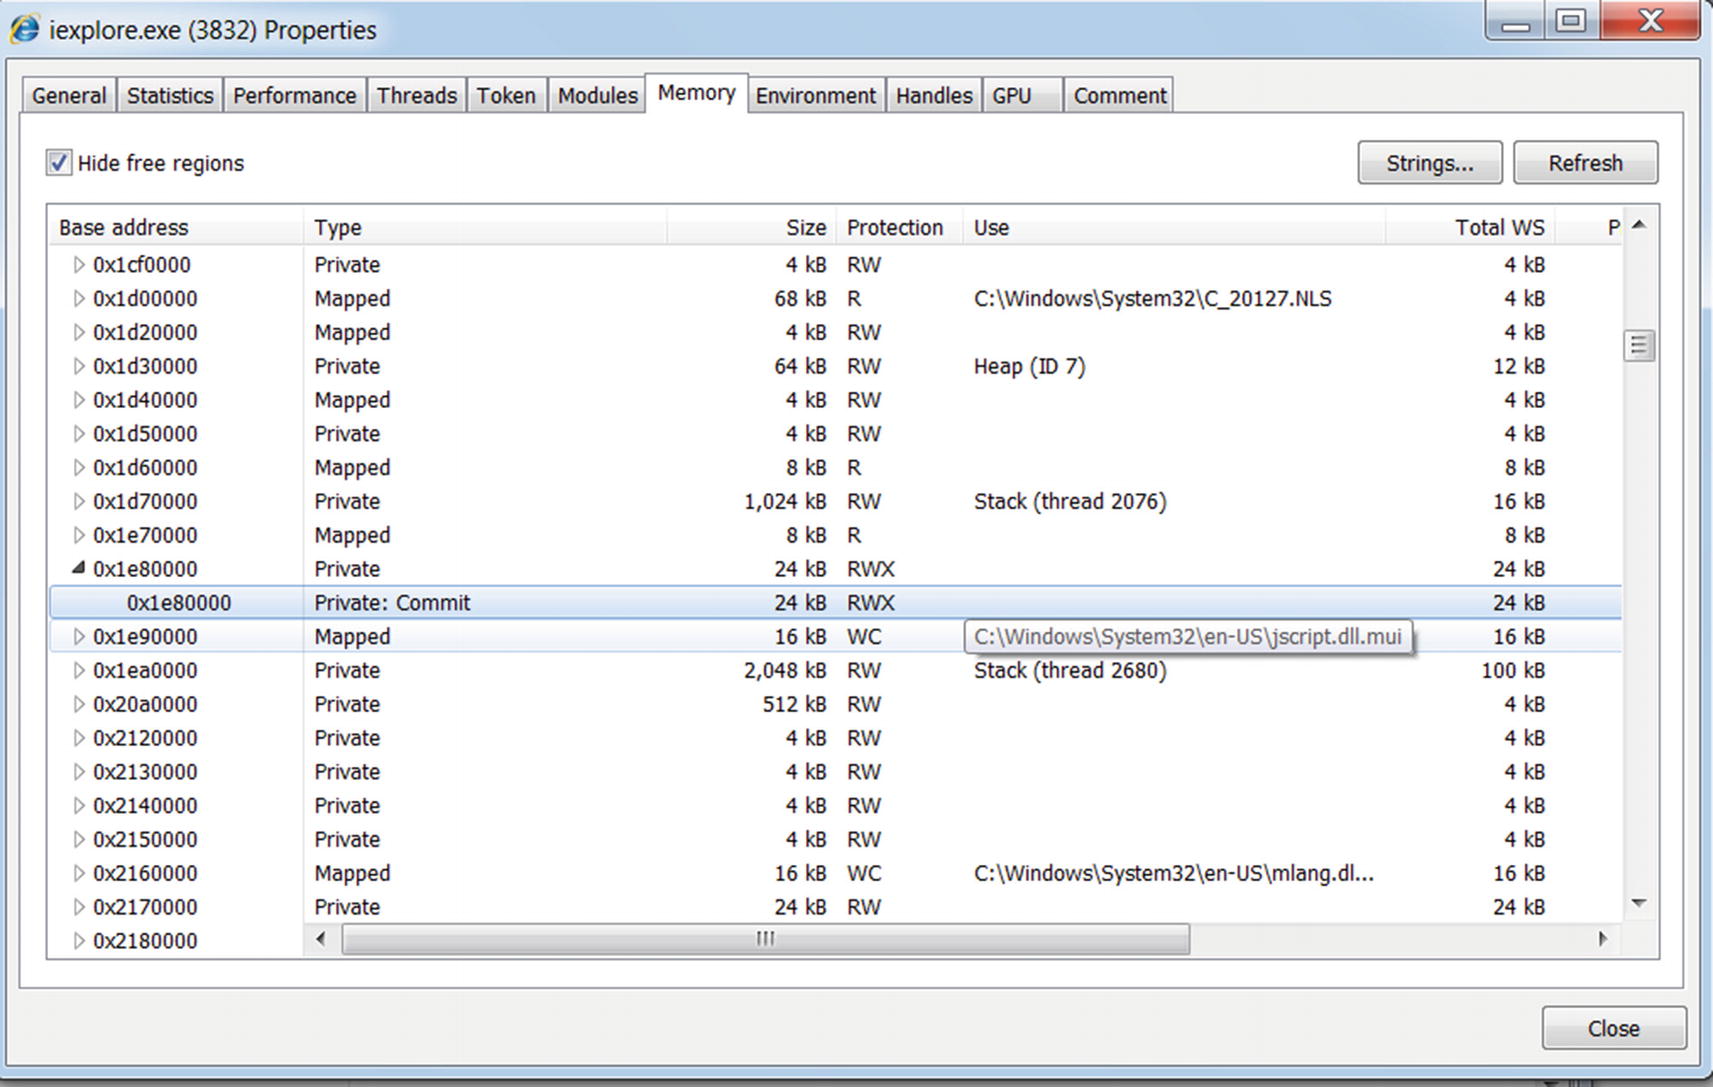
Identifying injected code in Internet Explorer using Process Hacker
Note that the memory block has RWX (read, write, and execute) permissions. You learned that malware that injects code allocates memory with RWX permissions, thereby indicating that this memory block must be the injected code by Sample-10-8.exe.
APIMiner

APIMiner to log APIs used by Sample-10-2.exe
As an exercise, let’s reanalyze Sample-10-2.exe from earlier in the chapter using APIMiner, as seen in Figure 10-48. Run the command and go through the whole exercise. Make sure you have an instance of notepad.exe process running while running the command, since Sample-10-2.exe needs it. After running the whole exercise, you can see an API log file starting with apiminer_traces in the same directory where the sample is located.
Open this log file, and as you can see, APIMiner has logged the various APIs used by this sample. As you learned in the Sample-10-2.exe exercise, this sample calls the VirtualAllocEx Win32 API to allocate memory in the notepad.exe process that you have started. In the API logs file, you can see the call to the NtAllocateVirtualMemory API, which is the NT API version invoked by the VirtualAllocEx (APIMiner logs NT APIs) API called by the sample.

Using APIMiner, you can easily analyze malware samples and log the APIs used by it, helping you easily identify any form of code injection. As an exercise, run all the exercises in this chapter using APIMiner, and examine the API logs and identify all the APIs that are used by the sample for code injection.
Summary
Code injection is one of the most common techniques used by malware. It helps analysts identify and classify the malware in question. In this chapter, you learned about code injection using various hands-on samples. We covered the different types of code injection techniques that are prevalent in malware these days. We also covered process hollowing, a notorious code injection technique used primarily for stealth. You also learned about API hooking, a primary motive for malware to inject code. Using hands-on exercises and samples, we investigated how API hooking works and the implications of using it. You also learned about anti-malware hook scanning tools like GMER And Ring3 API Hook Scanner for detecting any hooks that malware placed on a system.