
Malware can be analyzed both with and without execution. Static analysis is the analysis of a sample without executing it, as opposed to executing it and analyzing its behavior, which is known as dynamic analysis. While static analysis of a sample might look like a wholly separate and independent phase in the analysis process, it is not! Analyzing a malware sample and its various artifacts is a constant back and forth motion between static and dynamic analysis. In this chapter, we introduce the steps and various tools and tricks that one can use to statically analyze a sample.
Do note that in previous chapters, covered various static analysis techniques along with hands-on exercises. In this chapter, we rehash many of these techniques we have already introduced earlier. As you read this chapter, we suggest you go back and forth between this chapter and the older chapters and their various hands-on static analysis exercises and content to solidify all the things that you learned. The more you practice, the more solid an analyst you become.
Why Static Analysis?
Static analysis serves as a good first step in the analysis process. By using it, you can often figure out if a sample is malicious or clean without even having to run it. You can even go as far as finding the type, family, and intent of the malware without needing to carry out any dynamic analysis.
static analysis helps figure out the setup and environment for dynamic analysis
Let’s now list out and go through the various steps involved in static analysis.
Sample Hash for Information Xchange
Be it static analysis or dynamic, the first step always includes checking if others have any thoughts or conclusions on your sample. Often, others have already analyzed your sample or a similar sample that belongs to the same malware family and have blogged a report on its analysis. In other cases, the same sample might have made its way to VirusTotal and other malware analysis platforms.
But uploading samples to these public platforms or sharing it with others is normally forbidden, especially if the sample is from your workplace since the samples might also contain sensitive information. This is especially true if the malware component is embedded as a part of a sensitive customer or internal file, or if the sample in question isn’t malware at all, but a sensitive customer benign/clean file.
To get around this, the analysis world uses the file hash to exchange and obtain information about the sample. Almost all platforms, including analysis platforms, reports, and blogs for malware on the Internet, use the hash of a malware file to identify it. This allows one to obtain as well as share information about a malware sample without having to upload it or share it with any public analysis platforms, or even your friends.
Hash Generation
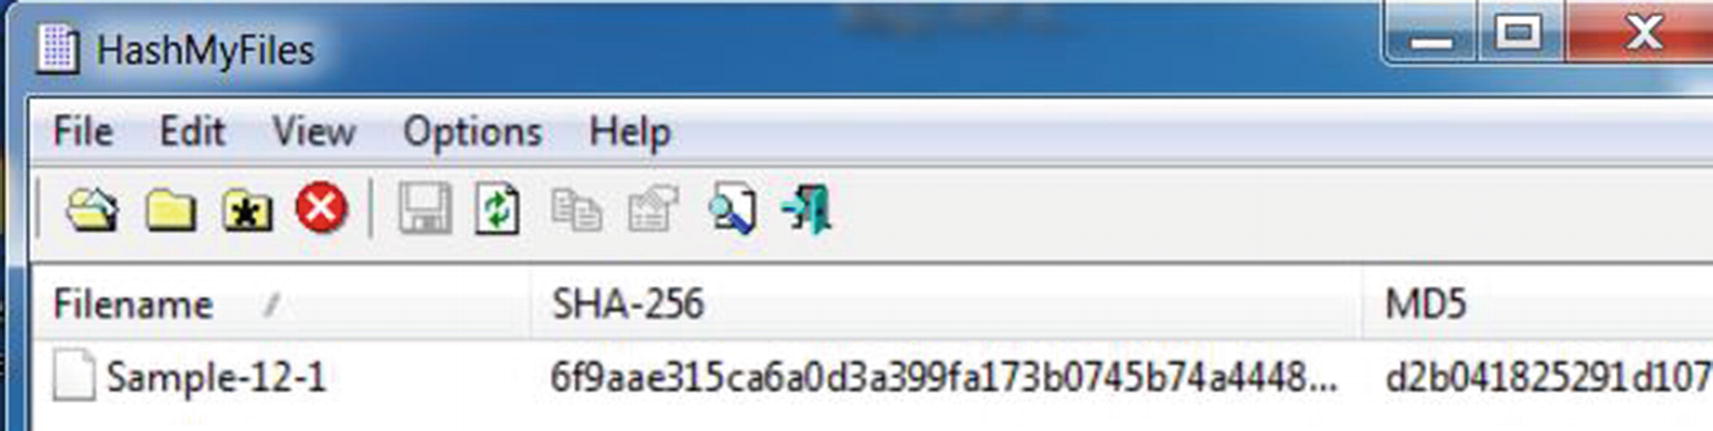
md5, sha1 and sha256 hashes for Sample-12-1 using command line tools
sha256: 6f9aae315ca6a0d3a399fa173b0745b74a444836b5efece5c8590589e228dbca
sha1: 5beea9f59d5f2bdc67ec886a4025cdcc59a2d9c3
md5: d2b041825291d1075242bd4f76c4c526
Internet, Blogs, and Analysis Reports
The malware analysis industry is buzzing with analysts who share information about new malware they find, along with various other cybersecurity-related info. Most of this info makes its way into the Internet media via blogs and analysis reports released by research labs of various anti-malware companies, personal blogs, annual security reports, and so on. A lot of security professionals are also part of various peer public and private forums and mailing lists, where one can request others for samples, info on samples, contact details, and other security-related information.
All the sources of various security feeds, combined with a search engine like Google, and you have a potent information source to probe for info about a new sample you have. Armed with the hash of the sample, you can query these different sources and try to obtain information about it.

Analysis reports on the Internet for malware Sample-12-1 using its sha256 hash
As an exercise, try the same yourself and observe the results shown by the Google search engine. Do note that trying the md5 and sha1 hashes for the same sample returned no results via Google search engine, but querying for the sha256 hash returned with results since the articles quoted the sha256 hash for the sample and not the md5 and sha1 hashes. Hence the need to try all three hashes: md5, sha1, sha256, while querying for information on a sample.
VirusTotal and Other Analysis Platforms
VirusTotal (www.virustotal.com) is an online web platform that aggregates many anti-malware detection products. You can upload a malware sample to it, and it scans the sample with the various detection products and generates an analysis report that includes whether any of the anti-malware products has detected malware and, if so, the classification for the malware into a type/category/family. Alternatively, you can query it with just the hash of a file, which generates a similar analysis report if it already has the sample in its database.
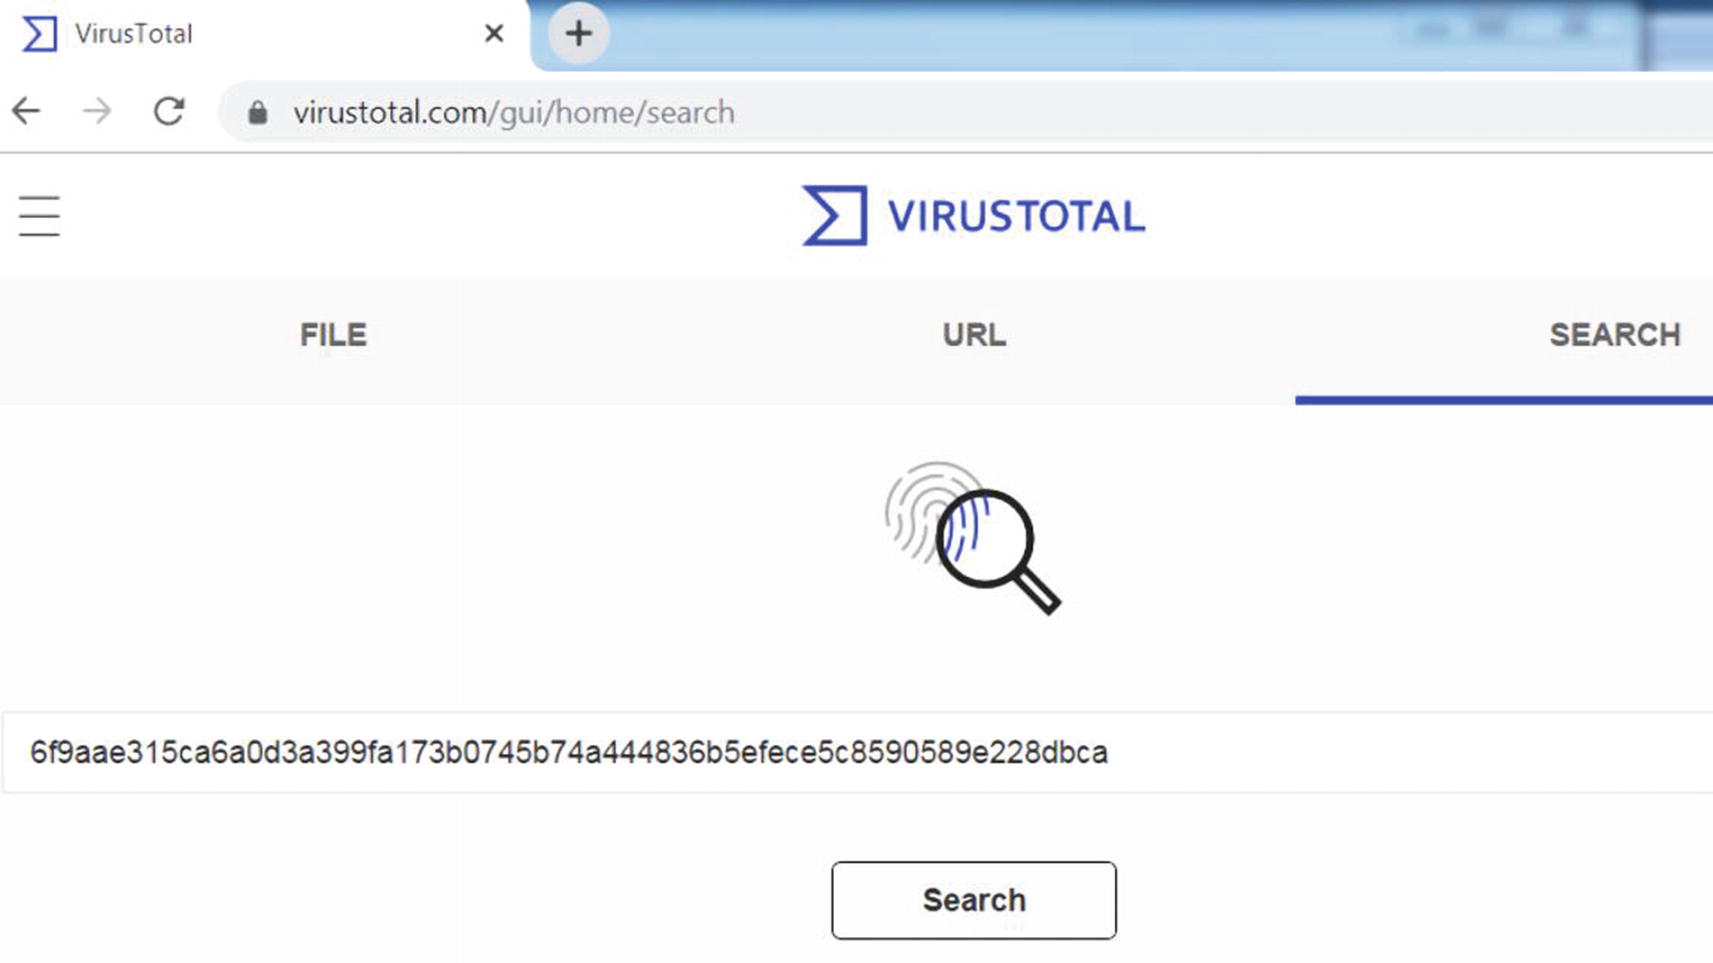
Querying VirusTotal using the sha256 hash for Sample 12-1
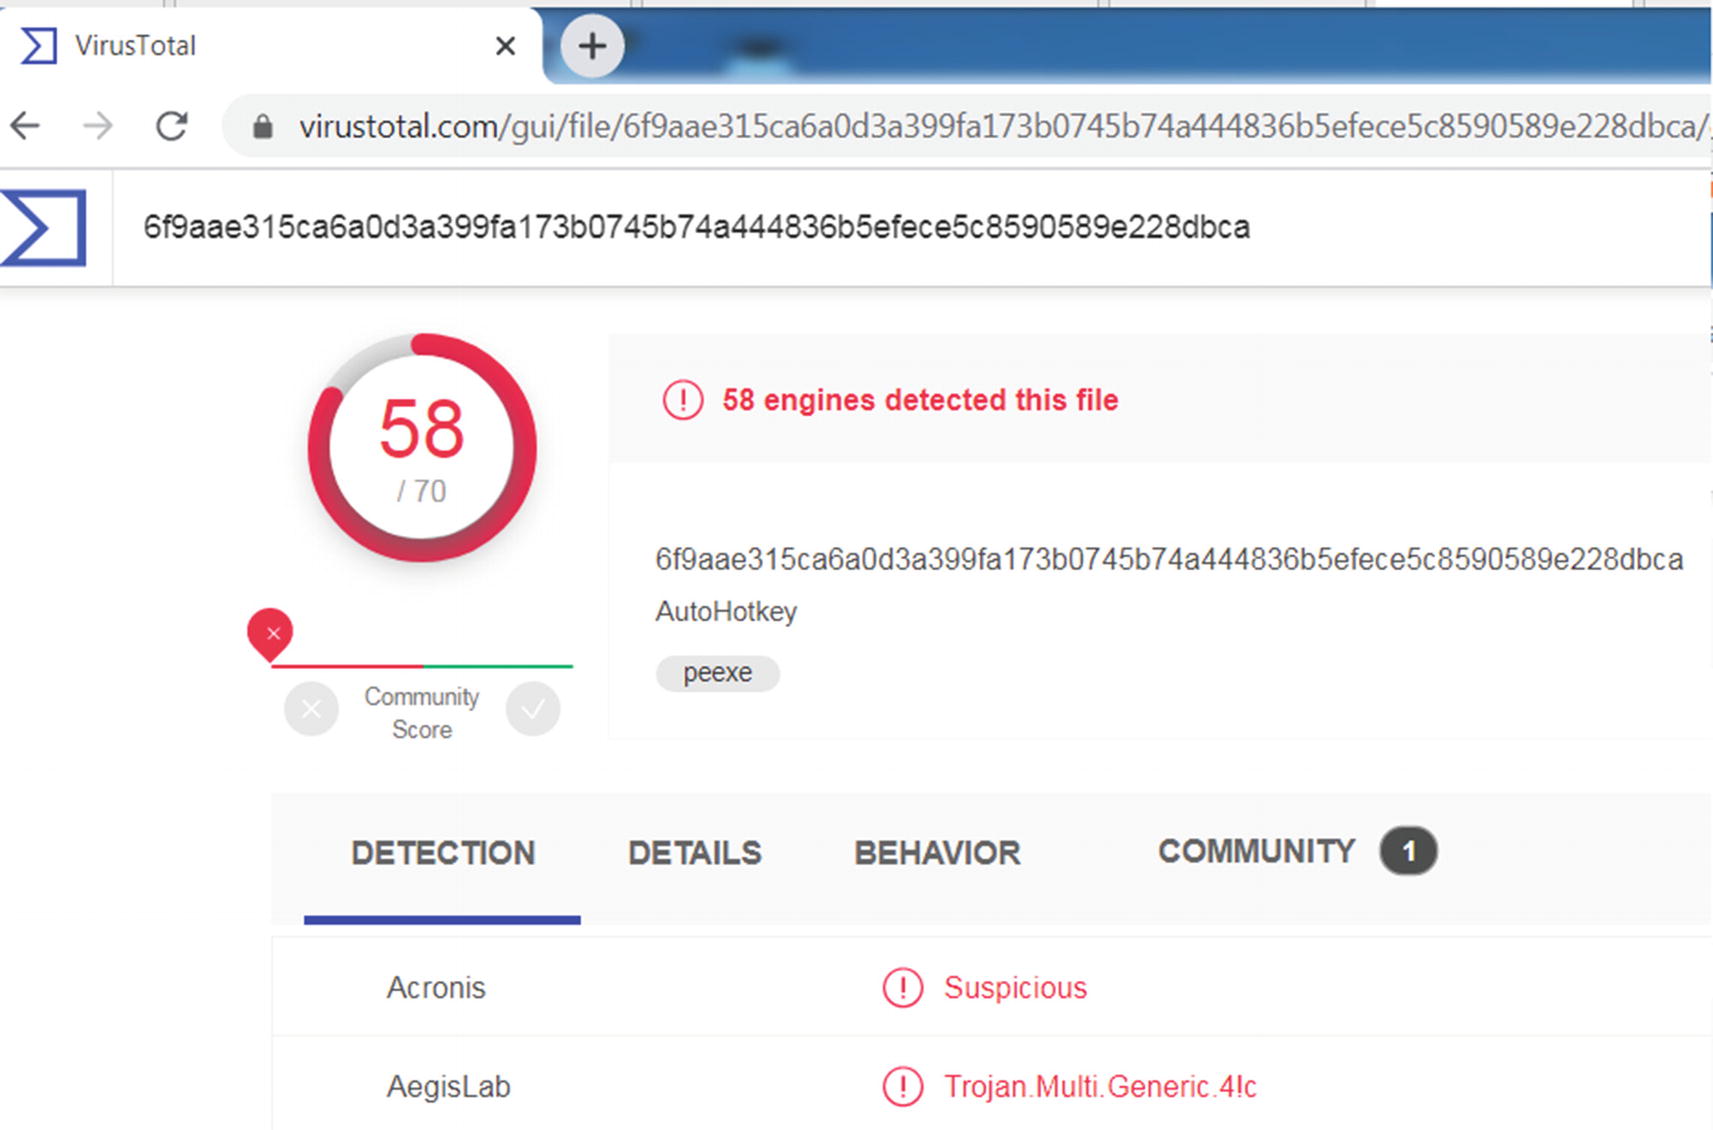
Analysis results from VirusTotal show that Sample 12-1 is malware
The analysis report in Figure 12-5 shows us multiple tabs: DETECTION, DETAILS, BEHAVIOR, and COMMUNITY, which hold varied information on the queried sample hash. The DETECTION tab displays the identification, classification, and the family of the malware, according to the various anti-malware products used by VirusTotal. The DETAILS tab holds the various static properties extracted from the sample. The BEHAVIOR tab holds the various dynamic events observed when the sample was executed. These reports made available can most often help us reach a conclusion on a sample hash quickly.
VirusTotal
Hybrid Analysis
SNDBOX
any.run
They Say It’s Clean! Is It?
When using analysis platforms, you often come across clean samples, or the detection engines found no malware. Does this mean that the sample is not malware? Is it actually clean?
The answer is not straightforward. It depends on various factors. The anti-malware industry world sees millions of samples every day, both clean and malware alike. This huge deluge means detecting these samples statically by using the hash is practically not possible, and this was the main reason that led to the development of behavior-based detection of malware. At the same time, with the arrival of new complex malware, these anti-malware products may not have any existing signatures or detection mechanisms that can identify if the sample is malware. This is what often leads to these anti-malware products in these analysis platforms failing to identify a real malware sample as malicious.
To counter this detection failure, whenever a new malware type arrives, and an anti-malware detection product can’t identify it as malicious, the detection and engineering team have to add/update signatures. In some cases, they add new features and functionality to their detection products to catch this malware. These new signatures and features/functionality are made available as software updates to these detection products. Usually, the detection team might take a few days to create these updates. With the new updates deployed, next time, if the detection product encounters the same or similar malware from the same malware family, it succeeds in identifying it as malware.
Keeping in mind that the detection team might take a few days to make available new signature and feature updates, if a malware sample comes up clean in online malware analysis platforms like VirusTotal, you might want to recheck the samples after a few days, with the hope that these anti-malware detection products might have received new signatures and feature updates by then. At the same time, we might also want to keep an eye on the date these samples were first submitted to these online platforms. Usually, we can recheck in one or two weeks since the sample was first submitted to these online analysis platforms since that should give the detection teams of these products enough time to provide updates to identify/detect these samples. If two to three weeks after the sample was first submitted to VirusTotal, the sample still comes up as clean from all its anti-malware products, then it is likely that the sample is indeed clean.

The date field that shows when the malware was first submitted to VirusTotal
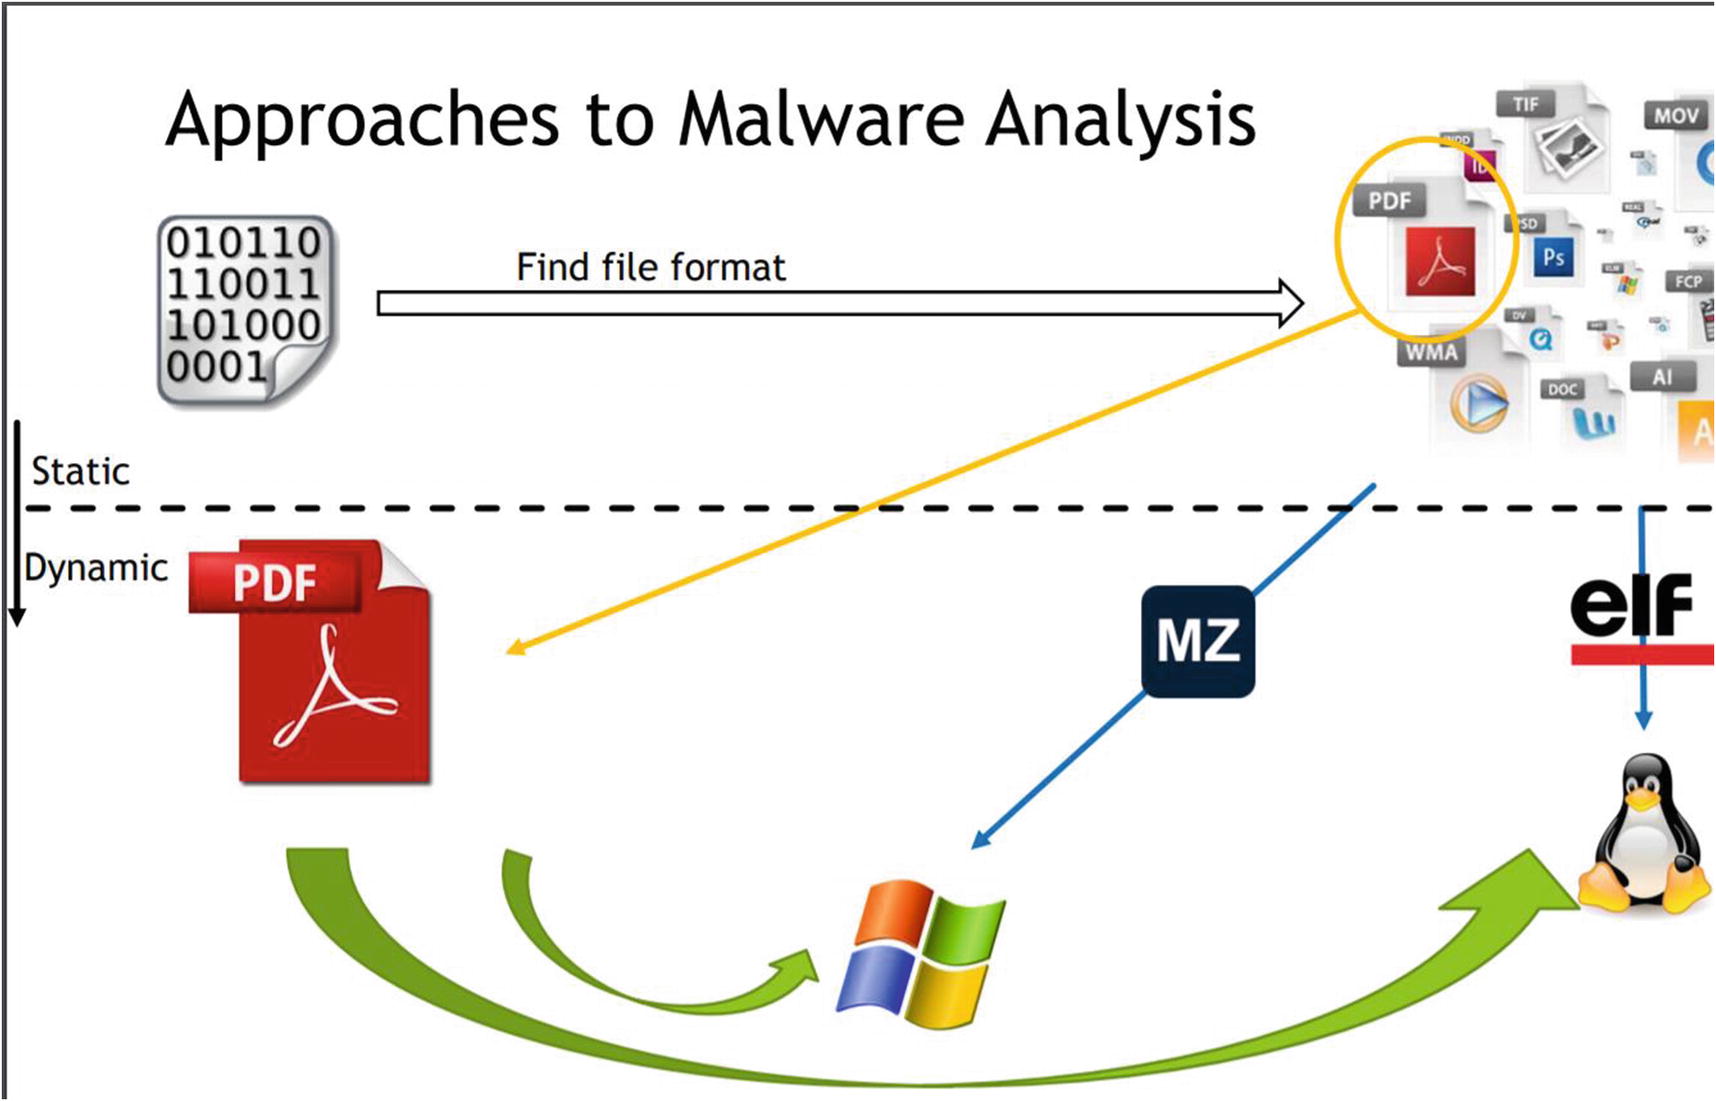
Figuring Out the File Format
Malware comes in different file formats: PE executables, .NET executables, Java files, Script files, JavaScript malware, WMI malware, and so forth. They might also be written for different operating systems: Linux, Windows, macOS, or Android. They might be targeted for a specific processor architecture: x86, x64, PowerPC, arm, and so forth. Based on the type and target of the sample file that you are analyzing, you might need different tools and even OS setup or maybe processor type to analyze the sample file.
A good first step is to figure out the format of the file, as that reveals a lot about what the target of the sample looks like.
In Sample-12-2, if you obtain its file format using trid.exe (see Figure 12-11), you notice that it is a PE executable file, which means all you need is a Windows OS environment (as well as the analysis tools that we installed in Chapter 2) to run it.
Let’s take Sample-12-4’s file format using trid.exe shows us that it is a .NET file: 81.0% (.exe) generic CIL Executable (.NET, Mono, etc.) (73294/58/13). analyzing .NET files on Windows requires specific .NET Frameworks, tools, and decompilers. The .NET Framework may not be installed on your machine, or the wrong version might be installed. But armed with the knowledge that you are dealing with a .NET file, you can now set up your analysis VM environment with the tools and the right .NET Framework to help you analyze the sample.
Obtain Full Infection Context
A malware infection involves a full cycle, with first the delivery of the malware via various techniques including email, or exploitation or other mechanisms, and so forth. After exploitation, malware might move laterally across your enterprise or network.
The malware came as an attachment via a target email to our finance department/CEO/HR department.
The malware came via a generic spam email to our engineering team.
We found this malware being copied into another machine over the network.
The malware came via a spam mail attachment and was named as Invoice.pdf.exe.
The first point may indicate a targeted phishing attempt. This information you gained about the malware can help you target your analysis to see if it is indeed a targeted phishing attempt or not. If your finance team is the recipient of the phishing mail, it might hint toward being a financial or banking malware and now you direct your analysis efforts accordingly, searching for artifacts and hints that prove this hunch right or wrong.
The third point indicates that the malware sample you are analyzing had a worm or a lateral propagation capability. Hence, it might involve tools within itself that might do lateral network scans. Knowing this information, you can now target your analysis toward searching for hints in the malware that indicate a local network scan or any network connection APIs that are targeted to the local network.
The fourth point indicates that the malware is possibly using filename and extension faking (explained shortly), which in combination with the info that it came as a part of a spam mail in itself is a telltale sign that it is malicious.
It helps to gather as much history and information about the malware sample you are analyzing, and this is where talking to your SOC or whoever is providing you the sample helps.
Filename Faking and Extension Faking
Please refer to Chapter 11, where we discuss filename faking and extension techniques. Filename faking works when attackers name their malicious files with names that attract attention from the victim and entice them to click it, thereby infecting the system. Some common examples of names are Invoice.exe, Invoice.pdf.exe, January_salary.exe, Resume.exe, and so on.

Malicious emails with malware attachments with enticing filenames to fool users to click them
Similarly, extension faking works by using fake extensions as a part of filenames. This technique takes advantage of the ignorance of most user victims who recognize extensions like .pdf, .xlsx, and .doc as nonexecutable extensions and hence think they are safe (not true). By adding these extensions to their malware filenames, attackers manage to fool victims into misreading them as non .exe files, basically deceiving them to download and click them. Some examples of these are January_salary.pdf.exe and Invoice.doc.exe.
Combining this with a delivery mechanism like email attachments and users rushing through reading their email, easily leads to the misreading of filenames and ignoring the .exe extension in the filename and assuming the file says Janury_salary.pdf or Invoice.doc.
To make matters worse, enabling extension hiding on the disk means downloading the files onto your disk effectively hides the .exe extension, thereby the File Browser displaying these files as January_salary.pdf and Invoice.doc.
It is very important to get the full infection context to reveal the actual names of malware file attachments in the email and other delivery mechanisms.
Watch out for files with enticing names, especially in email attachments, which should raise your suspicions and warrant further investigation of malware that uses filename faking.
Be ready to translate the filenames and email messages into English if they are in another language.
Disable extension hiding (see Chapter 2) in your analysis VM and, in general, on your personal systems as well, so that you can visually see the extension of every file you are dealing with.
File Thumbnail Faking
Please refer to Chapter 11’s “Thumbnail Faking” section, where we speak at length on this technique. Briefly, this technique works where malware attackers use unrelated thumbnails/icons from other clean applications as thumbnails of their malware, thereby fooling the user into thinking these are clean applications and click them.

Standard thumbnails used for Microsoft Word and Excel files
You can see that files with .doc or .xls from Microsoft Office tools use these thumbnails (also see Figure 11-9) in Chapter 11). But malicious attackers can change their malware’s thumbnail to Microsoft Office or any other brand’s thumbnail—Adobe, VLC video file, and so on (see Figure 3-11 in Chapter 3).

Malware file Sample-12-2 that uses fake Microsoft Word thumbnail to fool victims

The thumbnail of Sample-12-2 malware is that of Microsoft Word to fool users

The file format of Sample-12-2 indicates that it is an executable PE file
A lot of malware comes with custom thumbnails, but a lot of them use fake thumbnails, too. As analysts, when analyzing malware files, watch out for thumbnails that don’t match the file format type of the file, basically using this mismatch to identify malicious files that need further dissection.
File Type and File Extension Mismatch
Take a file say Sample-12-2, which we played around with the previous section. Add the .txt or .dat extension to it so that the file is named Sample-12-2.dat. Does it mean it is a text or data file? No. Testing the file format, as seen in Figure 12-11, shows that it is still a PE executable file.
When analyzing malware files, especially when run under dynamic analysis, they create and drop secondary payloads/malware files, which might be executables or text ASCII config files with incorrect file extensions to fool users into thinking they are other file types.
As analysts, regardless of the malware sample’s file extension, it always makes sense to check the file format of all malware files, including new files dropped/created by the malware when it runs under dynamic analysis. Any major mismatch between the file extension and the actual file format is suspicious and warrants further investigation.
Version Information/Details
Most clean software and files on our system have a Details tab under its Properties window accessible by right-clicking the file and selecting Properties. The Details tab shows various details about the file, including File version, Product name, Product version, and Copyright.
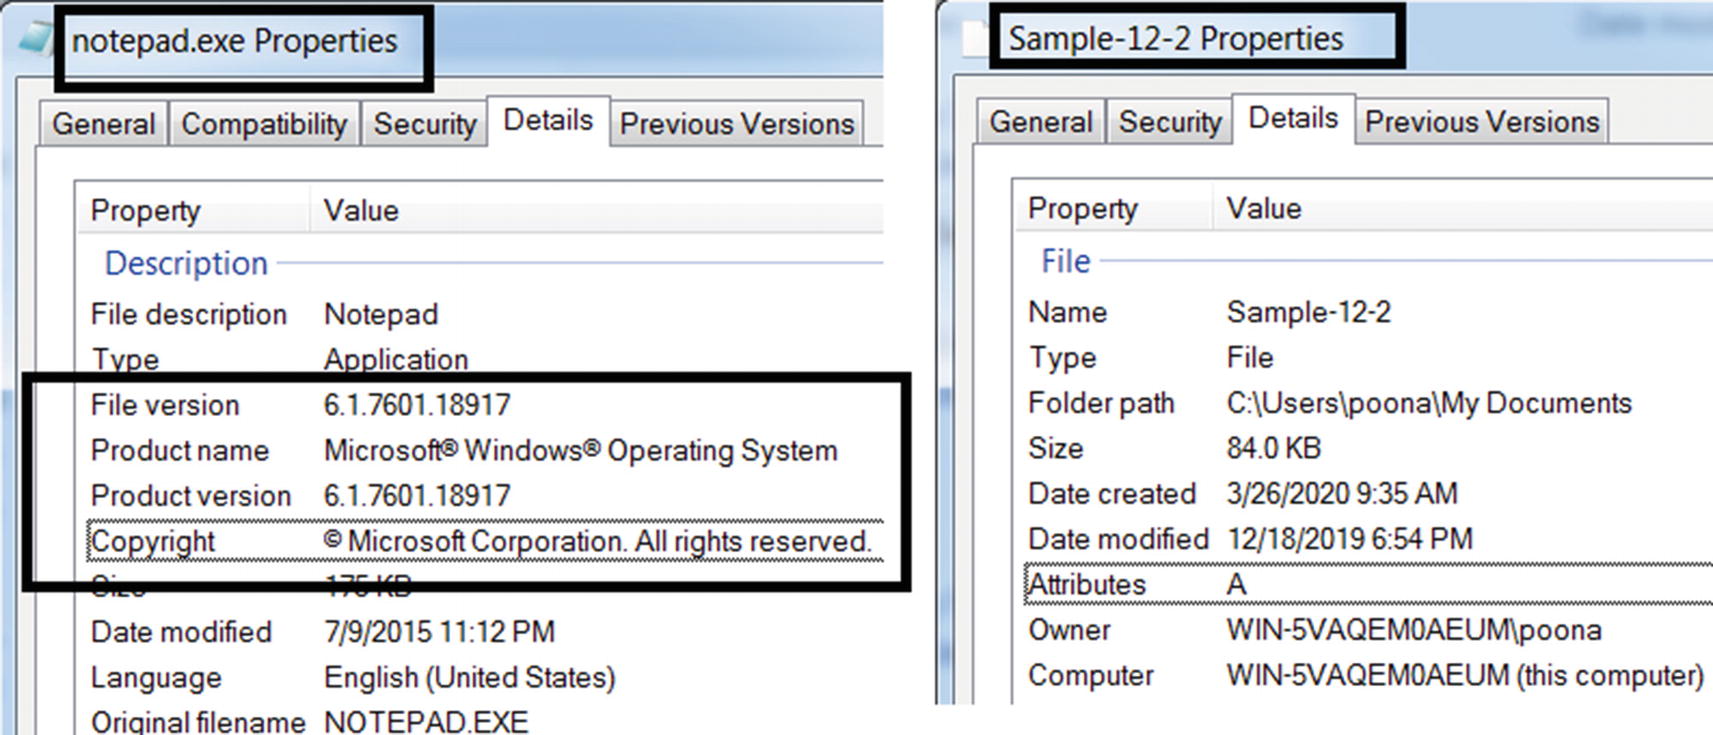
The Details tab of a file’s Properties that provides various info about the file
If you do not see well-described fields and properties describing the sample/application, then you can treat the sample as suspicious that warrants further investigation.
If you see field values that look like junk with little or no meaning, then you can treat the sample as suspicious. You don’t see clean applications that use junk values to describe its properties and version info.
Code Signer Information
In the previous section, we spoke about using the application Details properties as a filtration system to flag and further dissect suspicious malware files. But what if a malware attacker creates a malware file and copies all the product-related details from another clean software to his malware file. To counter this and to be sure about an application and its author/owner, there is code signing.
You can read more about code signing through various resources on the web. To briefly describe it, just as we sign documents with our signature, we have similar digital keys, also known as code signing certificates, that are cryptographically generated to sign files. The unique digital signatures generated for the files using these code signing certificates traces back to the original author of the file.
For example, if you are Google, you apply for a code signing certificate from certain authorized vendors who issue these certificates, who vet that you are indeed who you are saying you are. You can now use the issued certificate to sign your apps and distribute them along with the generated digital signature for the app. The user of your app can verify its digital signature to trace it back to Google (you), thereby validating the source/author of the application.

Digital Signature info for Chrome.exe and Firefox.exe
Digital signatures are useful for filtering out clean samples from malware samples if you see that the sample you have is digitally signed by a well-known vendor.
With malware samples, most of them are not digitally signed. If a file is not digitally signed, you want to place the sample under the suspicious list and further dissect it. Similarly, some malware actors are known to buy their own digital certificates under various companies they form and sign their malware using the certificate they get, with the hope that their digitally signed application won’t raise any eyebrows.
So as an analyst, you need to remember that just because an application is digitally signed, it doesn’t mean it is clean. A malware actor could buy a certificate to sign the malware. The point is whether the digital signature indicates if the author/vendor of the application is known or not.
As an analyst, you want to build a malware signer database with the names of the signer/author/company who signed a malware file. So when you find a new malware file that is digitally signed, extract the name of the signer (see Figure 12-13), and add it to your malware signer database. The next time that you see a new sample that is signed by any signer from your malware signer database, you can flag the sample as suspicious and dissect it further.
String Analysis Statically
Malware samples are nothing but software programs, and as a part of the final software executable generated, the program includes many strings. These strings often can serve as very good indicators to identify the type, functionality, and intent of the software.
The same applies to malware as well. The strings that are part of the malware program can serve as very useful and accurate indicators not just to identify it as malware, but to also understand its components, functionality, intent, and classification. But as you learned in Chapter 7, most malware is packed. While the malware sample is packed using a packer, the data and the strings which are part of the original malware file are obfuscated in the outputted packed file and are not visible anymore.
But under some circumstances, certain chunks of data and strings from the original malware file might escape packing and might still be present in the final packed malware file. Sometimes, the malware authors do not pack malware samples. In other cases, you might also receive an unpacked malware sample for analysis, probably because some other analyst unpacked it and extracted the original malware file out. What this means is you can now view the strings in the unpacked portion of the sample file you are analyzing, giving you a glimpse into the innards for the sample.
To view the strings in the file, one can use the BinText tool installed in Chapter 2. You can refer to Chapter 7, where we have explained and played with hands-on exercises on using BinText to view the strings in a file.

BinText tool displaying suspicious strings for Sample-12-3
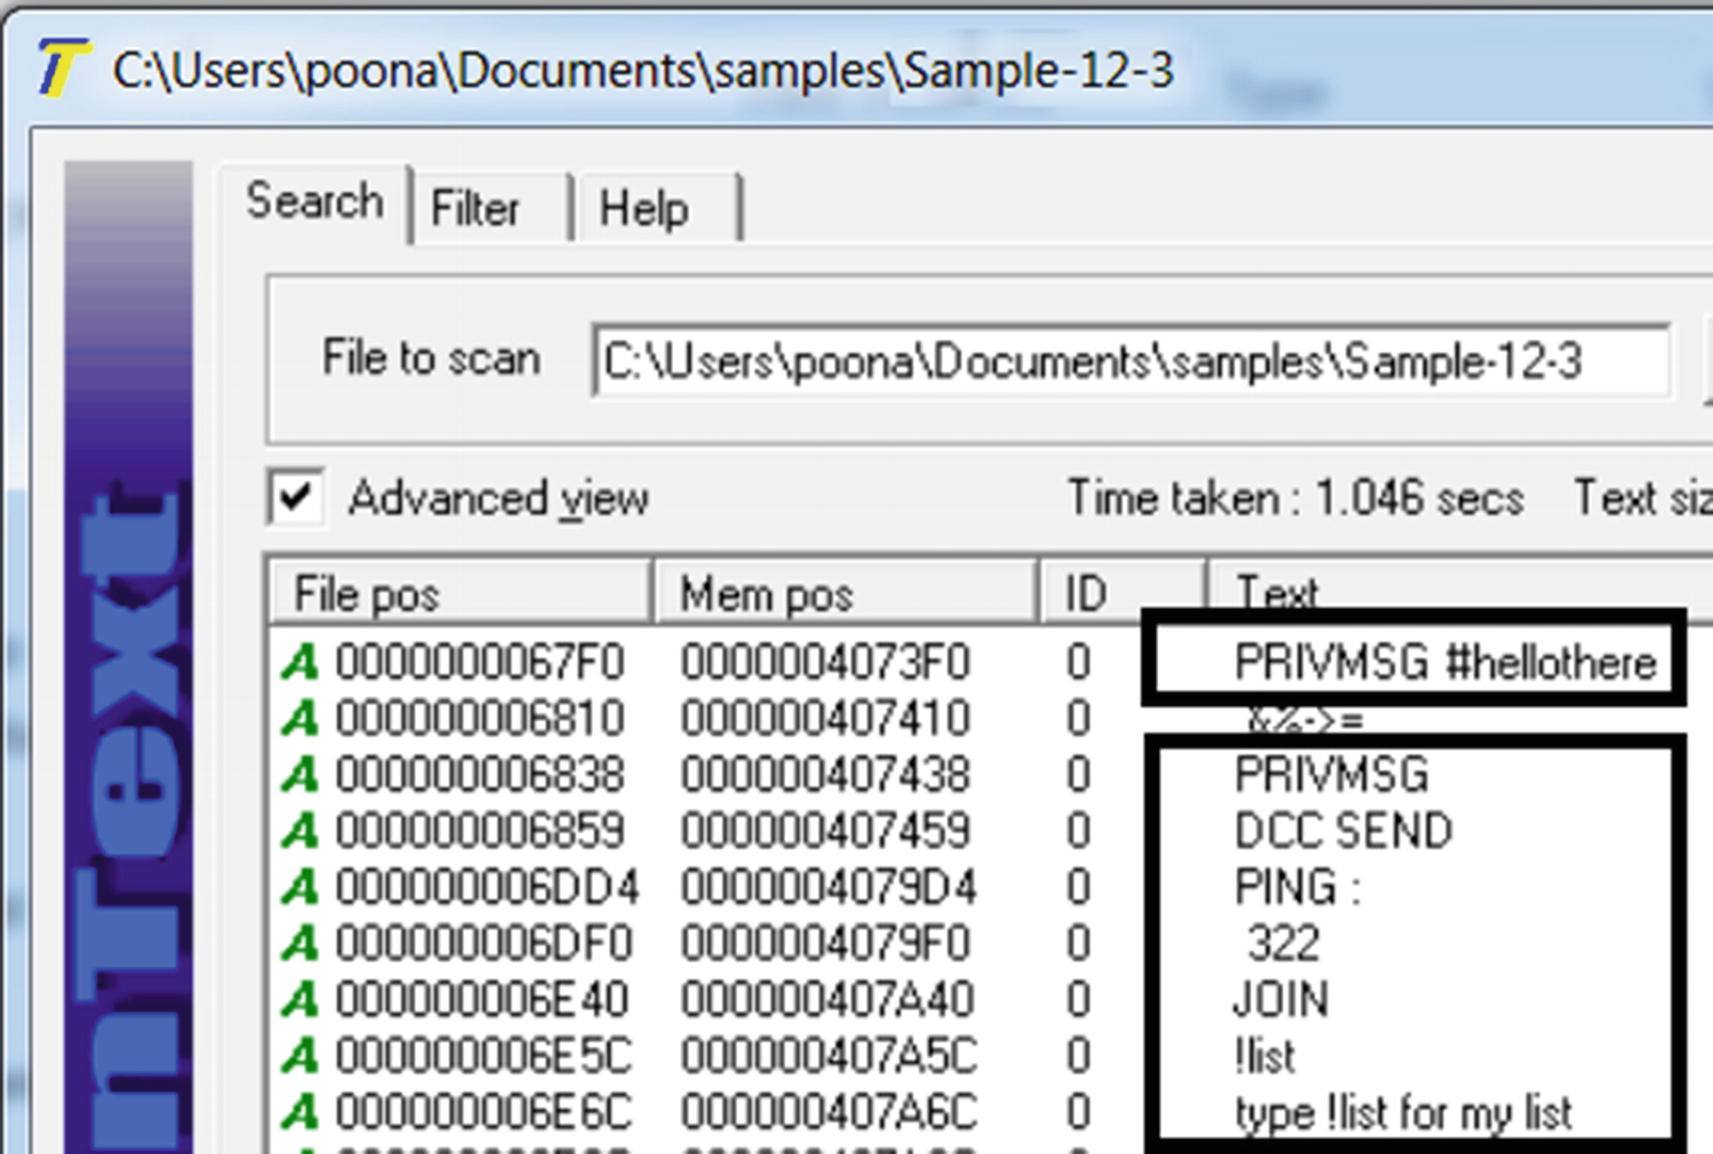
BinText tool displaying suspicious IRC network C&C strings for Sample-12-3
Figure 12-15 shows strings that are related to the IRC protocol, which are used by malware for command-and-control network communication .
But how did we figure out these strings were malicious. We cover that in detail in the next section, but in general, look for something weird, something specific that you usually don’t find in clean software but only in malware. For example, the string C:marijuana.txt is a weird string, which you will never find in almost any clean software. Similarly, the IRC strings from Figure 12-15, indicates the IRC protocol, which is also used by malware. It immediately raises alarms and forces you to dissect the sample more.
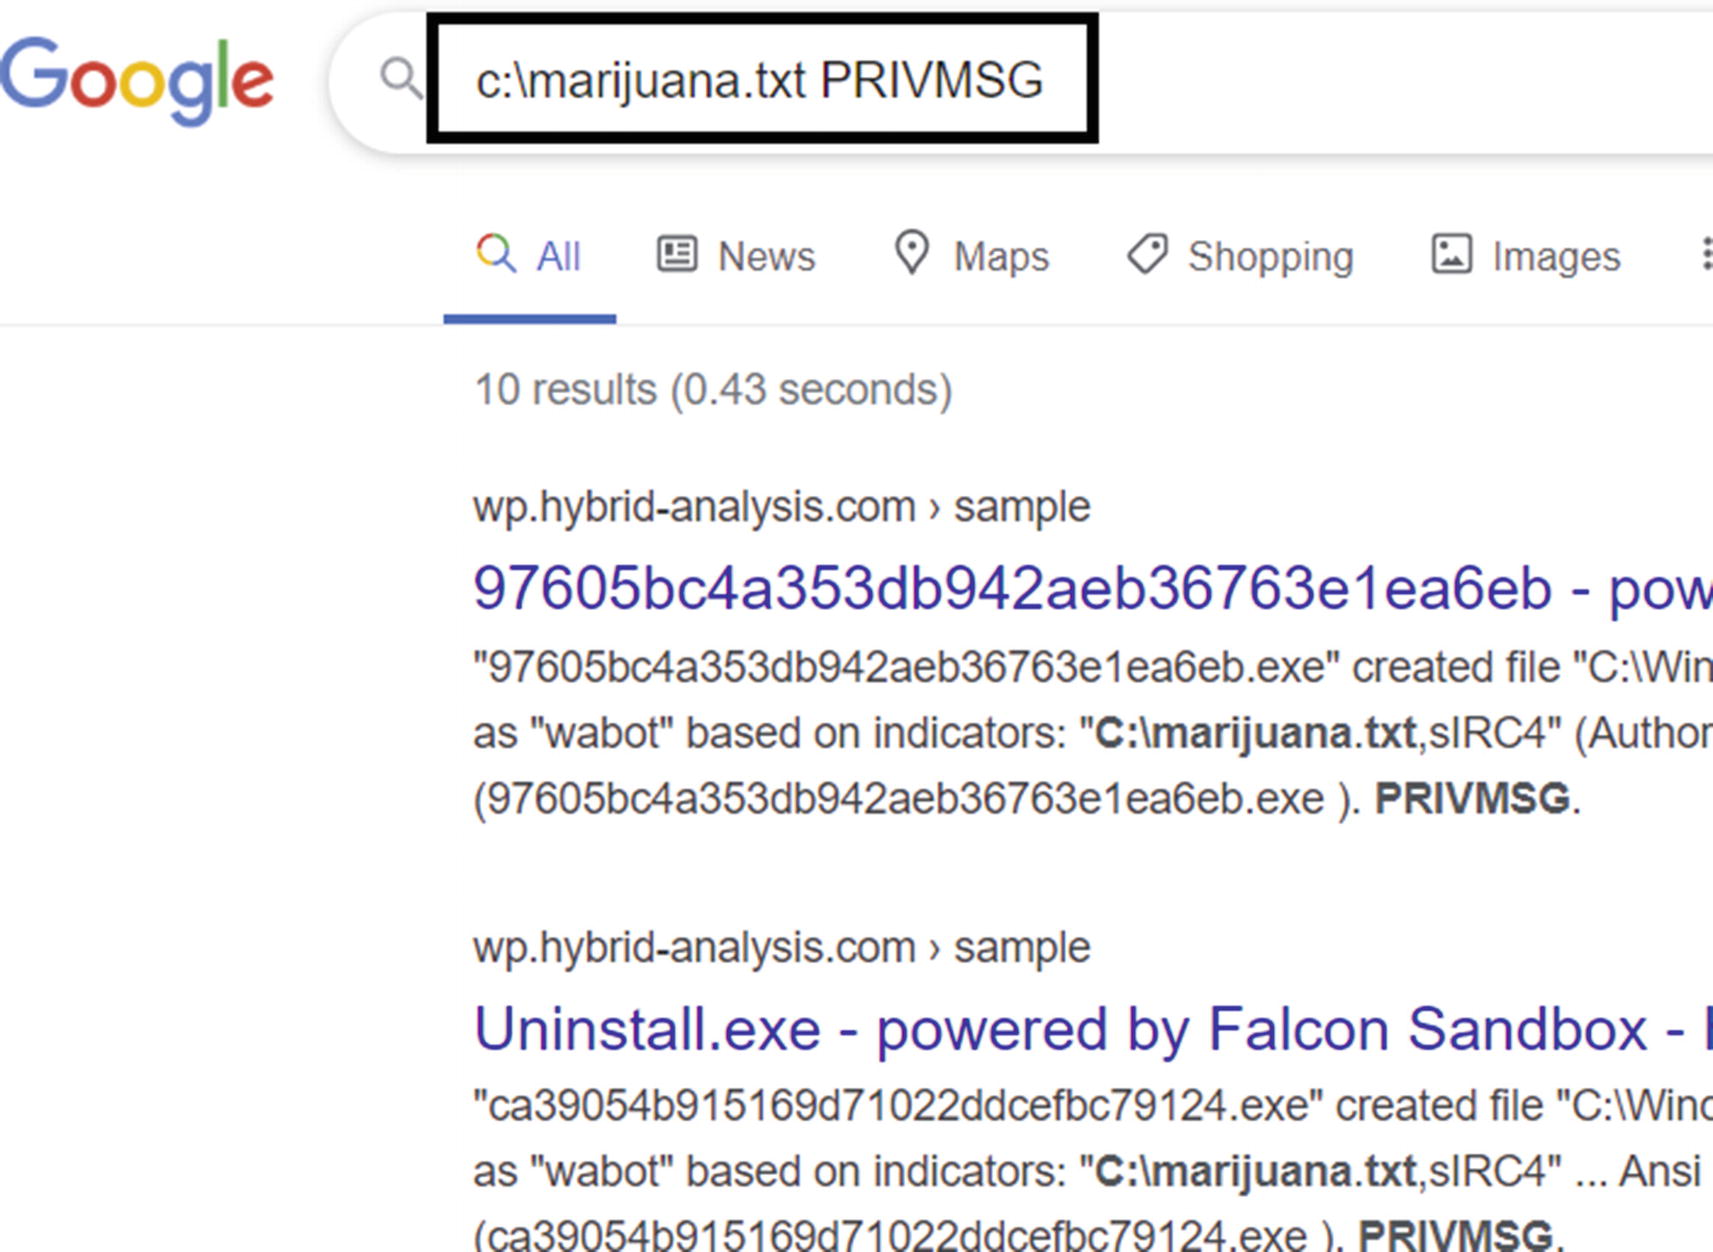
The suspicious strings from Sample-12-3 indicate the sample is malicious as searched and returned by Google search engine on the web
Strings That Indicate Maliciousness
When encountering suspicious strings (including the ones in the following points), verify them against other analyses on the Internet. These malicious strings are often mentioned by other researchers in their analyses and threat-report blogs.
Keep an eye out for weird names, such as the string C:marijuana.txt in Figure 12-14 for Sample 12-3. Another good example of a weird name is found in Sample-13-4 but under dynamic analysis YUIPWDFILE0YUIPKDFILE0YUICRYPTED0YUI1.0. At first glance, it looks like junk, but there is a structure to it with words like FILE0, CRYPTED1.0 as a part of it. You search Google for this string, and it points directly to the malware family Pony Loader or Fareit. We cover this string in Chapter 13.
Watch out for strings that look out of place, and that won’t occur that often among regular clean user software; for example, the IRC network protocol strings in Figure 12-15 for Sample 12-3. IRC protocol isn’t something that is often used by clean software and deserves a level of suspicion and further investigation.
Watch out for a large set of domain names, which probably indicates domains used by the attacker for CnC.
Watch out for names of major anti-malware and security tools. Malware is known to armor themselves by checking for the presence of security tools. This includes the antivirus vendor names, ProcMon, Process Hacker, Process Explorer, Wireshark, OllyDbg, and so on.
Watch out for IP addresses, since they might be from an attacker’s CnC server or another intermediate relay server to communicate with the attacker server.
Watch out for a huge set of file extensions, which are an indication that we are dealing with ransomware since it goes through all files on the system and encrypts files that match certain file extensions. We explore this in more detail in Chapter 15, which discusses classifying and identifying ransomware.
We continue with strings and string-based analysis in Chapter 13 and Chapter 15, where we talk about using these same artifacts for not just identifying malware but also classify them.
YARA
YARA is a tool described as a Swiss Army knife for malware researchers. It is a rule-matching engine against files and, in general, any kind of buffer. Using YARA, you can create rules using human-readable strings and even binary patterns and combine these patterns using boolean expressions to match on files and buffers.
Sample YARA Rule That Matches All Files and Buffers with the Pattern marijuana.txt

Our YARA rule from Listing 12-1 matches Sample-12-3 as expected.
A Complex YARA Rules with Multiple Patterns and Boolean Expressions
YARA is useful to malware analysts. You can quickly create custom rules on the fly and match it against malware samples to see if it matches against certain strings that usually trend among malware.
A more useful application of YARA is that you can build a custom YARA database over time and add more rules to it using new strings you find in new malware and malware families that you come across in your everyday analysis job. So next time you are given a sample to analyze, you can first run your YARA rule database against this sample and see if any existing rules in your database match against it, thereby speeding up your job.
Many analysts make their personal YARA-rule databases free on GitHub and anti-malware communities. But do watch out before you download and use others’ YARA database. A badly written one can have a false negative, but a false positive is worse.
Covering all the rule language features of YARA is out of this book’s scope. But we strongly recommend that you go through its features and write more exercise rules to help build your YARA rule-writing skills.
Where Does YARA Fail?
While YARA is a great tool for malware analysts, most analysts misuse it. You learned in Chapter 7 that most malware is packed, which means the strings and data from the original malware before packing is now obfuscated and look like junk strings just like in the packed malware file in Figure 7-11
A lot of analysts tend to pick up these junk obfuscated strings from the packed malware and write a YARA rule with them. This is not very useful and often can backfire badly when these YARA rules with these obfuscated strings might match on other clean software (which might also be packed).
The real use of these YARA rules is when you can write rules with patterns that are present in an unpacked file. But where do you find unpacked malware if most of them are packed? This is where dynamic analysis comes into play, where you can automatically unpack the malware in memory as the malware executes. You can now run your YARA rules on the running process’s memory. Yes, you heard it right. You can run the YARA tool against a running process. We cover this in more detail in the next chapter.
Static Fail: Feeder for Dynamic Analysis
Static analysis is a useful first step in, but a lot of times, you may not be able to conclude anything from it. This is when you need to head to the next phase of the analysis process—dynamic analysis, where you execute the sample and observe its behavior under the lens of various tools.
But before we head to dynamic analysis, static analysis covers one very important bit that is needed for dynamic analysis. It helps us understand the environment, the OS, the tools that we need to install to dynamically analyze the sample. Refer to the “Figuring Out the File Format” section in this chapter, where we explained that you might need to install certain .NET Frameworks to analyze a sample.
Similarly, the malware sample might be a Java application that you can figure out using the File Format identification tool trid.exe, and to run and analyze Java applications, you need the Java Runtime Engine (JRE) to be installed in your analysis VM. All this information on what to install and set up for dynamic analysis can largely be obtained from the static analysis phase. So, it’s very important to glean as much information about the sample statically before you head into dynamically analyzing the sample.
Summary
In this chapter, you learned about statically analyzing samples, which is the first step in the analysis process. The static analysis phase acts as a feeder and a setup guide for the dynamic analysis phase. In this chapter, we rehash a lot of the static analysis tools and techniques you learned in Part 3. We covered various static analysis techniques and tools that not just help us identify malware samples, but also help us identify a clean sample and avoid wasting time further analyzing it. With this chapter, we also set ourselves up to jump into the next phase of the analysis process, dynamic analysis, which we cover in the next chapter.