
An attacker avoids delivering a raw version of the malware to the victim. One of the good reasons is that anti-malware products can easily detect it as malicious by using static signatures. Another factor is the raw piece of malware can be larger and might take a longer time to download on a victim’s machine, making size reduction important.
To protect against that, before delivering the malware, the attacker encrypts and packs/compresses the malware. Wait, is packing and encryption only used by malware? The answer is no. Clean software can employ it as well. Just like malware, clean software also needs to encrypt and obfuscate its inner workings, to prevent cracking and from leaking its valuable IP to its competitors. They also want to reduce their size by compression, so that a user can quickly download it.
In this chapter, we talk about packers, cryptors, and installers used by malware and how they work. We also cover how a packed file looks compared to an unpacked file, both static and dynamically. We also run through hands-on exercises that show how to superficially observe the unpacking process and observe the unpacked inner contents of a packed sample using various tools like Process Hacker and Process Explorer.
Encryption and Compression
Encryption is a way to lock the data with a key in such a way that it cannot be accessed without the key. The motive behind encryption is to hide the data from a person who doesn’t have the permission to read or understand the data. Obfuscation is a direct side-effect of encryption, where the actual data is now obfuscated and looks like some sort of garbage data to the naked eye.
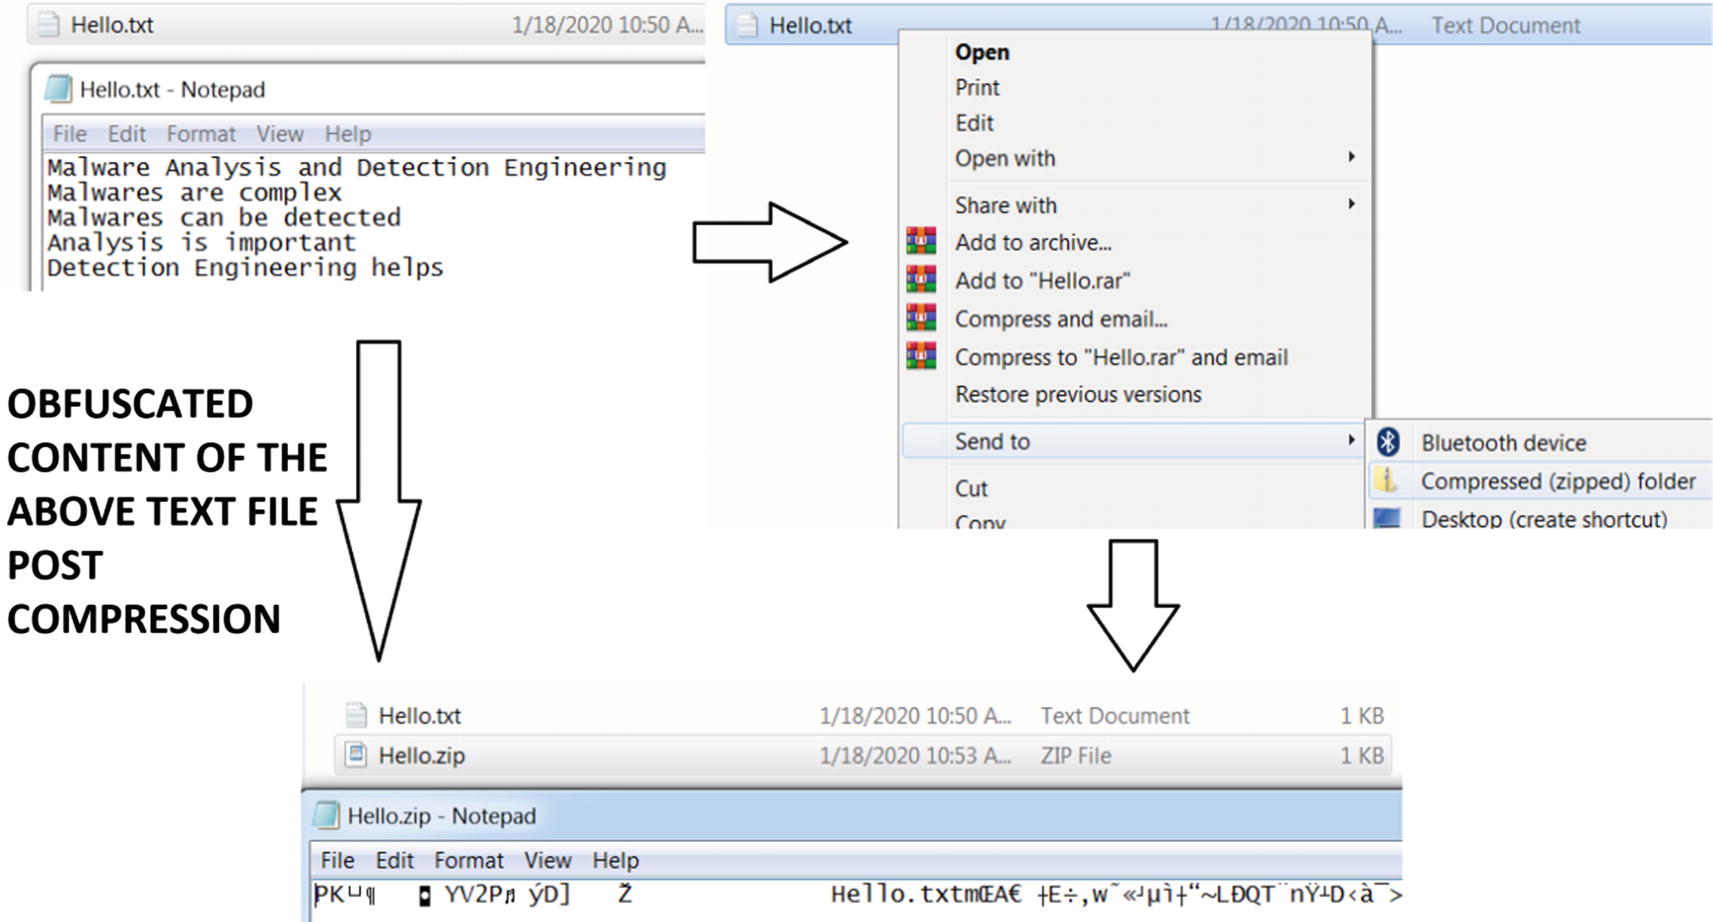
Obfuscation a side-effect of compression after zipping a text file
Years of effort have been put to develop unbreakable cryptographic algorithms to protect data. Encryption and compression algorithms were never created to be used by the bad guys, but unfortunately, it is used by malware. Malware uses encryption algorithms to hide parts of or all their code and data. We avoid covering cryptography in the book, but we urge you to have a basic understanding of cryptography. AES, Xtea, RC4, Base64 are some of the commonly seen encryption and encoding algorithms used by malware.
Similarly, malware also uses compression algorithms to compress certain sections of its code and data. LZMA, LZSS, and APLib are some of the compression algorithms used by malware.
Malware can use encryption and compression algorithms to encrypt and compress some chunks of both its code and data, which it decrypts and decompresses while it is run as a process. These have now become a hurdle while analyzing and detecting malware. To overcome them, malware researchers must develop algorithms that need to decrypt and decompress them, to obtain the real code of the malware.
Alternatively, and parallelly to encrypting just parts of code and data only, most malware authors might not bear the burden of using these encryption and compression algorithms themselves internally inside their payload code. Instead, they delegate their work to another software called a packer, which takes the whole original malware payload file developed by the malware attacker and generates a new malware file but which is now compressed and obfuscated. In the next section, we talk about this software called packer and investigate how it works.
Packers
A packer is software that can compress executables. Compressing an executable not only reduces the size but also changes the outer appearance of the executable, obfuscating the contents of the executable, hiding its real code and data. Hence using a packer on malware gives it a dual advantage of reducing the size as well as obfuscating its real code, data, and intent.
How Packers Work

High-level visualization of a packer and the packing process

Unpacker stub code to unpack the compressed code and data sections
Now the unpacking stub is like a shell created around the original code, which is in a compressed state. While the unpacking code runs, it not only unpacks the compressed code and data into its original uncompressed form in virtual memory but also hands over instruction execution control to now unpacked code.
We mentioned that compression done by packers alters the external look of malware. In other words, a packer obfuscates malware. Malware can also use other software that can obfuscate its code and data, and provide protection from antivirus and other anti-malware products. Cryptors and protectors are one among such software, which we cover in the next section.
Cryptors and Protectors
Cryptors are specifically used by malware rather than clean software. Cryptors may compress or encrypt code like packers. Cryptors are meant to give a deceptive appearance of a malware file by changing the external characteristics of the malware to make it look like legitimate software. They may change the icons, thumbnails, and version information to make it look like legitimate software created by a genuine organization. For example, you encounter a lot of malware that has Adobe PDF Reader or Internet Explorer application icons.
Protectors can also obfuscate the malware by replacing the code inside it with the code that does equivalent stuff, but that now looks more convoluted to analyze and understand. For example, take two expressions (A + B) and (A * C / C + B). You have two expressions that do the same thing, but the second expression is hard to read and analyze compared to the first. This is also called code polymorphism .
Packers, cryptors, encryptors, and protectors have a very thin line between them in the malicious world, and sometimes their names are used interchangeably. Most malware has a combo package of the preceding options, also combining it with various other techniques that can evade anti-malware solutions and deter analysts. These days most packers, cryptors, and protectors have incorporated new features where they include anti-debug, anti-VM, anti-analysis, and other armoring code as part of the outer packed loader stub code.
Installers
Installers are another means to package software but again used by malware. Installers, apart from packing, also provide installation options to the malware. An attacker can compress malware using an installer to generate an installer_malware, and configure the generated installer_malware executable to install the malware in certain directories and then execute it.
Some of the popular installers used by malware are MSI, Inno Setup, and autoIT. One of the key differences between clean software and malware installers is that installers used in legitimate software pop up GUI based user interfaces, but it installs malware silently and executes it.
Let’s Pack
UPX Command to Pack a Sample, Run from the Command Prompt
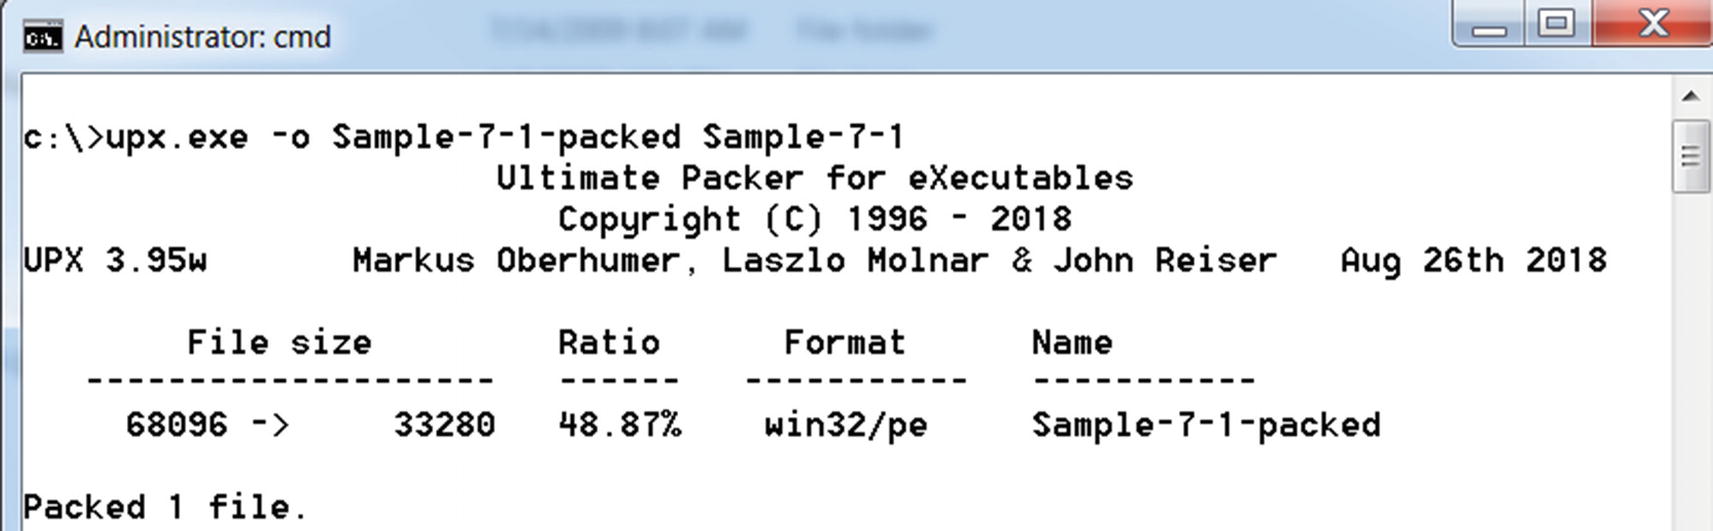
Command Prompt output of the UPX command used to pack Sample-7-1
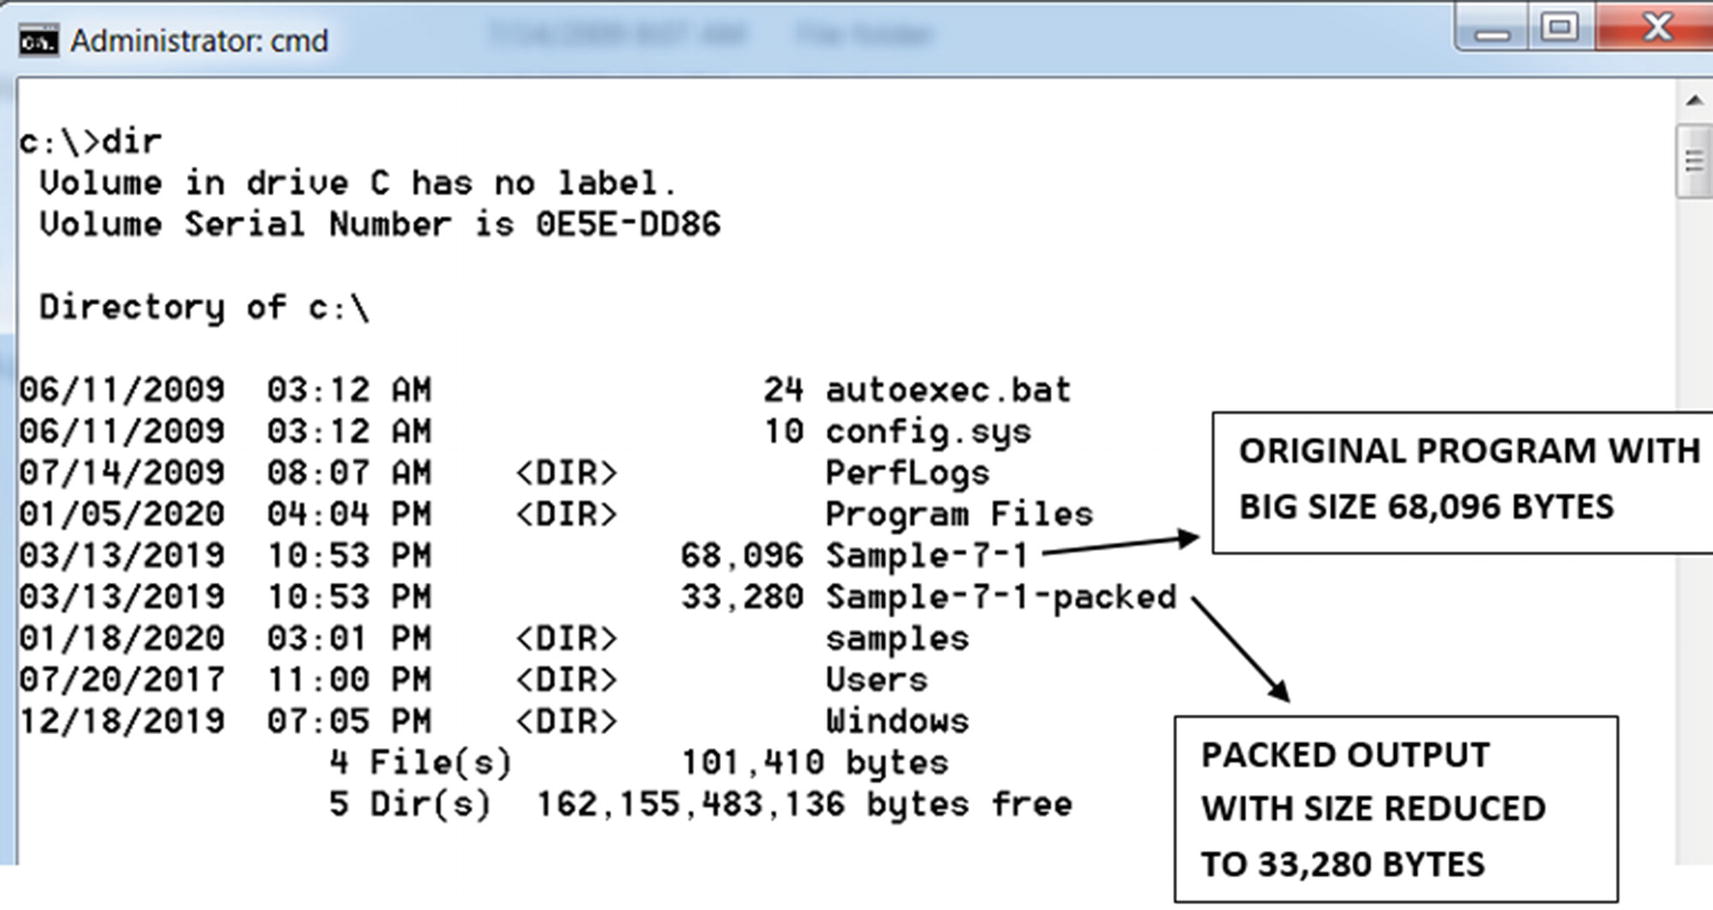
Comparing sizes of the original unpacked sample and the output packed sample
Comparing Packed and Unpacked Samples
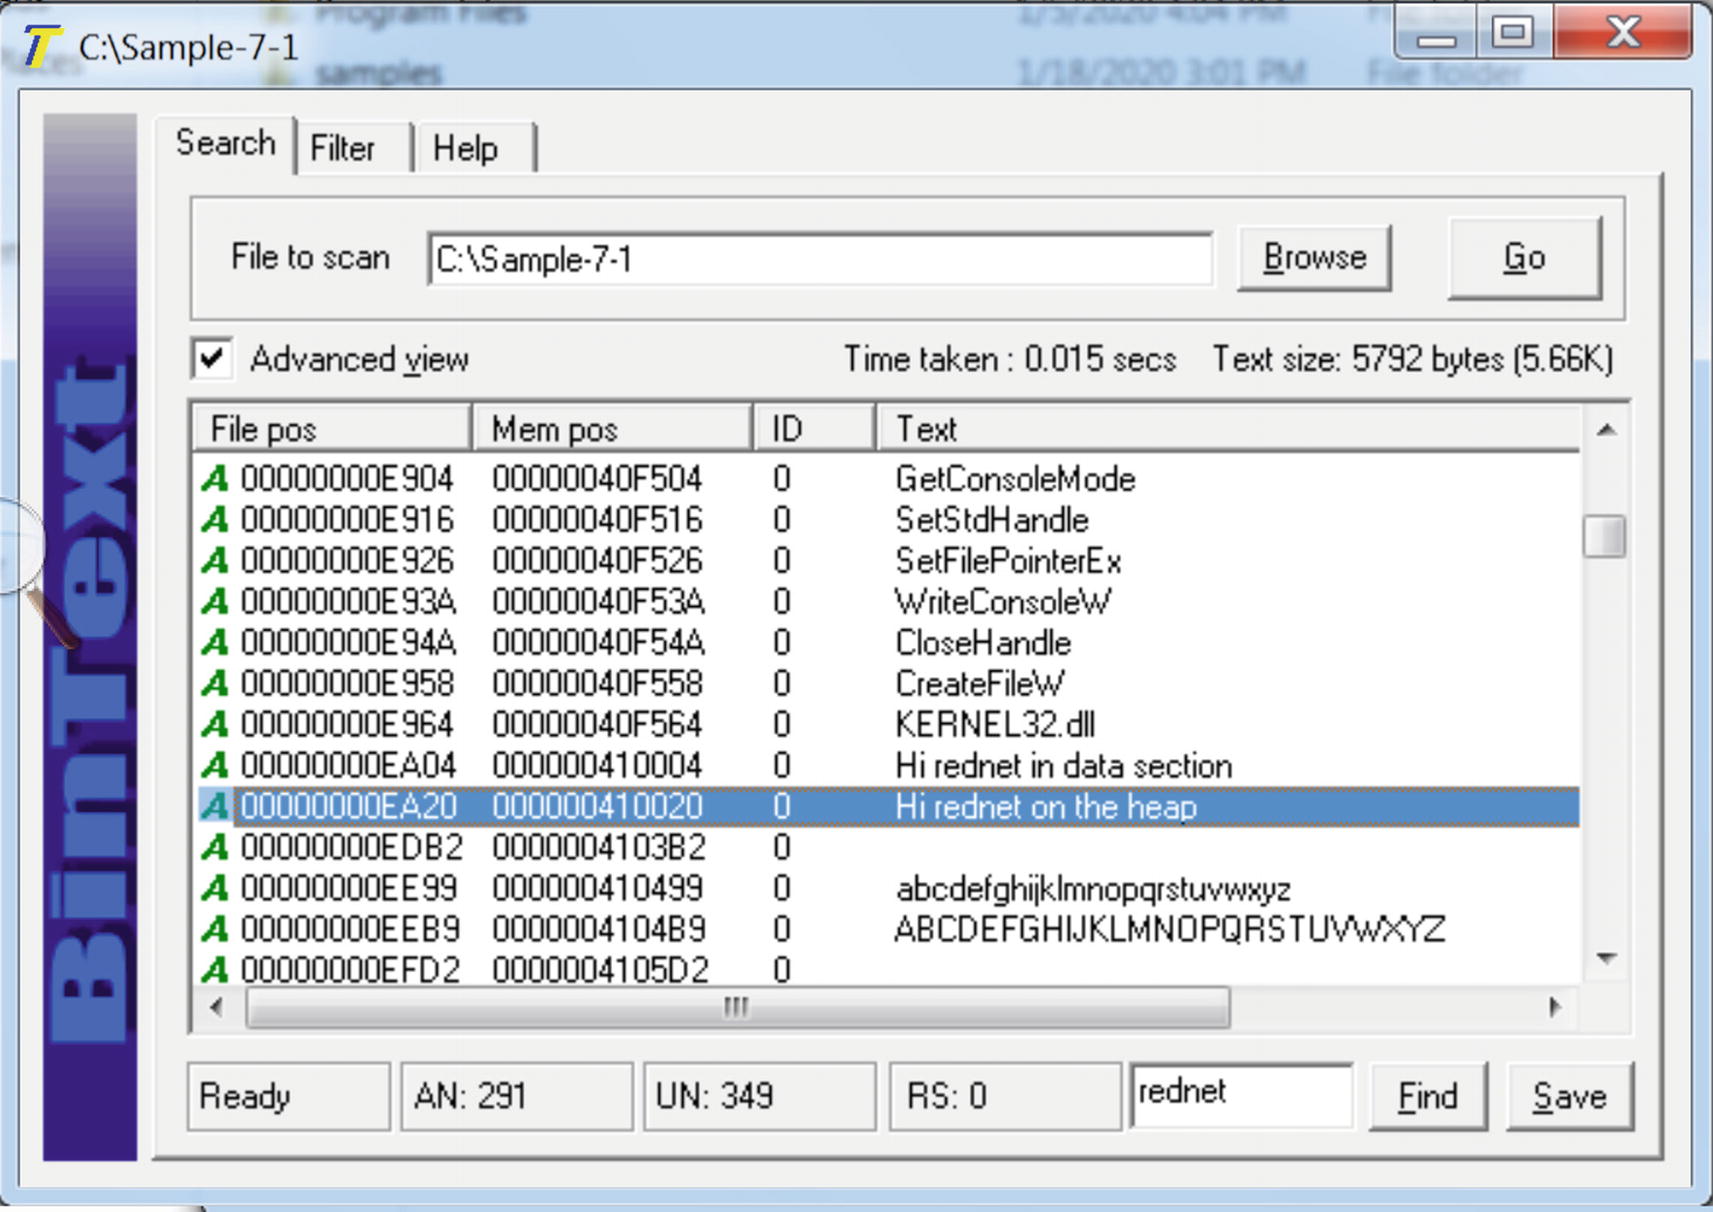
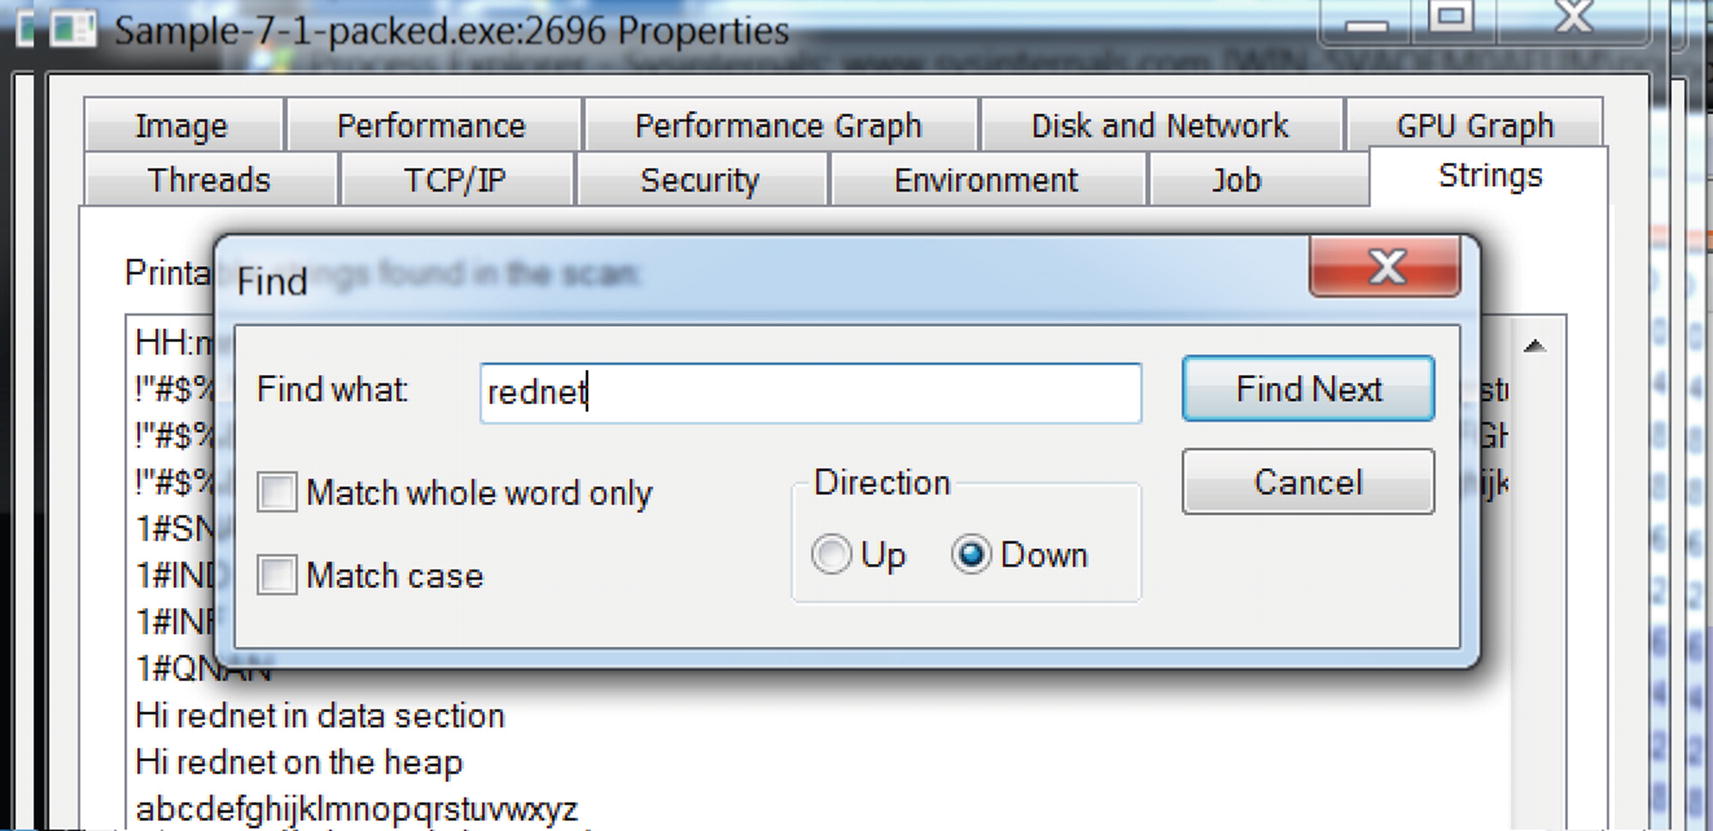
“Hi rednet on the heap” present in the original unpacked file Sample-7-1

“Hi rednet on the heap” NOT PRESENT in the packed file Sample-7-1-packed
Identifying Packed Samples
As analysts, we come across a lot of malware samples. Now not every malware sample is packed. Some malware is shipped by the attacker without packing. In other cases, we are given an unpacked malware by another analyst. Our initial first test is to figure out if a sample is packed or not. Some of the techniques are employed statically, where we can figure out if the sample is packed without executing it. Some other techniques require us to run the malware sample dynamically and observe its properties to conclude if it is packed or not. Let’s now look at some of these techniques.
Entropy
Entropy is the measure of randomness of data or, in our case, the file. Entropy is a common technique to detect encryption and compression since, after compression and encryption, the data looks random or junk-like, leading to higher entropy. On the other hand, an unpacked file has less randomness, thereby having less entropy.

Entropy of 7.8 for the Sample-7-1-packed file indicates that the sample is packed
Strings
Whenever you write a program, you end up using many strings in the source code. In malware, many strings that are used in the source code are C2 server domains and IP addresses of C2 servers; the names of analysis tools and VM-related artifacts that the malware tries to check and armor against; URLs and URL formats used for C2 communication; network protocol–based strings; and so forth. When the source code is finally compiled, the generated executable holds these strings. But packing obfuscates these strings, as you learned earlier. Let’s now see how we can identify a packed from an unpacked sample using these strings.
Static Observation of Strings in a File
You saw the effects packing has on an executable file. Let’s go back to Figure 7-6 and Figure 7-7, which use Sample-7-1 and Sample-7-1-packed in BinText. You can reload both samples in BinText again. As you can see from the strings in BinText, it contains human-readable strings like Hi rednet on the heap, but which is no longer present in the packed file and replaced by some junk looking strings.
While you are analyzing a malware sample, you can start by loading it in BinText or any other such tool that lets you look at its strings. Most if not all the strings in the sample look like some obfuscated junk like we saw in Figure 7-7, with no meaningful words and sentences found, then it is a very good indication that the sample is packed.
Strings to ignore, like API names which are common to both packed and unpacked samples
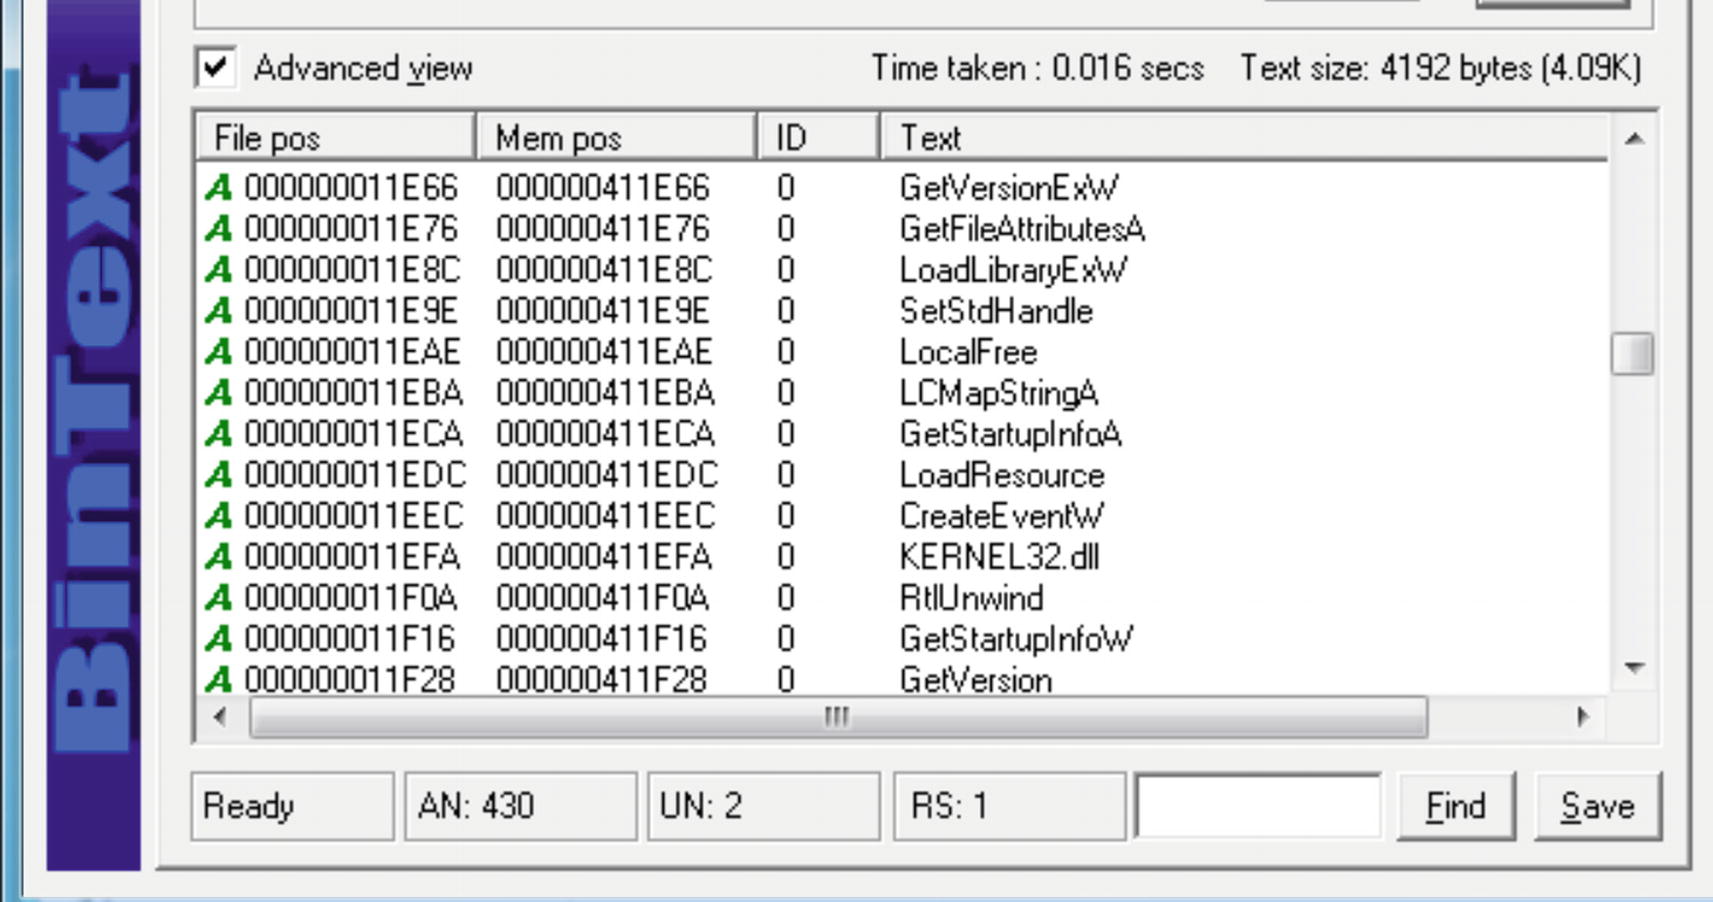
Strings in Sample-7-2 that shows human-readable strings indicating it’s not packed
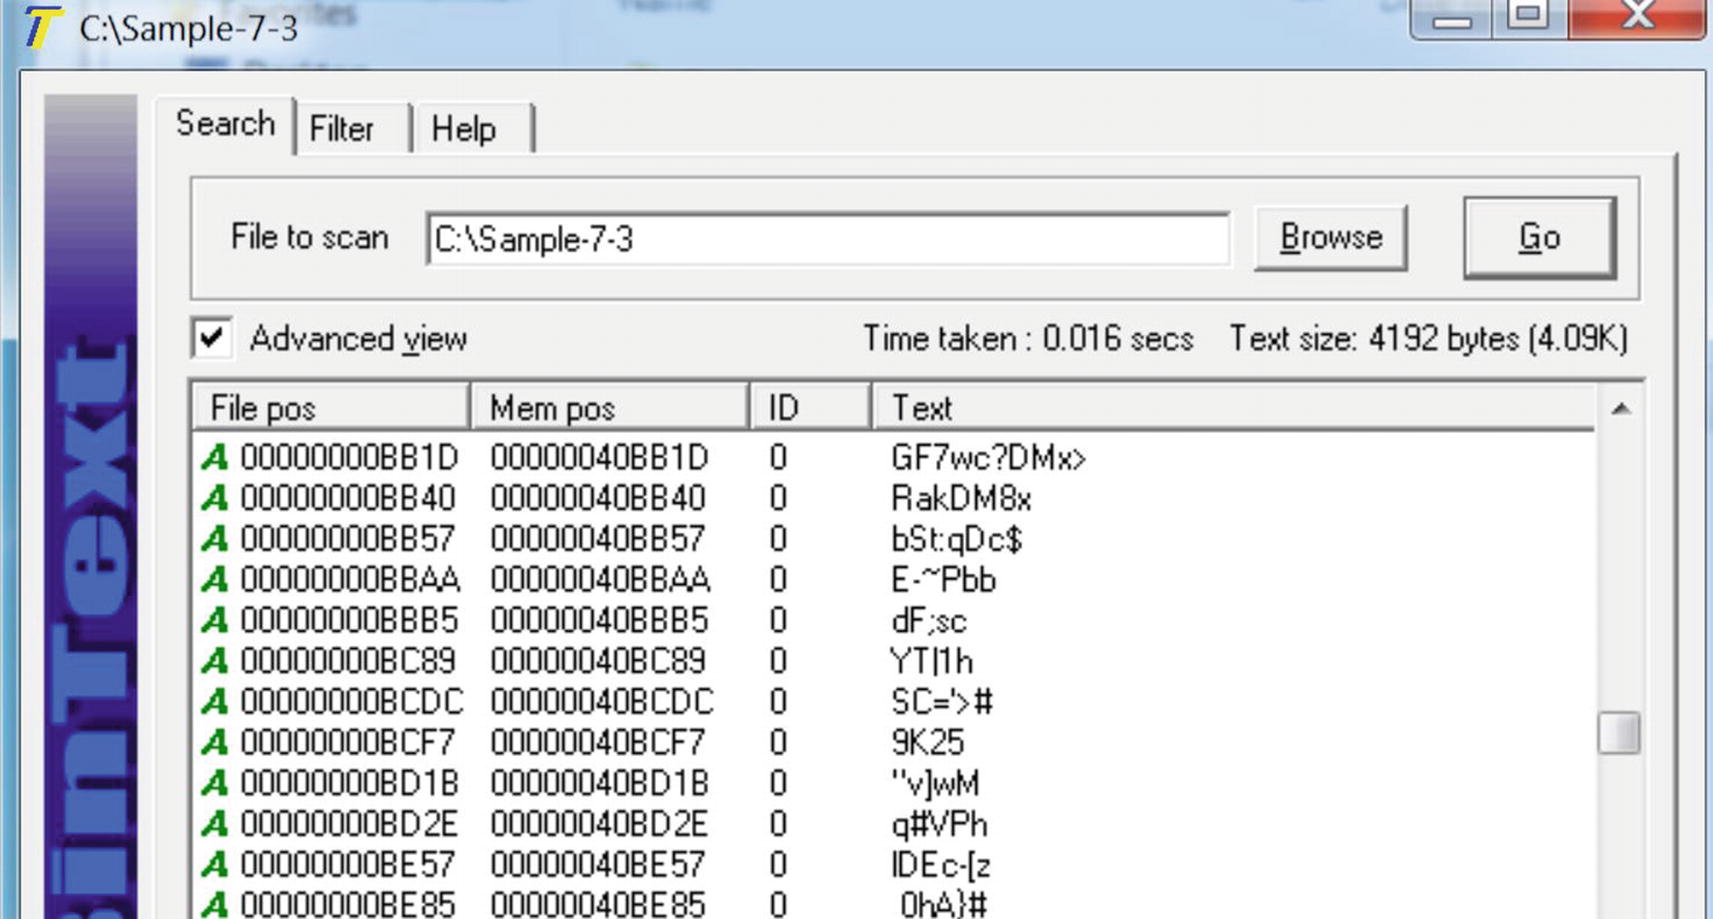
Strings in Sample-7-3 that shows junk strings, indicating it is packed
Dynamic Observation of Strings in Memory
Just like the static method of verifying if a sample is packed or not, we have another method that relies on executing the sample and dynamically verifying the strings of the sample in memory.
You learned in previous sections that when a packed sample runs, the unpacking stub loader code runs in the packed sample process at some point in time, which uncompresses the original executable code and data sections into its memory. The uncompressed data in virtual memory contains all the strings which belong to the original payload sample. If the strings in the virtual memory of the sample running process are more human-readable and not junk and are different from the static strings, we saw in BinText for the sample file on disk, then it indicates that the original sample file on disk is packed.
Some of the areas and pages in memory you should look for strings are memory areas that are allocated dynamically by the malware for decompression. Under Process Hacker, such pages are shown as private pages with the Commit property and do not belong to any modules. Another area is the one occupied by the main module image (see Chapter 4) of the sample executable.
Process Explorer and Process Hacker, in combination with BinText, compare the strings in memory against the strings in the file. In Chapter 4, you saw how Process Hacker could see the strings in memory. You can follow the same steps in Process Explorer too.
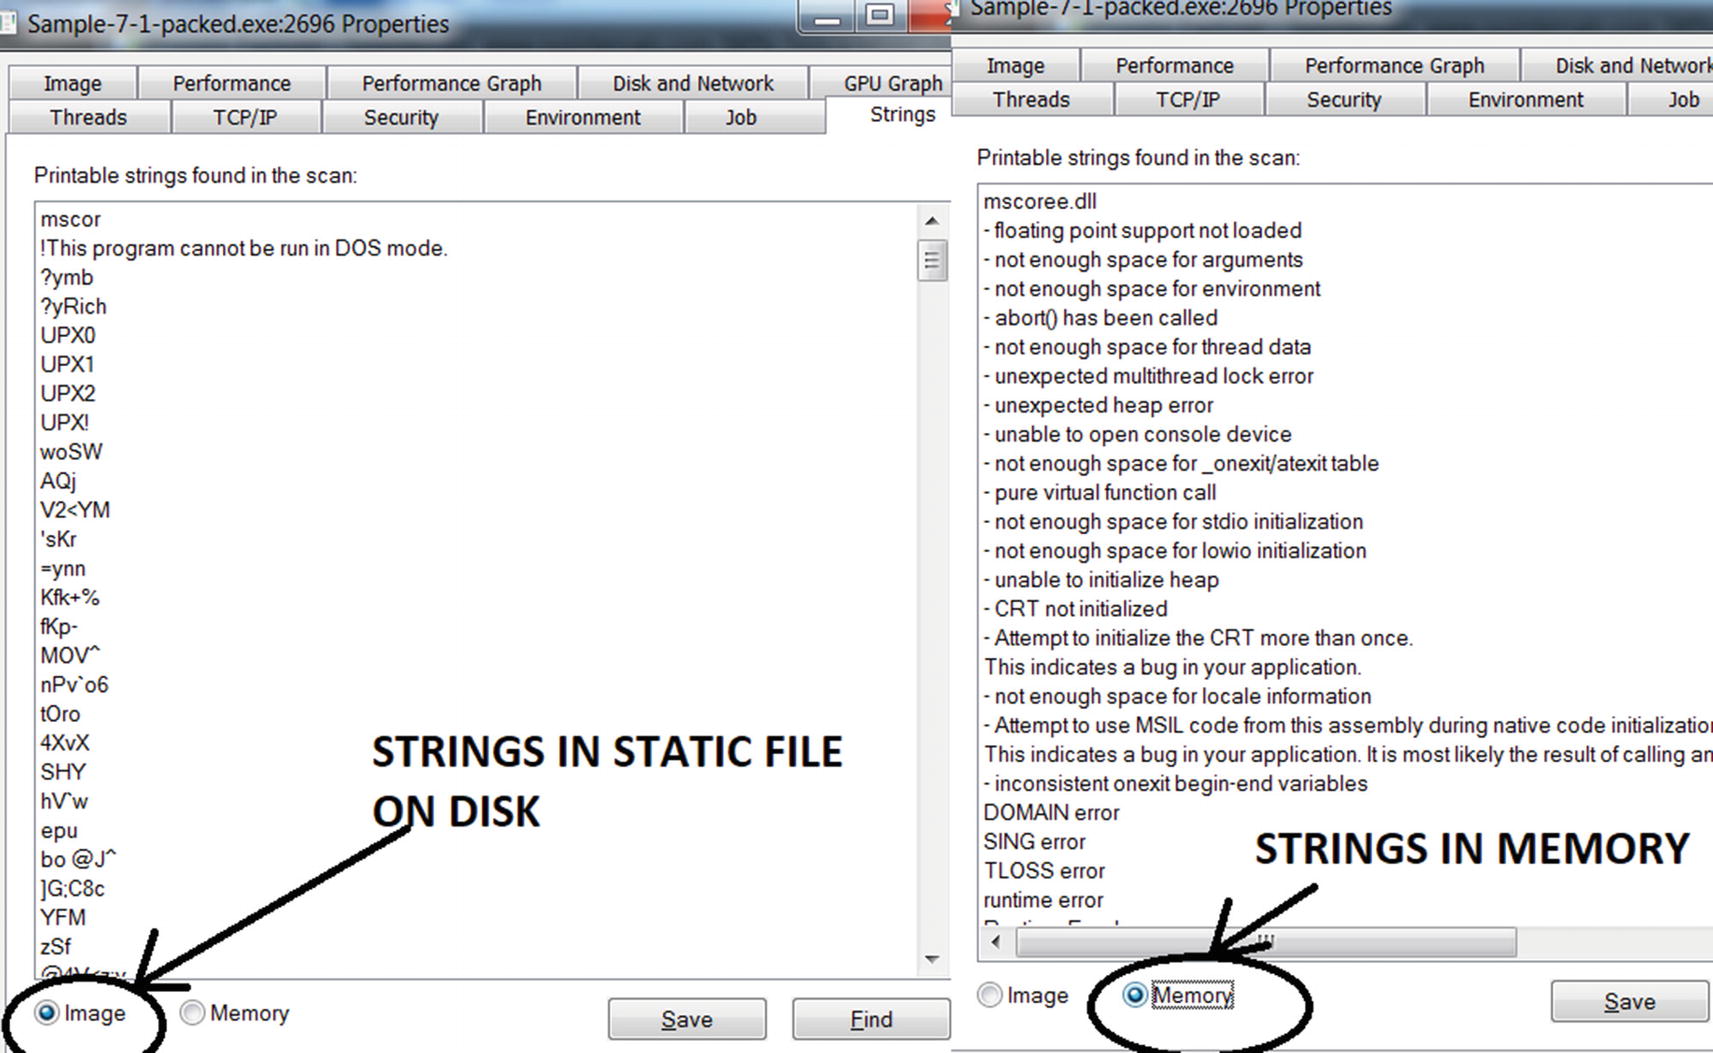
Strings in image vs. string in memory as shown by Process Explorer
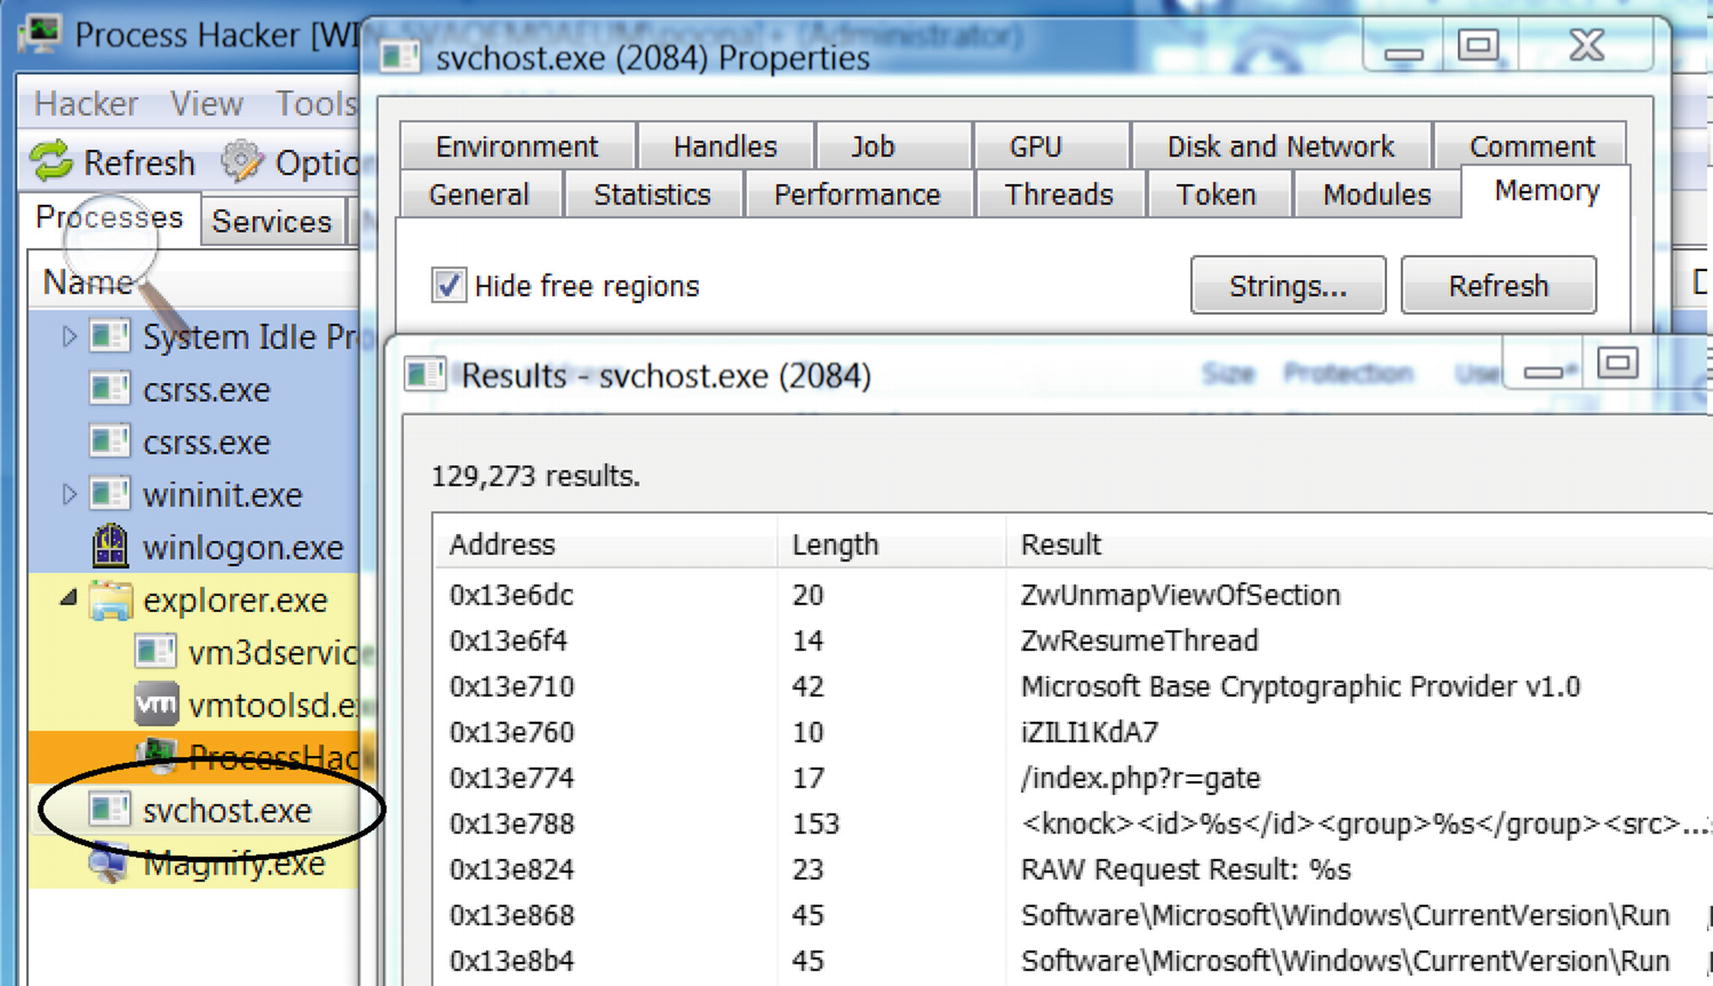
String rednet present in image but not in the memory as seen in Process Explorer
Keep in mind that Process Explorer only shows strings for the main module of the process. This can be a disadvantage for us analysts because malware can decompress itself into private memory outside the main module of the process.
Just as we used Process Explorer, we can do the same using Process Hacker as well. One disadvantage with Process Hacker is that it does not have the option to show the strings in the static file like the Image option in Process Explorer. Hence, you must use BinText to view the strings in the static file on the disk, and then use Process Hacker to view the strings in running process’ memory and compare it manually to the static file strings in BinText.
An advantage Process Hacker offers you is that it lets you view the strings from the entire process’s memory and not just the main module of the process. But a side-effect of this is that it ends up showing a lot of unnecessary strings from other DLL modules, which are also loaded in memory. Hence when you want to look at the strings in memory, we suggest you use Process Explorer first and then next use Process Hacker.

Process Hacker lets you choose the type of memory to show strings from.
Case-Study with Malware
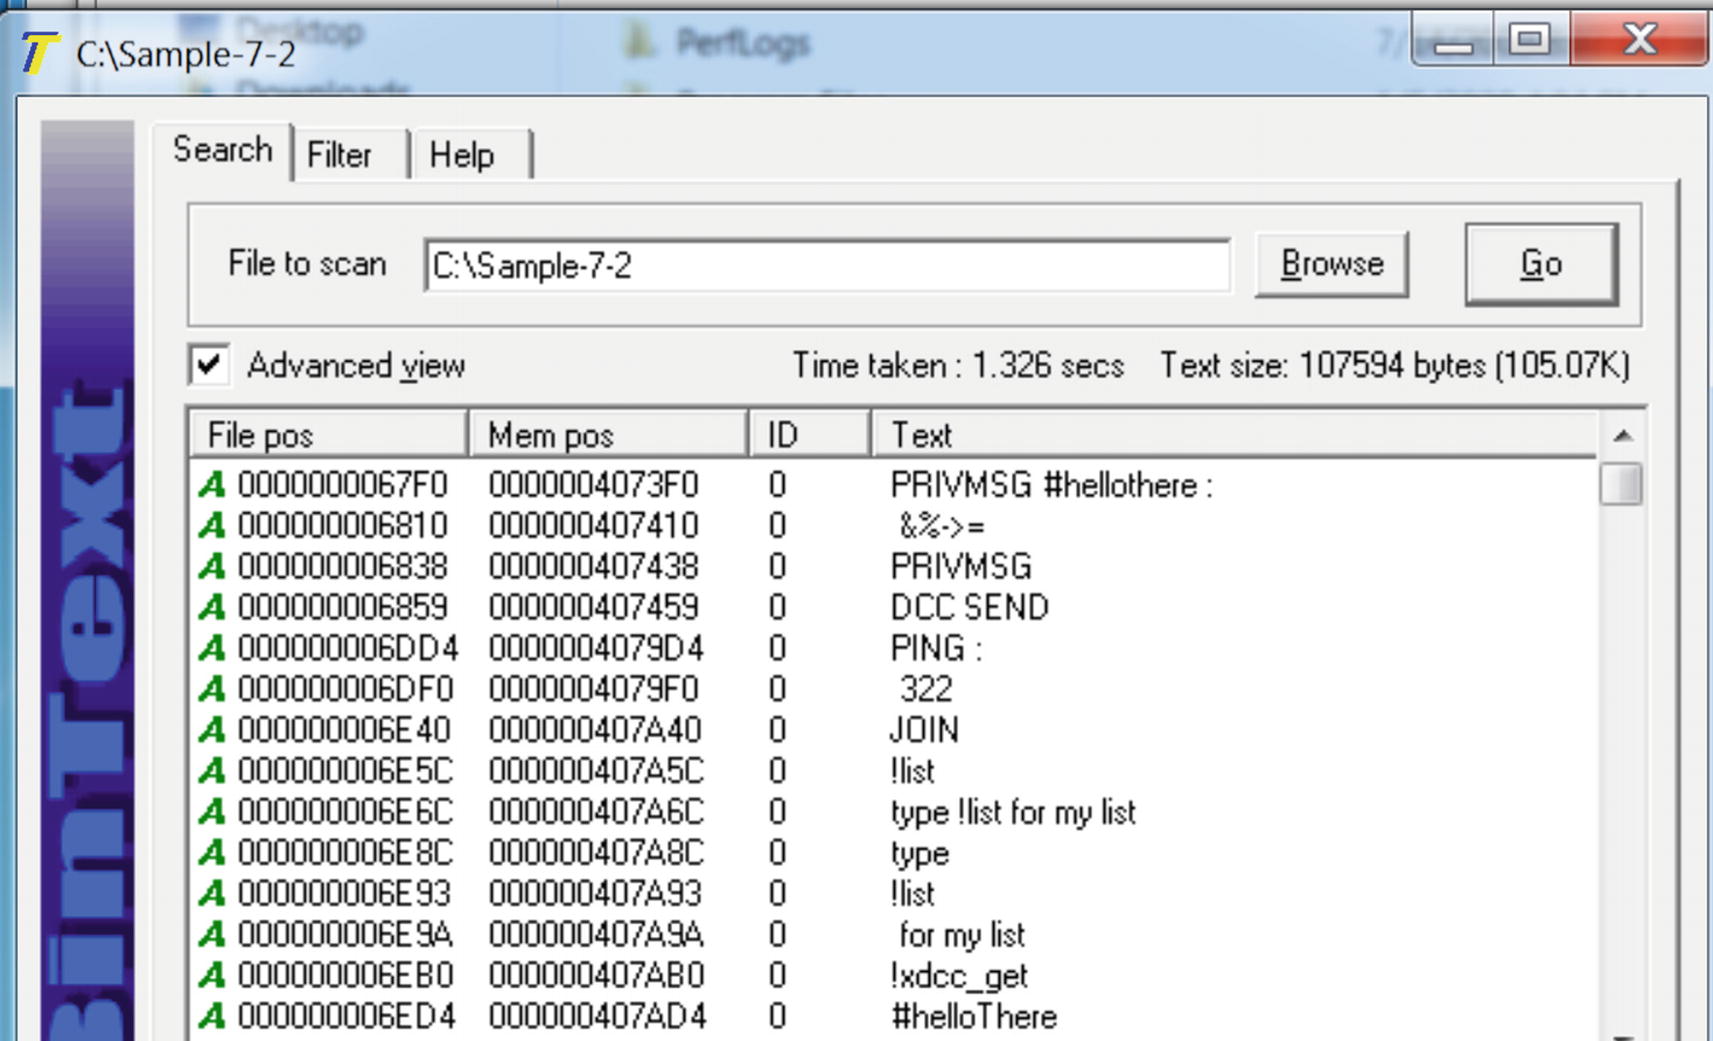
Let’s now look at Sample-7-3. We analyzed this sample for strings statically using BinText in Figure 7-11. From the static strings, we concluded that the sample is packed.
Strings in Sample-7-3 process’s memory using Process Hacker
In later chapters, you learn how these strings in memory can identify the sample as malware and classify the malware type and family as well.
Identifying Packers
In the previous section, you learned how to identify if a sample is packed or not. After verifying that an executable is packed, the next step is to try to identify the packer used to pack the sample. Identifying the packer is not always possible since there are a huge number of packers available, and malware authors use custom-developed packers to pack their malware. But figuring out the packer is very helpful when reverse-engineering a sample. With the packer known, you can blog for tools or techniques about the packer, which might explain how the packer works and how to unpack the sample or better yet help you write an automated unpacker for the sample.
Let’s now go through some tools, and techniques like section names and code at the entry point, that can identify the packer that packs a sample.
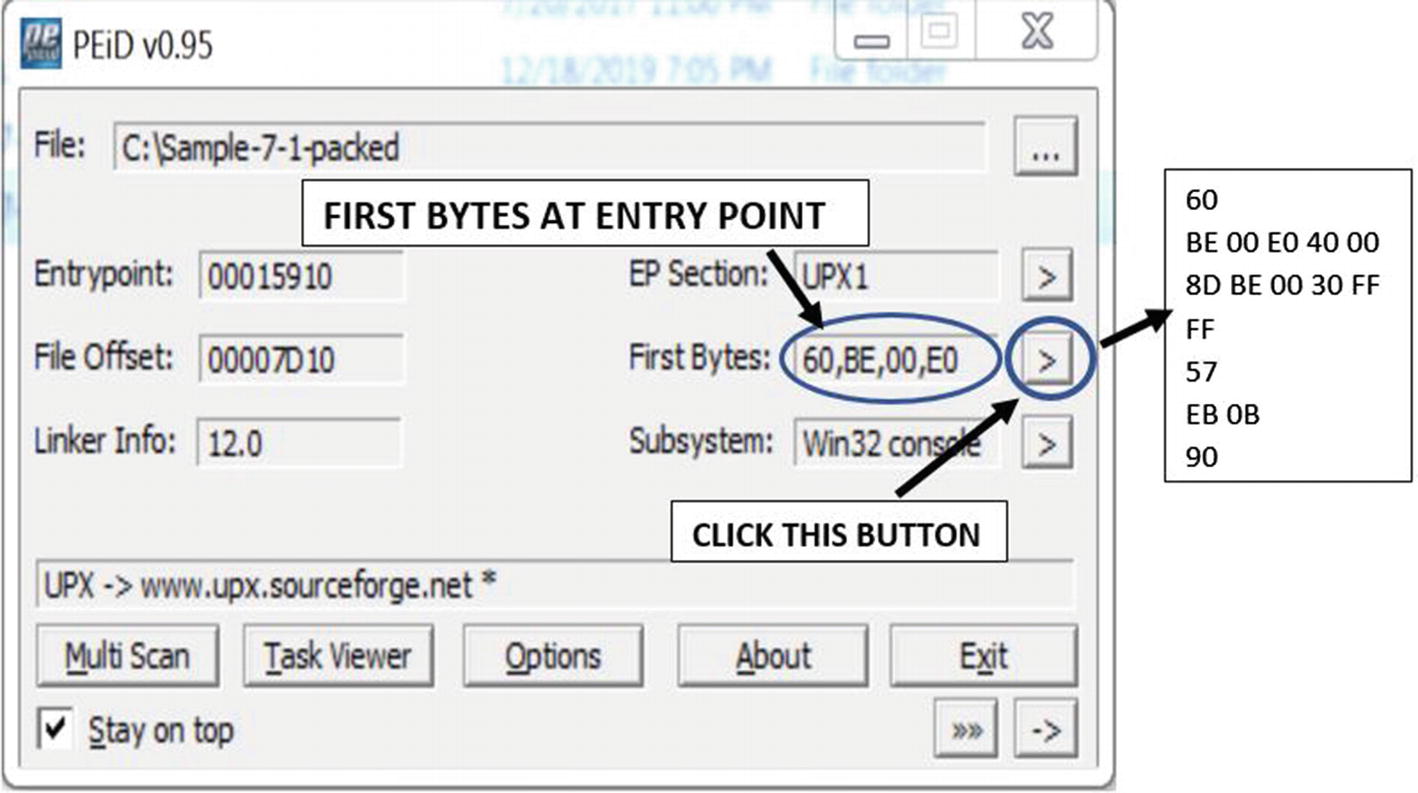
PEiD Tool

PEiD identifying Sample-7-1-packed PE file as having packed by UPX packer
PEiD detects packer based on signature at the first few bytes of the entry point. The signature used by PEiD to identify the packer comes from a signature database located in a file called userdb.txt, located in the same directory as the PEiD executable. If it didn’t show you the packer output while running PEiD for Sample-7-1-packed (see Figure 7-16), then it means that userdb.txt is the default that comes with the installation of the PEiD tool, which might be empty with no signatures present. But you can download it from various sources on the Internet. One such userdb.txt signature database file is available at https://handlers.sans.org/jclausing/userdb.txt, which contains signatures not just for UPX but for various other packers.
We can also edit the userdb.txt signature database to add new signatures as well when we find new packers.
Code at the Entry Point
Packers can be identified by the code around the entry point of the packed PE file it generates, since most packers have a fixed pattern around the entry point. The code at the entry point may vary across versions of the same packer, so we might want to keep an eye out for this.
Code at the entry point of the packed PE file Sample-7-1-packed
Signature Used by PEiD from userdb.txt to Identify UPX Packed Files
Section Names
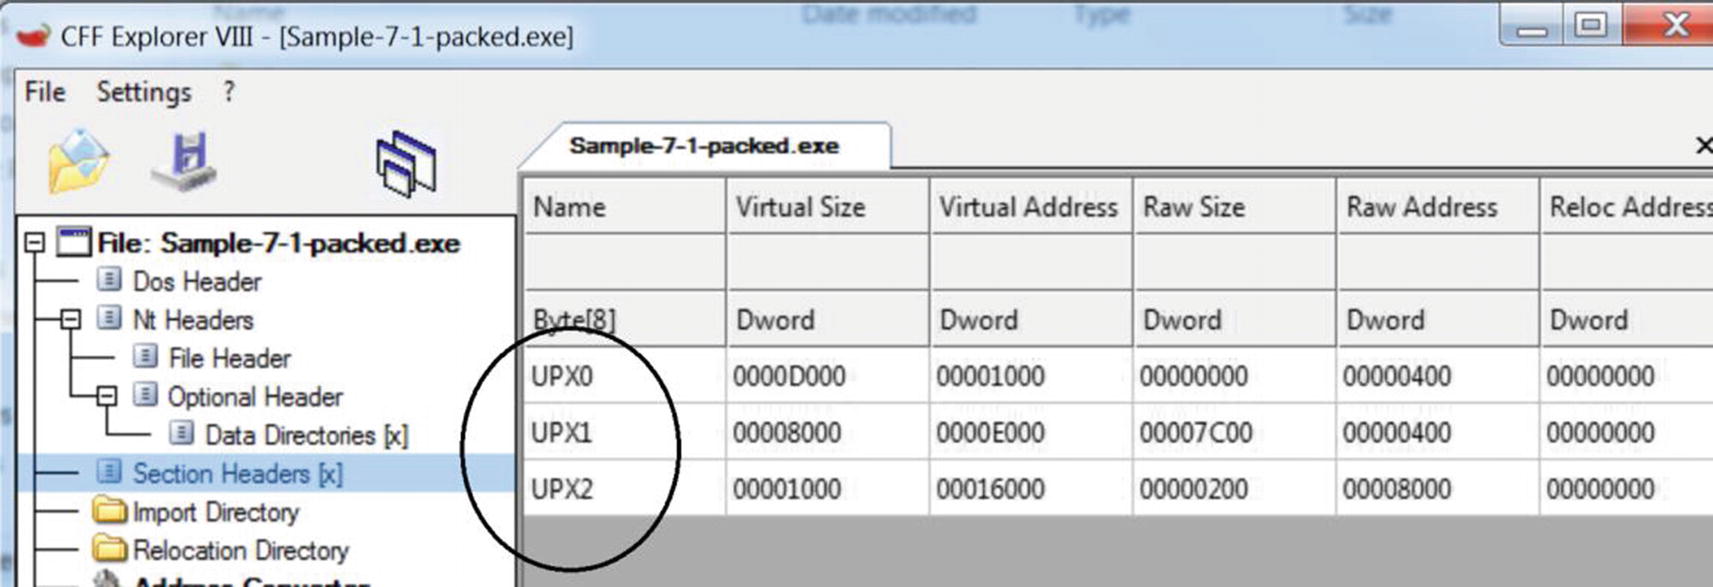
Section names for UPX packed files that start with the string UPX
Popular Packers and Sections Names Used Frequently for Their Packed Files
Packer Name | Section Names |
|---|---|
UPX | .UPX0, .UPX1 |
Aspack | .adata, .aspack |
Mpress | .MPRESS1, .MPRESS2 |
NsPack | .nsp0, .nsp1, .nsp2 |
PECompact2 | pec, pec, pec2 |
RLPack | .RLPack |
Y0da Protector | .yP, .y0da |
Upack | .Upack |
VMProtect | .vmp0, .vmp1, .vmp2 |
Pepack | PEPACK!! |
FSG | FSG! |
Custom Packers
Most malware authors out there use their own custom packers to pack their samples. As a result, when you are doing malware analysis, most of the time, you won’t come across any low-hanging fruit when it comes to identifying a packer. Neither are you going to find any resources on the web on how to specifically unpack packed samples. You might get packers whose section names might not match any of the known packers, and the same for the code at the entry point. Even PEiD or any other tool won’t show up any useful results for identifying the packer used.
But there is a solution for almost everything, including unpacking samples packed with custom packers. Chapter 17 discusses some of the undocumented tricks that you can use to unpack and reverse malware, regardless of the packer it is packed with.
Misconceptions About Packers
One of the most common misconceptions that we have come across is that if a file is packed, it is malware. This is not true. Packing is a technique that is used by both clean software and malware alike for the general requirement of compression and obfuscation. As a side-effect of this misconception, often, analysts end up identifying clean but packed software as malicious. We have also come across detection solutions and signature databases using static YARA rules that have signatures that match on packed files’ bytes, leading to both false negatives and false positives, thereby adversely affecting detection.
Summary
In this chapter, you learned that packing is a technique used by most malware for the sake of compression and obfuscation. You learned how packers work, and you also learned how to identify the packer used to pack a sample using various tools like PEiD, CFF Explorer, and custom signatures. Using hands-on exercises, which also include malware samples, you learned various techniques to identify whether a sample is packed, statically or dynamically, by using tools like BinText, Process Hacker, and Process Explorer.