
When malware executes, it makes several changes to the system, including creating new files, processes, registry keys, services, injecting code, and DLLs into other processes, initiating network connections, and so forth. They are called malware artifacts and indicators of compromise . There are chances that a victim of the malware infection might identify any of these malware artifacts like malicious files while browsing through the system or may observe a suspicious malware process while looking into the Task Manager.
The end-user victim is less likely to observe these malware artifacts unless he is a security professional or a malware analyst with malware analysis tools installed on his machine. But anti-malware products like antiviruses do always pose a threat to malware and can easily detect these complex malware artifacts, thereby detecting the presence of a malware infection.
Malware is not going to like being detected either by an end-user victim or by any anti-malware products; to prevent this, almost all malware prefers stealth so that they and their artifacts can stay hidden. To stay hidden, malware might use simple tricks like hidden files and fake process names . Malware can also use complex techniques like code injection and kernel rootkits to achieve stealth.
While most malware prefers stealth, not all need it—for example, ransomware. In this chapter, we explore various techniques that malware can use to stay hidden and avoid detection both by end users and anti-malware products.
Why Stealth?
Prevents end users from identifying them and their artifacts as malicious.
Prevents end users from detecting their presence and the presence of any of their artifacts
Prevents detection by anti-malware products
Prevents disrupting regular user/victim workflow
Makes malware analysis hard
Reveals little information during debugging
In the next set of sections, we go through various techniques, both simple and complex, that are commonly used by malware for stealth, and the various ways by which we can detect and circumvent these stealth techniques.
Simple Stealth Techniques
Malware uses various techniques to hide its artifacts. Some of these techniques, like rootkits, are complex and can even have a kernel component. There are other techniques as well, which are simple and are more commonly used by most malicious actors. Though they are simple, these techniques are very effective when it comes to deceiving victim end users. In this section, let’s go through some of these simple stealth techniques used by malware.
File Properties and Permissions
All kinds of operating systems, Linux and Windows included, have a provision to hide and protect sensitive files from the user. End users prefer to hide files and folders from being viewed to protect their sensitive personal documents. Similarly, the OS also uses this feature to protect its system files.

Options to hide both protected OS system files and other hidden files

Hidden Folders/Files now visible after toggling the checkboxes in Folder Options
Malware is not far behind when it comes to using the same file-and-folder hiding features provided by the OS. They extensively use these features to drop their files and folders on the system and set the hidden attribute on them so that they are no longer visible.
Use the CreateFile() Win32 API while passing a FILE_ATTRIBUTE_HIDDEN parameter to this API, which creates a file that is hidden from the start.
Use the CreateFile()Win32 API but without passing the FILE_ATTRIBUTE_HIDDEN parameter, which creates a non-hidden file. But the malware next calls the SetFileAttributes() Win32 API against the file but with the FILE_HIDDEN_ATTRIBUTE parameter/attribute set, which hides the file.
To catch hidden malware artifacts, you need to make sure that viewing hidden files and folders is enabled by selecting the Show hidden files, folders and drives option in Folder Options, as seen in Figure 11-1. Next, in combination with ProcMon and APIMiner tools, you can analyze the events and APIs from these malware samples that help us detect these hidden artifacts dropped by malware. Obtaining these hidden artifacts is very important since they might be secondary malware payloads and config, which might reveal the true functionality and intent of the malware infection.
Exercise 1

Command line to run Sample-11-1.exe using the APIMiner tool
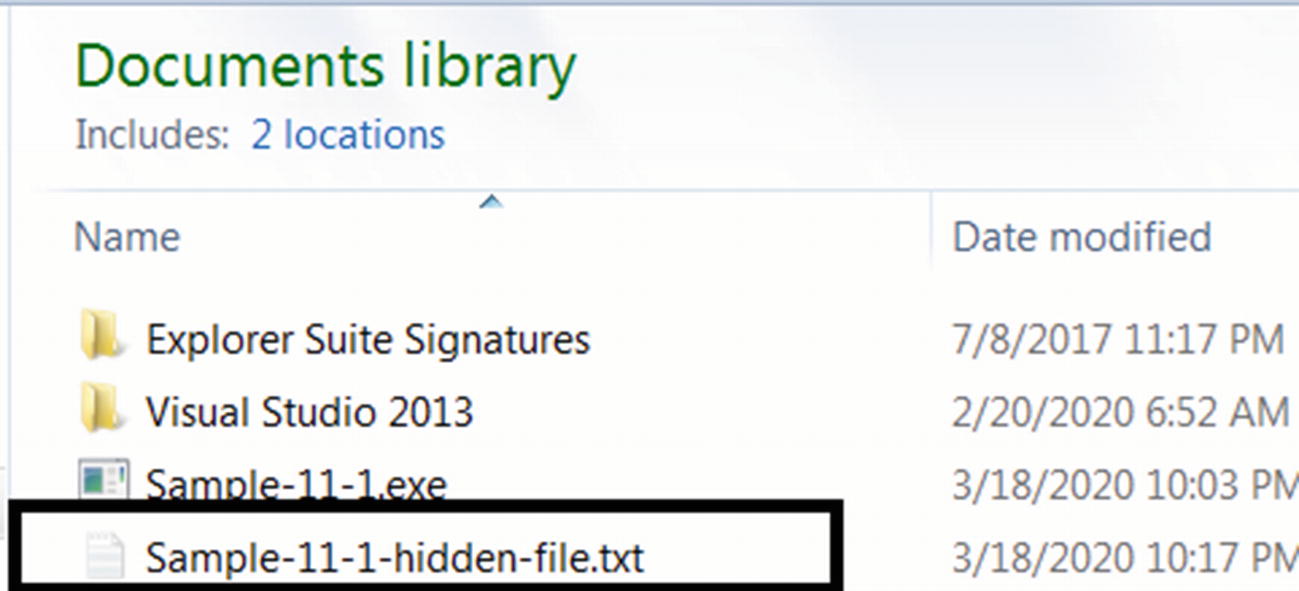
Hidden file created by Sample-11-1.exe
The reason why you can still see this hidden file is because we enabled the Show hidden files, folders and drives option in Folder Options.
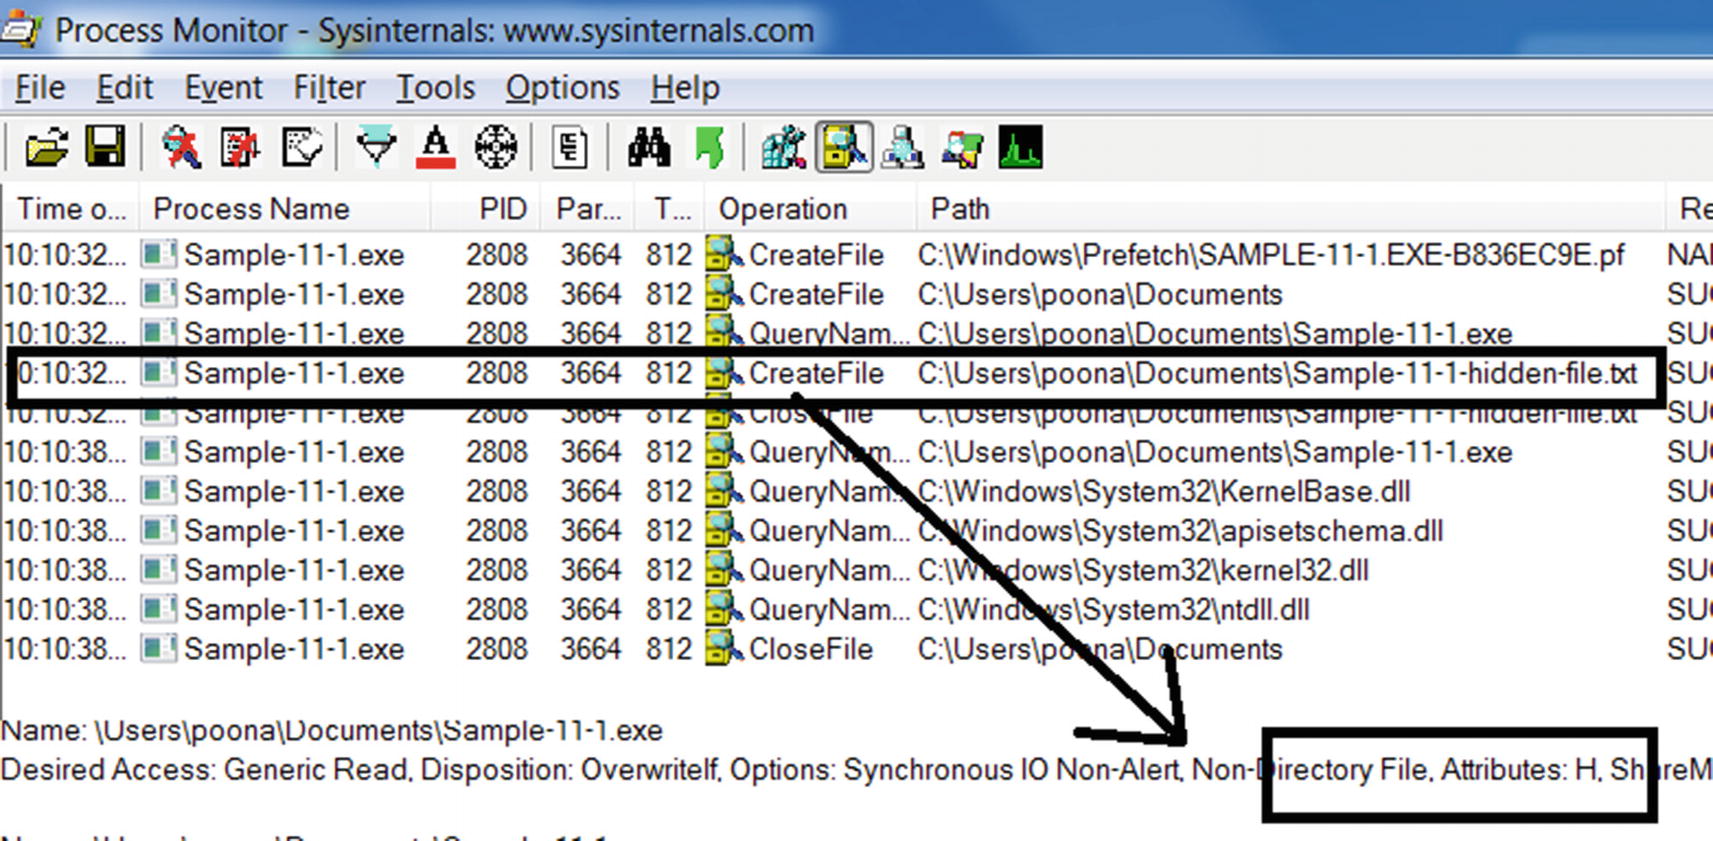
ProcMon shows us the hidden file created by Sample-11-1.exe

APIMiner logs show Sample-11-1.exe using CreateFile API to create a hidden file
Exercise 2
Let’s now try Sample-11-2 the same way we ran Sample-11-1, by first starting ProcMon and then running the sample using APIMiner. Sample-11-2 works by first creating a non-hidden file in the same folder as itself called Sample-11-1-Regular-File-To-Hidden.txt by using CreateFile API but then changes this file into being hidden by calling the SetFileAttributes API. Compared to Sample-11-1, this difference in the technique used is seen in both ProcMon and the APIMiner logs. In some cases, when running this sample using APIMiner.exe, the file is created in the path C:Users<username>AppDataLocalTempSample-11-1-Regular-File-To-Hidden.txt. If you can’t find this file created in the same folder as Sample-11-1.exe, check this AppData folder path, which should hold this file.

ProcMon shows us the Sample-11-2.exe creating a file and then making it hidden
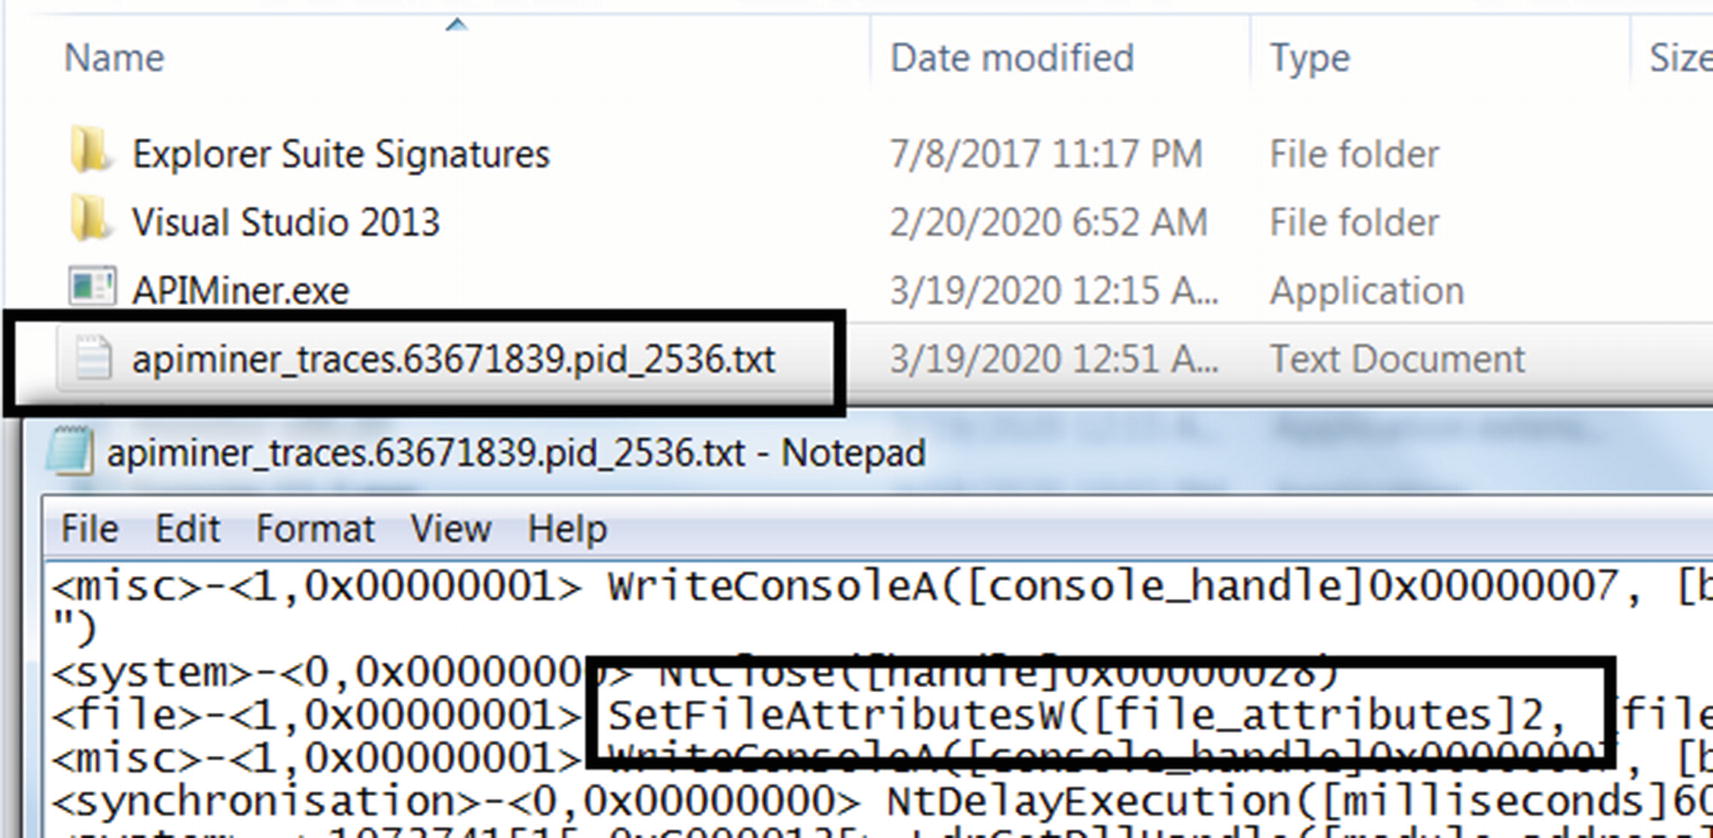
APIMiner logs show Sample-11-2 using SetFileAttributes API to make a file hidden
Thumbnail Faking

Default icons for files shown to us by the system that helps us identify files
these icons help us identify the type of file. But we can take any file and force change the icon/thumbnail that is shown for the file. For example, you can take an executable PE file .exe and attach a Microsoft Word icon/thumbnail to it.

Malware file faking the icon attached to its .exe file to fool users

The resource section of an executable holds the thumbnails
Also, take a look at the “Thumbnail Faking” section in Chapter 3 and Figure 3-11, which also explains the technique used by malware.
Filename Faking and Extension Faking
Email carrying malware relies heavily on social engineering to fool users into clicking malware attachments. One such mechanism uses filename faking by using fake user attractive filenames that are aimed to deceive the user into thinking it is benign and click it. Malware authors and malware botnets send spam mail, and in some cases, even targeted emails with attachments that use names that look like invoices, salary slips, or any other important documents. For example, the names can look like January_salary.pdf.exe or Invoice.doc.exe. These attachments are named in a way to manipulate a user into downloading and clicking to open them.
These filenames are also known to use extension faking wherein they use fake extensions as a part of the filenames, also explained in Chapter 3 (see Figure 3-10). When Extension Hiding is enabled in Folder Options, the real extension is hidden, and these files now appear as January_salary.pdf and Invoice.doc, with the real file extension .exe now being hidden, giving the user the impression that these are .pdf and .doc files.
As an analyst, we must disable extension hiding on your analysis systems and watch out for malware samples that use such tricks to fool users. If you are part of a SOC (security operations center), it is very important to get the full context of a malware sample, including information on the email and other delivery mechanisms by which the malware infection occurred. Having access to the full context helps you see the actual email attachment filename, email message, and so forth that can help you conclude more easily if the sample is malicious or benign.
Stealing System File Names
The Windows system has many of its native system files and programs, for example, svchost.exe, notepad.exe, explorer.exe, calc.exe, and so forth. Malware is known to name their malware files after these OS system files and start a process out of it, to deceive the user into thinking that these malware files/processes are the OS system files/processes.
But it is important to remember that the OS does not allow two files with the same name in the same directory. So, the malware with the same name as an OS system program is dropped into a different folder and not the OS system folder that holds these OS programs.
While analyzing malware filenames and processes using Process Hacker, it is important to verify the folder path of the file or the image path of the process. If you notice a file or a process with a name that resembles an OS system program, but the path is not the OS System path containing these OS system programs like C:windowssystem32, it very likely indicates that the process is malicious and warrants further inspection.
The Psycholinguistic Technique
Can you understand the following sentence? The vheclie epxledod. Two of the words are misspelled, but you can probably still figure out the meaning of the words. This is how human beings read most of the words or sentences, regardless of whether there are spelling mistakes or not. With small, subtle spelling mistakes, we understand without even noticing the spelling mistake. Psycholinguistic is the science of how the human mind reads and understands text and speech.
Malware authors misuse this knowledge of psycholinguistics quite often. As analysts, you come across various malware files created on the system with names like sv0host.exe, scvhost.exe, scchost.exe, and so forth. The malware author has intentionally misspelled it with an intention that the user misreads it as the well-known benign OS program svchost.exe.
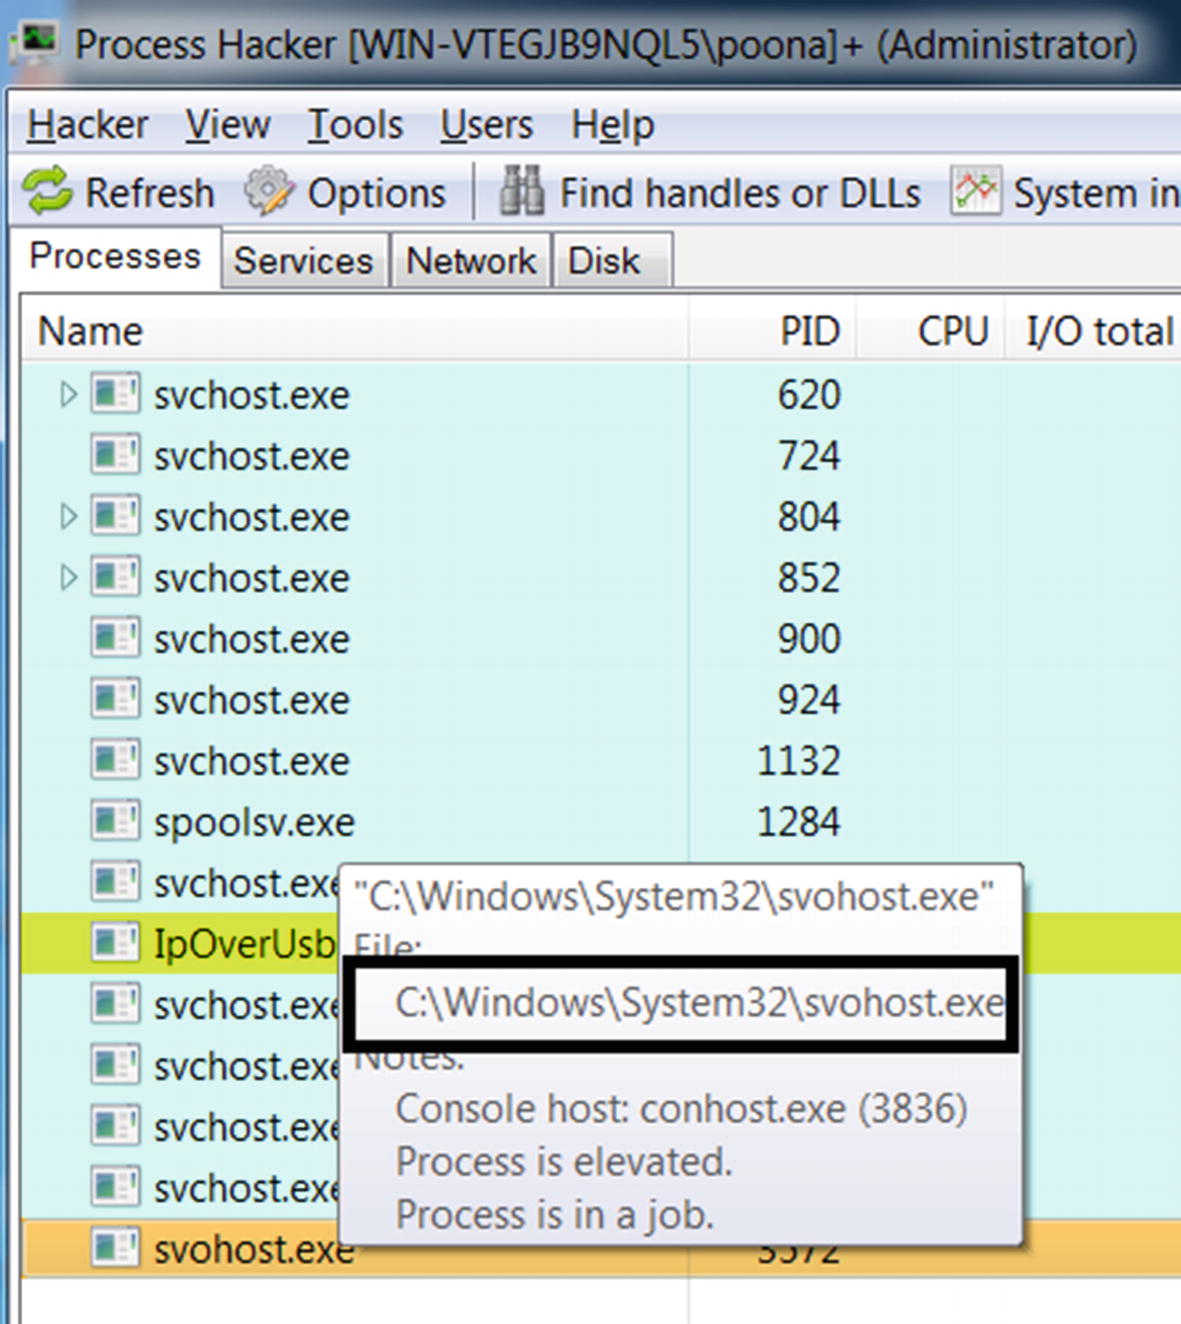
Sample-11-3 running a copy of itself under the name svohost.exe to fool the user
Hiding Process Window
All kinds of applications on Windows have a window. Even if you create a command-line application and execute it, a console window opens in the application, as you have seen earlier while running our samples from the repo, where the console window is the minimal graphical interface. Most malware is console-based applications that have a noninteractive GUI, but when run, have a console window.
APIs Used to Find the Console Window of the Current Process and Hide It
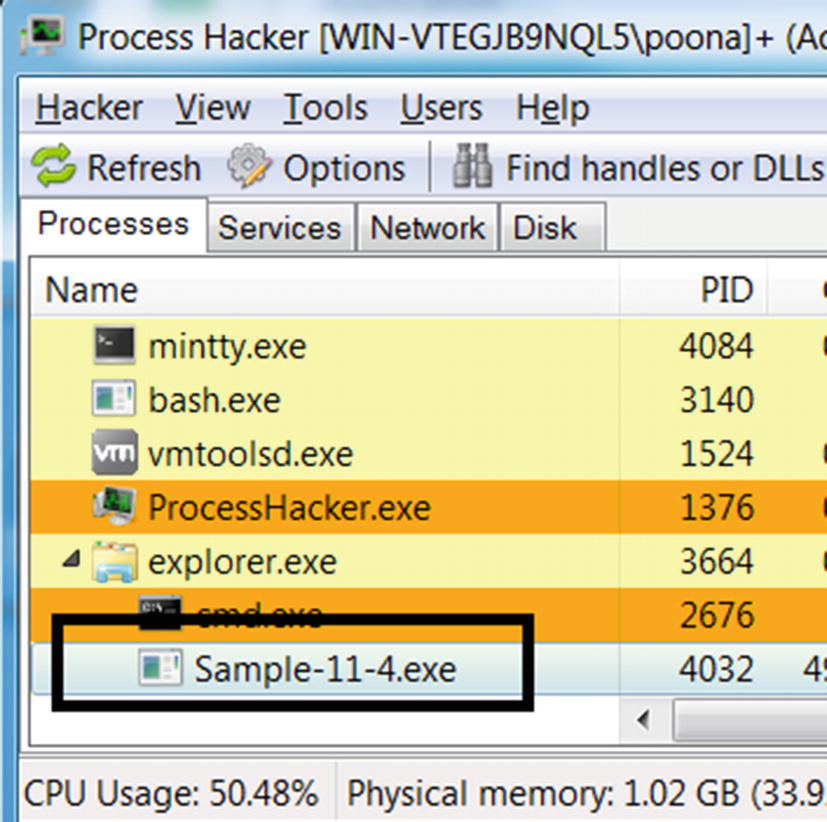
Sample-11-4 running as seen in Process Hacker, but without a console window
Code Injection
The malware does not need complex engineering coding techniques for any of the simple stealth techniques we mentioned in the previous sections. But their demerits are that they can easily be identified by anti-malware software. Malware authors can opt for other more complex stealth techniques like code injection and rootkits.
Code injection is a malware staple used by most of them out there for various reasons, one of them mainly being stealth. If you go back to Figure 10-2) in Chapter 10, we explain how malware use code injection as a stealth technique. What better way to hide oneself than inside another running a clean system process. Process hollowing takes it one step further by hollowing out clean system processes, injecting themselves into it, and running out of the hollowed system processes, thereby hiding under the fake name and properties of these system processes.
Code injection can also create rootkits that use hooks to hide and protect their malicious artifacts. Creating a rootkit requires much more complex programming techniques and in-depth knowledge of OS internals compared to what we saw till now. In the next section, let’s get our hands dirty with hands-on samples that explain well-known rootkit techniques used by malware on Windows.
Rootkits
Rootkits are advanced stealth techniques used by malware, often mistaken as a type of malware, which it isn’t. A rootkit is a feature or functionality or technology used by malware to hide and protect its actual payloads, executables, binaries, files, and any other artifacts created by the malware on the victim’s machine.
A rootkit is created both in user mode and kernel mode. But what are the differences between these two? While user-mode rootkits mostly depend on creating API hooks in user mode processes by injecting code into these processes, kernel rootkits require a kernel module/driver to be installed into the kernel.
User-mode rootkits are specific to a process into which the rootkit code is injected into, while kernel-mode rootkits are global. For example, if a user-mode rootkit is injected into the Task Manager to hide the malware processes that work great since you won’t find the malware processes if you are looking at the Task Manager. But you can still view the malware processes via other tools like Process Hacker and Process Explorer since the rootkit has not been injected into them. The application of the user-mode rootkit extends only to the process it has been injected into. For it to be truly effective, the user-mode rootkit code has to be injected into every user-mode process that is connected to the stealth you are trying to achieve.
On the other hand, kernel-mode rootkits work using kernel-mode drivers installed by the rootkit. They affect all the tools and processes running on the system since the kernel is a layer used by all the processes on the system. But rootkit-ing into the kernel may not be that easy. It is a tedious job to create any kind of kernel code as it needs accurate programming code since it might otherwise crash the system.
User Mode Rootkits
In the previous chapter, you learned about code injection and API Hooking. User-mode rootkits work by using both essentially, where they inject their rootkit code into other processes running on the system and hook Win32 APIs to manipulate the results of these APIs that are returned to the caller.
For example, Win32 consists of many APIs that enumerates various system states. The Task Manager that we use to view the list of processes running on the system calls the NtQuerySystemInformation Win32 API, which returns a list of processes running on the system. Malware that wants to hide its processes injects its rootkit code into processes like Task Manager, Process Hacker, and Process Explorer, and hooks the NtQuerySystemInformation API. When these tools call this API, the rootkit code intercepts the API call and manipulates the list of processes by removing its malware processes from the results and returning the modified results to the caller of the API, thereby hiding its malware processes.
Malware wants to hide the presence of its files on the system. The file browser that we use to browse files on the system internally calls APIs like NtQueryDirectoryFile, FindFirstFileA, and FindNextFileA to obtain the list of files and folders. Like the earlier process hiding rootkit, file hiding malware works by injecting code into the file browser represented by the process explorer.exe and hooking these APIs. When the file browser finally calls these APIs, the rootkit code intercepts them and manipulate the results by removing the names of any malware files and folders from being returned to the caller of the API. As a result, the rootkit can mislead the caller of the API, which in this case, is the file browser into showing the user that no malware files/folder exist on the disk.

Sample-11-6-malware.exe running shown by Task Manager and Process Hacker

Sample-11-6-malware.exe no longer visible in Task Manager because of rootkit
This is because, when you ran Sample-11-5-rootkit.exe, it searched for the taskmgr.exe process, which is the process for Task Manager, injected its rootkit code into it and hooked its NtQuerySystemInformation API. The hook inserted to intercept this API manipulates the list of process names returned by this API and removes any process names from this list if it contains the word malware. So next time when the Task Manager called this API, this rootkit code intercepted this API and removed from the list of processes the process name Sample-11-6-malware.exe and returned this modified list of process names to the Task Manager, thereby hiding the presence of this process.

Ring3 Scanner shows NtQuerySystemInformation in taskmgr as hooked
The following lists the various APIs that are mainly hooked by various user-mode rootkits for stealth.
NtQuerySystemInformation
CreateToolhelp32Snapshot
OpenProcess
Process32First
Process32Next
NtCreateFile
NtQueryDirectoryFile
NtDeleteFile
FindFirstFile
FindNextFile
you can catch a user-mode rootkit via API logs from APIMiner or any other sandbox or API logger. But do note that a malware that uses a rootkit has multiple stages. You have the actual main malware, which first injects the rootkit code into the target process like taskmgr.exe or explorer.exe. And after the injection of rootkit code into the target process, the rootkit code now runs within the target process hooks the APIs.
One log file is for the main malware (and its children) that does the code injection for the rootkit code into the target process. When analyzing such samples in the API logs, search for code injection-related APIs. The APIs for code injection are mentioned in Chapter 10.
The other log files are for the target process where the rootkit code is injected and hooks the APIs. Some of these APIs were listed earlier.
If you see code injection-related APIs calls and either API hooks or API logs for any of the APIs that are likely to be hooked by rootkits, you have an indicator that you are possibly dealing with a user-mode rootkit.
Kernel Mode Rootkits
In kernel-mode rootkits, it involves a kernel component like a kernel-module/driver to provide the rootkit functionality. One way that a kernel-mode rootkit is implemented is via hooks for kernel APIs/functions, very similar to the API hooks placed by user-mode rootkits. But either way, it needs a kernel module/driver to implement the rootkit functionality.
But a malware writer needs to have in-depth knowledge about the kernel to create kernel rootkits. With user-mode rootkits, injecting faulty rootkit code at most can crash the process. But a faulty code injected into the kernel can crash the whole OS. A kernel-mode rootkit written for one version of Windows may not work on other versions because of the differences in the structures and the kernel features across variants of the OS. Writing these kernel-mode rootkits gets even more cumbersome from a deployment and testing perspective for the attacker.
Malware with kernel-mode components used to be common; Stuxnet, TDSS, ZeroAccess, Sality, and Necurs are some of the popular malware families that use them. To counter it, Windows introduced some protection features, like driver signing and patch guard. But it’s a cat-and-mouse game, and malware attackers find ways around these protection techniques.
In the next set of sections, let’s get a basic understanding of some rootkit concepts related to kernel modules, drivers, and SSDT. Let’s explore how kernel-mode malware work internally and play around with some hands-on kernel-mode rootkits, and learn techniques to identify their presence while analyzing such malware samples.
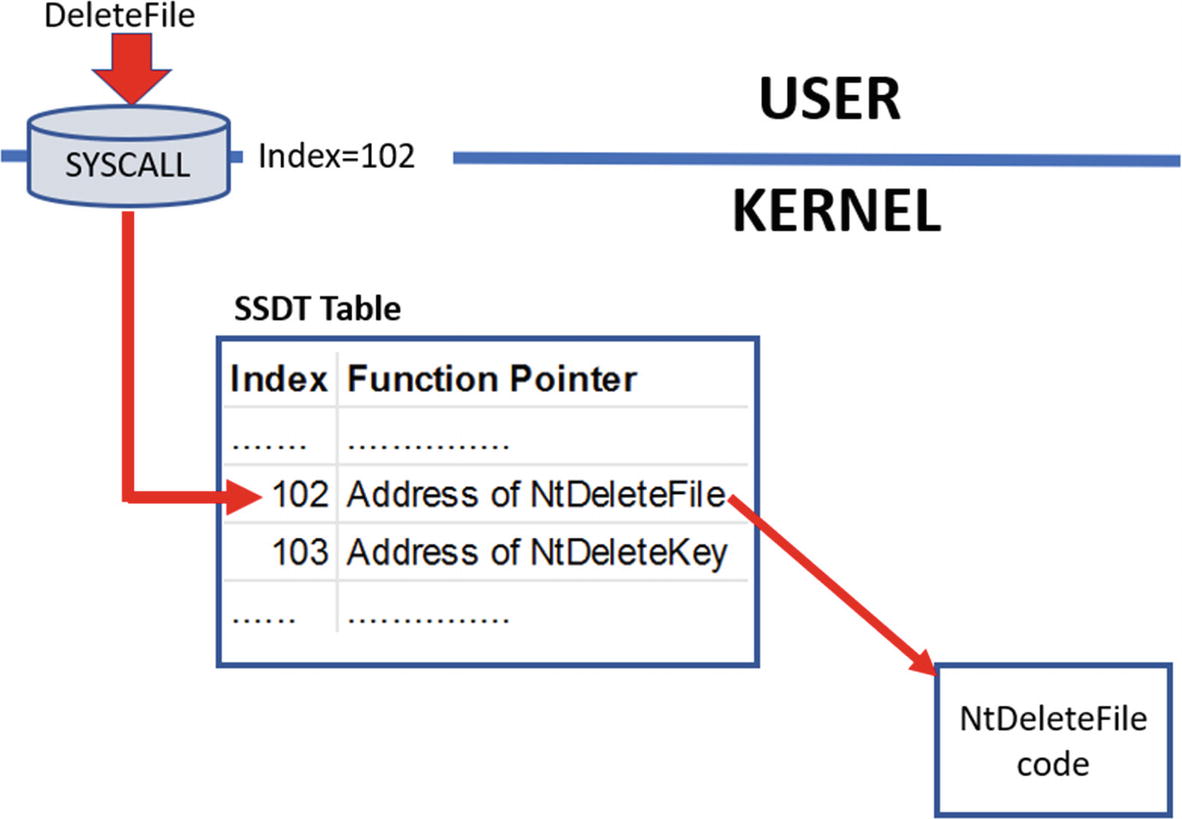
Request Flow from User to Kernel

The flow of an API call in user space to the kernel code via a syscall
An API call made from a user application is passed on to the kernel through kernel32.dll and NTDLL.dll. The APIs in NTDLL.dll use syscalls to pass on these API requests to the kernel. On the kernel side, there are corresponding functions that handle the request coming in from these user mode syscalls.
Which services (different from services in the user space) in the kernel handle these syscalls? The kernel holds a table called the SSDT (system service descriptor table) that holds a list of pointers to these kernel services (functions) that handle incoming syscalls from the user space. So, when a syscall comes in, the corresponding kernel service (function) is picked up from the SSDT and invoked to handle the syscall. The invoked kernel service (function) can now carry out the required activity to process the request, which might also involve calling another device driver using IRP packets. For example, a file operation request from the user space gets finally passed to a file system driver, while a network operation request is passed on to the network driver.
Injecting Code into Kernel Space
In kernel mode, there is no concept of a process, so the entire kernel code is one big virtual address space that is shared by the kernel, including the kernel modules and drivers. But how do we inject our code into the kernel? For this, we create what is called a kernel module, using the driver development kit (DDK) or the Windows driver kit (WDK) from Microsoft, which are nothing but frameworks and helper modules and utilities that can help you create kernel modules.
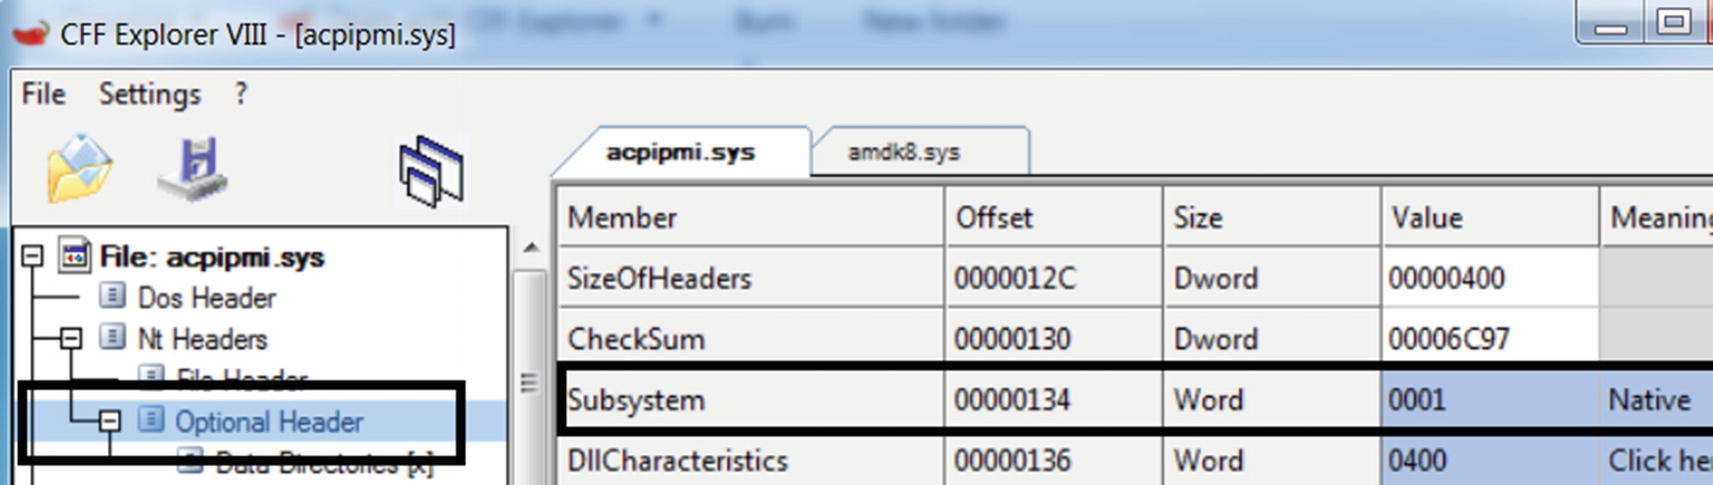
A kernel driver holds a value of native for Subsystem property in Optional Header
Viewing Loaded Kernel Modules and Drivers
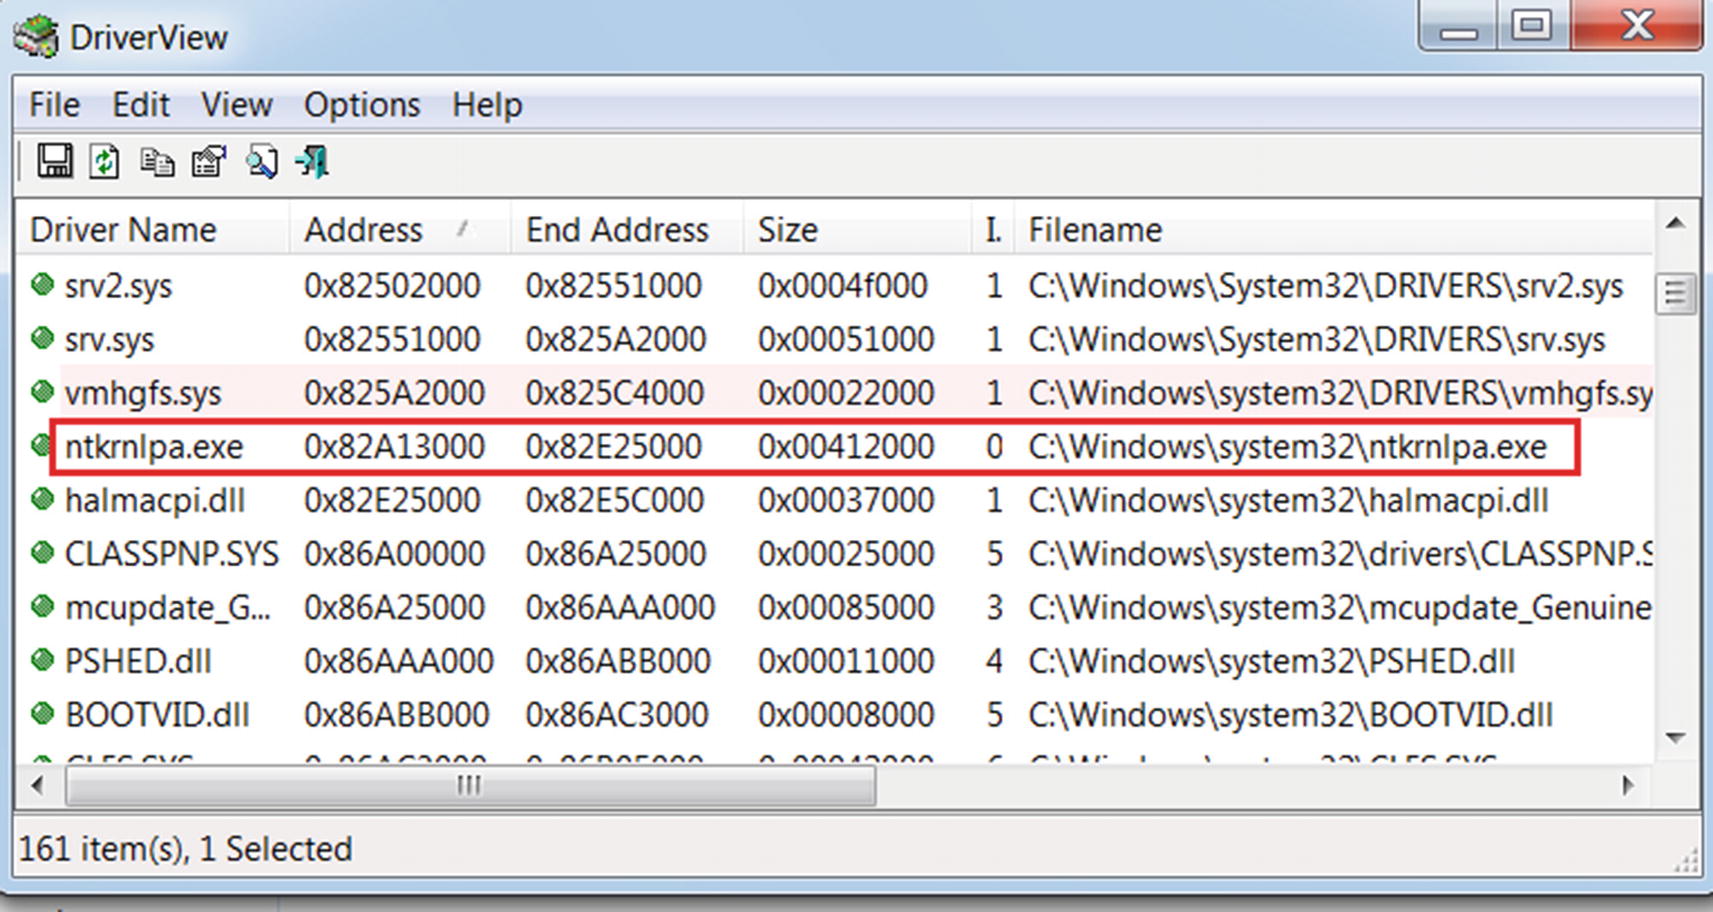
DriverView tool to view all the kernel modules loaded on the system
The tool displays a lot of columns by default, but we have shrunk the display only to five fields. You can identify the kernel driver by looking into the address of the module. By default, the address of a kernel module should lie above the memory address 0x7FFFFFFF for a 32-bit version of Windows. ntkrnlpa.exe (often named as ntoskrnl.exe) is the kernel image and is one of the most important kernel modules responsible for various system functions like hardware abstraction and memory management. It holds the SSDT table that we spoke about earlier, and we cover it in more detail later. It starts at 0x82A13000 and ends at 0x82E25000. Do note that the address might vary on your system. You can also obtain the path of the kernel module file on disk via its properties, which shows it as C:Windowssystem32 tkrnlpa.exe.
A kernel executable can have different names: NTOSKRNL.EXE, NTKRNLPA.EXE, NTKRNLMP.EXE, NTKRPAMP.EXE.
SSDT and How to View It
An incoming syscall from the user space is handled by kernel functions located in the SSDT (system service descriptor table). These kernel functions that handle these syscalls are called services (not to be confused with the Windows services in the user space you read about in Chapter 5). Let’s call them service functions to avoid any confusion.
Many service functions are defined and held in the kernel, and each of them is defined according to function; they provide to serve various kinds of user-space requests. For example, some of them are for creating and deleting files, creating, modifying, and deleting registry entries, allocating memory, and so forth.
Do not confuse the kernel services with user space Windows services, which are nothing but managed processes in the background. These kernel services are just kernel functions, very similar to how you have APIs in DLLs in user space, where the kernel is like one large DLL, and the kernel services are the APIs it provides.
The SSDT is nothing but a table that contains pointers to these service functions. Each service function pointer has a corresponding index in the SSDT. The pointers in the SSDT point to the memory locations in the kernel code where the service functions reside. The service functions are defined in ntoskrnel.exe(ntkrnlpa.exe) and win32k.ksys kernel modules.

SSDT View tool that can view the service functions in SSDT
As you can see, the leftmost column displays the index of the service function in the table; the second column displays its name; the third displays the address; and the fourth column shows where the module resides. Look at the entry for the NtDeleteFile service function with index 102. This function is located at 0x2BA66AD in the ntkrnlpa kernel module. You can verify the address range of the ntkrnlpa kernel module using the Driver View tool from Figure 11-20.
syscall uses the index of a service function in SSDT to invoke it in the kernel
Do note that many of these service functions in the SSDT have a corresponding API in the user space Win32 DLL NTDLL.dll with the same name. A NtDeleteFile in user-space Win32 DLL NTDLL.DLL has a NtDeleteFile in the kernel as a service function whose function pointer is in the SSDT.
Drivers and IRP
A driver is a kernel module that is separated into three broad categories: function drivers, bus drivers, and filter drivers. The drivers that directly talk to the device they are managing are called function drivers . Filter drivers don’t directly interface with the physical device but sit slightly higher in the device driver path, and their main task is to filter the requests coming into the drivers below it and to the actual device. Bus drivers drive the individual physical buses that the devices are plugged into. These three driver categories have subcategories.
To communicate with the device drivers and the device, the kernel provides a subsystem called the I/O manager, which generates and dispatches what are called I/O request packets (IRP). An IRP is a data structure that has information on the I/O operation needed from the device driver/device, with some of the common request operations being write requests, read requests, control requests, and so forth. When starting up, device drivers can register themselves to handle these I/O request types thereby giving them the ability to service these I/O operation requests.
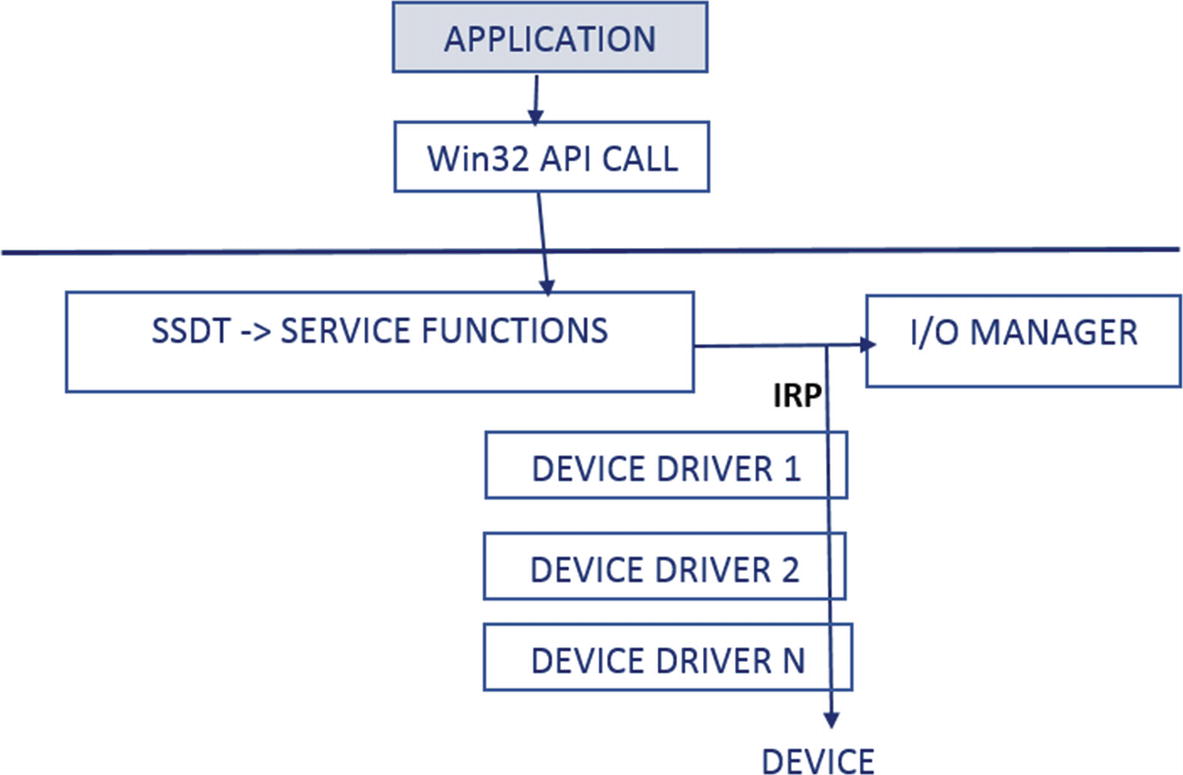
Flow of an IRP across device drivers to the device
How to Insert Kernel Modules and Driver?
Kernel modules and drivers are loaded into the kernel as a service (Windows services). We have gone through the various ways to create a Windows service in Chapter 5. As a malware analyst, keep in mind all the various techniques to identify the registration of services. It comes in handy when you are analyzing a sample that registers a rootkit kernel module into the kernel via a service.
- 1.
The kernel module is dropped by malware into the disk using the CreateFile API.
- 2.
OpenSCManager opens the service manager to register a new service.
- 3.
CreateServiceA registers a new service by supplying the kernel module file that it dropped into the disk in step 1.
- 4.
StartService starts the service created in step 1, which loads the kernel module.
You most likely see this sequence of APIs in malware that is trying to install a kernel module rootkit . You see this hands-on when we play with some exercises later.
As an analyst, you’ve got to make sure you can differentiate between the sample trying to register and create a regular Windows service and another case where it is trying to create a service that intends to load a kernel module or rootkit. To differentiate between the two, you can use the Subsystem value of the executable file that is registered as a service in the CreateService API from step 3.
A few other APIs can also load a kernel module, which can be used by malware. Two of them are ZWSetSystemInformation and ZwLoadDriver. With the help of the APIMiner tool that logs various APIs used by these rootkit malware samples, we can identify kernel-based malware and rootkits if we see any of them using these APIs.
SSDT Rootkits and SSDT Table Hooking
SSDT rootkits work by hooking the SSDT, very similar to how user-space rootkits use API hooking, as we saw earlier. To hook the SSDT, you need to locate the address of the SSDT in the kernel. To do so, you need to create a driver that can first locate the SSDT, and that can then traverse the service entries in SSDT and then hook it.
Definition of _KeServiceDescriptorTable Struct That Points to the Location of SSDT
ServiceTableBase points to the start of the SSDT.
ServiceCounterTableBase tells how many times each service is invoked.
NumberOfServices tells the number of services.
ParamTableBase is the base address of SSPT (system service parameter table). SSPT is another table that holds the number of bytes needed for the parameters of a service.

SSDT rootkits are implemented by using either IAT hooking or inline hooking
Creating SSDT hooks on 32-bit machines was easy because the kernel exported _KeServiceDescriptorTable, but Windows stopped it with 64 bits. Hence with 64-bit Windows, SSDT hooking was harder but not impossible.
Malware can use SSDT hooks to implement rootkits, and it can be used by them to protect and hide their files, processes, registries, and so forth. The advantage of using kernel-based SSDT rootkits is that it applies globally to all processes on the system, unlike user-mode rootkits, where the rootkit must be inserted into every process that you want to rootkit.
SSDT Rootkit Exercise

SSDT rootkit from our exercise Sample-11-7-ssdt-rootkit

APIMiner running the SSDT rootkit from our exercise Sample-11-7-ssdt-rootkit

API logs for Sample-11-7-ssdt-rootkit show APIs used for registering service
This only tells you half the picture that the sample is trying to register a service. But it is a Windows service. What proves that we have a rootkit kernel module being inserted by this sample? If you further check the CreateService arguments in your APIMiner API log file, it provides the path of the kernel module C:hidden ootkit.sys. If you try to access this folder, you are denied permission, as you saw in Figure 11-25, which is a telltale sign that we have a file rootkit.

GMER identifies that we have an SSDT rootkit installed on the system
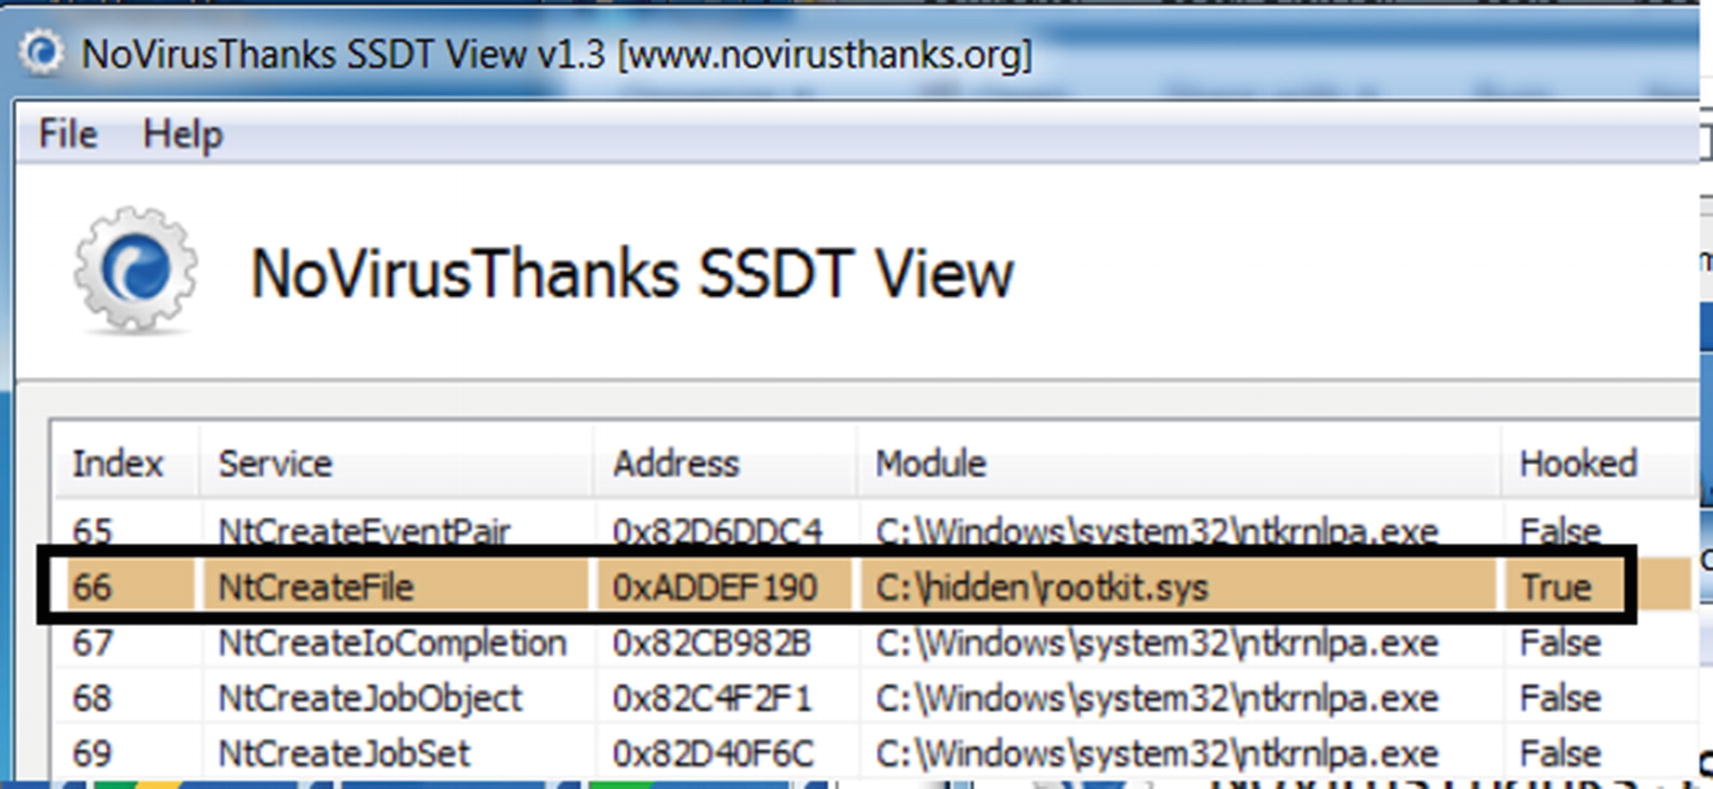
SSDT View identifies the hook placed by our sample for hiding files
ZwOpenFile
NtCreateFile
ZwQueryDirectoryFile
ZwTerminateProcess
ZwOpenProcess
ZwQuerySystemInformation
ZwQueryValueKey
ZwEnumerateValueKey
ZwEnumerateKey
ZwSetValueKey
ZwCreateKey
DKOM Rootkits and Kernel Object Manipulation
Another way to implement rootkits is by manipulating the list that is returned by the enumeration APIs like the ones that enumerate files, registry, and processes. Some of these lists are created by referring to some of the data structures that are available in the kernel called kernel objects. These rootkits are called direct kernel object manipulation (DKOM).
Before looking into the kernel-mode DKOM rootkits, let’s look at how the object manipulation happens at a very high level.

A list of processes, including a malware process represented in the kernel
The process hiding rootkit unlinks the malware process from the list, thereby hiding the process
Process Hiding Using DKOM In-Depth
We talked about how kernel object manipulation works at a high level to hide processes running on the system. Let’s explore the particulars of how DKOM can hide a process.
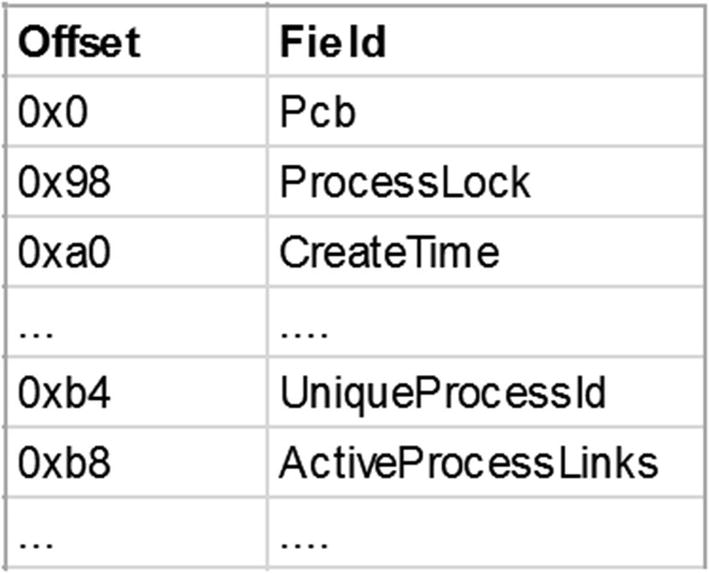
The EPROCESS data structure used to represent the process in the kernel

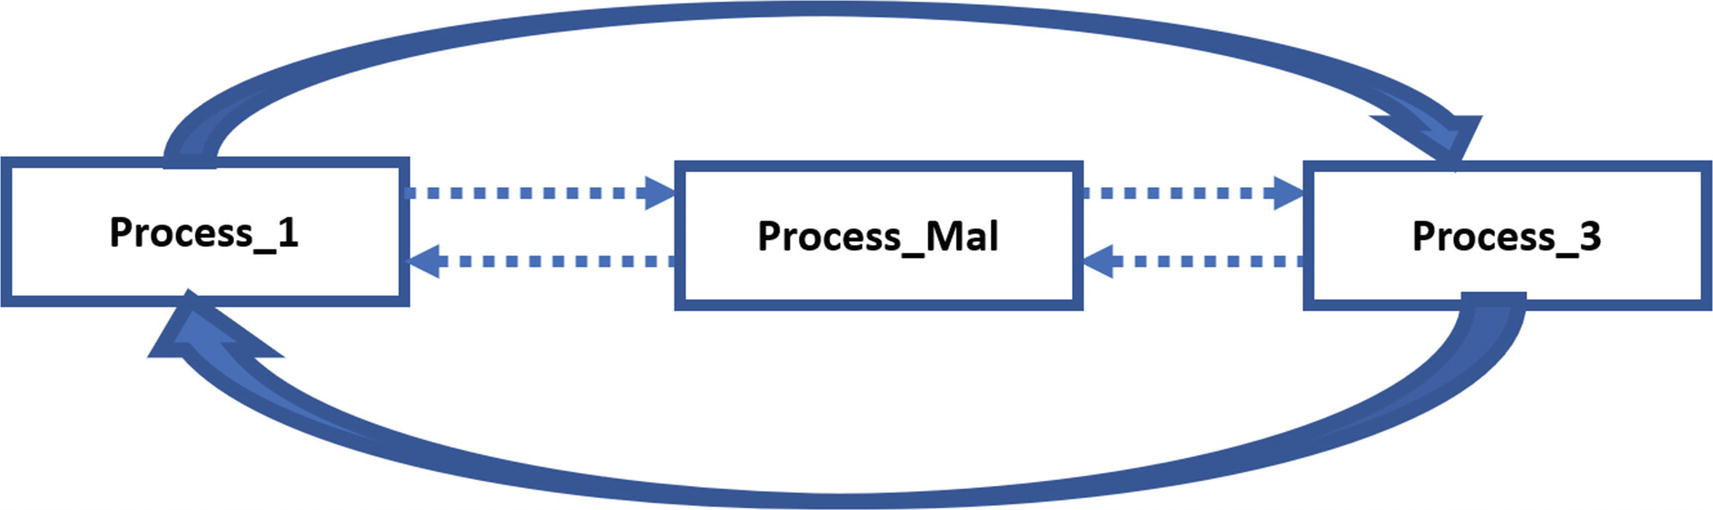
The doubly-linked list of EPROCESS structures of all the processes
Figure 11-32 shows how EPROCESS of PROCESS_1 and PROCESS_MAL and PROCESS_3 are connected into a doubly-linked list. A user-mode API like NtQuerySystemInformation, which can retrieve a list of processes in the Task Manager or any other tools, refers to this doubly linked list. The entire list is traversed programmatically using FLINK and BLINK pointers. A FLINK or BLINK can reach from one EPROCESS to another, and the rest of the fields can be accessed as an offset from these structures from the pointers. A malware rootkit can tamper this doubly linked list to hide its processes.

DKOM manipulation where we have manipulated the doubly linked list to delink the EPROCESS structure of a malicious process we want to hide
DKOM Rootkit Exercise

APIMiner running the DKOM rootkit from our exercise Sample-11-8-dkom-rootkit
This sample creates a new process with PID 3964 and then inserts a kernel module that manipulates DKOM to hide this process from the Task Manager. Let’s see how we can analyze this sample.

APIMiner API log files for Sample-11-8-dkcom-rootkit
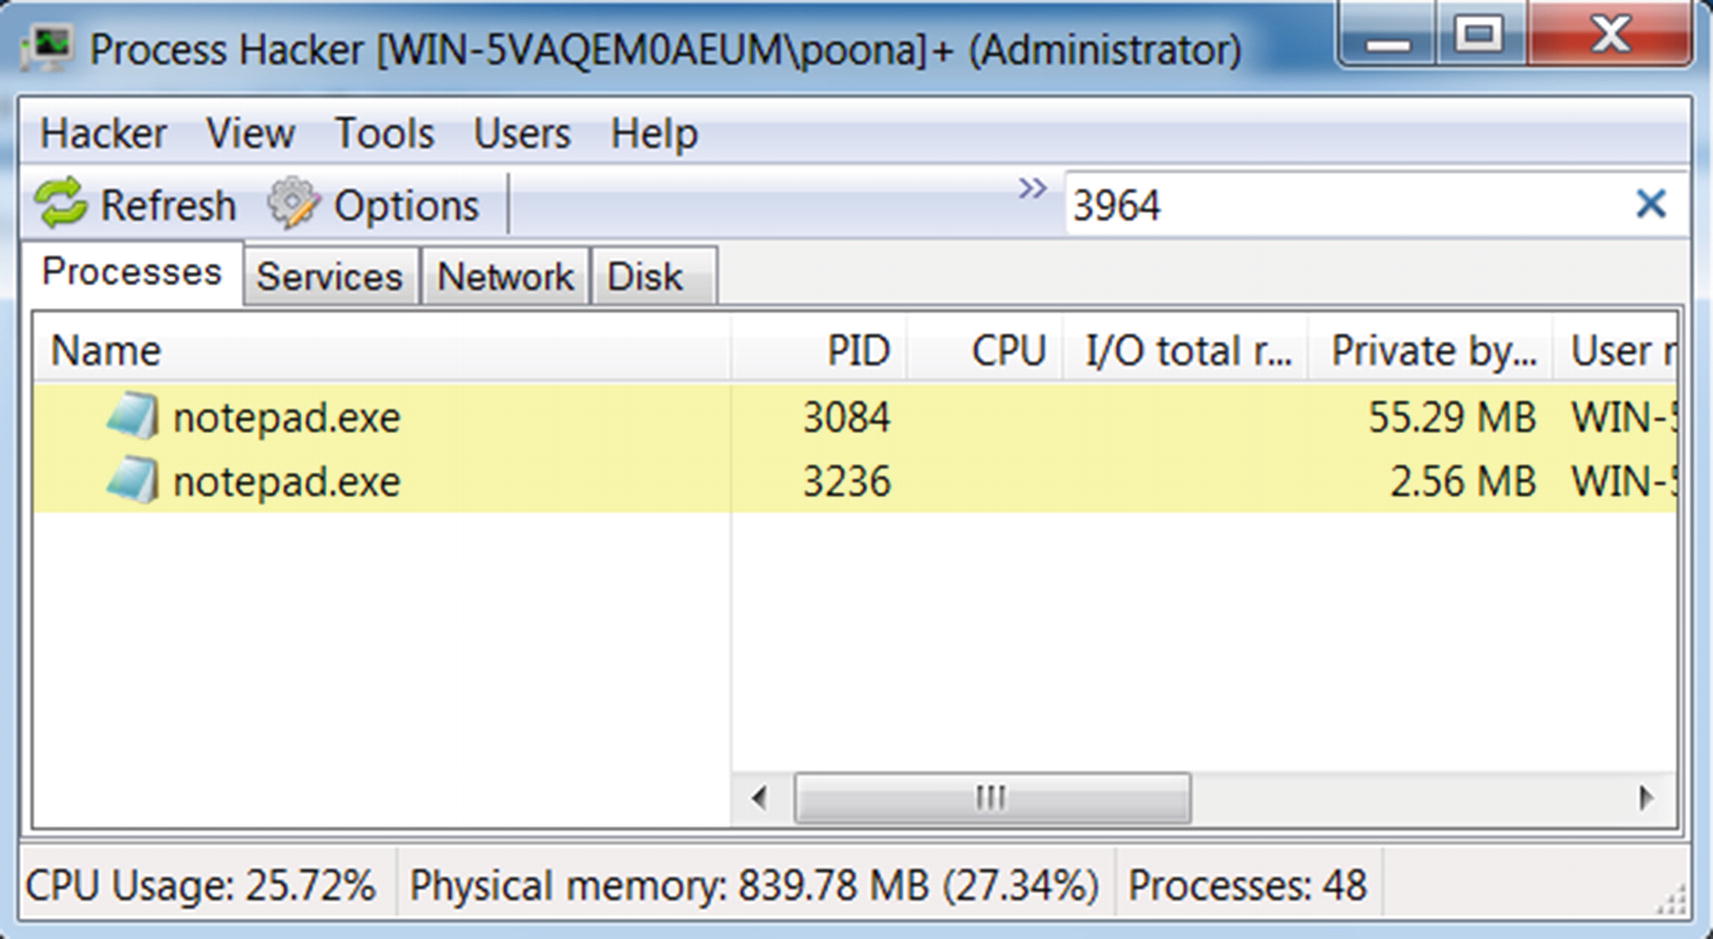
No process with PID 3964 found indicating it is most likely hidden by a rootkit

API sequence indicates the sample is creating and starting a service.

GMER shows we have a kernel process hiding rootkit installed by Sample-11-8
Rootkits Using IRP Filtering or Filter Driver
IRP packets flow from the I/O manager across device drivers so that drivers can carry out operations on the device based on the action requested by the IRP packet. Filter drivers are a category of drivers that are created to filter IRP packets. Filter drivers can also contain logic to carry out other bookkeeping related operations based on the IRP action requested.

Flow of IRP across the file system driver which then operates on the disk
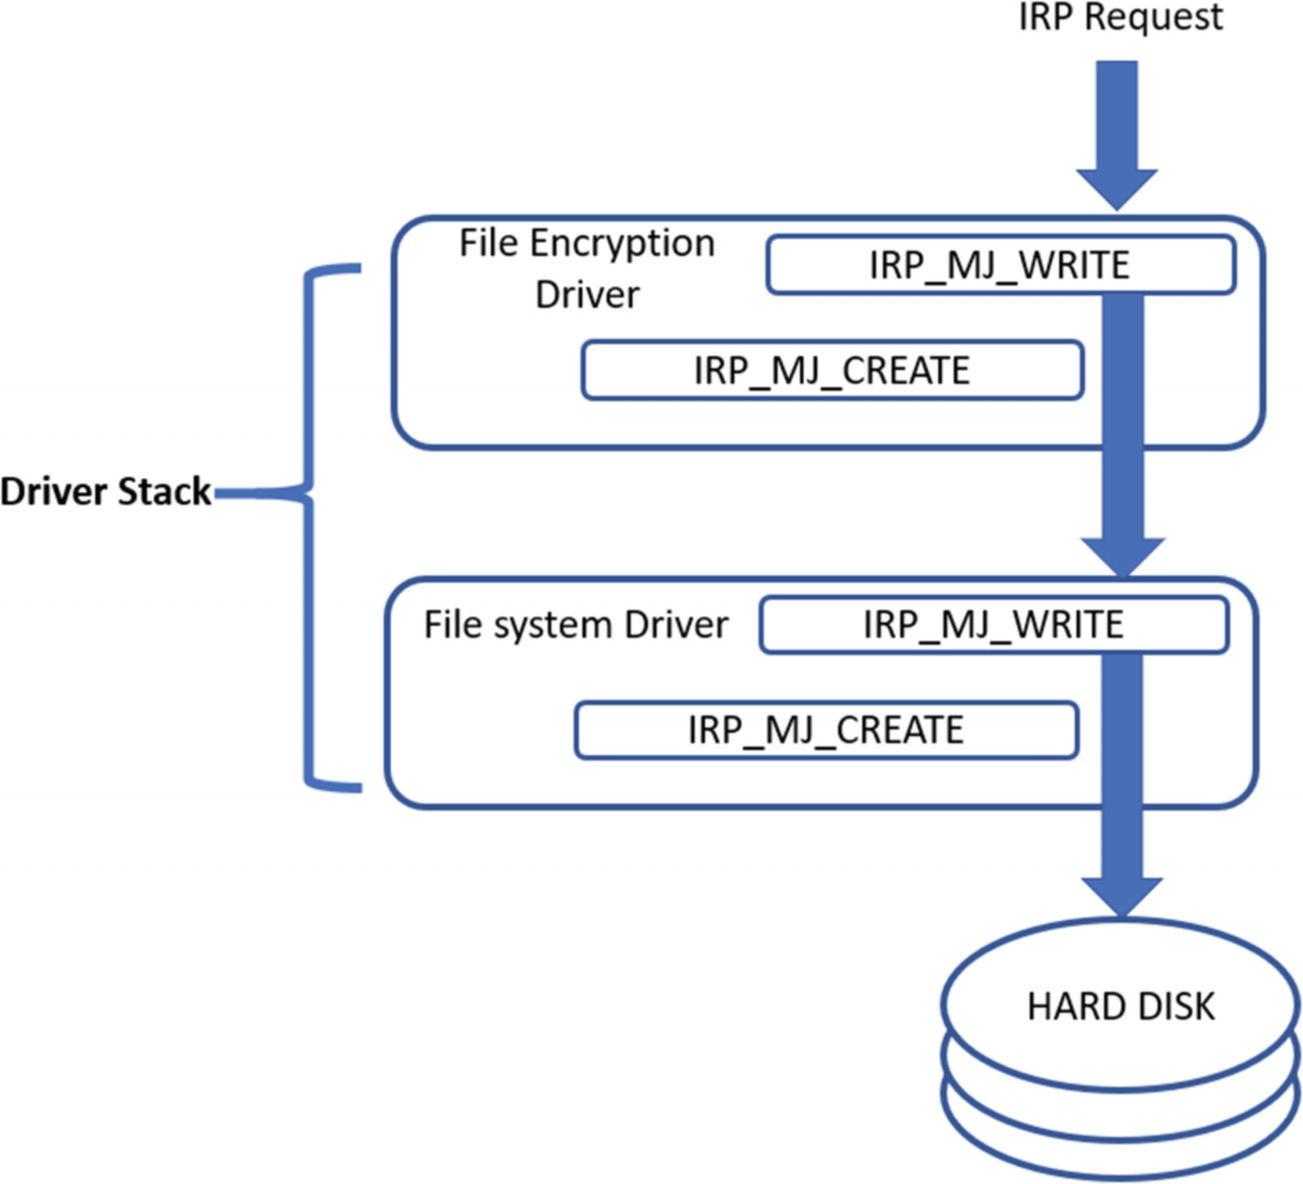
Flow of IRP across the file system driver, which then operates on the disk
The IRP packet coming from the OS now passes through this file encryption filter driver before reaching the final file system driver , which is responsible for writing to the disk. The file encryption driver is stacked on the top of the actual driver.
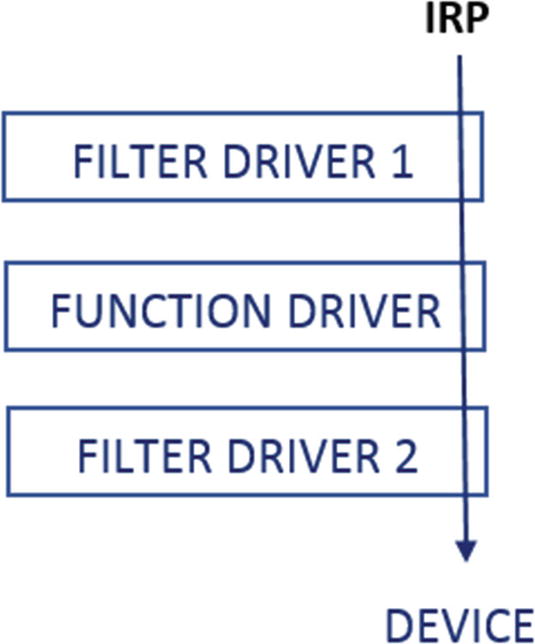
Flow of IRP across the driver stack for a device

Malware filter driver sits on top of other drivers filtering IRPs as a rootkit
the malicious filter driver from the malware sees the IRP before the function driver and the other drivers and can carry out various rootkit related functionality by filtering out the IRP packets and carrying out various actions based on the IRP packet contents and actions.
Going back to the file encryption driver, malware can place a malicious driver instead of a file encryption driver, which can hide malicious files and directories and prevent the deletion of its malicious files. Even keystrokes can be logged, and ports can be hidden by inserting malicious drivers to the device drivers stack.
Other Ways of Creating Rootkits
We have covered the most prevalent rootkit techniques used by malware out there. There might be other techniques that can implement rootkits. For example, malware can use its own file system and replace the one used by the OS to hide their artifacts on disk. Whatever the rootkit technique used, the methods to detect and identify malware that uses rootkits are the same as the ones we used in this chapter. Most of the techniques involve seeing mismatches and anomalies and proving these anomalies are malicious.
Summary
Stealth is an important functional feature used by most malware. In this chapter, you learn why malware use stealth and the various simple yet effective stealth techniques used by them. We went through some more complex hiding techniques like code injection, which we covered in Chapter 10. You learned about rootkits, an advanced stealth technique used by malware, that is implemented in both the user space and the kernel space.
You now understand how user-space rootkits are implemented by making use of code injection and API hooking and learn various techniques by which we can dissect malware that uses them. We also explore how kernel-mode rootkits work internally and the various types of kernel-mode rootkits prevalent, including SSDT rootkits, DKOM rootkits, and IRP filter rootkits. Using hands-on exercises for all the stealth techniques, we now have a fundamental understanding of how to detect and identify malware that uses them.