
If you have a custom registry value that you need to distribute and configure to all computers in the organization or just a select few computers in the organization, you should use custom .adm files. To create these files, you must use and understand the .adm file language. Don’t fret—the language is simple and easy to pick up. This section will give you all of the information you need to create your own .adm files for importing into a GPO.
An .adm file is designed for two functions. The first function is to create the interface within the Group Policy Object Editor for the registry values that you want configured on users or machines targeted by a GPO. This formatting is the same for all .adm files, so you can use existing .adm files as a guide. The second function of the .adm file is to format the registry path, value, and data that will be updated in the target computer’s registry. Again, this syntax is the same for all .adm files and is easy to follow.
Note
Although the syntax is easy to follow for the registry path in the .adm file, the path must be accurate or you could potentially corrupt the registry on the target computer.
Take a look at the following .adm file example. It enables the computer to log on without any user input by using a predetermined user name and password.
CLASS MACHINE
CATEGORY "Microsoft Custom ADM Entries"
   POLICY "Automatic Logon"
   KEYNAME "SOFTWAREMicrosoftWindowsNTCurrentVersionWinlogon"
     PART "What is the name of the user?" EDITTEXT
     VALUENAME "autoadminlogon"
     END PART
     PART "What is the user's password?" EDITTEXT
     VALUENAME "defaultpassword"
     END PART
END POLICY
END CATEGORY
You can see that the structure of the .adm file is very methodical. If you look closely at the example, you can see that there are some rules that must be adhered to. One such rule is the need to include an END syntax for PART, POLICY, and CATEGORY entries.
Take a look at the structure of the example to evaluate the key components that you need to fully understand:
CLASS MACHINE Specifies that the registry HKEY that we are modifying is under HKEY_Local_Machine.
CATEGORY Specifies the name that will be given to the folder that will appear in the Group Policy Object Editor. In our example, it is Microsoft Custom ADM Entries.
POLICY Specifies the name we are giving to the policy that will show up in the Group Policy Object Editor. In our example, it will show up as Automatic Logon.
KEYNAME Specifies the path in the registry where the value that will be modified exists. Notice that KEYNAME does not include the HKEY name or the name of the value.
PART Specifies to the Group Policy Object Editor that input will be required from the administrator of the GPO.
EDITTEXT Specifies that a text box will be presented to allow the administrator to type text for the data of the registry value.
VALUENAME Specifies the exact registry value that is being modified. Notice that VALUENAME is not the specified data for the registry value (the string or setting associated with the registry value); rather, it is the name of the Registry value. The data for the registry value will be input through the Group Policy Editor.
END PART Indicates to the Group Policy Object Editor that the syntax related to this PART is done.
END POLICY Indicates to the Group Policy Object Editor that the syntax related to this POLICY is done.
END CATEGORY Indicates to the Group Policy Object Editor that the syntax related to this CATEGORY is done.
If you were to create a shell of what a standard administrative template structure should look like, it would look something like this:
CLASS (Group Policy Editor and Registry)
CATEGORY (Group Policy Editor)
KEYNAME (Registry)
POLICY (Group Policy Editor)
PART (Group Policy Editor)
VALUENAME (Registry)
To create your own .adm files, you must build on this structure and understand all of the syntax that can be placed in the .adm files. We will do this by breaking down the syntax into two categories: the interface for the Group Policy Object Editor and the registry path and value inputs.
Instead of creating an .adm file for each set of operating system settings, you can use the #if version syntax within one .adm file to break up the settings. The #if version syntax breaks up the .adm file into zones, with each zone targeting a specific operating system range. The standard .adm files use this method to create these zones, providing settings for older operating systems and newer operating systems in a single .adm file.
Each operating system matches up with a specific version number within the .adm file. Table 14-4 specifies each operating system and the .adm file #if syntax version number associated with it.
Table 14-4. #if Syntax Version Number by Operating System
Operating System | Version | Type |
|---|---|---|
Windows Server 2003 SP1 | 5.0 | Group Policy |
Windows XP SP2 | 5.0 | Group Policy |
Windows Server 2003 and Windows XP | 4.0 | Group Policy |
Windows Server 2000 | 3.0 | Group Policy |
Windows NT 3.x and 4.x | 2.0 | Group Policy |
Windows 95 | 1.0 | System Policy |
In some instances, the #if version syntax can be omitted and the .adm code can span multiple operating system generations. This is possible because the registry value and location of the setting is the same for the different operating systems.
You can control the #if version syntax by adding operators to control ranges of operating systems that the .adm syntax should affect. Here are the operators that can be used with the #if version syntax.
> | Greater than |
< | Less than |
== | Equal to |
!= | Not equal to |
>= | Greater than or equal to |
<= | Less than or equal to |
You know that the .adm file generates the interface for the Group Policy Object Editor and specifies the registry path, value, and data. Specific syntax is used within the .adm file to handle all of these variables.
The syntax that builds the Group Policy Object Editor interface is essential within the .adm file. If any syntax for one of these components is missing, the file will fail to work properly. The syntax used to build the registry path, value, and data includes: CLASS, KEYNAME, VALUENAME, VALUEON/VALUEOFF, and PART.
There are two CLASS options: MACHINE and USER. The CLASS syntax indicates which portion of the registry will be modified. If the MACHINE option is specified, the GPO will modify the HKEY_Local_Machine handle in the registry. If the USER option is specified, the GPO will modify the HKEY_Current_User handle in the registry.
Note
There are only two primary handles within the registry: HKEY_Local_Machine and HKEY_Users. The other three handles are subsets of these two primary handles. The HKEY_Current_User handle is a subset of the HKEY_Users handle. The HKEY_Current_User handle is the current user’s profile that is placed in the registry when the user logs on.
You need to use the CLASS syntax only once for each of the MACHINE and USER options. All of the registry settings that fall under the HKEY_Local_Machine handle will be grouped together, after the CLASS MACHINE syntax is listed. The same goes for the registry settings that fall under the HKEY_Current_User handle and the CLASS USER syntax.
Note
If there are multiple CLASS MACHINE or CLASS USER sections in the same .adm file, they will be merged together when the Group Policy Object Editor interface is created.
If the .adm file you are creating will refer to only one of the registry handles, you list only that CLASS syntax in the .adm file.
The CLASS syntax also places the interface changes under Computer Configuration or User Configuration, based on MACHINE or USER, respectively. When the Group Policy Object Editor accesses the .adm file, it places the interface settings under the proper node.
The KEYNAME syntax is not optional within the .adm file. KEYNAME specifies the path from the HKEY to the registry value. KEYNAME comes after the CATEGORY syntax and either before or after the POLICY syntax, depending on how you choose to structure the .adm file. However, KEYNAME must come after the CLASS syntax and before the PART or VALUENAME syntax.
Note
If you want to group multiple policy settings together that reside under the same path in the registry, you can place the KEYNAME entry after the CATEGORY syntax. This results in a grouping of all the entries following the CATEGORY syntax under the same folder in the Group Policy Object Editor.
The KEYNAME syntax indicates the path to the registry value. Do not include HKEY_Local_Machine or HKEY_Current_User in the registry path—this is handled by the CLASS syntax. You also don’t need to use an introductory slash (/) to start the path within the KEYNAME text. For our example, the KEYNAME entry is as follows:
KEYNAME SOFTWAREMicrosoftWindowsNTCurrentVersionWinlogonIf there is a space within the path following the KEYNAME syntax, you must put quotation marks (") around the entire path string, but don’t include the KEYNAME word in the quotes. Here is an example of an entry that requires quotes:
KEYNAME "SOFTWAREMicrosoftWindows NTCurrentVersionWinlogon"VALUENAME references the registry value that will be updated. You must find the approved registry value name—you are not allowed to make up registry values. If the computer registry is updated with an incorrect registry value, the computer might experience a stop error. Values in the registry are typically cryptic words that are not found in a dictionary.
You can use two methods to modify the values specified with the VALUENAME syntax. These methods are controlled by the values that the registry can handle.
Many registry values support only two numeric values: 0 and 1. If the numeric value is 0, the registry value is off. If the numeric value is 1, the registry value is on. When the registry value is controlled in this fashion, you use the VALUEOFF/VALUEON syntax.
The other registry values require text or more than just 0 or 1 numeric values. These registry values are controlled using the PART syntax.
When you use the VALUEOFF/VALUEON syntax, you are directly affecting the behavior of the registry value. When you use the PART syntax, you are modifying the Group Policy Object Editor, which allows for a more complex entry to be set for the registry value.
The VALUEOFF/VALUEON syntax works like a switch. The registry value is either off or on. This goes back to the simple use of binary values of 0s and 1s. When you look at many of the registry entries in the Registry Editor, you will see that they actually support the string data type, which is denoted at REG_SZ. This does not alter the behavior or the limited values that the registry value supports.
Here is an example of a standard .adm entry that uses VALUEON and VALUEOFF:
KEYNAME "SoftwareMicrosoftWindowsCurrentVersionPoliciesSystem"
VALUENAME "HideStartupScripts"
VALUEON NUMERIC 0
VALUEOFF NUMERIC 1
For this .adm entry, no input is required once you are in the Group Policy Object Editor. You have only the ability to enable or disable the policy to toggle between the VALUEOFF and VALUEON numeric values. The Group Policy Object Editor shows this policy with the standard interface, as shown in Figure 14-4.
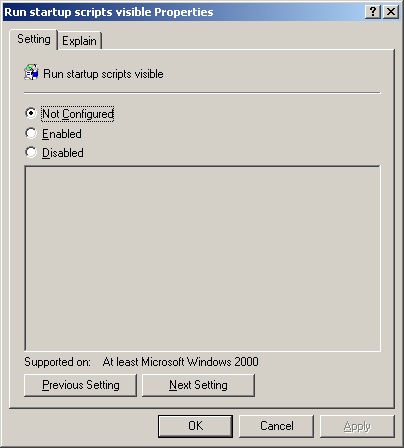
There are three options: Not Configured, Enabled, and Disabled.
Not Configured. Does not set any entry for the registry value; instead, it leaves the registry value as it is set on the computer.
Enabled. Sets the registry value to the VALUEON specified numeric value.
Disabled. Sets the registry value to the VALUEOFF specified numeric value.
You can use a second method that is indirectly associated with the VALUEOFF/VALUEON syntax; you use this method when you don’t explicitly use the VALUEOFF and VALUEON statements. Here is a sample of what that might look like:
POLICY!!EnableSlowLinkDetect
   EXPLAIN !!EnableSlowLinkDetect_Help
   KEYNAME "SoftwarePoliciesMicrosoftWindowsSystem"
   VALUENAME "SlowLinkDetectEnabled"
END POLICY
Notice that there is no explicit use of VALUEON/VALUEOFF, but the behavior is similar. In this example, the three settings of the GPO policy behave in the following manner:
Not Configured. Nothing is changed in the registry.
Enabled. Sets the registry value to a numeric value of 1.
Disabled. Deletes the registry value.
Note the policy-disabled state. The value is not written to the registry with the value of 0; instead, it is explicitly deleted. This means that a component reading the policy will not find the value in the registry and will fall back to using the default in the code.
The .adm files do more than just indicate the registry path, value, and data that need to be updated. They also configure the interface of the Group Policy Object Editor. The interface configurations are essential because the Group Policy Object Editor interface is where the actual configurations are made.
Four main areas of syntax create the interface within Group Policy Object Editor:
STRINGS
CATEGORY
POLICY
PART
The CATEGORY and POLICY syntax are the only required entries in the .adm file, but the other two variables are important. The STRINGS syntax is used extensively in the standard .adm files, but it is seldom used in custom .adm files. The PART syntax is used when the registry value or values being referenced require more than an ON or OFF configuration.
The STRINGS syntax is used to help organize and logically format the string variables used within the .adm file. The STRINGS syntax is not mandatory, but it can help reduce the code within the main body of the .adm file. The STRINGS syntax allows for variables to be used for lengthy strings. Strings are used to create the interface within the Group Policy Object Editor. The following example uses the STRINGS syntax whenever there is a string variable to create the interface.
CLASS MACHINE
CATEGORY !!CUSTOMADM
   POLICY !!Autologon
   KEYNAME "SOFTWAREMicrosoftWindowsNTCurrentVersionWinlogon"
         PART !!Username
         EDITTEXT
         VALUENAME "autoadminlogon"
         END PART
         PART !!Password
         EDITTEXT
         VALUENAME "defaultpassword"
         END PART
   END POLICY
END CATEGORY
[STRINGS]
CUSTOMADM = "Microsoft Custom ADM Entries"
AutoLogon = "Automatic Logon"
Username = "What is the name of the user?"
Password = "What is the users' password?"
As you can see, the STRINGS syntax cleans up the main part of the .adm file. It also allows for easy administration of all of the string variables because they are all located under the [STRINGS] section at the bottom of the .adm file. If a string variable is used more than once in the .adm file, you can just use the STRINGS syntax and the string variable name at each instance, which will point to the single instance of the actual string at the end of the .adm file. Within the main body of the .adm file, the strings are referenced by using the double exclamation point (!!) followed by the string variable name.
For smaller .adm files, you might not need to use the STRINGS syntax. However, in larger .adm files, the STRINGS syntax can help reduce the complexity of the main body of the .adm file. The STRINGS syntax is especially useful in conjunction with the EXPLAIN syntax. The EXPLAIN text is generally very lengthy and can clog up the main body of the .adm file. By using the STRINGS syntax within the main body of the .adm file, you can leave the longer strings to the STRINGS section at the bottom of the .adm file.
Tip
If you need to convert .adm files to different languages, you should place all interface strings in the STRINGS section. You then only need to convert the STRINGS section to the different languages.
The STRINGS syntax can be used with the CATEGORY, POLICY, PART, and EXPLAIN statements.
The CATEGORY syntax produces that folders that you see in the Group Policy Object Editor. Both the Computer Configuration and User Configuration display these folders, so you use the CATEGORY syntax under both the CLASS MACHINE and CLASS USER entries. The CATEGORY syntax can be nested in a hierarchy to generate subfolders. Each CATEGORY statement that you list produces a folder or subfolder in the Group Policy Object Editor.
The following structure creates three folders in a hierarchy:
CATEGORY "First level"
   CATEGORY "Second level"
         CATEGORY "Third level"
         END CATEGORY
   END CATEGORY
END CATEGORY
If you want to display multiple policies under a single folder (CATEGORY statement), you can just list the policies after the CATEGORY syntax and before the END CATEGORY syntax.
Note
The CATEGORY syntax must be combined with an END CATEGORY statement. This is required so that the Group Policy Object Editor knows where to stop nesting folders as well as where to stop placing policies within the folder.
Additional syntax that you can use in conjunction with CATEGORY includes KEYNAME, CATEGORY, END, SUPPORTED, and POLICY.
The POLICY syntax is used to identify a policy setting that the user can modify within the Group Policy Object Editor. The POLICY syntax generates the "policy settings displayed" in the details pane of the Group Policy Object Editor, under the folders that are created by the CATEGORY syntax.
If you want to have different registry paths and values show up under a single policy within the Group Policy Object Editor, you need the POLICY syntax followed by the KEYNAME syntax. However, if multiple registry paths and values that fall under the same KEYNAME need to be placed under the same policy, you must have the KEYNAME syntax precede the POLICY syntax.
An example of having the KEYNAME statement followed by the POLICY statement containing multiple registry values is shown here:
CLASS USER
CATEGORY "Microsoft Custom ADM Entries"
   POLICY "Controls hidden files."
   KEYNAME "SOFTWAREMicrosoftWindowsCurrentVersionExplorerAdvanced"
         PART "Do you want to see hidden files?" TEXT
         END PART
         PART "Hidden Files and Folders:" DROPDOWNLIST
        VALUENAME Hidden
               ITEMLIST
               NAME "Yes" VALUE Numeric 1
               NAME "No" VALUE Numeric 2
               END ITEMLIST
        END PART
        PART "Do you want to see Super Hidden files?" TEXT
        END PART
        PART "Super Hidden" DROPDOWNLIST
        VALUENAME Showsuperhidden
              ITEMLIST
              NAME "Yes" VALUE Numeric 1
              NAME "No" VALUE Numeric 0
              END ITEMLIST
        END PART
     END POLICY
END CATEGORY
This .adm snippet generates the interface in the Group Policy Object Editor, as shown in Figure 14-5.

The POLICY syntax requires an END POLICY to tell the Group Policy Editor when to stop grouping the settings together. Additional syntax that you can use in conjunction with POLICY includes KEYNAME, VALUENAME, VALUEON, VALUEOFF, POLICY, PART, END, ACTIONLISTON, ACTIONLISTOFF, and CLIENTTEXT.
The PART syntax is used to specify options such as drop-down list boxes, text boxes, and text in the lower pane of a policy in the Group Policy Object Editor. The previous example, which illustrates the use of the PART syntax, shows the PART syntax used in the .adm file and the resulting Group Policy Object Editor interface from Figure 14-5.
You can also use the PART syntax to create an introduction or information about the policy in the lower pane of the policy. This PART syntax would simply introduce a clarifying sentence, without associating it with a registry value:
PART "Do you want to see Super Hidden files?" TEXT
END PART
Associating a PART within a "policy" to a registry value would look like this:
PART "Super Hidden" DROPDOWNLIST
VALUENAME Showsuperhidden
   ITEMLIST
   NAME "Yes" VALUE Numeric 1
   NAME "No" VALUE Numeric 0
   END ITEMLIST
END PART
The PART syntax can handle the various types of registry values that you include in your custom .adm files. Each type of registry value requires use of additional syntax to handle the input for the registry value. The previous example uses ITEMLIST, but other syntax options are available that you will need to use. We will go over ITEMLIST and other syntax options later in this chapter.
Note
The PART syntax requires an END PART to tell the Group Policy Object Editor when to stop the configuration of the registry value within the interface. Additional syntax that you can use in conjunction with PART includes CHECKBOX, CLIENTTEXT, COMBOBOX, DROPDOWNLIST, EDITTEXT, LISTBOX, NUMERIC, PART, and TEXT.
To create the environment that allows the user to modify the registry values, you must include additional syntax after the PART syntax. Table 14-5 lists the valid syntax options that are used in conjunction with the PART syntax.
Table 14-5. Syntax That Can Be Used with the PART Syntax
Type | Description |
|---|---|
CHECKBOX | Displays a check box. The value is set in the registry with the REG_DWORD type. The value is other than zero if the check box is selected and zero if it is not selected. |
CLIENTTEXT | Specifies which client-side extension to use for the specific policy setting. |
COMBOBOX | Displays a combo box. |
DROPDOWNLIST | Displays a combo box with a drop-down list style. The user can choose only one of the entries supplied. |
Displays a text box that accepts alphanumeric text. The text is set in the registry with the REG_SZ or the REG_EXPAND_SZ type. | |
LISTBOX | Displays a list box with Add and Remove buttons. This is the only PART type that can be used to manage multiple values under one key. |
NUMERIC | Displays a text box with an optional spin control that accepts a numeric value. The value is set in the registry with the REG_DWORD type. |
TEXT | Displays a line of static text. No registry value is associated with this PART type. |
When you are combining multiple registry values under one policy, you use the CHECKBOX syntax to function like the VALUEON/VALUEOFF syntax. If the check box is selected, the registry value associated with the CHECKBOX syntax has a value of 1 written to the registry. A value of 0 is written to the registry value if the check box is not selected.
You can also combine the CHECKBOX syntax with the VALUEON/VALUEOFF syntax to clearly specify what the registry values should be when the check box is selected and not selected. Here is a snippet of the System.adm file, which uses the CHECKBOX syntax:
PART !!StdCheckT CHECKBOX
VALUENAME "DisableRollback"
VALUEON NUMERIC 1
VALUEOFF NUMERIC 0
END PART
The CLIENTTEXT keyword is used to specify which client-side extension to the Group Policy Object Editor needs to process the particular settings on the client computer. By default, the registry extension processes all settings configured under the Administrative Templates node. The CLIENTTEXT keyword changes the default behavior and causes the specified extension to process these settings after the registry extension has placed them in the registry.
The CLIENTTEXT syntax must be used within the POLICY scope or the PART scope and should follow the VALUENAME statement.
CLIENTTEXT alters the default behavior of typical GPOs. Typical GPOs process all settings under the Administrative Templates node. The CLIENTTEXT syntax specifies the specific extension to process a GPO setting once it has been placed in the registry.
The following is an example from the System.adm file. It configures the disk quotas within the GPO. As you can see, Disk Quotas has a separate client-side extension (CSE), which is referenced within the example code.
POLICY !!DQ_Enforce
KEYNAME "SoftwarePoliciesMicrosoftWindows NTDiskQuota"
   VALUENAME "Enforce"
   VALUEON NUMERIC 1
   VALUEOFF NUMERIC 0
   CLIENTEXT {3610eda5-77ef-11d2-8dc5-00c04fa31a66}
END POLICY
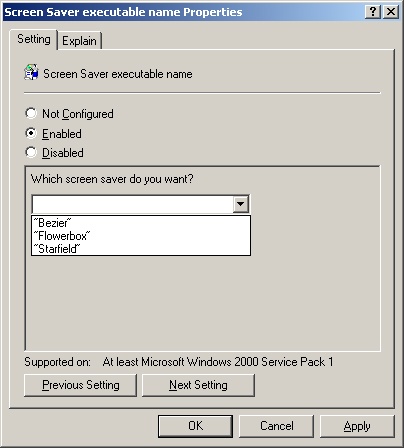
This PART type displays a combo box. It accepts the same options as EDITTEXT, as well as the SUGGESTIONS option, which begins a list of suggestions to be placed in the drop-down list. The suggestions are separated by spaces and must be enclosed in quotation marks (" ) when a value includes spaces. If a suggestion name includes white space, it must be enclosed in quotation marks. The list ends with END SUGGESTIONS.
For example, you can establish a list of screensaver names so the administrator doesn’t have to know the names of the screensavers. Here is snippet of the original administrative template code for the screensaver file name and the modified syntax using the COMBOBOX syntax:
POLICY !!ScreenSaverFilename
KEYNAME "SoftwarePoliciesMicrosoftWindowsControl PanelDesktop"
   PART !!ScreenSaverFilename EDITTEXT
   VALUENAME "SCRNSAVE.EXE"
   END PART
END POLICY
Here’s an updated version of the screensaver option with a COMBOBOX:
POLICY !!ScreenSaverFilename
KEYNAME "SoftwarePoliciesMicrosoftWindowsControl PanelDesktop"
   PART !!Screensaverpicker COMBOBOX
   VALUENAME "SCRNSAVE.EXE"
        SUGGESTIONS
         C:WINNTSystem32ssstars.scr
         C:WINNTSystem32ssbezier.scr
         C:WINNTSystem32ssflwbox.scr
        END SUGGESTIONS
   END PART
END POLICY
The resulting Group Policy Editor for this new syntax looks like Figure 14-6.

Tip
If you use the STRINGS syntax for the name of the COMBOBOX, the entry can have just a single word, where the variable is an entire sentence. This approach is useful because if you have more than one word in the quotes, you will receive an error when you attempt to import the administrative template into the GPO. Additional syntax that you can use in conjunction with COMBOBOX includes KEYNAME, VALUENAME, DEFAULT, SUGGESTIONS, REQUIRED, MAXLENGTH, OEMCONVERT, END, EXPANDABLETEXT, NOSORT, and CLIENTTEXT.
The DROPDOWNLIST syntax provides a combo box with a drop-down list style. It is similar to the COMBOBOX syntax, except that the actual registry value is converted to simple language text. The user can choose only one of the entries from the drop-down list. The DROPDOWNLIST syntax is preferable to the COMBOBOX syntax when the registry value does not indicate clearly what setting the policy will accomplish. To better illustrate this, let’s take a look at the COMBOBOX example with a DROPDOWNLIST solution:
POLICY !!ScreenSaverFilename
KEYNAME "SoftwarePoliciesMicrosoftWindowsControl PanelDesktop"
   PART "What screen saver do you want? " DROPDOWNLIST
   VALUENAME "SCRNSAVE.EXE"
         ITEMLIST
         NAME "Starfield"
         VALUE C:WINNTSystem32ssstars.scr
         NAME "Bezier"
         VALUE C:WINNTSystem32ssbezier.scr
         NAME "Flowerbox"
         VALUE C:WINNTSystem32ssflwbox.scr
         END ITEMLIST
  END PART
END POLICY
The resulting Group Policy Editor text for this syntax and administrative template is shown in Figure 14-7.
Tip
If any item in the drop-down list requires more than one word, you must use the STRINGS syntax for the entries; otherwise, the .adm file will generate an error during importing. The STRINGS syntax allows you to use a single word for each entry, but the Group Policy Object Editor converts the string variable to the actual string for the list.
The EDITTEXT syntax allows the user to input alphanumeric text into an edit field. We have already seen an example of editing text in the screensaver file name example. Here is that example again:
POLICY !!ScreenSaverFilename
KEYNAME "SoftwarePoliciesMicrosoftWindowsControl PanelDesktop"
   PART !!ScreenSaverFilename EDITTEXT
   VALUENAME "SCRNSAVE.EXE"
   END PART
END POLICY
By default, the EDITTEXT syntax provides an empty box for editing the policy. If you want to display an initial value in the edit box, you can use the DEFAULT syntax along with the EDITTEXT syntax. The options you can use with EDITTEXT syntax include:
DEFAULT value. Specifies the initial string to place in the edit field. If this option is not specified, the field is initially empty.
EXPANDABLETEXT. Specifies that the text is set in the registry with the REG_EXPAND_SZ type. By default, the text is set in the registry with the REG_SZ type.
MAXLEN value. Specifies the maximum length of a string. The string in the edit field is limited to this length.
REQUIRED. Specifies that the Group Policy Object Editor does not allow a policy containing this PART to be enabled unless a value has been entered for this PART.
OEMCONVERT. Sets the ES_OEMCONVERT style in the edit field so typed text is mapped from ASCII to OEM and back. ES_OEMCONVERT converts text entered in the edit control. The text is converted from the Windows character set (ASCII) to the OEM character set and then back to the Windows set. This ensures proper character conversion when the application calls the CharToOem <JavaScript:hhobj_1.Click()> function to convert an ASCII string in the edit control to OEM characters. This style is most useful for edit controls that contain file names.
The LISTBOX PART component specifies various options such as drop-down list boxes, text boxes, and text in the lower pane of the Group Policy Object Editor. The LISTBOX is a simple syntax, as you can see from this snippet from the System.adm template.
PART !!RestrictAppsList LISTBOX
   KEYNAME "SoftwareMicrosoftWindowsCurrentVersionPoliciesExplorerRestrictRun"
   VALUEPREFIX ""
END PART
The resulting Group Policy Editor interface is shown in Figure 14-8.
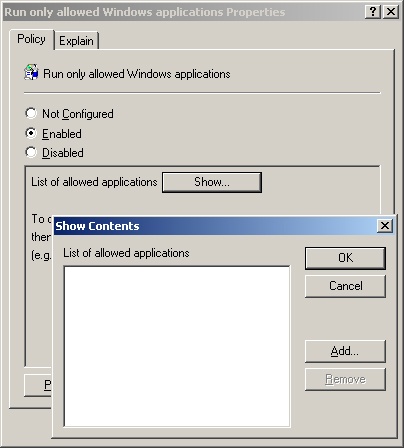
In addition to the standard LISTBOX syntax, you can also add more options to the administrative template. The following are additional options you can add to the LISTBOX syntax:
ADDITIVE. By default, the content of list boxes overrides any values set in the target registry. This means that a control value is inserted in the policy file that causes existing values to be deleted before the values set in the policy file are merged. If this option is specified, existing values are not deleted and the values set in the list box are in addition to whatever values exist in the target registry. If a GPO that uses this syntax is disabled, the disabled settings are not applied and are thus removed from the registry.
Caution
The ability to display a policy setting that uses the LISTBOX ADDITIVE syntax was not supported prior to Service Pack 2 for Windows XP. If you attempt to administer a GPO that uses the LISTBOX ADDITIVE syntax on a computer that does not run Windows XP Professional SP2 or Windows Server 2003 SP1, you will receive an error message: "The following entry in the [strings] section is too long and has been truncated." For more information, see article 842933 in the Microsoft Knowledge Base at http://support.microsoft.com/kb/842933.
EXPLICITVALUE. This option makes the user specify the value data and the value name. The list box shows two columns, one for the name and one for the data. This option cannot be used with the VALUEPREFIX option.
VALUEPREFIX prefix. The prefix you specify is used in determining value names. If you specify a prefix, the prefix and an incremented integer are used instead of the default value naming scheme described previously. For example, a prefix of SampleName generates the value names SampleName1, SampleName2, and so on. The prefix can be empty (""), which causes the value names to be 1, 2, and so on.
Displays an edit field with an optional spinner control (an up-down control) that accepts a numeric value. It is best to use the MIN and MAX syntax in conjunction with the NUMERIC syntax to ensure that the registry does not become corrupted with invalid data. The following is a snippet from the System.adm template using the NUMERIC syntax.
PART !!ProfileSize
   NUMERIC REQUIRED SPIN 100
   VALUENAME "MaxProfileSize"
   DEFAULT 30000
   MAX    30000
   MIN    300
END PART
The SPIN syntax allows for a spin control to set the range of values that can be set. This adds to the MIN and MAX controls to provide a boundary for the data of the registry value. Other syntax that you can use along with the NUMERIC syntax include:
DEFAULT value Specifies the initial numeric value for the edit field. If this option is not specified, the field is initially empty.
MAX value Specifies the maximum value for the number. The default value is 9999.
MIN value Specifies the minimum value for the number. The default value is 0.
REQUIRED Specifies that the Group Policy Object Editor does not allow a policy containing this PART to be enabled unless a value has been entered for this PART.
SPIN value Specifies increments to use for the spinner control. The default is SPIN 1.
SPIN 0 Removes the SPIN control from the "policy" settings.
TXTCONVERT Writes values as REG_SZ strings ("1", "2", or "128" ) rather than as binary values.
The TEXT syntax can be used to display text on the property page of a policy setting. The following is a snippet from the System.adm template that uses the TEXT syntax:
PART !!GPRefreshRate_C_Desc1 TEXT
END PART
PART !!GPRefreshRate_C_Desc2 TEXT
END PART
This creates two lines of static text in the dialog box when you edit the policy setting.
You can use the ACTIONLIST syntax to specify a set of arbitrary registry changes to make in response to a control being set to a particular state. Here is a snippet of code for the ACTIONLIST syntax:
POLICY "Deny connections requests"
    EXPLAIN "If enabled, TS will stop accepting connections"
    ACTIONLISTON
    VALUENAME "fDenyTSConnections" VALUE NUMERIC 1
    END ACTIONLISTON
    ACTIONLISTOFF
    VALUENAME "fDenyTSConnections" VALUE NUMERIC 0
    END ACTIONLISTOFF
END POLICY
ACTIONLIST has two variants that you can use with the POLICY and CHECKBOX syntax. Table 14-6 describes these variants.
You have now seen all of the essential syntax to add to your .adm files to handle the array of registry values you need to offer. However, other syntax is important for development and troubleshooting purposes. These statements are not required in the .adm file, but they provide additional control over the registry values you insert into the .adm file.
Although comments are not often used in standard .adm files, using them in your custom .adm files can benefit you and everyone else who needs to reference them. The comments don’t alter the registry or the Group Policy Object Editor interface—they are there to help you understand the syntax and code in the .adm file.
You can use two methods to add comments to an .adm file. You can precede the comment with a semicolon or two forward slashes, or you can add comments at the end of any valid line or on a line by themselves. Here is a small example that uses the comments syntax:
PART !!ProfileSize  //this is the user profile
   NUMERIC REQUIRED SPIN 100
         ; The spin control will increment by 100's,
         ; starting at 300, then 400, 500, 600, etc.
   VALUENAME "MaxProfileSize"
   DEFAULT  30000
   MAX     30000
   MIN     300
END PART
The REQUIRED syntax is straightforward. When you use it in conjunction with another statement in the .adm file, the registry value must be configured for the policy to be enabled.
This syntax controls the maximum length of the text within a "policy" entry. This is useful when a single digit value must be maintained for a "policy" entry.
The EXPLAIN syntax is used to provide online Help text for a specific GPO setting. Starting with Windows 2000, the Properties page for each policy setting includes an Explain tab, which provides the details about the policy settings.
Each custom GPO setting that you create should include one EXPLAIN keyword, followed by at least one space, and then the EXPLAIN string in quotation marks (" ) or a reference to the Help string. Here is an example snippet from the System.adm template that uses the EXPLAIN syntax. The resulting interface is shown in Figure 14-9.
POLICY !!Run_Startup_Script_Sync
EXPLAIN !!Run_Startup_Script_Sync_Help
   KEYNAME     "SoftwareMicrosoftWindowsCurrentVersionPoliciesSystem"
   VALUENAME "RunStartupScriptSync"
   VALUEON  NUMERIC 0
   VALUEOFF NUMERIC 1
END POLICY
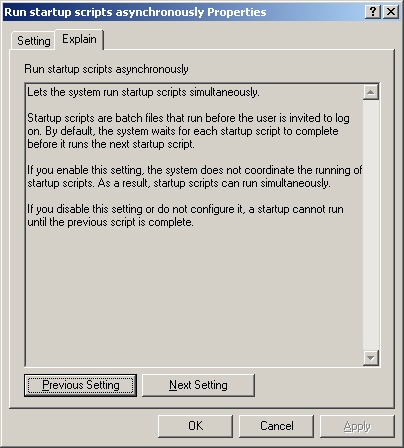
If you want to create a hard return within the Help text, just use the /n syntax. If you want to create a line break, you can use the /n/n syntax. You can use up to 4096 characters in any single EXPLAIN syntax entry—more than enough for a good description of the policy.
The Group Policy Object Editor uses the SUPPORTED tag to populate the REQUIREMENT field. This tag informs the Group Policy administrator about the platforms or applications for which the policy setting is supported. For example, many of the policy settings included in the System.adm file use a SUPPORTED tag that specifies a specific service pack release. The string used for the SUPPORTED tag often refers to multiple operating systems or service packs.
While operating system components generally use an operating system or service pack reference in this field, applications (which can be updated outside the release of a service pack) can refer to a specific version of an application. The SUPPORTED tag is essential for ensuring that Group Policy administrators have the information to make informed decisions about the use of the policy setting.
Your .adm file might also be localized, and you should use the !!Stringname construct in the SUPPORTED tag because it allows the referenced string to be localized easily. In addition, the SUPPORTED tag is supported only in Windows XP and later operating systems, so it should be enclosed within the if version construct, as follows. (This ensures that the Windows 2000 version of the Group Policy Object Editor does not attempt to interpret the SUPPORTED tag.)
POLICY !!ScreenSaverFilename
   #if version >=  4
   SUPPORTED !!SUPPORTED_Windows2003
   #endif
KEYNAME "SoftwarePoliciesMicrosoftWindowsControl PanelDesktop"
   PART !!ScreenSaverFilename EXPANDABLETEXT
   VALUENAME "SCRNSAVE.EXE"
   END PART
END POLICY
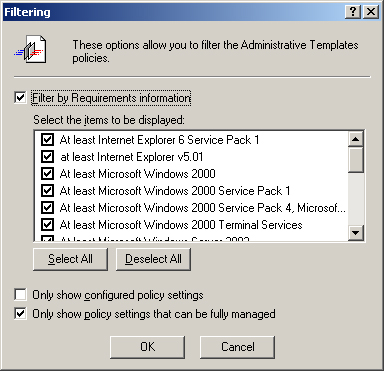
The SUPPORTED syntax and the operating system description accomplish two things in the Group Policy Object Editor. First, they list the operating system version under the requirements label in the Extended view of the Group Policy Editor, as shown in Figure 14-10. Second, they provide a way for the Filtering option to select the correct operating system versions to be displayed.
The .adm files cannot contain unlimited amounts of information. Restrictions are bound to each .adm file (although the chances of reaching these limits for custom .adm entries are small). Table 14-7 lists these restrictions.