The Windows component that handles program installation is Windows Installer. Group Policy includes many policy settings that allow you to modify how Windows Installer works. Windows Installer performs many tasks when programs are installed, including the following:
The sections that follow discuss policy settings and configuration options related to these tasks. Most of the related policies work with Windows 2000 or later and any Windows Installer version, but there are some specific exceptions. Check the Explain Text to verify specific support for each policy.
If System Restore is enabled in Windows XP Professional, a System Restore checkpoint is created before the installation begins. This checkpoint helps you recover the computer to the state it was in before the program was installed. The drawback is that each checkpoint uses disk space, and when you have many programs to install or update, you end up with many checkpoints that might not be needed.
In policy, you can configure computers so that System Restore checkpoints aren’t created. You do this by enabling Turn Off Creation Of System Restore Checkpoints under Computer ConfigurationAdministrative TemplatesWindows ComponentsWindows Installer.
If a program that uses baselines is being installed or updated, such as Microsoft Office 2003 or any Office 2003 components, Windows Installer version 3.0 or later either creates a baseline file cache or updates the existing baseline file cache to reflect which components have been installed or updated. This baseline is meant to eliminate user prompts for source media when you update programs. Instead of looking for the source media, the Windows Installer uses the baseline file cache to determine the location, version, status, and so forth of installed program components, and then it applies the updates.
By default, the maximum size of the baseline file cache is limited to 10 percent of a volume’s disk space. On computers with small drives, the maximum allowed size might not be enough to allow the Windows Installer to create a full baseline file cache. On computers with large drives, the maximum size might allow the baseline file cache to grow too large.
In policy, you can change the way the baseline file cache is used by completing the following steps:
Access the GPO you want to work with. Access Computer ConfigurationAdministrative TemplatesWindows ComponentsWindows Installer.
Double-click Baseline File Cache Maximum Size.
Select Enabled and then use the Baseline File Cache Maximum Size combo box to set the maximum allowed size for the baseline file cache as a percentage of hard disk space that can be used (Figure 6-7). Keep the following in mind:
A value of 0 disables the baseline file cache so that it cannot be used for future updates. Any existing baseline file cache is not deleted, however. An existing baseline file cache will be removed only if you run Disk Cleanup and elect to delete the files (as with Office baseline files) or uninstall the program for which the files were created.
A value of 100 allows the Windows Installer to use all available free space on a volume for the baseline file cache.
Click OK.

Rollback files allow Windows Installer to roll back an incomplete installation and to recover a program or the system to the state it was in before the program or component was updated. When you install programs, including system drivers and service packs, Windows Installer can automatically create rollback files. In some cases, users are prompted to choose whether they want these files to be created. In other cases, rollback files are created automatically. Although rollback files are considered temporary files, they generally remain on the computer until they are manually deleted or until you uninstall the related program.
Caution
The rollback feature can also be used by malicious users. If malicious users can interrupt an installation, they might be able to collection information about the computer and search secure system files.
You can configure Computer Configuration or User Configuration policy to prevent rollback files from being created. Unlike most other types of policy, if you prevent rollback in either location, the policy setting is considered to be enabled even if it is specifically disabled in the other location. For example, if you prevent rollback in User Configuration policy and someone else disables it in Computer Configuration policy, the policy setting is considered to be enabled.
To prevent rollback files from being created, double-click Prohibit Rollback under either Computer ConfigurationAdministrative TemplatesWindows ComponentsWindows Installer or User ConfigurationAdministrative TemplatesWindows ComponentsWindows Installer. In the Policy Settings dialog box, select Enabled and then click OK.
The privileges of the user performing an installation and the type of program being installed determine whether and how a program is installed. Programs that have been assigned to the user (offered on the desktop), assigned to the computer (installed automatically), or made available in Add Or Remove Programs in Control Panel have elevated installation privileges and can be installed, upgraded, or patched in directories that the current user might not have permission to view or work with. Other types of programs, however, are installed with normal system privileges and can be installed only in directories for which the current user has the appropriate access permissions.
On systems that have high security or very restrictive settings, you might find that users are prevented from installing needed programs. You can override this behavior in policy using Always Install With Elevated Privileges. This setting allows users who are not administrators to install programs that require access to restricted directories. Keep in mind, however, that this setting applies only to user-installed programs and not to programs distributed or offered by administrators; distributed or offered programs can be installed in restricted directories regardless of the configuration of this policy.
To make the Always Install With Elevated Privileges setting effective, you must enable it under Computer ConfigurationAdministrative TemplatesWindows ComponentsWindows Installer and under User ConfigurationAdministrative TemplatesWindows ComponentsWindows Installer. This means you enable and configure Always Install With Elevated Privileges as follows:
Access the GPO you want to work with. Access Computer ConfigurationAdministrative TemplatesWindows ComponentsWindows Installer.
Double-click Always Install With Elevated Privileges. In the Policy Settings dialog box, select Enabled and then click OK.
Access User ConfigurationAdministrative TemplatesWindows ComponentsWindows Installer.
Double-click Always Install With Elevated Privileges. In the policy settings dialog box, select Enabled and then click OK.
During installation, software programs can be configured for use by all users on a computer (also referred to as a per-computer configuration) or by the user who is installing the program (also referred to as a per-user configuration). In a standard Windows configuration, users can install and run both per-user and per-computer programs. In some situations, however, this might not be the optimal configuration. For example, some users might have an incompatible configuration of an application registered in their user profile, and this can cause problems with normal operations of both the computer and the application itself.
To prevent problems like this, you might want users to run only per-computer program installations and not any per-user program installations. This is where Prohibit User Installs comes in handy. Using this policy, you can specify whether per-user installations are allowed, hidden (ignored), or prohibited. For example, for computers configured as kiosks or on a Terminal Server, you might want only per-computer programs to be installed and available for use.
To configure Prohibit User Installs, follow these steps:
Access the GPO you want to work with. Access Computer ConfigurationAdministrative TemplatesWindows ComponentsWindows Installer.
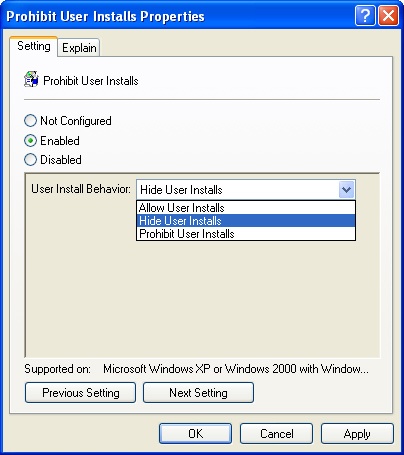
Double-click Prohibit User Installs.
Select Enabled and then use the User Install Behavior list to select the desired user install behavior (Figure 6-8). The options are as follows:
Allow User Installs. Windows Installer allows and makes use of programs that are installed per user, as well as programs that are installed per computer. If Windows Installer finds a per-user program installation, it hides any per-computer installations of that same program. This is the default behavior.
Hide User Installs. Windows Installer ignores per-user applications. Only per-computer installations are visible to users, even if those users have per-user installations registered in their user profiles.
Prohibit User Installs. Windows Installer prevents per-user installations of programs and ignores any previously installed per-user programs. If users try to perform a per-user installation, the Windows Installer displays an error message and stops the installation.
Click OK.
In some environments, you might want users to install only programs that have been distributed or offered to them (as discussed in Chapter 11). To prevent users from installing programs from floppy disk, CD, DVD, or other removable media sources, you can enable Prevent Removable Media Source For Any Install under User ConfigurationAdministrative TemplatesWindows ComponentsWindows Installer.
Tip
In addition to preventing use of removable media sources, you can hide and block access to individual drives. For details, see the "Managing File System, Drive, and Windows Explorer Access Options" section in this chapter.
Whenever programs are installed, Windows Installer creates an installation log to record various types of messages and events related to the installation. This log, named Msi.log, is stored in the %SystemDrive%Temp folder. By default, the log records the following types of messages or events:
Status messages
Nonfatal warning messages
Error messages
Startup of installation and logging actions
Through policy, you can modify the way logs are created and used. To do so, follow these steps:
Access the GPO you want to work with. Access Computer ConfigurationAdministrative TemplatesWindows ComponentsWindows Installer.
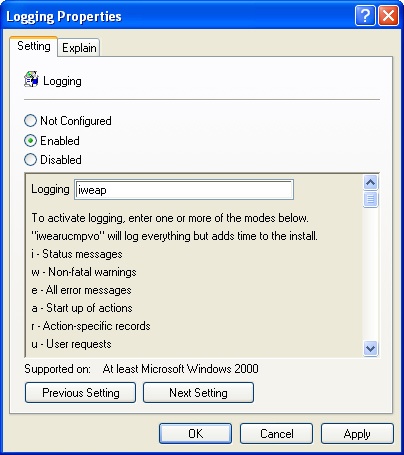
Double-click Logging.
Select Enabled and then use the Logging box to specify the desired logging options by using any combination of the following designators (Figure 6-9):
i. To record status messages
w. To record nonfatal warning messages
e. To all record messages
a. To record startup of installation and logging actions
r. To record details on installation and logging actions
u. To record user requests
c. To record the initial user interface parameters
m. To record Out Of Memory errors
p. To record Terminal Services properties
v. To enable verbose logging
o. To record Out Of Disk Space errors
Click OK.