
The Custom Installation Wizard, the Custom Maintenance Wizard and the Administrative Templates for Office are provided in the Office Resource Kit. Each version of Office has a separate resource kit that contains tools and administrative template files. You’ll find there is a resource kit for Office 2000, Office XP, and Office 2003. If you install multiple resource kits, you’ll have separate tools and policy files for each.
The best place to look for Office tools and information is the Office Web site (http://office.microsoft.com). You’ll find several important resource pages including:
http://office.microsoft.com/en-us/FX011511491033.aspx covering the Office 2000 Resource Kit
http://office.microsoft.com/en-us/FX011511511033.aspx covering the Office XP Resource Kit
http://office.microsoft.com/en-us/FX011511471033.aspx covering the Office 2003 Resource Kit
http://office.microsoft.com/en-us/FX011511561033.aspx covering Office updates administrators might be interested in
Because the Office Web site is continually updated, it is sometimes hard to locate the resources you need. At the time of this writing, http://www.microsoft.com/downloads/details.aspx?FamilyID=4bb7cb10-a6e5-4334-8925-3bcf308cfbaf&DisplayLang=en is the best download location for the Office 2003 Resource Kit tools. While you are online you might want to download the additional updates for Office 2003 service packs from http://www.microsoft.com/downloads/details.aspx?FamilyID=ba8bc720-edc2-479b-b115-5abb70b3f490&DisplayLang=en. Additional resource tools and files for Visio 2003 and for Project 2003 can be obtained from http://www.microsoft.com/office/ork/2003/tools/BoxA19.htm.
After you download the necessary files, you should run the associated installers on a computer that is part of the domain with which you want to work or a development machine if you want to test prior to deploying the tools. With the Office 2003 Resource Kit tools, you will want to perform a Complete Install. A complete install uses 30 MB of disk space. The default local path for the install is %SystemDrive%Program FilesORKTOOLS. Once the install is complete, you’ll find a new tools menu under Start, Programs or All Programs, Microsoft Office, Microsoft Office Tools, Microsoft Office 2003 Resource Kit. Table 10-1 provides an overview of the standard tools.
Table 10-1. Overview of Office 2003 Resource Kit Tools
Description | |
|---|---|
CMW File Viewer | Allows you to view the contents of Custom Maintenance Wizard (.cmw) files. |
Custom Installation Wizard | Allows you to create .mst transform files for customizing Office installations. |
Custom Maintenance Wizard | Allows you to update an existing Office deployment using.cmw files. |
Customizable Alerts | Provides detailed information for handling custom error messages. |
International Information | Provides detailed information on configuring and using multiple language versions of Office. |
MST File Viewer | Allows you to view the contents of .mst files. |
Office Information | Provides detailed information on Office files, registry entries and migration. |
OPS File Viewer | Allows you to view the contents of .ops files. |
Package Definition Files | Provide templates for deploying Office with Systems Management Server(SMS). |
Profile Wizard | Allows you to capture a user’s Office settings into a .ops file which can be included in an Office deployment. |
Removal Wizard | Allows you to selectively remove previous versions of Office applications. |
The Office 2003 Service Pack updates to the resource kit include additions and corrections to policies for administrative support of Office 2003 as well as several spreadsheets that describe available policies. These updated template files will be stored in the folder you designate when installing the updates. With updates to the Office 2003 Resource Kit, like a service pack, you’ll need to roll out two types of updates. First, you’ll roll out the actual update or service pack for Office 2003 through policy as discussed in Chapter 9 under "Deploying Microsoft Office Through Policy." You’ll then need to check for Administrative Templates or other types of policy updates, such as the ones from http://www.microsoft.com/downloads/details.aspx?FamilyID=ba8bc720-edc2-479b-b115-5abb70b3f490&DisplayLang=en, and deploy any updated policy files as appropriate to the GPOs that use Office-related Administrative Templates. The steps you’ll need to follow are discussed in the next section.
You configure new installations of Office using the Custom Installation Wizard. When you run this wizard, it creates transform files you can distribute through policy when you deploy Office. You can use the wizard to:
Choose the folder location to install Microsoft Office
Specify whether to remove previous versions of Office applications
Configure whether and how various Office applications are installed
Create a profile with default application settings, registry entries and shortcuts
Set security and other options for Office
Because there are several prerequisites, working with the Custom Installation Wizard isn’t as straightforward as you’d expect. Before you get started, you’ll need to create an administrative install of the Office .msi file. You’ll then need to use the Custom Installation Wizard to create the require .mst file. Once you have the transform file, you can deploy the Office configuration through policy. Keep in mind that you can add .mst files only when you are initially Assigning or Publishing an installer package.
Before you can use the Custom Installation Wizard, you will need an administrative install of Office’s .msi file. To perform an administrative install, complete the following steps:
Log on to a computer where you’ve installed the Office version you want to work with and where you have administrator privileges.
Perform an administrative installation of Office’s main .msi file by typing the following command at the command prompt:
setup /a MSIFileNamewhere MSIFileName is the name of the main .msi file for the version of Office you are configuring, for example:
setup /a pro11.msiThis starts the Office Installation Wizard. Use the wizard to prepare the Office’s .msi file for deployment. You will need to specify your organization name and a valid product key. You will also need to accept the End User License Agreement.
Copy the administrative install of the .msi file to the network share from which it will later be deployed through policy.
When you have an administrative install of Office’s .msi file, you can use the Custom Installation Wizard to configure the Office installation. To do this, complete the following steps:
Click Start, point to Programs or All Programs, Microsoft Office, Microsoft Office Tools, Microsoft Office 2003 Resource Kit, and click Custom Installation Wizard.
When the Custom Installation Wizards starts, click Next.
On the Open The MSI File page, click Browse and then browse to the location of the administrative install of Office’s .msi file. Click Next.
Set a name for the .mst transform file that will be used to customize the Office installation. Click Next.
You can now configure the Office installation. On the final wizard page, click Finish and then specify a save location for the .mst transform file. Generally, you will want to copy the .mst file to the same location as the administrative install of the .msi file.
When the Custom Installation Wizard finishes, configure policy to deploy the Office configuration using the transform file. Follow these steps:
Access Software Installation in Group Policy. For a per-computer Office deployment, access Computer ConfigurationSoftware SettingsSoftware Installation. For a per-user Office deployment, access User ConfigurationSoftware SettingsSoftware Installation.
Right-click on the Software Installation and choose New, Package.
In the Open dialog box, type the UNC path to the network share where your.msi package is located or use the options provided to navigate to the package and select it.
Click Open. Select Published or Assigned to publish or assign the application without modifications.
Wait for the package to be created. When you can see the package in the right pane, right-click it and select Properties.
On the Modifications tab, click Add. Specify the path to the .mst file and then click OK. The selected transform file will then be deployed with Office.
You can modify existing installations of Office using the Custom Maintenance Wizard. When you run this wizard, it creates .cmw files, which you can distribute through policy to update an Office Installation. You can use the wizard to:
Change your organization name
Reconfigure the installation options various Office applications
Modify default application settings, registry entries and shortcuts
Modify security and other options for Office
You work with the Custom Maintenance Wizard in much the same way as you work with the Custom Installation Wizard. Before you get started, you’ll need to know the location of the administrative install of Office’s .msi file. You’ll then need to use the Custom Maintenance Wizard to create the require .cmw file. Once you have the .cmw file, you can deploy Office configuration change through policy.
To update the configuration of a previously deployed Office installation, complete the following steps:
Click Start, point to Programs or All Programs, Microsoft Office, Microsoft Office Tools, Microsoft Office 2003 Resource Kit, and click Custom Maintenance Wizard.
When the Custom Maintenance Wizards starts, click Next.
On the Open The MSI File page, click Browse and then browse to the location of the administrative install of Office’s .msi file. Click Next.
Set a name for the .cmw file that will be used to modify the Office configuration. Click Next.
You can now reconfigure the Office installation. On the final wizard page, click Finish and then specify a save location for the .cmw file. Generally, you will want to copy the .cmw file to the same location as the administrative install of the .msi file.
After you create the .cmw file, copy the .cmw file and Maintwiz.exe to the administrative installation point. One way to apply the updates is to run the Custom Maintenance Wizard on your users’ computers. You can do this using a logon script, as an example. In the script, enter the following line:
UNCpathmaintwiz.exe /c "ConfigFile"
where UNCPath is the complete UNC path to the administrative share and ConfigFile is the name of the .cmw file, such as:
\CorpSvr08appsOfficeupdatesmaintwiz.exe /c "EngOfficeUpdate.cmw"The Custom Maintenance Wizard calls Windows Installer to apply the changes in the .cmw file to the user’s computer. By default, the wizard runs with a minimal user interface, displaying only progress indicators and error messages. To run the wizard silently, add the/q option to the command line, such as:
\CorpSvr08appsOfficeupdatesmaintwiz.exe /c "EngOfficeUpdate.cmw" /qWhen working with the Custom Maintenance Wizard keep the following in mind:
If Office 2003 was installed per-computer, the updates are applied per-computer and affect all users on the computer. However, if Office 2003 was installed per-user, Windows Installer makes the changes only for the user who runs the wizard and applies the .cmw file.
The Office Source Engine checks only the source from which the user originally installed Office and passes that information to the Custom Maintenance Wizard. If you installed Office from an administrative installation point, Windows Installer searches for a valid source from which to apply the .cmw file. If you installed Office from a local installation source, you must store the .cmw file on the original compressed image source.
Only administrators can apply .cmw files from any location to a user’s computer. To allow non-administrator users to apply the updates to their computers, you must store Maintwiz.exe and the .cmw file together on the administrative installation point (as recommended previously). You can work around this requirement by enabling Always Install With Elevated Privileges under Computer ConfigurationAdministrative TemplatesWindows ComponentsWindows Installer.
You can also deploy .cmw files through policy. To do this, complete these steps:
Access Software Installation in Group Policy. For a per-computer Office deployment, access Computer ConfigurationSoftware SettingsSoftware Installation. For a per-user Office deployment, access User ConfigurationSoftware SettingsSoftware Installation.
Right-click the Office software package and select Properties.
On the Modifications tab, click Add. Specify the path to the .cmw file and then click OK. The selected .cmw file will then be deployed and used to reconfigure Office.
The Office 2003 Resource Kit includes a set of Administrative Templates, which we’ll refer to as the Office 2003 Administrative Templates. These templates include policies settings for customizing the configuration of Office applications. Keep in mind that the Office 2003 Administrative Template files do not expose every user interface element in each Office application for configuration. Rather, they expose the most commonly used elements to allow you maximum control while minimizing the complexity of managing Office installations.
During installation of the Office 2003 Resource Kit, the Office 2003 Administrative Templates are copied to the %SystemRoot%Inf folder on the local computer. This location is the default location for policy templates. At this point, the policy templates are not available for use in your organization. If you examine the %SystemRoot%Inf folder, you will find a set of .adm files; each related to an individual Office application. Table 10-2 lists each file and the application to which it relates. If you downloaded the tools and files for Project and Visio, you’ll find two additional .adm files. These files are listed in the table as well.
Table 10-2. Office System 2003 Administrative Template Files
Filename | Office Application |
|---|---|
Access11.adm | Microsoft Access 2003 |
Excel11.adm | Microsoft Excel 2003 |
Fp11.adm | Microsoft FrontPage 2003 |
Gal11.adm | Microsoft Clip Organizer |
Inf11.adm | Microsoft InfoPath 2003 |
Office11.adm | Microsoft Office 2003, which controls global Office configuration settings |
Onent11.adm | Microsoft OneNote 2003 |
Outlk11.adm | Microsoft Outlook 2003 |
Ppt11.adm | Microsoft PowerPoint 2003 |
Proj11.adm | Microsoft Project 2003; only available if you install the Project policy file |
Pub11.adm | Microsoft Publisher 2003 |
Visio11.adm | Microsoft Visio 2003; only available if you install the Visio policy file |
Word11.adm | Microsoft Word 2003 |
You can deploy one or all of the Office 2003 Administrative Template files, depending on your configuration needs. To deploy a template within your Group Policy environment, you must first add the template file to the Group Policy Object (GPO) in which it will be used. There are two different recommended techniques, depending on whether you are deploying Office Administrative Templates files for the first time in your organization or updating Office-related policy due to availability of new files from an Office Service Pack or other Office update.
Note
Office 2003 Administrative Templates are deployed on a per-GPO basis. This deployment technique is different from the technique used for new operating system versions and operating system service packs. With new operating system versions and operating system service packs, you can update the entire Group Policy environment, meaning the updates will be applied to all GPOs.
To deploy Office-related policy templates for the first time to a GPO in your organization, follow these steps:
If you are deploying Office policy settings for the first time, and have updated policy files, such as those for Office 2003 Service Pack 1, you should copy the updated files to the %SystemRoot%Inf folder on the local computer before you continue.
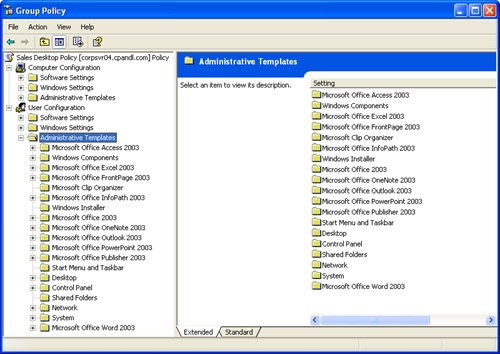
Open the GPO you want to work with. Right-click Administrative Templates under User Configuration and choose Add/Remove Templates to view the currently loaded .adm files as shown in Figure 10-1.
Click Add to open the Policy Templates dialog box. The default folder location opened is %SystemRoot%Inf.
Choose the template file or files to load. To select multiple files at once, hold the Shift or Ctrl keys as appropriate.
Click Open and then click Close. The Administrative Templates namespace changes to include new nodes representing the policy settings you’ve just added as shown in Figure 10-2.
Repeat this procedure for each GPO that should use Office-related policy.

Note
The files you’ve added are copied to the SYSVOL portion of that GPO and are replicated to all domain controllers in the domain. (See Chapter 13, for more information about Group Policy storage.)
Updates to Office-related policy are provided as service packs or general updates to an Office Resource Kit. Office 2003 is the first version of Office to use Group Policy as the recommended method for setting and maintaining policies throughout an organization. Several service packs for the Office 2003 Resource Kit have been released; each containing updates to the Office 2003 Administrative Templates. For more information about Office 2003 template updates, see http://office.microsoft.com/en-us/assistance/HA011513711033.aspx.
After you download the service pack, create a new folder on your computer’s local drive and then double-click the file you downloaded to begin the extraction process. When prompted to provide the extraction location, specify the path to the new folder you created. The updates tools and files will then be copied to this location.
To update previously deployed Office-related policy templates, follow these steps:
Access the GPO you want to work with. Right-click Administrative Templates under User Configuration and choose Add/Remove Templates to view the currently loaded .adm files.
Click Add to open the Policy Templates dialog box. Use the Look In list to select the folder in which you installed the policy updates from the Office Service Pack.
Choose the template file or files to load. To select multiple files at once, hold the Shift or Ctrl keys as appropriate.
When you click Open, you’ll see the Confirm File Replace dialog box. Click Yes To All if you’ve selected multiple templates. Otherwise, click Yes.
Click Close. The files you’ve added are copied to the SYSVOL portion of that GPO. Once the updates are replicated to all domain controllers in the domain, you’ll be able to use any new policies. You should check previously configured policies for material changes as well, which can sometimes occur.
Repeat this procedure for each GPO that should use Office-related policy.
To save yourself a lot of work, you should carefully plan your Office configuration roll out. You might be tempted to add Office policy to existing site, domain or OU GPOs. However, you will probably want to use separate Office configuration GPOs and then link them to the appropriate sites, domains or OUs in your organization. This approach will give you increased flexibility and make it easier to manage your Office installations.
To see why, consider the following deployment scenarios:
Scenario A: You’ve deployed Microsoft Office 2003 to the Marketing, Sales, Technology and Customer Service OUs. You want to manage the Office configuration in each of the environments so you add Office 2003 Administrative Templates to the OU GPOs for the Marketing, Sales, Technology and Customer Service OUs. You then set about configuring Office in each of these GPOs. You have separate configurations but had to configuration each option in multiple GPOs.
Scenario B: You’ve deployed Microsoft Office 2003 to the NE Sales, NW Sales, SE Sales, SW Sales and Midwest Sales OUs. You want to manage the Office configuration in each of the environments in the same way. You create an Office configuration GPO and add the Office 2003 Administrative Templates to it. You then configure Office in this GPO and can then link the GPO to the NE Sales, NW Sales, SE Sales, SW Sales and Midwest Sales OUs. You have a single configuration deployed to multiple GPOs.
Scenario C: You’ve deployed Microsoft Office 2003 to the Engineering, IT, Accounting, and Sales OUs. You want to manage the Office configuration in each of the environments separately. You create an Office configuration GPO and add the Office 2003 Administrative Templates to it. You then configuring Office in this GPO. This GPO establishes your Office configuration baseline. You then create 4 copies of the GPO and name the GPOs Engineering Office Policy, IT Office Policy, Accounting Office Policy and Sales Office Policy. You make adjustments to the baseline configuration as necessary in each GPO and then link the GPOs as appropriate to the OUs. You use a baseline configuration to minimize the work required to create separate custom configurations of Office.
As you can see, the way you deploy Office configurations can have a significant impact on the amount of work you have to do. In creating your Office configuration GPOs, you also consider who will receive a particular configuration. By default, the policy will apply to all users or computers within the site, domain or OU to which you’ve linked the GPO. As this might not be the ideal behavior, you might need to filter the policy application. For example, if you configure security filtering on an Office configuration GPO so that only members of the Temp Sales security group have the policy applied, only members of the Temp Sales group will have this Office configuration.
The choice to deploy a particular version of Office isn’t an all or nothing decision. You’ll often find that you have different groups of users running different versions of Office. For example, the Sales and Accounting departments might be running Office XP while the rest of the company is using Office 2003. This mixed environment is okay and you can manage both installations of Office through policy.
As discussed previously, the policy files for Office are distributed with the Office Resource Kit. If you have users running both Office 2003 and Office XP, you will need to install the Office 2003 Resource Kit and the Office XP Resource Kit. In the Office 2003 Resource Kit, you’ll find the policy files you’ll use to manage Office 2003 configurations. In the Office XP Resource Kit, you’ll find the policy files you’ll use to manage Office XP configurations.
As of this writing, the Office XP Resource Kit Tools can be downloaded from http://www.microsoft.com/downloads/details.aspx?FamilyID=25b30c79-b248-4eb9-8057-be0043f5b881&DisplayLang=en. the Office XP Resource Kit includes an Administrative Template file for each Office XP application. You install and work with these administrative templates using the techniques discussed previously. As shown in Table 10-3, the Office XP policy files are named different than other Office versions. Not only does this ensure that you won’t accidentally overwriting existing Office policy configurations, it also is used to manage various Office policy versions separately from each other. You will, in fact, have separate policy nodes for each Office version and their associated applications.
Table 10-3. Office XP Administrative Template Files
Office Application | |
|---|---|
Access10.adm | Microsoft Access 2002 |
Excel10.adm | Microsoft Excel 2002 |
Fp10.adm | Microsoft FrontPage 2002 |
Gal10.adm | Microsoft Clip Organizer |
Office10.adm | Microsoft Office 2002, which controls global Office configuration settings |
Outlk10.adm | Microsoft Outlook 2002 |
Ppt10.adm | Microsoft PowerPoint 2002 |
Pub10.adm | Microsoft Publisher 2002 |
Word10.adm | Microsoft Word 2002 |
As of this writing, the Administrative Template files for managing Office 2000 installations are part of the Office 2000 Resource Kit, available at http://www.microsoft.com/downloads/details.aspx?FamilyID=982348b3-0005-4792-a15c-34f738b3c328&DisplayLang=en. As with Office XP, Office 2000 Administrative Template settings can coexist with settings for other Office versions in a single GPO.
It is important to point out that because different versions of Office have different features, each version of the Office Administrative Template files supports a slightly different set of policies. This means you will not be able to have a complete one-to-one mapping of policy settings as you move from version to version. But in general, the settings are similar from version to version.
It is also important to point out that different Office versions are managed separately in the Windows Registry. For example, Office XP Administrative Template policies make changes to the HKEY_CURRENT_USERSoftwarePoliciesMicrosoftOffice10.0key, while the Office 2003 policies make changes to the HKEY_CURRENT_USERSoftwarePoliciesMicrosoftOffice11.0 key. This means that the Office XP and Office 2003 policy settings can coexist for a given user. It also means that you can have a GPO that contains both Office XP and Office 2003 Administrative Template files if you choose.
An example of when you might want both Office XP and Office 2003 Administrative Template settings in a single GPO is when that GPO is linked to an OU where users are running both versions of Office. In this case, having all of your Office configuration settings in a single GPO would make it easier to keep track of which settings you are using and let you quickly compare Office XP settings and their counterpart settings in Office 2003.
You could also implement each version of Office Administrative Template files within separate GPOs. You might want to do this to prevent groups of users from processing one or the other set of policies. In this case, you could split the Office policy settings into separate GPOs by version and then using security filtering to control which group of users receives which policy. Within the Marketing OU, for example, members of the Marketing Support security group might use Office XP and the Marketing Main security group might use Office 2003. If so, you could create Office XP Users and Office 2003 Users GPOs and use security group filtering to ensure policy is only applied to users who are using the respective version of Office.
An alternative that is easier to implement in some cases is to use a WMI filter to detect which version of Office is installed on a given computer. For example, a simple WMI filter, linked to a GPO, that detects the presence of Office 2003 looks like this:
RootcimV2;Select * FROM Win32_Product WHERE Caption="Microsoft Office
Professional Edition 2003"
Similarly, you can have a WMI filter linked to the Office XP GPO that searches for the Office XP string within the caption property of the Win32_Product class. Keep in mind, however, that if a computer has a large number of applications installed on it, this WMI query might take some time to execute, slowing Group Policy processing. Be sure to test this in your environment before rolling out into production.