
IPSec policies are stored and available for domain-wide access. When you create an IPSec policy in one GPO, you can edit other GPOs in a site, domain, or OU and assign the IPSec policy within those GPOs as well.
Within Active Directory domains and on local computers, there are three default IPSec policies:
Server (Request Security). Any server processing this policy will request secure communications from all clients. Secure communications will not be required, however, if a client does not support it. For example, Windows NT 4.0 clients are not IPSec-aware and cannot support IPSec.
Client (Respond Only). Any client processing this policy will communicate unsecured normally but will respond to server requests for secure communication.
Secure Server (Require Security). Any server processing this policy will communicate only with clients that either initiate or can respond to secure communication requests. Servers will not respond to clients that cannot use secure IPSec communications.
These predefined policies provide a starting point for you to implement the various services IPSec offers. You can assign and enforce these and other policies by completing the following steps:
Access Computer ConfigurationWindows SettingsSecurity SettingsIP Security Settings On Active Directory in Group Policy.
Under the Policy Assigned column in the right pane, you’ll see the current state of the default IPSec polices and any additional IPSec policies that you’ve created (Figure 11-1). A status of No indicates that a policy is not assigned and therefore is not applied.
To assign an IPSec policy and therefore apply it, right-click the policy and select Assign. The status under Policy Assigned should change to Yes.

If you later want to deactivate an IPSec policy, you can do so by right-clicking it and selecting Un-assign. The status under Policy Assigned should change to No.
You can create your own IPSec policies as well. An IPSec policy is composed of the following:
General settings, which apply regardless of which rules are configured. These settings determine the name of the policy, its description for administrative purposes, key exchange settings, and key exchange methods.
One or more IPSec rules that determine which types of traffic IPSec must examine, how traffic is treated, how to authenticate an IPSec peer, and other settings such as the type of network connection to which the rule applies and whether to use IPSec tunneling.
The steps you need to follow when creating a new IPSec policy are pretty straightforward. First you create the policy, then you create the rules within the policy that are composed of filters, filter actions, and other required settings. Finally, you assign one IPSec policy to each GPO that requires an IPSec policy.
You can create an IPSec policy by completing the following steps:
Access Computer ConfigurationWindows SettingsSecurity Settings.
Right-click IP Security Settings On Active Directory, and choose Create IP Security Policy. This starts the IP Security Policy Wizard. Click Next.
On the IP Security Policy Name page, enter a policy name and description, as shown in Figure 11-2. Click Next.
In the absence of any other defined rules on this policy, a Default Response Rule is created by default. The Default Response Rule guarantees that the machines that process this policy will respond with secure communications when requested to do so. It’s generally a good practice to keep this enabled for GPOs being applied to client computers. Click Next.
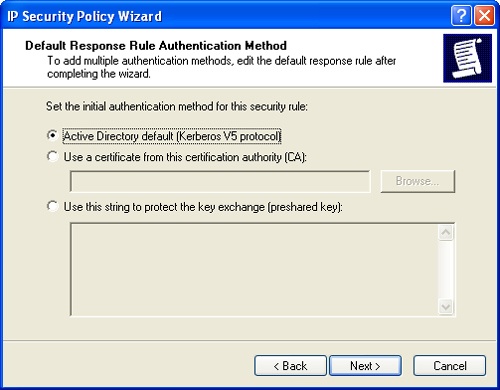
On the Default Response Rule Authentication Method page (Figure 11-3), choose an authentication mechanism for the Default Response Rule. The authentication options are:
Active Directory Default (Kerberos V5 Protocol). Uses Kerberos authentication. Kerberos is the default authentication method for all domain computers running Windows 2000 or later. If you are managing systems that are all members of an Active Directory domain, this is the best choice.
Use A Certificate From This Certification Authority (CA). Uses a public key encryption technology for authentication. This requires a certificate from a designated Certification Authority (CA) in your organization. If your systems are not part of Active Directory, this option is best.
Use This String To Protect The Key Exchange. Uses a preshared key for authentication. You must type (or copy and paste) the text of the preshared key into the text box provided. Preshared keys don’t provide the same level of security as the other two approaches and recommended only for use in test environments or for third-party IPSec peer interoperability.
Click Next, and then click Finish. The Edit Properties box is selected by default so you can further customize the policy with rules and actions (as detailed in the next section).

Once the new policy has been created, you must activate the IPSec policy so it will be processed. If you want to activate the IPSec policy for the currently selected GPO, right-click the policy and choose Assign. The IPSec policy is assigned in the GPO being edited. Any computer that processes that GPO will receive the policy.
Tip
IPSec policies are stored and available for domain-wide access, so you can edit other GPOs in the site, domain, or OU and assign the IPSec policy to these GPOs as well. Simply access Computer ConfigurationWindows SettingsSecurity SettingsIP Security Policies On Active Directory, right-click the IPSec policy, and then select Assign.
After you create an IPSec policy, the next step is to define the rules that govern how network communications should be secured and what actions should be taken by those rules. To do this, follow these steps:
Display the Properties dialog box for the IPSec policy you are configuring. If necessary, Access Computer ConfigurationWindows SettingsSecurity SettingsIP Security Settings On Active Directory, right-click the policy, and select Properties.
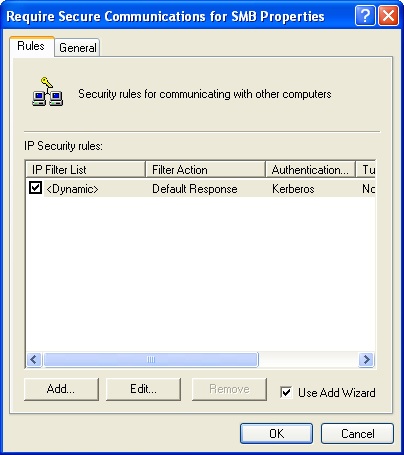
As shown in Figure 11-4, any current IP security rules, such as the Default Response Rule, are listed under IP Security Rules.
To define a new security rule, click Add. This starts the Security Rule Wizard.
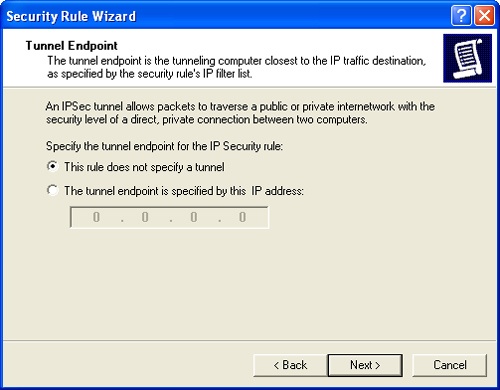
Specify whether to use an IP tunnel for this rule, as shown in Figure 11-5, and then click Next. You have two choices:
This Rule Does Not Specify A Tunnel. Allows for secure communications between computers without the use of IPSec tunnel mode. Choose this option to allow for secure communications when you do not have a requirement for direct, private connections, such as when communicating on a private network. Keep in mind that you do not need to tunnel traffic to ensure that it is encrypted. Other encryption options can be set within a rule.
The Tunnel Endpoint Is Specified By This IP Address. Creates an encrypted communications tunnel over a private or public network between two computers that are communicating. When you choose this option, you must also enter the IP address of the tunnel endpoint. This option allows direct, private connections between two computers, such as may be needed when communicating over a public network such as the Internet.
Choose the network type that you want the rule to cover, and then click Next:
All Network Connections. Applies the rule to all network connections on the computers to which the policy is assigned, including both LAN and remote access interfaces
Local area network (LAN). Limits the rule application to LAN connections on the computers to which the policy is assigned
Remote Access. Limits the rule application to Remote Access connections on the computers to which the policy is assigned
Note
Typically, you will apply security rules to LAN interfaces because these are the most commonly used types of interfaces on internal networks. If your organization has users with portable computers and must connect remotely with third-party VPN servers that do not support L2TP/IPSec, you should also consider how policy will be applied to users who access the internal network from remote connections. To handle local and remote connections separately, you need two rules, one that specifies how to handle IP security for local connections and one that specifies how to handle IP security for remote connections.
The IP Filter List page, shown in Figure 11-6, allows you to specify the type of traffic to which the rule should apply as well as the source and destination IP addresses to which the rule applies. By default, two filter lists are provided:
All ICMP Traffic. Specifies all ICMP traffic from any source to any destination
All IP Traffic. Specifies all IP traffic from any source to any destination
Select one of the default filter lists if you want to specify a particular action for all ICMP or all IP traffic. If neither of these filter lists works for you, click Add and then create a new filter list (as discussed under "Creating and Managing IP Filter Lists"). Click Next.
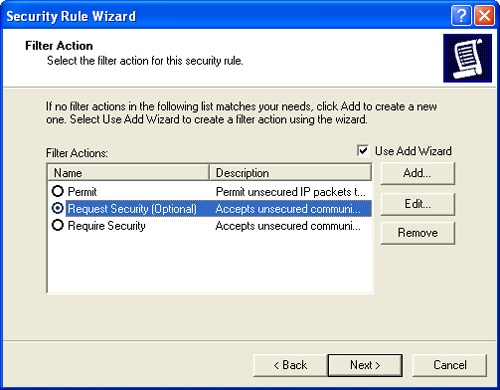
On the Filter Action page, shown in Figure 11-7, you set the action that should be taken with network traffic that meets the filter requirements. By default, three filter actions are specified:
Permit. Permits unsecured packets to be sent and received.
Request Security (Optional). Allows unsecured communications but asks clients to establish trust and use secure communications. Allows communication with unsecure clients if they do not respond successfully to the request to use security.
Require Security. Allows unsecured communications but always requires clients to establish trust and use secure communications. No communications with unsecure clients are allowed.
Select a default filter action or create a new filter action by clicking Add (as detailed in the upcoming section titled "Creating and Managing Filter Actions." Click Next.
Click Finish. The Edit Properties box is selected by default so you can further customize the security rule.

Now you assign the policy so that it will be applied to computers that process the current GPO. To do this, simply right-click the new IPSec policy and choose Assign. The policy is actively linked to this GPO, and any computer that processes the GPO will receive and apply the policy.
IP filter lists allow you to specify the type of traffic to which an IP filter action will apply. Two default filter lists are provided:
All ICMP Traffic, which specifies all ICMP traffic from any source to any destination
All IP Traffic, which specifies all IP traffic from any source to any destination
You can create additional filter lists for IP Security rules as well. To see how filter lists work, consider the following example:
You want to filter Server Message Block (SMB) traffic between clients on your subnet and a specific file server with the IP address 192.168.1.50.
You create an IP security rule and then add an IP filter list to this rule.
You set the source IP address for the filter to any IP address that originates on your IP subnet, 192.168.1.0 with a subnet mask of 255.255.255.0.
You set the destination IP address for the filter to the IP address of the file server, 192.168.1.50.
You mirror the filter because you want SMB traffic both from and to the server to be secured.
To create new IP filter lists or manage existing filter lists assigned to a rule, follow these steps:
Display the Properties dialog box for the IPSec policy you are configuring. If necessary, access Computer ConfigurationWindows SettingsSecurity SettingsIP Security Settings On Active Directory, right-click the policy, and then select Properties.
Select a previously defined IP Security rule, and then click Edit. This opens the Edit Rule Properties dialog box.
The IP Filter List tab shows the currently defined IP filter lists. You can now edit or remove existing IP filter lists or create a new IP filter list. The selected IP filter list specifies which network traffic will be in affect for the current rule. Only one filter list can be selected for each rule.
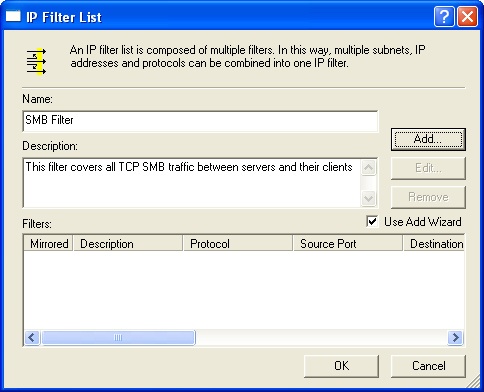
To create a new filter list, click Add. In the IP Filter List dialog box, type a name for the filter list and then add a description (Figure 11-8). For example, if you are creating an SMB filter list, you might use the name SMB Filter List and a description such as This filter list covers all SMB traffic between servers and their clients.
Click Add. When the IP Filter Wizard starts, click Next.
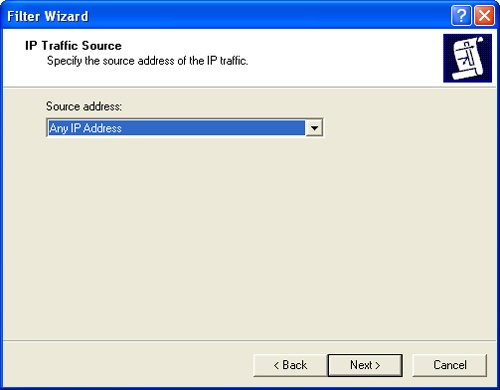
On the IP Traffic Source page, specify the source address of the IP traffic that you want to filter (Figure 11-9). Select one of the following options, provide any necessary information, and then click Next:
My IP Address. Sets the filter source to the IP address of the computer on which the IPSec policy is applied
Any IP Address. Sets the filter source to any IP address
A Specific DNS Name. Sets the filter source to the IP address resolved from the DNS host name you specify
A Specific IP Address. Sets the filter source to the specific IP address with a given subnet mask
A Specific IP Subnet. Sets the filter source to a specific IP subnet using a given subnet address and subnet mask
On the IP Traffic Destination page, specify the destination address of the IP traffic that you want to filter. After selecting one of the following options, provide any necessary information and then click Next.
My IP Address. Sets the filter destination to the IP address of the computer on which you are configuring IP security
Any IP Address. Sets the filter destination to any IP address on the network
A Specific DNS Name. Sets the filter destination to the specific DNS host name you specify
A Specific IP Address. Sets the filter destination to the specific IP address with a given subnet mask
A Specific IP Subnet. Sets the filter destination to a specific IP subnet using a given subnet address and subnet mask
On the IP Protocol Type page, set the protocol type to filter. Select Any to filter packets sent and received on any IP protocol. Select Other to manually configure the protocol type. Click Next.
If you chose TCP or UDP as the protocol type, you can now specify the source and destination ports. For example, if you want to filter SMB traffic, which can originate on any port but connects to TCP port 445 on file serves, select From Any Port and To This Port with 445 entered, as shown in Figure 11-10. Click Next.
On the Addressing tab of the Filter Properties dialog box, confirm that the mirroring option is the one you want to use. When a filter is mirrored, the same filter is applied to both source and destination computers. Thus if you want the rule to apply only one way—from clients to servers or from servers to clients, depending on the filter configuration—you clear the Mirrored check box.
Click OK.

The filter action lets you tell computers that process the IPSec policy what to do with network traffic that meets the filter list you just created. By default, three filter actions are specified:
Permit. Permits unsecured packets.
Request Security (Optional). Allows unsecured communications but requests that client establish trust and use secure communications. Allows communications with unsecured clients if they do not respond successfully to the request to use security.
Require Security. Allows unsecured communications but always requires that clients establish trust and use secure communications. No communications with unsecured clients are allowed.
You can create additional filter actions for IPSec rules as well. To create new IP filter actions or manage existing filter actions assigned to a rule, follow these steps:
Display the properties dialog box for the IPSec policy you are configuring. If necessary, access Computer ConfigurationWindows SettingsSecurity SettingsIP Security Settings On Active Directory, right-click the policy, and select Properties.
Select a previously defined IP Security rule, and then click Edit. This opens the Edit Rule Properties dialog box.
The Filter Action tab shows the currently defined filter actions. You can now edit or remove existing filter actions or create a new filter action. The selected filter action specifies how traffic that meets the filter list selected on the Filter List tab is handled. Only one filter action can be selected for each rule.
To create a new filter action, click Add. When the IP Security Filter Action Wizard starts, click Next.
On the Filter Action Name page, type a name for the filter action and then add a description. For example, if you are creating a filter action for an SMB filter list, you might use the name Require Security for SMB and a description such as This filter actions is used to require secure communications for SMB traffic between severs and their clients.
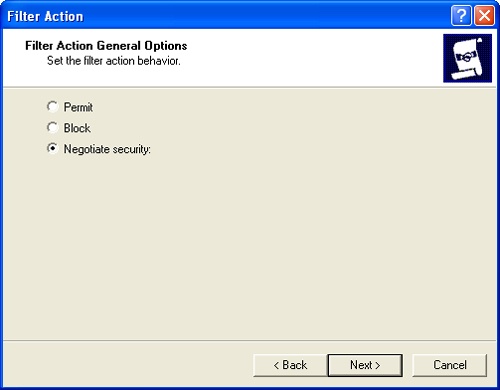
Click Next. On the Filter Action General Options page, you can now set the filter action behavior (Figure 11-11). Choose one of the following options:
Permit. All traffic that meets the filter is permitted.
Block. All traffic that meets the filter is blocked.
Note
You can use blocking to provide basic port filtering via IPSec policy. By choosing particular types of traffic and particular ports and then specifying the block option, you can control which types of traffic are processed by your computers and which are dropped. However, Windows Firewall is a better approach because it is more versatile and easier to manage.
Negotiate Security. Allows you to specify additional requirements for secure communication.
If you chose Permit or Block, click Next and then click Finish, and skip the remaining steps.
If you chose Negotiate Security, click Next and then specify whether you want this filter action to allow communication with computers that do not support IPSec:
If you want to ensure that only IPSec-capable computers can communicate according to the filter rule, choose Do Not Communicate With Computers That Do Not Support IPSec.
If you want to allow unsecured communications with clients that don’t support IPSec-based secure communications, choose Fall Back To Unsecured Communications.
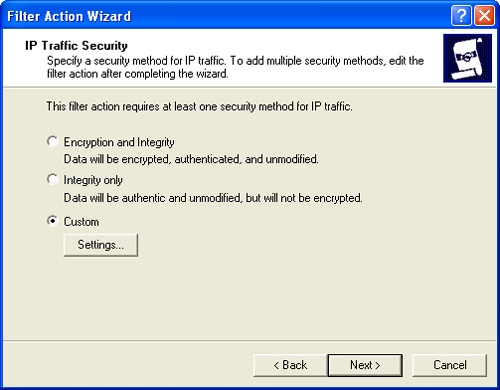
Click Next. Choose the security method you want to use for this filter (Figure 11-12).
Encryption And Integrity. Data is encrypted, authenticated and unmodified. The default encryption algorithm is 3DES. The default integrity algorithm is SHA1.
Integrity Only. Data is authenticated and unmodified. Integrity is checked using the SHA1 integrity-checking algorithm.
Custom. Allows you to specify the encryption and integrity techniques and algorithms to use. You can also specify that you want to generate session keys and configure session key handling.
Click Next, and then click Finish.
After you deploy IPSec policy, you should check individual machines to make sure they are receiving the correct policy and that the policy is being used. Windows Server 2003 provides the IP Security Policy Management snap-in for this purpose. You can start and use this snap-in by following these steps:
To open a new Microsoft Management Console, click Start, Run. In the Run dialog box, type mmc and then click OK.
Choose File, Add/Remove Snap-in.
In the Add/Remove Snap-in dialog box, click Add.
In the Add Standalone Snap-in dialog box, select IP Security Monitor and then click Add.
Click Close, and then click OK.
By default, the IP Security Monitor snap-in opens with its focus on the computer where it’s being run. However, you can right-click the IP Security Policy Monitor node and choose Add Computer to select a different computer.
As shown in Figure 11-13, the IP Security Monitor snap-in shows details about the active IPSec policies on a given computer. You can thus see at a glance if IPSec is being used, how it is being used, and which policy is in effect.
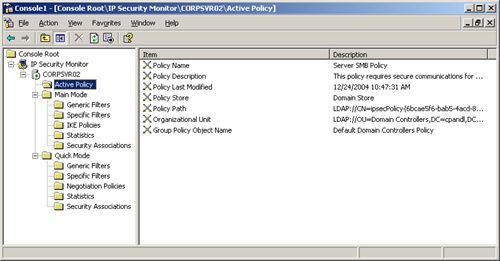
The IP Security Monitor snap-in also lets you view details of:
Main Mode, which represents the key exchange negotiation phase of an IPSec communication
Quick Mode, which is the data protection negotiation phase.