
Windows Explorer provides access to and views of a computer’s files, folders, drives, and network locations. Using Windows Explorer, you can access and configure network drives, folder sharing, file system security, and much more. In some environments, you might want to limit the available features in Windows Explorer and any related views or dialog boxes, such as My Computer and My Network Places, to enhance security and help maintain system integrity. Common scenarios you might want to implement include:
Hiding specified drives
Preventing access to drives
Removing CD-burning features
Removing the Security tab
Limiting the maximum allowable size for the Recycle Bin
The sections that follow examine these configuration options. Most of the related policies work with Windows 2000 or later, but there are some specific exceptions. Check the Explain Text to verify specific operating system support for each policy.
Tip
In addition to hiding or blocking access to drives, you can specifically prevent installation from any and all removable media sources. For details, see the "Preventing Installation from Floppy Disk, CD, DVD, and Other Removable Media" section in this chapter.
Hiding a drive removes the corresponding icon from Windows Explorer, My Computer, and other related views. The goal of hiding drives is to make it more difficult for users to get into areas of the computer they shouldn’t try to access. Hiding drives doesn’t prevent users from running any programs and doesn’t affect access to drives using file paths. Users can still run programs and open files on hidden drives, and they can still type file paths that include the hidden drives in the Run dialog box, at the command line, and elsewhere.
To use Group Policy to hide drives in Windows Explorer and related views, follow these steps:
Access the GPO you want to work with. Access User ConfigurationAdministrative TemplatesWindows ComponentsWindows Explorer.
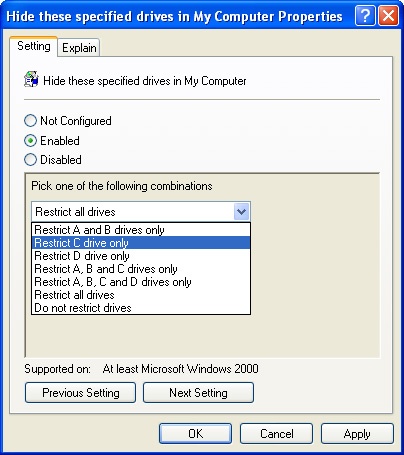
Double-click Hide These Specified Drives In My Computer.
Select Enabled and then select which drives to hide (Figure 6-4). If you want to unhide all drives, select Do Not Restrict Drives.
Tip
Hide These Specified Drives In My Computer is designed with the following in mind: the A and B drives represent removable media drives, the C drive is the main system drive, and the D drive is a CD-ROM or DVD-ROM drive. If computers in the related site, domain, or OU have a different drive configuration, you must carefully select the appropriate drives to hide or specify that all drives should be hidden.
After you click OK, consider whether you want to also prevent access to drives. If you do, read the next section.
To improve computer security, the next step beyond hiding drives is to prevent access to the drives in Windows Explorer and related views. Similar to hiding drives, preventing access to drives doesn’t affect access to the drives or prevent running of programs. Users can still run programs and open files on restricted drives using applications (such as Microsoft Word). Unlike with hiding drives, however, users cannot type file paths that include the restricted drives in the Run dialog box or the Map Network Drive dialog box. Further, even though users can browse the directory structure of restricted drives, they cannot open folders and access their contents. With this in mind, if you want to ensure that users cannot browse or access a drive, you should both hide and prevent access to a drive.
One of the most common scenarios in which you might want to prevent access to drives is when the A and B drives on computers are used in labs, kiosks, or sensitive areas within your organization. By preventing access to these drives, you block access to one of the easiest ways for users to create copies of files and take the files out of the office on floppy disk or other removable media configured for use with the A and B drives.
To use Group Policy to block access to drives in Windows Explorer and related views, follow these steps:
Access the GPO you want to work with. Access User ConfigurationAdministrative TemplatesWindows ComponentsWindows Explorer.
Double-click Prevent Access To Drives From My Computer.
Select Enabled and then select which drives to block (Figure 6-5). If you want to open access to all drives, select Do Not Restrict Drives.
Click OK.

Both Windows XP Professional and Windows Server 2003 include features that allow you to create and modify rewritable CDs and DVDs. As long as a computer has a CD or DVD writer, the computer can use these built-in features to create and modify rewritable CDs and DVDs. When you consider that most CDs store up to 600 MB of data and most single-layer DVDs store up to 4.7 GB of data, there is great potential for misuse and a high likelihood that CDs and DVDs might be used to store important documents, source code, and so forth if proper safeguards are not in place to protect the data.
To prevent users from using the built-in CD-burning and DVD-burning features, follow these steps:
Access the GPO you want to work with. Access User ConfigurationAdministrative TemplatesWindows ComponentsWindows Explorer.
Double-click Remove CD Burning Features.
In the Policy Settings dialog box, select Enabled and then click OK.
Caution
Removing the built-in CD-burning and DVD-burning features doesn’t prevent users from installing and using third-party software that performs these tasks. To ensure that users cannot install this type of software, you must also configure software restriction policies. To learn more about software restriction policies, see Chapter 9.
When users access the Properties dialog box for files, folders, shortcuts, and drives, the Security tab allows them to view the list of users and groups that have access to those resources (as long as they have some limited permissions on the computer). If users have the appropriate access permissions, they can also use the options of the Security tab to modify the security settings. In some environments, having access to security settings on file system objects is a good thing because it allows users to quickly determine who has access to what and possibly why they can’t work with a particular file or folder. In other, more secure environments, being able to access security settings represents a potential security risk. For example, you might not want John to know that Sally can access the secure Finance folder. There might be a reason that she has access and he doesn’t, and you probably don’t want John asking Sally to give him access to files in that secure folder or asking if he can use Sally’s logon to browse the folder.
To prevent users from accessing the Security tab for files, folders, shortcuts, and drives, follow these steps:
Access the GPO you want to work with. Access User ConfigurationAdministrative TemplatesWindows ComponentsWindows Explorer.
Double-click Remove Security Tab.
In the Policy Settings dialog box, select Enabled and then click OK.
Caution
As with many other security-related policy settings, you should consider carefully whether and where to define the Remove Security Tab policy setting. If you enable this policy setting at the domain level, dire consequences might result because domain administrators cannot access and configure security settings for file system objects. Typically, you should configure this type of policy at the OU or local machine level.
When documents and other types of files are removed from a folder, they aren’t normally permanently deleted. Instead, in the standard configuration, deleted files are moved to the Recycle Bin and are permanently deleted only when you empty the Recycle Bin. By default, the maximum allowed size of the Recycle Bin is 10 percent of a volume’s disk space. Each volume on a computer has its own Recycle Bin, and you can increase or decrease this maximum allowed size on a per-volume basis. When the Recycle Bin reaches its maximum size, it must be emptied before additional files can be added to it, and when users try to delete files they see a warning prompt telling them to empty the Recycle Bin.
Through Group Policy, you can limit the maximum size of the Recycle Bin to a fixed percentage of a volume’s disk space. The value you set in policy cannot be overridden by users, so you can be sure that Recycle Bins have a fixed maximum size. To see how this works, consider the following scenario. All computers in the Shipping OU have a standard configuration that includes a single 60-GB hard drive. The maximum allowed size of the Recycle Bin is therefore 6 GB of deleted files. The standard configuration of the Shipping OU computers uses 52 GB of disk space. As files are added to the system, there is an increased possibility that a full Recycle Bin might cause a drive to run out of space, which would seriously affect system performance. To avoid potential problems with drive space, you configure the maximum allowed size of the Recycle Bin to 2 percent of the disk space, or 1.2 GB in this instance.
To configure a fixed maximum allowed size for the Recycle Bin, follow these steps:
Access the GPO you want to work with. Access User ConfigurationAdministrative TemplatesWindows ComponentsWindows Explorer.
Double-click Maximum Allowed Recycle Bin Size.
Select Enabled and then use the Maximum Recycle Bin Size combo box to set the maximum allowed size of the Recycle Bin as a percentage of hard disk space that can be used (Figure 6-6).
Click OK.
