
Microsoft occasionally releases hotfixes that are made available to you via your Partner or customer source. Services packs or second releases (for example, R2) are also released this way, but this is beyond the scope of this book.These hotfixes are installed as a model per hotfix to the SYP layer. The update must be coordinated with your Partner, who will apply the hotfix to its system and release an updated model of the supplied code. The only conflict resolutions you should be concerned with are conflicts to the code in your layers.
A hotfix can affect the following components:
- Client: An update to a client component will be applied to all clients.
- Components: Components include debuggers, management utilities, report server extensions, and so on.
- Application: An update to the model store effectively installs an AX model. This is termed as database, but it means the model store database or application code.
- Server: An update to the server components needs to be applied to all the AX application object servers.
Applying a hotfix should be done in a controlled fashion, tested, and deployed as per any change to your live environment.
This would entail refreshing a test environment from live to create a sandboxed environment so that the update can be applied and tested in isolation.
Hotfixes may make changes to code that is already modified in layers above the SYP layer (for example, ISV, VAR, CUS, and so on). If this is the case you should contact the authors for an update of where they have already merged the code from the hotfix. If not, you will have to merge the code into one of your layers.
The hotfix is normally delivered as a self-extractable ZIP file, containing another compressed file. Decompress both the files into a hotfix folder specifically for this hotfix. This should be a server share, set up for storing hotfixes. The steps for performing this activity are as follows:
- Drain users from all AX Servers in the target environment.
- Shut down all AX Servers for the environment you are importing into (refer to Chapter 4, Setting Up and Managing the Application Object Server).
- Back up your databases (data and model store databases).
- Ensure your Windows account has the following rights within the SQL Server:
- In the SQL Server instance hosting the AX databases:
Securityadminor greater - On the AX databases:
db_owner
- In the SQL Server instance hosting the AX databases:
- Ensure your Windows account has administrative permissions on the local computer.
- Ensure your Windows account is mapped to a user in AX that has system administrator rights.
Once extracted, you will be able to see the following files in the root folder of the hotfix:
AxImpactAnalysis.exeAxUpdate.exe
The first step is to analyze the potential impact, and the second is to perform the update.
In order to perform the impact analysis, the following steps are to be performed on a computer that has the AX client installed:
- Right-click on
AxImpactAnalysis.exeand select Run as administrator… which opens Update Setup in Impact Analysis Mode. - Click on Next, accept the terms on the next dialog box that opens, and click on Next.
- Select the configuration you intend to update and click on Next.
- If the system can detect the model stores, it will default to the active model store; otherwise, you need to specify SQL Server and the Model Store database and click on Next.
- The system will suggest the baseline database where the update is applied for later analysis. This process will overwrite the database. Now click on Next.
If a baseline database doesn't exist, one must be created prior to this process.
- You will be warned that the baseline model store will be lost; click on OK. The system will now perform the analysis.
- Click on Impact Analysis…, which will open the AX client where you can export the analysis as an impact analysis state for later use.
- Click on Finish to close the impact analysis tool.
Assuming the hotfix does not require a code upgrade, we can apply the update and proceed with the application update element of the upgrade, if applicable.
In CU6, you must apply the binary (kernel) components before applying the database (application code) update; otherwise, the updates do not apply correctly. If binaries must be installed first, you need to run the update twice; first for the binary components and then for the database (application code) update. You are then free to apply the update to the remaining server and client computers.
In this example, we will apply this update to UAT, which is a sandboxed environment. No components for other instances are installed. We can apply the update by performing the following steps:
- Stop UAT AOS.
- Log in to the server that hosts the UAT AOS and launch the
Axupdate.exefile as an administrator. This is the default behavior for this file. - On the welcome screen, click on Next.
- On the license terms page, click on Next, of course, after reviewing the license terms.
- On the next page, select the components to be updated. You should select all the available components.
- The database node defaults to Other…. If the correct database is selected, check as given in the following screenshot:

- If you selected Other…, or the databases had no subnodes, you should select the database from the list page or use the Server Name and Database Name fields to specific the server and database for the model database as shown in the following screenshot:
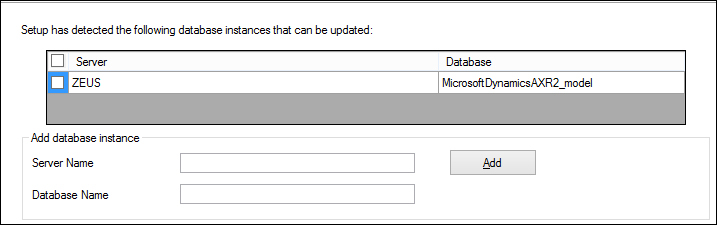
- Click on Next.
- The final page shows you what actions will be performed. Click on Install.
- The next page will show you the progress of the upgrade and the status, once completed. If any component fails, it will be marked with a red icon and we then need to check the Open the log file when Setup closes checkbox. This can be useful to determine why it failed.
- Apply the update to all the remaining servers.
- Once the database update is done (most likely, the first AX Server) you should apply the update to all the remaining servers: remaining AOS, report servers, terminal servers (client), servers involved in retail, and so on.
You can't apply the update to remote servers, so this must be run locally on each server.
The final step is to start AOS and launch the client to complete the update by performing the following steps:
- Once complete, start or restart AOS.
- Launch the AX client and select the appropriate option on the The model store has been modified dialog box. Start the software update checklist is recommended after a hotfix.
- If the model contained new or updated reports, you should deploy these. Refer to Chapter 12, Setting Up and Managing the Application Integration Framework.
The Windows installer is used to apply the updates. The application update is termed as the database update, which is a misnomer; this is not your transactional database.
The processes involved here are not new, the application update to the model store is simply an AX model. The server and client components follow the same process as any other software update. These are not available via the Windows update, as we need far more control over the deployment than what is required for Windows and Office updates.
While applying the client component updates to a large organization, it isn't feasible to apply this PC by PC.
You can either use Group Policy or System Center (2007 or 2012) to deploy the client and the hotfixes.
The following link explains the process of mass deploying the client:
http://technet.microsoft.com/en-us/library/dd309709.aspx
The binaries within the hotfixes are supplied as MSP (Microsoft Installer Patch) files, which can be found within the Hotfix folders in a folder called msi if there are client components to be installed.
- The client update is located in
clientoba32andclientoba64(a 32-bit or 64-bit OS) - The client components update is located in
components32andcomponents64 - The retail POS update is located in
retailpos - The retail POS plugins update is located in
retailposplugins
The msiexec command for silent installation of the client is as follows:
msiexec /update clientoba32.msp /quiet /norestart
All other updates should be applied using AxUpdate.
Once tested, you need to apply the update in live. In order to apply the database update (model store) to other environments (UAT, development, and so on). You are recommended to transfer the model store. You should use the environment refresh method for this.
After this is completed, you should run AxUpdate on the relevant servers.
Another important method of simplifying updates to clients is Slipstreaming. This allows the installation of a new component or client to have any of the updates automatically applied.
You can apply the following types of update:
- Service packs
- Cumulative updates
- Help content
- Model files (your or third-party modifications)
The model files are only relevant while installing the application for the first time. The same is the case for database (application) updates in the service packs and cumulative updates.
In order to use slipstreaming, you must store the AX 2012 installation files on a shared network folder and use this to install both server and client components.
Since the previous cumulative updates and service packs are replaced, only include the latest update in the Updates folder.
To update the installation media to use slipstreaming, perform the following steps:
- In the folder structure there is a folder called
Updates. - In this folder create a folder for each update (name it by its update name number, for example,
..\UpdatesCU6). - Extract the update twice; since the
AxUpdate.exefile is in the folder, copy the files and folders into a new folder. - Create a folder for your model files (for example,
customer changes,Internal). - Create a folder for each ISV (for example,
Axponents). - Create a folder for your Partner (for example,
Binary) - Under each of these folders, create a folder called
Models. - Copy the models into the appropriate
Modelsfolder.
The folder structure you should have is as follows:
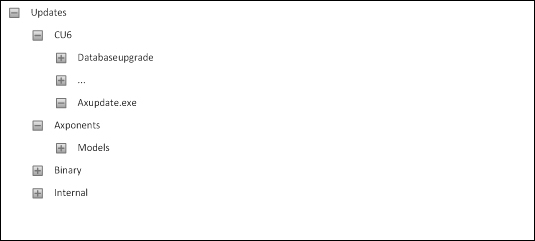
The preceding updates will now be installed whenever a new client, server, or component is installed.