
While making changes to the security in AX, even though this is done within the client and not in the development environment, it will make changes to objects in your current model and layer effectively making a modification to AX.
This may fill many of us with horror: "I thought we were just ticking boxes in data!" but it has some really great benefits (once we have recovered from the shock of this realization).
One benefit is that we can design our security model and move it easily to User acceptance testing (UAT) and then live. Be completely sure that the security will behave as it did when tested.
The other benefits are that we can draw from the layer technology to extend Microsoft's or our partner's security design for our purposes and easily compare and roll back any changes.
The drawback is that we start editing the roles without realizing this and end up modifications in the current model and layer. We could also be moved to UAT by mistake; for example, as a developer deploys his/her changes.
But this does force us to use a good practice for control.
In our experience, we should place all of our security changes in a distinct model. As a partner we choose "Binary – Security" in our VAR layer and our customers would use "<Customer> – Security" in the USR layer (we prefer the USR rather than CUS for this purpose as it is the top layer).
In order to do this task, you must log in to AX as a system administrator. If you intend to create the model in a specific layer, you must configure the client to log in to that layer.
We create a model for security by performing the following steps:
- Change to the development window (Ctrl + D is a common favorite that developers will use).
- From the top menu, navigate to Tools | Model management | Create model.
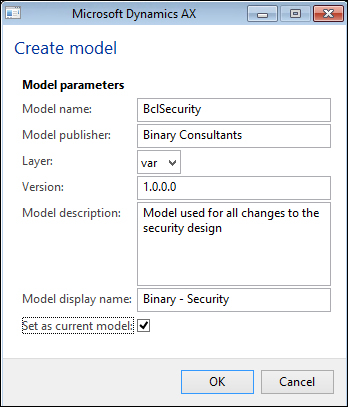
- This model is referenced using the model name when accessed from PowerShell or AxUtil; it is easier if named as an identifier, for example,
BclSecurity. - The Model publisher field's value is your organization's name.
- You should leave the Layer field's value as the layer you are logged in to, if you create a model in a layer you do not have access to, you cannot set it as your current model.
- For this purpose, the default version is fine, leave it as 1.0.0.0.
- In this case, the Model description field is self-explanatory, but you can add notes on its usage for others.
- The Model display name field is important and appears against the modified elements. Keep this short but meaningful.
- Since we are about to adjust security, we should check Set as current model.
- Once complete, click on OK.
- The system will inform you that the creation was successful, for example, this will be the message The model BclSecurity was created successfully in layer var.
This task creates a model so that all future modifications (made in this session) are then placed into this model. This also means that we can transfer the model in its entirety to a target environment.
If the client is restarted, the default model from the user options will be used by navigating to Tools | Options, and then the Startup model in the Development tab.
Since all modifications will end up in this model, if you make any modifications (for example, adjust a report) they will end up in the current model. So you need to be careful to set the correct model before you make a change.
It is a good practice to create a project from a model since you can check the contents and move the elements into the correct model.
In this example, we changed the security before creating the model, so effectively we "forgot" to change the default layer model before adjusting the security.
We can create a project from a model by performing the following steps:
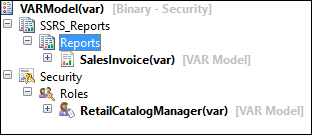
- In the development environment, navigate to Tools | Model management | Create project from model.
- Change the model to the desired model, for example, VAR Model. The default is USR Model.
- Change the name of project to the model name without spaces; for example, VARModel.
- Click on OK.
- The system will create the project (which is under the private node) and open the project window. The following screenshot shows the resulting project with two elements: one report and one security role:
- To move an element to a different model, right-click on the object (for example, RetailCatalogManager on the Security node) and choose Move to model.
- In the dialog box, check the model you wish to move the element(s) to and click on OK.
- The elements will now be moved; once complete, you should remove this temporary project. Click on View/Project.
- Expand Private and select the project we just created.
- Right-click on the project we just created (VARModel) and click on Delete. This will delete the project, but not the objects that are within it!
In the preceding example, the change was not intended. If you modify a role in the client, and back out the change, the object is stored, marked as modified, and placed in the current model and layer. Since hotfixes are sometimes made to security, anything we modify (deliberately or not) is protected from this change.
In order to back out a change, we simply delete the object. This will delete all the changes made to the object (and its subelements) in the current layer.
Also, if you add and then remove a privilege or duty it will not be removed from the object, it will just be disabled. Since we have a maximum of three levels for roles, we can have a situation where the application will not compile. The roles that are disabled (but would be a 4th level) are also counted during the compilation.
- Press Ctrl + D or navigate to View | Application Object Tree.
- Scroll down to the Security node, and expand Roles.
- Scroll down (or click on the first role and type the role's name) to the required role, as shown in the following screenshot:
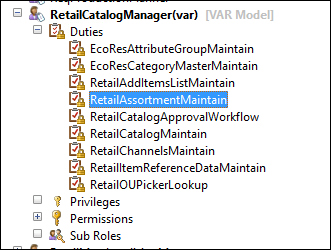
- Right-click on the element to be deleted (in this case RetailCatalogManager) and click on Delete.
- You are asked whether you are sure you want to remove the object, click on OK.

- The object will now revert to not bold, and the layer and model information will be removed. If this is a role created in the current layer, it will be deleted.