
Have you ever thought of creating your own events just like we have out-of-the-box events available in organization services? If yes, then actions can help you. Actions were released in CRM 2013 initially, to allow us to define our own custom messages that can be called using server-side code or client-side code. If you are working with 2013 you can just access actions using SDK calls alone, but with the new enhancements in CRM 2015, we can call actions through workflows and dialogs as well.
Actions can be created for a particular entity or can be global; they are always synchronous and run on the current user security context. Thus, similar to synchronous plug-ins, actions are also transactional. Once an action is activated, it is available like messages and we can register plug-ins on them.
Let's take an example where we want to set up a custom message to calculate the fine on a book issued if it is submitted after five days. We will create an action that will take the issue date, return the date as an input argument, and will calculate the output based on the date difference. To implement this requirement, first we will design our action so it just holds the definition of our custom message and then we will register a plug-in on our action to calculate the fine. Perform the following steps to create actions:
- Navigate to Components | Process and click on the New button from the process toolbar.
- Enter the following properties and click on Ok:
Process Name:
Fine CalculationCategory: Action
Entity: Book Issue or Return
- Click on the + sign to add a new argument and change the properties of the argument as follows:
Name:
IssueDateType:
DateTimeRequired:
SelectedDirection:
Input - Repeat Step 3 to add two other arguments using the following properties:
Name
Type
Required
Direction
ReturnDateDateTimeSelectedInputFineIntegerUnselectedOutput - After adding all the arguments, you should see:
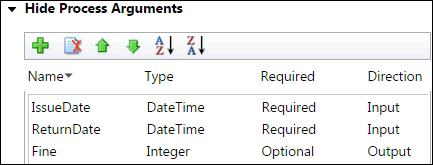
The action arguments
- Click on Activate and then the Close button.
Our action is ready; as soon as it is activated, it is available as a custom message, which can be called from SDK and can be used for plug-in registration. Now let's develop our fine calculation plug-in that we will be registering in our custom action. Perform the following steps:
- Add a New Class Library project that is similar to earlier examples that we did for custom workflows.
- Rename class1 to CalculateFineAmt, add a Microsoft.Xrm.Sdk assembly to the project, and sign the assembly like we did earlier.
- Add the following code to the
CalculateFineAmt.csfile:public void Execute(IServiceProvider serviceProvider) { // Obtain the execution context IPluginExecutionContext context = (IPluginExecutionContext) serviceProvider.GetService(typeof(IPluginExecutionContext)); if (context.InputParameters.Contains("IssuedDate") && context.InputParameters.Contains("ReturnDate")) { //read input arguments DateTime issueDate = (DateTime)context.InputParameters["IssuedDate"]; DateTime ReturnDate = (DateTime)context.InputParameters["ReturnDate"]; //calcuate date double TotalDays = (ReturnDate - issueDate).TotalDays; if (TotalDays > 5) { //set output argument context.OutputParameters["Fine"] = Convert.ToInt32((TotalDays - 5) * 5); } } }
In the preceding code, first we are reading action input arguments, they will be accessible by the input argument, and then we are calculating the difference between the start and end date; if it is greater than five days, we calculate the fine by multiplying by five:
- Build the assembly and connect to the plug-in registration tool.
- Register our assembly just like we did for the plug-in example.
- Register New Step and select our custom message for the
him_bookissueentity (as for the Post operation) as follows:
Now we have our custom message available with the fine calculation logic, we can simply use it by creating a real-time workflow and passing the required input arguments as follows:
- Create a real-time workflow using the following properties:
Name:
Calling Custom Calculation ActionCategory: Workflow
Entity: Book Issue/Return
Run this workflow in background (recommended): Unselected
- Configure it to start when Record is created and when Return date is changed (select the return date field under the Selection option for the Record field changes).
- Click on Add Step | Perform Action and select our action name from the drop-down button.
- Click on the Set Properties button and set action arguments as follows using Form Assistant available on the right hand side:
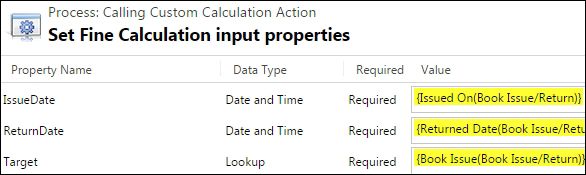
The custom action values
- Add the update step and click on the Set Properties button to set the fine field as follows:
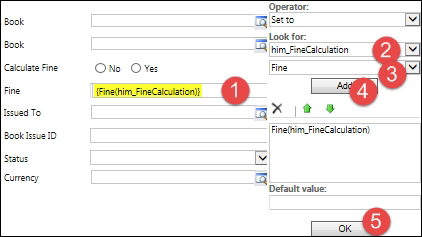
Action calling
- Save and activate the workflow.
Now let's test our actions. Open any book issue or return entity record, where the book is issued, and complete Return Date. Once we save the book issue or return record, it will calculate the fine using our custom action as follows:

Note
We can also call actions using server-side and client-side calls. You can refer to: http://a33ik.blogspot.ae/2013/10/custom-actions-walkthrough-for-net-and.html for information on using actions with server-side and client-side code.