After playing a bit with our pixels we are now going to add a split screen
- We don't need the whole code from the previous example. So delete the compositor listener and the frame listener.
- We need a second camera, so create a pointer to hold it:
private:
Ogre::Camera* mCamera2;
- The
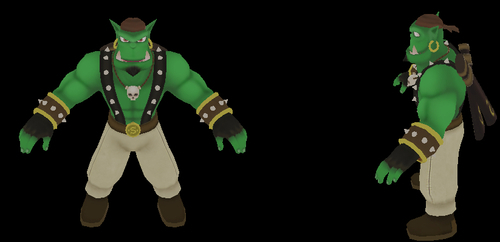
createScene()function just needs to create an instance ofSinbad.meshand attach it to a scene node:void createScene() { Ogre::SceneNode* node = mSceneMgr->getRootSceneNode()->createChildSceneNode(); Ogre::Entity* ent = mSceneMgr->createEntity("Sinbad.mesh"); node->attachObject(ent); } - Now we need a
createCamera()function in which we create a camera that looks at our model at (0,0,0) from (0,10,20):void createCamera() { mCamera = mSceneMgr->createCamera("MyCamera1"); mCamera->setPosition(0,10,20); mCamera->lookAt(0,0,0); mCamera->setNearClipDistance(5); - Now use the new camera pointer to store another camera, which looks at the same point but now from the position (20,10,0):
mCamera2 = mSceneMgr->createCamera("MyCamera2"); mCamera2->setPosition(20,10,0); mCamera2->lookAt(0,0,0); mCamera2->setNearClipDistance(5); } - We have the cameras, but we need the viewports, so override the
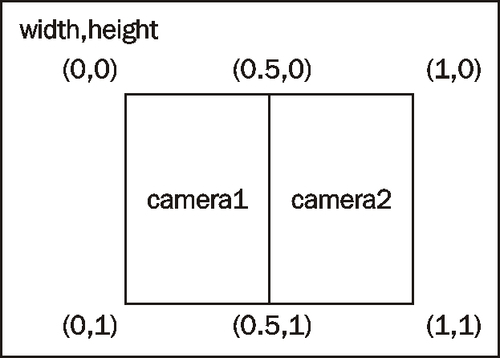
createViewport()method:void createViewports() { - Create a viewport that covers the left half of the render window using the first camera:
Ogre::Viewport* vp = mWindow->addViewport(mCamera,0,0.0,0.0,0.5,1.0);
vp->setBackgroundColour(ColourValue(0.0f,0.0f,0.0f));
- Then create a second viewport that covers the right half of the render window using the second camera:
Ogre::Viewport* vp2 = mWindow->addViewport(mCamera2,1,0.5,0.0,0.5,1.0);
vp2->setBackgroundColour(ColourValue(0.0f,0.0f,0.0f));
- Both cameras need the correct aspect ratio; otherwise the image would look strange:
mCamera->setAspectRatio(Real(vp->getActualWidth()) / Real(vp->getActualHeight()));
mCamera2->setAspectRatio(Real(vp2->getActualWidth()) / Real(vp2->getActualHeight()));
- Compile and run the application. You should see the same instance from two different directions.
We created an application with two viewports; each has a camera that looks at our model instance from a different direction. Because we want to view our model from different directions, each viewport needs its own camera. Therefore, we created a new pointer in step 2 to hold our second camera. Step 3 just created a simple scene containing one model to look at. Step 4 overrode the createCamera() function and created our first camera, which was created at position (0,10,20) and looks at (0,0,0). This means this camera looks along the z-axis, for example, at the front of the model. Step 5 created a camera at (20,10,0), which looks along the x-axis. Step 6 overrode the createViewports() function, which was filled by later steps. Step 7 created the first viewport and added the first camera to the RenderWindow. This was done using the addViewport() function. As the first parameter, this function takes the camera that will deliver the image to be displayed. The second number defines which viewport has higher priority, should two viewports overlap. The viewport with the highest number is rendered if two viewports overlap. The third and fourth parameters define the beginning point of the viewport and the fifth and sixth parameters define the height and width. Each is in the range 0 to 1. The following is an image showing how our render window and viewports are set up.
Step 9 just set the aspect ratios of each camera using the view port to get the width and height information.
Also, if we tried moving the camera with the mouse and keyboard, we might have noticed that we can only control the camera on the left viewport. This is because only the camera pointer mCamera is controlled from the default frame listener. If we wanted to control all cameras, we would need to modify ExampleFrameListener.