We are going to use the code from the previous example:
- Particle systems are defined in
.particlefiles. Create one in the media/particle folder. - Define the system and name it
MySmoke1:particle_system MySmoke1 { - Each particle should use the
Example/Smokematerial and be 10 units long and high:material Examples/Smoke particle_width 10 particle_height 10
- We want a maximum of 500 particles at the same time and each particle should be a point that always faces the camera:
quota 500
billboard_type point
- We want an emitter that emits the particles from a single point at a rate of 3 particles per second:
emitter Point { emission_rate 3 - The particles should be emitted in the direction (1,0,0) with a velocity of 20 units per second:
direction 1 0 0
velocity 20
- That's all for this script. Close the brackets:
}
}
- In the
createScenefunction, change:Ogre::ParticleSystem* partSystem = _sceneManager->createParticleSystem("Smoke","Examples/Smoke");Ogre::ParticleSystem* partSystem = _sceneManager->createParticleSystem("Smoke","MySmoke1"); - Compile and run the application. You should see Sinbad and a trail of smoke that emerges from him.
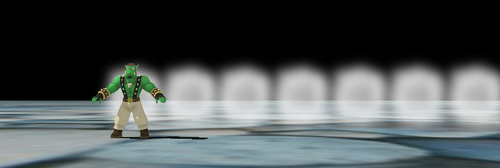
We created our first own particle system. For this, we need a .particle file to store the script. In this script, we started the definition of the particle system with the keyword particle_system and then the name we want it to have, like we did for all the other scripts. In step 3, we defined which material each particle should use. We used a material that ships with the SDK. This material just attaches a texture and combines this texture with the vertex color and ignores any lighting. The following is the complete material script:
material Examples/Smoke
{
technique
{
pass
{
lighting off
scene_blend alpha_blend
depth_write off
diffuse vertexcolor
texture_unit
{
texture smoke.png
tex_address_mode clamp
}
}
}
}
We gave each particle the length and width of 10 units. Step 4 defined the maximum number of particles we want at any given point in the existence of the particle system; this number is helpful in preventing one wrongly defined particle system to slow the complete application down. If this number is reached, no emitter is allowed to create new particles. This step also defined that we want points as particles that always face the camera. Step 5 added an emitter that emits three particles from exactly one point. Step 6 set the direction and speed at which the particles move. We then changed our program to use this new particle system and then saw it in action.