
Until now, we've talked about flat forms that include all the directions, help information, and content needed to help form fillers complete forms.
PDF forms provide more opportunities to combine additional content for descriptions, help information, or any similar information that may be needed to help form fillers more clearly understand how to complete a form.
As a PDF author, you are interested in receiving data back from form fillers. However, the form fillers may need much more than a form to guide them through completing a form. Complex forms that you find in the health care industry, real estate industry, and income tax reporting agencies are examples of where you may need to add extensive help and descriptions for form fillers to complete forms.
When a form filler receives a package containing both a form and all the related documents to help individuals complete forms, your only interest is in receiving back the populated form. All the other associated documents are of no interest to you. Through the use of PDF Portfolios, you can compile all the documents you need to help the form filler complete forms, and when data are submitted back to you, only the forms are returned.
Likewise, you may have some type of description that appears apart from a form. You can create multiple page forms, but another option you have with Acrobat is to create layered forms where you can separate the form containing field objects from ancillary content.
In this chapter, we look at creating PDF Portfolios for the complex form author and add some discussion on using Adobe PDF Layers.
In Acrobat 8, Adobe offered PDF Packages as a means for assembling files together. You could add LiveCycle Designer forms, secure documents, signed forms, native application documents, and aggregate data from multiple forms with the same form fields.
In Acrobat 9, Adobe introduced PDF Portfolios. A PDF Portfolio has all the advantages of PDF Packages along with an Adobe Flash-based interface and a focus on the package design. Forms authors can use PDF Portfolios with forms that require companion files for providing instructions, additional information about completing a form, or any other content pertinent for form fillers to complete a form accurately.
In Acrobat 9.0 and later, you have several menu commands to create a PDF Portfolio. You start by adding files to a portfolio and then you can customize the appearance in many ways.
To create a PDF Portfolio, follow these steps.
Note
In the Chapter13 folder on the book's CD-ROM, you'll find several files. For these steps, you can use the generalApplication_populated.pdf, applicationGuidelines.pdf, powerAttorney.pdf, and riskDisclosure.pdf files.
STEPS: Creating a New Portfolio
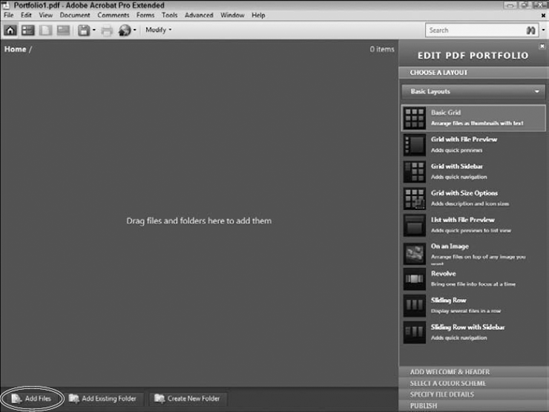
Open Acrobat and choose File
Create PDF Portfolio. Note that you can alternately choose several other commands to create a PDF Portfolio. For example, you can choose File
Add files. You can add individual files or a folder of files to a PDF Portfolio. We have additional files in the Chapter13 folder on the book's CD-ROM, so we used the Add Files button in the lower-left corner of the PDF Portfolio window. Click this button, and the Add Files dialog box opens. Locate the Chapter13 folder on the book's CD-ROM, and select these files: generalApplication_populated.pdf, applicationGuidelines.pdf, powerAttorney.pdf, and riskDisclosure.pdf.
Tip
To select files in the Add Files dialog box in a noncontiguous order, press the Ctrl/

Click OK in the Add Files dialog box.
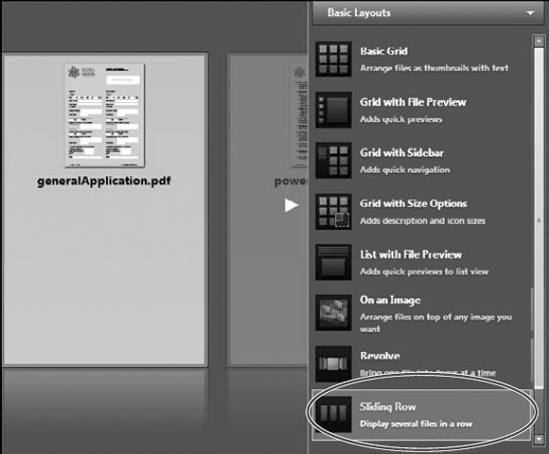
Change the layout. When you first add files to a new PDF Portfolio, the default layout is the Basic Grid you find in the Edit PDF Portfolio panel on the right side of the PDF Portfolio window. You can change the layout view by making selections in the Edit PDF Portfolio panel when the Basic Layouts panel is in view, as shown in Figure 13.2. For our example, we used the Sliding Row layout. Click Sliding Row to change the layout.
Add some file descriptions. In the Sliding Row layout, a text box appears below each document thumbnail. Click below the filename, and type a description, as shown in Figure 13.3.
Save the Portfolio. Choose File

Files added to the new portfolio include a general application form, a document to assist form fillers completing a form, a document specifying risk conditions, and a document explaining some details for a power of attorney. The only file that would be of interest to the form author to get back from the form filler is the application form with data. The additional documents are not needed to process the application form because no fields appear on the other three documents and no signatures are required.
Welcome pages in PDF Portfolios can be instructive and provide form fillers an idea of what's contained in the portfolio. Welcome pages can contain text, images, both text and images, and Adobe Flash animations. As a general rule, you might want to consider avoiding Flash files for distributing portfolios with forms. Having large files in the portfolio makes the download times longer for the form fillers. Keeping the welcome page simple is best advised for packages containing forms.
To add a welcome page to a portfolio, follow these steps.
Note
Use the same portfolio file created in the preceding set of steps. In the Chapter13 folder on the book's CD-ROM, you'll find a file titled globalLogo.jpg. Use this image file for these steps.
STEPS: Adding a Welcome Page to a PDF Portfolio
Open a PDF Portfolio. We continue with the portfolio created in the steps "Creating a New Portfolio."
Click Add Welcome & Header in the Edit PDF Portfolio panel. If the Edit PDF Portfolio panel is not open, select Modify
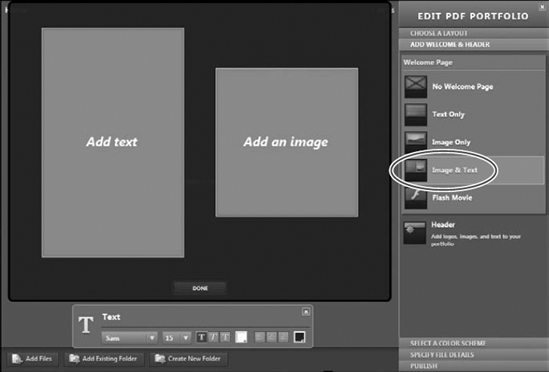
Make a choice for the layout. In the Add Welcome & Header panel, you have several options for the design of the Welcome page. The items shown in Figure 13.4 should be self-explanatory. For our example, we chose the Image & Text layout. This option provides us an opportunity to use a graphic for the company logo and a text description.
Add an image. You find two boxes in the left pane when you click Image and Text in the Welcome Page panel. One frame is used for placing images, and the other is used for typing text in the frame. Click the Add an image frame, and the Browse for Image dialog box opens. File formats supported for importing images on a Welcome page include .jpg, .gif, and .png.
Locate the globalLogo.jpg file on the book's CD-ROM in the Chapter13 folder, and select it. Click Open to place the image in the frame. When the image is placed, you can change the frame border by dragging the corner and midpoint handles on the frame edges.
Add text. Type text in the Add text frame. Notice the Text palette at the bottom of the window. You can set type attributes for font, font size, bold, italic, and underline, specify type color and background color, and choose from left, center, and right paragraph justification.
Position the image and text frames. The image and text frames can be moved and sized to any position. In our example, we swapped the default text left and image right to image left and text right by dragging the frames in the window, as shown in Figure 13.5.
Close the Edit PDF Portfolio panel. Click the close button (X) in the top-right corner of the Edit PDF Portfolio panel, or choose Modify
Preview the Welcome page. Click the Open the Welcome Page button shown in Figure 13.6 to preview the Welcome page.
Save the file. We use the same file for additional steps in this chapter, so save the file to your hard drive and keep it handy to use again.

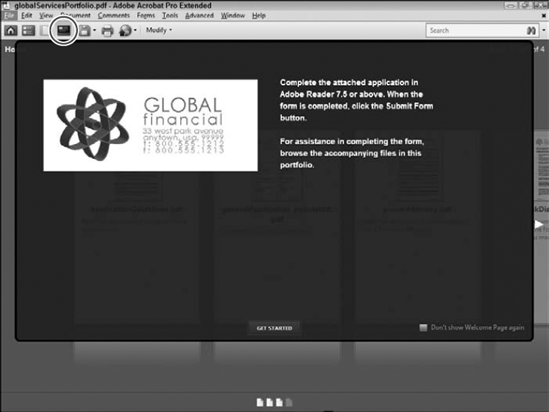
A Welcome page in a PDF portfolio can be dismissed by a form filler at any time and never appear again if a user clicks the Don't show Welcome Page again check box shown in Figure 13.6. If you want some pertinent information or your company logo to be in view as a form filler explores the files in a portfolio, you can add information to a header. A header in a portfolio appears on the welcome page and in all the page layouts when users navigate documents in the Home view.
To add a header to a PDF Portfolio, follow these steps.
Note
We continue using the same file created in previous steps in this chapter. In addition, we reuse the globalLogo.jpg file from the Chapter13 folder on the book's CD-ROM.
STEPS: Adding a Header to a PDF Portfolio
Open the file saved from previous steps in this chapter.
Enter Portfolio Editing mode. Choose Modify
Click Add Welcome & Header. In the Edit PDF Portfolio panel, click Add Welcome & Header.
Click Header in the Edit PDF Portfolio panel.
Choose a header style. When the Header panel opens, choose a header style from the list shown in Figure 13.7. In our example, we used the Logo & Structured Text style shown in Figure 13.8.
Fill in the header data. When you choose Logo & Structured Text, the header placeholders permit you to add an image, a title, and three lines of text for contact into, e-mail address, and a URL, as shown in Figure 13.8.
Click Add an image, and select the globalLogo.jpg file to import the image.
Click the cursor in the Add a title frame, and type a title.
Click the cursor in each of the three frames, and type contact info, an e-mail address, and a URL.
The results of the edits we made are shown in Figure 13.9.
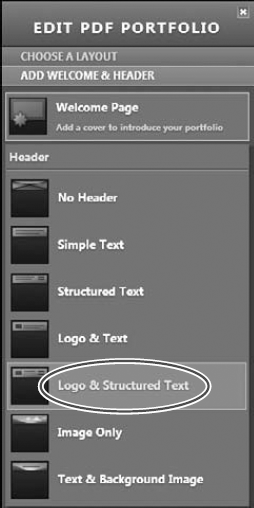


Figure 13.9. We added an image and title and filled in the three text frames adding contact info, an e-mail address, and a URL.
The header information appears when any file is brought forward in the portfolio as well as on the Welcome page. In Figure 13.10, the Welcome page is in view together with the new header we added to the portfolio.

Up to this point, we've viewed documents in a portfolio in the layout or Home view. In the PDF Portfolio toolbar, the first icon with a house image is the Home view. The second icon is the File Details view. You also have a few other icons that display a Preview and the Welcome page, as shown in Figure 13.11.

When you click the File Details button, the files in your portfolio are displayed in a list similar to list views you see when files in folders are viewed as a list from your operating system. Click the File Details tool, and the portfolio display changes as shown in Figure 13.12.

In the File Detail view, you see columns with information. By default, a PDF Portfolio displays the filename, file descriptions, date modified, file size, and compressed file size. The columns can be toggled on or off in the Specify File Details panel when you enter Edit Portfolio mode. When you choose Modify
Check one of the checked boxes, and you hide the column from the list when viewing the portfolio in Details view. Conversely, check an unchecked box to display the column. You can adjust column sizes in either the Edit Portfolio mode or File Details mode by dragging the column separator bars at the top of the list.
The fixed list of columns you see in Figure 13.14 cannot be removed from the panel. You can hide the views, but the items cannot be deleted. At the top of the Specify File Details panel, you find a text box where you can type a name for a new column, a drop-down menu with the default listed as text, and a plus (+) icon. The drop-down menu offers choices for text, number, and date. Clicking the plus (+) icon adds a new column to the File Details. Any custom columns you add to the File Details view can be deleted by clicking a custom column to select it and clicking the Trash icon.
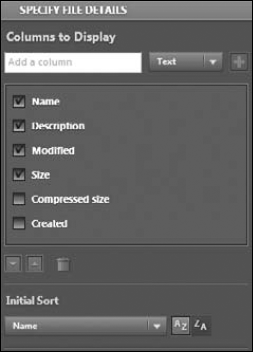
Figure 13.13. Click Specify File Details in the Edit PDF Portfolio panel, and the Specify File Details panel opens.
At the bottom of the Specify File Details panel, you find another drop-down menu with the default Name label. You use this menu to sort files according to the column you choose from the list. As new columns are added, they are dynamically added to the Sort menu. Adjacent to the drop-down menu are two icons. The first icon (A/Z) is used to sort in ascending order. The second icon is used to sort in descending order.
If you look back at Figure 13.12, you'll notice that the files added to the portfolio we created in earlier steps are sorted in an ascending alpha order by filename. This is the default for PDF Portfolios when you create them.
In many cases, you may want to sort your PDF Portfolio files in an order other than the default alpha order for filenames. You cannot drag files to new locations in the File Details view, and no up/down buttons are available to reorder the files. Reordering requires you to create a new column and sort files according to the column criteria.
Note
As of this writing, we're using the first release of Acrobat 9. We've been informed that the Acrobat 9.1 maintenance upgrade may take care of many issues related to PDF Portfolios such as reordering files in the List view mode. If you're using Acrobat 9.1 or above, you may not need to add a sort column in List view.
To create a new column for a custom sort order, follow these steps.
STEPS: Creating a New Column to Sort Files
Open a PDF Portfolio. In our example we use the file saved from earlier steps in this chapter.
Click the File Details tool to view the portfolio in a File Details view.
Open the Edit Portfolio view. Choose Modify
Open the Specify File Details panel. Click Specify File Details in the Edit PDF Portfolio panel.
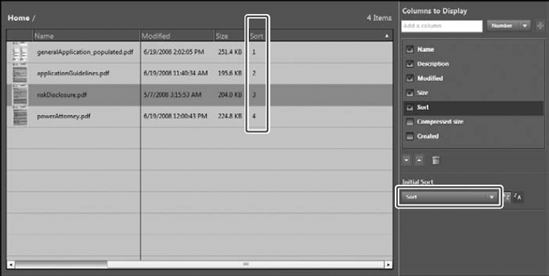
Add a new column. Type a name for the new column in the Add a column text box. From the drop-down menu, choose Number. To add the column, click the plus (+) button. In our example, we created a new column named Sort, as shown in Figure 13.14.
Add column data. If the column is not in view, scroll horizontally to bring the new column in view. Double-click the mouse button in the first row in the new column, and type the data you want for the value for the selected cell. In our example, we wanted the applicationGuidelines.pdf document to be the second file in the file order, so we typed 2 in the column for this file. Subsequent values are 1, 4, and 3, as shown in Figure 13.15.
Sort the columns. As yet, the sort order hasn't changed. Open the Sort drop-down menu, and choose Sort from the list. The File Details view now shows the files sorted in the new order, as shown in Figure 13.16.
Choose File
Save Portfolio to update your edits.


In this particular case, we want the most important document, the PDF form, to appear first when the form filler opens the portfolio. The second document is the detail for instructions for filling in the form, followed by two other informational documents.
Form fillers can easily navigate documents in the Home view by clicking arrows to scroll documents and clicking the Preview tool to preview a file. For many files added to portfolios, this method of navigation works well. However, if a form filler is completing a form and wants to look up some help information, closing one document, searching for another document that contains the needed description, and then returning to complete the form is awkward and can be frustrating. A simpler solution for the form filler is to click link buttons that open other files in a portfolio and a return button to take the form filler back to the area on the form where the editing can be resumed.
Before we jump into creating navigation links, you should be aware of the different views you can preview a file and the kinds of editing you can perform while in one view or another. If you double-click a file in Home view or File Details view, the file opens in Preview mode in the portfolio interface. You also can click the Preview tool, and the view is the same as double-clicking a file.
When you enter Preview mode, the portfolio toolbar displays an Open button, as shown in Figure 13.17. Click this button, and the file opens in a New Window view.
When you're in Preview mode, you have a limited set of menu commands available and no Acrobat toolbars are in view. If you open the Tools menu and select Advanced Editing, you find that the Link tool is the only tool you can access, as shown in Figure 13.18. While in the Preview mode, you can add links using the Link tool.

Figure 13.17. Double-click a file or click the Preview tool to open a file in Preview mode. When in Preview mode, the portfolio toolbar displays an Open button.

Figure 13.18. Choose Tools
If you want to add buttons for navigational links, you need to click the Open button when in Preview mode. Clicking Open opens a file in a New Window view. When in this view, you have access to all Acrobat commands and toolbars.
To exit the New Window view, click the close box (X) in the top-right corner of the window or press Ctrl/
In the example portfolio we used in this chapter, a few items on the second page of the application form need to be linked to other documents in the portfolio. To create these links, we use the Link tool.
To add navigational links in a PDF Portfolio using the Link tool, follow these steps.
STEPS: Creating Navigation Links in a PDF Portfolio
Open a PDF Portfolio. For these steps, we use the portfolio saved from earlier steps in this chapter.
Double-click the generalApplcation_populated.pdf file to open it in Preview mode. If you followed the steps to sort files as described in the section "Adding new columns to the File Details view" earlier in this chapter, the first file in the Home view is the application form. Double-click this file to open it in Preview mode, or click the Preview tool.
Open the second page. At the top of the window, you find up/down arrows that are used for page navigation for a file in Preview mode. Click the down arrow to open page 2 of the application form, and scroll to the bottom of the page.
Click the Select tool. Right-click (Windows) or Control+click (Macintosh) to open a context menu. From the menu options, choose Select Tool.
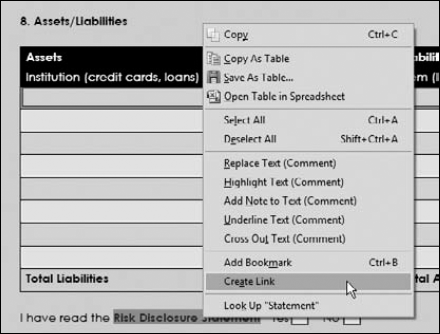
Select text. Drag the cursor through the blue text where you see Risk Disclosure Statement to select the text.
Create a link. Open a context menu on the selected text, and choose Create Link, as shown in Figure 13.19.
Set the link attributes. Choose Invisible Rectangle from the Link Type drop-down menu, and choose None for the Highlight Style, as shown in Figure 13.20. Leave the default radio button selection at Go to a page view, and click Next.
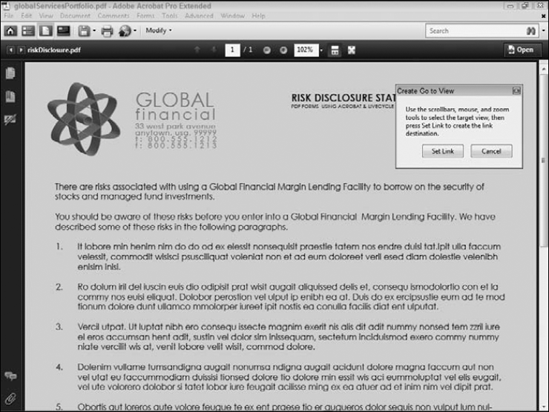
Set the link. The Create Go to View dialog box opens when you click Next in the Create Link dialog box. Leave the Create Go to View dialog box open, and click the Home tool in the PDF Portfolio toolbar. Click the right-pointing arrows in the Home view until the riskDisclosure.pdf document moves to the foreground. Double-click the file or click the Preview tool to open the file in Preview mode. Set the view you want using the zoom tools in the PDF Portfolio toolbar, and click Set Link, as shown in Figure 13.21.
Create a return link. The link we created leaves the form and opens another document in Preview mode in the PDF Portfolio. After a form filler reviews the document, we need another link to take the form filler back to the view last shown on the application form.
Open the riskDisclosure.pdf file in Preview mode, and scroll to the bottom of the page where you see Return. Choose Tools
Open the target destination. Click the Home tool, and return to the application form; open it in Preview mode. Open page 2, and scroll to the bottom of the page where the original link was created. Click Set Link in the Create Go to View dialog box.
Choose File
Save Portfolio.

We created one series of steps to link to the riskDisclosure.pdf file. Try to step through the same procedure to create a link and return to the powerAttorney.pdf file.

At times you may want to have links to actions that are visible on a form, but when a form is printed you don't want any evidence of the link. In this case, you need to use a button. Links don't provide options for adding text or a graphic to the link appearance. Other than a border and fill color, a form filler won't know where a link is located or what it does. With buttons, you can use a graphic icon, text, or both text and an icon that gives the form filler an idea for what a button does. Furthermore, because buttons are form fields, you can configure a button to be visible on a form and hidden when printed.
Using the same portfolio we worked on in this chapter, we want to add a button to submit a form. Ideally, you would create the button before assembling the portfolio. However, if you find after creating a portfolio that you need to add buttons, you can add them to documents within a portfolio.
To see how we approach adding buttons to documents in a PDF Portfolio, follow these steps.
Note
We continue using the portfolio created in steps throughout this chapter. In addition, we use the submitFormButton.pdf file in the Chapter13 folder on the book's CD-ROM. You'll also find the resetForm.pdf file in the same folder, which you can use to add a second button to the form.
STEPS: Adding Buttons to Documents within a Portfolio
Open a PDF Portfolio. In our example, we used the portfolio created in earlier steps in this chapter.
Open the application form in Preview mode. If you followed steps to reorder the files, the application form is the first file shown in Home view. Double-click the file to open it in Preview mode.
Open the file in a New Window view. Click the Open button when you arrive in the Preview mode to open the file in the New Window view. Creating buttons requires access to the Advanced Editing toolbar (or entering Form Editing mode). Because the Advanced Editing toolbar isn't accessible in Preview mode and you can't enter Form Editing mode, you need to open the form in the New Window view where you have access to all tools and menu commands.
Scroll to the bottom of page 2. We want to add a Submit Form button at the bottom of the last page on the form.
Open the Advanced Editing toolbar. Choose Tools
Add a Button field. Click the Button tool in the Advanced Editing toolbar, and click the cursor in an open area on the lower-right corner of the form, as shown in Figure 13.23.
Name the field. Type a name for the field in the default Properties mini window. In our example, we used submitForm for the field name.
Show all Properties. Click Show All Properties to open the Button Properties window.
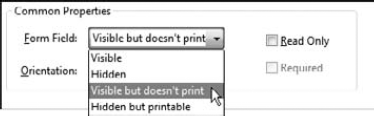
Set the button value to Visible but doesn't print. By default, the General tab opens in the Button Properties window. From the Form Field drop-down menu, choose Visible but doesn't print, as shown in Figure 13.24.
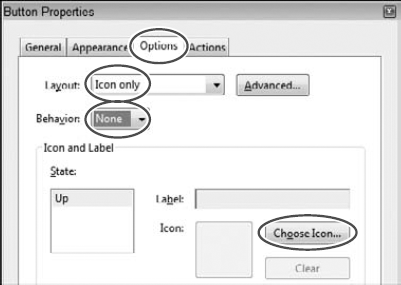
Add an icon to the button face. Click the Options tab in the Button Properties window, and then choose Icon only from the Layout drop-down menu and None from the Behavior drop-down menu, as shown in Figure 13.25. Click Choose Icon to open the Select Icon dialog box, where you can identify the button face you want to use for this field.
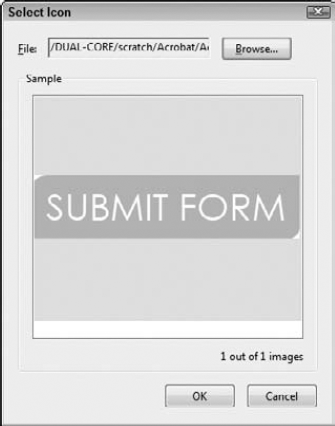
Browse for a file to add for the button face. Click Browse in the Select Icon dialog box shown in Figure 13.26. Locate the submitFormButton.pdf file from the Chapter13 folder on the book's CD-ROM, and select it. Click Select and OK in the Open dialog box. When you return to the Select Icon dialog box, the file you selected is shown in the Sample window, as shown in Figure 13.26.
Click OK. Click OK in the Select Icon dialog box, and you return to the Button Properties Options tab.
Fit the icon to the field bounds. Click Advanced in the Options tab, and the Icon Placement dialog box opens. Click Fit to Bounds so the icon fills the button field rectangle, and click OK to return to the Options tab.
Choose an action. Click the Actions tab. From the Select Action drop-down menu, choose Submit a form, as shown in Figure 13.27. After making the choice for the action type, click the Add button, and the Submit Form Selections dialog box opens.
Enter a URL. Type mailto: and <your email address> in the Enter a URL for this link text box, as shown in Figure 13.28.
Choose an export format. Click PDF The complete document, as shown in Figure 13.28, and click OK.
Click Close in the Button Properties window.
Choose File
Save. This step is optional. You can close the New Window without saving and save the portfolio when finished editing.

You can practice adding another button by opening the form in a New Window and adding a Reset Form button at the top of the page. Follow the same steps to add the button, and use the Reset a form Action. You'll find the resetForm.pdf file in the Chapter13 folder on the book's CD-ROM to use for the button face.

Figure 13.27. Select the Submit a form action and click the Add button to open the Submit Form Selections dialog box.

Note
The completed portfolio with all the steps outlined in this chapter is included in the Chapter13 folder on the book's CD-ROM. Open the file globalServicesPortfolio.pdf to examine all the edits we made to create the PDF Portfolio.
When you choose to submit the PDF The complete document in the Submit Form Selections dialog box, you need to be certain that the PDF is enabled with Adobe Reader usage rights before Adobe Reader users can submit the complete document back to you.
Again, ideally you might prepare a form with all required assets before assembling a portfolio. However, if you forget to properly prepare a file before creating a portfolio, Acrobat offers you the flexibility to make edits from within the portfolio. You can add security to the portfolio, and you can enable forms for Adobe Reader users to extend rights to the Reader users.
Note
For information related to securing files, see Chapter 12.
To add Adobe Reader usage rights for Reader form fillers, place the form in view in Preview mode. Choose Advanced
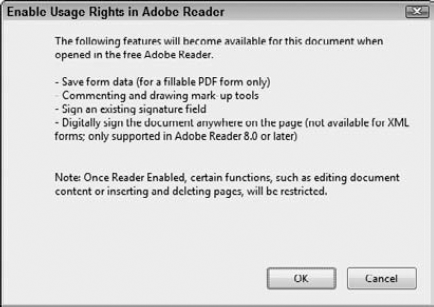
Figure 13.29. Open a form in a PDF Portfolio in Preview mode, and choose Advanced
Click OK in the dialog box, and your file is saved so Adobe Reader users can save form data, add digital signatures, and return the complete PDF back to you.
The nice thing about using a PDF Portfolio is that when a form filler clicks a submit button on a form, only the document where the button is located is submitted to you. Using our example of the portfolio we created in steps throughout this chapter, the submit form button on the application form sends just the form. The description file, power of attorney statement, and risk disclosure statement are not submitted, thus requiring less upload time for the form filler.
Layered files offer you another dimension for showing data apart from the necessary form fields. Whereas PDF Portfolios enable form fillers to send back just essential data to you, layered files cannot be separated and the forms you receive from form fillers contain the form as well as the additional layers on the form.
You can find a number of ways to use layers with forms. You might have a form designed as a program event registration. On a second layer, you might have a seating chart where form fillers can make choices for seating preferences. Another use might be showing diagrams such as a house plan where different layers can show different structural elements. Of course, the most obvious use for layered files is when designing multi-lingual forms.
To create a layered PDF document, you need an authoring program capable of producing Adobe PDF Layers. Programs like Adobe InDesign, Adobe Illustrator, and a few other vector art applications can create layers and export to PDF with the layers intact.
Typically, layered forms require two action items that are most often triggered by buttons. You need an action to change layer visibility; with forms, you need actions to hide form fields.
The form in Figure 13.30 is a layered document with several fields on the layer in view. In Figure 13.31, you see the layer visibility changed to display the second layer (Seating). The numbers on the seating diagram are buttons that are used to place a value in a field on the first layer. If all the fields are visible from the first layer when looking at the second layer, the form would be difficult to work with. Therefore, when changing the layer visibility, we also hide the form fields on the first layer. When the layer visibility is changed back to the first layer, the fields on the second layer are hidden and the fields on the first layer are placed in view.
In the Actions tab for field properties, you have an action to set layer visibility. Changing layer visibility is similar to creating bookmarks. You first display the layer visibility you want for the target view and then set the layer visibility in the Actions tab. Always remember to set the target view and then add the action to set the visibility.
Hiding fields is another matter. You have an action to show/hide form fields. However, the form fields need to be individually hidden/shown using the Show/hide a field action. Individually selecting fields and adding an action to hide each field becomes a laborious task when you have many fields on a form such as the form shown in Figures 13.30 and 13.31. Rather than using the Show/hide a field action, write a simple JavaScript to do the job.
We save the detail for using JavaScripts for showing/hiding fields in later chapters when we talk about JavaScript. For now, you can look at the sample form on the CD-ROM to see how we change layer visibility and show/hide fields.


Figure 13.31. When the second layer is made visible, the fields on the first layer are hidden from view.
Note
To see an example of a form using buttons to show/hide layer visibility, see the seminarLayered.pdf file in the Chapter13 folder on the book's CD-ROM.
Note
For more information on using JavaScript to show/hide fields, see Chapter 17.
If you use Microsoft Office or other applications that do not create Adobe PDF Layers, Acrobat 9 and above supports adding layers in Acrobat. You have two methods for creating layers in Acrobat 9 and above. Use the Preflight window to create layers from an existing PDF document, or use the Layers panel to import new content in a PDF file as a new layer.
Again, you can use layers in a variety of ways. Suppose you want to add an agreement to a form that specifies terms and conditions. Rather than create a PDF Portfolio and add the terms along with a form to a PDF Portfolio, you can add the terms and conditions statement as a new layer. You also can create an action to display the terms and conditions statement based on a field that a form filler completes, tabs into, or exits.
To add new layers to a PDF and create a scenario where you might use a terms and conditions statement on a form, follow these steps.
Note
On the book's CD-ROM in the Chapter13 folder, you'll file the following files we use for these steps: globalTransferFields.pdf, globalTransferTerms.pdf, globalTransferAgree.pdf, and agreeButton.pdf.
STEPS: Adding New Layers to a PDF Form
Open a form in Acrobat Pro or Pro Extended. Adding new layers to PDFs can be performed only in Acrobat Pro or Pro Extended. In our example, we used the globalTransferFields.pdf document. Open this file from the Chapter13 folder on the book's CD-ROM.
Import a new layer. Open the Layers panel, and from the Options menu, choose Import as Layer. The Import as Layer dialog box opens.
Choose a file to import as a new layer. Click the Browse button in the Import as Layer dialog box. When the Select Source File dialog box opens, select the file you want to import as a new layer, and click Select. In our example, we used the globalTransferAgree.pdf file from the Chapter13 folder on the book's CD-ROM. This document contains an opaque background, and when added to the form, it hides the background data.
Name the Layer. You must provide a name for the new layer. Type a name in the Create new layer text box, and click OK. For this layer, we used the name agree.
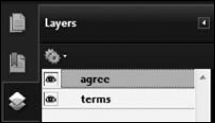
Add a second layer. Repeat the same steps to add another layer, and use the globalTransferTerms.pdf document. Name the new layer terms, as shown in Figure 13.32.
View the layers. In the Layers panel, you should see both layers added to the list of layers with both layers visible in the document, as show in Figure 13.33. The layer state you see in the Layers panel is the default view when the file is opened.
Save the file. We'll use the saved file for the remaining steps in this chapter. Save the file to a location where you can easily access it for following additional steps.

One of the new layers added to the file in the steps "Adding New Layers to a PDF Form" has an opaque background. This layer is intended for a temporary view for the form filler to read the terms of agreement and dismiss the layer after reading the content. Therefore, we need a button to hide the layer from view. The second layer added to the form is where the form filler confirms that he has read the agreement. This layer needs to remain in view when the file is saved.
Several actions need to be added to the form to change the layer visibility. To learn more about changing layer visibility, follow these steps.
Note
We continue with the file saved after adding new layers to the globalTransferFields.pdf form. Additionally, we create a button face from the agreeButton.pdf file found in the Chapter13 folder on the book's CD-ROM.
STEPS: Changing Layer Visibility
Open the globalTransferFields.pdf form with the two new layers.
Add a button. Click the button tool in the Advanced Editing toolbar, and add a new button in the lower-right corner of the form. Name the button agree.
Set the button properties. Add a button face for the button field using the agreeButton.pdf file from the Chapter13 folder on the book's CD-ROM. Follow the same steps for adding a button face as covered earlier in this chapter in the steps "Adding Buttons to Documents within a Portfolio."
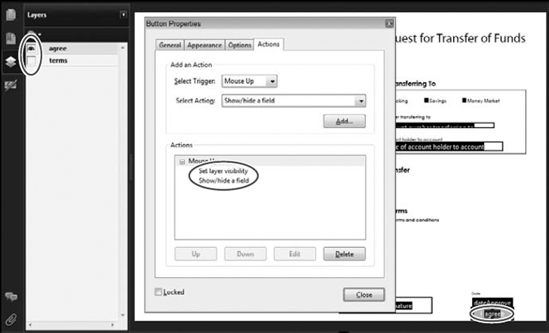
Set the layer visibility. When the form filler clicks the agree button, we want to hide the terms layer and show the agree layer. We also want to hide the agree button. If you added a button face, the Button Properties window should be open. Click the Actions tab in the button Properties.
While the Actions tab is in view in the Button Properties, click the eye icon in the Layers panel adjacent to terms to hide the layer. In the background, you should see the layer disappear. When you click the eye icon, the button field is deselected. Select the button, and choose Set layer visibility from the Select Action drop-down menu, as shown in Figure 13.34. Click the Add button, and click OK in the warning dialog box that opens.
Open the Select Action drop-down menu, and choose Show/hide a field. Click Add, and the Show/Hide Field dialog box opens. Scroll down to the agree item in the Select a field list, and select it. The default action is to hide the field, which is what we want to happen when the form filler clicks this button. Click OK, and you return to the Button Properties window.
Set layer visibility to open the terms statement. When a form filler works on the form, we need a trigger to open the terms statement. The best location for the action is the Date of Transfer field (transferDate). Open the Text Field Properties dialog box by double-clicking the field with the Select Object tool, and click the Actions tab.
Choose On Blur from the Select Trigger drop-down menu. On Blur invokes the action when the form filler tabs out of the field. Because all fields are filled in prior to this field, the last action the form filler does before signing the form is to read the terms of agreement.
Set the layer visibility to show the terms and hide the agree layers by clicking the eye icons, as shown in Figure 13.35. Choose Set layer visibility from the Select Action drop-down menu, and click Add. Click OK in the warning dialog box to add the action.
Show the agree button. When the terms layer is in view, we want the agree button to be in view also. Add another action using the On Blur mouse trigger, and add the Show/hide field action. Locate the agree item, click Show in the Show/Hide Field dialog box, and click OK. Both actions should appear in the Actions tab for the transferDate field, as shown in Figure 13.36.
Hide the agree button. One last item you need to deal with is hiding the agree button. By default, the button is visible, but when the form filler works on the form, the button should be visible only when tabbing out of the transferDate field. Open the Button Properties Window for the agree button, and in the General tab, choose Hidden from the Form Field drop-down menu.
Save the form to update it.

Two more items need attention on our form with layers. The default layer state is set for both the new layers added to our form to be in view when the file opens. We need to change the default state to hide the layers when the file is opened. Additionally, a form filer could conceivably use the Layers panel to place layers in view and hide them, which would defeat the purpose of having the form filler agree to the terms of the agreement. We need to lock the layers so a form filler won't be able to change the layer states without executing the actions we added to the form.
To change the default layer state and lock the layers, follow these steps.
STEPS: Changing Layer Default States and Locking Layers
Open the form created in the steps in this section. We continue with the form we used for adding new layers.
Open the Layers panel. Click the Layer panel icon to open the panel.
Select the first layer. Select the agree layer in the Layers panel.
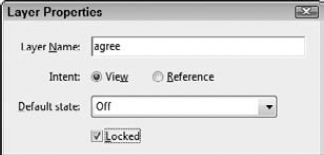
Open the Layer Properties dialog box. With the first layer selected, choose Layer Properties from the Layer Options drop-down menu. Alternately, you can open a context menu on the layer, and choose Properties.
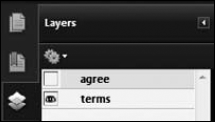
Change the default state. Open the Default state drop-down menu, and choose Off.
Lock the layer. Click the Locked check box in the Layer Properties dialog box, as shown in Figure 13.37.
Repeat these steps for the second layer to change the default state to Off and lock the layer.
Save the file.
Note
You can open the globalTrasferFinal.pdf document in the Chapter13 folder on the book's CD-ROM to browse the form we created by following all the steps in this section.
As a final step, you'll want to secure the form with Acrobat security to prevent a user from unlocking fields and changing the layer states.
Note
To learn more on adding document security, see Chapter 12.
What we've accomplished working through the steps in this section was to add new layers to an existing form. Both layers are off by default after changing the default layer state. When a form filler tabs out of the transferDate data field, the terms of agreement opens and hides all the content on the form. Because we locked the layers (and subsequently secured the form), the form filler cannot change the layer state. The only way to return to the form to sign the document is to click the agree button. Clicking the agree button hides the terms layer and displays the agree layer that adds a simple statement to the form indicating the form filler agrees to the terms.
You can add one more level of confidence to the form by hiding the Signature field and showing the field only after the form filler clicks the agree button. In this regard, a form cannot be signed unless a form filler agrees to the terms of the agreement.
Something else we might do to the form is hide all the form fields when the terms layer is placed in view and show the fields when the form filler clicks the agree button. Again, showing and hiding fields is much better handled using JavaScripts, so we'll defer the steps to hide fields using JavaScripts until we get to the chapters on using JavaScript.
Note
For more information on using JavaScripts to show/hide fields, see Chapter 17.
PDF Portfolios provide you opportunities to add companion documents helpful for form fillers to understand how to complete complex forms.
Forms can be submitted from PDF Portfolios without sending all the files back to you for processing data.
Forms can be enabled easily with Adobe Reader usage rights from within a portfolio.
Links can be added to open documents in a portfolio while in Preview mode.
In order to access Acrobat toolbars and menu commands in PDF Portfolios, you need to open the New Window view.
You can create welcome pages and headers in PDF Portfolios; headers are displayed in Home view and when the welcome page is in view.
In the Detail view, you can add new columns. A custom sort column can be created to sort the file order different than the default filename sort order.
Layer views can be changed in the Layers panel and through actions added to fields.
You can import layers in non-layered as well as layered PDFs using the Layers panel Options menu or the context menu only in Acrobat Pro and Pro Extended.
Layer default states can be changed in the Layer Properties dialog box.
You can lock layers and secure files so form fillers cannot change layer views in the Layers panel.