
Tables are part of many PDF forms. Tables are commonly set up with columns and rows having a header at the top that describes the content for each column and two or more rows of data following the header.
You find tables in a variety of forms. You might have a job application form where tables are used for work and education history. You see many tables in point of sale purchase forms where you find columns of descriptions, quantity, price, and totals across each row. In other forms, you see tables that make data entry and exporting data intuitive and easy for form fillers.
Tables can be as small as a few rows of data following a header or many pages of data all within a tabular format. In Acrobat, you need to design a table for the maximum anticipated rows of data that a form recipient is likely to use on your form. In LiveCycle Designer, you can create dynamic forms that spawn new rows based on user input or data flowing into a form.
In this chapter, we talk exclusively about creating and editing tables in Acrobat. If you want to know more about dynamic tables created in LiveCycle Designer, see Chapter 28.
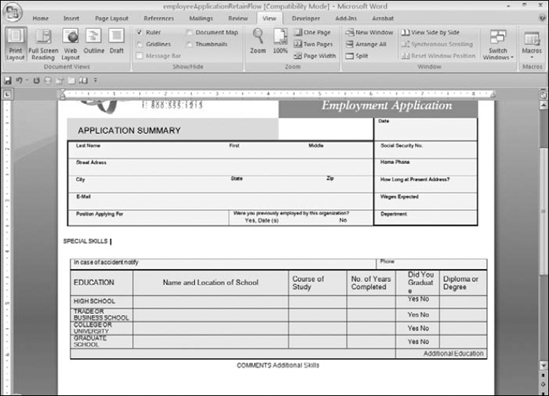
When designing tables, you should use a table feature in an authoring application. Programs like Microsoft Word and Adobe InDesign both have table features that support formatting tables, such as adding columns and rows, adding headers, and alternating fills for cells according to rows; Figure 8.1 shows an example of such a table. Authoring programs like Word and InDesign also allow you to format text within cells and perform many more formatting tasks.

Figure 8.1. This table contains rows with alternating fills. With the calculations added to this form and the column of combo box fields, this form isn't a good candidate for using auto field detection.
If you have to get the data from a table in a PDF form out to an authoring program, Acrobat recognizes the structure of a table and can easily export data to a spreadsheet application. If you use other authoring programs and use tables and indents, you might find more challenges when attempting to export data. As a general rule, try to use table features in programs to design your original forms that have tables.
After you convert your original authoring application documents to PDF, you can add fields in Acrobat to populate the forms with form field objects. Tables often require you to avoid using auto field detection when you open a form containing a table in Form Editing Mode. You might get away with populating a table that has no calculation fields such as a job application form; but when you have calculations to perform on a form, you most often are best served by adding fields manually.
Knowing when to use auto field detection and when to avoid it is helpful when you create PDF forms containing tables.
You can always open a file in Form Editing Mode, populate the form, check over the fields, and delete fields that you feel are better designed by adding field objects manually on a form. This method works if fields are recognized for areas where you don't need some special properties such as calculation formulas for the fields.
Regardless of whether you use auto field detection or open a form and decide to manually add form fields, you'll want to know some standards in regard to adding fields in a table where auto field detection isn't your best solution. The forms that you should plan on manually populate with field objects contain fields such as:
Calculation formulas: If you have to write JavaScripts to calculate row totals, discounts, sales tax, shipping costs, and grand total fields, then you'll want to use hierarchical names in a table, as explained in Chapter 7. Using auto field detection won't help you when hierarchical names are needed.
Radio buttons and/or check box columns: If you have several columns containing radio buttons and check boxes, using hierarchical names will speed up your form editing by ten to one over using auto field detection and using independent field names.
Combo box and list box fields: You might choose to auto-detect fields on a form as a partial solution when adding combo box and list box fields; however, the combo boxes and list boxes should be created manually. If you have long lists of options for each combo/list box, you're better off creating one field for each column/row manually and then placing multiple fields that duplicate the responses while changing field names for the remaining columns/rows. If you rely totally on auto field detection, you'll have to edit properties for each of these field types on the table.
Duplicating text fields: This issue is not related exclusively to forms with tables. If you have a block of text fields that need to be replicated on a form, it's best to use hierarchical field names especially when populating several forms with the same types of fields. For example, suppose you have identifying information for one block of fields and another group of fields designed for emergency contact information. The fields are identical in the two blocks but they need separate field names for each block. You can easily copy one block, change the parent names, and paste the changed name fields back to your form. Using auto field detection requires you to set properties on each field separately.
When auto field detection doesn't detect fields: Quite obviously as explained in Chapter 5, some form designs are not auto field detection-friendly. If Acrobat cannot detect fields on a form, then you need to add fields manually. With many different forms, Acrobat may recognize fields in many areas outside a table. If you find this to be true with some of your forms, you may only need to add the table fields to complete your form editing.
For forms that don't meet the criteria for low-optimum results when using auto field detection, you can open the form in Acrobat and choose Forms
To see the results of creating a form with a table where auto field detection is used, follow these steps.
Note
To follow the steps, use the globalEmploymentApplicationRaw.pdf in the Chapter08 folder on the book's CD-ROM.
STEPS: Using Auto Field Detection with Tables
Open a form containing a table in Acrobat. In our example, we use the globalEmploymentApplicationRaw.pdf document found in the Chapter08 folder on the book's CD-ROM.
Choose Forms
Add or Edit Fields. Acrobat prompts you in a dialog box for auto-detecting fields on the form. Click Yes, and the form opens in Form Editing Mode populated with fields, as shown in Figure 8.2.
Examine the form. In this example, the table in the Education area of the form was successfully populated with field objects. Acrobat did not pick up the Yes/No boxes/radio button fields needed to complete the form because no geometric shapes were added to the form design.
Save the form. The form needs some editing. Before proceeding, save the file by choosing File
The form in Figure 8.2 is a good candidate for using auto-detection of fields. The form requires no calculation fields, only a few radio button/check boxes need to be added, and the form has no combo/list boxes. With a few edits, we can finalize this form and distribute it.
Partial auto-detection of fields is most common with many forms and especially on forms with tables. That is to say, you let Acrobat detect fields, and some fields are missed when using auto field detection. You can expect to modify a form with manual edits using the Form tools in Form Editing Mode.

Figure 8.2. When you open the form in Form Editing Mode, you see the table in the Education area populated with fields.
For the form in Figure 8.2, we need to add some radio button or check box fields for the Yes/No responses. To see how this form would be edited in Form Editing Mode, follow these steps.
STEPS: Editing a Table with Auto-detected Fields
Open a form with a table where you need to add more fields after Acrobat has auto-detected fields. In our example, we use the form shown in Figure 8.2.
Zoom in to the target area on the form where you want to add fields. Click the Zoom In tool several times to zoom into the area where you want to add fields.
Tip
Form Editing Mode doesn't provide you with a Zoom tool in the Form Editing Mode toolbar. To access the Zoom tool, press Ctrl/

Add a radio button field. The Yes/No responses can be either radio button or check box fields. We'll use radio buttons to easily create mutually exclusive fields. In Form Editing Mode, click the Radio Button tool in the toolbar. Make certain the Keep tool selected in the toolbar check box is not checked. Doing so won't open the mini Properties window where you can choose the Radio Group Name.
Click the loaded cursor in the first row where you want the radio button to appear. Don't worry about the size of the field for now. We'll take care of sizing fields after adding all the radio button fields.
Name the fields. In the mini Properties window, name the field. In our example, the first two radio buttons are used for Yes/No responses for graduating high school. We named our first radio button field highSchool. Type a field name, and press Enter.
Note
When naming fields, you don't have to press Enter. You can click a tool in the toolbar or click outside the field, and the name you last typed for the field name is recorded for the field.
Add another radio button. Click the Radio Button tool again, and click below the first field. By default, the second radio button is added to the same Radio Group Name. Type No in the Button Value text box, as shown in Figure 8.3.
Tip
When creating a mutually exclusive set of radio buttons you can also click the Add another button to group check box to add another radio button field.
Add an additional Radio Group Name. Click the Radio Button tool again, and click the loaded cursor in position to add another field. In our example, the next row asks about receiving a trade or business diploma. We typed a new name for the field and called it businessDiploma. Then we added a second radio button to this group and set the Button Value to No. By default, Acrobat adds the name of the last group you identified when the last radio button was created.
Add all the fields needed for the form. In our example, we need two more groups of radio buttons. We named the next two groups college and graduateSchool, as shown in Figure 8.4. We changed the Button Value for the second radio button in each group to No and left the default value Yes for the first button in each group.
Resize an anchor field. In our example, the radio button sizes are too large. We want to reduce the size of each field. To do so, click the top radio button, press the Shift key, and drag one of the corner handles inward to size the field down. We'll use this field as an anchor field and size the remaining radio buttons to the same size. If the field is not positioned carefully within the area where you want the field to appear, click with the Select Object tool and drag it into position. This field will be used for alignment and positioning of the remaining radio button fields.
Resize all the radio buttons. Drag the Select Object tool through the fields you want to resize. Open a context menu after selecting the fields, and choose Set Fields to Same Size
Align the fields. With the fields selected and the handles appearing on the top anchor field, open a context menu and choose Align, Distribute, or Center
Distribute fields. Click the bottom field with the Select Object tool, press Shift, and drag down (or up) to vertically place the field in proper position. You should have the top and bottom fields in the right position on the form. Drag the Select Object tool through the fields, and choose Align, Distribute, or Center


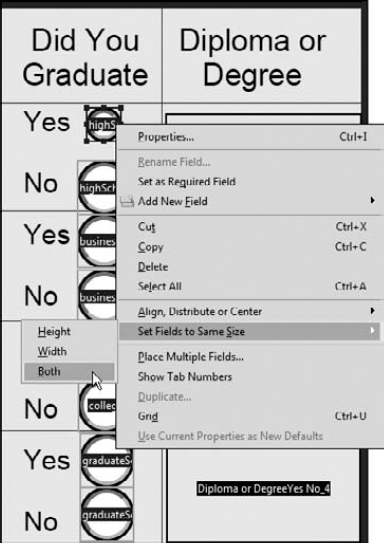

Figure 8.6. After sizing, aligning, and distributing the fields, they fall into the proper position on the form.
The appearance of the radio buttons doesn't match the design of the form in Figure 8.6. We'll hold off for now on changing Appearance Properties and cover the options you have for appearances in Chapter 9. At this point, you should have an idea for some of the kinds of edits you need to make on forms where auto field detection doesn't pick up all fields in a table.
Notice that we first added the fields to our form and didn't worry about sizing and alignment. You could add fields with a guideline in place and snap fields to a guideline as discussed in Chapter 7. You could size them by sizing a field to the correct size and then choosing Use Current Properties as New Defaults. All subsequent radio buttons fields would then be created at the same size. However, you still need to use the context menu command to Distribute the fields. If you try to visually position fields in vertical or horizontal alignment, you'll rarely get it right the first time. Because we had to visit a context menu command for distributing fields, we found it just as easy to size and align fields using the menu commands.
When creating tables on forms, you not only have to decide what tables work with auto field detection, but also what's the easiest way to populate a table. If you read the preceding section, you should have an idea for the complexity of making edits to prepare a single column of fields in a table.
Modifying fields created with auto field detection can sometimes take more time than starting from scratch and adding all fields manually. If you have to edit a few columns, you may as well populate the entire form manually and make edits to all columns and rows. Creating fields manually can sometimes take less time by populating the entire form than using auto-detection for partial field creation.
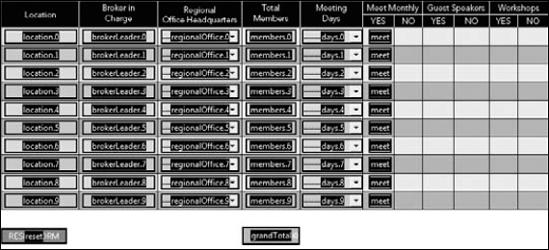
Figure 8.7 shows a table with several columns and rows. This type of form is just as easy to create manually as it is by letting Acrobat auto-detect fields. If we open the form in Form Editing Mode and use auto field detection, Acrobat misses the first column. The Meeting Days column is designed for a Combo box so this column needs to be created manually. The remaining six columns are designed for check box fields. If Acrobat adds fields via auto field detection, the fields won't be mutually exclusive for the Yes/No columns following the Meeting Days columns. Therefore the last six columns will be unusable. The only usable fields we end up with after auto field detection are the second, third, and fourth columns where we won't need to rename fields.

Figure 8.7. A table such as this one is created more easily using manual methods than using auto field detection.
The first order of business for populating the form shown in Figure 8.7 is to add a row of fields in the top row. When you choose Add or Edit Fields, be certain to click No when prompted for auto-detecting fields.
After entering Form Editing Mode, add fields and set the properties appropriately for each field. The Meeting Days column is designed as a combo box with options for days of the week. The last five columns do not need to be populated. We'll just add one check box field for the first column where Yes/No responses are needed. The first two Yes/No columns appear under the Meet Monthly heading. The No column under this heading is intentionally left empty. The form, with the fields added to the top row, appears in Figure 8.8.
Figure 8.8. Fields needed to populate the table are added in the first row. The last five columns are left empty intentionally.
Note
We added the first row of fields and two fields at the bottom of the form to the globalBrokerChaptersFirst.pdf file found in the Chapter08 folder on the book's CD-ROM. You can use the file to follow steps in this chapter.
Beginning with the column heading Location and ending with the column heading Monthly Meetings, we can use the Place Multiple Fields command to populate the rows below the first row. The Yes/No columns under the Meet Monthly heading need some special treatment that we'll use later to populate the last five columns, but we'll use the first Yes field under this heading.
To populate the first six columns, follow these steps.
STEPS: Manually Populating Rows in a Table
Select the fields to be populated. Click the Select Object tool, and draw a marquee around the fields in the first row. All fields on the form in the table are selected.
Open the Create Multiple Copies of Fields dialog box. Open a context menu and choose Place Multiple Fields to open the Create Multiple Copies of Fields dialog box. There are ten rows on our form. Type 10 in the Copy selected fields down text box, as shown in Figure 8.9, and click OK to populate all rows with the first five fields.
Note
When you use Place Multiple Fields, Acrobat doesn't count the first field you created on a form. Inasmuch as you might think Acrobat is copying the first field and pasting nine copies for a column of ten rows, Acrobat is actually replacing the first field and giving it a hierarchical name. Therefore, you need to type the total columns/rows on your form in the Number of Fields text box in the Create Multiple Copies of Fields dialog box.
Move the bottom row to fit within the last row in the table. Click the Select Object tool, and drag through the bottom row of fields to select them. Drag the fields to the correct position in the bottom row.
Distribute the fields. You must distribute fields individually for each column. Select the first column of fields, and open a context menu. Choose Align, Distribute, or Center
Save the file. The fields added thus far are shown in Figure 8.11. You can use the saved file to follow additional steps later in this chapter.


The first five columns are set up for the form. For the remaining columns, we have to use some different methods for the check box fields and use a little shortcut to easily populate the rest of the form.
Using Place Multiple Fields with Radio Buttons and Check Boxes
When you use the Create Multiple Fields command, all fields you want to duplicate need to have unique field names. If you try to duplicate fields with the same name, Acrobat opens a dialog box informing you that you cannot create multiple copies from the selected fields.

When you create radio buttons and check boxes designed to be mutually exclusive fields, you must use the same field name and choose different export values in the field Options Properties dialog box. Having fields with different names and different export values ensures that when one field is clicked in a common row of fields with the same field name, all other fields having the same field name are turned off as the target field is turned on.
The dilemma facing you is that you must use the same field names, but Acrobat won't let you place multiple fields if you do use the same field names. The way you get around the problem is to create one column (or row) of fields using the Place Multiple Fields command, duplicate the fields, and change the export value in the duplicated fields.
In Figure 8.10, we created ten fields for the first five columns and one field for the Monthly Meeting Yes column. This field is a check box field with an export value of Yes. Our next task to complete this form is to add the remaining check box fields to the form for the last five columns.
To get a better understanding of how to add radio button/check box fields to a table, follow these steps.
STEPS: Adding Mutually Exclusive Check Boxes to a Table
Open a form with a table in Acrobat designed for several columns of check boxes used for mutually exclusive choices. For this example, we continue with the form shown in Figure 8.11. This form has one column of check boxes formatted for our use.
Duplicate a column. Click the Select Object tool, and drag through the column of check box fields to select them. Press Ctrl/
Change the Export value. Open a context menu on the selected fields, and choose Properties. Be careful not to deselect any of the fields. When the Check Box Properties dialog box opens, click the Options tab. Note that when you have multiple check box or radio buttons selected and you open the Properties dialog box, you can change the Export Value for all the selected fields. Type No in the Export Value text box as shown in Figure 8.12. Click Close after editing the Export Value.
Save the form. Click File
Open the Fields panel. If you're not in Form Editing Mode, choose Forms
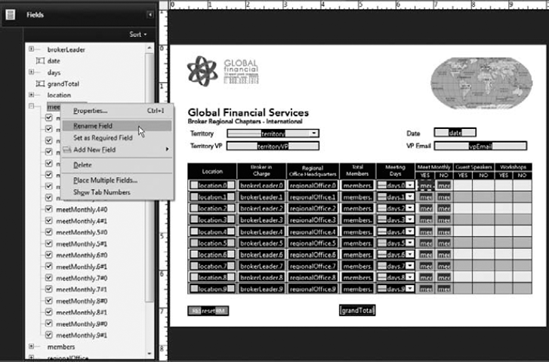
Select the field parent name you want to edit. Scroll the Fields panel to locate the monthly field. The parent name for the check box fields is monthly. We need to change this name, and all the child names nested below the parent name will change too. Open a context menu on the parent name, and choose Rename Field, as shown in Figure 8.13.
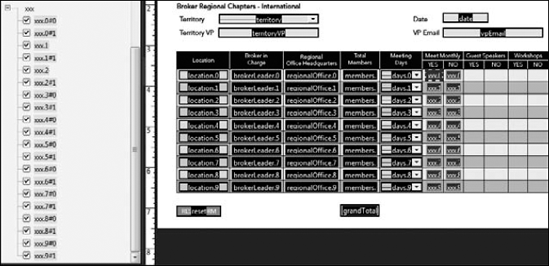
Type a new name for the parent name. When you choose Rename Field, the name for the field in the Fields panel becomes highlighted and ready to accept new text. In our example, we type xxx for the new parent name, as shown in Figure 8.14. This is a bogus name that we'll use temporarily.
Copy the fields with the new parent name. Drag the Select Object tool through all fields having the same root name. You should see both the Yes and No check box fields appearing with new parent/child names. When selected, choose Edit
Select Edit
Undo. At this point, the copied fields on the clipboard have the parent name xxx. It does us no good to paste the same names on a form. We cannot change parent names in the Fields panel for a partial list of names. Therefore, we need to undo the renaming the fields to return the first column back to the original field names—Monthly—while keeping the clipboard names at xxx.Paste the fields on the clipboard into your form. Choose Edit
Edit the parent name. The fields are pasted with xxx as the parent name. In the Fields panel again, choose Alphabetic from the Sort pull-down menu and locate the xxx field's parent name. Open a context menu, and rename the parent. In our example, we renamed the field Guest Speakers.
Add another group of fields. The xxx fields are still on your clipboard. Press Ctrl/
Save the final form. Choose File Save As, and rewrite the form to optimize it.

The first time you follow the steps outlined here, it may seem a little lengthy and cumbersome. However, after you perform these steps a few times and can rely on memory to complete them, you'll find populating tables with mutually exclusive fields to be efficient and much faster than trying to edit field names and properties after Acrobat has recognized them with auto field detection.
Changing parent names and pasting fields back to a form is not something you need to reserve for columns and rows in tables. Even some of the simplest forms can take advantage of creating fields quickly and efficiently using similar methods you use for tables.

Figure 8.15. After you've pasted all three sets of columns, the form contains mutually exclusive check box fields.
For example, in the form in Figure 8.16, we have a block of fields set up for employee identification, including name, address, phone, email, and so on. Some of the fields require special formatting, such as the state combo box field, the zip code field, and the phone number field.

Figure 8.16. This form has two sections with virtually identical fields. You can easily copy and paste fields in this type of form.
Below the employee ID section is another section for emergency contact information. The emergency contact fields are identical to the employee ID fields. On this form, you can easily format all the fields in the first section and then copy and paste the fields for the emergency contact fields. To see how easy it is to perform the task, follow these steps.
Note
To follow the steps here, you can use the globalCreditApp.pdf form in the Chapter08 folder on the book's CD-ROM.
STEPS: Copying and Pasting Fields with Hierarchical Names
Open a file that requires setting up two identical blocks of fields. In our example, we use the globalCreditApp.pdf form on the CD-ROM.
Open the form in Form Editing Mode. Choose Forms
Rename the parent name for the employee ID fields. Choose Alphabetic from the Sort pull-down menu, and click the employee parent name as shown in Figure 8.17. If you click again on the parent name, the name is highlighted and ready to accept new text. Type emergency for the parent name.
Select the renamed fields. Drag the Select Object tool through the emergency fields, and press Ctrl/
Choose Edit
Undo. The employee fields return to the default parent names when you opened the file while the fields on the clipboard remain with the emergency parent name.Paste the fields. You don't need to open the fields panel and change names on this form, so you can use either Form Editing Mode or Viewer mode and paste the fields. If using Viewer mode, click the Select Object tool and then press Ctrl/


At best, a table exported to another format requires lots of revision if you need it re-edited in an authoring application. A Microsoft Word file, Excel file, or Adobe InDesign file converted to PDF won't get converted back to the authoring program with the original look and design elements created in the native application document as a completely editable table. Still, you can obtain some interesting results when exporting PDFs as tables for purposes of redesigning forms and using tables for other layout uses.
The primary thing to keep in mind is that you have two completely different types of data to work with when exporting PDF files to other file formats. You have the background design that comprises one form of data, and you have the form fields (if populated) with another set of data. In their original state, you cannot export both background data and form data together in another file format.
You can flatten form fields to eliminate the field objects while retaining any data contained in form fields and then export the layout and the data together to another format. After you flatten the form fields, however, you lose all field attributes, and the document is no longer a PDF form.
Note
For more information on flattening fields, see Chapter 13.
If you're concerned with the data only, then exporting table data is perhaps the most successful thing you can do regarding table data exports. Fortunately, Acrobat provides some impressive options for exporting table data.
In terms of background design, exporting to Microsoft Excel format sends data to individual cells without retaining any design elements. Only the text is exported when you select background text and export to a spreadsheet.
To export a background layout to Excel, select text on a form with the Select tool. If you want the entire form exported in addition to any tables on the form, press Ctrl/
As you might expect, data are exported to a spreadsheet with data appearing in individual cells. As you can see in Figure 8.20, this type of file is fairly useless for redesign purposes when the data appears in a Microsoft Excel spreadsheet.
When it comes to table exports to spreadsheets, the only real use you'll find worthwhile is when exporting field data.
Note
For information related to exporting field data, see "Exporting Table Data" later in this chapter.


When editing a form design for forms containing tables, you'll find tables exported to Microsoft Word a better solution than exporting to Microsoft Excel. Word can retain formatting from PDF exports much better than Excel, and you have several options for getting PDF content into Word.
Open a PDF file in Acrobat, and choose File

Figure 8.21. Choose File
If you want to retain the original format of the form design, choose the Retain Page Layout radio button. Other options appear for tags, comments, and image settings. Make your choices, and click OK. Word does a nice job in converting the PDF content back to a Word .doc file. Not all designs will work for you, but you might get away with copying and pasting tables to new layouts. In Figure 8.22, the tables look fine as converted and are editable in Word.
Another option you have for exports to Word is to use a context menu command to copy a background design as a table and paste the copied content into Word. When exporting to Excel, we used the Open Table in Spreadsheet command from a context menu. When exporting to Word, use the Select tool to select text and open a context menu on the selected text. From the menu options shown earlier (refer to Figure 8.19), choose Copy as Table.
After the data are copied to the clipboard, open Word and press Ctrl/
Ideally, you should return to an original document that was converted to PDF to make any design changes on forms. The methods discussed here are intended for those who need to at least get part of the data in a design application for forms where you don't have the original files that were converted to PDF. In a pinch, you can rescue some parts of a form. However, you should plan of doing lots of revision work when you get to either Excel or Word.
Whereas Microsoft Word is best used for exporting PDF content to an authoring application, when it comes to field data, Microsoft Excel is the program to use. You can export field data to a spreadsheet from one form or many forms having the same data fields.
In Acrobat, choose Forms
Click the Add button, and locate files on your hard drive to import. Select the files, and click Select; the files are listed in the Files to Export Data From list, as shown in Figure 8.23.

Figure 8.23. Choose Forms
After adding files to the list, click the Export button; Acrobat aggregates the data and opens a spreadsheet in Microsoft Excel. In Excel, you can sort columns and rows, add new columns and rows, and delete any unwanted columns and rows.
Note
You have many more options for handling form data. For more on managing Acrobat forms data, see Chapter 15. For more on managing LiveCycle Designer data, see Chapters 31 through 34.
You can use auto field detection with tables; however, in many instances tables can be populated with field objects more efficiently using manual methods for adding field objects.
When manually creating fields on a table, you can use the Place Multiple Fields command only when applying it to fields all having unique field names. The command doesn't work when attempting to create multiple fields having the same name.
When creating radio buttons, you can set Export Values at the time the radio button is created in the mini Properties window.
You can edit a parent name for a row or column of fields, copy the fields, undo the edits, and paste a column or row on a form.
Fields can be aligned and sized to an anchor field via a context menu command.
After placing multiple fields, select a row or column of fields with the Select Object tool and choose the Distribute (Vertically or Horizontally) command to space the fields equidistant from each other.
The Distribute command works only when distributing single columns or rows. If you distribute multiple columns or rows, the fields are distributed in a cascaded arrangement.
You can export table design content to Microsoft Excel as a table. In Excel, the data are placed in individual cells and are not well suited for redesigning a form.
You can export any PDF file to Microsoft Word format while retaining the layout of the form. Microsoft Word recognizes tables and enables you to edit the tables in Word.
You can export form data from a single PDF form or multiple PDF forms directly to a spreadsheet.