Let's face it. LiveCycle Designer is not a very intuitive program, and it's quite complicated. Anyone telling you differently thinks in code and complex tasks. For the rest of us, the learning curve is steep, and becoming proficient requires much patience and dedicated study.
With this book, we've tried to expose you to many of Designer's methods and how to use the program from the ground up. However, we cannot hope to satisfy everyone's needs and special circumstances. To become a LiveCycle Designer advanced user, you need to go beyond this book and research other sources to help you learn more about the program and more easily create forms in Designer.
In this chapter, we point you to some places to start your research and advanced learning for more knowledge as it relates to LiveCycle Designer.
If you have a background in programming and database logic, you may find much of working with LiveCycle Designer to be intuitive and easy to learn. If you don't have skills in programming and understanding database management, you are likely to have much difficulty getting up to speed in the program. Some people say that Designer is easy and intuitive. We define easy as something a child or an elderly grandparent can learn in 30 minutes. This program doesn't fall into that category. If someone tells you it's easy to learn, don't believe it! Adobe LiveCycle Designer is complex and tough to learn—especially if you're trying to learn the program from the online guide. You won't become a Designer expert by reading a single book on the subject. Many users need some sort of formal training.
If you intend to spend a good part of your workday designing interactive dynamic forms, you may want to look at a framework for learning the program in detail. Here are some of our recommendations for getting the most out of Adobe LiveCycle Designer:
Practice with the program. Nothing beats diving into a software program and starting to use it. But before you attempt to create some sophisticated forms, try to design static forms. Don't jump into adding subforms and trying to create dynamic forms, and don't worry about database connections. The more you can become familiar with the different field types and setting field properties, the better off you'll be when it comes time to design more complex forms.
Be sure you understand the Library palette, the Object palette and its Value tab, and the Border palette thoroughly. Practice so they become very intuitive and you know exactly where you want to go to change properties for objects and fields. Like any other kind of learning, starting with the basics helps you trim some time off the learning curve. Be sure you understand Chapters 22 through 24. The foundation for creating forms is comprehensive in these chapters.
Attend a class. Some type of formal training is always best when working with a program as complex as LiveCycle Designer. Search out your local community colleges, universities, and private training centers that offer classes on Designer. But be certain to carefully review the class content before you enroll in a class. If you see classes advertised as "Creating PDF Forms" or "Learning Adobe LiveCycle Designer," make sure that the class instructor and the contents of the class cover creating dynamic forms. An overview of working with fields and creating static PDF forms isn't going to do much more for you than what you can learn by reading through the chapters in this book.
Some private training centers may boast about having credentialed instructors who are Adobe Certified Experts in Photoshop, Illustrator, InDesign, Dreamweaver, Acrobat, Flash, and a few other programs. My guess is you won't find anyone claiming to have all these certificates who knows Designer in depth, at least to the level you need. Look for people who live in the program and do some sort of professional forms design work or are celebrated speakers frequently talking at conferences and expos.
Adobe has a full-blown certification program in Designer, and learning from a certified LiveCycle Designer trainer is your best avenue. You can find certified LiveCycle Designer trainers by logging on to
partners.adobe.comand selecting Training Providers from the "Find products and services" list on the home page.Get a video. Check regularly online to see if a video or DVD is released as an instructional tutorial. Videos and DVDs can cover much more territory in less time than reading the online guide.
Attend a conference. One of the best ways to learn features, tips, and workarounds about a program is to attend a conference. You get some special benefits from attending a conference. You can attend sessions and sometimes find pre- or post-conference workshops that offer full-day courses on Designer. The added benefit is you can gather some e-mail addresses for Adobe employees, speakers, and other conference participants. There's probably not a more valuable asset than having someone to call when you really get stuck on a problem.
Be patient. Learning Designer for the average person is like learning a foreign language. You have to start with basics, add continual reinforcement, and keep practicing. Don't try to create complex forms too quickly. Take your time, and learn a little each day. Try to devote some time to concepts, and practice many times over so the steps in a process become intuitive and second nature. When you get frustrated, move away from the program and come back the next day. Sometimes a good night's rest can help you solve a problem in a matter of a few minutes that was an all-day burden the day before.
A wealth of information on LiveCycle Designer can be found online. Many Web pages are found on Adobe's Web site—some in a few obscure locations. You need to search in your Web browser and poke around a little to find some valuable resources. What you can find are helpful guides, user forums, instructional materials, training programs, templates, forms samples, and other information.
The Web is continually changing, so it's a good idea to make some periodic visits to your search engine and explore the search results from time to time. Some of the staples for Web information on Designer stays relatively fixed in the same location on Adobe's Web site—or at least you are automatically forwarded to a new area where the material you want to return to can be found. Inasmuch as the Web sites remain in static locations, the URLs are often long and difficult to remember.
You may want to create links in Acrobat to some of the more valuable Web sites to browse periodically. You can easily bookmark Web site URLs, but that means you need to be working in your Web browser. When you have instant access from within Acrobat, it's easy to click a menu item or button to search for an answer when you're stumped about some aspect of working in Designer (or Acrobat).
In Chapter 19, we talked about adding menu commands in Acrobat and we used JavaScript to add menu items in the top-level menu bar. You also have an option for creating toolbar buttons using JavaScript. Unfortunately, the addToolButton object is not available with LiveCycle Designer, so you need to add the new tool buttons in Acrobat. Because you're likely to have Acrobat open during most Designer editing sessions, you'll find it convenient to add tools that launch some important URLs.
Note
We added several JavaScripts that you can add to your Acrobat JavaScript folder in the Chapter35 folder inside the jsFolder on the book's CD-ROM. Copy the files to your Acrobat JavaScript folder, and the tool buttons are added to an Add-on toolbar. For locating the JavaScript folder where you need to copy the files, see Chapter 19.
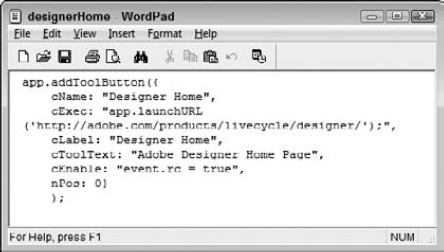
We have several files you can add to the JavaScript folder on the book's CD-ROM with different URLs. We could have added all the JavaScript in a single routine, but we wanted to keep it simple in case you want to modify some scripts to delete some from the JavaScripts folder after you've had a look at them. Each file contains code similar to the following and shown in Figure 35.1:
1. app.addToolButton({
2.   cName: "Designer Home",
3.   cExec: "app.launchURL('http://adobe.com/products/livecycle/designer/'),",
4.   cLabel: "Designer Home",
5.   cToolText: "Adobe Designer Home Page",
6.   cEnable: "event.rc = true",
7.   nPos: 0}
8. );
Note
The code is written in a simple text editor as explained in Chapter 19. Be sure to use a text editor and not a word processor when writing the code and save the file as text only with a .js extension.
In line 1, we use the addToolButton object to add a tool to the Add-ins toolbar shown in Figure 35.2. Line 2 is the name of the tool. You need to be certain that each tool you add to the Add-ins toolbar has a unique name. In line 3, we execute the action. In this case, we launch a URL. When you click the tool, your default Web browser opens and takes you to the URL specified in this line of code. If you want to modify the URL launch, just edit the text in the line between the single quote marks.
In line 4, we add a label for the tool. You can add icons to the tool button faces with a few more lines of code, but we wanted to keep this simple so you can easily modify the target location to suit your personal needs. In line 5, we added the tooltip, and line 6 makes the tool active. In line 7, we identify the position of the tool in the toolbar. The 0 (zero) position is the first location of the tool in the toolbar.
Tip
The code in the sample files is intentionally kept very simple to help you easily make edits in the scripts to customize the toolbar buttons for your own personal use. You can get fancier by adding icon images to the toolbar using JavaScript. For code samples for how to add icons to toolbars, see the JavaScript Specification guide that you can download from Adobe's Web site.
The links you find using the JavaScripts in the CD-ROM folder include:
http://adobe.com/products/livecycle/designer(Adobe LiveCycle Designer ES Home page): Here you find information provided by Adobe on Designer, getting support, and many links to solutions providers.http://www.adobe.com/devnet/livecycle/designing_forms.html(Adobe Developer Connection): This site provides a wealth of information on LiveCycle Designer. You find tips and tutorials for using the program, links to references such as FormCalc, LiveCycle Designer ES Scripting Reference, and many different developer links.http://www.adobe.com/devnet/acrobat/(the Developer Connection for Acrobat): You find similar information here related to Acrobat as you find in the LiveCycle ES Developer Connection.http://kb.adobe.com/selfservice/viewContent.do?externalId=333249(Scripting Languages and Resources): Here you find information related to scripting languages supported by Designer, links to sample forms, help with converting JavaScript from Acrobat Forms to Designer forms, scripting reference guides, and more.http://www.adobeforums.com/webx/.3bb7d189/(LiveCycle Designer User-to-User Forums): This site is a user forum where you can post questions and review responses from questions posted by professionals in the Designer user community.http://www.adobe.com/devnet/acrobat/javascript(Acrobat Development Center–JavaScript for Acrobat): This site is dedicated to providing information on Acrobat JavaScript. You'll find links to reference guides, debuggers, information on converting Acrobat JavaScript to Designer JavaScript, and more.http://www.pdfscripting.com(Tutorials, Tools, Scripts, and Samples for scripting Acrobat and PDF): This site is primarily related to Acrobat JavaScript, but you'll also find some Designer scripting available. Thom Parker of Windjack Solutions, an Acrobat solutions developer, has created a Web site with six hours of video training, copy/paste JavaScript routines, tutorials, a library of scripted PDF examples, and automation tools such as the buttons we talk about adding to Acrobat in this chapter. You'll find a huge amount of information related to JavaScript and detailed explanations for the novice as well as advanced users.
Let's face it, reference manuals are a necessary evil for most of us. With the exception of a few, no one really likes sitting down and reading a reference manual from cover to cover. But even the most advanced users live by reference manuals and couldn't do without them.
The operative here is reference. These manuals are your right-hand assistants and not intended for you to digest them in entirety. It's like the book you're reading. We add lots of cross-references in this book because we expect people to jump around, locate some information on getting a solution to a problem, and then put the book aside and be on your way to work on your forms. Reference manuals are exactly that. They are there for you to focus on solutions and get the kind of information you need quickly to resolve problems. A number of resources are available to you, and you'll want to keep them handy to make frequent visits.
One of the best references you can find on Designer is always available when you're in the program. Choose Help
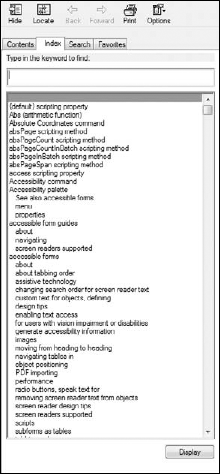
The Contents section of the Help Guide opens by default. Here you see a topical listing of all the help information contained in the guide. Click the plus (+) icons to expand a section and browse content by topical listings. The Index tab displays an index of the guide. Click the Index tab, and the panel changes as shown in Figure 35.4. At the top of the Index panel, you see a text box where you can type search criteria to search the Index panel.

The Search tab offers you options for searching the Guide and using Boolean expressions in your search criteria. Type text in the text box and open the fly-away menu, as shown in Figure 35.5. Choose from Boolean AND, OR, NEAR (proximity), and NOT, and then type additional text in the text box. Press Enter, and the search results are reported in the Search Panel.
The Favorites panel is an area where you can mark pages to return to. Double-click an item in the left panel to place the respective page in view in the right panel, and click Add at the bottom of the Favorites panel to add a new favorite.

Figure 35.5. Click the right-pointing arrow to open the fly-away palette and choose a Boolean expression.
The Help Guide is always available when you're in Designer, but unfortunately the Help Guide doesn't come in the form a PDF document that you can browse while not working in the program. In addition, Designer offers no option to create comment notes in the Help Guide. If you want to carry a PDF around with you on a laptop where you don't have Designer installed, add comment notes for remarks and code listings, or print the entire help document at a copy shop to produce a printed version of the guide, you can create your own PDF version of the Help document.
To create a PDF version of the Help document you need to convert the Help document to several PDF files and then combine the files into a single PDF document. To learn how to perform the conversion and document assembly, follow these steps.
STEPS: Creating a PDF Version of the LiveCycle Designer Help Guide
Open the Help Guide. Open Designer, and press F1 on your keyboard.
Click a topic in the Contents panel. Click the root name on one of the items in the Contents panel, as shown in Figure 35.6.
Click the Print tool. The Print Topics dialog box opens, as shown in Figure 35.7.
Print the heading and subtopics. In the Print Topics dialog box, choose Print the selected heading and all subtopics, as shown in Figure 35.7.
Identify the Printer. Click OK in the Print Topics dialog box, and the Print dialog box opens. Choose Adobe PDF for the printer driver, and click Print. When you print a topic, you may have to wait some time for the file to print to PDF. There are more than 900 pages in the complete Help Guide, and some topics will take quite a while to print. Wait for the resultant file to open in Acrobat before proceeding.
Tip
When you print to PDF, you are prompted to name the file. Use names like 0.welcome.pdf, 1.introduction.pdf, and so on. By adding a number for the filename prefix, you know what order the files should be merged together.
Click all the items individually, and repeat Steps 2 through 5.
Open Acrobat.
Choose File

Combine the files. Click Combine Files, and Acrobat merges the PDF files together in a single PDF document. After merging the files, click Save when prompted and save the merged documents under a new filename. At this point, you can delete the original individual files.
Add an index. Choose Advanced


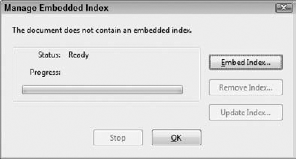
Figure 35.9. Choose Advanced
Copy the final file to a folder where you keep reference documents on your computer. Be sure to keep the documents outside your Acrobat application folder. When you upgrade Acrobat and LiveCycle Designer, all folders are lost inside the application folders.
The final file you create from the Help Guide is a PDF document. You can add comment notes to the document, keep it open on another monitor in Acrobat if you work on two monitors, search the file using Acrobat Search, create links to forms examples, and copy the file to a computer where you can read it using Adobe Reader. If you want to add comments in Adobe Reader, you can enable the PDF with Reader usage rights using Acrobat Pro or Pro Extended.
Scripting guides are essential documents when you want to write code using either FormCalc or JavaScript in Designer and when you want to write JavaScripts in Acrobat. Some of the top JavaScript programmers we know keep the guide open whenever they add new routines to forms and JavaScripts at the folder level.
Fortunately, Adobe makes available several scripting resources to help you learn to write code and debug problems. If you're a user of an earlier version of Designer, you might start looking in the Designer folder inside the Acrobat folder for the FormCalc manual. This manual was installed on your computer in earlier versions of Designer. However with Acrobat 9 and above, all reference documents are Web hosted. By hosting documents on the Web, Adobe can routinely update manuals after they are developed. And in some cases, manuals are published after a product release, so hosting these types of documents on the Web makes sense.
Some of the more important reference documents you'll want to download include:
Acrobat JavaScript Reference: This manual is the primary reference for Acrobat JavaScript and writing JavaScript code.
http://www.adobe.com/devnet/acrobat/pdfs/js_api_reference.pdf.Adobe XML forms 2.7 specification: This is the specification for the XFA architecture.
http://partners.adobe.com/public/developer/en/xml/xfa_spec_2_7.pdf. There are several versions of the XFA specification architecture. You'll find several other manuals athttp://partners.adobe.com/public/developer/xml/index_arch.html.Calculations and Scripts Reference Guide: This guide provides a basic understanding of objects, events, models, and so on when using JavaScript and FormCalc.
http://partners.adobe.com/public/developer/en/tips/CalcScripts.pdf.Converting Acrobat JavaScript for Use in LiveCycle Designer: This guide helps you understand more about converting Acrobat JavaScript to JavaScripts that can be used in Designer.
http://partners.adobe.com/public/developer/en/acrobat/sdk/AcroJS_DesignerJS.pdf.FormCalc specification, version 2.0: You'll need this FormCalc specification manual to write scripts using FormCalc in Designer.
http://partners.adobe.com/public/developer/en/xml/formcalc_2.0.pdf.LiveCycle Designer ES Scripting Errors: Use this guide (which we mentioned in Chapter 29) to understand error messages related to JavaScript and FormCalc.
http://help.adobe.com/en_US/livecycle/8.2/lcdesigner_syntaxchecking.pdf.Scripting Object Model expression specification (SOM), v2.0: This reference guide describes the syntax used in form objects, values, properties, and methods.
http://partners.adobe.com/public/developer/en/xml/som_2.0.pdf.Scripting Samples: Nothing beats seeing examples of scripts used in actual forms. Visit the Adobe Web site for sample documents containing scripts.
http://www.adobe.com/devnet/livecycle/designer_scripting_samples.html.
Other guides and documents are found on Adobe's Web pages. Start with looking at http://partners.adobe.com/public/developer/xml/index_arch.html for links to many other documents.
You can find a number of RSS feeds on Adobe's Web site to keep up to date with recently published articles and information right in Acrobat. One of the best sources for scripting is found at Thom Parker's JavaScript Corner on Acrobat Users (www.acrobatusers.com). Thom frequently writes articles related to JavaScript and LiveCycle Designer scripting on his blog site (www.acrobatusers.com/blogs/thomp).
If you want to monitor new additions to Thom's contributions or another area on Adobe's Web site where blogs and RSS feeds are found, you can add RSS feeds in the Tracker. To add an RSS feed in the Tracker, follow these steps.
STEPS: Adding an RSS Feed to the Tracker
Open the Preferences dialog box. By default, Acrobat 9 and greater has RSS feeds turned off in the Tracker. You need to enable RSS feeds in the Tracker Preferences before you can add a new feed to the Tracker. Press Ctrl/

Enable RSS feeds. Check the Enable RSS feeds in Tracker in the right pane, as shown in Figure 35.10.
Locate an RSS feed in your Web browser. In our example, we'll use Thom's JavaScript Corner blog site. When you visit
www.acrobatusers.com, you'll find RSS Feeds listed under the News item in the red banner, as shown in Figure 35.11. Click RSS Feeds, and a Web page listing all the RSS feeds on Acrobat Users opens.Copy a feed. On the second page in our example shown in Figure 35.12, we located the feed we wanted, right-clicked (Control+click on the Macintosh), and chose Copy Shortcut (Copy Link on the Macintosh) to copy the RSS feed link.
Open the Tracker. Choose Forms
Click RSS in the left panel. When the Tracker opens, you'll see RSS in the left panel, as shown in Figure 35.13, if you enabled the preference choice in the Tracker Preferences.
Subscribe to a feed. Click Subscribe to RSS Feed in the right panel. This action opens the Add Subscription dialog box shown in Figure 35.14.
Paste the feed link in the Add Subscription dialog box. Press Ctrl/
Delete the feed// text. By default, you'll find a URL containing text such as feed//http:... You need to delete the feed// text in the Add Subscription text box. The URL should begin with
http://. Delete the text, and press OK.Open the feed in the Tracker. Expand the RSS heading so you can see the items nested below the heading, and you'll find the feed you added to the Tracker. One nice thing about using the Tracker as an RSS reader is that you can convert the entire list from a feed in the Tracker to a PDF document by opening a context menu and choosing Convert To PDF, as shown in Figure 35.15.
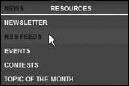


Figure 35.15. You can convert a list in the tracker from the RSS feed to PDF by opening a context menu and choosing Convert To PDF.
In these steps, we used a blog site on Acrobat Users to monitor the blog posts. You can monitor a number of other sites for frequent information updates. Search for RSS feeds on Adobe's Web site, and you'll find a number of different products and forums that you can keep in touch with. When you open the Tracker, your feeds are updated in Acrobat.
Among other things, attending workshops and conferences are good means for learning a program like LiveCycle Designer.
An abundant amount of information, training resources, and help guides can be found on Adobe's Web site.
Adobe provides a wealth of reference manuals you can download from the Internet.
You can add RSS feeds to the Tracker and keep up to date with blogs and other RSS type posts in the Tracker window.