We hope this book provides you an exposure to scripting in Acrobat and LiveCycle Designer. To be completely thorough, we would have to write a book equal to this size covering just Acrobat JavaScript and a separate book for JavaScript and FormCalc in LiveCycle Designer.
This book is not a JavaScript book; as such, we offer you only some samples that we hope guide you into looking at more opportunities for adding scripts to your forms.
In this chapter, we provide some different examples of JavaScript routines to demonstrate how JavaScript is used for adding content to forms, calculating data, formatting fields, working with functions, working with dialog boxes, and changing views. In essence, we use examples for a variety of conditions that can be used on your forms.
Scripting for conditions more specific to your forms will require you to understand what we cover in this chapter and use additional JavaScript objects you learn from the manuals and resources you can find on Adobe's Web site.
All the scripts we talk about in this chapter work with Adobe Reader and Acrobat. We leave scripts unique to working with Acrobat to Chapter 19.
A variety of JavaScripts can be used to add new content to a form. You can add fields using JavaScript, add new pages using JavaScript, add bookmarks using JavaScript, and add a number of other items as new content to a form.
Unfortunately, most of the new content you add to a form can be performed only using Acrobat. You cannot add new content to a form using Adobe Reader. However, there is one exception. If you enable a form with Adobe Reader usage rights, you can add annotations via executing JavaScript routines.
Note
For more information on enabling forms with Adobe Reader usage rights, see Chapter 10.
You may want to provide a form recipient an option for adding a comment note or markup on a document. Rather than use design space on a form, you can add a button with a button field to dynamically create a comment if the user decides to amplify a response with a comment message.
Comment note pop-ups and text box comments locations are defined in JavaScripts using x,y coordinates on a page. You need to define the bounding area for a comment in the JavaScript code to inform Acrobat where the comment appears on a form. Therefore, before you write a JavaScript to add comments, you need to determine the coordinates for where the comment note (or text box) is to be placed on the form. The code for specifying the location of a comment note might be written as follows:
[200, 100, 300, 400]
In the above code, we are defining the coordinates on a page beginning with 200 points from the left and 100 points from the bottom for the lower-left corner coordinates of a note. The top-right corner of the comment note rectangle appears 300 points from the left and 400 points from the bottom of the form.
To take the guesswork out of finding coordinates, you can let JavaScript return coordinate locations to you in the JavaScript Console. The following steps show you how.
Note
To follow these steps, use the productOrder.pdf form from the Chapter18 folder on the book's CD-ROM.
STEPS: Using JavaScript to Locate Annotation Comment Coordinates
Open a form in Acrobat. For our example, we used the productOrder.pdf form from the book's CD-ROM.
Open the Comment & Markup toolbar. Click the Comment task button, and choose Show Comment & Markup Toolbar.
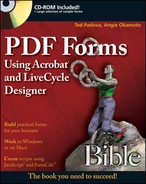
Draw a rectangle comment precisely in the area where you want a comment to be drawn when a JavaScript is executed. Click the Rectangle tool in the Comment & Markup toolbar, and draw a rectangle, as shown in Figure 18.1.
Open the JavaScript Console. Press Ctrl/

Clear the default text in the JavaScript Console. Click the Trash icon to clear the text.
Type the following code in the JavaScript Console:
this.getAnnots()[0].rect
Press the Num Pad Enter key. The JavaScript Console reports the annotation coordinates, as shown in Figure 18.2.
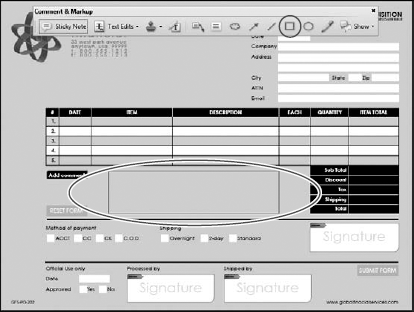
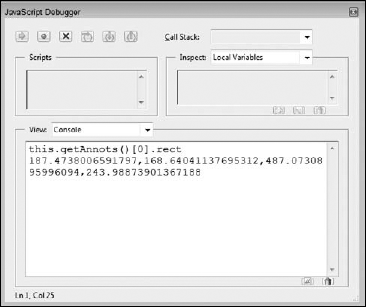
Figure 18.2. Type the code, and press the Num Pad Enter key to display the coordinates for the Rectangle comment in the JavaScript Console.
The coordinates shown in Figure 18.2 report x,y values with 13 decimal places. You can copy the code as it appears and paste into a script in the JavaScript Editor or simply use the integers (187, 168, 487, and 243) to add to the code.
In Figure 18.1, we defined an area where we want to add a comment note. The form is straightforward and easy enough to fill out. However, this form contains no provisions to advise the host company when to ship the order if the form recipient wants a delayed shipment, no way of dealing with different shipping and mailing address, no option for requesting an e-mail confirmation that an order has been successfully processed, or some other information that a form recipient may want to know.
Rather than add a text box field to the form, we decided to let the form recipient add a comment note if some additional comments need to be added to the order. Because some Adobe Reader users may not be familiar with using the Comment & Markup tools, we use JavaScript to create a new text box comment when the form recipient clicks a button.
Note
In order to add a comment in Adobe Reader, the form must be enabled with Adobe Reader usage rights using Acrobat Pro or Pro Extended.
To create a button action that adds a new comment to a form, follow these steps.
Note
Use the productOrder.pdf form in the Chapter18 folder on the book's CD-ROM to follow these steps.
STEPS: Adding a Button Action to Create a Comment Text Box
Open a form in Acrobat. In our example, we used the productOrder.pdf form from the book's CD-ROM.
Assess the coordinates for the comment text box. Use the same method for assessing coordinates as shown in Figure 18.2. Generally, it's a good idea to open a text editor to paste the coordinates and keep it open while writing the JavaScript. When you come to the line of code for adding coordinates, you can copy from the text editor document and paste into the JavaScript Editor.
Delete the Rectangle comment. If you created a Rectangle comment to display coordinates in the JavaScript Console, click the Rectangle comment with the Select Object tool and press Delete to remove it from the form.
Create a button field. Add a button field where you see Add comment on the form shown in Figure 18.1. We used addComment for the field name and set the appearances for the button field to no border and no color fill in the Button Field Appearance Properties.
Add a JavaScript. Click the Actions tab, and choose Run a JavaScript from the Select Action drop-down menu. Click the Add button to open the JavaScript Editor.
Write the code. Type the following code in the JavaScript Editor, as shown in Figure 18.3:
1. var annot = this.addAnnot({
2.   page: this.pageNum,
3.   type: "FreeText",
4.   rect: [187, 168, 487, 243],
5.   strokeColor: ["RGB", .270, .270, .270],
6.   fillColor: color.white
7. });
Click OK in the JavaScript Editor, and save the file.
Click the button, and the text box comment note is added. Type some text in the text box shown in Figure 18.4 to test it.

Figure 18.4. Click the button to add a text box comment, and type text in the comment window to test it.
In line 1 in our script, we use the addAnnot object to add an annotation. Lines 2 through 6 set the attributes for the annotation. Line 2 targets the current page for the annotation. Line 3 defines the type of annotation to be added when the script is executed. If we want to add a Sticky Note, we would use "Text" instead of "FreeText." Line 4 contains the coordinates we obtained in Figure 18.2 earlier in this chapter. Lines 5 and 6 set the stroke and fill colors. In Line 5, we used a custom color.
Note
For more information on creating custom colors with JavaScript, see Chapter 17.
Calculation scripts are among the most frequent types of scripts you'll use. As discussed in Chapter 15, you need to use a scripting language to perform some of the most basic math functions. Using Simplified Field Notation offers you an easy method for creating simple math calculation formulas, but it is much more limiting than using JavaScript. When you need to use functions, write complex scripts, and perform calculations based on conditions, JavaScript is what you need to use.
Note
For more information on using Simplified Field Notation, see Chapter 15.
In Chapter 15, we learned that summing rows and columns of data can be performed easily when you use hierarchical names and Acrobat's preset sum + formula. You name a column of fields total.0, total.1, total.3, and so on, and pick the parent name total in the Field Selection dialog box when you choose sum + from the Value drop-down menu in the Calculate tab.
Note
For more information on using preset formulas, see Chapters 8 and 9.
Using Acrobat's preset formula works for a number of different forms where all you need to do is sum a row or column. However, if you have to do something else with the result, such as add a sales tax after summing a column, then you need to use a JavaScript. Because SFN cannot be used with hierarchical names, you don't have any option other than JavaScript to perform the calculation.
Note
For descriptions and steps in this section, we used the purchaseOrder.pdf form from the Chapter18 folder on the book's CD-ROM.
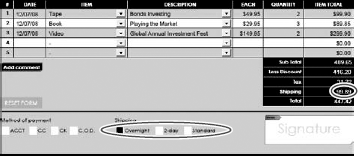
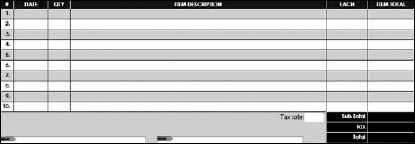
Figure 18.5 shows the purchaseOrder.pdf form from the book's CD-ROM. Acrobat's auto field detection didn't recognize any fields on the form, so we had to add all the fields manually. As you can see in Figure 18.5, the Item Total column contains ten fields using hierarchical names. The first field below the tenth row is used to calculate a subtotal.

Figure 18.5. An Item Total column contains fields using hierarchical names. Below the last row, a total of the amount fields needs to be calculated.
We use this form as an example to keep the scripting simple. For purchase order forms, any taxable items generally contain sales tax in each row total, so you may not need a separate field for tax on purchase order forms you design for your company. We broke this form up to illustrate different formulas you may need to use on forms, so focus on the process we describe in this chapter and not so much on the design of the sample form.
On some forms, you might not have a separate tax field like the one shown in Figure 18.5. For any form where sales tax is added to an amount total using a single calculation, you need to use JavaScript.
For the example form, we can use the preset sum + formula in the subtotal field to calculate the total for the Item Total column; but because we're talking about JavaScript, we'll use a script to total the column. Later, we talk about why we use JavaScript when we come to "Hiding zeros" later in this chapter.
Although the calculation to sum a column or row using JavaScript involves several lines of code, copying and pasting the code into additional forms is very easy. To create a JavaScript to sum a column, follow these steps.
STEPS: Summing a Column of Fields Using JavaScript
Open a form in Acrobat having a column of fields that need to be summed. In our example, we used the purchaseOrder.pdf file shown in Figure 18.5 from the book's CD-ROM.
Open the Text Field Properties window for the field used to sum a column. In our example, we used the Select Object tool and double-click the subTotal field while in Viewer mode. All the fields on this form have been properly formatted. If you use another form to follow these steps, be certain to format the fields you use in the calculation as numbers.
Click the Calculate tab in the Text Field Properties window.
Add a JavaScript. Click the Custom calculation script radio button in the Calculate properties, and click the Edit button to open the JavaScript Editor.
Add a JavaScript. Type the following code in the JavaScript Editor window:
1. var f = this.getField("amount");
2. var a = f.getArray();
3.   var sum = 0;
4.   for (i = 0; i < a.length; i ++)
5.   sum += a[i].value;
6. event.value = sum;
The code as you should type it in the JavaScript Editor appears in Figure 18.6.
Click OK, and click Close in the Text Field Properties window.
Save the file. We'll use this file in more steps in this chapter. Keep the file handy to follow additional steps.

We introduce a few new routines in the script shown in Figure 18.6. We start the routine by assigning the parent name amount to variable f. If you followed other steps in Chapter 17 and this chapter, this assignment should be familiar to you.
In line 2, you find a new object. We set up an array and assign the array to variable a. Another item that's new is the loop we introduce in line 4. We first set the counter i to zero. The i < a.length item tells Acrobat to run the loop until the value i is less than the total number of rows. But we need to increment the i value through each pass in the loop, which is what the i++ item does.
In line 3, we set a variable sum to zero. In line 5, you see the sum value incremented with each pass in the loop. As the first row value is acquired, the a item is the field value and the i item is the counter. The last line of code (line 6) is the total sum we place as the event.value.
What's especially nice about this script is that you can add the script to a document where you collect an assortment of scripts as explained in Chapter 16 and paste the script into a document you use to collect various scripts. When it comes time to use the script, copy it from your template file and paste it in any form needing a similar calculation.
The only concern you have is just making sure you use the correct parent name for a row or column of fields. It you use the Place Multiple Fields command, Acrobat names the fields in hierarchical order. If you use a name like total, just replace amount in the first line of code with total. Every other line of code remains the same.
At the end of the script, you have a value sum. If you want to add a sales tax with a fixed tax rate, you would add a line 7 to the code, such as:
sum = sum + (sum * .075)
The above line of code adds a sales tax of 7.5 percent to the total. If you want a discount applied to the total, you might add a line 7 as follows:
sum = sum - (sum * .15)
This line of code creates a total less 15 percent.
The important thing to remember is that you have lots of flexibility for using the script shown in Figure 18.6 and can add just one more line of code for calculating various totals.
You can handle calculating a sales tax in several ways. You can use a fixed tax rate in a calculation formula as one method. Using such a method for calculating a sales tax, however, means that when a tax rate is changed, you need to modify your form and change the formula to reflect the new rate.
Another method is to add a field to a form for a form recipient to supply the tax rate. This option works well for sales to areas where tax rates differ, such as selling products to various U.S. states or when international sales require adding sales tax.
An alternative to adding a field for a user-supplied tax rate is to create an application response dialog box where a user is prompted to add a tax rate in a dialog box. The value added to the dialog box is then used in the calculation for the sales tax amount.
Using a tax rate in a field calculation for a fixed rate is nothing more than adding the formulas as:
1. var f = this.getField("amountFld");
2. event.value = f.value * .085;
The simple two-line script assigns variable f to a subtotal field or an amount field ("amountFld") you want to use for taxable items. Line 2 contains the fixed rate. In this example, the tax rate is 8.5 percent.
If you use a script like this on your forms, any change in tax rate requires you to edit the calculation script and change the rate to a new rate value.
Tax rates can vary among U.S. states and among different counties within a state. If you use forms that require calculating tax for each individual location where products are purchased, adding a user-supplied tax rate field might be the best way to calculate the tax. The formula uses the tax rate input to calculate the result.
In Figure 18.7, a tax rate field is used for a user-supplied tax rate. The Tax field is calculated based on the rate entered for this field.

To calculate a tax rate based on user input for the rate amount, follow these steps.
Note
For these steps, we used the purchaseOrder.pdf file from the Chapter18 folder on the book's CD-ROM.
STEPS: Calculating Sales Tax Based on User Input Rate Values
Open a form having a field used for user-supplied tax rates. In our example, we used the purchaseOrder.pdf file from the Chapter18 folder. On this form, the field is added for the user-supplied tax rate data, and the fields are formatted as numbers.
Open the tax Text Field Properties. Double-click the tax field with the Select Object tool where the tax result is calculated.
Click the Calculate tab.
Add a JavaScript. Click the Custom calculation script radio button, and click Edit to open the JavaScript Editor. Type the following code in the JavaScript Editor, as shown in Figure 18.8:
1. var f = this.getField("subTotal"); 2. if (f.value !=0){ 3. var j = this.getField("taxRate.amount") 4. event.value = Math.round (f.value * j.value)/100; 5. }Click OK, and click Close in the Text Field Properties window.
Save the file.
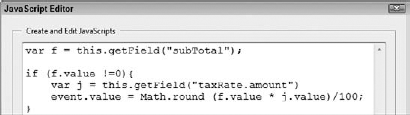
We start the script off in line 1 in Figure 18.8 by looking at the subTotal field. If the field is not yet populated with data, the calculation script is not run. This line prevents a calculation on zero error. If the value is greater than zero, the script is executed.
In line 2, we get the user-supplied tax rate. Line 3 multiples the subTotal value times the taxRate.amount value and rounds off the result to two decimal places.
Shipping charges often offer a form recipient a few options for the shipping service. As an example, you might design a form that offers overnight shipping, two-day shipping, and standard shipping. Shipping charges are then calculated according to the shipping preference made by the form recipient.
In Figure 18.9, you can see three check box fields used for choosing a shipping preference. Below the tax field on the right side of the form, you see an amount calculated for the shipping fees.
Shipping fees can be calculated in a number of ways. You can use fixed rates for different shipping options, use a percentage value based on total purchase price, or create a number of different other custom calculations.
Note
For calculating a shipping fee, we used the productOrder.pdf form from the Chapter18 folder on the book's CD-ROM. This form has many JavaScripts we explain in this chapter. Because many scripts are dependent on other scripts in the document, we added the JavaScripts to the document level and various fields rather than adding them to comment notes. You can delete the scripts from the document level and fields and save the file under a new name to step through examples in this chapter or review the scripts contained in the document as you follow steps.
We created two fields for calculating a subtotal. One field is the sum of the Item Total fields, and the other field is the same value less a discount amount. We used the subtotal (or discount) amount for calculating a shipping fee and sales tax.
The Sub Total field sums the data in the Item Total column. The Less Discount field is the Sub Total less 15 percent for an amount exceeding $200. If the amount is less than $200, we use the Sub Total value to calculate the shipping fee and sales tax. If the amount is equal to or greater than $200, we use the Less Discount field to calculate the shipping fee and sales tax.
The three check box fields in the Shipping area of the form contain the JavaScripts for calculating the shipping fee. We used rates based on the total purchase price (from either the Sub Total field or the Less Discount field) to determine the shipping fee. The three check boxes are mutually exclusive fields with separate JavaScripts to calculate the shipping fee.
Using the productOrder.pdf file from the Chapter18 folder on the book's CD-ROM, we add three different scripts to the check box fields for calculating a shipping fee. To understand how to create the calculations, follow these steps.
STEPS: Calculating a Shipping Fee
Open a form where a shipping fee needs to be calculated. In our example, we continued with the productOrder.pdf file from the book's CD-ROM.
Open the first shipMethod Check Box Properties window. The Shipping area on the example form contains three check boxes. Double-click the Select Object tool on the first check box field to open the Check Box Properties window.
Click the Actions tab.
Add a JavaScript. Leave the default Mouse Trigger at Mouse Up, and choose Run a JavaScript from the Select Action drop-down menu. Click Add to open the JavaScript Editor, and type the following script in the editor window, as shown in Figure 18.10.
1. var oShip = this.getField("shipping");
2. var oSub = this.getField("subTotal");
3. var oDiscount = this.getField("discount");
4.
5. if (oSub.value <200)
6.   var oRate = oSub.value * .24;
7. else
8.   var oRate = oDiscount.value * .24;
9.   oShip.value = oRate;
Click OK, and click Close in the Check Box Properties window.
Save the form.
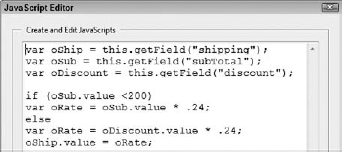
In lines 1 to 3, we assign the variables. We need the Sub Total and Less Discount fields used in this calculation. If the Sub Total field is less than 200 (line 5), we use the subTotal value. If the amount is 200 or more, we use the discount value to calculate the shipping fee.
The shipping fee is calculated as 24 percent of the total value (line 6 or line 8 depending on the total purchase price).
For the next check box, we copied the script from the first check box and pasted it into the JavaScript Editor we opened from the second check box field. The only change needed is the fixed rate (.24). We changed this value to .18. In the third check box, we changed the rate to .12.
When the form recipient completes the form, clicking a check box shows the amount of shipping costs. Click a second check box, and the shipping cost changes to reflect the respective calculation. This way, a form recipient can view how much one shipping method varies from another before clicking the submit button.
Unless you use a server product, the reliability of a date stamp is dependent on the date being accurate on a user's computer. If you have a controlled environment in an enterprise with an IT department responsible for configuring computers and implementing security, date stamps can be reliable when using a computer system clock.
Date stamps can be used for a variety of conditions. Perhaps you want a document to be stamped when a user submits or signs a form. You can easily add a date to the form when the action is invoked. In Figure 18.11 you see the JavaScript code that adds a date stamp to a field.

The easiest way to use a date stamp for something like a submit form action is to create a text field. You don't want the field to be displayed on a form while a form recipient is completing the form because the user will wonder what data to add to the form field. So keep it hidden until you are ready to display it on a submit form action.
On the productOrder.pdf form, we added a field above the identifying information fields and named the field orderDate.fld, as shown in Figure 18.12. We set the field properties to Read Only and Hidden in the General field properties window. We formatted the field as None in the Format tab.

Using JavaScript, you can add the current time based on the computer system clock to populate the field as well as add a title such as Date:. If you set the field properties to Read Only, the field cannot be edited if the file is secured after the field is shown on the form.
Note
For more information on securing forms, see Chapter 12.
To add a date stamp to a form, follow these steps.
Note
For these steps, we continued using the productOrder.pdf form from the Chapter18 folder on the book's CD-ROM. If you saved the form from earlier steps, use the saved version.
STEPS: Date Stamping a Form
Open a form where you want to add a date stamp. In our example, we used the productOrder.pdf form from the book's CD-ROM.
Add a field to hold the date value. In our example, we used a form that has a field formatted properly for holding a date value that we'll add with a JavaScript. If you use another form, add a text field and leave the formatting at the default None from the Select format category drop-down menu in the Format tab. While testing the JavaScript code, leave the field visible and do not mark it for Read Only. After you check the code to be sure it works properly, clear the data and set the General properties for the field to Read Only and Hidden.
Open the Button Properties for the Submit Form button. In our example, we have a button field to be used for submitting the form. We use the Select Object tool and double-click this field to open the Button Field Properties window.
Add a JavaScript. Click Actions, and add a JavaScript action to open the JavaScript Editor. Type the following code in the JavaScript Editor, as shown in Figure 18.13.
1. var f = this.getField("orderDate.fld"); 2. f.hidden = false; 3. f.value = "Date: " + util.printd("mmm dd, yyyy", new Date());Click OK in the JavaScript Editor.
Move the JavaScript action above the Submit a form action. We didn't add a Submit a form action to the example form. However, if you have a form with a Submit a form action, be sure to move the JavaScript action above the Submit a form action in the Actions tab. You want the date field to be visible to the recipient of the submitted form, and you need to show the field before submitting it to make the field visible.
Click Close to close the Button Field Properties.
Click the button. If the script was added correctly to the button action, you should see the field appear with the current date from your system clock after clicking the button with the Hand tool.
Clear the field, and change the General properties. If the field works properly, clear the field data, open the General properties, click the Read Only check box, and choose Hidden from the Form Field drop-down menu.
Save the file.

The script shown in Figure 18.13 is a simple three-line code script. We assign variable f to the field where we want to add a new date. We show the field in line 2, and we add the date in line 3. After clicking the button to add a date, the form appears as shown in Figure 18.14.

You have a variety of formatting options when using the Format tab and writing scripts to create custom field formatting, as well as writing scripts to format fields when using calculation formulas. You might want to eliminate zeros that appear as defaults for calculated fields, add fixed responses to combo and list fields, format fields for accepting defined values, limit responses to fixed character lengths, and more.
Generally, scripts handling field formatting issues are written as Custom Format Script or Custom Calculation Scripts in the Format tab. Additionally, you can add some formatting to calculation scripts in the Calculate tab.
Many forms authors want to eliminate default zeros from calculation formulas. Rather than have a field with no result appear as 0.00, forms authors generally prefer having a null value in a field so the field appears empty.
The purchaseOrder.pdf form we used in several examples in this chapter contains a combo box field at the top of the form, as shown in Figure 18.15. In this example, when the form recipient chooses an approved vendor from the combo box list the vendor name is added to the Company field appearing below the combo box.
We could add addresses in a JavaScript so when a vendor is selected, not only the vendor name is added to the Company field, but all the identifying information shown in Figure 18.15 is also added. We kept it simple to illustrate a point here, so we didn't add the additional information. For now, just be aware that additional lines of code can populate the remaining fields in this section on the form.

The combo box has a default value of Choose a vendor. For the Company field, you'll notice in Figure 18.15 that nothing appears in this field. The reason for this is that we added a null value to the Company field if the combo box value is Choose a vendor. Here's how we do it.
Note
To follow these steps, use the purchaseOrder.pdf form from the Chapter18 folder on the book's CD-ROM.
STEPS: Adding a Null Value to a Field
Open a form in Acrobat having a combo box. In our example, we used the purchaseOrder.pdf form from the book's CD-ROM.
Open the vendor.company Text Field Properties window. The Customer item field is the vendor.company field. Click the Select Object tool, and double-click this field to open the Text Field Properties window.
Click the Calculate tab.
Add a JavaScript. Click the Custom calculation script radio button, and click the Edit button to open the JavaScript Editor. Type the following code in the JavaScript Editor window, as shown in Figure 18.16:
1. var f = this.getField("vendor.choice");
2. if (f.value != "Choose a vendor")
3.   event.value = f.value;
4. else
5.   event.value = "";
Click OK in the JavaScript Editor, and click Close in the Text Field Properties window.
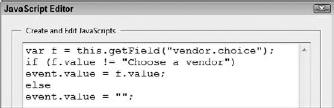
In the first line of code, we assign variable f to the combo box field. The default value for the field is Choose a vendor. In line 2, we set up an if condition. If the value of the combo box field is not Choose a vendor, line 3 in the script is executed where we get the value of the combo box and place it in the field where this script is written (the vendor.company field).
If the f.value is Choose a vendor, line 5 is executed. We place the value "" (a null value) in the field. If any item in the combo box other than the default value is chosen, the value shown in the combo box is added to the Company field, as shown in Figure 18.17.

A similar kind of script is used for eliminating zeros from calculated fields. You can handle this in a number of ways. You can add a custom format script in the Format tab, add a script in the Calculate tab, or add a Function at the document level and call the function from a format script. What you do, where you put it, and for what type of fields are important to know.
If you have a form that contains an integer, something like a quantity field, you format the field differently than when you format a field containing a calculation, something like (quantify * amount). As an example, look at the table in the purchaseOrder.pdf form we've worked with in this chapter and shown in Figure 18.18.
Notice that all the fields are empty and devoid of default zeros. In the Qty column, we use a custom format script to eliminate the zeros. In the Each, Item Total, and calculation fields at the bottom of the form, we add some code to the calculation formulas to eliminate zeros.
Why do we have two formatting controls on this form? The reason is that the Qty fields are not calculated, so we cannot use a calculation script on these fields. When we add a custom format script to the fields, we're not formatting the fields for a number. In the remaining fields, we definitely need to format the fields as a number. If we do, we cannot add a custom format script in the Format tab. The Format tab permits only format fields using either a custom script or number formatting.
To make this clearer, follow these steps to add both formulas to the form.
Note
To follow these steps, use the purchaseOrder.pdf form from the Chapter18 folder on the book's CD-ROM.
STEPS: Eliminating Zeros Using Format and Calculation Scripts
Open a form in Acrobat. For the steps here, use the purchaseOrder.pdf form from the book's CD-ROM.
Open the qty.0 Text Field Properties. This form contains all the scripts we cover in these steps. If you begin creating a new form, you'll want to add the format scripts before you create a table. The script will be duplicated when you use the Place Multiple Field command to populate a table without needing to modify the script for each field. To open the Text Field Properties window, double-click the field with the Select Object tool.
Click the Format tab.
Add a Custom Format Script. Click the Edit button for a Custom Format Script, and the JavaScript Editor opens. Type the following code:
1. event.rc =/d*/.test(event.change);
Click OK in the JavaScript Editor.
Add a Custom Keystroke Script. Click the Edit button for Custom Keystroke Script, and type the following code in the JavaScript Editor:
1. event.value =event.value?event.value: "";
Click OK in the JavaScript Editor. You return to the Format tab with the scripts appearing as shown in Figure 18.19.
Open the each.0 Text Field Properties window. Double-click the first field in the Each column with the Select Object tool to open the Text Field Properties window.
Click the Calculate tab.
Add a JavaScript. Click the Custom calculation script radio button, and click Edit to open the JavaScript Editor. Type the following code:
1. var f = this.getField("qty.0");
2. if (f.value == 0)
3. event.value ="";
Click OK.
Add a JavaScript to the first field (amount.0) in the Item Total column. Follow the same steps to add a Custom calculation script in the Calculate tab, and type the following code in the JavaScript Editor, as shown in Figure 18.20:
1. var f = this.getField("qty.0");
2. var g = this.getField("each.0");
3.
4. if (f.value != 0)
5.   event.value = f.value * g.value
6. else
7.  event.value = "";
Click OK in the JavaScript Editor, and click Close in the Text Field Properties window.


In the first script, we set the formatting for a non-calculated field having an integer value. If a formatted number needed to be added to this field, we couldn't use the format scripts used in the first set of JavaScripts.
In the second script, we look at the first field in the Quantity column (qty.0). If the value is zero, a null value is placed in the each.0 field. We cannot use the same script for the qty.0 field because we need to format the each.0 field as a number with two decimal places.
In the third script for the amount.0 field, we have similar conditions as the each.0 field. This field also needs to have the field formatted as a number. Therefore, we add the script in the Calculate tab to look at the qty.0 field. If the value is not zero, we execute a calculation formula to multiple qty.0 times each.0. If the value f is zero, we add a null value to the amount.0 field.
Unfortunately, the scripts you write for the Each column fields and the Item Total fields require you to add scripts individually to each field. You need to open the field's properties for each field in the respective rows (each.1, each.2, amount.1, amount.2) and add a JavaScript in the JavaScript Editor.
We use the term creating fixed response options here to mean that when you make a selection from one combo box, a second combo box offers you fixed responses from the menu options. For example, if you have a list of choices in a combo box such as books, shirts, and pens, your response options for books might be a variety of titles, for shirts a variety of sizes, and for pens a variety of ink colors. When a choice is made for something like books, only book titles appear in a second combo box. Likewise, if you make a choice for shirts, only shirt sizes appear as choices for the same second combo box.
Using the productOrder.pdf form we've used in many steps in this chapter, you can see an example of fixed responses in combo boxes shown in Figure 18.21.
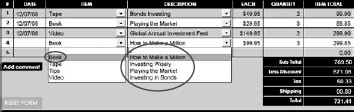
Figure 18.21. This form has two combo box fields. The second combo box field displays fixed responses according to the menu choice made in the first combo box field.
This type of setup for fixed responses has a number of applications for your forms. It's particularly useful when creating point of sale purchase forms. As you look over Figure 18.21, there are only four different sets of fields the form recipient can interact with.
The date fields are open for a form recipient to supply a date. The Item combo box fields are open for the form recipient to choose an item. The Description combo box fields are confined to choices based on the first combo box fields, and the form recipient selects an option from the list of fixed responses. The Quantity fields are open for the form recipient to indicate how many items to order. All the remaining fields in the table are marked Read Only. Prices are fixed, and calculations are performed by JavaScripts. This type of form limits user error through limited choices that a form recipient needs to make to complete the form.
Up to this point, we've dealt with scripts having fewer than ten lines of code. Simple scripts are easy to review and understand. However, when you write a substantial amount of code, when you plan to come back later to the scripts, or when other forms authors work with the forms, you'll want to add comments within the code to understand the routines.
We haven't added notes to the code in this chapter to try to keep the amount of text down so you can easily duplicate the routines. However, in the real world when you add JavaScripts to fields and functions, you'll want to make a habit out of adding programmer's comments.
To add comments to JavaScript code, you add two forward slashes where you want a comment to appear in the code such as:
// This routine calculates sales tax.
Or add code to a line such as:
var f = this.getField("tax"); //get the text fieldWhen a routine is executed, the lines of code following // are ignored by JavaScript.
On the form shown in Figure 18.21, we created three separate functions. You can use multiple functions in a single script, but we broke this example down to three scripts to make it a bit easier to follow.
For the combo box fields on the productOrder.pdf file, we created two functions for formatting the fields. We also needed a third function for the Item Total fields.
Preceding the first function, we set up an array for the combo box fields. We opened the JavaScript Functions dialog box by choosing Advanced
1. var oArray = {
   Book: [ ["-","None"], ["How to Make a Million",99.95],
   ["Investing Wisely",69.95], ["Playing the Market",29.95],
   ["Investing in Bonds",34.95]],
2. Tape: [ ["-","None"], ["Stocks Investing",69.95], ["Bonds
   Investing",49.95], ["Commodities Investing",79.95],["Property
   Investing",139.95]],
3. Video:  [ ["-","None"], ["Global Annual Investment Fest",149.95],
   ["Investing Wisely",159.95], ["Playing the Market",219.95],
   ["Staying Ahead of Inflation",139.95]],
4. Tips:[ ["-","None"], ["Gold",39.95], ["Silver",29.95], ["Orange
   Juice",19.95],["Coffee",9.95]]
5. };
6. function SetDescriptionEntries()
7. {
8.   if(event.willCommit)
9.   {
10.    var cRowName = event.target.name.split(".").shift();
11.    var list = oArray[event.value];
12.    if( (list != null) && (list.length > 0) )
13.      this.getField(cRowName + ".Description").setItems(list);
14.    else
15.   {
16.    this.getField(cRowName + ".Description").clearItems();
17.   }
18.   this.getField(cRowName + ".Each").value = 0;
19.   }
20. }
With 20 lines of code, you obviously want to add some programmer's comments if you create a script like this. We show you just the lines of code that are executed without any notation to simplify the demonstration.
In lines 1 through 4, we set up an array. The first item in each of the four lines of code is the name that appears in the first combo box fields. Therefore, the first combo box contains Book, Tape, Video, and Tips. Making a choice from the first combo box provides the options respective to the item you choose in the second combo box in the Description column. For example, if you choose Book in the Item combo box field in row one, the combo box for the Description row 1 options are "How to Make a Million", 99.95, "Investing Wisely", 69.95, and so on. The value after the name is the price that is placed in the Each column.
In line 6, we added a function named SetDescriptionEntries(). In line 10, we split the name of the field so we can use a loop to loop through the items beginning in line 11. Field names were added such as Row1.Item, Row2.Item, Row3.Item, and so on. Because the names aren't hierarchical, we needed to split the name to gain access to the number following Row for each field.
In line 12, we set the value of the Each column to zero to clear out any data that may have been there from another choice.
The second function we added was named addDescription for the Script Name in the JavaScript Functions dialog box, and we used SetEachValue() for the function name. This function sets the value for the Each column and was written as follows:
1. function SetEachValue()
2.   {
3.     if(!event.willCommit)
4.     {
5.       var cRowName = event.target.name.split(".").shift();
6.       var nSelection = 0;
7.       if(!isNaN(event.changeEx))
8.       nSelection = event.changeEx
9.       this.getField(cRowName + ".Each").value = nSelection;
10.    }
11.  }
This script is set up to run using the Change Event of the previous function. It will not run on other events because the event.willCommit and event.changeEx parameters are used.
The third function we named calculateTotal in the JavaScript Functions dialog box, and we used CalculateTotal() for the function name. We use this function to calculate the totals for the Item Total column. The script was written as:
1. function CalculateTotal()
2.   {
3.     var cRowName = event.target.name.split(".").shift();
4.     event.value = this.getField(cRowName + ".Each").value * this.getField(cRowName + ".Qty").value;
5.   }
Note
The code is available in the productOrder.pdf file in the Chapter 18 folder on the book's CD-ROM.
The code for the functions is contained in three separate document-level JavaScripts. Rather than analyze the code here, you can open the Advanced
Formatting the fields is easy after you add the functions. For the Item fields, we added a Custom Keystroke Script in the Format tab and used the first function name. The code was written as:
SetDescriptionEntries();
Note
The name of the function is used in the JavaScript in the code samples. The name you use for the Script Name in the JavaScript Functions dialog box has nothing to do with the name of the function you address in the field properties.
The second field to format is the second combo box fields in the Description column. Again, a Custom keystroke Script was added in the Format properties. The Script was written as:
SetEachValue();
The last field where we used a function was the Item Total fields. We opened the Calculate tab on the fields in the Item Total column and added the following code as a Custom calculation script:
CalculateTotal();
Obviously, writing the functions is much more complex than the other scripts we've discussed in this chapter. It will take a bit of doing to duplicate the scripts on another form, especially if you're a novice programmer. You can copy the Item, Description, Each, Quantity, and Item Total Fields and the document-level JavaScripts and paste into a new form. Everything will work if you leave the field names and code unmodified.
The one item you can change is the array names. Just be certain to use the same syntax when you change the names. After you get some experience and study the scripts, you can begin to change variable names and values.
In Figure 18.22, you see a form with two list box fields. The master list on the left contains a list of personal attributes for an employee to list in the list box on the right. The list on the right is intended to be populated in a rank order, so a few buttons are added to move items in the right list up or down, delete an item, or clear all items to start over.
To make the buttons functional on this form, we added a simple function as a document-level JavaScript and a script for each button action.
Note
A modified version name globalPerformanceList.pdf of the globalPerformanceReview.pdf form used in earlier chapters is found in the Chapter18 folder on the book's CD-ROM. Open the globalPerformanceList.pdf file from this folder to review the scripts found on page 4 of the form.

We started with a function added to a document-level JavaScript that we use in the Add button action. The script was written as follows:
1. function addToRankList(cEntry)
2.   {
3.     var oFld = this.getField("rankList");
4.     var bFound = false;
5.     for(var i=0;i<oFld.numItems;i++)
6.       {
7.         if(oFld.getItemAt(i,false) == cEntry)
8.           {
9.             bFound = true;
10.            break;
11.          }
12.      }
13.
14.    if(!bFound)
15.    {
16.      oFld.insertItemAt({cName:cEntry, nIdx:-1});
17.    }
18.   }
The script to add a selected item in the list box on the left to the list box on the right was written as a button field action as:
1. var oFld = this.getField("attributeList");
2. if(oFld)
3.   {
4.     var cEntry = oFld.getItemAt(oFld.currentValueIndices,false);
5.     addToRankList(cEntry);
6.   }
The Delete button action was scripted as:
1. var oFld = this.getField("rankList");
2. var prev = oFld.currentValueIndices;
3. if(oFld.currentValueIndices > −1)
4.   {
5.     oFld.deleteItemAt(oFld.currentValueIndices);
6.     if(oFld.numItems > prev)
7.       oFld.currentValueIndices = prev;
8.     else if(oFld.numItems > 0)
9.       oFld.currentValueIndices = prev-1;
10.  }
To clear all items from the list box on the left, we added a single line of code on the Clear button action as:
1. this.getField("rankList").clearItems();To move a selected item up in the list on the right, we added the following script to the Up button action:
1. oFld = this.getField("rankList");
2. if(oFld)
3. {
4.   var prevIdx = oFld.currentValueIndices;
5.   if(prevIdx > 0)
6.   {
7.     var curVal = oFld.getItemAt(prevIdx);
8.     oFld.deleteItemAt(prevIdx);
9.    oFld.insertItemAt({cName:curVal, nIdx:prevIdx-1});
10.    oFld.currentValueIndices = prevIdx - 1;
11.  }
12. }
The final script was added to the Down button action and written as:
1. oFld = this.getField("rankList");
2. if(oFld)
3. {
4.   var prevIdx = oFld.currentValueIndices;
5.   if( (prevIdx >= 0) && (prevIdx < (oFld.numItems −1)) )
6.   {
7.     var curVal = oFld.getItemAt(prevIdx);
8.     oFld.deleteItemAt(prevIdx);
9.     oFld.insertItemAt({cName:curVal, nIdx:prevIdx+1});
10.    oFld.currentValueIndices = prevIdx + 1;
11.  }
12. }
Although fairly extensive, these scripts can be easily copied and pasted into your forms. If you change field names or values, you need to modify the code. If you copy the document-level script, add a function with the same name we used addToRankList(cEntry), and copy the fields, the only edits you need to make are in the attributeList list box field.
Unlike the scripts used for creating fixed responses (see the section "Creating fixed response options" earlier in this chapter), you don't need to create an array. Open the first list box shown in Figure 18.22, and edit the Options tab shown in Figure 18.23.
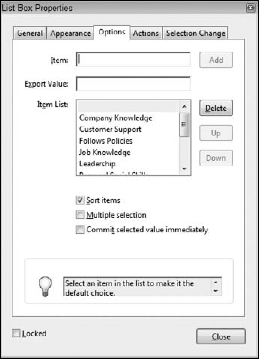
Figure 18.23. To change the items list in the first list box, edit the List Box Properties Options tab items.
Delete the existing items, and add new items to the list. Be certain to select the item you want to appear as a default before closing the List Box Properties window.
Note
For more information on creating list boxes, see Chapter 7.
When you click an item in the left list box on the globalPerformanceList.pdf form, the item is added to the list on the right side of the page, as shown in Figure 18.24.

An application response dialog box prompts a form recipient for a response in a dialog box. After the user types a response, you can add the data to a field or perform an action based on the response data. You might use an application response dialog box for a form recipient to add a social security number or credit card number, type a date or name, or enter some other kind of data. In the response dialog box, you can display the format you want the form recipient to use.
Fields for credit card numbers are good candidates for adding this kind of action to a form. People are not always certain whether to type nnnn-nnnn-nnnn-nnnn or nnnnnnnnnnnnnnnn for a credit card number. You can display the format you want the form recipient to use in the application response dialog box to make it clear whether dashes are used in the number or not. Additionally, JavaScript can evaluate the response, and if it doesn't meet an acceptable response, the form recipient can be alerted and prompted again to fill in the field properly.
Assume you want a form recipient to type a name as last, first. We'll use a simple application response to set up the conditions for adding a name to a text field. To see how an application response dialog box is added to a form, follow these steps.
Note
For the following steps, we used the globalPerformanceList.pdf form that you can find in the Chapter18 folder on the book's CD-ROM.
STEPS: Adding an Application Response Dialog Box to a Form
Open a form in Acrobat. You can use any form you like to follow these steps. In our example, we used the globalPerformanceList.pdf form on the book's CD-ROM.
Open the Text Field Properties window. On page 1 in the sample form, we used the employee name field to add our JavaScript. The design of the form does not inform the form recipient whether the name should be typed as first and last or last, first. We use an application response dialog box for the form recipient to add the name and show a message in the dialog box for how the name should be added to the field. Double-click the employee.name field with the Select Object tool to open the Text Field Properties window.
Click the Actions tab. We add the JavaScript in the Actions tab.
Choose On Focus from the Select Trigger drop-down menu. We want the script to be executed when the form recipient tabs into the field (or clicks the mouse cursor in the field). Using the On Focus trigger executes the JavaScript when a form recipient enters the field.
Add a JavaScript. Choose Run a JavaScript from the Select Action drop-down menu, and click the Add button to open the JavaScript Editor. Type the following code as shown in Figure 18.25:
1. var t = event.target; // the target field
2. var cResponse = app.response({
3.   cQuestion: "Type your name Last, First",
4.   cTitle: "Name",
5.   cDefault: "Name not added",
6.   cLabel: "Type your name"});
7.   {
8.     if ( cResponse == null){ // if Cancel is selected
9.     app.alert ("You cancelled adding your name?");
10.    cResponse = "";
11.  }
12.    else
13.    app.alert("You typed your name as: ""+cResponse+""

 Tab out of the field to register your name",2);
14.  }
15. t.value = cResponse; // places the data from the dialog to the target field
Click OK in the JavaScript Editor, and click Close in the Text Field Properties window.
Save the form.
We begin this script by assigning the target value (the employee.name field) to variable t. Lines 2 through 6 set up the application response dialog box formatting. The application response dialog box appears as shown in Figure 18.26. The default text defined in line 5 appears when the dialog box opens.
In line 8, we check to see if the form recipient clicked Cancel. If true, the alert message in line 9 opens in an application alert dialog box, as shown in Figure 18.27.

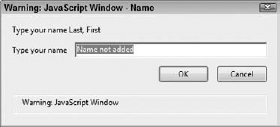
Figure 18.26. The application response dialog box as it appears from the code used to format the dialog box

Figure 18.27. If the form recipient clicks Cancel in the application response dialog box, an application alert dialog box opens.
If the form recipient doesn't click Cancel, line 13 is executed. In line 13, another application alert dialog box opens confirming the form recipient action, as shown in Figure 18.28. Notice the item in line 13. This addition to the code is a switch that forces a carriage return so the second line appears as shown in Figure 18.28. The last line of code takes the value typed in the application response dialog box and copies it to the target field.

We'll use a script similar to the application response dialog box for a name field to demonstrate how a credit card number might be formatted. For this script, we evaluate the response and if the response doesn't meet the text string length, we instruct JavaScript to place a null value in the target field.
Follow these steps to script a field meeting these conditions.
Note
Use the productOrder.pdf form from the Chapter18 folder on the book's CD-ROM to follow these steps.
STEPS: Using an Application Response for a Credit Card Number
Open a form in Acrobat. Use a form where you need a credit card number filled in by a form recipient. In our example, we used the productOrder.pdf form from the book's CD-ROM.
Open the Text Field Properties window for the Credit Card field. In our example, we double-clicked the Credit Card number field on the productOrder.pdf form shown in Figure 18.29.
Add a JavaScript in the Actions tab, and use an On Focus Mouse Trigger. Follow the same steps as used in the section "Using an application response dialog box for a name field" earlier in this chapter. Type the following script in the JavaScript Editor, as shown in Figure 18.30:
1. var t = event.target; // the target field
2. var cResponse = app.response({
3.   cQuestion: "Type your credit card number using numbers only and without dashes",
4.   cTitle: "Credit Card",
5.   cLabel: "Type your credit card number"});
6.   {
7.     if ( cResponse == null){ // if Cancel is selected
8.     app.alert ("You cancelled adding your number?");
9.     cResponse = "";
10.  }
11.    else {
12.    if (cResponse.length != 16){
13.    app.alert("Type the complete number without dashes.");
14.    cResponse = "";}
15.    else
16.    app.alert("You typed your card number as: ""+cResponse+""

 Tab out of the field to register the card number",2);}
17.  }
18. t.value = cResponse; // places the data from the dialog to the target field
Exit the windows, and save the file.

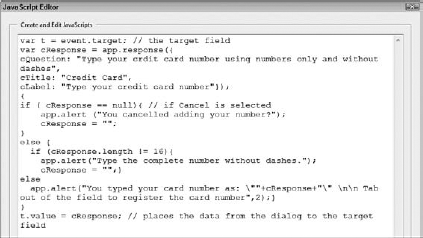
Setting up the application response dialog box is the same as the code we used to create the application response dialog shown in Figure 18.25 earlier in this chapter. Beginning in line 12, we have a little twist in the script shown in Figure 18.30. When the script is executed, the application response dialog box opens, as shown in Figure 18.31.
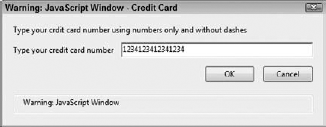
Figure 18.31. The application response dialog box opens and prompts the form recipient to add a credit card number.
In Figure 18.31, the message in the dialog box asks the form recipient to type numbers without dashes. In line 12 of our code, we simply check to see if the number of characters are not equal to 16 (total numbers needed for the credit card without dashes). If a form recipient leaves off a number or types the number with dashes, the value in the response dialog box is different than 16. We use line 13 to inform the form recipient in an application dialog box that the number needs to be without dashes, and line 14 clears the target field.
If the numbers total 16 for the text string, line 16 is executed confirming adding 16 numbers and the response value is added to the target field in line 18.
This example demonstrates one method for evaluating responses and the kind of flexibility you have with data handling using application response dialog boxes.
In Chapter 13, we talked about creating forms with Adobe PDF Layers. We discussed a number of different types of forms you may create having layers, and we used the form shown in Figure 18.32 as one example for a form benefiting from layers. The form is designed for an inquiry for a potential homebuyer. The buttons on the right side of the form are used to display the house diagram in a number of different views by showing and hiding individual layers. For example, a potential buyer may be interested in looking at the house plan without the fixtures. By clicking a button, the layer containing fixtures is hidden.
In the Actions tab for field properties, you have an action to show and hide layers using the Set layer visibility action. Generally, this action takes care of showing and hiding layers. However, if you create interactive elements in a program like Adobe InDesign, the button field objects are displayed only on the layers where they were added in InDesign, making it impossible to use the Set layer visibility action. In other situations, you may want to execute different actions based on the choice of a layer's visibility. With these types of conditions, you need to use JavaScript to show/hide layers.
Note
We use the housePlan.pdf file in the Chapter18 folder on the book's CD-ROM to demonstrate some uses for working with forms having layers and JavaScripts needed to change layer views.
The Button.6.Page.1 field contains a JavaScript to toggle on and off the text layer. When you open the Actions tab, select Run a JavaScript and click the Edit button, you find the following code displayed in the JavaScript Editor:
1. var docOCGs = this.getOCGs();
2. for (var i=0; i < docOCGs.length; i++)
3.   {
4.     if(docOCGs[i].name == "Text")
5.     {
6.       docOCGs[i].state = !docOCGs[i].state;
7.     }
8.   }
Figure 18.32. A form used for a potential homebuyer where the house plan can be viewed in different ways by showing and hiding layers
The remaining buttons use the same code with a single change in line 4 where we use a name respective to the layer we want to hide. When you want to display a hidden layer, you click the button again, and line 6 changes the state. Therefore, if a layer is hidden, changing the state makes the layer visible.
This code is relatively easy to copy and paste into your forms. Just make a single change to line 4 using the names of the layers you use on your form. As discussed in Chapter 13, you can create multi-lingual forms, add Adobe Flash animations for displaying diagrams and showing instructions, add help information on separate layers, and use this method in a number of other ways.
When forms are enabled with Adobe Reader usage rights, you can use JavaScript to create new annotations in a document.
Using a simple JavaScript in the JavaScript Console, you can obtain coordinates of annotations added to a form.
Summing columns and rows using JavaScript enables you to perform multiple calculations for the same event and eliminate zeros from calculated fields.
You can date stamp a form from a submit form action that uses the form recipient's computer system clock to add a date for when a form is submitted.
Fixed response options provide you with a means for reducing user error in filling in a form and limiting responses to options chosen for a given field.
When writing JavaScripts, be sure to add programmer's comments to explain each routine with notes.
Functions provide you an option for accessing routines from multiple fields without having to write the same routine for each field.
Using JavaScript, you can add data from one list box to another.
Application response dialog boxes let you help clarify proper data formatting when a form recipient completes a form.
You can use JavaScript to change layer visibility.