In Chapter 15 we covered field calculations for Acrobat Forms using Simplified Field Notation. In Section V we discussed JavaScript for Acrobat Forms. Acrobat and Designer both offer two scripting languages. Designer uses FormCalc and JavaScript. FormCalc is similar to Simplified Field Notation but is more powerful. FormCalc has some built-in functions such as a spreadsheet program to help you write formulas. You don't need to pick a single scripting language in Designer. A form can have script using either of the languages.
Scripting is not required to create a form. Scripting enhances forms and allows you to control their behavior at runtime. A form with script allows a more customized user experience than a form without script. Scripting also can be used for controlling data entry, ensuring the form captures the intended data from the form filler.
You may not wish to become a programmer, but understand that scripting is possible in Designer forms. Knowing what the program is capable of doing is half the battle in learning a new program. It may be some time down the road before you decide you are ready to try scripting. It may be the result of a division of job duties where you work. The form designer builds the forms and then sends the form to the programming department to have scripts added. In this case you need to be able to express your intentions to the programming department so they understand what you want the scripts to do.
We begin this chapter with the advantages of scripting, and then discuss where scripting goes in a Designer form. We explore the Script Editor and some shortcuts to writing scripts. We discuss the differences and similarities between the two languages to help you decide when to use one scripting language over the other.
LiveCycle Designer's built-in form design capabilities are fantastic. When you add the ability to script, the capabilities become phenomenal. Scripting can enhance a form design and turn an ordinary form into a smart form with a better user experience.
We create forms to collect electronic information from the form filler. Lots of time and planning goes into this process. Have you looked at your form from the perspective of the person completing it? Have you asked them to enter the same information more than once? Have you asked them to perform mathematical calculations? These are only a few reasons we add scripts to a form. Many form fillers expect smart forms these days, we are inclined to agree. Nothing is more aggravating then being asked to complete a form, only to find out it is non-interactive. The longer we work with forms, the more we expect our forms to do.
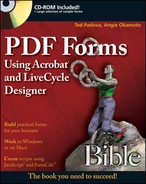
Scripts can be used for automating form entries that repeat, such as billing and shipping information. You can handle this situation in many ways. One solution is to copy the billing information into the shipping information. Another solution is shown in Figures 29.1 and 29.2. The repeated information is simply removed from the layout to give more space to other fields.

Note
The packing slip shown in Figures 29.1 and 29.2 can be found in the Chapter29 folder of the CD-ROM. This file is a dynamic that adjusts the field layout based on the same as billing info check box. The Purchase Order shown in Figure 29.3 has two copies of the file on the CD-ROM. PurchaseOrderJS.pdf contains the completed calculations from this chapter done in JavaScript. PurchaseOrderFC.pdf contains the completed calculations from this chapter done in FormCalc.
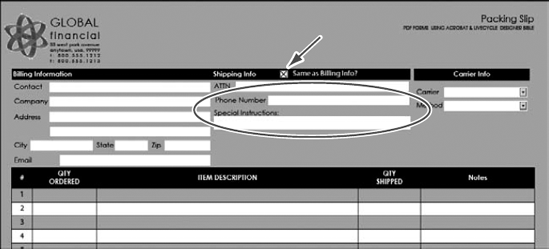
Figure 29.2. The packing slip with hidden information
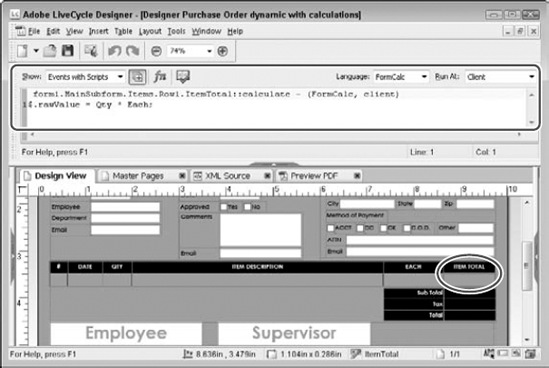
Creating calculations for multiplying the line items in an order form, totaling those lines, and adding the tax for the user is another common example of scripting, as shown in Figure 29.3. How you use the scripting capabilities in your forms is limited only by your ability to come up with creative uses for them.
Consider who enters the information into your form. How do they work through the form, and what can we do to make that experience better? Our challenge to you is to locate or create the scripts that can make your forms easier to use and then make those improvements to your forms.
To write scripts in Designer, begin by opening the Script Editor. The Script Editor is located in the palette well above the design window but is hidden by default. The Window menu contains the option to open the Script Editor, Window

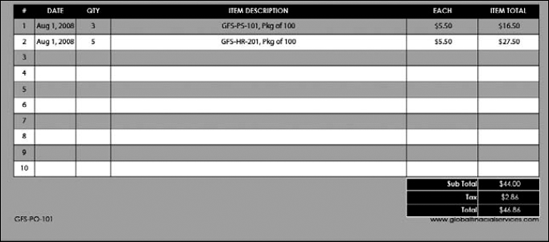
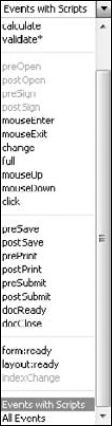
The Script Editor shows script for the selected object in the form. In the top left area of the Script Editor is a Show drop-down list, as shown in Figure 29.6. By default the Show list is set to events with scripts. The Script Editor displays a continuous list of scripts for any events. An event that is unavailable to the active object appears dimmed in the list. Any event in the list with an asterisk contains scripting. Choosing an event from the Show list changes the Script Editor window accordingly.
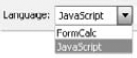
The Language drop-down list on the right side of the Script Editor window changes the language for the current script session only.
Warning
If you have multiple objects selected, or the show events for child objects selected, changing the scripting language affects all visible scripts.
Tip
If you wish to change a single script when multiple scripts are in the Script Editor, right-click. Choosing a script language from the context menu is limited to the script where you right-clicked.

The Run At drop-down list allows you to change the location where the script executes.
Each time you create a new blank document in Designer, a template controls many of the form properties such as the page size, margins, fonts, and more. That template includes the scripting language that becomes the default in the document. Changing the scripting language can be done at many places in the form. When you write each script, you can choose the scripting language. Setting the scripting language for multiple scripts is also an option. If you seem to be changing the scripting language most of the time, then you should change the document default.
The scripting preferences used in the current form are stored in the Defaults tab of the Form Properties dialog box (File

Note
Customizing keyboard shortcuts is discussed in Chapter 22.
In addition to the scripting language, other preference settings affect each script you create in Designer. The scripting preferences include:
Language: The preferred scripting language for the current form.
FormCalc is the default language. Working in FormCalc is similar to writing a spreadsheet formula.
JavaScript is also available and provides more flexibility in coding.
Run At: Where scripts are executed for processing.
Client: This is the default setting. Any script you put into your designer form is executed on the form filler's computer by the viewing application.
Server: Use this setting if you want the LiveCycle ES components to do the processing of lengthy scripts that may take lots of time or need access to resources only available on the server. The results are returned to the form in the browser.
Client and Server: The scripts are made available to both the client and the server for processing.
Preserve Scripting changes to form when saved: Specifies how scripting changes are saved.
Automatically: This is the default setting. Each time a form is saved the scripting changes are preserved. This setting cannot be used with certified forms.
Manually: This setting is mainly used for certified forms and requires additional scripting using the delta script object to function properly.
Enforce Strict Scoping Rules in JavaScript: This setting is on by default when the selected target version supports the setting. It is recommended only if the target output is Acrobat/Reader version 8.1 or higher and is automatically deselected when lower than 8.1. Strict scoping rules affect how long a variable can be referred to. This length of time is called the variable scope. A form designed to open in the browser as HTML may need altered script to function properly when strict scoping is enforced.
Changing these settings alters the scripting preferences that are set when the Script Editor opens in the current document only.
STEPS: Changing the Scripting Preferences for the Current Document
Work with the open document. If necessary start a new file by selecting File

Select File
Form Properties. This opens the Form Properties dialog box. The settings found in this window apply only to the active document.Select the Defaults tab. The scripting section of the Defaults tab stores the scripting language preference for the active document as shown in Figure 29.8.
Choose JavaScript or FormCalc from the Default Language drop-down. The default setting is FormCalc.
Press OK. Save your changes and close the dialog box.

Tip
To make the scripting language a permanent change, alter the default template used to build new documents.
Note
For information on creating or modifying templates see Chapter 23.
Deciding which scripting language to use is a personal choice. Being comfortable with formula writing in a spreadsheet program such as Microsoft Excel gives you an edge with FormCalc. Existing knowledge of scripting on the Web suggests you'd be comfortable with JavaScript in Designer. The functionality desired and the ease of writing the script are also considerations.
A factor to consider when choosing a scripting language is how the form will be deployed. Forms rendered using LiveCycle Forms ES can be represented as PDF, HTML, or Flash. These options are shown in Figures 29.9 through 29.13. HTML and Flash require the scripting language to be set as JavaScript. The Flash rendering appears in the form recipient's browser like a wizard with Next buttons to navigate. The data is all captured in the PDF in the background, which allows the user to print the original PDF version while completing the form.

Figure 29.9. The first panel of the purchase order form rendered as Flash in the browser using LiveCycle Forms ES
The first panel of the form is the section for requestor information. Notice the Next button on the lower-right area of the screen. Navigational links are also provided on the left side of the form. The remaining screens in Figures 29.10 through 29.12 have been cropped to show the right side of the form. This is the area that changes.


Note
For an overview of LiveCycle Enterprise Suite (ES), see Chapter 34.
A form rendered in PDF format supports both of the scripting languages, even allowing both to be used within the same form. For forms rendered as HTML or Flash, JavaScript must be used because they do not support FormCalc. FormCalc is an Adobe proprietary language and should not be used when rendering forms in formats other than PDF.
Both FormCalc and JavaScript are case-sensitive languages. Be extremely careful when entering code. A single character typed in the wrong case can cause your script to fail. Finding these typos is one of the most tedious tasks in long scripts, especially when you are first learning to script. It is difficult to determine if you typed something incorrectly or if something else is causing the problem.
A shortcut exists for entering the object name in the script window. You can place your cursor in the Script Editor, and then hold down the Ctrl key while clicking an object on the design page to add it to the script window, as shown in Figure 29.14. This enters the relative path to the object. If you need to start at the top of the form hierarchy and work your way down then you need the absolute path. To get the absolute path, hold down Ctrl + Shift while clicking an object.

Figure 29.14. The mouse pointer appears as a V while adding relative or absolute references to the Script Editor. Holding down Ctrl while mousing over the Each field shows the V symbol. Clicking returns the object's relative syntax.
Scripts can become lengthy and hard to read. Adding comments to the code can help you decipher the intent or provide clues for someone who is learning to script. Comments can be added to either scripting language by preceding them with two forward slashes (//) as shown in Figure 29.15. In the Script Editor any comment appears in green text indicating it is not executed with the other code.
Keywords, function names, and operators appear as blue text in the script editor. Fields, variables, strings, and numbers appear in black text. These color coding features are designed to help you write your code. If you type the keyword Sum in your script but it remains black, make sure the first letter is uppercase.
Tip
The Script Editor color coding may appear to stop working on occasion. Although we are unsure of the exact cause, running low on system resources exaggerates the problem. Try closing unnecessary applications before continuing. Opening and closing the Script Editor also may restore the color coding.

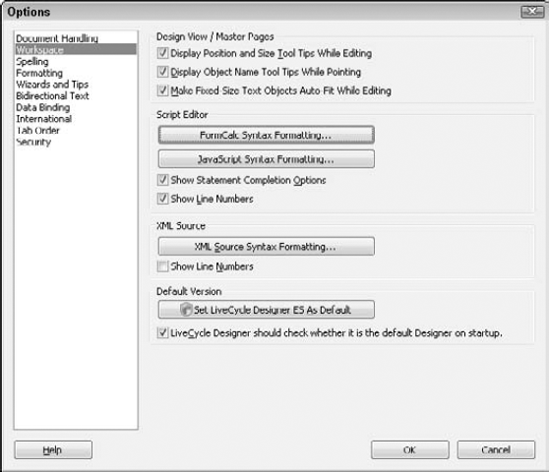
Features like showing the line numbers in the Script Editor and statement completion options can be turned on or off according to your preferences. You also can change syntax formatting options in the Script Editor. FormCalc and JavaScript use the same color setting in the Script Editor. We recommend that you change the blue settings in one language to an alternate color as another visual indicator when you switch between the scripting languages. The Script Editor formatting is stored in the Options window. Select the Workspace category from Tools
STEPS: Changing the Script Editor Formatting Settings
Select Tools
Options. This opens the Options dialog box.Select the Workspace category from the left side. The Workspace category dialog box appears, as shown in Figure 29.16 The workspace options include settings for the Design View/Master Pages, the Script Editor, XML, and whether or not Designer is the default design program.
Select the FormCalc Syntax Formatting button. As shown in Figure 29.17 the font, size, color, and background color can be set for each of the syntax types.
Select the Keyword option from the color setting list. Set the formatting options to your preferences.
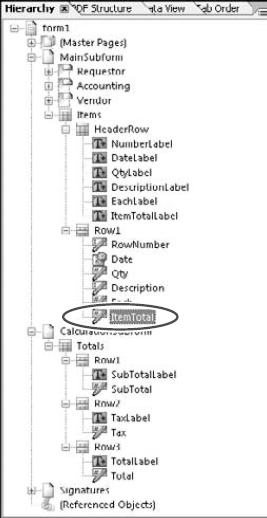
You can refer to an object using multiple methods in either language. All of the examples in this section refer to the value of the ItemTotal in our purchase order form, as shown in Figure 29.18.

The fully qualified syntax works from any point on the form. This means the form starts at the top level of the hierarchy and works down through the tree to find the desired object. An example of the fully qualified syntax for the value of the ItemTotal Field in our Purchase Order form follows:
form1.MainSubform.Items.Row1.ItemTotal.rawValue; //FormCalc
form1.MainSubform.Items.Row1.ItemTotal.rawValue; //JavaScript
Notice how the fully qualified version is the same in both languages. Some syntax shortcuts are available. The .rawValue property is the default property in FormCalc and is assumed by Designer if omitted. FormCalc also does not require the end of the statement character (;) to be placed in the script. Each new line in the Script Editor is considered a new statement. The following shortened FormCalc script is equivalent to the preceding fully qualified line and can be used anywhere in the form:
form1.MainSubform.Items.Row1.ItemTotal //FormCalc
If two objects exist in different containers of the hierarchy you can use relative reference syntax. Relative references start based on the current location and work their way up the tree to locate the desired object. The syntax must begin with the name of the highest level container object that the two objects do not have in common. See Figure 29.19 for an expanded view of the hierarchy.

If you think about the ItemTotal field in terms of human relationships, we can form an analogy. The MainSubform is a parent, with four children: Requestor, Accounting, Vendor, and Items as shown in Figure 29.20. Any object contained in one of the four children can talk to a sibling's object without going to the parent first. It simply requires that they talk to the sibling who holds the object. Although going up to the parent level and then back down won't hurt anything, it is unnecessary. Any object in the MainSubform could use the following syntax to reach the value of the ItemTotal.
Items.Row1.ItemTotal //FormCalc
Items.Row1.ItemTotal.rawValue; //JavaScript
If two objects exist in the same container of the hierarchy, they are referred to as sharing the same context. This means the shortened reference syntax is directly to the object name and property desired. Any Object in the Row1 container can refer to the value of the ItemTotal with the following syntax:
ItemTotal //FormCalc
ItemTotal.rawValue; //JavaScript

Both scripting languages offer a unique shortcut to refer to the active object and reduce the size of the reference syntax. Although it is possible to always refer to the object with relative or absolute syntax, it is not necessary and makes the scripts longer and more difficult to read. The following lines refer to the value of the ItemTotal when referring to the active object:
$.rawValue; //FormCalc
$ //Shortened FormCalc
this.rawValue; //JavaScript
Tip
When you are unsure what syntax you need to reach the desired object, try using the shortcut for adding the relative (Ctrl + Click Object) or absolute path (Ctrl + Shift + Click Object) to your script. You may need to add the desired property to the end, but it helps you find the correct syntax to reach the object.
When setting the value of a field equal to an expression, again some shortcuts are available. If the object you are setting the value of is omitted the active field is assumed. All of the following examples set the value of the LineTotal equal to the product of the Qty and Each fields as shown in Figure 29.21:
$.rawValue = Qty.rawValue * Each.rawValue; // FormCalc
$ = Qty * Each //FormCalc shortened
Qty * Each //FormCalc omitting active object
this.rawValue = Qty.rawValue * Each.rawValue; //JavaScript
Qty.rawValue * Each.rawValue; //JavaScript omitting the active object

Although it is possible to set the value of the active object while omitting the active object reference in both scripting languages, all of our examples show the field whose value we are setting. We choose to show this to maintain clarity about what the script is designed to do. Whether you choose to use scripting shortcuts or the more explicit statements in your code is a personal preference. The reason we discuss all the options is to help you understand the scripts you find in other locations and interpret them effectively.
Each time you write a script in Designer you attach it to an event. This determines when the code should execute. The event that we focus on in this chapter is the calculate event. There are many additional events that offer the functionality you may need. The event you choose is the initialization point of the code execution. The events are broken down into the following three categories:
Process Events: Process events occur automatically because of an internal process or form action. For example, a dynamic form contains an Add button. When the user clicks the button, the additional section is created and the remaining portion of the document must be laid out. This triggers other process events. The process events include:
calculate: When the form design and data are merged, when any field used in a calculation changes in value, and when a field loses focus. Losing focus means exiting the field by clicking or tabbing in another area of the form.
form:ready: After the form design and data are merged. The document has not yet been presented to the user on the screen. It is still stored in memory, and the initialize, calculate, and validate events are complete.
indexChange: Any time a subform section is added or removed from the document the number of subforms has changed and so has the index which refers to them.
initialize: After the form design is merged with data. The initialize event occurs for each object on the form. This event fires any time additional fields are added to the form during runtime such as adding subforms.
layout:ready: After the form design and data are merged the layout is applied. This is when pagination occurs.
validate: Any time a field loses focus, and when the form design and data merge, and upon submission of data.
Interactive Events: These events occur as a direct result of the user's actions. Interactive events include:
change: Any time a content of a field is altered. This includes typing, pasting, cutting, using drop-down lists, and more.
click: When the mouse is clicked within the scripted region. The region may be a button, a field, and so on. The region's boundaries are determined by the size of the object.
enter: Any time the object receives focus, and becomes active. Focus means the object was tabbed to on the keyboard or clicked by the mouse.
exit: Any time the object loses focus by tabbing out or clicking away from the object.
mouseDown: When the mouse button is held down over the object, but not yet released.
mouseEnter: When the user moves the mouse over the object but has not clicked yet.
mouseExit: When the user moves the mouse out of the boundary of the object. Usually this is when you roll over something, then roll off again without doing anything. It also occurs if you roll over, click but not release the mouse button and roll off again.
mouseUp: When the mouse button is released within the boundary of the object.
Application Events: Application events are the result of the actions that the application performs. Application events include:
Although we focus on the calculate event in this chapter, we frequently use other events as well. Think about when you want your script to be executed, and locate that event. It is most common to script against the calculate, validate, and interactive events when first learning.
Note
More complicated scripts are explored in Chapter 32. We also explore subform scripts in Chapter 27.
FormCalc is an Adobe proprietary language, available in the LiveCycle ES components, Designer, Acrobat, and Reader. FormCalc is generally used for simpler formulas and because of the shortened syntax available requires less code to execute. FormCalc usually provides better performance than JavaScript because it executes simple calculations and validations more quickly.
Writing a script in FormCalc is similar to writing a formula in Microsoft Excel. Predefined functions exist to simplify the work needed to use common formulas. FormCalc has more than 60 predefined functions currently in the built-in function list. They are categorized into the following groups:
Arithmetic: Standard mathematical formulas for items such as:
Abs: The absolute value of the expression.
Avg: The average of the non-null elements in the expression.
Ceil: The whole number greater than or equal to a given number.
Count: The number of non-null elements in the expression.
Floor: The largest whole number less than or equal to a given number.
Max: The largest value in the expression.
Min: The smallest value in the expression.
Mod: The modulus (remainder) of a division expression.
Round: Rounds an expression to the given number of decimal places.
Sum: Adds the numbers in the expression.
Date and Time: Date and time functions based on the epoch date. Epoch is an instant in time chosen as the origin. These calculations are based on a midnight, January 1, 1900 start date.
Date: The current system date in the number of days.
Date2Num: The number of days based on a date string.
DateFmt: A date formatted string given a date format style.
IsoDate2Num: The number of days given a valid date string.
IsoTime2Num: The number of milliseconds given a valid time string.
LocalDateFmt: A localized date formatted string given a date format style.
LocalTimeFmt: A localized time formatted string given a date format style.
Num2Date: A date string given the number of days.
Num2GMTime: A Greenwich Mean Time (GMT) time string given a number of milliseconds.
Num2Time: A time string given the number of milliseconds.
Time: Current system time as a number of milliseconds.
TimeFmt: A time format given a time format style.
Financial: Common financial calculations including:
Apr: Annual percentage rate for a loan.
CTerm: Number of periods needed for a compound term.
FV: Future value based on consistent payment amounts and intervals at a fixed APR.
IPmt: Interest paid on a loan over a set period of time.
NPV: Net present value of an investment based on a discount amount rate and future cash flows.
Pmt: Payment for a loan based on constant payments and interest rate.
PPmt: Principal paid on a loan over a set period of time.
PV: Present value of an investment based on constant payments and rates.
Rate: Compound interest rate per period.
Term: The number of periods needed.
Logical: Logical functions including:
Choose: Select a value from a given list.
Exists: Whether a given parameter is an accessor to an existing object. An accessor is a method called in scripting to access the contents of an object but does not modify that object.
HasValue: Rather a given parameter is an accessor with a value. Null, empty, and blank are not considered values.
Oneof: If a value is in a given set.
Within: If a value is within a given range.
Miscellaneous: Functions that don't fit into the other categories including:
Eval: The value of a given form calculation.
Null: Returns a null value, meaning no value, empty.
Ref: A reference to an existing object.
UnitType: Returns the units of a unitspan. A unitspan is a string consisting of a number followed by a unit name.
UnitValue: Returns the numeric value of a measurement with its associated unitspan, after an optional unit conversion.
String: Formulas dedicated to working with text.
At: Locates the starting character position of a string within another string.
Concat: Joining two or more character strings end to end (concatenation).
Decode: The decoded version of a text string.
Encode: The encoded version of a text string.
Format: Formats according to the specified picture format string.
Left: Extracts the specified number of characters, starting from first character on the left.
Len: The number of characters in a string (length).
Lower: Converts the string to lowercase characters.
Ltrim: Returns the string, trimming all spaces from the left or front of the string.
Parse: Analyses according to the specified picture format string.
Replace: Replaces all occurrences of the specified string with a replacement string.
Right: Extracts the specified number of characters, starting from first character on the right.
Rtrim: Returns the string, trimming all spaces from the right or end of the string.
Space: A string consisting of a given number of blank spaces.
Str: Converts a number to a string, formats and rounds decimals to specified number of digits.
Stuff: Inserts a string into another string.
Substr: Extracts a portion of a string.
Upper: Converts the string to uppercase characters.
Uuid: A Universally Unique Identifier (UUID).
WordNum: Returns the English text of a given number.
URL: Functions for use with Uniform Resource Locators, a global address on the World Wide Web.
Putting the FormCalc script into the fields only takes a few minutes. We will take the dynamic purchase order from we created in a previous chapter and add the necessary mathematical calculations to complete the form.
Note
The StartingPurchaseOrder.xdp form can be found on the CD-ROM in the Chapter 29 folder. If you have any difficulty completing the steps in this section, the finished file is included on the CD-ROM. You can open it and explore these scripts in PurchaseOrderFC.pdf.
STEPS: Calculating a Line Total
Open a Designer file. Be sure to open the StartingPurchaseOrder.xdp in Chapter 29 on the CD-ROM.
Select the Preview PDF tab. Fill in a few fields in the purchase order table. Notice there are no calculations in this form.
Return to Design View. Select the Design View tab to start creating the needed calculations.
Select the ItemTotal Field. We will create a formula that multiplies the quantity times the price per item to calculate the item total.
Open the Script Editor. Select Window
Expand to the multiline Script Editor. If necessary drag the palette border down to open the multiline Script Editor for more editing room.
Change the Show drop-down to calculate. Select calculate from the drop-down list in the Show box to set the event the calculation occurs on. We don't want the form filler to have to take extra steps to get the calculation to appear. By placing our script in the calculate event, any time a field value changes the line totals recalculate.
Verify the Calculation Language is set to FormCalc. Use the Language drop-down list on the right side of the Script Editor to select FormCalc if necessary.
Verify the Run At is set to Client. Use the Run At drop-down on the right side of the Script Editor to select Client if necessary. This allows the script to execute in the viewer application on the computer where the form is being completed.
Turn on the Line Numbers in the Script Editor. If desired, you can turn on line numbers in the Script Editor to match the line numbers in our code sample. To turn on the line numbers, right-click in the Script Editor and select Show Line Numbers from the context menu. You do not need to type the line numbers in our code samples; they are for reference only.
Type the code in the Script Editor. Type the following code into the Script Editor. Remember that FormCalc is a case-sensitive scripting language. We can use the field names directly because they both reside in the same node of the hierarchy. The $.rawValue refers to the active form field, in our case the ItemTotal. We are setting its value equal to the Qty field times the Each field. Your code should match the screenshot in Figure 29.22 after this step.
1. $.rawValue = Qty * Each;
Test your script. Select the Preview PDF tab fill in a few quantities and prices in the each column. The line totals should now be calculating. Also notice that since the line totals are a calculated value, you aren't allowed to change them.
Return to Design View. Return to Design View to continue editing your form.
Save a copy of the form. Save the form in a location of your choice on your computer.
That wasn't as difficult as you thought, was it? We will continue by adding a few more calculations to our Purchase Order form. We need calculations for the subtotal at the bottom of the table, the tax amount, and the grand total. Taking the scripts in the order of difficulty to write, we save the subtotal calculation for last because this table is a dynamic table. The script we write must be able to adjust for the changing number of rows it may contain.
STEPS: Calculating the Tax Amount
Open a Designer file. We continue using the StartingPurchaseOrder.xdp from the previous steps.
Select the Tax Field. We will create a formula that multiplies the subtotal amount times the local tax rate to calculate the tax due.
Open the Script Editor. Select Window
Change the Show drop-down to calculate. Select calculate from the drop-down list in the show box to set the event the calculation occurs on.
Verify the Calculation Language is set to FormCalc. Use the Language drop-down list on the right side of the Script Editor to select FormCalc if necessary.
Verify the Run At is set to Client. Use the Run At drop-down on the right side of the Script Editor to select Client if necessary. This allows the script to execute in the viewer application on the computer where the form is being completed.
Type the code in the Script Editor. Type the following code into the Script Editor. Remember that FormCalc is a case-sensitive scripting language. Because the tax field we are calculating is in a different node of the hierarchy than the subtotal, we need to access them from the branch of the hierarchy they have in common, the rows of the Totals table. We start at the node they have in common and work our way down the hierarchy until we reach the desired field. Your script should appear like the screenshot in Figure 29.23 when finished.
1. $.rawValue = Row1.SubTotal*.065;
Tip
You can use a shortcut to get the proper object name into the Script Editor without typing it. Ensure your cursor is in the Script Editor at the proper location. Hold down the Ctrl key and click the desired object on the design page. This enters the relative path to the object. If you need the absolute path, hold down Ctrl + Shift while clicking the object.
Test the script. Select the Preview PDF tab. Fill in a subtotal amount (we will calculate this shortly). The tax amount should be calculating now.
Return to Design View. Return to Design View to continue editing your form.
Save a copy of the form. Save the form in a location of your choice on your computer.
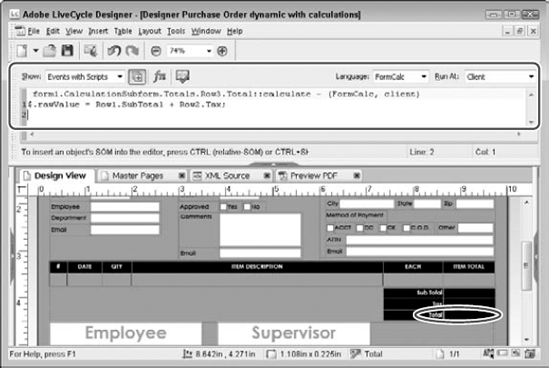
Creating the Total calculation by adding the subtotal and the tax amount together is very similar to creating the sales tax calculation. By selecting the Total field you can enter the following into the calculate event of the Script Editor, as shown in Figure 29.24:
1. $.rawValue = Row1.SubTotal + Row2.Tax;

If you have any trouble, follow the steps for entering the tax amount again. The same formula could be written using the Sum function instead of manually adding the fields as indicated in the following code, and shown in Figure 29.25:
1. $.rawValue = Sum(Row1.SubTotal,Row2.Tax);

Either formula produces the same results. Using the Sum function over the manual addition is preferable in this case. Creating the subtotal script to add the table rows will be a little different. Since the table is dynamic, it is capable of growing or shrinking. We want our calculation to work regardless of the number of rows contained in the table.
Because the additional rows added to the table create objects with the same name, Designer creates an array of objects. An array is an ordered list of related objects. Each item contained in the array is known as an element. The elements are indexed starting with 0. Accessing that array makes summing the table a simple formula without the need to know exactly how many rows it contains.
STEPS: Calculating the SubTotal
Open a Designer file. We continue using the StartingPurchaseOrder.xdp from the previous steps.
Select the SubTotal Field. We will create a formula that sums the Item Total for each row of the table.
Open the Script Editor. Select Window
Change the Show drop-down to calculate. Select calculate from the drop-down list in the show box if necessary.
Verify the Calculation Language is set to FormCalc. Use the Language drop-down list on the right side of the Script Editor to select FormCalc if necessary.
Verify the Run At is set to Client. Use the Run At drop-down on the right side of the Script Editor to select Client if necessary. This allows the script to execute in the viewer application on the computer where the form is being completed.
Type the code in the Script Editor. The beginning of this formula is exactly like the others. The Sum function also hasn't changed. We add a set of brackets with an asterisk inside after the object name that repeats in the form. The asterisk allows us to get all of the objects contained in the array. Your script should appear like the screenshot in Figure 29.26 when finished.
1. $.rawValue = Sum(MainSubform.Items.Row1[*].ItemTotal);
Test your script. Select the Preview PDF tab. Fill in a subtotal amount (we will calculate this shortly). The tax amount should be calculating now.
Return to Design View. Return to Design View to continue editing your form.
Save a copy of the form. Save the form in a location of your choice on your computer.

We have discussed the need to clean and organize your field objects by renaming them and putting them into subform containers. The next code sample is the same script that is necessary if the subform objects are not renamed. The pound sign (#) in the script is an indicator of an untitled object. The brackets with the zero ([0]) indicate there is an array of those untitled objects. Because the subform is untitled, we have to go up another level to establish where it resides in the hierarchy.
$.rawValue = Sum(form1.#subform[0].Items.Row1[*].ItemTotal);
Scripting with FormCalc is like writing formulas in a spreadsheet program. Once you become familiar with the events available for scripting and the formula names, the rest is simply typing. Exploring the sample forms on the CD-ROM and the forms loaded with Designer gives you a great start to writing your own. Remember, you can borrow the code from one of those existing forms until you are ready to write them on your own. Let's see what it would take to recreate these purchase order scripts in JavaScript.
JavaScript is an open source, object-based, platform independent scripting language that is used to add interactivity to forms on Web sites. The Designer implementation of JavaScript is different from JavaScripts written in Acrobat or HTML code. Object-oriented languages depend on the object models of the environment they reside in. Each of these three environments has a unique object model to script against. When searching the Web for scripting samples, be sure to include the keywords Designer and/or LiveCycle to limit the results to scripts that work in Designer.
If we use the same purchase order file used in the FormCalc section, we'll have a direct comparison between the two languages when we finish. Learning to script in another language is no more difficult than the first language; it only has different syntax rules. Once you've grasped the key concepts of objects and events it is only a matter of learning the differences in syntax.
Let's discuss the Purchase Order form. We need to add only four calculations to the document to complete the form design. The ItemTotal field in each row, the SubTotal, the Tax, and the Total fields each need a script. If we are going to write the forms calculations in JavaScript, then we should change the default scripting language in the form to save a few steps each time we open the script editor.
Note
See "Changing the Scripting Preferences for the Current Document" section earlier in this chapter for details.
Note
The StartingPurchaseOrder.xdp form can be found on the CD-ROM in the Chapter29 folder. The finished file is also included on the CD-ROM. You can open it and explore these scripts in PurchaseOrderJS.pdf.
STEPS: Adding JavaScript Calculations to the Purchase Order
Open a Designer file. We opened the StartingPurchaseOrder.xdp from the CD-ROM.
Change the default scripting language for the document. Select File
Select the ItemTotal Field. We will create a formula that multiplies the quantity times the price per item to calculate the item total.
Open the Script Editor. Select Window
Change the Show drop-down to calculate. Select calculate from the drop-down list in the show box if necessary.
Verify the Calculation Language is set to JavaScript. The Language drop-down list is on the right side of the Script Editor. Because we changed the default scripting language for this document, we assume this was already set in the following steps and do not remind you to check each time.
Type the code in the Script Editor. The keyword this refers to the active object, the ItemTotal field. We are setting the rawValue of the active field equal to the value of the Qty field times the value of the Each field. The JavaScript version of this formula requires only a little more text because the rawValue property is not assumed in JavaScript. Your script should match Figure 29.27:
1. this.rawValue = Qty.rawValue * Each.rawValue;
Test the script. Select the Preview PDF tab. Enter some numbers in the Qty and Each fields to test your calculations.
Return to Design View. Return to Design View to continue editing your form.
Save a copy of the form. Save the form in a location of your choice on your computer. We continue to create our form calculations by moving on to the Tax field.
Select the Tax Field. We will create a formula that multiplies the SubTotal times the current tax rate of 6.5 percent.
Open the Script Editor. Select Window
Change the Show drop-down to calculate. Select calculate from the drop-down list in the show box if necessary.
Type the code in the Script Editor. The keyword this refers to the active object, the Tax field. We are setting the rawValue of the active field equal to the value of the SubTotal * .065. Because the Tax field and the SubTotal are both inside the Totals Table (container) but not in the same subcontainer we use a relative path to reach it. After entering the following code, your script should match Figure 29.28.
this.rawValue = Row1.SubTotal.rawValue * .065;
Test the script. Select the Preview PDF tab. Enter a number in the SubTotal field to test your calculation.
Return to Design View. Return to Design View to continue editing your form.
Select the Total Field. We will create a formula that adds the SubTotal and Tax fields.
Open the Script Editor. Select Window
Change the Show drop-down to calculate. Select calculate from the drop-down list in the show box if necessary.
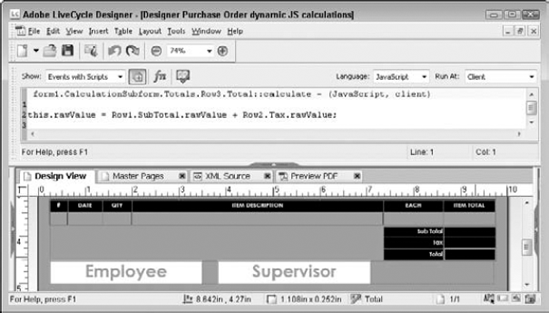
Type the code in the Script Editor. The keyword this refers to the active object, the Total field. We are setting the rawValue of the active field equal to the sum of the SubTotal and Tax Fields. After this step your script should match Figure 29.29. Again due to their positions we use a relative path to reach them:
1. this.rawValue = Row1.SubTotal.rawValue + Row2.Tax.rawValue;
Test your script. Select the Preview PDF tab. Enter a number in the SubTotal field to test your calculation.
Return to Design View. Return to Design View to continue editing your form.
Save the form.


To finish the SubTotal field in JavaScript we need to discuss a few more concepts. We can't use a function to add the elements of the Row1.ItemTotal array. This requires us to loop through the elements and add the values together manually. We need a temporary storage facility to hold the value of our calculation while we work our way through the array. We also need to figure out how many items are in the array and instruct the loop to continue through the array until all items have been added.
A for loop structure consists of the following pieces:
for (var=startvalue;var<=endvalue;var=var+increment) {
     statement
     }
Use the for loop when you know how many times the script should run. It loops through the code the specified number of times. The three arguments are:
A Start value: A variable is declared and given a starting value.
The ending value: When the variable reaches this ending value, the loop stops.
Increment: How much the variable increments with each time through the loop.
A variable is a temporary storage facility, defined with the var keyword. Variables can be declared in a formula, such as the one we are using, which makes its value available in the current formula only. Or a variable can be defined in a more broad location such as the form, or a script object that changes the objects that have access to the value stored in the variable.
We need three variables to write this formula. The first variable we declare holds all of the ItemTotal fields. This variable is named fields, and the contents are an array of fields.
The second variable holds the total we are calculating. This variable is named total and is initially set to a value of zero.
The third variable is a counter to determine when we have looped through all of the elements in the fields array. This variable is named i and initially set to a value of zero. The letter i is commonly chosen for this purpose as an abbreviation for integer. An integer is a whole number. We need to take the counter and increment it by one each time it goes through the loop. This can be done by taking the variable i and adding one to it each time. Typing i = i +1 accomplishes that. Another scripting shortcut is to shorten that statement into: i++. Our for loop continues as long as the counter is less than or equal to the number of elements in the fields array.
Select the SubTotal Field. We will create a formula that adds all the ItemTotal fields together.
Open the Script Editor. Select Window
Change the Show drop-down to calculate. Select calculate from the drop-down list in the show box if necessary.
Type the code in the Script Editor. The keyword this refers to the active object, the SubTotal field. We are setting the rawValue of the active field equal to the sum of the ItemTotal in each row of the table. Because JavaScript doesn't contain a sum function that allows us to add items stored in the array, we need to create a loop to add the items in the array one at a time. Check your script with Figure 29.30 when finished with this step.
1. var fields = xfa.resolveNodes("MainSubform.Items.Row1[*].ItemTotal");
2. var total = 0;
3.
4. for (var i=0; i < fields.length; i++) {
5.   total = total + fields.item(i).rawValue;
6.   }
7.
8. this.rawValue = total;
Line 1: Defines the fields variable and sets it equal to the array of the Row1 ItemTotal Fields.
Line 2: Defines the total variable and sets it equal to zero. By setting the variable at zero, the counter remains one number lower than the field count; we can simply say as long as the counter is less than the number of fields. If we started at one, we would need to test as long as the counter is less than or equal to the field count.
Line 3: Is for readability and could be removed.
Line 4: Is the beginning of the for loop. The three arguments are set here.
Line 5: Sets the total variable equal to whatever it currently contains plus the value of the current element in the array.
Line 6: The closing bracket of the for loop
Line 7: Is for readability and could be removed.
Line 8: Sets the value of the active field, the SubTotal equal to the amount in the total variable.
Test the script. Select the Preview PDF tab. Enter a few numbers in the Qty and Each fields to test your calculation.
Return to Design View. Return to Design View to save your form.
Save the form.

Congratulations, you completed the calculations in the Purchase Order form using JavaScript. Learning to write loops is a necessity when learning scripting. Loops are useful in many situations. However, as you can see from the previous example the FormCalc Sum function is much easier in this situation. We chose to explore it here to accomplish two tasks: Exposure to a simple loop structure, and to be able to compare the two languages functionality.
What do you do when you have written a script and everything looks correct, but the script does not produce the desired results? Where do you start to troubleshoot? Our first recommendation is to reread your script and double-check the case of each word, as shown in Figures 29.31 and 29.32. Both scripting languages are case-sensitive and are the cause of much frustration for beginners. Functions, fields, and properties must all be typed exactly the way they are defined.

If that doesn't seem to be the problem, did you remember to set the scripting language to the type you were writing? The best JavaScript code won't function if the language is still set to FormCalc. Of course the opposite produces the same problem.

Turn on the Report palette, and check the warnings and log tabs for problems. Use the check scripts button of the Script Editor to generate these warnings. Although allowed in FormCalc, removing the .rawValue property from a JavaScript function generates a message in the Warning tab of the Report palette, as shown in Figure 29.33.

Clicking the palette menu and selecting Help opens the help window with Report palette topic open. A link there takes us to the About warning messages help topic where we follow another link to the Addressing scripting error messages topic. Here we find a link to the syntax checking help PDF document on the Web site help.adobe.com/en_US/livecycle/8.2/lcdesigner_syntaxchecking.pdf where error number 7003 is explained as a "Syntax Script Error: An assignment attempts to access a constant such as a number, string, or XML."
Sometimes a little detective work on our own is a faster solution. Double-clicking the item in the Warnings tab opens the Script Editor and takes you to the line of code that generated the error, as shown in Figure 29.34. After a little thought we would probably realize that we forgot the .rawValue property on each of the fields.

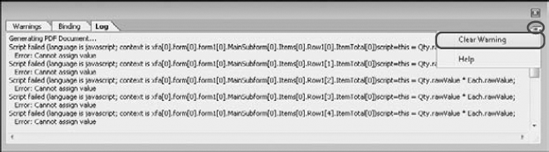
Take a look at the Log tab of the Report palette. The message generated here, as shown in Figure 29.35, is a little more descriptive and maybe would have pointed us in the right direction.

Another great tool is the JavaScript Debugger in Acrobat. In the Preview PDF tab, you can turn on the JavaScript Debugger by pressing Ctrl + J. With the same error still in the form the console window shows multiple errors as seen in Figure 29.36.

The error appears in the console window ten times because the calculation error is in the repeating row of the dynamic table that has ten rows. The console is telling us that there is an error due to an invalid assignment on the left side of the formula. Again after some checking we realize the .rawValue properties are missing.
Both the JavaScript Debugger and the Log tab of the Report palette can have the existing errors cleared to verify the errors you see are current, and not an old problem already corrected. As indicated by Figure 29.37, click the trash can in the lower-right corner of the JavaScript Debugger to clear the console window. To clear the Log tab in the Report palette, select the Palette menu and choose Clear Warning, as shown in Figure 29.38. To clear the console window, press the trash can button in the lower-right corner. The only way to clear an item from the Warnings tab of the Report palette is to fix the error that generates the message.

Many tools exist to help you find and fix the errors in scripts. Don't give up, keep looking. If you have a similar script in another location you can try copying and pasting the good code into the Script Editor where the broken script is. Sometimes comparing this way helps troubleshoot a problem.
Writing script is not something you perfect overnight. This book is not a FormCalc or a JavaScript reference book. Each of those topics deserves a book of its own. Our goal is to expose you to the scripting languages in the hope that you become interested and want to learn more. We want to provide you with some basic information that helps you decipher the scripts you find, and some samples to explore.
When searching for scripts on the Internet be sure to use keywords like Designer, LiveCycle, FormCalc, JavaScript, Forms, and Scripts. The results contain sample code, tips, and cautionary notes others have collected while scripting. As we mentioned in the Acrobat JavaScript chapters, bookmark your favorite sites and make frequent visits to check for updates.
Some of the best documentation available comes straight from Adobe, the reference manuals available from their Web site. Many are available as PDF files you can download, search, add to your library collection, and even make comments on for future use.
Note
For more information regarding your own library collection of help documentation see the section "Adding the JavaScript Manual to Your Organizer" in Chapter 16.
You can find more information about scripting languages and resources for LiveCycle Designer 8.x on Adobe's Web site at kb.adobe.com/selfservice/viewContent.do?externalId=333249. This page contains links to many of the resources listed in this section and always offers the most current version of the resources.
There is a specific reference guide for Acrobat users migrating to LiveCycle Designer to help convert existing JavaScripts. You can find the reference for Converting Acrobat® JavaScript for Use in LiveCycle™ Designer Forms at www.adobe.com/devnet/livecycle/articles/AcroJS_DesignerJS.pdf.
Documentation regarding the Adobe XML Forms Architecture (XFA) specification can be found at partners.adobe.com/public/developer/xml/index_arch.html.
The FormCalc Specification Version 2.0 is a PDF available from Adobe's Web site, and can be found at partners.adobe.com/public/developer/en/xml/formcalc_2.0.pdf.
Note
For more information see the section "Using online servics" in Chapter 16.
The Designer help file offers many resources that include both FormCalc and JavaScript. It is titled Scripting Using LiveCycle Designer ES and includes the following topics:
About scripting in LiveCycle Designer ES: An introduction to how scripting works, calculations, and what objects can contain scripts.
Configuring LiveCycle Designer ES Workspace for Scripting: Describes how to use the Script Editor and setting your scripting preferences.
Creating Calculations and Scripts: Deciding when and where to place your scripts, the statement completion options, how to view scripts, the debugger, and more.
Events: An alphabetical list of events, the event types, and diagrams explaining the event order.
Scripting Languages: The differences between FormCalc and JavaScript functions, the basics for using each language.
Referencing Objects in Calculations and Scripts: How to reference objects using absolute and relative syntax and any additional syntax shortcuts.
Variables: Naming, defining, and using variables.
Debugging Calculations and Scripts: How to turn on, use, and troubleshoot with the tabs in the report palette. How to use the Acrobat JavaScript Debugger with LiveCycle Designer.
Working with a Host Application: LiveCycle ES Forms, Acrobat, Adobe Reader, or an HTML browser are hosts you can work with.
Working with the Event Model: Using the event object properties and methods, you can retrieve information that otherwise is not accessible through scripts.
Creating and Reusing JavaScript Functions: How to create a script object, custom JavaScript functions, and use them in other scripts.
Using Script Fragments: How to create a reusable script object, stored in the fragment library.
Moving from Scripting in Acrobat to LiveCycle Designer ES: The differences between scripting in Acrobat and Designer are discussed, determining how much is supported and what needs to be converted.
Examples of Common Scripting Tasks: Specific examples for common items such as calculating totals in tables, changing visual properties, using the Instance Manager in dynamic forms, and more.
Contained in the LiveCycle Designer help file is a FormCalc user reference. The reference is broken down into the following areas:
Introducing FormCalc: This area explains what FormCalc is, why there are two scripting languages in Designer, and an alphabetical function list.
Language Reference: Provides an explanation of the building blocks used in the FormCalc language such as keywords, operators, comments, identifiers, and more. Putting those building blocks together to form expressions is also explained.
Functions: Help for each category of functions, including a link to each function within the categories:
Arithmetic Functions
Date and Time Functions
Financial Functions
Logical Functions
Miscellaneous Functions
String Functions
URL Functions
The LiveCycle® Designer ES Scripting Reference, Version 8.2 is available from the Adobe Web site at help.adobe.com/en_US/livecycle/8.2/lcdesigner_scripting_reference.pdf. This file can also be accessed using the help file in Designer: Help
In the Designer help files are several resources on scripting:
About the Object Scripting Reference: Information regarding the objects, properties, and methods that you can use in LiveCycle Designer.
Version mapping to XFA: This document explains how each release of the XML Form Architecture Maps to a version of LiveCycle Designer. It helps explain when features become available.
XML Form Object Model Class Hierarchy: Explains the XML Form Object Model Classes, and whether or not they inherit properties and methods from their parent classes.
Scripting Objects: An alphabetical list of all objects supported in the scripting environment including the parent-child hierarchy relationships.
Scripting Properties: An alphabetical list of all properties supported.
Scripting Methods: An alphabetical list of all methods supported.
Using a combination of all of the resources listed here provides the most well-rounded resource guide we can think of. Open a form that already contains scripts, make a backup copy, and tear apart the script it contains. Can you improve the existing code to reduce the number of lines of code? Try changing the existing code from the current scripting language to the other. Explore the sample files and try your own code!
As we found by creating our calculations in the Purchase Order form in both languages, you can do many of the same things in both languages. One language may be better suited than another for a particular task. Table 29.l lists JavaScript methods and comparable FormCalc functions.
As shown in Figure 29.36, we found that creating the SubTotal formula was much less complicated when using the Sum function in FormCalc than writing a for loop in JavaScript. Yes, sometimes that exact JavaScript loop is needed in a Designer form because it is rendered as HTML and browsers don't understand FormCalc.
Table 29.1. JavaScript Methods with the Comparable FormCalc Function
JavaScript Method | FormCalc Function | Description |
|---|---|---|
Math.abs | Abs | Absolute Value |
At | Locates the starting character position of a string within another string. | |
Math.ceil | Ceil | The whole number greater than or equal to a given number. |
Concat | Joining two or more character strings end to end (concatenation). | |
Date.getDate | Date | Current Date. JS does not use the Epoch date the way FormCalc does. |
eval | Eval | The value of a given form calculation. |
Math.floor | Floor | The largest whole number less than or equal to a given number. |
Left | Extracts the specified number of characters, starting from first character on the left. | |
Len | The number of characters in a string (length). | |
Lower | Converts the string to lowercase characters. | |
Math.max | Max | The largest value in the expression. |
Math.min | Min | The smallest value in the expression. |
Mod | The modulus (remainder) of a division expression. | |
Replace | Replaces all occurrences of the specified string with a replacement string. | |
String.substring | Right | Extracts the specified number of characters, starting from first character on the right. |
Math.round | Round | Rounds an expression to the given number of decimal places. |
Str | Converts a number to a string, format and round decimals to specified number of digits. | |
Substr | Extracts a portion of a string. | |
Date.getTime | Time | Current Time. JS does not use the Epoch date the way FormCalc does. |
Upper | Converts the string to uppercase characters. | |
String.search | Within | If a value is within a given range. |
Scripting enhances form design for a more customized user experience.
FormCalc is the default scripting language in Designer and is an Adobe proprietary language.
JavaScript is the alternate scripting language.
FormCalc contains more than 60 predefined functions to work with.
Functions automate common mathematical expressions.
Changing the scripting preferences can include the default language for the current form and where the code executes.
The Script Editor formatting can be changed to create visual differences in the scripting languages.
Entering references to other objects can be relative or absolute.
The keyword this refers to the active object in JavaScript, whereas in FormCalc we use $.
Debugging scripts using the Report palette and the JavaScript Debugger tools can help you troubleshoot your scripts.
To change the scripting language for all new designer forms, you need to customize the default template.
Adobe offers many resources for learning FormCalc and JavaScript. Check the Adobe Web site for the most current reference manuals available.