
Up to this point, we've covered many different uses for auto detecting fields using auto field detection. When you need to quickly create a simple form and convert an application document to PDF and then use auto field detection as discussed in Chapter 5, you may not need to manually create new fields or edit fields on a form. When you scan a paper form using Acrobat's OCR engine as discussed in Chapter 6 and then auto field detection, you may not need to perform much manual editing.
In some cases, however, detecting fields won't work for all fields on a form. In other cases, you may need to start from scratch adding fields manually when auto field detection doesn't detect any fields. In these cases, you need to use Acrobat's Form tools, draw fields on a form, and make various changes to the fields' properties.
In this chapter, we leave Acrobat's auto-detection features and talk about the Form tools, how to manage fields on a form, use some design assistants, and set up tab orders. Even though you may often use auto field detection, you'll typically encounter instances in which you need some help using the methods described here.
Fields are added to a form in Form Editing Mode in Acrobat 9 and in Viewer mode in all earlier versions of Acrobat. In Acrobat 9, you have access to eight Form tools via a pull-down menu or after loading the tools in the Form Editing toolbar.
In earlier versions of Acrobat, you opened the Forms toolbar, docked the toolbar in the Toolbar Well, and accessed the Form tools. In all viewer versions back to Acrobat 6, the Form tools appeared as separate tools in the Forms toolbar. In Acrobat 8, the Barcode tool was added to Acrobat. Earlier versions of Acrobat had the remaining seven Form tools you find in Acrobat 9 loaded in the Forms toolbar. Prior to Acrobat 6 and dating back as far as Acrobat 3, you could use the primary seven Form tools to create fields on a PDF form. We've seen some changes in the Field Properties dialog boxes, but if you happen to be working in an earlier version of Acrobat, much of what you find in this chapter can be used in Acrobat versions 3 through 9.
When you enter Form Editing Mode by selecting Forms
To display the Form tools in the Form Editing toolbar, enter Form Editing Mode and from the Add New Field pull-down menu, choose Show Tools on Toolbar, as shown in Figure 7.1. When you select the command, the Form tools appear in a row in the Form Editing toolbar.

Figure 7.1. Choose Show Tools on Toolbar from the Add New Field pull-down menu to display tools on the Form Editing toolbar.
Note
In Chapters 7 through 19, we assume you have the Form tools visible to follow instructions. When we say, "click the Text Field tool," we assume the Form tools are visible in the Forms toolbar on your monitor. If you don't open the toolbar, remember that the instruction requires you to open the Add New Field menu and choose the respective Form tool.
Note
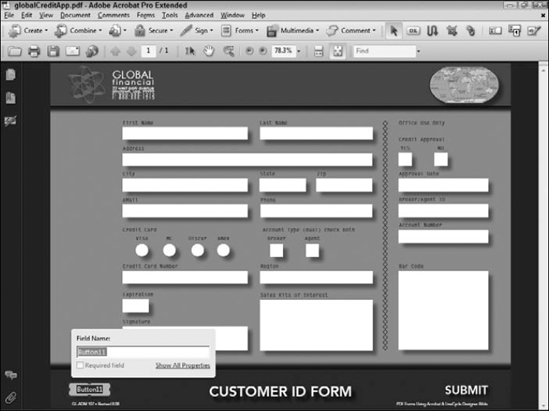
For this section, we use the globalCreditApp.pdf document in the Chapter 07 folder on the book's CD-ROM.
The first Form tool appearing in the Form Editing toolbar when you load the Form tools is the Text Field tool. Text fields are a bit misleading because they handle both text and numeric data. If you want to create fields where numbers are used, you use a text field.
Note
For more information on calculations using built-in formulas, Simplified Field Notation, and JavaScripts, see Chapters 15 through 19.
To add a text field to a form, click the Text Field tool and the cursor is loaded with the Text Field. Move the cursor to a location on a form, and click. A text field is dropped on the form at the cursor location. When you use Form tools in Acrobat 9, a small Properties window opens, as shown in Figure 7.2. We refer to this window as the mini Properties window to distinguish it from the Properties dialog box.

Tip
You also can select the Text Field tool by pressing the F key on your keyboard. Pressing the F key loads the text field by default. Using keystrokes to change tools requires you to open the Preferences dialog box (Ctrl/
In the mini Properties window, you have three options:
Field Name: By default, Acrobat adds a name to the field for you. You can pick a name of your choosing and type the name in the Field Name text box. Notice that when you add a field to a form, the Name Field text (Text2 in Figure 7.2) is highlighted. Type a new name, and the highlighted text is deleted while the new name you type is added for the field name. Pressing Enter on your keyboard or clicking outside the mini Properties window registers the name you type in the Field Name text box.
Note
For more on naming fields, see "Naming Fields" later in this chapter.
Required field: Click the check box, and the field becomes a required field for the form recipient to complete before submitting data. If a required field is not filled in, the form won't be submitted.
Note
For more information on submitting forms, see Chapter 15.
Show All Properties: What you have available in the mini Properties window is a few property assignments you add to a field's properties (field name and required field). A field's properties are extensive for all field types. When you want to edit field properties, click Show All Properties and the Text Field (or other field types) Properties dialog box opens.
Note
For more information on using field Properties dialog boxes, see Chapter 9.
Some common views, assignments, and methods are common to all Form tools. You can set defaults for field sizes and appearances, set up tools to display tool labels, and assign tooltips to fields. This section helps you to understand some issues related to all the Form tools and how to adjust these settings.
Each field type has a fixed size. When you zoom in on a document, the loaded cursor displaying a field zooms its view at the same magnification as your zoom view.
If the default size for a field is not the same size as the field location on a form design, you can click a loaded cursor and drag to shape the size of a field. You begin drawing a field in the top-left corner of the field location and drag to the lower-right corner. All fields you add to a form appear with rectangle bounding boxes. As the cursor reaches the lower-left corner, release the mouse button and the field is drawn to a custom size.
When you draw fields on a form, the same mini Properties window opens where you can name a field, check it for a required field, and open the Properties dialog box.
When you click a Form tool in the Form Editing toolbar, the cursor is loaded with the respective field type. If you decide to change your mind and want to add a different field type, press the Escape (Esc) key and the cursor is cleared of the selected field.
You also can click the Select Object tool or any other Form tool to remove a field from the cursor. If you click the Select Object tool, the cursor is cleared of all fields. If you have a loaded cursor and click another tool, the next tool replaces the loaded cursor tool.
The Form tools in the Form Editing toolbar appear as icons and don't provide you an immediate clue as to what the tools are. Until you're familiar with the icons, you'll need a little help in discerning the differences between the tools such as displaying labels or names for the tools in addition to the icons shown in the toolbar.
In Viewer mode, when you open a context menu on the Toolbar Well, you have some choices for button label appearances. Buttons, per the Toolbar Well context menu command, refer to the tool buttons in the Acrobat toolbars.
Open a context menu in Viewer mode on the Toolbar Well, and choose Button Labels
After choosing All Labels from the Button Labels submenu, open Form Editing Mode. When you look at the Form tools in the Form Editing toolbar, you'll see the Digital Signature tool and the Barcode tool appearing with labels, as shown in Figure 7.3.
Figure 7.3. You can have Acrobat show button labels on the toolbar—it's sort of like creating a cheat sheet on the toolbar.
While in Form Editing Mode, you don't have access to a context menu on the Form Editing toolbar. You need to toggle the view, make your Button Label choice, and return to Form Editing Mode to make changes in the toolbar appearances.
Another way to distinguish the Form tools while in Form Editing Mode is to open tooltips. When you start creating forms in Acrobat, you may be confused by the similar appearance of the Text Field tool icon and the Digital Signature tool icon. Likewise, the List Box tool and Combo Box tool can be confused.
To know what tool you are selecting when moving the cursor to the Form Editing toolbar, place the cursor over a tool and pause. A tooltip opens with a description of the tool. In Figure 7.4, the cursor rests over the Combo Box tool.

Buttons are used commonly on forms and other PDF documents. PDF authors frequently use buttons to invoke actions for interactivity such as navigating pages, opening pop-up menus, navigating Web pages, and more. Because button fields are used for these kinds of interactive actions, the tool is made available in both Viewer mode and Form Editing Mode.
If you are in Viewer mode and press the F key, the Button tool is the default tool loaded in the cursor. No other Form tools can be accessed by a keyboard shortcut when in Viewer mode. Press F and click to drop a button field on a document, as shown in Figure 7.5.
Check boxes are used for selecting items within a group. Check boxes can be designed as mutually exclusive fields where only one box can be checked within a group, or as independent boxes where one or more boxes are checked within a group.
As an example, you might use a check box field for identifying gender. In this example, you would design the fields as mutually exclusive fields where only male or female can be selected. Another group of fields might ask a form recipient to select favorite recreational activities from within a group of several options. All activities that meet the form recipient's interests would be checked. In this example, the fields are designed as independent check boxes.

Notice that the options you have for this field type are identical to text fields where you can name the field, mark it as a required field, and open the Properties dialog box.
Note
For information on creating mutually exclusive and independent check boxes, see Chapter 9.
By default, Acrobat assumes that when you add radio button fields, you want mutually exclusive fields within a group. Offering a choice of credit cards is a typical use of radio buttons.

Figure 7.7. Radio button fields offer some additional options, such as for Button Value and for adding another button to the same group.
Radio Group Name: Type the name for the group in this text box. In our example, we typed CreditCard for the Radio Group Name.
Required field: Check this box, and at least one button in the group must be selected by the form recipient in order to submit the form.
Button Value: Each button in the group has the same name as it is defined in the Radio Group Name. However, each radio button must have a different value in order for the radio buttons to select a single choice from within the group. It doesn't matter what you type in the Button Value text box. You just need to be certain that no two radio buttons within a group have the same value.
Add another button to group: Click the blue text, and the cursor is immediately loaded with another radio button field. When you drop the field on the form, the Radio Group Name appears in the mini Properties window.
You may have several Radio Group Names on a form. Each time you select Add another button to group, Acrobat picks up the name for the current group and places the group name in the Radio Group Name text box. If you work on a form and come back to a group where you want to add another field to a given group, you select the Radio Button tool and from the Radio Group Name pull-down menu, you choose the group you want the new radio button added to, as shown in Figure 7.8.

Figure 7.8. When adding more buttons to a group, select the group you want to add the button to from the Radio Group Name pull-down menu.
Note
By design, Adobe assumes you want to create check boxes as independent fields and radio buttons as mutually exclusive fields. However, the reality of using one field type for another for either use is virtually the same, as explained in Chapter 9.
List boxes are used for scrollable windows where a form recipient has an option to choose one or more choices from among a list you compile in the List Box Properties dialog box. List boxes are handy when you have limited space on a form and a long list of options from which the form recipient chooses. Because the box is fixed to a size, you can add a huge number of options in a small space on your form.
When you release the mouse button, the mini Properties window opens, as shown in Figure 7.9. Your choices in the window are the same as for text fields. Whereas you might get by with leaving the default properties set up for fields like text fields, check boxes, and radio buttons, list boxes always require you to open the List Box Properties dialog box, where you assemble the options for the scrollable window choices.

Note
For more information on setting up list box properties, see Chapter 9.
With the exception of appearance and some different Properties choices, combo boxes are very similar to list boxes. Instead of a scrollable window to choose from among many different options, a combo box appears with a pull-down menu where choices are listed. Again, this type of field can be added to a form within a limited space to offer the form recipient a large number of options from which to choose. A good example of a combo box is one that lists U.S. state names or country names. In an address block where identifying information is added, a combo box can list all the countries in the world while fitting within a section of a form used for identifying information.

Like list boxes, combo boxes require you to click the Show All Properties button to add a list for the combo box choices. This is another field type that you can't leave at default values without making changes in the Properties dialog box.
Digital signature fields enable a form recipient to add a digital signature to a form. Adobe Reader users can create and add digital signatures to forms, as can Acrobat users.

Unlike combo boxes and list boxes, you can leave digital signatures at default values. You do have a number of options to choose from in the Digital Signature Properties dialog box, but without making any options choices, a signature field does work on a form.
Barcode fields dynamically assemble barcode data as a form recipient completes a form. In order to read the barcode on a PDF form, the form must be printed and a barcode reader is needed to read the data. For best results when working with barcodes, fill in a form in Preview mode, and then return to Edit Layout mode and add the barcode after all your fields are populated with data. The barcode needs to estimate the amount of space required to encode the data typed on a form.

Figure 7.12. When you drop a barcode field on a form, a dialog box opens informing you of what's needed to read barcodes.
This dialog box informs you that you need to fill in all fields in order for the barcode to be created. This dialog box opens only when you have data missing from fields. If all fields are filled in, this dialog box doesn't appear.

If the second dialog box appears, click Cancel and fill in your form with sample data. Try to use the maximum number of characters for any given field, such as a last name field. You should plan on the maximum amount of data any given form recipient will use to make the field usable. Acrobat estimates the amount of room needed for the barcode field to encode the data.
When you drop the field on the form, you see options in the mini Properties window similar to many other field types, as shown in Figure 7.14. Click the Show All Properties link to configure the barcode field with your barcode reader.

We introduce the Form tools in this chapter for readers who are new to creating forms in Acrobat. You can make a huge number of choices in the various Properties dialog boxes, but we don't want to overwhelm the novices quite yet, so we cover all the Properties descriptions in Chapter 9.
If you're new to Acrobat forms and you're following this book in a linear read, we encourage you to open the CD-ROM file globalCreditApp.pdf and practice a little using the different Form tools. By the time you get to Chapter 9, you'll have a good idea of how to add fields to a PDF form.
If you attempt to auto-detect fields on the CD-ROM file used for this section of the book, you'll find that Acrobat cannot populate the form with fields. The design of the form shown in Figure 7.15 isn't Run-Form-Field-Recognition-friendly and no fields are recognized.

If there's a single section in the parts related to Acrobat Forms, it's this one. If you don't commit to memory anything else in the first half of this book, be certain to understand the importance of field naming and how field names are developed in Acrobat.
What you have control over is naming fields you create using manual methods of adding fields in Form Editing Mode. What you don't have control over is the way Acrobat automatically names fields. However, you have the option to rename any fields created by you or by Acrobat. When you create or rename form fields, you need to take a few general considerations into account.
Setting up proper field names can save you much time when calculating field data, renaming fields, and working with JavaScript. A little attention to naming fields can save you much time if field names are creating using hierarchical naming conventions.
When you use auto field detection, Acrobat names fields according to text adjacent to where a given field is detected and plotted. You have no control over how fields are named by Acrobat using auto field detection.
With auto field detection, Acrobat might name one field Signature and another field Position Applying For. If two fields appear with the same name, such as Position Applying For, Acrobat will name the fields Position Applying For 1 and Position Applying For 2 when auto-detecting fields. Field naming depends on the text Acrobat finds adjacent to where a field is added to a form.
When you manually add fields with the Form tools, Acrobat again offers an auto name for fields. When you launch Acrobat and add a text field in Form Editing Mode, Acrobat names the field Text1. Add another field, and the field name used is Text2. If you switch to the Check Box tool, the next field added to the form is Check Box3. Change to the Combo Box tool, and the next field added is Combo Box4. Acrobat numbers each field sequentially, regardless of the field type, and adds a prefix relative to the type of field created.
When you quit Acrobat and later return to a form and add a new field, Acrobat picks up the field type and adds a new field in sequential order. For example, suppose you have three text fields named Text1, Text2, and Text3. You also have Combo Box1, Check Box1, and Check Box2. Add a new text field, and the field is named by Acrobat Text4. Add a new combo box, and the field is named Combo Box2. Add a new check box, and the check box is named Check Box3.
The important thing to remember is that each field requires a unique name. If two fields of a common type are named with identical names, the data added to one field is duplicated in the remaining fields with the same name. For example, suppose we add a text field on a form and name the field Name, and then add a second field and name the field Name. Typing Angie in field 1 adds Angie to field 2. If we edit field 2 and type Ted, field 1 reads as Ted too.
Assume you want to edit field names that have been added with auto field detection or names of fields you manually add to a form. After you create a field in Acrobat or when you edit a form that's been populated with field objects, you can use the Fields panel in Form Editing Mode, the mini Properties window in Viewer mode, or the field Properties dialog box to edit names in either mode.
Note
For renaming fields, use the jobApplication.pdf document in the Chapter07 folder on the book's CD-ROM.
After fields are added to a form, you can easily rename fields in the Fields panel. By default the Fields panel is open when you enter Form Editing Mode. If you use auto field detection and you want to change some names or if you've added some fields manually and want to edit names, follow these steps.
STEPS: Renaming Fields in the Fields Panel
Open a form containing fields in Acrobat, and choose Forms
Add or Edit Fields. Alternately, you can open a form in Acrobat, choose Add or Edit Fields, and let Acrobat's auto field detection feature populate a form.
Open a context menu on a field you want to rename.
Choose Rename Field from the context menu, as shown in Figure 7.16. Alternately, you can click once on a field name and click again and the name is ready to edit.
Tip
You also can rename fields using the Fields panel while in Form Editing Mode. Locate a field in the Fields panel and double-click the field name. The name is highlighted and ready for you to type a new name.
Type a new name for the field. In our example, the first field name in the Fields panel is POSITION APPLYING FOR 1. The second field in the Fields panel is POSITION APPLYING FOR 2. We typed position for the first new field name.
Press Enter on your keyboard. When you press Enter, the field name is recorded and the next field in the Fields panel is highlighted. Click once on the field, and it's ready to edit. In our example, field 2 in the Fields panel is named POSITION APPLYING FOR 2. Acrobat picked up the text from the first field caption, duplicated it for the field name, and then added 2 after the name to keep the field as a unique name. However, the field is designed to enter a closing date. Therefore, we named this field closeDate.
Press the Num Pad Enter key (or Ctrl + Enter). When you press the Num Pad Enter key, the field name is recorded but the field highlight does not jump to the next field.

Acrobat recognizes almost any character or combination of characters for field names. You can use wildcard characters such as / ? > @ ! *, but we don't recommend using symbols and characters that don't have literal meanings. The more complex your forms, the more you'll need to use descriptive names for fields.
Case sensitivity is also an issue. If you name a field Last Name, last name, or last NAME, Acrobat sees these fields as three different fields. If you want data repeated on a form, be sure to use the same field name including case sensitivity for each occurrence of the data.
Length of field names can be a problem if you're writing JavaScripts and need to use field names in the scripts. If you have a field named The first order item in the shopping cart, Acrobat accepts the name, but having to retype a name like this is awkward and time consuming.
So what are the best field names to use? Programmers tend to use field names that are descriptive, short, without spaces between words, and lowercase with the exception of when a new word is introduced in the name. Names like item, quantity, amount, salesItem, creditCard, amountTotal, and so on are common field names used by programmers. Sometimes you find a little more description for the field names, but generally field names are written in similar fashion by JavaScript programmers.
What's most important when naming fields in Acrobat is to be consistent. If you use lowercase for field names, ALWAYS use lowercase. If you use uppercase/lowercase (Name, Item, Amount), be certain to ALWAYS use uppercase/lowercase. When it comes time to use field names in scripts, you'll find it very difficult to remember field names if you use different syntax among the field names on a form.
In Viewer mode, select a field with the Select Object tool, open a context menu, and choose Rename Field. When you choose this menu command, the mini Properties window opens the same as when creating fields in Form Editing Mode. Click the Field Name text, and type a new name. Press Enter on your keyboard, and the name is changed.
You also can edit fields using the Properties dialog box. Changing field names in the Properties dialog box is handy when you want to edit additional properties for a field. After populating a form in Form Editing Mode, you can open the Properties for a field in either Viewer mode or Form Editing Mode.
When you open the Properties dialog box, you'll see the Name text box containing the name that Acrobat supplied for the field name. If you use auto field detection, you'll also find the name duplicated in the tooltip text box. If you add fields manually on a form and Acrobat supplies the name, the tooltip field is left blank. In Figure 7.17, we edited the field name on the jobApplication.pdf form on the CD-ROM. You can see the tooltip Acrobat added when we used auto field detection.
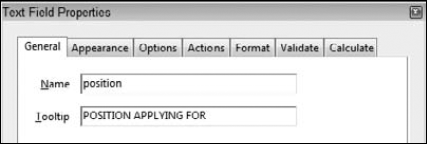
Figure 7.17. Open the properties dialog box to edit a field name in either Form Editing Mode or Viewer mode.
Tooltips are where you want to add descriptions for form recipients. You might use a field with a field name such as item, and in the tooltip you might use a description such as Item Product Description. The tooltip pops up when a form recipient moves the cursor over a field. With regard to using tooltips, the names you use to describe a field in a tooltip do not need to follow any particular nomenclature. You can use long word descriptions, spaces, uppercase/lowercase, and so on. Tooltips aren't used in scripts so you don't need to have the same concern for these names as you do with field names.
The important thing to remember regarding tooltips is that they are designed for legibility. Avoid using all uppercase text because it's more difficult to read than lowercase or a mixture of uppercase and lowercase.
Something else that's important with tooltips is when you make your forms accessible for screen readers used by the visually and motion challenged form recipients. The tooltip content is read aloud by a screen reader.
Note
For more on making forms accessible, see Chapter 11.
Hierarchical names are a beneficial when it comes to calculating field data, and use of hierarchical names is perhaps the most important part of this section on naming fields. Hierarchical names are written like item.0, item.1, item.2; customer.first.name, customer.last.name, customer.emailAddress; lineTotal.0, lineTotal.1, lineTotal.2, and so on. In these examples, the names have parent/child relationships. The parent items in these sample names are item, customer, and lineTotal.
The first part of a hierarchical name is the parent. The parent is separated from the child names with a period (.). When it comes time to perform calculations, you can calculate fields using a parent name. If you have a form with a table, for example, and the number of rows are 15 separate data fields, you can write a script that can calculate the 15 rows in two lines of code. If you use individual field names for the same 15 rows of data, the code to perform a calculation will exceed more than 30 lines of code.
Hierarchical names have many uses. Simplicity in calculating formulas is the obvious advantage for using hierarchical names, but you'll also find great advantages for copying and pasting fields, duplicating fields, and renaming fields.
Note
For more information on using hierarchical names, see Chapter 8.
We use the term managing fields to mean dealing with field duplication, deleting fields, and modifying field attributes. After you create a field on a PDF page, you may want to alter its size, position, or attributes. Editing form fields in Acrobat is made possible by using one of several menu commands or returning to the respective field's Properties window.
To edit a form field's properties, use the Select Object tool and double-click the field rectangle. The Properties window opens after you double-click the field object. You also can use a context-sensitive menu opened from the Select Object tool and click the form field to be edited. At the top of the context-sensitive menu, select the Properties command. Also, you can select Forms
To select multiple fields of different types, you must use the Select Object tool. Because you cannot use a Form tool in Acrobat 9 to select a field, all field selections are made with the Select Object tool. In earlier versions of Acrobat, you can use the individual Form tools to select fields respective to the Form tool you're using. For example, you can select all text fields with the Text Field tool.
When you select multiple fields and choose Properties from the context-sensitive menu, options in the General tab, the Appearance tab, and the Actions tab are available for editing. Specific options for each different field type require that you select only common field types. For example, you can edit the Appearance settings for a group of fields where the field types are different. However, to edit something like radio button field options for check mark style, you need to select only radio button fields in order to gain access to the Options tab.
Tip
If the fields you want to select are located next to each other or you want to select many fields, use the Select Object tool and drag a marquee through the fields to be selected. When you release the mouse button, the fields inside the marquee and any fields intersected by the marquee are selected. The marquee does not need to completely surround fields for selection; just include a part of the field box within the marquee.
All of the editing you perform using the Select Object tool and context menu commands can be performed in either Form Editing Mode or Viewer mode.
Fields can be copied and pasted on a PDF page, between PDF pages, and between PDF documents. Select a field or multiple fields, and choose Edit
Tip
To ensure that field names are an exact match between forms, create one form with all the fields used on other forms. Copy the fields from the original form, and open the target document in Form Editing Mode. Choose Edit
When you're in Form Editing Mode, the top-level menu commands for Edit
Tip
You can duplicate a field by selecting it and holding down the Ctrl/Option key while clicking and dragging the field box.
Using the Place Multiple Fields command from a context menu enables you to create table arrays or individual columns or rows only on a single page. If you want to duplicate fields on a page, you use the Place Multiple Fields command. If you want to duplicate fields across pages, you use the Duplicate command.
Note
For more information on using Place Multiple Fields, see "Creating multiple copies of fields" later in this chapter.
To duplicate a field on a page, you can use the copy/paste commands in the top-level Edit menu or from context menus. For a fast method for duplicating fields, press the Ctrl/
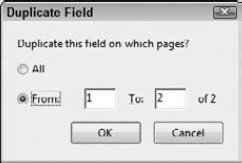
You also find a Duplicate context menu command. This command is inactive on single page forms. You use Duplicate from a context menu opened on a field with the Select Object tool to duplicate a field across multiple pages. You might have a navigation button set up with an action to open the next page in a PDF Document containing multiple pages. To easily duplicate the field, choose Duplicate from a context menu. When you choose Duplicate, the Duplicate Field dialog box shown in Figure 17.18 opens. You specify the page range and click OK, and the fields are duplicated at the same position on the page across all pages chosen in the Duplicate Fields dialog box.
You can relocate fields on a PDF form by selecting the Select Object tool and then clicking and dragging the field to a new location. To constrain the angle of movement (horizontal or vertical), select a field with the Select Object tool, press the Shift key, and drag a field to a new location. You can use the arrow keys on your keyboard to move fields and perform some other actions when using modifier keys. You have these options with the arrow keys:
Left, Right, Up, Down (arrow keys): Select a field(s) with the Select Object tool, and press the arrow keys. Fields move in the direction of the arrow key you press (up, down, left, and right) one-pixel at a time.
Shift+Left, Right, Up, Down (arrow keys): This key combination moves the selected field(s) 10 pixels in the direction of the arrow key you press.
Ctrl/Option+Left Arrow: This sizes the field object 1 pixel smaller in width moving the right side of the field object inward.
Ctrl/Option+Right Arrow: This sizes the field object 1 pixel larger in width moving the right side of the field object inward.
Ctrl/Option+Up Arrow: This sizes the field object 1 pixel smaller in height moving the bottom side of the field object upward.
Ctrl/Option+Down Arrow: This sizes the field object 1 pixel larger in height moving the bottom side of the field object downward.
Ctrl/Option+Shift+Arrow: This sizes the field object 10 pixels in width/height according to the arrow key you press.
You delete fields from PDF forms in three ways:
Select the field, and press the Backspace key (Windows) or Delete key (Macintosh) or Del key (Windows/Macintosh).
Select the field, and choose Edit
Open a context menu and choose Edit
In all cases, Acrobat removes the field without warning. If you inadvertently delete a field, you can Undo the operation by choosing Edit
Even when you view the grids on a PDF form, aligning fields can sometimes be challenging. Acrobat simplifies field alignment by offering menu commands for aligning the field rectangles at the left, right, top, and bottom sides, as well as for specifying horizontal and vertical alignment on the form. To align fields, select two or more fields, open a context menu, and select Align, Distribute, or Center, as shown in Figure 7.19. The alignment options for Left, Right, Top, Bottom, Horizontally, and Vertically appear in a submenu.
Acrobat aligns fields according to the first field selected (the anchor field appearing with handles). In other words, the first field's vertical position is used to align all selected fields to the same vertical position. The same holds true for left, right, and top alignment positions. When you use the horizontal and vertical alignments, the first field selected determines the center alignment position for all selected fields. All fields are center aligned either vertically or horizontally to the anchor field. (See the sidebar "Selecting Fields" for more information about changing the anchor field.)
You can distribute fields on a PDF form by selecting multiple fields and choosing Distribute from a context menu. Select either Horizontally or Vertically for the distribution type. The first and last fields in the group determine the beginning and end of the field distribution. All fields within the two extremes are distributed equidistant between the first and last fields.
Note
For an example of how to use the Distribute command, see "Creating multiple copies of fields" later in this chapter.
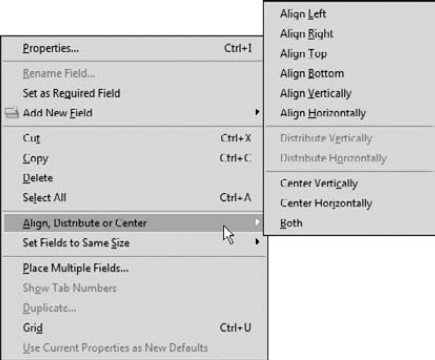
Field rectangles can be sized to a common physical size. Again, the anchor field determines the size attributes for the remaining fields selected. To size fields, select multiple field boxes, open a context menu, and choose Set Fields to Same Size
If you spend time formatting attributes for field appearances, options, and actions, you may want to assign a new default for all subsequent fields created with the same Form tool. After creating a field with the attributes you want, open a context menu and select Use Current Properties as New Defaults. The properties options used for the field selected, when you choose the menu command, become a new default for that field type. As you change Form tools and create different fields, you can assign different defaults to different field types.
If you quit Acrobat and re-launch Acrobat in another editing session, the new defaults you last established prevail each time you use the respective Form tool on additional forms.
Selecting Fields
When you click the Select Object tool and drag through a group of fields, all fields within the marquee area of the Select Object tool are selected. The anchor field appears with handles (or tiny squares at the corners and middle points) on the field rectangle. All the selected fields appear with blue text for the field name but without the handles.
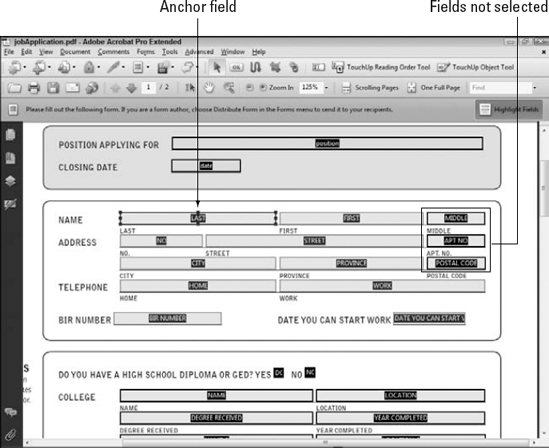
An anchor field is used for field alignment. When you choose Align, Distribute, or Center
If you want to change the anchor field among the group of selected fields, press the Ctrl/
If you want to add a deselected field to the group of selected fields, press the Ctrl/
If you want to duplicate fields on a single page form, you cannot use the Duplicate command from a context menu. However, Acrobat provides another command for duplicating fields on a page. The Place Multiple Fields context menu command is commonly used for creating tables on forms. You can use the command for creating multiple fields in a column or row or when you want to populate a table having several columns and/or rows.
To understand how the Place Multiple Fields command is used, follow these steps.
Note
For the steps following, we use the purchaseOrder.pdf file found on the book's CD-ROM in the Chapter07 folder.
STEPS: Creating Multiple Fields on a Form
Open a form in Acrobat. In this example, we use the purchaseOrder.pdf file from the book's CD-ROM found in Chapter07. This form is populated with fields in the first four columns. A single field appears in the Total column. This field needs to be duplicated down the column. Because we have fields on the form, we don't need to enter Form Editing Mode to perform our edits.
Open a context menu on a field. Use the Select Object tool to select the total field, and open a context menu. From the menu selections, choose Place Multiple Fields, as shown in Figure 7.20. When you release the mouse button, the Create Multiple Copies of Fields dialog box opens.
Set the attributes for placing multiple fields. In the Create Multiple Copies of Fields dialog box, shown in Figure 7.21, type the number of fields down and across that you want to create. In our example, we need 10 copies down and only 1 field across. Therefore, we type 10 in the Copy selected fields down text box and 1 in the Copy selected fields across text box. The remaining options in the dialog box we leave at the default values and click OK.
Move the last field into position. When you arrive back at the Document pane, the fields are plotted on the form. But the location of the fields needs to be adjusted so they fit within the cells on the form design. To begin the alignment, click the last field in the column with the Select Object tool, press the Shift key to constrain the movement, and drag down to the bottom cell.
Distribute the fields. All fields between the first and last fields can be spaced equidistant from the others using a simple menu command. With the Select Object tool, select all fields in the column. Open a context menu, and choose Align, Distribute, or Center

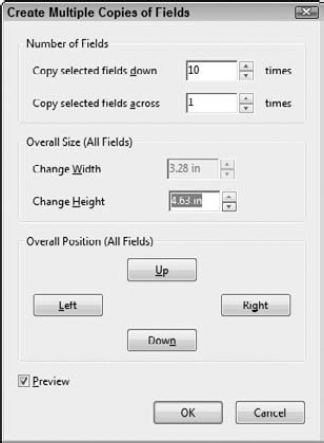

Figure 7.22. Open a context menu on the selected fields, and choose Align, Distribute, or Center
When using the Distribute command, you can only distribute single rows or columns. If you attempt to select all fields in a table containing multiple columns and distribute several rows or columns at once, the results produce a cascaded arrangement.
Note
There's much more to creating tables on PDF forms than we covered in this chapter. For an in-depth look at working with tables, see Chapter 8.
If you're a seasoned Acrobat forms developer, you may find the Form Editing Mode in Acrobat 9 a bit too simplistic for your taste. You might prefer to create forms in Viewer mode and visit the Form Editing Mode only when needed.
To stay in Viewer mode while you create a PDF form, you need a little workaround that you can use by following these steps.
Note
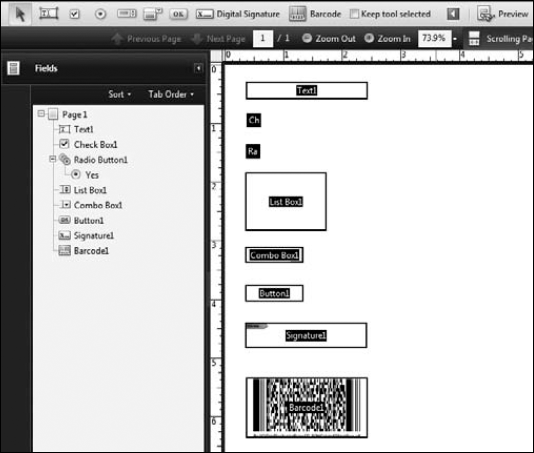
We created a blank page with all the field types and saved the file as blankPage.pdf that you can review on the CD-ROM in the Chapter07 folder.
STEPS: Creating Forms in Viewer Mode
Create a blank new page. Choose File
Save the file. When you create a blank new page, Acrobat assumes you want to type a memo. To dismiss the text tools and eliminate the text frame on the blank page, choose File
Reopen the blank page. After closing the file, open the File menu (Windows) and choose blankPage.pdf (or whatever name you chose for your file) to reopen the document without the text frame and text tools appearing in the Acrobat toolbar. On the Macintosh, choose File
Add one form field for each field type. Open Form Editing Mode by choosing Forms
Save the form. Your form should look something like Figure 7.23. Choose File
Copy/paste fields. When you want to create a new form, open the template file, click the Select Object tool, and select all fields (Ctrl/

If it's not inconvenient, you can always open Form Editing Mode and create individual field types for a form you work on, and then switch to Viewer mode and copy/paste fields, set properties, and make all the edits in Viewer mode. The benefit of a template file is that you can set up the field properties used most often on your forms without having to open the Properties dialog box when adding fields in Form Editing Mode.
When you're in Form Edit Mode, a cursor loaded with a form tool helps you align field objects as you drop them on a form. For a number of different form designs, the design of the cursor when using Form tools is all you need to assemble field objects on a page. Together with the context menus for alignment, you may find that you don't need any additional tools for precisely positioning fields on a page.
In other cases, you want more assistance for field placement. Acrobat offers you a number of different design assistants in the form of rulers, grids, and guides.
By default, rulers are turned on when you enter Form Editing Mode. Rulers also are available in Viewer mode. You can toggle rulers on and off by pressing Ctrl/
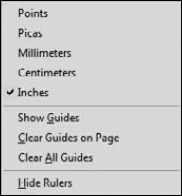
Units of measure: Choose from the items in the first section of the context menu to set your unit of measure to Points, Picas, Millimeters, Centimeters, or Inches.
Show Guides: You can draw guidelines on each page on a form. Guidelines are used to help you with a form design. The guidelines added to a form are not shown in printed documents. When you want the guides to be hidden, remove the check mark adjacent to Show Guides in the context menu. To display the guides, select this command from the menu.
Clear Guides on Page: After drawing guides, use this command to clear guides on the page in view.
Clear all Guides: If you have more than one page for a form and you draw guides on separate pages, use this command to eliminate all guides in the document.
Hide Rulers: This option hides the horizontal and vertical rulers. To show the rulers after hiding them, open the top level View menu and choose Rulers or press Ctrl/
The rulers contain an inexhaustible well of guides that you can add to a form page. You draw guidelines by selecting any tool in Viewer mode, clicking on a ruler, and dragging down (or right) to add a new guideline to a form page. If you have the cursor loaded with a Form tool in Form Editing Mode, you can move the cursor to a ruler and drag a new guide to the document, and the cursor remains loaded with the selected Form tool.
To relocate a guideline after you've added one to a form page, click the Select Object tool and drag the guideline to a new position. You also can eliminate a guideline by dragging a guideline to a ruler well.
Field objects can be snapped to guides you draw on a page. After creating the guidelines you want, you can load the cursor in Form Editing Mode and move the cursor to a guideline. As you approach a guideline, move the cursor slowly. If you move too fast, Acrobat won't sense the guideline and you'll move past it. As you slowly move a loaded cursor to a guideline, you'll see the field object bounding box snap to the guideline. Click to drop the field, and the field object is aligned to the guideline.
You also can snap field objects while in Viewer mode. Click a field with the select object tool (this works in both modes), and drag a field toward a guideline. You follow the same principles as when creating new fields that you want to align to a guideline. Drag slowly until you see an edge of the field object bounding box snap to a guideline.
Grids provide you with a series of horizontal and vertical guidelines that are divided in major and minor subdivisions. When you show a grid by choosing View
By default, grids are set up with 1-inch major divisions having three minor divisions. Major and minor divisions are customizable, and you can define the units of measure, major divisions and minor divisions in the Preferences dialog box.
Open Preferences (Ctrl/
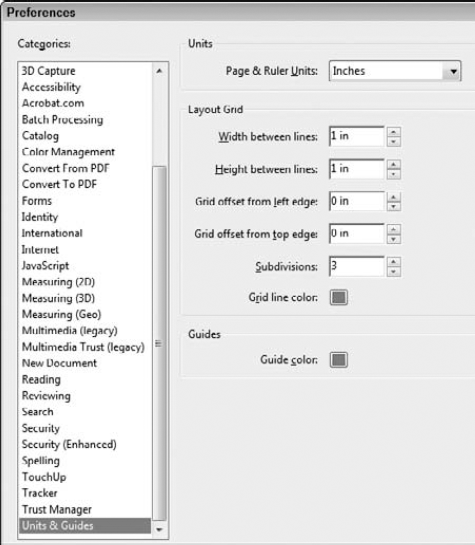
Figure 7.25. Open the Preferences dialog box and click Units & Guides to display options for creating a custom grid.
Page & Ruler Units: Five choices are available from the pull-down menu. You can choose Points, Picas, Millimeters, Centimeters, or Inches.
Width between lines: The horizontal distance between the major gridlines is determined in the field box for this setting. You can click the arrows, enter a number between 0.028 and 138.888 in the field (when inches are selected for the unit of measurement), or press the up-arrow key or down-arrow key to change the values.
Note
The limit of 138.888 relates to inches. If you change the units of measure, the limits are roughly the same as the 138.888-inch limit. In points, the range measures between 2 and 10,000.
Height between lines: You can change the major gridlines appearing vertically with this field. Use the same methods of changing the values here as for the lines for the Width option.
Grid offset from left edge: Each grid has x and y coordinates indicating where the grid begins on a page. You set the x-axis (offset left) in this field.
Grid offset from top edge: Use this field to set the starting point of the y-axis (offset down).
Subdivisions: The number of gridlines appearing between the major gridlines is determined in this field. The acceptable values range between 0 and 10,000 (when units are set to points).
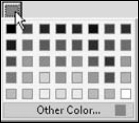
Grid line color: By default, the color for the gridlines is blue. You can change the grid color by clicking the color swatch. When you click the blue swatch for Grid line color, a pop-up color palette opens, as shown in Figure 7.26. Select a color from the preset color choices in the palette, or click Other Color. If you click Other Color, the system color palette opens, where you can make custom color choices. The Windows and Macintosh system color palettes vary slightly, as shown in Figure 7.27.
Guide color: Guides are added from ruler wells, and you can manually position them in the Document pane. If you have ruler guides and a grid, you'll want to change one color to easily distinguish the guides from the grid. Both default to the same blue. To change the guide color, click the Guide color swatch in the Units & Guides Preferences and follow the same steps as described for Grid line color.

Grids are viewable in both the Form Editing Mode and Viewer mode. Setting up a custom grid doesn't snap field objects to a grid in either mode unless you turn on the Snap to Grid menu command. To snap field objects to a grid, choose View
When Snap to Grid is turned on, field objects are snapped to the major and minor gridlines. It doesn't matter whether you view a grid, the Snap to Grid feature snaps field objects to the grid with or without gridlines visible.
Dragging field objects to a grid works the same as when dragging fields to guidelines. You need to slowly approach the grid for a field to snap to one of the gridlines.
If you want to disable the Snap to Grid feature momentarily, so you can add a field not aligned to the grid, you need to turn off Snap to Grid by choosing View
Forms authors should be familiar with filling in forms in Adobe Reader and Acrobat viewers to help guide the form recipients receiving your forms or by adding help messages on forms to ease the completion process for the form recipients.
A little practice with filling in forms in Adobe Reader helps you understand the limitations that a Reader user may face when completing your forms.
As a PDF form author, you won't be using the Typewriter tools, but you may need to guide form recipients in filling in forms and, occasionally, using the Typewriter tools on forms created by other PDF form authors. Ideally your forms have all the necessary fields that a form recipient needs to complete your form, but there may be times when you receive a form that doesn't have field objects and you need to complete the form yourself.
You want to discourage the use of the Typewriter tool if you're processing data from your forms. Any data added with the Typewriter tool is not going to flow into a database or be exported to a spreadsheet. As a matter of practice, you should secure your forms with Acrobat Security to prevent the Typewriter tool from being accessed by a form recipient completing one of your forms.
Note
For more information on processing data, see Chapter 15. Form more on securing forms with Acrobat Security, see Chapter 12.
Note
If you don't see the Typewriter appearing in the Toolbar Well context menu, the form you opened in Acrobat is secured with password security and permissions for using the Typewriter tool have been denied. (For more on Acrobat Security and preventing the Typewriter tool from being accessed by a form recipient, see Chapter 12). If you're using Adobe Reader, the Typewriter is not available unless the form is not secured and is enabled with Adobe Reader usage rights.
Click on the page where you want to type text, and an I-beam cursor appears. Type the text on a line. You'll notice right away that the default font is Courier, and you don't have much paragraph formatting control. In Acrobat versions prior to version 9, your font choices were limited to Courier. In Acrobat 9, you have options for changing fonts and some font attributes.
If you want to stop typing on one block of text and start a new block, press the Escape (Esc) key. Then click the Typewriter tool and click again on the page in an area where you want to start a new block of text.
The Typewriter tools in the Typewriter toolbar from left to right, as shown in Figure 7.28, include the Typewriter tool, the Text Smaller tool, the Text Larger tool, the Decrease Line Spacing tool, the Increase Line Spacing tool, the Text Color pop-up palette, the Font Pull-down menu, and the Font Size pull-down menu. If you want to move a text block after typing, use the Select Object tool.
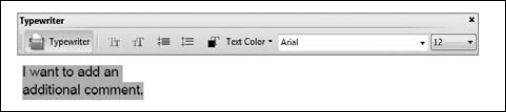
Figure 7.28. Click the Typewriter tool, and click on a page to type text. The text defaults to Courier font.
You'll often find that you can't quite get the line spacing right for the form you fill in using the Typewriter tool. However, when a form recipient needs to fill in a form where no form fields appear on a document, using this tool saves some time over printing, completing by hand, and then faxing the form back to the form author.
Typewriter Tool Avoidances
All text typed with the Typewriter tool appears as comment notes on a form. You can check to see if the Typewriter tool was used on a form by clicking the Comments panel icon to expand the Comments panel.
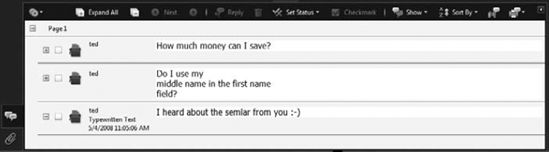
When designing PDF forms, always avoid using the Typewriter tool for text used as part of your form design. Adding text with the Typewriter tool makes your form appear sloppy, and form recipients can get confused by seeing a list of comments in the Comments panel. If you need to add more text to a form, do so in the original authoring program and recreate the PDF file.
If you populated a form with fields and you need to make changes to text on a form, you can use the Document
To fill out a text field, select the Hand tool, place the cursor over the field, and click the mouse button. When you click, a blinking I-beam cursor appears, indicating that you can add text by typing on your keyboard.
Tip
To begin filling in a form, press the Tab key on your keyboard. When the Hand tool is selected and the cursor is not active in any field, pressing the Tab key places the cursor in the first field on the form.
To navigate to the next field for more text entry, you can make one of two choices: Click in the next field, or press the Tab key on your keyboard. When you press the Tab key, the cursor jumps to the next field, according to an order the PDF author specified in Acrobat when the form was designed. Be certain the Hand tool is selected, and a cursor appears in a field box when you press the Tab key. If you have any other tool selected, you can tab through the fields and type data in the field boxes; however, if you click with the mouse when another tool is selected, you make edits according to the active tool.
When selecting from choices in radio button or check box fields, click in the radio button or check box. The display changes to show a small solid circle or check mark within a box or other kind of user-defined symbol from options you select for button/check box styles. When using a combo box, click the down-pointing arrow in the field and select from the pull-down menu choices. List boxes are scrollable fields. Scroll to the choice you want to make using the up and down arrows.
Note
For more information on field object appearances, see Chapter 9.
As mentioned earlier, to move to the next field, you either click in the field or press the Tab key. Following is a list of other keystrokes that can help you move through forms to complete them:
Shift+Tab: Moves to the previous field.
Esc: Ends text entry.
Return: Ends text entry for single line entries or adds a carriage return for multi-line fields.
Double-click a word in a field: Selects the word.
Ctrl/
+A: Selects all the text in a field.Left/right arrow keys: Moves the cursor one character at a time left or right.
Up arrow: Fielding combo and list boxes moves up the list.
Down arrow: Fielding combo and list boxes moves down the list.
Up/down arrow with combo and list boxes selected: Moves up and down the list. When the list is collapsed, pressing the down-arrow key opens the list.
Ctrl/
+Tab: Accepts new entry and exits all fields. The next tab places the cursor in the first field.
You may open a form in Acrobat where the fields are not clearly visible. Creating form fields on white backgrounds for fields with no border or fill color makes a field invisible when opened in an Acrobat viewer.
If you start to fill in a form and can't see the form fields, click the Highlight Fields button on the Forms Document Message bar. All fields are highlighted with a color specified in the Forms Preferences. In Figure 7.29, the fields are white in the form design but highlighted with the default blue highlight color. Some of the lines indicating where data needs to be typed are drawn across the form without separations indicating where one field ends and another begins. When we click the Highlight Fields button in the top-right corner of the Forms Document Message bar, the fields are highlighted, making it easy to see where each field appears in the form.

Figure 7.29. Click Highlight Fields in the Forms Document Message bar to display fields with highlights.
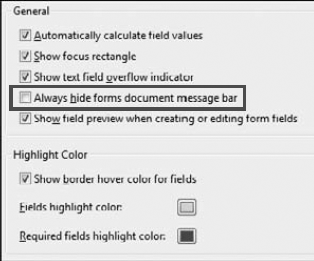
If you don't see the Forms Document Message bar, you need to adjust a preference setting. Press Ctrl/
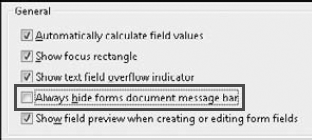
Figure 7.30. Uncheck the Always hide forms document message bar box to display the message bar in the Document pane.
Understanding the Document Message Bar
The Document Message bar can be made visible or hidden from view by form recipients. If you open the Preferences dialog box (Ctrl/
You have no control over preventing a user from hiding the Document Message bar and other preference choices for Forms in the Preferences dialog box. There is no JavaScript you can write to prevent these Preferences changes.
When designing forms, you should try to avoid creating forms where users cannot intuitively know where form fields exist. For example, form fields on white backgrounds with no fills, no borders, and no design elements to clearly indicate where a field exists can be confusing for form recipients if they choose to hide the Document Message bar.
As a forms author, you need to anticipate all the controls that can be changed in Acrobat by unknowing users and try to create forms that are functional regardless of what preference options are changed by the form recipients.
While filling in a form, you can enable Acrobat to record common responses you supply in form fields. After recording responses, each time you return to similar fields, the fields are automatically filled in or a list is offered to you for selecting an option for auto-completing fields.
To turn the recording mechanism on, you need to address the Forms preference settings. Open the Preferences dialog box by pressing Ctrl/
By default, numeric data are eliminated from the data stored for the suggestions. If you want to include numeric data for telephone numbers, addresses, and the like, check the Remember numerical data check box.
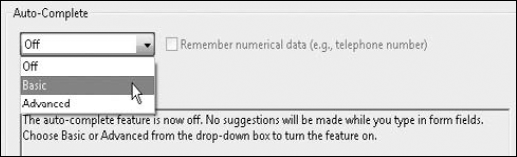
Figure 7.31. Click Forms in the Preferences dialog box, and select Basic or Advanced from the Auto-Complete pull-down menu to use the auto-completion feature.
The list grows as you complete forms when either the Basic or Advanced choice is enabled in the pull-down menu. You can examine the list of stored entries by clicking the Edit Entry List button; the Auto-Complete Entry List dialog box opens, as shown in Figure 7.32. To remove an item from the list, select it and click the Remove button. To remove all entries, click the Remove All button.

Figure 7.32. To remove entries from your suggestion list, click the Edit Entry List button in the Forms preferences. Select items in the Auto-Complete Entry List, and click the Remove button.
In order to record entries, you need to first make the selection for using either the Basic or Advanced Auto-Complete feature. To have suggestions for entries submitted as you type in fields, one of the two menu options must be enabled. When you select Off in the pull-down menu, both recording entered data and offering suggestions is turned off.
After selecting either Basic or Advanced in the Forms preferences and editing entries, fill out a form. If you recorded data after filling out one form, the next time you fill out another form you'll see suggestions, as shown in Figure 7.33. The cursor appears just below City, and the suggestion (Fairways) is derived from recorded data supplied on another form.

How good is the Auto-Fill feature in Acrobat? When the feature was first introduced several generations ago, it was pretty clumsy. There wasn't much sophistication in controlling what data are recorded and what data are suggested when filling in a form. After several Acrobat revisions, there remain no changes in the Auto-Fill feature. It's still quite clumsy, and you'll find sometimes it may work well for you and in other cases, you'll find turning off the Auto-Fill option less distractive when completing a form. As a general rule, you might guide form recipients to not use the Auto-Fill features in Adobe Reader.
This is one item you should address before saving your final edited form. You should be able to press the Tab key to enter the first field on a page and tab through the remaining fields in a logical order to make it easy for the end user to fill in your form. Before deploying your form, be sure to check the tab order.
You can set tab orders in either Viewer mode or Form Editing Mode. How you approach setting tab orders varies a bit between the modes. When in Viewer mode, open the Pages panel and open a context menu on the page where you want to set tab order. Select Properties from the menu options, and the page Properties dialog box opens, as shown in Figure 7.34. By default, the Tab Order pane opens with options for setting tab order by making radio button selections.

Figure 7.34. To set tab order, open the Pages panel and open a context menu on the page where you want to edit the tab order. Select Properties from the menu choices, and click Tab Order in the Pages Properties dialog box.
The options for setting tab order include the following:
Use Row Order: Tabs through rows from left to right. If you want to change the direction for tabbing through fields, choose File
Use Column Order: Tabs through columns from left to right, or right to left if you change the binding as described in the preceding bullet.
Use Document Structure: When selecting this option, you first need to use a PDF document with structure and tags. The tab order is determined by the structure tree created by the original authoring application when the file was exported to PDF.
Note
For more information on structured PDFs and tags, see Chapter 11.
Unspecified: All documents you created in earlier versions of Acrobat that you open in Acrobat 6 through 9 have the Unspecified option selected by default. Unless you physically change the tab order to one of the preceding options, the tab order remains true to the order set in Acrobat 5 or earlier.
The order in which you create fields and add them to a page is recorded. If you happen to create a row of fields, and then change your mind and want to add a new field in the middle of the row, Acrobat tabs to the last field in the row from the last field created. Changing the tab orders in the Page Properties won't help you fix the problem when the fields need to be reordered.
Fortunately, you do have more options for setting tab orders, and the ideal method for changing tab orders is available only in Form Editing Mode. Switch to Form Editing Mode, and from the Sort menu in the Fields panel, be certain that Tab Order is selected. Open the Tab Order, and you find several menu commands, as shown in Figure 7.35.
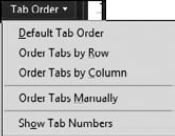
Figure 7.35. Open the Tab order pull-down menu to display options for setting tab order when working in Form Editing Mode.
You have these options available in the Fields panel Tab Order pull-down menu:
Default Tab Order: This order is determined by the order in which you create fields on a form.
Order Tabs by Row: This option is the same as selecting Use Row Order in the Page Properties dialog box.
Order Tabs by Column: This option is the same as selecting Use Column Order in the Page Properties dialog box.
Order Tabs Manually: This option is automatically selected if you reorder fields in the Fields panel by dragging them up or down. If you make the selection here in the Tab Order pull-down menu, you can click and drag fields to change an order in the Fields panel, but it's not necessary to first select the menu command. The check box in the menu merely lets you know that the order has been set manually.
Show Tab Numbers: Choose this menu item, and each field on a form displays the tab order number, as shown in Figure 7.36. You also can choose Forms
Tip
When you want to change the order of a field on a form, click the field object and the field name is highlighted in the Fields panel. After you've identified the field in the Fields panel, you can easily move it up or down to reorder the tabs.
Prior to Acrobat 9, you had to set tab orders manually by clicking a field using a modifier key (Ctrl/Option) on the field preceding the field you wanted to reorder. You then had to click the next field in the order you wanted and click all subsequent fields following the first field you changed.
In Acrobat 9, you have the ability to rearrange fields by dragging them in the Fields panel. Click a field in the Fields panel, and drag up or down to move to the location you want to reorder the field tab order. As you move a field in the Fields panel, you see a right-pointing arrow and dashed line between two fields. Drag to the position, be certain the line appears after the field you want in the order, and release the mouse button.

Eight different Form tools can be used to create form field objects in Form Editing Mode.
When you click a Form tool in the Form Editing toolbar, the cursor is loaded with the respective field type.
Forms are added by clicking a loaded cursor on a form in Form Editing Mode.
When a form field is added to a form, you can name the field and select from a few options in the mini Properties window.
The field Properties dialog box can be opened in ether Viewer mode or Form Editing Mode.
Acrobat automatically names fields when using auto field detection and when adding fields with the Form tools.
Fields can be renamed in the Properties dialog box and the Fields panel.
When creating tables, columns, or rows of fields, use hierarchical names.
When naming fields, always be consistent with naming conventions.
You can organize fields by aligning, sizing, and distributing them from context menu commands in either Viewer mode or Form Editing Mode.
An anchor field is the one where all fields are aligned and sized within a selection of fields.
You can duplicate fields across multiple pages.
You can duplicate fields on a single page by opening a context menu and choosing Place Multiple Fields.
You can add guidelines to a form by dragging them from a ruler well.
Custom grids are set up in the Units & Guides Preferences dialog box.
You can snap fields to guidelines and grids.
Form authors should be familiar with filling in PDF forms, using the Typewriter tool, and setting up the auto completion options.
When designing forms, avoid using the Typewriter tool as a replacement for modifying a form. You should return to the original authoring application, make changes, and then recreate the PDF form. If you have field objects on a form and need to modify a design, you can use the Document
Tab orders can be set in the Pages panel in Viewer mode and the Fields panel in Form Editing Mode.
You can reorder fields in the Fields panel by dragging them up or down.