
Calculating field values is a common function for many types of forms. You may have product sales forms that need calculations for sums, sales tax, shipping charges, and so on, or you might want to calculate employee time on HR forms or average responses on customer satisfaction surveys. Other than simple office forms, calculating values is commonplace with many PDF and LiveCycle Designer forms.
Acrobat provides several methods for performing calculations. You can use some preset built-in formulas, use a simple scripting language known as Simplified Field Notation, or use a more robust scripting language like Acrobat JavaScript.
In this chapter, we begin with simplicity covering preset formulas built into Acrobat and explore scripting formulas using Simplified Field Notation. To create some basic field calculations, you can follow steps in this chapter. However, when you need more sophisticated formulas, you'll need to look ahead at Part V where we cover JavaScript.
As a forms-authoring application, Acrobat is the ideal program that permits you to create very impressive and utilitarian forms. Tools and features enable you to create just about any kind of form you need for whatever purpose you desire. Adobe has worked hard on making Acrobat a simple but very powerful forms-authoring program for several years, and each year new features are added to the program to support PDF forms authors.
Unfortunately, Acrobat is not without fault. Forms features were added in Acrobat 3 and, as of this writing, have been upgraded six times. Yet, in seven generations of Acrobat, we haven't seen any development in Acrobat's preset formulas that permits you to easily subtract values or produce dividends. The basic preset formulas remain the same in Acrobat 9 as we had available in Acrobat 3 with virtually no changes.
Unless all your calculations are performed for sums and products, you'll need to use a scripting language when you want to perform other simple math operations.
If you have no experience with writing scripts, be assured that using scripting languages can be very easy when performing simple calculations. Inasmuch as Adobe hasn't provided us with more preset formulas, some easy methods are at hand to assist you in adding scripts to perform those math functions not available via the preset calculations.
Before we address any method for adding calculations to fields, it is critically important for you to format fields properly before adding preset math functions or writing scripts. In Acrobat, we use the Text Field tool in Form Editing Mode to add text fields to forms. The Text Field object is used to hold both numeric and alpha characters. Unlike LiveCycle Designer, where you have a number of different field objects to hold data (either numeric or alpha), Acrobat requires you to format fields for numbers in the same field object as when using text if calculating data.
This means, of course, that if you use Acrobat's auto field detection, you need to open the Text Field Properties window and format text fields in the Format tab. If you intend to add a number of data fields that are designed to hold numeric data, you can format one text field and from a context menu choose Use Current Properties as New Defaults. All subsequent text fields added with the Text Field tool hold the same properties as your new assigned defaults.
Note
For more information on setting new defaults for field properties, see Chapters 5 and 7.
To format a field for number values, open a Text Field Properties window and click the Format tab. As shown in Figure 15.1, you have several choices for formatting text fields, including these:

Select format category: From the drop-down menu choose from these options:
None: The default for text fields is None, which means no special formatting is applied to the field properties. By default, if you add a number to a field formatted as None, the field contains zero decimal places. Additionally, you cannot perform calculations on fields when the format is set to None.
Number: Choose Number as shown in Figure 15.1, and you have several choices for formatting numbers, such as number of decimal places, separator styles (including format styles used by many countries outside the U.S.), currency symbols for a variety of different countries, and choices for displaying negative numbers using parentheses and/or red text.
Date: Choose Date, and several different date formats appear in a scrollable list. You also can add custom dates by typing a date format in the text box below the scrollable list.
Time: Several preset time options exist in a list for displaying hours, minutes, seconds, or choose Custom for typing a custom format in the text box below the list.
Special: Several special formats appear in a list when you select Special from the drop-down menu. Zip codes, phone numbers, U.S. social security numbers, and an Arbitrary Mask option are listed.
Note
For more on creating arbitrary masks, see Chapter 7.
Custom: When you choose Custom from the menu, two text boxes appear. Adjacent to each box is an Edit button. Click Edit, and the JavaScript Editor opens where you type JavaScript code for creating Custom Format Scripts or Custom Keystroke Scripts. JavaScripts afford you an infinite number of formatting options. You might want to eliminate default zeros from fields by using a Custom Format Script, or you might want to auto tab the cursor to subsequent fields after a form recipient types data in a field. To create the auto tab action, you would use a Custom Keystroke Script.
Note
For more on creating Custom Format and Custom Keystroke Scripts, see Chapter 18.
Choosing options: When you make a choice for a format type from the Select format category drop-down menu, the items below the menu change to reflect choices for the respective menu option. In Figure 15.1, you see the options for Number. When creating calculations, most often you'll use Number for the format. Other options such as percentage, date, and time are used with calculations, but Number is typically the most frequent choice you'll make for the format type.
Realize that when you create fields by duplicating them on a page, the format characteristics follow the new field addition. If, for example, you press Ctrl/Option and click+drag a field to copy it, formatting for the field is preserved. Be certain to exercise care in duplicating fields. If you copy a date field to an area where you expect the form recipient to type text for a name, the formatting must be changed for the duplicated field.
Almost all calculations are made in the Calculations tab in either a Text Field Properties window or a Combo Box Properties window. Only these two field types support the Calculate tab.
Open a Text Field Properties (or Combo Box Properties) window, and click the Calculate tab. In this tab you find all the calculation options available in Acrobat. The options, as shown in Figure 15.2, include the following:

Value is the: Click this radio button, and the drop-down menu becomes active. The drop-down menu contains all the preset calculations provided by Acrobat, including:
sum (+): Choose this menu command when you want to sum two or more values.
product (x): Choose this item when you want to calculate the product of two or more values.
average: Choose this item to average two or more values.
minimum: Choose this option to return the minimum of two or more values.
maximum: Choose this option to return the maximum of two or more values.
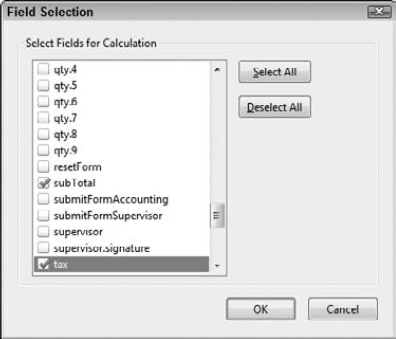
Pick: After making a choice from the Value in the drop-down menu, click the Pick button, and the Field Selection dialog box opens, as shown in Figure 15.3. You must choose fields from this dialog box for the fields to be considered in a calculation. Acrobat 6 and above makes no provision for typing names of fields in the text box below the Value drop-down menu. After you check the boxes for the fields you want to use in the calculation, Acrobat adds the names of the fields to the text box.
Simplified Field Notation: As mentioned earlier in this chapter, two scripting languages are available for performing custom calculations. The first listed in the Calculations tab is Simplified Field Notation (SFN). To create an SFN script, click the radio button and then click the Edit button. The JavaScript Editor window opens where you type a script.
Custom calculation script: Click the radio button and then click the Edit button, and the same JavaScript Editor window opens. You type JavaScript code in the editor to create custom calculation JavaScripts.
Up to this point, we've provided the background for the preliminaries you need to consider when creating calculations on a PDF form. It's now time to take a look at the preset formulas and see how they are used on a form. The first item we deal with is averaging data.
You might use the average preset to average responses on a survey. Something like a consumer satisfaction survey is an ideal candidate for using the average preset. To understand how averaging data is handled in Acrobat, follow these steps.
Note
For these steps, we used the customerSatisfactionSimplePopulated.pdf form on the book's CD-ROM in the Chapter15 folder.
STEPS: Averaging Data Fields
Open a file that contains fields needing averaging. In our example, we used the customerSatisfactionSimplePopulated.pdf found on the book's CD-ROM. Note that this form is fully populated with form fields, as shown in Figure 15.4.
The objective for calculations on this form is to average data in the first column with the result placed in the Broker score text field and averaging data in the second column with the result placed in the Company score text field.
Open the first result field Properties window. In our example, we wanted to format the Broker score text field for a number. To edit the format, open the Text Field Properties window by clicking the Select Object tool, and double-clicking the text field; alternately, you can select the field and from a context menu choose Properties.
Note
You can work in Form Editing Mode or Viewer mode to edit field properties. Typically, after fields have been added to a form, you may find it easier to work in Viewer mode.
Format the field. Click the Format tab, and choose Number from the Select format category drop-down menu (refer to Figure 15.1). The default for decimal places is 2. Leave the setting at the default.
Open the Calculate tab. Click Calculate to open the Calculate tab.
Choose average for the preset formula. Click the Value is the radio button, and choose average from the drop-down menu.
Pick the fields to average. Our first calculation is performed using the fields in the first column on the example form. Be sure to select the exact fields you want to use in the calculation. If you view the form in a Fit Page zoom level, you can't see the field names. You have two choices to see what field names appear in the first column of fields. Either zoom in on the form until the fields display the field names, or place the cursor over a field name to display a tooltip. The names contained in the tooltips on this form are the same as the field names.
For the first column of fields on the example form, the fields to be used in the calculation are Score and Score_2 through Score_10.
Click the Pick button to open the Field Selection dialog box, and check the corresponding fields from the scrollable list, as shown in Figure 15.5.
Click OK in the Field Selection dialog box.
Repeat these steps to calculate the second column of fields. Open the Company score Text Field Properties window, and format the field. Open the Calculate tab, and choose average from the Value drop-down menu. Click Pick, and check fields Score_11 through Score_20.
Save the file.
Test the form. Type values for all the Score text boxes. You'll see the value change as each field is populated with data.


Tip
If a form recipient skips a field when answering questions, the data are skewed. Acrobat doesn't take into consideration fields with no responses when averaging data. To be sure a form recipient adds data to each field, select the Required check box in the General Properties tab. Alternately, you can check Required if you manually create fields in Form Editing Mode.
When designing forms, you'll want to take into consideration the amount of time you have for completing and distributing a form and the complexity you want in your form design. You might make forms more attractive, but you may need to spend more time during the form creation process.
If you look back at Figure 15.4 or open the customerSatisfactionSimplePopulated.pdf form from the Chapter15 folder on the book's CD-ROM, you find a simple form edited in Acrobat in a matter of minutes. This form took more time laying out in Adobe InDesign than populating the form in Acrobat. By using Acrobat's auto field detection, we needed to make only a few edits in the result fields and add two buttons to the form.
Using Auto Field Detection with Columns of Data
The customerSatisfactionSimplePopulated.pdf sample form on the book's CD-ROM in the Chapter15 folder was populated with fields using Acrobat's auto field detection. We opened the PDF file in Acrobat, chose Forms
For the example form, auto field detection worked about as well as creating a form manually while editing field names and properties. Notice on this form that we did not format the columns of fields for a number format and we left the default format None as it was created by Acrobat. In this case, formatting the columns of fields was not critical to producing the averages for the result fields.
Occasionally, you can get by using Acrobat's auto field detection when designing forms containing columns and rows. However, in most cases, you'll want to manually create tables as explained in Chapter 8. Things become more complicated when you have an abundant number of fields in columns and rows, and you have to check each individual field name in the Field Selection dialog box. In the sample form, we checked each field we wanted included in the calculation. Checking 10 fields wasn't much of a problem. However, if the number of fields were 50, 100, or more, the task of checking field names and getting it right becomes more complicated.
The alternative is to create hierarchical names such as score.1, score.2, score.3, and so on for the first column and perhaps names like scoreTwo.1, scoreTwo.2, scoreTwo.3, and so on for the second column. When you arrive at the Field Selection dialog box, you need only check score for the first column and scoreTwo for the second column. Acrobat lists all the parent names in the Field Selection dialog box followed by each child name. This alternative not only makes finding the fields in the Field Selection dialog box easier, but it also minimizes your chances for errors.
To create tables in Acrobat, you would create the first row of fields in a table and supply all the formatting options in the Format tab. You then select the fields and from a context menu choose Place Multiple Fields, as explained in Chapter 8. Acrobat automatically adds the hierarchical naming structure when the fields are created.
The tradeoff is that creating fields in Acrobat using auto field detection is faster to add fields on a form, but editing all the individual fields for changing field names and formatting field objects is much longer than manually creating fields. In many cases, you'll find manually creating fields to be a faster solution for populating a form that needs calculations and field formatting.
Compare Figure 15.4 with Figure 15.6. The form in Figure 15.6 has the same questions and solicits the same responses from the form recipient. In Figure 15.6, we still want to use the average preset to average the responses in two groups and place the results in the same two fields at the bottom of the form. But to do so, we have many more calculations to perform.

Figure 15.6. This form uses the average preset but requires more calculations to create the results.
Each check box needs to be assigned a value. The value of the checked box then needs to be calculated as a sum of all fields in a given row and then the average taken from the sums for each row. In Figure 15.4, we were able to produce the correct results by formatting two fields and adding a calculation to two fields. In Figure 15.6, we needed to format 100 fields, and unless we created a complex JavaScript, we needed to add 22 calculations to produce the same results.
The bottom line is this: If the form shown in Figure 15.4 gets the job done, you save lots of editing time and can distribute your form much faster. However, if you need to conform to certain design standards for your company or client, you need to invest some more editing time.
Note
To see how the calculations are added to Figure 15.6, see the section "Summing and averaging data" later in this chapter.
The most frequently used preset calculation formulas are no doubt sum (+) and product (x). Simple math calculations for addition and multiplication are used on forms much more often than any of the other formulas.
We cover creating a product first, and later in the section "Summing data" we talk about summing values. If you look at Figure 15.7, you'll see that we need to first create a product for the amount fields before we can sum the Item Total column.
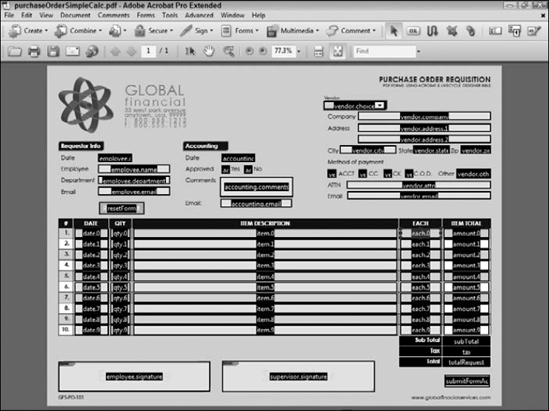
Figure 15.7. On this Purchase Order Requisition form, a product needs to be created for the amount fields before the subTotal field in the Item Total column can be calculated.
Before we look at adding calculation formulas to the form shown in Figure 15.7, let's review the design process. When we opened this form in Form Editing Mode, no fields were auto detected by Acrobat. For this form, it's just as well that Acrobat didn't pick up any fields because most fields on the form need to be added manually, particularly the fields in the table.
We created the table by adding the first row of fields and formatted the number fields with Number values. We then used the Place Multiple Fields command to populate the remaining rows in the table. Unfortunately, the calculation for each amount field in the Item Total column needs to be assigned a calculation formula individually. Acrobat makes no provision for looping through a column to create formulas respective to each field automatically.
In the Item Total column, each amount field needs to calculate the product of the qty * each for the individual rows. The following steps show you how to set up the calculations for the fields in the Item Total column.
Note
To follow these steps, use the purchaseOrderSimpleCalc.pdf file from the Chapter15 folder on the book's CD-ROM.
STEPS: Calculating a Product
Open a form with fields needing calculations for a product. In our example, we used the purchaseOrderSimpleCalc.pdf file from the Chapter15 folder on the book's CD-ROM.
Open the Text Field Properties window. With the Select Object tool, double-click the amount.0 field in the Item Total column in the first row.
Choose the calculation. Click the Calculate tab, and from the Value is the drop-down menu, choose product (x), as shown in Figure 15.8.
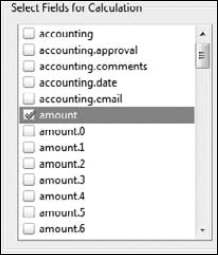
Choose the fields to calculate. Click the Pick button, and the Field Selection dialog box opens. Scroll to the each.0 field, and select the check box. Scroll to the qty.0 field, and select the check box. Click OK to dismiss the Field Selection dialog box.
Repeat the steps for choosing the formula for each row respective to the amount field where the formula is assigned. This part of your work to assign calculation formulas is tedious. You need to be patient and be certain to check the proper fields in the Field Selection dialog box that match the field where the formula is assigned.
Save the form after adding a formula to each amount field.

Tip
Because the fields in the table in this example use hierarchical names, you can easily keep track of what fields need to be checked in the Field Selection dialog box. Move the Text Field Properties window aside so you can see the column where you add formulas to the fields. When you open the Field Selection dialog box, move it out of the way so you can see the column of fields you are editing. When you select a field, the field is highlighted—for example, amount.5. In the Field Selection dialog box, you know what fields need to be checked by observing the highlighted field. In this case, you would check qty.5 and each.5. Because all fields have matching child names, you can easily keep track of the fields that need to be added to a given calculation.
One annoying problem you find when adding calculations is that, by default, you find fields appearing with zeros where data has not yet been added to a result field. After adding calculations to the Purchase Order Requisition form, you find the default zeros appearing in the Item Total column, as shown in Figure 15.9.

The downside for using the preset calculation formulas is that there is no way to eliminate the default zeros from the fields containing calculations. In order to eliminate zeros, you need to use JavaScript.
Note
For sample code used to eliminate zeros for calculated fields, see Chapter 18.
If you followed the steps to produce a product in the "Calculating a product" section of this chapter, you should have a handle on how to sum data. For adding individual fields, you choose the sum (+) menu item in the Value drop-down menu in a field's Calculate tab and click the Pick button to open the Field Selection dialog box. Check all fields you want to include in the sum amount.
Using the purchaseOrderSimpleCalc.pdf form from the Chapter15 folder on the book's CD-ROM, you see that we need to sum a column of data. To sum a column on this form, follow these steps.
Note
We continue using the purchaseOrderSimpleCalc.pdf form from the Chapter15 folder on the book's CD-ROM. If you saved the form from earlier steps in this chapter, use the saved form.
STEPS: Summing Data in Columns
Open a file with a column of data that needs to be added. In our example, we used the form we saved from the steps in "Calculating a product" earlier in this chapter.
Open the Text Field Properties on the field where you want the sum result to appear. In our example, we clicked the Select Object tool and double-clicked the subtotal field.
Choose the formula. Click the Calculate tab, and choose sum (+) from the Value drop-down menu.
Choose the fields to sum. Click Pick to open the Field Selection dialog box. Locate amount, and check the box adjacent to the name, as shown in Figure 15.10. Notice that you find the amount field name followed by child names. In addition, the parent name (amount) appears above the first child. You need only check the parent name, and Acrobat sums all fields having the same parent name.
Click OK, and save the form.
Let's return to Figure 15.6 shown earlier in this chapter. The Customer Satisfaction Survey that contains check boxes for form recipient responses needs both the sum (+) and the average calculations to complete the form.
Locking Calculated Fields
When we formatted the fields in the first row of the table on the purchaseOrderSimpleCalc.pdf form, we opened the General Properties for the amount field. In the General Properties window, we checked Read Only to lock the field and prevent any user entry in this field.

The amount field is where we calculated a product for of the qty and each fields. Because Acrobat populates the amount fields with data derived from calculations, you don't need to keep this field unlocked and available for a form recipient to enter data. As a security measure, you can lock calculated fields so form recipients cannot tamper with the calculated amounts.
We used Acrobat's auto field detection to populate the form, but the check boxes for sections 3 and 4 on the form all need reformatting. The best way to complete the design is to delete all the check boxes in these sections and manually create fields in Form Editing Mode.
To prepare the form for calculating an average value, we need to assign a numeric value to each check box and calculate the form recipient's response in a new field. When all the responses are calculated, we can then average the fields. To see how this form needs to be prepared for calculating an average, follow these steps.
Note
To follow these steps, use the customerSatisfactionFieldsAuto.pdf file in the Chapter15 folder on the book's CD-ROM.
STEPS: Preparing Check Boxes for Averaging Data
Open a form with a table of check box fields to be used for averaging data. In our example, we used the customerSatisfactionFieldsAuto.pdf file in the Chapter15 folder on the book's CD-ROM. This form has check box fields created with Acrobat's auto field detection.
Delete the check box fields. Draw a marquee with the Select Object tool around the check box fields on the form, and press Delete (or Del). Be sure to leave one check box on the form and delete all others in sections 3 and 4. By leaving one check box on the form, you can stay in Viewer mode and don't need to enter Form Editing Mode to populate sections 3 and 4.
Open the Check Box Properties window. Click the Select Object tool, and double-click the one check box field remaining in section 3 on the form.
Rename the field. Click the General tab, and type a new name for the field. In our example, we used broker, as shown in Figure 15.11, because the questions for section 3 relate to satisfaction with a client's broker.
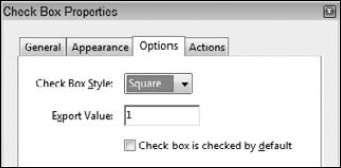
Edit the Export Value. Click the Options tab, and edit the Export Value text box. This first column of check boxes is for responses for a value of 1. Therefore, we typed 1 in the Export Value text box, as shown in Figure 15.12.
Populate the first column with check box fields. To create mutually exclusive fields, we need to use identical field names across each row with each check box having a different Export Value. Unfortunately, to populate a table with multiple columns and rows, we cannot use the Place Multiple Fields menu command when fields have the same name. Therefore, each column must be created individually.
To populate the first column, open a context menu on the check box field you renamed. From the menu items, choose Place Multiple Fields to open the Create Multiple Copies of Fields dialog box. Type 10 in the Copy selected fields down text box and 1 in the Copy selected fields across text box, as shown in Figure 15.13. Click OK, and the fields are created with each field having the same Export Value.
Position the fields. Drag the bottom field to position. Select all fields in the column with the Select Object tool, and open a context menu. Choose Align, Distribute, or Center

Duplicate the first column. Select the first column of fields with the Select Object tool, and press Ctrl/Option and drag to the right to position the duplicated fields in the second column.
Open the Check Box Properties window. With the second column of fields selected, open a context menu and choose Properties.
Change the Export Value. You can change Export Value for multiple fields. Click the Options tab, and edit the Export Value text box. For the second column of fields, type 2 in the text box.
Repeat duplicating fields and changing export values for each column. In Figure 15.14, you can see column 4 duplicated and the Export Value edited.
Repeat these steps to populate section 4.
Save the file. After duplicating columns and changing Export Values, save the form and keep it handy for following additional steps in this chapter.


Continuing with the sample form we used to create check box fields with different Export Values in the section "Designing the form" earlier in this chapter, we now need to calculate values. You could write a complicated JavaScript to loop though fields and increment values when a form recipient clicks each check box, but using the preset formulas keeps it simple.
You can use two approaches to calculate an average. Which method you use depends on the names used for the check box fields—either individual names or hierarchical names. The methods are:
If you use hierarchical names for all the check box fields such as broker.0, broker.1, broker.2, and so on. then you can calculate an average using the parent name broker.
Most often you'll have a column of names like broker1.0, broker1.1, broker1.2, and so on. and the second column will use a different parent name such as broker2.0, broker2.1, broker2.2, and so on. If you use auto field detection then all fields will have unique names.
Using field names like those described in the second bullet point, the first order of business is to create fields that hold values for each row. We can create fields as temporary placeholders and keep the fields out of view for the form recipients. These fields are nothing more than temporary placeholders to be used when averaging the responses.
To calculate rows from check box fields with different Export Values, follow these steps.
Note
We continue using the customerSatisfactionFieldsAuto.pdf file in the Chapter15 folder on the book's CD-ROM. You should have a file saved after following steps to populate the form with check box fields.
Duplicating Tables
In Figure 15.14, four columns are created on the form. After adding the final column, you end up with a table. On the example form, two tables need to be added that are virtually identical. The only difference between the tables is that the parent names for the tables need to be different. You can easily duplicate tables on a form by editing the parent name. However, editing the parent name on a duplicated table isn't something you can do without a little workaround.
The easiest way to duplicate a table is to open Form Editing Mode and edit the parent name of a column of fields. Type something like xxx for the parent name. Copy the fields to the clipboard, and then press Ctrl/
Note
On our sample form, auto field detection was used to populate the form. Ideally, it would be best to delete all the check box fields and use the Place Multiple Fields command to create a hierarchy of field names. However, we'll proceed with the steps to demonstrate how to calculate an average using the existing field names. There are many different names that were created with auto field detection so you need to be certain to double-check the field names as you create calculations for each row.
STEPS: Calculating Sums for Check Box Fields
Open a form containing check box fields. We continue using the form saved after following steps in "Preparing Check Boxes for Averaging Data" earlier in this chapter.
Add a text field. Choose Forms
Format the field. Click Show All Properties to open the Text Field Properties window. Click Format, and choose Number from the Select format category drop-down menu. Choose 0 (zero) for the number of decimal places.
Check the export values for all check box fields. Auto field detection didn't assign proper export values to the fields. You need to manually add the correct export values. For the first column in both tables you need to set the export value to 1. Set the second column to 2, and so on.
Add a calculation. Click Calculate, and choose sum(+) from the Value drop-down menu. Click Pick, and choose the first row field names. In our example, the first row field names are: 1_2, 2_2, 3, 4, and 5. Unfortunately, we need to pick each field individually because auto field detection created all the fields with unique field names.
Each check box has a default value of zero when the box is unchecked. Therefore, if we click the check box with the Export Value of 3, then the sum of the row is 3. Because only one check box can be checked in a row, the placeholder text field you add to the row contains only the value of the Export Value respective to the box checked.
Duplicate the placeholder text field. Open a context menu on the text field, and choose Place Multiple Fields. Copy ten fields in a single row, and distribute the fields to align them adjacent to each row in section 3.
Edit the calculations. The first calculation is duplicated for all fields. You need to change the calculation for each row after the first row. Open each row's text field, and change the sum to the fields respective for each row. The last row calculates the sum for brokerSum.9, as shown in Figure 15.15.
Save the file. Before you hide the fields, it's a good idea to test your form. We'll continue with further steps on this sample form, and as the final step, we hide the fields.
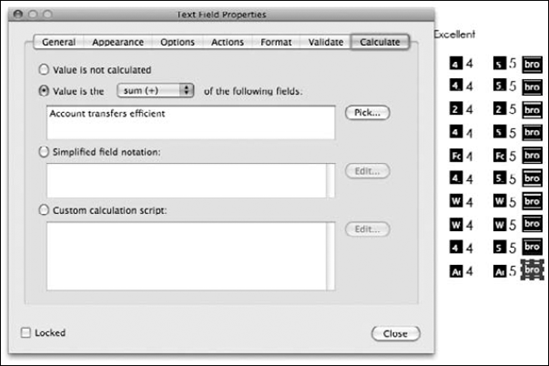
Note
In Figure 15.15 you see the field name for the last row in the first table was named Account transfer efficient by Acrobat when auto field detection was employed. This row did not have individual names for the fields in each column; therefore the sum of the fields is simply set to the sum of the field name used for all fields in this row.
Following the example from the steps in "Calculating Sums for Check Box Fields" earlier in this chapter, we now have a form that provides a value for each row based on a form recipient's responses. The last step to complete the form is to average the data from the placeholder fields. To perform the final steps, follow these steps.
STEPS: Averaging Data from Placeholder Fields
To follow these steps, we continue with the form saved from the steps "Calculating Sums for Check Box Fields."
Open the Broker score Text Field Properties window by double-clicking the field at the bottom of the form.
Add an average calculation. Click the Calculate tab, and choose average from the Value drop-down menu.
Pick the fields to calculate. Click Pick to open the Field Selection dialog box. The placeholder fields we created use the parent name brokerSum. Scroll the list of fields, and click the check box adjacent to brokerSum. Be certain to click the parent name check box and not one of the fields with a child name. Click OK, and click Close in the Text Field Properties window.
Repeat these steps to create calculations for the table in section 4.
Test the form. While the placeholder fields are in view, check the boxes in the first table. The placeholder fields should calculate the values, and the broker score should reflect the average of the placeholder fields, as shown in Figure 15.16.
Test the second table by clicking check boxes and observing the average calculation. Be certain all calculations are correctly producing the results.
Reset the form. A Reset Form button appears on our sample form. Click the button to reset the form.
Hide the placeholder fields. Select the placeholder fields in section 3, and open a context menu. From the menu options, choose Properties. Click the General tab, and choose Hidden from the Form Field drop-down menu, as shown in Figure 15.17. Note that when you select multiple fields, you can hide all selected fields in the same Properties window.
Repeat the same steps to hide the section 4 placeholder fields.
Save the form. The final form contains the hidden fields, as shown in Figure 15.18. Inasmuch as the fields are hidden, they still hold values when the form recipient selects the check box fields in the tables.


Figure 15.17. Select multiple fields, and open the General Properties. Choose Hidden from the Form Field drop-down menu.

The steps illustrate how difficult it is to keep the field names unedited when auto field detection is used. If you use the same parent name for all fields such as broker.rowOne (+child values) for the first row, broker.rowTwo (+child values) for the second row, and so on, there is no need to create temporary fields to calculate an average. You simply use the root name broker to calculate the average. We went through the elaborate sets of steps here to demonstrate the process if you don't create tables manually on your forms.
These steps show you how you can use placeholder fields when you need to calculate fields with complex calculations. Until you get up to speed with JavaScript, you can break down complex calculations by using placeholder fields that remain hidden from view when a form recipient completes a form.
The creation of temporary fields, however, has much value in many instances. For example, you might have a form that calculates a total and a sales tax in one field. If you're not familiar with JavaScript, you can create a placeholder field that sums data in a column. You can then use preset formulas or Simplified Field Notation to calculate a sales tax in another placeholder field using results from the column sum field. The final result field can be the sum of the two placeholder fields. In this regard, a form recipient has no idea that multiple fields are used to perform the calculations, and because the fields are hidden, no clutter appears on the form.
In many cases, the order in which calculations are established in Acrobat won't have an effect for properly obtaining calculation results. However, sometimes one calculation depends on the result of another calculation that won't yield the correct result if it's out of sequential order. It is rare that calculation orders can affect obtaining correct results, but it does happen. As a matter of practice, you should review the calculation order for each form you create where calculations are present. A quick review can help you prevent potential errors when calculating fields.
To manually adjust calculation orders, you need to be in Form Editing Mode. In Viewer mode, you don't have access to a command that can open the Calculated Fields dialog box where calculation orders are organized.
Choose Forms
In Figure 15.19, notice that the amount.9 field appears after the subTotal field. The subTotal field is a sum of the amount fields. Therefore, the calculation order is a little scrambled. To reorder fields in the Calculated Fields dialog box, click the field to be reordered and click the Up or Down button. In Figure 15.19, we want to move the amount.9 field up so it appears before the subTotal field.
After you reorder fields, click OK and the new order is established.
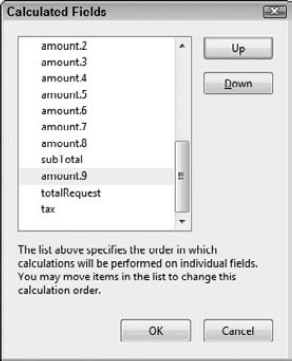
Figure 15.19. Choose Forms
Tip
You can use the Calculated Fields dialog box as a diagnostic tool. If at first glance you see fields where you expect calculation results appearing empty, you can open the Calculated Fields dialog box to be certain all the fields you expect to have formulas are listed in the dialog box. You won't see any errors in calculations, but the dialog box lists only fields that have been assigned a calculation formula.
If you haven't written a single line of code in an Acrobat PDF form, then using Simplified Field Notation is a good place to start. It's much less complex than JavaScript, and if you have any experience adding calculations to spreadsheet cells, then you're already familiar with the basic structure of this scripting language. It uses a syntax very similar to spreadsheet formulas.
If you want to stay completely away from scripting, then you need to stay away from forms where simple math functions such as subtraction and division are used. You have no alternatives other than scripting either by using SFN or JavaScript to create these calculations.
Anyone who can create a form using tools in Acrobat can learn some simple scripting. You can copy and paste fields containing scripts and modify some code sections to fit your form. You can view text written on a page and copy the text in a script editor. You may not understand the fundamentals behind the code when you start writing some scripts, but you can add scripts that work when your form needs them.
As you peruse the remaining pages in this chapter and delve into the chapters ahead where we talk about JavaScript, realize that you can write some scripts. As you begin, you start with the very simple scripts using SFN, and the more you explore, study, and copy and paste scripts, the more you'll learn.
Before we type a script using SFN, you need to be aware of one simple issue related to field naming conventions. In several chapters, we've repeated many times the fact that you'll want to use hierarchical names when creating forms. This is true especially for those forms that contain calculations and JavaScripts.
The exception to the rule is when you intend to add an SFN script to your form. You cannot use hierarchical names with SFN. Fields like amount.0, item.1, total.5, and so on cannot be used with SFN. You must avoid using these names and use something like item, amount, subtotal, My first field, and the like. In short, forget the periods in field names when you intend to use SFN.
You add scripts for calculations using SFN in the Calculate tab in Text Box Field or Combo Box Field properties windows. Figure 15.20 shows a form that uses a placeholder field called sub. This field holds the sum of amounts in a column of fields. The orderTax field is used to calculate a sales tax based on a fixed tax rate.

Figure 15.20. This form has a placeholder field for holding a sum of a column of fields and a field for calculating sales tax.
Using SFN, we would open the Calculate tab on the orderTax field and click the Simplified Field Notation radio button. When we click the Edit button, the JavaScript Editor opens. To calculate the sales tax for the sub field amount with a fixed rate of 7.5 percent, we would type sub * .075. When you click OK and return to the Calculate tab in the Text Field Properties window, the script appears in the Simplified Field Notation text box, as shown in Figure 15.21.

Figure 15.21. After typing an SFN script in the JavaScript Editor, click OK and the script appears in the Calculate tab.
Although you can calculate a product using a preset formula, preset formulas are limited to calculating fields contained on a form. Using the example in Figure 15.21, you would need to create a separate field to hold the tax rate (.075) if you use the product (x) preset formula. Using SFN, you are not confined to using data fields on a form. You can add values in the formulas.
SFN follows basic algebraic notation. For some sample scripts, look over Table 15.l.
Table 15.1. Some Sample Simplified Field Notation Scripts
Field Name | Field Name | Field Name | Operation | SFN Script |
|---|---|---|---|---|
qty | each | Multiply | qty * each | |
amount | discount | Subtract | amount – discount | |
amount | items | Divide | amount / items | |
apples | oranges | mangos | Add | apples + oranges + mangos |
amount | commission | bonus | (A – B) + C | (amount – commission) + bonus |
amount | discount | (A * (A – B)) | (amount * (amount – discount)) |
Calculating time is something you might want for time and billing worksheets, HR forms such as employee timesheets, or other types of forms that need calculations for the amount of time devoted to tasks. In Figure 15.22, you can see a time and charges worksheet for a legal department.
Under the Time heading, you see two fields for a beginning time and an ending time. The Total Time column calculates the amount of time for each row where the In and Out entries are made.

Figure 15.22. A time and charges worksheet that contains calculations for amount of time devoted to tasks
Creating the form shown in Figure 15.22 requires lots of manual editing. We began working on this form in Acrobat by using Acrobat's auto field detection when we chose Forms
The Location and Personnel fields are combo boxes. Therefore, we deleted the default fields and manually added combo boxes in Form Editing Mode. After configuring the first field in the Personnel column, we used Place Multiple Fields to populate the rows in this column. All the options for the first combo box field were duplicated for each field in the column.
The Date, In, Out, and Rate columns each needed number formatting. Unfortunately, Acrobat doesn't allow format multiple fields, so we had to open the field Properties window and individually format each one of these fields.
Acrobat named the fields in the table using unique names such as In1, Out1, Rate1, and so on. No hierarchical names were used, which is fine if you want to use Simplified Field Notation to perform calculations. For the Amount column, we deleted the fields Acrobat created and added our own field, named amount, to the first row. After formatting the field, we chose Place Multiple Fields and created 16 copies of the fields.
There are only 15 rows, but we created an extra row for the Amount column. We then deleted the amount.0 field and moved the remaining fields up. This enabled us to use the same values for the field names that match the fields Acrobat created. For example, in row one, we had field names such as Rate1, In1, Out1, and so on. By deleting the amount.0 field and moving the fields in the Amount column up, we matched the amount.1 field with the same value as the other fields in the row. This made it much easier to keep track of field names we used in the SFN scripts. The Total Charges field at the bottom of the form was easy to calculate when we chose sum (+) for the formula and the amount parent name in the Field Selection dialog box.
Note
As we mentioned earlier, you cannot use a hierarchical name when performing calculations with SFN. You'll also note that we added fields such as amount.1, amount.2, and so on. These fields are the result fields holding SFN calculations. The result fields themselves are not used in SFN calculations. By using a hierarchical order for the result fields, it was easy to create a sum for the total amount simply by adding amount in the Value is the sum (+) text box in the Calculate tab.
The In and Out columns required us to format the fields for Time values. When you open the Format tab, you have several choices for formatting time, as shown in Figure 15.23. We chose the HH:MM format that formats time on a 24-hour clock. This made the calculation in the fields in the Total Time column easy to calculate.
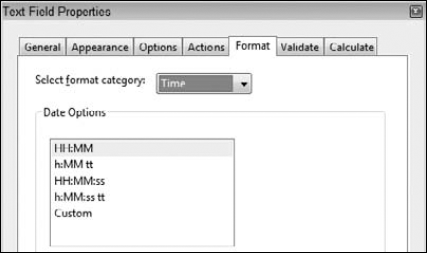
Figure 15.23. Open the Format tab, and choose Time from the Select format category drop-down menu. Choose a time format from the list window.
After formatting all the In and Out fields, we then began to work on the fields in the Total Time column. The formula for calculating the total time based on the values in the In and Out columns was easy enough using Simplified Field Notation. Figure 15.24 shows the formula used to calculate the total time for the fields in the first row.
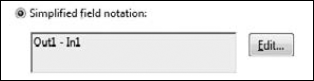
Figure 15.24. The first row formula to calculate the total time is shown in the Simplified Field Notation text box.
Again, we had to add the calculation formula for each field in the Total Time column. For the formatting for these fields, we used a Number format with two decimal places. Be aware that you need the value here set to Number and not a Time format.
The easiest way to perform this repetitive task is to add the SFN formula to the first field. Test the field to make sure it works, and then open the field containing the formula and copy it to the clipboard. As you add formulas to additional fields, press Ctrl/
Note
The calculations on the sample form require you to use Out1 – In1, Out2 – In2, Out3 – In3, and so on. Be certain to place the Out value first in the formula.
The Rate fields are intended for user input, but the Amount fields require calculations. Again, using Simplified Field Notation, you can easily calculate the amount by adding Rate1 * totalTime1 in the JavaScript window for an SFN calculation. Also, after you create the formula for the first row, you can copy and paste and just change the number values when you add the formula to additional fields.
Note
On the book's CD-ROM in the Chapter15 folder, open the globalAttorneyTime.pdf file. This form is fully populated with the fields shown in Figure 15.22. You can practice formatting and adding calculations by deleting the fields and repopulating the form.
When calculating data fields, format text (or combo box) fields as numbers.
Acrobat has a limited number of built-in preset formulas. For some simple math operations and complex formulas, you need to use a scripting language.
Averaging fields and summing two or more fields is available using preset formulas.
When designing forms requiring many calculations, Acrobat's auto field detection has limited value, and you often need to add form fields manually.
Adding a placeholder field and hiding the field can help break down complex calculations and help you simplify writing scripts.
Summing data in columns or rows within tables is made much easier when you name fields with hierarchical names.
Be sure to review the calculation order on forms containing calculations to ensure that all fields are calculated in the proper order.
Simplified Field Notation is a scripting language where formulas are written similar to the way you write spreadsheet formulas.
When using SFN, you cannot use field names with parent/child relationships for all fields that are used as part of a calculation.
Time calculations are helpful when creating forms for time and service charges and human resource forms such as employee timesheets.