
In Chapter 5, we talked about creating simple forms from original authoring application documents converted to PDF. Adobe has invested much development time to help novice users create rich, intelligent fillable forms. Using the Acrobat 9 features for editing a form in Form Editing mode and using auto field detection are two things that help all Acrobat users create forms with a minimal amount of work.
Adobe has received much feedback from users who have a need to convert legacy analog forms to electronic forms. In response to users' requests, Adobe has introduced in Acrobat 9 superb features for scanning paper forms and converting the scanned documents into rich intelligent forms.
With the introduction of ClearScan technology and support for Windows Imaging Architecture scanner drivers, scanning a paper form is as easy as converting original authoring documents to PDF forms. In this chapter, we cover scanning paper forms, using Acrobat's built-in Optical Character Recognition (OCR) features, and converting the scanned documents to fillable forms.
Acrobat Scan is a feature available in all commercial Acrobat viewers. While in Acrobat, you can trigger your scanner to perform a scan, and the scanned document opens in the Acrobat Document pane. In essence, the scanned image file is immediately converted to PDF when the scan is completed.
Configuring a scanner requires you to know some things about the scanner drivers supported by Acrobat and the tools you use to perform the scan.
Before you can scan a page in Acrobat, you need to configure your scanner and be certain it functions properly. After you complete your installation of Acrobat, it should recognize your scanner immediately. If all the scanner hardware is in place and operational and Acrobat still does not recognize your scanner, the next step is to be certain the scanner's software is recognized by Acrobat. If Acrobat doesn't see your scanner, you may need to relocate software to another location on your hard drive or acquire a software update from your scanner developer.
You can access your scanner in Acrobat through three methods: TWAIN drivers, Acquire plug-ins, or WIA-compliant drivers.
TWAIN (Technology With An Important Name) software is developer-supplied and should be available on the CD-ROM you receive with your scanner. In Windows, the TWAIN files are stored in the Windows wain_32 folder. When you install scanner software, the TWAIN driver should find the proper folder through the installer routine. On a Macintosh, you'll find TWAIN resources in the SystemLibraryImage CaptureTWAIN Data Sources folder.
Many scanner developers produce the equipment but use third-party developers to write the software. Adobe has certainly not tested the Scan plug-in with all scanner developers and all software developers, but many of the popular brands have been thoroughly tested to work seamlessly with Acrobat. Theoretically, the TWAIN software should work for scanners using TWAIN resources. If you have problems accessing your scanner from within Acrobat, but can perform scans in other applications, then you most likely have a problem with the TWAIN driver. If this is the case, contact your scanner manufacturer and see whether it has an upgrade or whether you can get some technical support. In many cases, you can download upgrades for registered software on the Internet.
When you scan a paper form using a TWAIN driver, your scanner's interface is used to perform the scan. In your scanner's interface, you make choices for paper size and resolution, create previews, and so on. You also use the Scan button or menu command in your scanner's interface to initiate the scan. As the progress of a scan is reported in your scanner's interface, you watch the scan process until the scan is completed. After a scan is completed, the resultant document opens in Acrobat and your scanner's interface is no longer used.
Acrobat 9.0 supports Acquire plug-ins used with Adobe Photoshop. More prevalent than TWAIN drivers, Photoshop plug-ins are available from almost every scanner developer. If you use Adobe Photoshop or Adobe Photoshop Elements, you may need to copy your Photoshop Acquire plug-in to your Acrobat plug-ins folder. On Windows, copy the Photoshop Acquire plug-in, open the Acrobatplug_insPaperCapture folder, and paste your Acquire plug-in.
Mac OS X requires you to expand the Acrobat 9.0 Professional package in order to paste your Photoshop Acquire plug-in. To do so, follow these steps.
STEPS: Setting Up the Photoshop Plug-in in Mac OS X
Open your Applications/Adobe Acrobat 9.0 Pro folder and select (not double-click) Adobe Acrobat 9.0 Pro.
Ctrl-click to open a context menu, and select Show Package Contents. The Contents folder appears in the Adobe Acrobat 9.0 Pro folder.
Double-click the Contents folder, and double-click the Plug-ins folder that comes into view.
Double-click the PaperCapture.acroplugin folder, and drag your Photoshop Acquire plug-in into this folder. (Option+click+drag to copy the plug-in to the target folder.) When you close the folders, the package is restored.
If your scanner doesn't support scanning directly via a plug-in in Acrobat, you need to scan a paper form in Photoshop, Photoshop Elements, or your native scanning application supplied by your scanner developer. If you do scan using one of these applications, you need to save your file to disk and then choose File
Note
When saving files from programs like Photoshop and Photoshop Elements, you need to save files using Photoshop PDF, TIFF, JPEG, or PNG in order to open the files in Acrobat. Native file formats such as .PSD are not supported in Acrobat.
TWAIN drivers have been around for a long time, and many developers are still supporting TWAIN drivers, but many newer scanners now support a more recent driver technology called Windows Imaging Architecture (WIA). WIA is a Microsoft-developed technology that provides developers with a relatively easy way to write support for scanners. Developers such as Acer, Compaq, Epson, Fujitsu, HP, Kodak, Microtek, Ricoh, and UMAX have all embraced WIA in many of their newer models.
The good news from Adobe is that if you have a WIA-supported scanner, you can configure your scanner's Scan button with Acrobat. To do so, open the Start Menu and choose Control Panels/Scanners and cameras/<scanner name>. The Scanners and Cameras dialog box opens. Click your scanner name, and click the Properties button to open the scanner properties.
The WIA scanner Properties dialog box opens, as shown in Figure 6.1. Select your scanner's Scan, Copy, Photo, or other button you want to activate. When using scanners with a button to initiate a scan, choose the Scan button. Click the Start the Program radio button, and choose Adobe Acrobat from the options in the pull-down menu. Click OK, and the next time you press your scanner's Scan button, the scan is opened in Adobe Acrobat.

If you have a WIA-compliant scanner, your options for scanning from within Acrobat are much more plentiful than using Acrobat Scan and a TWAIN driver. Acrobat Scan has been greatly simplified in Acrobat 9, and you have far fewer options than when using Scan to PDF on a WIA-compliant scanner.
Presets are settings that you can configure and retain to perform scans with a set of options defined by you or created by Adobe as a series of defaults.
Acrobat 9 provides you with several presets that are used with black and white documents, grayscale documents, color documents, and color images. The settings for scanning each of these types of documents are preset for you. You can use them out of the box, or you can configure each preset for your own personal needs.
Adobe's intent is to help you simplify your scanning and OCR recognition by setting up some general options that apply for scanning a range of original document types. However, you may have some special needs. For example, you may be scanning a different paper size than the default choice for one of the scanning presets, or you may want to scan at a different resolution than the choice in a given preset. If this is the case, you'll want to change a preset to suit your own personal scanning needs.
Look at some of the options available when you first start a scan. Choose Document
To edit a preset, follow these steps.
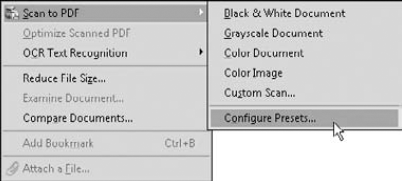
Choose Document
Scan to PDF Configure Presets. The Configure Presets dialog box opens, as shown in Figure 6.3.
Choose your scanner. Open the Scanner pull-down menu, and choose the scanner you want to use. If you have multiple scanners, all scanners configured properly appear in the menu.
Choose the preset you want to edit. From the Presets pull-down menu, choose the preset you want to edit, as shown in Figure 6.3.
Change the attributes. From the options shown in the Configure Presets dialog box, use the menus and text boxes to make the changes you want for the preset. In our example, we edited Resolution and changed our scanner's default A4 paper size to US Letter.
Save the settings. Click the Save button, and your new settings are applied to the preset. The next time you want to scan a document with the new preset, choose Document

Tip
When setting up the paper size, notice that you have an option for Custom from the Paper Size pull-down menu. Click Custom, and edit the Width and Height text boxes to scan custom size pages.
If you change a preset but find that the settings have all been configured improperly and you want to start over, simply open the Configure Presets dialog box and choose your edited preset. Click the Defaults button, and the options change back to the originally installed preset choices.
For an occasional scan where options don't exist in one of your presets, you may want to use the Document
When you perform a scan using the Custom Scan dialog box, you need to address the choices in the dialog box before clicking the Scan button. Your first choice is selecting your scanner from the Scanner pull-down menu. Next, choose the number of sides, the color mode, resolution, and paper size. Other choices for quality and activating the OCR engine also are choices you'll make for custom scans.
When you use the Custom Scan dialog box, your options choices become new defaults. Therefore, you can perform several scans using the same settings in a given editing session.

Note
For more information on using the OCR engine, see the section "Recognizing Text Using OCR" later in this chapter.
In both the Configure Preset dialog box and the Custom Scan dialog box, you find an Options button adjacent to the Scanner pull-down menu. Click this button, and the Scanner Options dialog box opens, as shown in Figure 6.5, where you can make some choices for the transfer method and user interface.
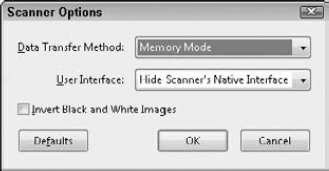
Figure 6.5. Click the Options button adjacent to the Scanner pull-down menu to open the Scanner Options dialog box.
For the Transfer Method, you can choose Native Mode or Memory Mode from the pull-down menu. Both modes prompt you to save your file in a Save dialog box. For faster scanning of multiple pages, choose the Memory Mode option.
For User Interface, choose between options in Acrobat for your scanner's interface. To use the options in the presets and the Custom Scan dialog box, you'll want to choose Hide Scanner's Native Interface. If the pull-down menu is grayed out, you are forced to use your scanner's interface.
Note
Using the scanner's interface provides the same options you find when scanning a paper form using a TWAIN driver.
The Invert Black and White Images check box is used for scanning white text on a black background. This option is a likely candidate for using the Custom Scan menu choice if you have an occasional piece of artwork designed with white text on a black background. You wouldn't want to change a preset if this type of artwork is used infrequently when scanning.
All paper forms you scan should be converted from the image file to recognizable text. You could keep a scan as an image file, but doing so defeats the purpose of using Acrobat's auto field detection command. Working with an image file would require you to manually create form fields.
After a file is converted from an image file to recognizable text, auto field detection automatically populates form fields when you enter Form Editing mode (discussed in Chapter 5) when converting to PDF native documents designed as forms.
Although in this chapter, we explain scanning, using OCR, and opening files in Form Editing mode, Acrobat can perform all these steps automatically when you scan a paper form.
Note
For more information on using the one-step operation for scanning a paper form, converting text using OCR, and adding form fields with auto field detection, see "Converting Paper Forms to PDF Forms" later in this chapter.
You can use Acrobat's OCR engine in a few ways. If you have image files scanned in another program, such as Photoshop or Photoshop Elements, and convert the image files to PDF, you might want to use the Document
The other way you can use the OCR engine is to activate it at the time you perform the scan. When you open either the Configure Presets dialog box (refer to Figure 6.3) or the Custom Scan dialog box (refer to Figure 6.4), you find a check box for Make Searchable (Run OCR). When the box is checked, the paper form is scanned and the text is recognized using OCR.
In both the Configure Presets and Custom Scan dialog boxes, you find an Options button. Click Options, and the Recognize Text – Settings dialog box opens, as shown in Figure 6.6. You have three choices for PDF Output style, which determines how the text recognition is performed:

Figure 6.6. Click Options in either the Configure Presets dialog box or the Custom Scan dialog box, and the Recognize Text – Settings dialog box opens.
Primary OCR Language: By default, Acrobat installs 42 language dictionaries available for OCR. If you scan documents from any of the supported languages, select the appropriate language in the pull-down menu in the Recognize Text – Settings dialog box.
PDF Output Style: From the pull-down menu shown in Figure 6.6, your options are as follows:
ClearScan: In earlier versions of Acrobat, this item was called Formatted Text and Graphics. When using the legacy format or the ClearScan technology introduced in Acrobat 9, the bitmapped image is discarded and replaced with searchable text and graphics. If there is an instance where the OCR engine does not have confidence, the original bitmap is left in place and the best guess is placed behind, mimicking the "Searchable Image" style.
Formatted Text and Graphics had some problems related to color images in Acrobat 8 and earlier viewers. The newer ClearScan technology does a much better job of converting scanned images to text. In addition, pseudo fonts are created when you use ClearScan and the scan file sizes are significantly reduced.
Searchable Image: Text is placed behind the original image, preserving the integrity of the original documents. The image scan is compressed to reduce file size. Some of the quality of the original scan is lost. However, when scanning forms, this option is your best choice because auto field detection works well on Searchable Image PDF outputs.
Searchable Image (Exact): This option keeps the image scan in the foreground with text placed in the background. The appearance of the scanned image does not change. Text is added on a hidden layer that gives you the capability of creating indexes and performing searches. Use this option when you don't want to change a document's appearance, but you do want to be able to search the text of that document. Something on the order of a legal document or a certificate might be an example of such a document.
Note
See the "PDF Image versus ClearScan" sidebar in this chapter for more detail on the differences among the PDF Output Styles.
Downsample Images: This option enables you to downsample images or keep them at the original scanned resolution. If None is selected, no downsampling is applied to images. The remaining options offer downsampling values at 600 dots per inch (dpi), 300 dpi, 150 dpi, and 72 dpi.
After you make choices in the Recognize Text – Settings dialog box and click OK, you return to the dialog box where you selected the Options button. When you click Scan or choose Document
Note
The options for choosing PDF output style also are available to Macintosh users. For more information recognizing text using OCR on the Macintosh, see "Converting image files to text (on a Macintosh)" later in this chapter.
PDF Image versus ClearScan
When you search OCR pages with either Searchable Image (Exact) or Searchable Image, the pages are image files with searchable text. The original file is an image file produced from your scan designed to be viewed as an original, unaltered document. This option enables you to electronically archive documents for legal purposes or when unaltered originals need to be preserved.
When you convert a document with Recognize Text Using OCR, the OCR conversion places text behind the scan. The intent is for you to be able to archive files and search them either by using the Search panel to search files on your hard disk or by searching an index where these documents have been cataloged.
The text behind PDF Image is not editable with Acrobat. If Recognize Text Using OCR misinterprets a word, you cannot make corrections to the text. The text is selectable, and you can copy the text and paste it into a word processor or text editor. If you want to examine the OCR suspects, paste the text into a word processor and review the document.
If you want to scan a form and redesign it in an original authoring program, you can copy text from a PDF Image format using the Select tool. Click the cursor anywhere in the text, and choose Edit
ClearScan files (previously referred to as Formatted Text & Graphics in Acrobat 6 through 8) are scanned documents converted to text. When you select ClearScan in the Recognize Text – Settings dialog box, the file conversion is made to a PDF with formatted text and graphics. Recognize Text reads the bitmap configuration of words and converts them to text. This text can be edited and altered on a page. When you make text corrections, you see the changes reflected on the document page.
When scanning paper forms, use the Searchable Image PDF Output Style. Using the other options may not work with auto field detection. If you want to redesign a form in an authoring program, use ClearScan for your PDF Output Style.
You may have a number of scanned forms saved as image files that you want to convert using OCR. You can convert forms using OCR and open the forms in Form Editing mode to populate the documents with field objects.
Tip
In some workflows, it may be more efficient to set up scanners to produce image scans on some computers and use Acrobat's OCR to convert to text and edit forms on other computers. If you have a great number of paper forms to convert to PDF, creating such a workflow might be more efficient.
Assuming you have a scanned form saved as an image file and you want to convert the image file to recognizable text, follow these steps.
STEPS: Converting Image Files to Searchable Text
Open a scanned form in Acrobat. Use the Create
Recognize text. Select Document
Set the PDF Output Style. Click the Edit button in the Recognize Text dialog box to open the Recognize Text – Settings dialog box (refer to Figure 6.6). From the PDF Output Style pull-down menu, select Searchable Image. If you don't make this selection, auto field detection may not work and may result in no form fields being detected. Click OK, and you return to the Recognize Text dialog box.
Run the OCR engine. Click OK, and Acrobat starts the OCR engine to convert the image file to recognizable text.
Save the PDF. Select File

Some of the features related to setting up scanning presets are not available to Macintosh users. In addition, you don't have WIA support on the Macintosh. All your scanning occurs using a TWAIN driver and making choices for scan attributes in your scanner's software. To create a scan in Acrobat on the Macintosh and recognize text, follow these steps.
STEPS: Scanning a Text Document on a Mac
Place a document on the scanner platen. Be certain your scanner is configured and operational.
Select Document
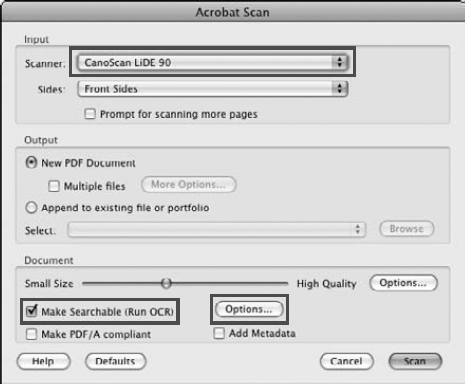
Scan to PDF. The Acrobat Scan dialog box opens, as shown in Figure 6.8.Choose your scanner. Open the Scanner pull-down menu, and choose your scanner.
Set the OCR Settings. Be certain the Make Searchable (Run OCR) box is checked, and click the Options button adjacent to the text to open the Recognize Text – Settings dialog box.
Choose Searchable Image. Open the PDF Output Style, and choose Searchable Image from the menu items, as shown in Figure 6.9. Click OK to return to the Acrobat Scan dialog box.
Set attributes in your scanner application. Click Scan, and your scanner application interface opens. Make choices for resolution and paper size, and preview the scan. Click Scan to start the scan.
Make text corrections on the document. If you find any errors, type corrections in the Find Element dialog box. Click Accept and Find to find additional suspects.
Save the file. Select File

If you set up a workflow where you perform scans on multiple scanners and save files as PDFs or an image format compatible with the Create PDF From File command, you can recognize text in multiple files.
Tip
Acrobat 9 introduced a new submenu command in the Document
To recognize text in multiple files, follow these steps.
STEPS: Performing OCR on Multiple Files
Choose Document
OCR Text RecognitionRecognize Text in Multiple Files Using OCR. The Paper Capture Multiple Files dialog box opens.Add files. Open the Add Files pull-down menu, and choose from three menu commands. Add Files enables you to add individual files. Add Folders enables you to add a folder of scans. Add Open Files enables you to add all files open in the Document pane. You can combine choices in the Paper Capture Multiple Files dialog box. For example, you can add individual files, add a folder, and add some files open in Acrobat and list them in the Paper Capture Multiple Files dialog box, as shown in Figure 6.10.
Set the Output Options. Click OK in the Paper Capture Multiple Files dialog box, and the Output Options dialog box opens, as shown in Figure 6.11. Click the Browse button to make choices for the folder where you want to save the files, add text to the filename, and select an output format. You also can open the PDF Optimizer and choose optimization settings for the saved files.
Click OK to start the OCR process and save the files.

Note
For more information on using the PDF Optimizer, see Chapter 10.

If you scan paper forms that you want populated with form fields in Acrobat or Adobe LiveCycle Designer and you want to use auto field detection in Acrobat, you need to start with a form that has sufficient resolution for the form fields to be recognized by Acrobat. If the resolution and image contrast aren't sufficient for Acrobat to recognize form fields, Acrobat will create few fields on low-resolution scans, and your results will be disappointing.
Note
For more information on using auto field detection in Acrobat, see Chapter 5. For more information on creating forms in Adobe LiveCycle Designer, see Parts VI through IX.
Developing a workflow for scanning forms using your scanner and Acrobat requires some practice and testing. Scanners vary considerably with quality, options, and resolution choices. The first thing you need to do is run a series of tests to determine what settings are optimal for recognizing fields automatically in Acrobat. Some considerations include:
Resolution: More is generally better when it comes to scanning forms. Most desktop scanners support two resolutions. Optical resolution is the true resolution of your scanner. You may have a 600 ppi (pixels per inch) scanner that supports an optical resolution of 600 ppi. Your scanner also supports an interpolated resolution. For the 600 ppi scanner, the interpolated resolution is likely to be 1200 ppi. A 1200 ppi optical resolution scanner often supports an interpolated resolution of 2400 ppi, and so on.
Interpolated resolution is best suited for line art drawings. Because most office forms are black and white, your scan resolution for forms at the highest interpolated resolution (up to 1200 ppi) of your scanner usually produces the best results when it comes to recognizing form fields. In Figure 6.12, you can see three scans we created using Scan to PDF. The form on the left is a 150 ppi scan, the one in the middle is a 300 ppi scan, and on the right is a 1200 ppi scan. Although auto field detection isn't perfect, you can see that the 1200 ppi scan produced the best results. In the 150 ppi scan, fields were created in areas where we don't want fields and some fields were not detected. In the 300 ppi scan, several fields were missed. In the 1200 ppi scan, Acrobat recognized the fields almost perfectly. Only one extra field was added between the second and third sections.
Color Mode: Black and white art is generally scanned in a line art (bitmap) color mode. However, when it comes to OCR Text Recognition and ultimately using auto field detection, the anti-aliasing of grayscale scans often provides you with better results.
Make Searchable (Run OCR): When you use Scan to PDF for scanning forms on which you want to use the auto field detection command, be certain to check the box for Make Searchable (Run OCR) in the Acrobat Scan dialog box (refer to Figure 6.3). Using auto field detection produces no results if you attempt to run the command on a scan that hasn't been converted with the OCR Engine.
Tip
Note that ClearScan works well for documents you intend to view in Acrobat. However, forms, and especially forms with check boxes and ones on which you've used auto field detection, are best scanned using the Searchable Image PDF Output Style.
Clean Up: Ideally, you're best off using Scan to PDF and you'll achieve optimal results using the controls in your scanner software for brightness, contrast, color mode choices, and scanning resolution. However, if your scanner software doesn't produce good results when recognizing form fields on your scans, you may be able to do a little image editing to adjust brightness and contrast. You'll need a program like Adobe Photoshop or Adobe Photoshop Elements to adjust Levels (in Photoshop and Elements) and Curves (in Photoshop only).
If you do plan to do some image editing to adjust your scans' brightness and contrast, turn off Make Searchable (Run OCR) if using Scan to PDF. After editing a scan in Photoshop or Photoshop Elements, save as a Photoshop PDF file, open in Acrobat, and choose Document

Figure 6.12. Three scans after selecting Forms
Tip
If the quality of your original form is poor and you can't adjust contrast in Photoshop or Elements sufficiently to convert text with the OCR Engine and ultimately recognize fields, you can use Photoshop or Photoshop Elements to improve image brightness. Duplicate the Background layer in the Layers palette in either program. For the layers blending mode, change the default Normal to Multiply. Add more duplicate layers using the Multiply blending mode until you see enough brightness in areas such as text, lines, boxes, and so on. Flatten the layers and make your final adjustments in the Levels dialog box.
Plan to do lots of testing if you need to scan many forms and populate them with form fields in Acrobat or Adobe LiveCycle Designer. Try scanning forms with different resolutions to pinpoint the resolution setting that works best for your forms. After you find the settings that work best, go about scanning the forms you need to prepare in Acrobat.
When scanning forms, you can use a one-button action to perform three steps in your paper form conversion to a PDF fillable form. When you choose Forms
Note
The steps to convert a paper form can be completed in Acrobat Standard, Pro, and Pro Extended.
To convert a paper form to a fillable form, follow these steps.
STEPS: Scanning a Form in Acrobat
Choose Forms
Start Form Wizard. The Create or Edit Form Wizard opens, as shown in Figure 6.13.Choose A paper form. From the radio button choices, click A paper form and click Next.
Choose a preset or custom option (WIA-compliant scanners). When you click Next in the Create or Edit Form Wizard, an Acrobat Scan dialog box opens, as shown in Figure 6.14. If you have a preset already created for scanning forms, click the option (Black and White or Grayscale). If you want to adjust scan options, click Custom. In the Custom Scan dialog box, choose scan options.
If scanning using a TWAIN driver, your scanner software opens where you make your scan adjustments.
Click Scan. If you choose a preset, your scan commences and you don't need this step. If using a TWAIN driver, click the Scan button in the scanner's interface to start the scan.
Edit the form. The scan finishes, and the OCR engine recognizes text. The document is then moved to Form Editing mode where Acrobat automatically starts auto field recognition and populates the form. In many cases, you may need to edit a form such as the form shown in Figure 6.15. In this form, Acrobat missed a few check box fields. The fields are added while you stay in Form Editing mode.
Save the form. Preview the form by clicking the Preview button, and test the fields. When all fields appear on the form, choose File


Figure 6.15. Auto field detection picks up most of the form fields, but the check boxes were missed.
Note
When you open a scan in Form Editing mode, Acrobat prompts you in a dialog box to use auto field detection. Click Yes in the Add or Edit Form Fields dialog box, and Acrobat searches the document for the placement of field objects on the form.
Note
For more information on Form Editing mode and adding fields to forms, see Chapter 5.
In earlier versions of Acrobat and LiveCycle Designer, the duties of scanning a form and Running Form Field Recognition were the responsibility of LiveCycle Designer. In Acrobat 9, Acrobat takes control of the scanning, OCR recognition, and populating a form.
Note
Adobe LiveCycle Designer is available only in Acrobat Pro and Acrobat Pro Extended for Windows.
When you open the Create or Edit Form wizard, the only option that takes you to LiveCycle Designer is No existing form. Click this radio button and then click Next, and the New Form Assistant wizard opens, as shown in Figure 6.16. Notice that this wizard doesn't have a choice for scanning a paper form.
If you want to edit a form in LiveCycle Designer and use a form where you let Acrobat populate the form with fields using auto field detection, you need to scan from within Acrobat following the steps outlined earlier in the section "Converting a paper form to a fillable form." Exit the Form Editing mode after adding all the fields by clicking the Close Form Editing button shown in Figure 6.15. Save the form, and choose Forms
In the Create or Edit Form wizard, choose No existing form and click Next. This choice opens LiveCycle Designer and the New Form Assistant Wizard shown in Figure 6.16. Click Import a PDF Document, and click Next. Add the Submit and Print buttons in the next pane, and click Finish. The form with the fields added in Acrobat opens in LiveCycle Designer. From here, you can use Designer to add additional fields and modify the form.
Note
For more information on using the New Form Assistant in Adobe LiveCycle Designer, see Chapter 22.

If you want to scan a number of forms from paper and convert to either Acrobat PDF forms or Adobe LiveCycle Designer XML forms, you use a Batch Sequence command to convert the text using OCR and using auto field detection in one step.
Two things need to be accomplished for preparing forms for editing in Acrobat or Adobe LiveCycle Designer. You need to Recognize Text Using OCR and Detect Form Fields. Open the Batch Sequences dialog box (Advanced
When you finish creating the sequence, the new sequence appears in the Batch Sequences dialog box, as shown in Figure 6.18. Select the sequence, and click Run Sequence. You can run the sequence on a folder of forms, and the files are converted with the OCR Engine and form fields are added to the documents. You can open the resultant files in either Acrobat or Adobe LiveCycle Designer for editing.
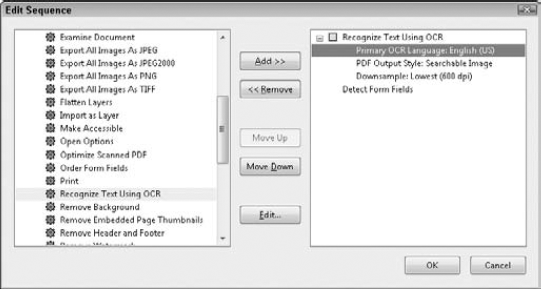
Figure 6.17. Create a batch sequence for Recognize Text Using OCR and Detect Form Fields on files you save in an image format.

Note
You can use Document
Acrobat Scan provides choices for using presets and customizing presets with WIA-compliant scanners on Windows.
TWAIN drivers or Adobe Photoshop Acquire plug-ins are needed when you use the Create PDF From Scanner command on Macintosh and when you use non-compliant WIA scanners.
Acrobat 9 uses a new technology called ClearScan that replaces the Formatted Text & Graphics PDF Output Style used with earlier versions of Acrobat.
Text can be converted and saved as a PDF ClearScan Output Style, where you can edit text and change the appearance of the original scan. Text can be converted with Optical Character Recognition and saved using the Searchable Image option, which preserves the original document appearance and adds a text layer behind the image.
For optimum results with auto field detection, use the Searchable Image Output Style when using Recognize Text Using OCR.
A new feature introduced in Acrobat 9 enables you to perform OCR text recognition on multiple scanned documents saved in any format compatible with the Create PDF From File command.
OCR suspects are marked when the OCR Engine does not find an exact word match in its dictionary. Text editing is performed in the Find Element dialog box.
Scanned paper forms can be populated with form fields when you enter Form Editing mode. Acrobat automatically uses auto field detection to place field objects on a page when you enter Form Editing mode.
You can convert a paper form to a fillable PDF form using a single menu command in Acrobat.
You can set up a batch sequence to Recognize Text Using OCR and Detect Form Fields that can be run on a folder of image files.