
We lightly touched on adding digital signatures to forms in Chapters 5 through 7, and in several other earlier chapters we also mentioned securing files. We combine these two topics in this chapter because signing a form provides a form recipient with one level of security. Anyone signing a form can be assured that additional edits on a form will invalidate a signature.
All users of all Acrobat viewers can create digital signature ID files that are necessary to sign a form, and all Acrobat users are subject to the same limitations for permissions when files have been secured.
You should be aware of the steps needed to create digital IDs so you can create your own digital IDs for signing forms and coach Adobe Reader users when the need arises on how to create and use digital IDs. You also should know the various options you have for securing a document and preventing your forms from being edited by others. Knowing when to secure a form and what permissions you need to lock out of forms is critical. In this chapter, we talk about the issues related to digital signatures and security options that are important for PDF forms authors.
A digital ID can be created in all Acrobat viewers. Adobe Reader and Acrobat users can create and use digital IDs. For Adobe Reader users, forms must be enabled with Reader usage rights before the Reader user can sign a document.
Note
For more information on enabling PDFs with Adobe Reader usage rights, see Chapter 10.
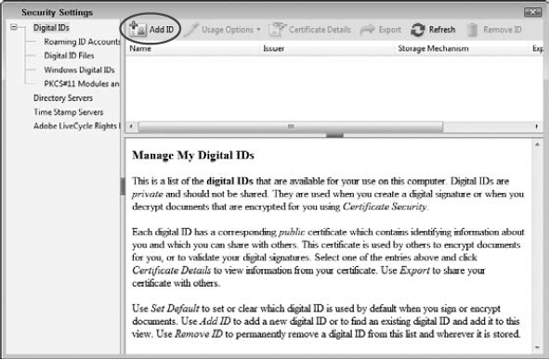
To sign a form, you need a digital ID. Digital IDs are created in an Acrobat viewer and saved as a file. The IDs you create are displayed in the Security Settings dialog box shown in Figure 12.1. As you sign forms, you use your digital ID. Typically you don't need to locate your digital ID file to sign a document, but if your Acrobat viewer looses the file location on your hard drive, you may need to browse your drive to find the file.
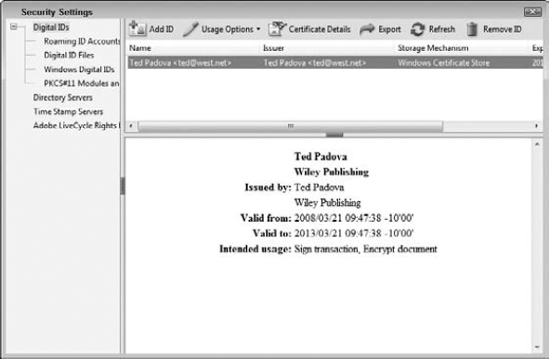
Digital IDs have two important components—your personal or private digital ID and your public certificate. When you create a digital ID with Acrobat, you are creating your private ID and your public certificate. The public certificate is a file you share with other users so they can authenticate your signature.
Digital IDs can be created in all Acrobat viewers. However, more industrial-strength digital IDs can be acquired and used through services provided by third-party vendors. A digital ID you create from within an Acrobat viewer is stored locally on your computer. If you use a third-party product for signature handling, IDs are stored on a vendor's server.
Using Acrobat viewers to create digital IDs or choosing to use a third-party signature handler largely depends on the level of security you need for your company. Individuals, small businesses, and companies not dealing with sensitive information can confidently use an Acrobat viewer to create a digital ID. If you work with government offices and large enterprises dealing with sensitive information, then using a third-party product might be the best choice. Organizations dealing with the most sensitive data such as the U.S. National Security Agency or the Homeland Security Office are likely to develop their own in-house signature handlers running on their secure servers.
For the purposes of the Acrobat Forms section of this book, we don't delve into the world of third-party signature handlers. Rather, we try to focus on what you can do with digital signatures right out of the box when you install Acrobat and for signatures added by Adobe Reader users.
You can research an abundant amount of information related to digital signatures and third-party signature handlers on the Web. Adobe's Web site is full of great information. See http://www.adobe.com/devnet/acrobat/security.html for information related to security and http://www.adobe.com/security/digsig.html for more information on third-party signature handlers.
For some third-party signature handlers, look at some of the products provided by Entrust www.entrust.com/ and VeriSign http://www.verisign.com.
A wet signature on an electronic form might be a scanned image of your analog signature. If you use a wet signature that's not part of a digital ID, the signature carries no validity, verification, security, or authenticity. In this regard, a wet signature might just be an imported graphic, and you cannot add a level of security to graphic imports used as wet signatures.
Wet signatures, however, do have their place. You might be working on internal forms within a company and need to sign a vacation leave request, maternity leave form, memo, or some such document that does not require authentication of your signature and needs no security.
Unfortunately, Acrobat viewers do not have an option for applying wet signatures to documents unless you create an appearance for a digital ID. The downside for using digital IDs, particularly for the Adobe Reader audience, is that creating an ID and using it is complicated. Novice users often find creating IDs and verifying signatures to be a difficult task.
As an alternative to using digital IDs for signing documents where merely a scan of your analog signature is acceptable to a host organization, you can create some workarounds using Acrobat Pro, Pro Extended, or Adobe LiveCycle Designer to prepare files for applying a wet signature.
To use a graphic for a wet signature, you need to scan your signature and save the scan as an image file compatible with conversion to PDF from within Acrobat or save as a PDF file. Adobe Reader users would need a scan saved as a PDF file.
Depending on whether form recipients are using Acrobat or Adobe Reader, you may want to polish up your scan a bit in a program like Adobe Photoshop. If a graphic can be imported with transparency like you see in Figure 12.2, the signature looks a little more authentic than importing a signature without transparency, as shown in Figure 12.3.
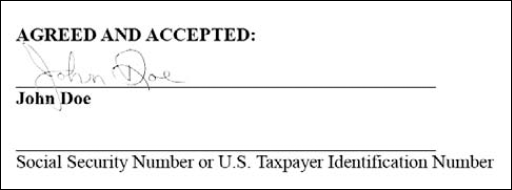
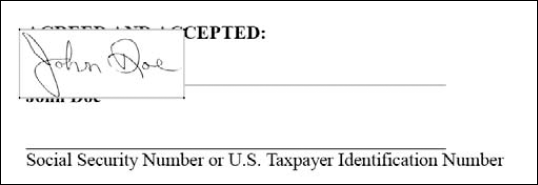
Unfortunately, you cannot import the graphic in Figure 12.2 in Adobe Reader. Reader users are stuck with importing graphics with solid white backgrounds, as shown in Figure 12.3. Such imports demonstrate an obvious manipulation of the digital file when the signature appears over text or objects rather than appearing like an authentic signature.
If using a wet signature with the appearance shown in Figure 12.3 works for your needs, the following steps are needed for the Reader user to import a scan into a PDF document.
Note
For the following steps, you can use the leaveRequestEnabled.pdf and johnDoeSolid.pdf files found on the book's CD-ROM in the Chapter 12 folder.
STEPS: Applying a Wet Signature in Adobe Reader
Scan an analog signature. All users applying a wet signature need to scan a signature and save the scan as an Adobe PDF file. Use a high-resolution scan such as 1200 dpi, and size the image to about three inches without resampling in a program like Adobe Photoshop.
Open a PDF document needing a signature. For Adobe Reader users, the PDF documents must be enabled with Adobe Reader usage rights for commenting from either Acrobat Pro or Pro Extended.
Open the scanned signature file. In our example, we use the johnDoeSolid.pdf file in the Chapter 12 folder on the book's CD-ROM.
Load the Snapshot tool. Open a context menu on the Adobe Reader Toolbar Well, and choose More Tools to open the More Tools window. Scroll down to the Select & Zoom Toolbar, and click the check box adjacent to the Snapshot tool. Click OK, and the Snapshot tool is added to the Toolbar Well, as shown in Figure 12.4.
Take a snapshot of the signature. Place the file with the signature in the Document pane, and click the document page. A dialog box opens confirming that a snapshot has been taken.
Bring the form to the foreground. Choose Window

Open the Comment & Markup toolbar. Because the files you work with need to be enabled for Comment & Markup, the Comment & Markup toolbar is accessible in Adobe Reader. Choose Tools
Paste the image as a stamp comment. Open the Stamps drop-down menu, and choose Paste Clipboard Image as Stamp Tool. This action loads the cursor with the Stamp tool.
Place the image on the form. Drag open a rectangle with the Stamp tool in the area where you want the wet signature, as shown in Figure 12.5. Although the image is now an annotation, the appearance of the graphic looks very much like the document has been signed.


For those form recipients using Acrobat, you have some alternative options for applying a wet signature. You can add transparency to a signature in a program like Adobe Photoshop and then paste the graphic as a transparent object in a PDF file.
To create a transparent image, scan an analog signature, again using a high-resolution scan, and open the file in Photoshop. Choose Image
Note
If you scan a file as line art, you need to choose Image
Click the Magic Wand tool, and set the Tolerance to 1 pixel, as shown in Figure 12.8. Click in the white area around the signature to select all the white background on the outside of the signature. Choose Select
Inverse the selection by choosing Select
You need to save the file with transparency. Choose File
After you've prepared a transparent file, follow these steps in Acrobat.

Figure 12.6. Select all the white background, and inverse the selection. Copy the selection to a new layer, and delete the Background layer.
Note
To follow these steps, you can use the leaveRequest.pdf and the johnDoeTrans.png files in the Chapter 12 folder on the book's CD-ROM. The form is not enabled with Adobe Reader usage rights.
STEPS: Adding a Transparent Wet Signature in Acrobat
Open a form in Acrobat. The form you open in Acrobat must not be enabled with Adobe Reader usage rights to work through these steps.
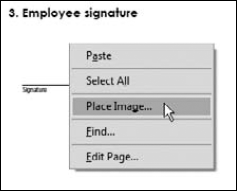
Place the scan on the form. Click the TouchUp Object tool in the Advanced Editing toolbar. Open a context menu, and choose Place Image, as shown in Figure 12.7. Choose a file format for the image you're placing when the Open dialog box appears. In our example, we used a PNG image, so we chose PNG (*.png) from the Files of type (Format on the Macintosh) drop-down menu. When the file appears in the Open dialog box, double-click the file to import it.
Position and size the image. Keep the TouchUp Object tool active, and drag the placed image to position. You can resize the image by dragging in or out with any of the four corner handles, shown in Figure 12.8.

Note
When you resize an image imported to a form in Acrobat, don't press the Shift key when dragging the handles. Dragging a handle without any modifier key constrains the scaling.
The easiest way to add a wet signature requires a little help from Adobe LiveCycle Designer. You can create a new form using LiveCycle Designer or open a form created in Acrobat in LiveCycle Designer for some additional editing. If you do use an Acrobat form, you need to use forms that don't have JavaScript calculations or be prepared to edit JavaScripts in Designer.
Because we cover creating forms in LiveCycle Designer beginning in Chapter 20, we limit this discussion to editing a PDF form initially created in Acrobat.
To prepare a file for image imports using Adobe LiveCycle Designer (for Windows only users), follow these steps.
Note
For the following steps, we use the leaveRequest.pdf and johnDoeTrans.png files in the Chapter 12 folder on the book's CD-ROM. The final file we created is the leaveRequestLCDenabled.pdf file, which you can find in the Chapter 12 folder.
STEPS: Preparing Forms for Wet Signatures Using LiveCycle Designer
Open a PDF form in Adobe LiveCycle Designer. In our example, we used the leaveRequest.pdf form in the Chapter 12 folder on the book's CD-ROM. When you open the form, the New Form Assistant wizard appears. Do the following in the wizard panes:
Leave the default Create an Interactive form with Fixed Pages radio button active, and click Next.
The next pane prompts you to add e-mail and print buttons to your form. Uncheck the boxes, as shown in Figure 12.9. Click Finish, and the form opens in LiveCycle Designer.
Locate the Image Field. Scroll the Object Library, and locate the Image Field shown in Figure 12.10.
Add an image field to the form. Drag the Image Field to the form, as shown in Figure 12.10. You can size the field after adding it to the form by dragging corner handles in or out.
Save the form. Choose File
Enable the form with Adobe Reader usage rights. Open the form in Acrobat, and choose Advanced


The form is now ready for deployment. Any user of an Acrobat viewer, including Adobe Reader users, can add a wet signature by clicking the image field button added to the form. To test the form, click the image field button in Adobe Reader or Acrobat, and the Select Image File dialog box opens. As you can see in the Files of type (Windows) or Format (Macintosh) drop-down menu, the file formats supported are .jpg, .gif, .png, and .tif.
Choose PNG (*.png) for the file type, click the johnDoeTrans.png file, and click Select. The transparent wet signature is placed in the button field, as shown in Figure 12.11.
This method of preparing a form for adding a wet signature permits Adobe Reader users, as well as Acrobat users, to add a graphic to a form. The only issue the end user needs to handle is scanning a signature and adding transparency. Unfortunately, Macintosh users need to send the form off to a Windows user to work with LiveCycle Designer or install Windows and Adobe LiveCycle Designer on your Intel Macintosh as we explain in Chapter 20.
To begin understanding creating and using digital IDs, look at the Advanced menu. As shown in Figure 12.12, you have four menu items that in one way or another relate to digital IDs and security.
Also two task buttons in the Acrobat Toolbar Well are loaded by default that relate to security. The Secure task button relates to security items, and the Sign task button relates to applying digital signatures, as shown in Figure 12.13. In addition to these menu commands, you have a Security tab in the Document Properties dialog box and security options in the Preferences window. All these locations for accessing commands for security and digital signatures make it a bit confusing for novice users, and it's often difficult to determine where you need to start when creating a digital ID. The menu commands are not intuitive when you first begin creating new digital IDs.
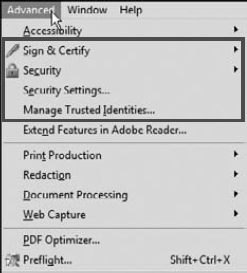

Because you don't have an intuitive menu description or a hint for where to start when creating a digital ID, you need to commit to memory one command that takes care of creating a new ID. Digital IDs are created using the Advanced menu and selecting Security Settings. This is the only command available from all the menu items used with signatures and security that permits you to create a new digital ID.
When you choose Advanced
In the Security Settings window, you choose from options listed in the left pane of the window. As shown in the Security Settings window, you have these options for working with digital IDs and configuring server access:
Digital IDs: Four options for working with Digital IDs are available:
A file: Available on Windows and Macintosh, this form of ID is similar to what you had available in earlier versions of Acrobat when using Acrobat Certificate Security. You can select Add ID, which opens the Add Digital ID dialog box to find an existing digital ID, create a new Acrobat Self-Sign ID, or get a third-party certificate.
A roaming ID stored on a server: This option permits you to host your ID on a Web server. You can access your ID anywhere in the world by logging on to the server that contains your roaming ID and digitally sign documents using any one of your IDs available on the server. Roaming ID accounts are available to both Windows and Macintosh users.
A device connected to this computer: Use this option if you have a hardware device such as a token connected to your computer.
A new digital ID I want to create now: You use this option when you want to create your own personal ID that will be stored locally on your computer.
Directory Servers: This option is used to locate specific digital ID certificates from network servers for encrypting documents using Certificate Security. Directory Servers can be added by importing a configuration supplied by a system administrator or by entering the parameters required to configure the server.
Time Stamp Servers: This option is used if you will be adding time stamps to documents. As with Directory Servers, Time Stamp Servers are added by importing a configuration from a system administrator or by adding parameters required to configure the server.
Adobe LiveCycle Rights Management Servers: Adobe LiveCycle Rights Management Server (
www.adobe.com/products/server/policy/main.html) is a Web server–based security solution provided by Adobe Systems that provides dynamic control over PDF documents. Policies created with Acrobat or Adobe LiveCycle Rights Management Server are stored on the server and can be refreshed from the server. After you've configured an Adobe LiveCycle Rights Management Server, all polices maintained on this server are available to you. You must log in to Adobe LiveCycle Rights Management Server to use these policies. This option also requires that you access a URL provided by a system administrator and add the server to your list of Adobe LiveCycle Rights Management Servers.
Note
For more information on LiveCycle Rights Management Server, see Chapter 34.

Digital IDs can be created with or without custom appearance settings. The appearance of your signature has no effect on the kind of security you add to a signature. If you want to create a custom signature appearance such as a scanned analog signature, it's usually best to first create the appearance and then create the digital ID.
Custom appearances such as a scanned image of an analog signature are very different than the wet signatures we talked about earlier in this chapter. When you add a wet signature to a form, you simply add a graphic to the form. When you use a graphic associated with a digital signature, you configure the appearance of a signature as it is shown on the form, but behind that appearance is data using a key that describes the signature. This data can be verified and authenticated. A wet signature cannot be verified or authenticated.
Appearances for your digital IDs are created in the Security preferences. Open the Preferences dialog box (Ctrl/
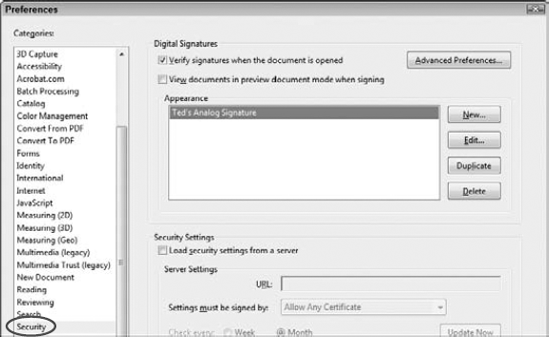
Figure 12.15. Click Security in the left pane in the Preferences dialog box, and the right pane changes where you can add a new appearance for a digital ID.
Two preferences dialog boxes are used for creating an appearance and setting some attributes for your signatures:
Security Preferences: You use the Security Preferences to create digital ID appearances for your personal digital IDs. If you want to add a logo, analog signature, symbol, or some text to an ID, you can do so by clicking the New button and choosing from various settings in the Configure Security Appearance dialog box.
Advanced Preferences: If you have an ID configured such as the one shown in Figure 12.18, the ID(s) appears listed in the Appearance list in the Security Preferences dialog box. Select an ID, and click Advanced Preferences to open another dialog box where a number of options exist for verifying signatures, creating them, and (in Windows) selecting settings for Windows Integration. A number of different options exist in three tabs in Windows or two tabs on the Macintosh. For a detailed description of each item, consult the Acrobat Help document.
Note
If you have not created a digital ID yet, you will see nothing listed in this box, but you still can create appearances that can later be used with a digital ID.
To understand how to create a custom appearance for a digital ID, follow these steps.
Note
If you don't have a scan of your analog signature available you can use the johnDoeTrans.png file in the Chapter 12 folder on the book's CD-ROM.
STEPS: Creating a Custom Digital ID Appearance
Open the Security preferences. Press Ctrl/

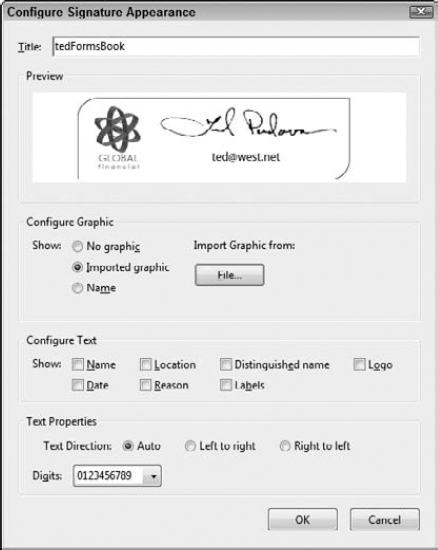
Click the New button in the right pane to open the Configure Signature Appearance dialog box.
Configure the appearance. Type a title in the Title text box. This title will appear as the name for your appearance, and you'll select it when configuring a digital ID. If you want to use a graphic, click the Imported graphic radio button and click File to open the Select Picture dialog box. Locate and select the graphic you want to use for the appearance. (The file can be any file type supported by the File
Select the text items you want to display on your signature by checking boxes in the Configure Text area of the Configure Signature Appearance dialog box. In our example, we removed all check boxes, as shown in Figure 12.16.
Click OK in the Configure Signature Appearance dialog box. The signature is listed by Title in the Security preferences. Click OK in the Preference dialog box, and your appearance for a signature is now configured.
The steps used to create a signature appearance are optional. You don't need to use a custom appearance when creating a digital ID. If you do create a signature appearance, you can use it when creating a new ID.
To understand how digital IDs are created, follow these steps.
STEPS: Creating a Digital ID and Appearance
Open the Security Settings dialog box. Click Advanced
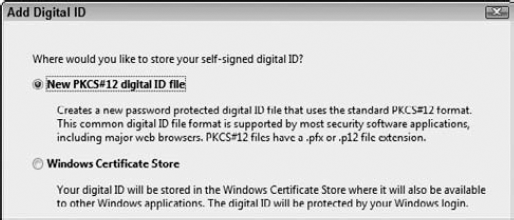
Create a Self-Signed digital ID. Click Add ID in the Security Settings dialog box. The Add Digital ID wizard opens, as shown in Figure 12.18. Select A new digital ID I want to create now, and click Next.
Choose an option for your ID. The next pane has two options for locating or creating an ID. The first radio button assumes you have an ID available either as a file, a roaming ID on a server, or a hardware device.
The second option enables you to create a new ID. Select the second radio button (A new digital ID I want to create now), and click Next to open the second pane in the wizard.
Choose a location to store your ID. Click the first radio button to create a password-protected ID using Acrobat, as shown in Figure 12.19—this option works best for cross-platform compliance. Click Next to move to the next pane in the wizard.
Add identity information. The next pane opens with text boxes for you to supply identity information. If you added identity information in the Identity preferences, the information is transposed to the pane shown in Figure 12.20. If you want to use special characters, non-Roman languages, or non-ASCII characters, check the box for Enable Unicode Support.
Choose a key algorithm. The default is 1024-bit encryption. If you expect users of Acrobat prior to 9.0 to work with your files, leave this default alone. If you use Acrobat 9.0 or above exclusively, you can choose 2048-bit encryption.
Choose a use for the ID. If you use your digital ID exclusively for digital signatures, choose Digital Signature from the drop-down menu. If you anticipate using your ID for encrypting documents, choose Digital Signatures and Data Encryption.
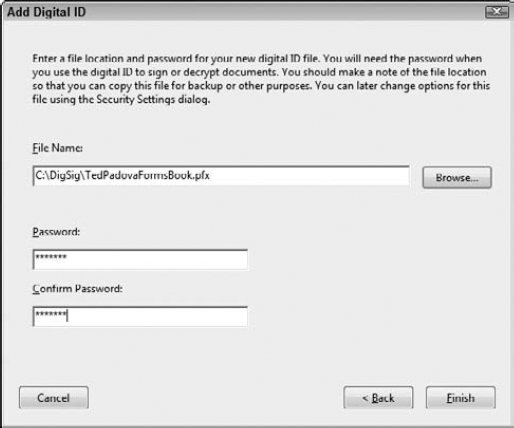
Choose where you want to store the ID and type a password. Click Next in the wizard, and click the Browse button to locate a folder where you want to save the ID (for New PKCS#12 digital ID files). Type a password in the Password text box, and type the password again in the Confirm Password text box, as shown in Figure 12.21.
Click Finish. Click Finish in the Add Digital ID dialog box and you return to the Security Settings dialog box. Your new digital ID is now ready to use.


After you click Finish, your ID appears listed in the Security Settings dialog box, as shown in Figure 12.22. The Security Settings dialog box offers some options for managing your IDs. You can choose usage options from the Usage Options drop-down menu, examine certificate details, export your ID to a new location on your hard drive, and click Refresh to update any changes to IDs and locations.
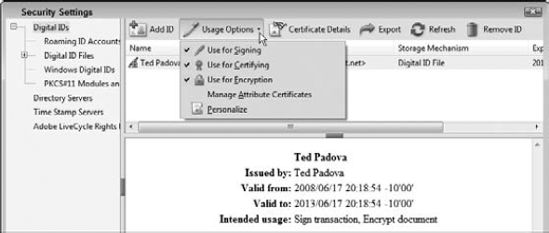
Notice that we have not selected an appearance for the digital ID. You can store multiple appearances in the Security preferences, and each time you sign a document, you can choose which appearance you want to use for your signature. You might, for example, sign documents internally in your company using one appearance and with the same ID sign documents coming from other sources outside your company with another appearance.
After you have an ID created, you can use it to sign signature fields using any Acrobat viewer. You also can sign documents without signature fields. Forms authors are most likely to use signature fields rather than asking form recipients to sign documents without signature fields, so we'll limit our discussion on digital IDs to forms containing form fields.
To sign a document, follow these steps.
Note
You can use the leaveSignaturesLock.pdf file in the Chapter 12 folder on the book's CD-ROM for these steps.
Open a form with a signature field. In our example, we opened the leaveSignaturesLock.pdf file in the Chapter 12 folder on the book's CD-ROM.
Fill in the form. The form used in our example has some fields designed for an employee of a company to fill in. Fill in the items in sections 1 and 2.
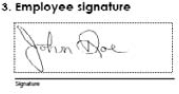
Click the signature field. With the hand tool active, click the signature field below item 3, Employee signature. To proceed, you must have created a digital ID.
Add your password, and choose an appearance. The Sign Document dialog box opens, as shown in Figure 12.23. Type your password in the Password text box. Your password is the same password you used when you created your digital ID.
From the Appearance drop-down menu, choose an appearance. The appearances listed in this menu are the appearances you created in the Security preferences. If you created multiple appearances, they all are listed in the drop-down menu.
Sign the document. Click the Sign button, and the Save As dialog box opens. Save the file with a new name, such as adding a _signed extension on the original filename.

When you click Sign, you are prompted to save your file. Locate the folder where you want to save the file, and click Save. The document is signed as shown in Figure 12.24 using the Usage Options assigned to the signature.

Signatures in and of themselves provide a level of security on forms. If anything is changed on a form, the signature won't be validated. If you add additional security as explained in the "Using Password Security" section coming up next, you can prevent form recipients from tampering with the form fields. When signatures are added to a document, you can configure the signature fields to lock fields. Therefore, if your file is secured against editing form fields and signatures lock fields, then you have a high level of security applied to your form preventing any alterations to the field data.
To configure signature fields for locking fields on your forms, follow these steps.
Note
On the book's CD-ROM in the Chapter 12 folder, you'll find two forms with signature fields. The leaveSignaturesNoLock.pdf has three signature fields with no settings applied for locking fields. The leaveSignaturesLock.pdf file has three signature fields configured for locking fields when the form is signed. You can use the file with no locks assigned to the signature fields to follow these steps and use the file with locks to compare your results.
STEPS: Configuring Signature Fields for Locking Fields
Open a form with a digital signature field. In our example, we used the leaveSignaturesNoLock.pdf file found in the Chapter 12 folder on the book's CD-ROM.
Open a signature field's Properties window. Click the Select Object tool while in Viewer mode, and double-click a signature field to open the Signature Field Properties window. In our example, we opened the employee.signature field on the leaveSignaturesNoLock.pdf form.
Click the Signed tab in the Properties window. The Signed tab contains options that are unique to signature fields.
Check Mark as read-only. With the Signed tab in view, click the Mark as read-only radio button, as shown in Figure 12.25.
Choose the fields to mark. If you look at the form shown later in Figure 12.27, you can see that the form has three signature fields. Each signature is intended to be filled in by different parties after adding data to the form. For the first signature field, items 1, 2, and 3 are to be completed by an employee. Therefore, we want to lock fields related only to the employee's data fields.
If you want all fields locked when a form recipient signs a form, you can choose All fields from the drop-down menu. If you find it easier to choose all fields but a few, choose the All fields except these menu item from the drop-down menu. As a third option, you have a choice to choose Just these fields when it's easier to mark just the fields you want to lock.
In our example, it's easiest to choose All fields except these from the drop-down menu. To choose what fields to not mark, click the Pick button. The Field Selection dialog box opens, as shown in Figure 12.26.
Select fields to eliminate from locking. Because we chose to lock all fields except these, we need to mark the fields that we don't want to lock. In the Field Selection dialog box, check the fields you want to remain unlocked. In our example, we chose the fields shown in Figure 12.26.
Click OK in the Field Selection dialog box. Then click Close to close the Signature Fields Properties window, and the fields are marked for locking when a form recipient signs the form.
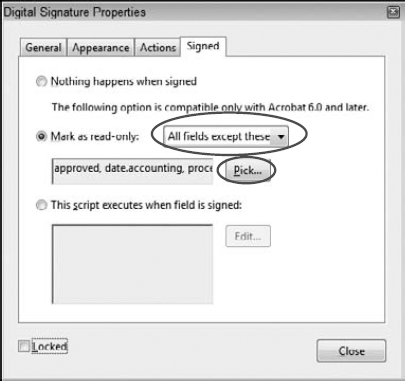

Figure 12.26. Check the fields you want to remain unlocked when the form recipient signs a document.
Notice in Figure 12.26 that we chose the fields to remain unlocked that will be filled in by a supervisor and an accounting clerk. All fields the employee fills in will be locked. The remaining fields will not be affected when the employee signs the form.
To complete this form, we would choose fields to lock respective to the supervisor signature and the accounting clerk signature. Each signature field would be configured to lock fields appropriate for the person signing the form.
Note
To examine a form where the signature fields are configured for locking different fields, open the leaveSignaturesLock.pdf file on the book's CD-ROM in the Chapter 12 folder.
You can add multiple signature fields to a form. A signature field, unlike all other field types, cannot be duplicated either by Ctrl/Option+clicking and dragging or by copying the field and pasting into the same form. Signature fields require you to enter Form Editing mode and create additional signature fields on the same form using the Digital Signature tool.
To sign a document with multiple signatures, follow these steps.
Note
To follow these steps, use the leaveSignaturesLock.pdf file on the book's CD-ROM in the Chapter 12 folder.
STEPS: Signing a Form with Multiple Signatures
Open a form with multiple signatures. In our example, we used the leaveSignaturesLock.pdf file on the book's CD-ROM in the Chapter 12 folder.
Fill in the data related to the first signature. On the form used in our example, we filled in the employee-related data.
Sign the form. Sign the form by clicking the first signature field with the Hand tool. Supply your password, choose an appearance, and click Sign. Save the file with a new filename—something like 01 for the extension of the original filename (leaveSignaturesLock_01.pdf).
Check the locked fields. Move the hand tool over the fields related to the first signature. These fields should be locked and should not accept any new data or modifications.
Fill in the data related to the second signature field, and sign the form. You can use your same digital ID to sign the form again if you don't have a second ID. When you click Sign in the Sign Document dialog box, use another extension such as 02 for the second save.
Fill in data, and sign the third signature field. Follow the same steps, and save the file with a 03 extension added to the filename.
After signing the form with three signatures, click the Signatures panel icon to open the Signatures panel. Notice that all three signatures appear in the panel along with the signatures you see on the form, as shown in Figure 12.27.

If you check the form by moving the Hand tool around the fields (other than the Signature fields), you'll notice that all the fields are locked and can't be modified. If you click a Signature field, the Signature Properties dialog box opens, where you can obtain information about the respective signature. However, like the other fields, you cannot modify the signature. In Figure 12.29, notice that the Advanced Editing tools are grayed out to ensure you that, indeed, the form cannot be modified.
When a form recipient completes a form, signs a document, and then sends the form back to you, you'll want to validate signatures on the form. Validating signatures is handled by obtaining a public certificate from a form recipient. A public certificate is created at the time a user creates a digital ID. The ID itself is stored on the user's computer when creating an Acrobat digital ID, and the public certificate that's created along with the ID is intended to be distributed to people receiving a signed document.
Typically, you acquire public certificates from form recipients in two ways: Either the certificate is sent to you by a form recipient as a separate file, or you acquire a certificate from within a signed document.
A form recipient can use the Security Settings dialog box to export a public certificate as a file and send the file to a forms author via an e-mail attachment. After the forms author receives the certificate, forms are validated using the certificate.
To export a public certificate to a file, follow these steps.
STEPS: Exporting Public Certificates to Files
Create a digital ID. In order to export a public certificate to a file, you need to have a digital ID. If you don't have a digital ID, follow the steps outlined earlier in this chapter in the section "Creating a digital ID."
Open the Security Settings dialog box. Choose Advanced
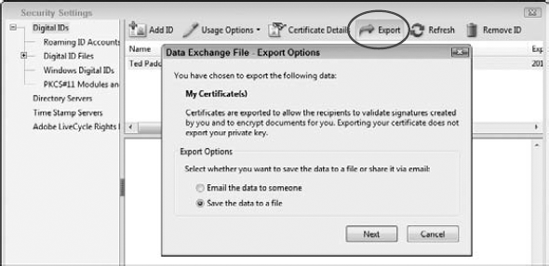
Click the Export button. At the top of the Security Settings dialog box, locate the Export button shown in Figure 12.28.
Choose Save the data to a file. When you click the Export button, the Data Exchange File – Export Options dialog box opens. The default selection is Save the data as a file, as shown in Figure 12.28. Accept the default selection by clicking Next.
Save the file. Clicking Next opens the Export Data As dialog box. Navigate to a target location on your hard drive, and click Save. Your public certificate is saved to a file and ready for e-mailing to other users.
Note
If you create several IDs and many public certificates, you may want to create a folder on your hard drive and save all files to the same folder. At the root C drive (Windows) or Macintosh HD (Macintosh), create a new folder and name it DigSigs or some descriptive name. Copy all your files to this folder for easy access, particularly if you uninstall Acrobat and reinstall at a later time and happen to lose some Acrobat settings.
When you export a public certificate, realize that the certificate does not compromise the security added to your digital ID. Select information in the public certificate is merely used to verify your signature each time a forms author receives your signed forms.
When you receive a certificate via e-mail, the certificate is sent to you apart from a signed document. You also can export certificates directly from within a signed document. Which method you choose depends on the level of security you want to associate with public certificates.
If you export a certificate from a signed document, you are assuming that the form was signed by the person you distributed the form to. This carries a fairly low level of security, because anyone can sign a form pretending to be the intended form recipient. If you receive a public certificate and a signed form, you receive two documents. This method offers you a bit more security knowing that the form recipient had to receive your file and an e-mail request for sending you a public certificate. It's a slight difference, but it does offer you a bit more confidence knowing that the certificate you receive is indeed from the individual you expect to return a completed form.
If your level of confidence is high that a signed document is received from authentic form recipients, you can use the following steps to export a public certificate.
Note
To follow these steps, you can use the leaveRequestSignatures.pdf file on the book's CD-ROM in the Chapter 12 folder.
STEPS: Exporting Public Certificates from Signed Documents
Open a signed document. In our example, we used the leaveRequestSignatures.pdf file on the book's CD-ROM in the Chapter 12 folder.
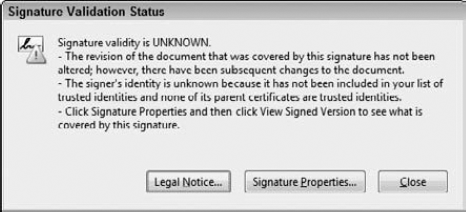
Click a signed signature field. Using the Hand tool, click a signed signature field. The Signature Validation Status dialog box opens, as shown in Figure 12.29.
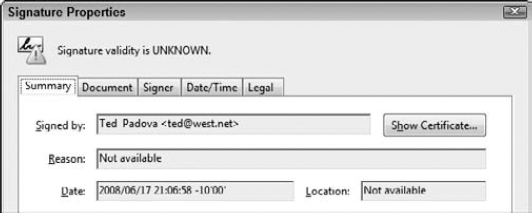
Click Signature Properties. Click the Signature Properties button in the Signature Validation dialog box, and the Signature Properties dialog box opens, as shown in Figure 12.30.
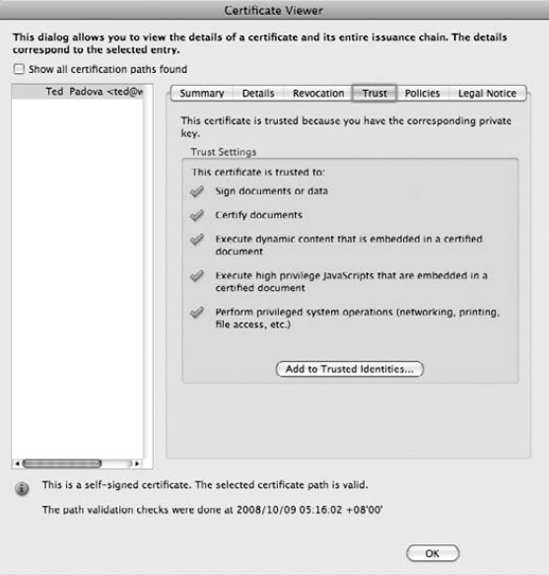
Click the Show Certificate button. Click Show Certificate in the Signature Properties dialog box, and the Certificate Viewer dialog box opens, as shown in Figure 12.31.
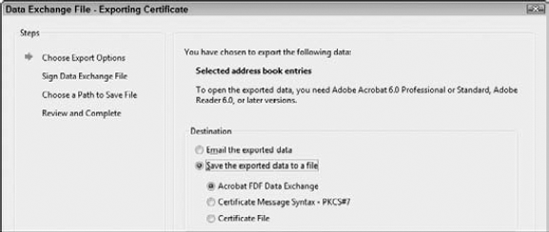
Click the Export button. At the bottom of the Certificate Viewer, you find the Export button. Click the button, and the Data Exchange File – Exporting Certificate dialog box opens. The first pane in the dialog box offers choices for Export Options, as shown in Figure 12.32.
Choose a destination. From the radio button choices, you can choose to save the certificate to a file, e-mail the exported data, and choose from other destinations. To export to a file, choose Save the exported data to a file and click Next. The next pane offers you an option to Sign the document adding your signature. Bypass this option, and click Next again.
Save the file. When you make a destination choice and click Next, the Choose a Path to Save File dialog box opens. Navigate your hard drive to locate a target destination, and click Save to save the file. Another pane opens after you save the file. Click Finish to complete the steps.

Up to this point, we've saved public certificates to files. Saving a certificate to a file does nothing more than add a public certificate to your hard drive. The next step is to use the certificate you saved as a file to validate a signature.
Trusted Identities is like an address book. You add certificates to your Trusted Identities for easy management for all the signatures you acquire from signed documents. To add a new certificate to your list of Trusted Identities, follow these steps.
Note
You can export a certificate from the leaveRequestSignatures.pdf file on the book's CD-ROM in the Chapter 12 folder. After you have a certificate exported, you can follow the steps here.
STEPS: Managing Trusted Identities
Know the location of at least one exported certificate. Be certain you have a certificate file on your hard drive and know the folder location where you can find the file.
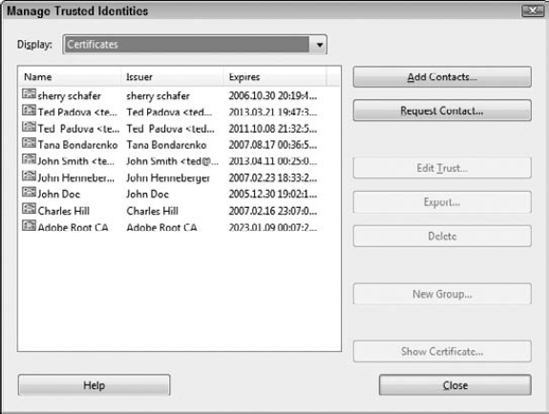
Open the Trusted Identities. Choose Advanced
Display the certificates. From the Display drop-down menu, choose Certificates to display your existing certificates. We have several certificates loaded in our Trusted Identities, as shown in Figure 12.33. You may not have any certificates added to your Trusted Identities.
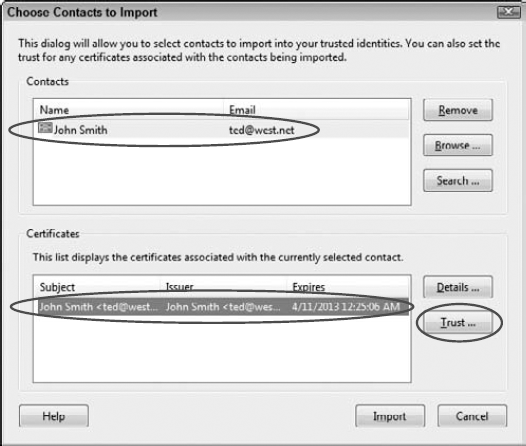
Add a new certificate. Click the Add Contacts button to add a new certificate, and the Choose Contacts to Import dialog box opens, as shown in Figure 12.34.
Browse for a contact. Click the Browse button, and locate an exported certificate file. Select the file, and click Open.
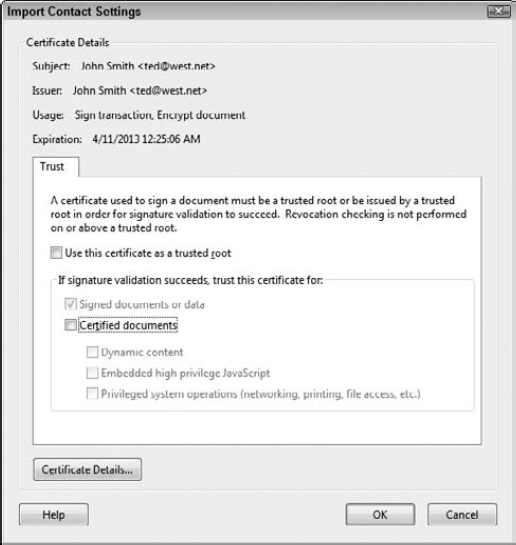
Add a level of trust to the contact. Click the name in the list of contacts in the top list, and the certificate name is added to the bottom list. Select this name, and the Trust button becomes active. Click Trust to open the Import Contact Settings dialog box.
Check the boxes for the items you want to trust from the contact. For forms with signatures, you may need only the default selection for Signed documents or data. The check box is selected when you open the Import Contacts dialog box, as shown in Figure 12.35. You can add more trust items by checking additional boxes. Leaving the default and clicking OK trusts the certificate for all signed form fields on a form. Leave the default as is, and click OK.
Import the contact. After you click OK in the Import Contact Settings dialog box, you return to the Choose Contacts to Import dialog box. Click the Import button to import the trusted certificate, and the Import Complete dialog box opens. Click OK, and your certificate is now added to your Trusted Identities and trusted for accepting signatures from the respective form recipient.
Adding Certificates to Trusted Identities
Another way to add a certificate to a trusted identity is to use the Certificate Viewer. In this case you don't need to export a file from a signed document nor do you need to acquire a public certificate from the form recipient.
In the Certificate Viewer click the Trust tab and click Add to Trusted Identities. The certificate is added to your certificate list without any need for managing certificate files.
After you have a trusted certificate added to your Trusted Identities and determined a level of trust for the certificate, you can use the certificate to validate a signature. In the Signatures panel, select individual signatures, and from the Signatures panel drop-down menu, choose Validate Signature. If the certificate was added to your Trusted Identities with a specified level of trust, the signature is validated.
If you have multiple signatures on a form, you can validate all signatures by clicking the Validate All button in the Signatures panel. When the signatures are validated, the Document message bar reports the validation, as shown in Figure 12.36.

You apply security to forms to prevent form recipients from changing your form and altering field objects in Acrobat. Securing forms is particularly important if you have fixed data on a form that you do not want a form recipient to change. As an example, look at Figure 12.37. The form contains some fields with fixed prices. If the form is not secured to prevent users from editing the fields, form recipients can change the fixed amounts and/or the calculation formulas.
Fortunately, Acrobat provides an easy way to secure forms with an elaborate set of options to prevent editing and changing forms. To secure an open document, choose File
Notice the Security Method drop-down menu shown in Figure 12.38. Four menu items are listed that relate to different security methods. Below the drop-down menu, you see a list of different permissions and the status of the items. When no security has been added to a document, the status of all items is Allowed.
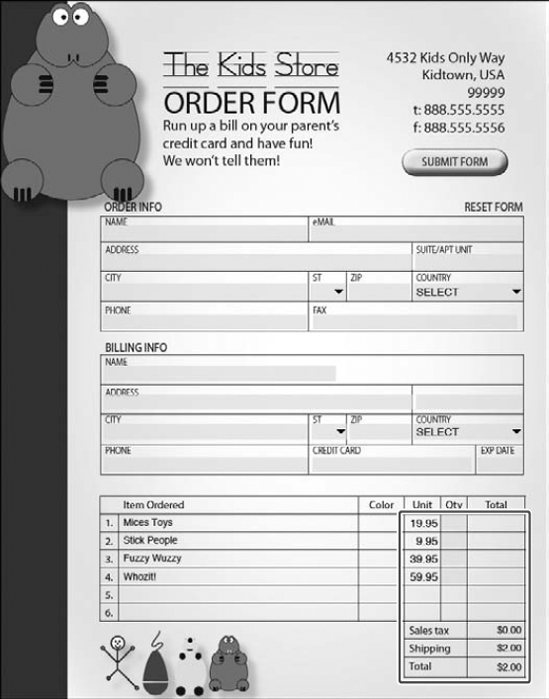
Figure 12.37. The form contains fixed unit prices and calculation formulas that need to be protected against editing.
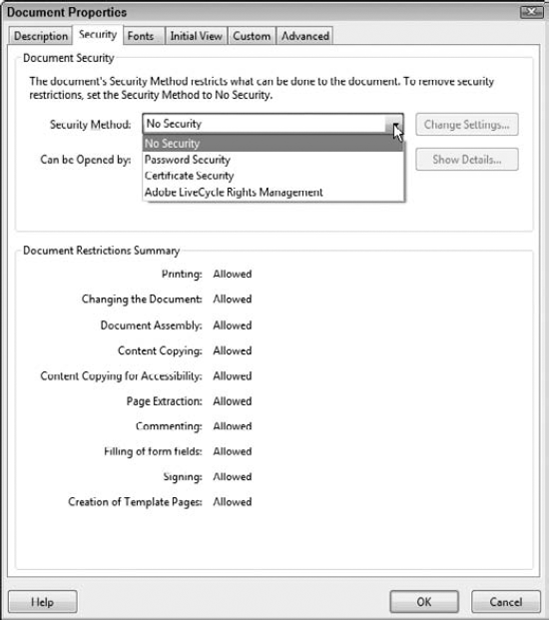
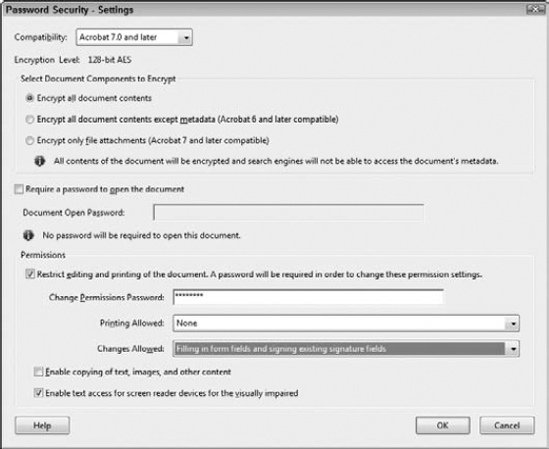
To add password security to a form, you choose Password Security from the Security Method drop-down menu. Choosing this option opens the Password Security – Settings dialog box, shown in Figure 12.39. As a forms author, you'll want to understand several items and use them when you secure forms, and they're all contained in the Password Security – Settings dialog box.
You add Password Security via this dialog box anytime you want to restrict users from opening a file and/or making changes to the content. Passwords are added to require a user to supply the password when opening the file and/or editing the file. Because forms authors typically design forms for many users, you're unlikely to use a password to open a file.
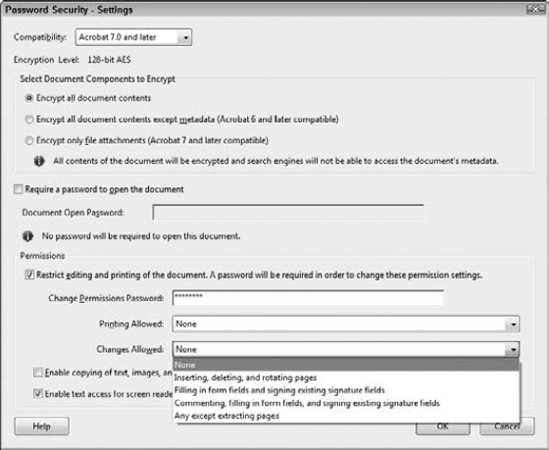
Figure 12.39. Choose Password Security in the Security tab in the Document Properties, and the Password Security – Settings dialog box opens.
In the Password Security – Settings dialog box, you have these options available to secure a PDF form:
Compatibility: The options from this pull-down menu include Acrobat 3.0, Acrobat 5.0, Acrobat 6.0, Acrobat 7.0, and Acrobat 9.0 compatibility. The more recent compatibility settings offer you higher levels of encryption. At a minimum, you should choose Acrobat 7 compatibility for your forms.
Encryption level: Below the Compatibility pull-down menu, Acrobat informs you what level of encryption is applied to the document based on the compatibility choice made in the pull-down menu. If you select Acrobat 3 from the Compatibility pull-down menu, the encryption level is 40-bit encryption. Acrobat 5 and Acrobat 6 compatibility are encrypted with 128-bit RC4 encryption. Acrobat 7 and Acrobat 8 support 128-bit AES. Acrobat 9.0 supports 256-bit AES. All the higher encryption levels offer you more options for restricting printing and editing.
Encrypt all document contents: This option applies encryption to all document contents.
Encrypt all document contents except metadata (Acrobat 6 and later compatible): Use this option to apply encryption to all document contents except document metadata. As the item name implies, this level of security is compatible with Acrobat 6 and later. This is a good selection if you want to have the metadata in your secure documents available for a search engine.
Encrypt only file attachments (Acrobat 7 and later compatible): Use this option to encrypt file attachments but not the PDF document. This option is compatible only with Acrobat 7 and above. For forms authors, you're unlikely to use this option often.
Require a password to open the document: Select this check box if you want a user to supply a password to open the PDF document. Again, this option is one that you're unlikely to use when distributing forms.
Restrict editing and printing of the document. A password will be required in order to change these permission settings: This option is critically important for forms authors. You first check this box and then choose the items you want to secure against editing.
Change Permissions Password: Fill in the text box with a password.
Printing Allowed: If you want forms to be submitted electronically and don't want form recipients to print a form, you can choose to prevent printing by choosing the None option from the drop-down menu.
Changes Allowed: From this pull-down menu, you make choices for the kinds of changes you allow users to perform on the document. When compatibility is set to Acrobat 7 or above, the options include the following:
None: This option prevents a user from any kind of editing and content extraction. This choice is one you must not use as a forms author. If you use None, form recipients won't be able to fill in the form fields.
Inserting, deleting, and rotating pages: For forms, you probably don't want this option available to form recipients. Inserting pages on your forms can lead to confusion and problems with data collection.
Filling in form fields and signing existing signature fields: For forms authors who do not want form recipients to add any comment notes or add markups to a document, this is your best choice. All the document content is protected and fields cannot be edited in Form Editing mode, but form recipients can fill in the form and submit the form to you.
Commenting, filling in form fields, and signing existing signature fields: If for some reason you want to add commenting opportunities for form recipients, you can choose this option.
Any except extracting pages: With this option, all the permissions are available to users except extracting pages from the document and creating separate PDFs from selected pages. This setting is one you should avoid using for forms.
Enable copying of text, images, and other content: If you want to prevent users from copying text and images in your forms, leave the box unchecked.
Enable text access for screen reader devices for the visually impaired: As explained in Chapter 11, screen readers need access to text on a form when using assistive devices. By default, you should keep this box checked.
Note
For more information on screen readers and accessibility, see Chapter 11.
After you make choices for the password permissions, click OK. A password confirmation dialog box opens and prompts you to type your password again. Type the same password added to the Change Permissions Password text box and click OK, and you return to the Document Properties dialog box. Click OK again in the Document Properties dialog box, and then save your file to apply the security. If you close the document without saving, the security settings are not applied.
Security policies are settings you save that are used later when securing documents—similar to creating style sheets in word processors or layout programs. Three different options for creating a security policy are available:
Use passwords: This option is the same as applying a password to a document via the Document Properties Security pane. The difference between applying password security in the Password Security – Settings dialog box, shown in Figure 12.43, and adding a security policy is that the latter is more efficient when you're applying the same security settings repeatedly to multiple forms. If you use the Password Security – Settings dialog box, you need to set options each time you secure a form by selecting check boxes and making choices from pull-down menus. When you use a security policy, the options you choose are captured and saved as part of the policy; you just use the policy each time you want to encrypt documents with the same settings.
Use public key certificates: Use this option to share files with users who have sent you a public certificate. These certificates include ones you've added to your Trusted Identities list or by searching directories you have access to. You can create a policy that applies different permissions to different users. Using this policy encrypts the same document with choices for granting different permissions for different recipients. As a forms author, you might use this option when you have in-house forms and want to grant different permissions to different people in the organization.
Use the Adobe LiveCycle Rights Management: If you have access to an Adobe LiveCycle Rights Management Server, you can create a security policy that is enforced by connecting to the Adobe LiveCycle Rights Management Server. PDF forms and attachments can be secured for a selected group of users or for a period of time you determine when creating the policy. When a policy changes or expires on the server, the forms tied to the policy respect these changes as well.
Note
For more information on the Adobe LiveCycle Rights Management Server, see Chapter 34.
To make the process of creating a security policy a little more clear, try the following steps to create a policy using password security.
Note
Creating a security policy does not require having a form open in Acrobat. If you want to apply the security to a form after creating it, use the leaveRequest.pdf form in the Chapter 12 folder on the book's CD-ROM.
STEPS: Creating a Password Security Policy
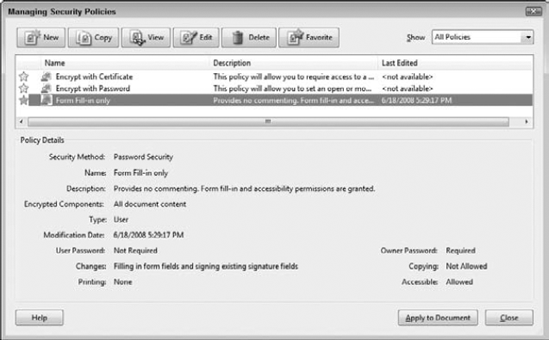
Open the Managing Security Policies wizard. You open the Managing Securities Policy wizard by selecting Manage Security Policies from the Secure task button pull-down menu or choosing Advanced
Create a new policy. In the Managing Security Policies wizard, click the New button to open the New Security Policy wizard pane, as shown in Figure 12.41. You have three options from which to choose. The default is Use passwords, as shown in Figure 12.41. For these steps, we used the Passwords option to create a policy where we secured documents using Acrobat Security. Select Next.
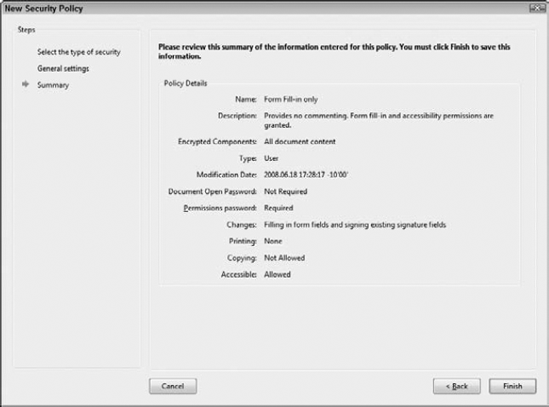
Add a name and description for the new policy. Type a Policy name and Description in the respective field boxes in the General settings panel of the New Security Policy wizard, as shown in Figure 12.42. Select the box for Save passwords with the policy. The name and description you add in the second pane appear when you access the Managing Security Policies dialog box. Try to add information in the field boxes that describe the settings you use when creating the policy.
Note
If you want to periodically change passwords, leave the box unchecked. Each time you use the policy, Acrobat prompts you for a new password.
Add the security settings. Click Next, and you arrive at the Password Security – Settings dialog box. This is the same dialog box you see in the Password Security – Settings dialog box shown earlier in Figure 12.43. Here, you set the attributes for the security to be applied when using the policy. In our example, we did the following:
Selected Acrobat 7 compatibility.
Checked the box for Restrict editing and printing of the document. A password will be required in order to change these permission settings.
Added a password.
Selected None from the Print allowed pull-down menu.
Selected Filling in form fields and signing existing digital signatures from the Changes Allowed drop-down menu.
Checked the last box in the dialog box, as shown in Figure 12.43.
Review the policy. Click Next, and the last pane (Summary) appears with a Finish button, as shown in Figure 12.44. Click Finish to create the policy. You are returned to the Managing Security Policies dialog box, where your new policy is listed in the policy list window, as shown in Figure 12.45. Notice that the name and description you added when creating the policy now appear in the Name and Description headings. Additionally, you see a description of the policy details and encryption components for the policy you created. If creating multiple policies, select a policy name in the top window, and the policy details and encryption components in the lower half of the dialog box change to reflect attributes for the selected policy.
Secure a document. By default the Managing Security Policies dialog box opens, as shown in Figure 12.45. Your new policy is listed in this dialog box. If you have a document open in the Document pane, you can apply the policy to the open document. If not, open the leaveRequest.pdf form in the Chapter 12 folder on the book's CD-ROM.
Select the policy you created, and click the Apply to Document button. Acrobat opens a dialog box informing you that you need to save your file after applying the policy to complete the security. Click OK, and save the file. Your file is now secure using the permissions you identified for the policy.
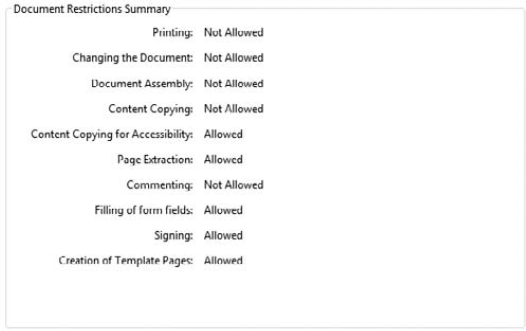
Review the security applied to the document. After saving the form using a security policy, press Ctrl/


To digitally sign a document, you need to create a digital ID. You create and manage digital IDs via several menu commands and menu options found in the Secure Task Button pull-down menu.
Digital IDs are created in the Security Settings dialog box. Choose Advanced
You can apply appearance settings to your signatures in the form of scanned documents, icons, and symbols from files saved as PDF or other file formats compatible with the Create PDF From File command. You add signature appearances via the Security Preferences dialog box.
You can digitally sign a document by using an existing signature field and clicking the field with the Hand tool.
Trusted Identities are a list of digital ID certificates from people with whom you share information. You can export your public certificate to a file or attach your public certificate to an e-mail message from within Acrobat. When other users have your public certificate, they can validate your signature or encrypt documents for your use.
In order to validate a signature, the public certificate for that digital ID needs to be loaded into your Trusted Identities list.
PDF forms can be secured with built-in Acrobat Self-Signed Security and security handlers acquired from third-party developers. Files can be secured from users opening documents, editing documents, or for both.
Securing forms prevents form recipients from changing things on your forms like fields and calculation formulas.
Security policies are created to apply the same security settings to multiple files.