![]()
JavaScript and HTML5 Canvas Basics
This chapter gives a brief review of the elements of JavaScript and HTML5 that we will make the most use of in the rest of this book. It is not meant to be a comprehensive tutorial on JavaScript; instead, it is a summary of what you need to know to understand the code examples in the book. The other aim of this chapter is to cover relevant aspects of the HTML5 canvas element and JavaScript that will set the context for applying physics.
This chapter was written with the assumption that the reader has at least a basic knowledge of HTML and JavaScript. If you are an experienced JavaScript programmer, you can safely skip most of this chapter, perhaps skimming over some of the material at the end on the canvas element and animating with code. On the other hand, if you haven’t done any programming with JavaScript before, we suggest you pick up one of the books mentioned in the summary at the end. If you have programmed in another language, you will benefit from going through the chapter in some detail. While the overview on its own won’t make you a proficient JavaScript programmer, it should enable you to use and build upon the code examples in the book without much difficulty.
Topics covered in this chapter include the following:
- HTML5 and canvas: HTML5 is the latest standard of HTML, and brings exciting new features to the web browser. The most important addition for our purpose is the canvas element, which enables rendering of graphics and animation without the need for external plug-ins.
- JavaScript objects: Objects are the basic building blocks of JavaScript. “Things” in the real world can be represented as objects in JavaScript. Objects have properties. They can also do things by means of methods.
- JavaScript language basics: For completeness, the basic constructs of JavaScript and their syntax are reviewed, such as variables, data types, arrays, operators, functions, math, logic, and loops.
- Events and user interaction: We briefly review some basic concepts and syntax, giving examples of how to make things happen in response to changes in the program or user interaction.
- The canvas coordinate system: This is the equivalent of space in the canvas world. Objects can be positioned on a canvas element using its 2D rendering context. We review the differences between the canvas coordinate system and the usual Cartesian coordinate system in math.
- The canvas drawing API: The ability to draw things using only code is a powerful tool, especially when combined with math and physics. Some of the most common methods of the canvas-drawing application programming interface (API), which will be used throughout the book, are briefly reviewed here.
- Producing animation using code: We review different methods for producing animation using code, and explain the main method we’ll use for physics-based animation in the rest of the book.
HTML5, the canvas element, and JavaScript
HTML5 is the latest incarnation of the HTML standard, and it brings lots of new capabilities to the web browser. We will only present the bare minimum of what you, as a prospective physics programmer using JavaScript, need to know to exploit the most important feature for animation purposes—the canvas element.
For the purpose of this book, you need to know surprisingly little of HTML5. Here is an example of a minimal HTML5 document. Assuming you are familiar with basic HTML markup, much of it should make sense. Note the very simple form of the doctype declaration compared to that of earlier HTML versions.
<!doctype html>
<html>
  <head>
    <meta charset="utf-8">
    <title>A minimal HTML5 document</title>
  </head>
  <body>
    <h1>Hello HTML5!</h1>
  </body>
</html>
The HTML5 documents that we will use in this book won’t be much more complicated than this! Essentially, we’ll add a few more tags for including a canvas element, CSS styling, and JavaScript code.
One of the most exciting additions to the HTML5 specification is the canvas element, which enables rendering graphics, and hence animation, in the web browser without the need for external plug-ins such as the Flash Player. To add a canvas element to an HTML5 document couldn’t be simpler. Just include the following line in the body part of the document:
<canvas id="canvas" width="700" height="500"></canvas>
This produces a canvas instance of the specified dimensions that can be accessed in the Document Object Model (DOM) via its specified ID.
You can style the canvas in the same way as any regular HTML element. In the example canvas-example.html (source files can be downloaded from the http://apress.com web site), we have linked a CSS file named style.css by inserting the following line in the head section:
<link rel="stylesheet" href="style.css">
If you look in the file style.css, you’ll find that we have chosen different background colors for the body section and the canvas element, so that we can better see the latter against the background of the former.
There’s nothing stopping you from adding more than one canvas element to a single HTML5 document. You could even overlap or overlay different canvas instances. This technique can prove very useful for certain purposes, for example to render a fast-moving animation against a fixed background. The file canvas-overlap.html shows a simple example of this, with the file style1.css specifying the required CSS positioning code for the two canvas instances (see Figure 2-1 in the next section).

Figure 2-1. Top: Two overlapping canvas elements. Bottom: JavaScript console in the Chrome browser
You can add JavaScript to an HTML5 document in two ways: by embedding the code within a <script></script> tag within the HTML file itself, or by linking to an external file that contains the JavaScript code. We’ll adopt the latter practice in this book. Let’s take another look at the bouncing ball example from the last chapter. Here is the HTML file for that example in its entirety (bouncing-ball.html):
<!doctype html>
<html>
<head>
<meta charset="utf-8">
<title>Bouncing ball</title>
<link rel="stylesheet" href="style.css">
</head>
<body>
<canvas id="canvas" width="700" height="500"></canvas>
<script src= "bouncing-ball.js"></script>
</body>
</html>
Note the line of code in the body part of the script that links to the file bouncing-ball.js, which contains the JavaScript code. This line is placed right before the end of the closing body tag so that the DOM has a chance to fully load before the script is executed. You have already seen that script in Chapter 1.
The JavaScript debugging console
Modern browsers provide a very useful tool for debugging JavaScript code, known as the console. The best way to learn about what you can do with the console is to experiment with it. To launch the console in the Chrome browser, use the following keyboard shortcut: Control-Shift-J (Win/Linux) or Command-Option-J (Mac).
You can type JavaScript code directly at the command line in the console and press Enter to have it evaluated (see Figure 2-1). Try the following:
2 + 3
console.log("I can do JavaScript");
a=2; b=3; console.log(a*b);
JavaScript objects
If you’ve programmed in an object-oriented programming (OOP) language such as C++, Java, or ActionScript 3.0, you have been exposed to classes as the fundamental constructs upon which objects are based. However, JavaScript is a classless language, although it does have OOP capabilities. In JavaScript, objects themselves are the basic units.
So what are objects, and why are they useful? An object is a rather abstract entity. So before we define one, let us explain it by means of an example. Suppose you want to create particles in a project. The particles will have certain properties and will be able to perform certain functions. You can define a general JavaScript object (called Particle, say) that has these properties and functions. Then every time you need a particle, you can just create an instance of the Particle object. The following sections describe how to do these things.
We can generalize from the example just given to define an object in JavaScript as a collection of properties. A property may in turn be defined as an association between a name and a value. The scope of what constitutes the value of a property is rather generous; it can also include functions—see the next section. This makes objects quite versatile.
In addition to existing JavaScript objects, you can create custom objects with custom properties at will. Examples of predefined objects include String, Array, Date and the Math object (which we’ll discuss later in this chapter). To create a new object, you can use two alternative forms of syntax, either
obj = new Object();
Or
obj = {};
Either of these creates an instance of Object. The resulting object obj has no properties. To ascribe properties and corresponding values to it, as well as to access those properties subsequently, we use the dot notation:
obj.name = "First object";
obj.length = 20;
console.log(obj.name,obj.length);
An alternative syntax is bracket notation:
obj["name"] = "First object";
obj["length"] = 20;
We have seen how to assign properties to objects, but how can we make an object do something? That’s where functions come in. A function is a block of code that is executed when the function’s name is called. The general syntax for a function definition is the following:
function functionName(){
     code block
}
Optionally, functions can carry any number of arguments or parameters:
function functionName(arg1, arg2){
     code block
}
And they can return a value by using a return statement, for example:
function multiply(x,y){
     return x*y;
}
In this example, multiply(2,3) would return the value of 6.
Going back to objects, we define a method as a property of an object that is a function. Hence, methods allow objects to do stuff. A method is defined in the same way as a function, but additionally needs to be assigned as a property of an object. This can be done in a number of ways. One syntax is this:
objectName.methodName = functionName;
For example, to assign the multiply() function as a property of the obj object, we can type
obj.multiply = multiply;
The function multiply is now a method of obj (we could have used a different method name), and obj.multiply(2,3) would then return 6. We’ll come across other ways to assign methods to objects in the next section when we look at constructors.
Prototypes, constructors, and inheritance
An important concept in OOP is that of inheritance, which allows you to build a new object from an existing object. The new object then inherits the properties and methods of the old object. In class-based languages, inheritance applies to classes—this is known as classical inheritance. In JavaScript, objects inherit directly from other objects—this is achieved by means of an internal object known as a prototype. Hence, inheritance in JavaScript is prototype-based.
The prototype is actually a property of any function. A function is also an object and hence has properties. Properties ascribed to a function’s prototype are automatically inherited by new objects constructed from the function object. A function object that is intended to be used for constructing new objects is therefore called a constructor. There is nothing special about a constructor function—any function can be used as a constructor. But there is a widespread convention to denote constructors by function names starting with a capital letter.
Here is an example that shows the syntax in action:
function Particle(pname){
     this.name = pname;
     this.move = function(){
          console.log(this.name + " is moving");
     };
}
This code creates a constructor Particle with a property name and a method move(). The keyword this ensures that these properties are accessible outside the constructor. Any instance of the Particle object can then be created by the new keyword, and it automatically inherits these properties, as shown in this example:
particle1 = new Particle("electron");
particle1.name; //returns"electron"
particle1.move(); // returns "electron is moving"
To add new properties to the parent object so that they are inherited by all instances of the object, you need to assign those properties to the parent object’s prototype. For example, to add a new property mass and a new method stop() to the Particle object, we can type:
Particle.prototype.mass = 1;
Particle.prototype.stop = function(){console.log("I have stopped");};
These are then available to all instances of Particle, even those instantiated previously, for example:
particle1.mass; // returns 1
Note that the value of particle1.mass can thereafter be changed independently of the default value inherited from Particle.prototype.mass, for example:
particle1.mass = 2;      // returns 2
Particle.prototype.mass; // returns 1;
Other properties can be added to the instance and do not, of course, propagate to the parent object or to other instances. For example, this line:
particle1.spin = 0;
adds a new property called spin to particle1 and gives it the value of 0. Other instances of Particle will not have that property by default.
In the example from the preceding section, suppose we assign a new property directly to Particle (and not its prototype), for example:
Particle.lifetime = 100;
This statement creates a static property of Particle that is accessible without the need to instantiate the object. On the other hand, instances of Particle do not inherit the static property.
Naturally, static methods can also be defined. For example, suppose you have the following static method in an object called Physics:
function calcGravity(mass,g) {
     return(mass*g);
}
Physics.calcGravity = calcGravity;
The function Physics.calcGravity(4, 9.8) would then give you the gravity force on a 4kg object on planet Earth.
The Math object is an example of a built-in JavaScript object that has static properties and methods, such as Math.PI and Math.sin().
Example: a Ball object
As an example of the principles discussed in the last few sections, the file ball.js contains code that creates a Ball object:
function Ball (radius, color) {
     this.radius = radius;
     this.color  = color;
     this.x      = 0;
     this.y      = 0;
     this.vx     = 0;
     this.vy     = 0;
}
Ball.prototype.draw = function (context) {
     context.fillStyle = this.color;
     context.beginPath();
     context.arc(this.x, this.y, this.radius, 0, 2*Math.PI, true);
     context.closePath();
     context.fill();
};
Note that the Ball object has been given six properties and one method. The drawing code has been placed in the Ball.draw() method, and takes one compulsory argument, the canvas context on which the ball is to be drawn.
The file ball-object.js provides a simple example of the creation of a ball instance from the Ball object:
var canvas = document.getElementById('canvas'),
var context = canvas.getContext('2d'),
var ball = new Ball(50,'#0000ff'),
ball.x = 100;
ball.y = 100;
ball.draw(context);
We’ll make use of this Ball object extensively throughout the book, making various modifications to it along the way. As an example, the file bouncing-ball-object.js is a modification of the bouncing ball simulation of Chapter 1 to make use of the Ball object—take a look!
JavaScript frameworks, libraries, and APIs
If you’ve had any contact with JavaScript you are probably aware of the existence of numerous libraries and frameworks, such as jQuery and MooTools. These offer the advantage of providing a set of core functionality for commonly needed tasks. However, each has its own learning curve; hence, we will not generally make use of existing libraries or frameworks in this book (the notable exception is when we explore 3D in Chapter 15). Rather, as we proceed through the various chapters, we will create a small library of math- and physics-related objects from scratch.
Likewise, numerous JavaScript APIs exist that bring extended functionality to the web browser. Of particular note is the WebGL API, which uses the HTML5 canvas element to provide 3D graphics capabilities. WebGL is based on OpenGL ES 2.0, and includes shader code that is executed on a computer’s GPU (Graphics Processing Unit). WebGL coding is outside of the scope of this book. However, in Chapter 15 we’ll make use of a JavaScript library that will greatly simplify the task of creating 3D animations in conjunction with WebGL.
In this section, we review essential code elements in the JavaScript language. Special emphasis is placed on their relevance to math and physics.
A variable is a container that holds some data. Here data might mean different things, including numbers and text. A variable is defined, or declared, using the var keyword:
var x;
Subsequently, x may be assigned some value. For example:
x = 2;
This assignment can be done together with the following variable declaration or anywhere else in the code:
var x = 2;
One can also perform arithmetic on x; for example, the following code multiplies x by a number, adds the result to another variable y, and assigns the result to a third variable z:
z = 2*x + y;
This resembles algebra, with some notable differences. The first difference is purely a matter of syntax: We use the operator * to multiply 2 and x. More about operators soon.
The second difference is more subtle and relates to the meaning of an assignment. Although the preceding code may look superficially like an algebraic equation, it is important to note that an assignment is not an equation. The difference can be highlighted by considering an assignment like this one:
x = x + 1;
If this were an algebraic equation, it would imply that 0 = 1, an impossibility! Here, what it means is that we increase the value of x (whatever it is) by 1.
Variables in JavaScript can have values other than numeric values. The type of value that a variable can hold is called its data type.
Data types
Variables in JavaScript have dynamic data types. This means that they can hold different data types at different times. Data types in JavaScript can be divided into two categories: primitive and nonprimitive. The primitive data types are Number, String, Boolean, Undefined, and Null (the latter two are sometimes referred to as special data types); nonprimitive data types include Object, Array, and Function (which are all types of objects). Table 2-1 lists all these data types. The data type of a variable can be determined by the typeof operator.
Table 2-1. Data Types in JavaScript
Data Type |
Description |
|---|---|
Number |
64-bit double-precision floating-point number |
String |
A sequence of 16-bit characters |
Boolean |
Has two possible values: true and false, or 1 and 0 |
Undefined |
Returned for a nonexistent object property or a variable without a value |
Null |
Has only one value: null |
Object |
Holds a collection of properties and methods |
Array |
An object consisting of a list of data of any type |
Function |
A callable object that executes a block of code |
Numbers
Unlike in many other programming languages, there is only one numeric data type in JavaScript: Number. There is no distinction between integers and floating-point numbers, for instance.
The Number type is a double-precision 64-bit floating-point number according to the IEEE 754 specification. It is able to store both positive and negative real numbers (not only whole numbers, but those with fractional parts, too). The maximum value that Number can store is 1.8 × 10308. Given that the number of atoms in the visible universe is estimated to be “only” 1080, this should be enough even for the biggest scientific calculations! It also allows for numbers as small as 5 × 10–324.
The Number data type also includes the following special values: NaN (not a number), Infinity, and –Infinity. NaN signifies that a numeric value has not been assigned. You’d get NaN as a result of a mathematical operation that produces nonreal or undefined results (for example, by taking the square root of –1 or dividing 0 by 0). Infinity is the result of dividing a nonzero number by 0. You will get positive or negative infinity depending on the sign of the number you are dividing by zero.
A String is a group of characters. For example, the following
var str = "Hello there!";
console.log(str);
would give this output: "Hello there!"
Note that the value of a String must be enclosed within quotes (single or double). Double quotes can be contained in strings enclosed by single quotes and vice-versa.
Booleans
A Boolean can have only one of two values: true or false. For example:
var bln = false;
Note that the value true or false is not enclosed within quotes; it is not a string. Particular care must be taken, because JavaScript variables are of dynamic type. Hence, if bln is later assigned the following value:
bln = "true";
it will become a string variable because of the quotes!
Undefined and Null
The Undefined data type has a single value: undefined. A nonexistent property, or a variable that has been declared but not assigned a value, assumes a value of undefined. A function without a return statement returns undefined. The unsupplied argument of a function also assumes an undefined value.
The Null data type also has a single value: null. A crucial difference between null and undefined is that null is assigned to a variable intentionally, for example
var noVal = null;
Using the typeof operator on a variable with a null value reveals an Object type rather than an Undefined type or a Null type.
Objects, Functions, and Arrays
We have already come across objects and functions earlier in this chapter. Just like functions, arrays are particular types of objects. An array is an object that holds a collection of items. Suppose you have to keep track of a number of particles in your animation. You could do that by naming them individually as particle1, particle2, particle3, and so on. That might work fine if you have a few particles, but what if you have 100 or 10,000? That’s where an array comes in handy. You can just define an array called particles, for example, and put all the particles in there.
A simple way to create an array is by specifying the array elements as a comma-separated list enclosed by square brackets:
var arr = new Array();
arr = [2, 4, 6];
arr[1]; // gives 4
As the preceding code snippet shows, the resulting array elements are then accessed by arr[n], where n is an unsigned integer called the array index. Note that the array index starts from 0, so that the first array element is arr[0]. Array elements can also be assigned values individually, for example to create a fourth array element and assign it a value of 8:
arr[3] = 8;
There are several other ways of creating arrays. There are also many rules for the manipulation of arrays and array elements. We’ll come across examples of those soon.
You can also create multidimensional arrays, by creating arrays whose elements are also arrays. The following example creates a two-dimensional array from two one-dimensional arrays:
var xArr = new Array();
var yArr = new Array();
xArr     = [1,2];
yArr     = [3,4];
var zArr = new Array(xArr,yArr);
zArr[0][1]; // gives 2
zArr[1][0]; // gives 3
Note that we’ve created the third array in a different way, by passing the array elements directly as arguments in Array().
It is possible to add different types of data into the same array. That’s because arrays in JavaScript are not typed, unlike in some other languages like C++ and Java.
You can perform basic arithmetic with numbers with the usual operators (+, -, * and /, respectively) for adding, subtracting, multiplying, and dividing numbers.
There are also a number of other, less obvious operators. The modulo operator % gives the remainder when a number is divided by another. The increment operator (++) increases the value of a number by 1, and the decrement operator (--) reduces the value of a number by 1.
var x = 5;
var y = 3;
x%y; // gives 2
var z;
z = x++; // assigns the value of x to z, then increments x
console.log(z); // gives 5
z = ++x // increments the value of x, then assigns it to z
console.log(z); //gives 7
Operators can also be combined with assignment. For example:
var a = 1;
a = a + 1;
console.log(a); // gives 2
a += 1;         // shortened form of a = a + 1
console.log(a); // gives 3
a = 4*a;
console.log(a); // gives 12
a *= 4;         // shortened form of a = a*4
console.log(a); // gives 48
Math
Besides the basic operators described in the last section, the Math object contains many more mathematical functions.
Table 2-2 gives some common examples of Math functions and what they do. In the next chapter you will encounter many more Math methods, such as trigonometric, exponential, and logarithmic functions.
Table 2-2. Math Methods
Method |
What it returns |
|---|---|
Math.abs(a) |
absolute value of a |
Math.pow(a,b) |
a to the power of b |
Math.sqrt(a) |
square root of a |
Math.ceil(a) |
smallest integer that is larger than a |
Math.floor(a) |
largest integer that is smaller than a |
Math.round(a) |
nearest integer to a |
Math.max(a,b,c,...) |
largest of a, b, c, … |
Math.min(a,b,c,...) |
smallest of a, b, c, … |
Math.random() |
a pseudo-random number n, where 0 <= n < 1 |
The last method, Math.random(), is an interesting one. It generates a random number between 0 and 1, including 0 but excluding 1. Strictly speaking, the number is pseudorandom because generating it follows an algorithm. But it is good enough for most purposes you’re likely to use it for.
Here is an example of how to use the Math.random() method. In bouncing-ball-random.js, we have made a simple modification so that each time the animation runs, the ball has a different initial velocity. We do this by initializing the horizontal and vertical speeds as follows:
vx = Math.random()*5;
vy = (Math.random()-0.5)*4;
The first line sets the initial horizontal speed to be between 0 and 5. The second line sets the vertical speed between –2 and 2. What does a negative vertical speed mean? It means a speed in the direction opposite to the direction of increasing y. Because in the canvas coordinate system y increases as we go down (as we’ll see later in this chapter), negative vertical speed means that the object moves upward. So each time you reload the page, you’ll see the ball initially move up or down with a different horizontal and vertical speed.
Logic
In any programming language, logic is an essential part of coding. Logic enables code to take different actions based on the outcome of some expression.
The simplest way to implement logic in JavaScript is through a basic ifstatement, which has the following structure:
if (logical expression){
     do this code
}
An if statement basically checks if a logical expression is true. For example, in the bouncing-ball.js code, there is the following logic:
if (y > canvas.height - radius){
     y = canvas.height - radius;
     vy *= -0.8;
}
This tests whether the ball’s vertical position is below the floor level and, if so, repositions the ball exactly at the floor level and then multiplies its vertical speed by –0.8. In this example, the logical expression to be tested is y > canvas.height – radius, and > is a logical operator that means “greater than.”
Other commonly used logical operators include < (less than), == (equal to), <= (less than or equal to), >= (greater than or equal to), and != (not equal to). There is also a strict equality operator ===, which differs from the equality operator == in that it takes the data type into account when comparing two variables.
Care must be taken not to confuse the equality operator == with the assignment operator =. This is a common source of mistakes and consequent debugging frustration!
There are also && (and) and || (or) operators, which enable you to combine conditions:
if (a < 10 || b < 20){
     c = a+b;
}
There are more elaborate forms of the if statement. The if else statement is of this form:
if(logical expression){
     do this if expression is true
} else {
     do this if expression is false
}
You can also use an if else if ... else statement to check for different possibilities:
if (a == 0){
     do this if a is zero
} else if (a < 0 ) {
     do this if a is negative
} else if (a > 0) {
     do this if a is positive
} else {
     do this if a is NaN
}
Other logical constructs include the switch and the ternary conditional operator, but we won’t be using them in this book.
Try this exercise: modify the bouncing-ball-random.js code to recycle the ball so that when it disappears at the right boundary, it starts again at the initial location but with a new random velocity. The answer is in bouncing-ball-recycled.js.
Loops
Just like logic, looping is an essential ingredient of programming. One of the things that make computers useful is their capability to repeat operations over and over again, much more quickly than humans, and without ever getting bored. They do it by looping.
In JavaScript there are several kinds of loops. We’ll review just a couple of those here.
The forloop is the one that we’ll make most use of. Here is an example of a for loop, used for summing the first 100 positive integers:
var sum = 0;
for (var i = 1; i <= 100; i++) {
     sum += i;
}
console.log(sum);
The first line initializes the value of the variable sum to 0. The next line sets up the loop—the variable i is a counter, set to start at 1 (you could start it from 0 or any other integer), up to and including 100, and told to increment by 1 (i++) on each step. So the loop executes 100 times, each time adding the current value of i to sum.
Looping over elements of an array is an especially useful technique. Suppose you want to animate five bouncing balls rather than one. To see how you’d do it, take a look at the code in bouncing-balls.js, which builds upon the code in bouncing-ball-object.js.
The main idea is to modify the init() function so that we create a bunch of balls, give each one a position and velocity, and put them into an array named balls using the push() method:
function init() {
     balls = new Array();
     for (var i=0; i<numBalls; i++){
          var ball = new Ball(radius,color);
          ball.x = 50;
          ball.y = 75;
          ball.vx = Math.random()*5;
          ball.vy = (Math.random()-0.5)*4;
          ball.draw(context);
          balls.push(ball);
     }
     setInterval(onEachStep, 1000/60); // 60 fps
};
Naturally, the event handler (see the section “Event listeners and handlers” later in this chapter) is also modified to loop over all the balls:
function onEachStep() {
     context.clearRect(0, 0, canvas.width, canvas.height);
     for (var i=0; i<numBalls; i++){
          var ball = balls[i];
          ball.vy += g;
          ball.x += ball.vx;
          ball.y += ball.vy;
          if (ball.y > canvas.height - radius){
               ball.y = canvas.height - radius;
               ball.vy *= -0.8;
          }
          if (ball.x > canvas.width + radius){
               ball.x = -radius;
          }
          ball.draw(context);
     }
};
Don’t worry that the balls just pass through each other when they meet. That’s because your code doesn’t know about collision detection yet! We’ll fix that in a later chapter.
Note that in order to use a for loop, you need to know exactly how many times you want to loop. If you don’t, or if you have array keys which are discontinuous, then there are other options, such as for ... in, for each ... in, and while loops. We won’t describe the first two as we don’t make use of them in this book.
In a while loop, you tell the loop to execute as long as some condition is true, no matter how many times through the loop are needed. The basic structure of a while loop is as follows:
while (some condition) {
     do something
}
For example, suppose you want to know the minimum number of consecutive integers you must sum, starting from 1, to obtain at least 1000. Here is a while loop to do this:
var sum = 0;
var i = 1;
while (sum < 1000) {
     sum += i;
     i++;
}
console.log(i-1);
You can also use a while loop in the same way as a for loop, to perform an operation a fixed number of times, for example, to sum the first 100 positive integers:
var sum = 0;
var i = 1;
while (i <= 100) {
     sum += i;
     i++;
}
console.log(sum);
Be careful with while loops— if the condition is always true, you’ll end up with an infinite loop, and the code will never stop executing!
A variation is a do ... while loop, in which the condition is checked after the loop instead of before. This ensures that the code within the loop executes at least once:
do {
     do something
} while (some condition);
An event allows a given course of action to be replaced by a different course of action. User interaction, for example via the keyboard or mouse, generates special event types. Events and user interaction contribute in a major way to making interactive media as interesting as they are. JavaScript can be used to react to HTML DOM events.
There are two aspects to event management: tracking events and responding to them. Event listeners “listen” to events, and event handlers take the appropriate action. The listeners are HTML DOM elements. The syntax for setting up a particular DOM element as a listener for a particular event is as follows:
someElement.addEventListener(event_type, handler [, useCapture]);
The different types of events that can be specified as event_type will be discussed in the next section. Here handler is simply a function that is called whenever an event of type event_type happens. The third argument, useCapture, is usually optional; however, in some older browser implementations it is not. Hence, we will always specify it as false in this book. The value of useCapture determines how events bubble up the DOM tree, and it need not concern us here.
You can also remove an event listener in exactly the same way, replacing addEventListener by removeEventListener:
someElement.removeEventListener(event_type, handler [, useCapture]);User interaction: keyboard, mouse, and touch events
The events that we’re generally interested in are keyboard, mouse, and touch events. These types of events are great because they allow the user to interact with an animation or simulation. We don’t have space for reviewing all the different types of events, and will merely provide some examples to explain the usage. The reader is referred to the books mentioned at the end of this chapter for more detailed information. As a simple example, suppose we want to pause the bouncing ball animation when the user clicks and holds down the mouse, and resume it when the mouse is released. This can be achieved easily using the 'mousedown' and 'mouseup' events. Just modify the init() method as follows:
function init() {
     canvas.addEventListener('mousedown',stopAnim,false);
     canvas.addEventListener('mouseup',startAnim,false);
     startAnim();
};
and include these event handlers:
function startAnim() {
     interval = setInterval(onEachStep, 1000/60); // 60 fps
}
function stopAnim() {
     clearInterval(interval);
}
The code is in bouncing-ball-pause.js.
Often one wants to drag and move an object in an interactive animation. A simple trick to do that is to force the position of the object to match that of the mouse cursor when the mouse is pressed on the object and moved around. To illustrate the method, we will modify the bouncing-ball-object.js code, so that now you can click the ball, move it anywhere on the stage, and then release it again.
To do this, make the following changes. First, add the following code block to the init() function:
canvas.addEventListener('mousedown', function () {
   canvas.addEventListener('mousemove',onDrag,false);
   canvas.addEventListener('mouseup',onDrop,false);
}, false);
This sets up a 'mousedown' event listener, which in turn sets up 'mousemove' and 'mouseup' listeners. Then add the following event handlers:
function onDrag(evt){
     isDragging = true;
     ball.x = evt.clientX;
     ball.y = evt.clientY;
}
function onDrop(){
     isDragging = false;
     canvas.removeEventListener('mousemove',onDrag,false);
     canvas.removeEventListener('mouseup',onDrop,false);
}
The clientX and clientY properties provide a simple way to track the mouse location. The isDragging Boolean variable must be declared and set to false at the beginning of the code:
var isDragging = false;
As its name indicates, isDragging tells us if the object is being dragged. This is needed to stop the physics part of the code from executing while dragging is taking place. Hence, we wrap the physics code in the following if block in function onEachStep:
if (isDragging==false){
     execute physics code
}
You will also need to set the initial values of vx and vy to zero, the initial value of ball.y to canvas.height – radius (so that it is initially stationary on the ground), and ball.x to any suitable value so that it is visible on the stage. The modified code is in bouncing-ball-drag-drop.js. Try it out. You will notice a couple of oddities—first, the ball moves to the mouse position even if you click outside the ball; second, the ball’s center jumps to the mouse location. You will be able to fix these issues when you learn how to work out the distance between two points in the next chapter.
The canvas coordinate system
In the real world things exist in space. In the HTML5 world the equivalent is that objects exist on the canvas element. To know how to position objects on canvas, it is necessary to understand the canvas coordinate system.
The canvas coordinate system is somewhat different from the usual Cartesian system of coordinates in math. In normal coordinate geometry, the x-coordinate runs from left to right, and the y-coordinate runs from bottom to top (see Figure 2-2b). In canvas, however, the y-coordinate runs in the opposite way, from top to bottom (see Figure 2-2a). The origin is in the top-left corner of the visible stage.
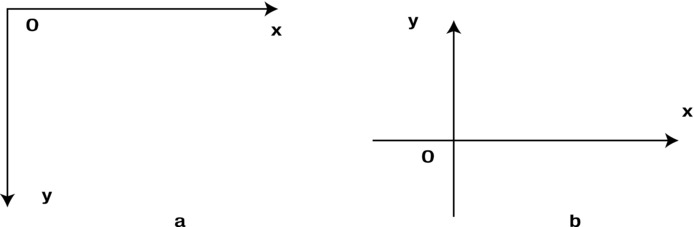
Figure 2-2. 2D coordinate systems compared: (a) in canvas and (b) math
The usual Cartesian system is called a right-handed coordinate system because if you hold your right hand with your fingers partly closed and your thumb pointing out of the paper, your fingers will point from the positive x-axis to the positive y-axis. By implication, the coordinate system in canvas is a left-handed coordinate system.
Another oddity in the canvas coordinate system is that angles are measured in a clockwise sense from the direction of the positive x-axis (see Figure 2-3a). The usual convention in math is that angles are measured counterclockwise from the positive x-axis (see Figure 2-3b).
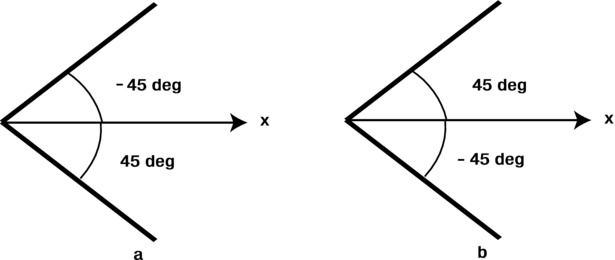
Figure 2-3. Angles as measured in (a) canvas and (b) math coordinate systems
The canvas drawing application programming interface (API) allows you to draw things such as shapes and fills using JavaScript. The canvas drawing API provides a rich set of functionality through a relatively small number of methods. We will only go through a few for illustrative purposes here.
The object that allows access to the canvas drawing API is the canvas rendering context. The API is nothing but a collection of properties and methods of that object. The first two lines of code in bouncing-ball.js in Chapter 1 show how to access the canvas context:
var canvas = document.getElementById('canvas'),
var context = canvas.getContext('2d'),
The string '2d' in the canvas element’s getContext method is self-explanatory: the HTML5 standard specifies a 2D drawing API, which is supported by all modern browsers.
The canvas context has a number of properties and methods—rather than list all of them, we’ll pick just a few to illustrate how we can accomplish certain common drawing tasks.
Drawing lines and curves
The following are a few essential properties and methods of the canvas context for drawing basic shapes using lines and curves:
- The strokeStyle property specifies the line color in CSS-style format. The default value is '#000000' (black).
- The lineWidth property specifies the line thickness in pixels. The default value is 1.
- The beginPath() method resets the current path. A path is a collection of subpaths. Each subpath is a set of points connected by straight or curved lines.
- The closePath() method closes the current subpath and starts a new one from the end of the closed subpath.
- The moveTo(x, y) method moves the cursor to the specified location (x, y) without drawing anything, that is, it creates a new subpath from the specified point.
- The lineTo(x, y) method draws a straight line from the current location to the new location (x, y) specified in its argument, that is, it adds a new point to a subpath and connects that point to the previous point in the subpath with a straight line.
- The arc(x, y, radius, startAngle, endAngle, anticlockwise) method adds an arc to the path with center (x, y), and of the specified radius. The starting and ending angles are in radians (see Chapter 3). The anticlockwise parameter is a boolean: if true, the arc is drawn in a counterclockwise direction; if false, it is drawn in a clockwise direction.
- The rect(x, y, w, h) method creates a new closed rectangular subpath with the upper-left corner at (x, y) and width w and height h.
- The stroke() method renders the current subpath using the current stroke styles.
- The strokeRect(x, y, w, h) method combines the last two methods to render an outline of the specified rectangle.
As a simple example, to draw a blue 2-pixel straight line from the point (50, 100) to (250, 400), you would do something like this:
context.strokeStyle = '#0000ff';
context.lineWidth = 2;
context.beginPath() ;
context.moveTo(50, 100);
context.lineTo(250, 400);
context.stroke();
Note that if the stroke() method is not invoked, then nothing will be rendered, and the path will be invisible!
As an exercise, try drawing a grid using these methods. See the code in drawing-api-grid.js.
Producing fills is a straightforward process with the aid of the following commands:
- The fillStyle property gets or sets the style for filling shapes. It can be a color or a gradient.
- The fill() method fills subpaths using the current fill style.
- The fillRect(x, y, w, h) method creates a filled rectangle with the upper-left corner at (x, y) and width w and height h, using the current fill style.
The following code snippet produces a green rectangle with a blue border:
context.strokeStyle = '#0000ff';
context.lineWidth = 2;
context.beginPath() ;
context.moveTo(50, 50);
context.lineTo(150, 50);
context.lineTo(150, 200);
context.lineTo(50, 200);
context.lineTo(50, 50);
context.stroke();
context.fillStyle = '#00ff00';
context.fill();
And this single additional line of code will produce a green rectangle without a border:
context.fillRect(250,50,150,100);
You can use the following additional methods for creating gradients:
- The createLinearGradient(x0, y0, x1, y1) method creates a linear gradient object, where (x0, y0) is the start point and (x1, y1) is the end point of the gradient.
- The createRadialGradient(x0, y0, r0, x1, y1, r1) method creates a radial gradient object, where (x0, y0) and r0 are the center and radius of the starting circle, and (x1, y1) and r1 are the center and radius of the ending circle of the gradient.
- The Gradient.addColorStop(offset, color) method adds the specified color and offset position in a canvas gradient object. The offset is a decimal number between 0 and 1, where 0 and 1 represent the start and end points in a gradient.
The following example creates a ball with a radial gradient, against a background “sky” represented using a linear gradient (see Figure 2-4).
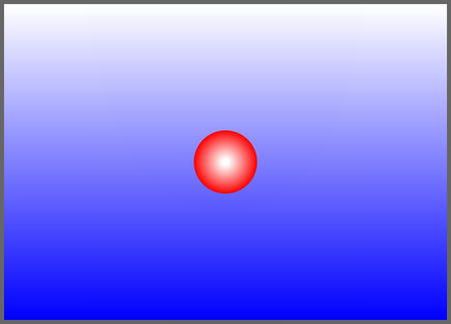
Figure 2-4. A linear gradient and a radial gradient produced using the canvas drawing API
gradient = context.createLinearGradient(0,0,0,500);
gradient.addColorStop(0,'ffffff'),
gradient.addColorStop(1,'0000ff'),
context.fillStyle = gradient;
context.fillRect(0,0,700,500);

gradient1 = context.createRadialGradient(350,250,5,350,250,50);
gradient1.addColorStop(0,'ffffff'),
gradient1.addColorStop(1,'ff0000'),
context.fillStyle = gradient1;
context.arc(350,250,50,0,2*Math.PI,true);
context.fill();
Animating using the canvas context
So far we have been drawing static shapes—but how do we animate objects on the canvas? The approach is very basic—simply erase everything and redraw over and over again! This can be accomplished using the clearRect() method: The clearRect(x, y, w, h) method clears the pixels on a canvas context within a rectangle with the upper-left corner at (x, y) and width w and height h.
The following line of code clears the entire content of the canvas element:
context.clearRect(0,0,canvas.width,canvas.height);
Repeated application of clearRect() before each time step then creates an empty canvas context to draw on. The next section describes how to do the time-stepping.
Producing animation using code
Producing animation using code is one of the main themes of this book. In addition, since our focus is to produce physics-based animation, we need a method to measure the advancement of time. We need a clock. We have already introduced the setInterval() function, which to some extent accomplishes this task. So let’s begin by looking at this and related functions.
Using JavaScript timers
The “old” classic way of animating in JavaScript involves the use of a timer function, There are a couple of those: setTimeout() and setInterval(). The latter is what we have been using in the examples so far.
- The setTimeout(func,timeDelay) function will execute the specified function func() once after a delay of timeDelay (in milliseconds).
- The setInterval(func,timeDelay) function will execute the specified function func() repeatedly after successive delays of timeDelay (in milliseconds).
- The corresponding functions clearTimeout(timerId) and clearInterval(timerId) clear the setTimeout() and setInterval() timers respectively, where timerId is a variable to which they are assigned.
The generic syntax for the use of these functions is demonstrated here:
intervalID = setInterval(func,timeDelay);
function timeDelay(){
     some code
}
clearInterval(intervalId);
We have already encountered the use of setInterval()in various versions of the bouncing ball simulation. A stripped-down example of the use of setInterval for animation is given in the file timer-example.js.
We can specify the time delay in the setInterval() function as 1000/fps, where fps is the frame rate of the animation, that is, the number of updates or frames per second.
How is the frame rate related to the perceived speed of an animation? To answer this question, we’ll need to do some simple math. Suppose that we want to move an object at a constant velocity of 100 pixels per second, and suppose that the frame rate of the animation is 50 fps. Let’s increment the object’s horizontal position by vx per frame as in the bouncing ball example:
function onEachStep(){
     ball.x += vx;
}
In other words, vx is the horizontal velocity in units of pixels per frame. What value must we give vx? Well, the velocity in units of pixels per second is 100, and there are 50 frames per second. So the value of vx is 100/50 or 2. In general, we have the following relationship:
(Velocity in pixels per second) = (Velocity in pixels per frame) × (Frame rate in fps)
Okay, so if we set vx = 2, we should see the ball moving at 100 pixels per second. The speed in pixels per second is what we actually perceive on the screen. However, there is no guarantee that the frame rate at which the movie runs will be exactly the frame rate that is set. Suppose that your machine is slow or there are other things running on it, so that the actual frame rate is closer to 30 fps. This gives an actual velocity of only 60 pixels per second. Your object appears to be moving slower. Hence, setting the frame rate in a setInterval() function does not guarantee the speed of an animation. We will look at how to resolve this problem shortly. But first we’ll introduce another, more recent, method of animation using JavaScript—the requestAnimationFrame() method.
In recent years, a new API has emerged among web browsers, allowing developers to create HTML5 animations that benefit from browser-based optimizations, allowing significant performance gains over the old setInterval() and setTimeout() methods.
The function requestAnimationFrame(someFunction) calls the function someFunction() before redrawing the browser screen. Some browser implementations also include a second parameter to specify the HTML5 element to which the redrawing applies, for example requestAnimationFrame(someFunction, canvas).
To create an animation loop using requestAnimationFrame(), you just include it within the function that it calls! For example:
function animFrame(){
     requestAnimationFrame(animFrame,canvas);
     onEachStep();
}
The onEachStep() function is the one that contains the animation code. As an example, the timer-example.js code has been modified to use requestAnimationFrame(), and the resulting code is given in frame-example.js. This is an important example, since we will use the basic code setup within it as the basis for most of the animations in the rest of the book. We therefore reproduce the code in its entirety here for quick reference:
var canvas = document.getElementById('canvas'),
var context = canvas.getContext('2d'),
var ball;

window.onload = init;

function init() {
     ball = new Ball(20,"#0000ff");
     ball.x = 50; ball.y = 250;
     ball.vx = 2;
     ball.draw(context);
     animFrame();
};
function animFrame(){
     requestAnimationFrame(animFrame,canvas);
     onEachStep();
};
function onEachStep() {
     ball.x += ball.vx;
     context.clearRect(0, 0, canvas.width, canvas.height);
     ball.draw(context);
};
Despite the superior performance of the requestAnimationFrame() function compared to setInterval() and setTimeout(), it suffers from the limitation that there is no built-in way to control the frame rate. A simple trick to constrain the frame rate is to nest the requestAnimationFrame() function within a setTimeout() function. In the previous example, we can modify the animFrame() function to the following:
function animFrame(){
     setTimeout(function() {
          requestAnimationFrame(animFrame,canvas);
          onEachStep();
     }, 1000/60);
}
This of course does not guarantee that the frame rate will be exactly 60 fps. One of the main problems is that the time interval between timer events actually includes the time it takes to execute all the code within the event handler on top of the specified delay. If there is a lot of code in your event handler, it might mean your timer ticking rate is substantially slower than you specified.
Using getTime() to compute elapsed time
Bad timekeeping can really mess up your physics. For really accurate timekeeping, what we need is a way to measure actual elapsed time. Fortunately, there is a simple way to do this: using the getTime() function. And the method can be used with either setInterval() or requestAnimationFrame().
The getTime() function is a method of the built-in JavaScript Date object, and it returns an integer equal to the number of milliseconds that have elapsed since midnight on 1 January 1970. So if you call Date.getTime() twice, in different parts of the code, and work out the difference in the returned value, that would give you the time that has elapsed between those two calls.
How does that help us with animation? The point is that we can calculate the actual time that has elapsed since an object’s position was last updated. Then we can use that time to calculate the amount by which to move it.
To see this in action, getTime-example.js modifies the frame-example.js code to animate the motion of a ball moving at constant horizontal velocity vx. Here is the modified event handler:
function onEachStep() {
     var t1 = new Date().getTime(); // current time in milliseconds
     dt = 0.001*(t1-t0); // time elapsed in seconds since last call
     t0 = t1; // reset t0
     ball.x += ball.vx * dt;
     context.clearRect(0, 0, canvas.width, canvas.height);
     ball.draw(context);
};
We added three lines here. The first line gets the current time in milliseconds by invoking Date().getTime(). The second line works out the time elapsed dt (this notation will become clear in the next chapter) since the last time the call to onEachStep() was made. Here t0 is a variable initialized to new Date().getTime() before the start of the animation. The next line resets t0 so that it can be used for the next call.
You’ll see also that we modified the code that updates the ball’s position. We’re now adding an amount vx*dt to the ball’s current position instead of vx, as before. What’s going on here? Well, this is the whole point of calculating the elapsed time dt. You see, previously we were interpreting the velocity vx as pixels moved per frame (if using requestAnimationFrame) or per tick (if using setInterval). In doing so, we were assuming that the frames or ticks were of fixed duration, and that duration was just what we specified in the frame rate or timer delay parameter. As long as those assumptions work, we can use frames or timer ticks as a good proxy for time, and thinking of velocity in terms of pixels per frame or timer tick is a good idea. But what we’re saying is this: let’s get back to thinking about velocity in the correct way, as pixels moved per second. Therefore, in dt seconds, the distance moved is vx*dt, so that the new position is this:
ball.x += vx*dt;
The advantage of going back to the real meaning of velocity is that the motion is always computed correctly, independently of the frame rate or timer tick rate. This technique will come in handy when we start looking at more complex physics. But even with this simple example, you can see how the animation reflects real physics by varying the value of ball.vx, and seeing how the ball moves exactly at the specified velocity in pixels per second.
Here is the code for getTime-example.as in its entirety:
var canvas = document.getElementById('canvas'),
var context = canvas.getContext('2d'),
var ball;
var t;

window.onload = init;

function init() {
     ball = new Ball(20,"#0000ff");
     ball.x = 50; ball.y = 250;
     ball.vx = 200;
     ball.draw(context);
     t = new Date().getTime(); // initialize value of t
     animFrame();
};
function animFrame(){
     requestAnimationFrame(animFrame,canvas);
     onEachStep();
};
function onEachStep() {
     var dt = (new Date().getTime() - t)/1000; // time elapsed in seconds since last call
     t = new Date().getTime(); // reset t
     ball.x += ball.vx * dt;
     context.clearRect(0, 0, canvas.width, canvas.height);
     ball.draw(context);
};
As you’ll now be aware, the methods for animating objects with code we’re using work by calculating updates to the object’s position “on the fly.” It might also be possible to precalculate the motion of an object and animate it afterward. This can be done by using a for or while loop to represent time-stepping, calculating the particles position at each step and saving the position coordinates in an array.
Why would you want to do that? It can be useful, for example, if calculations take too long to perform and cannot fit within a reasonable frame rate.
The downside of this method is that it doesn’t work with interactivity. Because user interaction is usually an important aspect of physics-based applications, we won’t generally use this approach.
Summary
Wow! This chapter has been a whirlwind tour through vast stretches of JavaScript and the HTML5 canvas. Hopefully, you’ve now gained an appreciation of how they can be useful for physics-based animation.
If you’ve struggled with any of the material in this chapter, we highly recommend that you brush up on your knowledge of JavaScript and HTML5. Here are a couple of books that we particularly recommend for beginners:
- Foundation HTML5 Canvas: For Games and Entertainment, by Rob Hawkes (Apress, ISBN: 978-1430232919).
- Foundation HTML5 Animation with JavaScript, by Billy Lamberta and Keith Peters (Apress, ISBN: 978-1430236658).