
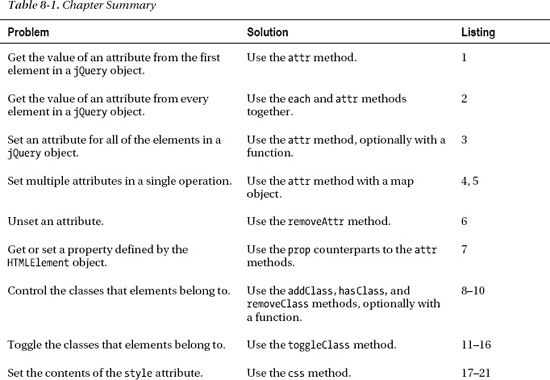
C H A P T E R 8
Manipulating Elements
In this chapter, I'll show you how to use jQuery to work with elements, including how to get and set attributes, how to use the jQuery convenience methods for working with classes and CSS properties, and how to get and set HTML and text content. I'll also show you a nice feature that allows you to associate data with elements. jQuery has its own internal mechanism for storing this data but also supports the new HTML5 data attributes. Table 8-1 provides the summary for this chapter.
Working with Attributes and Properties
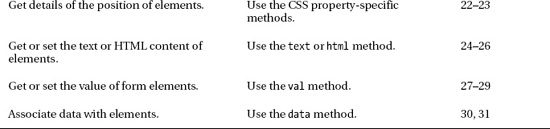
You can get and set the values of attributes for the elements in a jQuery object. Table 8-2 shows the methods that relate to attributes.
When you call the attr method with a single argument, jQuery returns the value of the specified attribute from the first element in the selection. Listing 8-1 contains a demonstration.
Listing 8-1. Reading the Value of an Attribute
<!DOCTYPE html>
<html>
<head>
<title>Example</title>
<script src="jquery-1.7.js" type="text/javascript"></script>
<link rel="stylesheet" type="text/css" href="styles.css"/>
<script type="text/javascript">
$(document).ready(function() {
var srcValue = $('img').attr('src'),
console.log("Attribute value: " + srcValue);
});
</script>
</head>
<body>
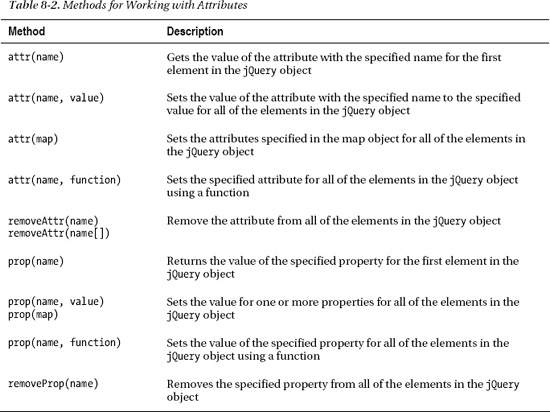
<h1>Jacqui's Flower Shop</h1>
<form method="post">
<div id="oblock">
<div class="dtable">
<div id="row1" class="drow">
<div class="dcell">
<img src="astor.png"/><label for="astor">Astor:</label>
<input name="astor" value="0" required />
</div>
<div class="dcell">
<img src="daffodil.png"/><label for="daffodil">Daffodil:</label>
<input name="daffodil" value="0" required />
</div>
<div class="dcell">
<img src="rose.png"/><label for="rose">Rose:</label>
<input name="rose" value="0" required />
</div>
</div>
<div id="row2"class="drow">
<div class="dcell">
<img src="peony.png"/><label for="peony">Peony:</label>
<input name="peony" value="0" required />
</div>
<div class="dcell">
<img src="primula.png"/><label for="primula">Primula:</label>
<input name="primula" value="0" required />
</div>
<div class="dcell">
<img src="snowdrop.png"/><label for="snowdrop">Snowdrop:</label>
<input name="snowdrop" value="0" required />
</div>
</div
            </div>

        </div>

        <div id="buttonDiv"><button type="submit">Place Order</button></div>

    </form>

</body>

</html>
In this script, I select all of the img elements in the document and then use the attr method to get the value for the src attribute. The result from the attr method when you read an attribute value is a string, which I write out to the console. The output from this script is as follows:
Attribute value: astor.png
You can combine the each method with attr to read the value of an attribute for all of the elements in a jQuery object. I described the each method in Chapter 5, and Listing 8-2 shows how you can use it in this situation.
Listing 8-2. Using the each and attr Methods to Read Attribute Values from Multiple Objects
...

<script type="text/javascript">

    $(document).ready(function() {

        $('img').each(function(index, elem) {

            var srcValue = $(elem).attr('src'),

            console.log("Attribute value: " + srcValue);

        });

    });

</script>

...
In this script, I pass the HTMLElement object passed as the argument to the function to create a new jQuery object via the $ function. This object contains only one element, which is ideally suited to the attr method. The output from this script is as follows:
Attribute value: astor.png

Attribute value: daffodil.png

Attribute value: rose.png

Attribute value: peony.png

Attribute value: primula.png

Attribute value: snowdrop.png
Setting an Attribute Value
When you use the attr method to set an attribute value, the change is applied to all of the elements in the jQuery object. This is in contract to the read version of this method, which returns a value from only a single element. When setting a value, the attr method returns a jQuery object, which means that you can perform method chaining. Listing 8-3 demonstrates how to set an attribute.
Listing 8-3. Setting an Attribute
...

<script type="text/javascript">

    $(document).ready(function() {

        $('img').attr("src", "lily.png");

    });

</script>

...
In this script, I select all of the img elements and set the value of the src attribute to lily.png. This value is applied to the src attribute of all the selected elements, and you can see the effect in Figure 8-1.
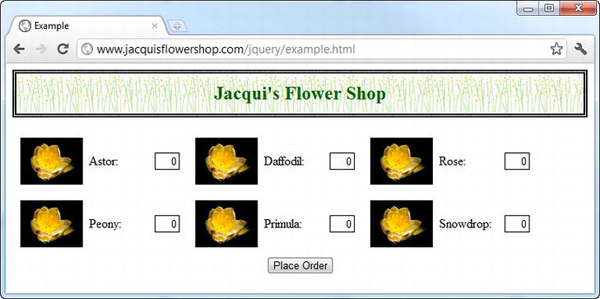
Figure 8-1. Setting an attribute to the same value for multiple elements
Setting Multiple Attributes
You can set multiple attributes in a single method call by passing an object to the attr method. The properties of this object are interpreted as the attribute names, and the property values will be used as the attribute values. This is known as a map object. Listing 8-4 provides a demonstration.
Listing 8-4. Setting Multiple Elements Using a Map Object
...

<script type="text/javascript">

    $(document).ready(function() {

        var attrValues = {

            src: 'lily.png',

            style: 'border: thick solid red'

        };


        $('img').attr(attrValues);


</script>

...
In this script I create a map object that has properties called src and style. I select the img elements in the document and pass the map object to the attr value. You can see the effect in Figure 8-2.
![]() Tip Although I have set the
Tip Although I have set the style property explicitly in this example, jQuery provides some methods that simplify working with CSS. See the “Working with CSS” section in this chapter for details.
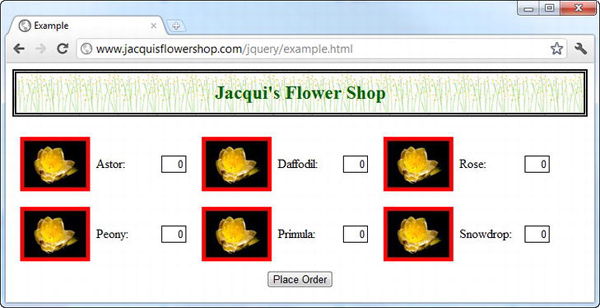
Figure 8-2. Setting multiple attributes with the attr method
Setting Attribute Values Dynamically
You can tailor the values that you assign to an attribute by passing a function to the attr method. Listing 8-5 provides a demonstration.
Listing 8-5. Setting Attribute Values with a Function
...

<script type="text/javascript">

    $(document).ready(function() {

        $('img').attr("src", function(index, oldVal) {

            if (oldVal.indexOf("rose") > -1) {

                return "lily.png";

            } else if ($(this).closest('#row2').length > 0) {

                return "carnation.png";

            }

        });

    });

</script>

...
The arguments passed to the function are the index of the element being processed and the old attribute value. The this variable is set to the HTMLElement being processed. If you want to change the attribute, then your function must return a string containing the new value. If you don't return a result, then the existing value is used. In the example, I use the function to selectively change the images shown by the img elements. You can see the effect in Figure 8-3.
Figure 8-3. Changing attribute values with a function
Removing an Attribute
You can remove (unset) attributes by using the removeAttr method, as shown in Listing 8-6.
Listing 8-6. Removing Attribute Values
...

<script type="text/javascript">

    $(document).ready(function() {


        $('img').attr("style", "border: thick solid red");

        $('img:odd').removeAttr("style");


    });

</script>

...
In this example, I use the attr method to set the style attribute and then use the removeAttr method to remove the same attribute from the odd-numbered elements. You can see the effect in Figure 8-4.
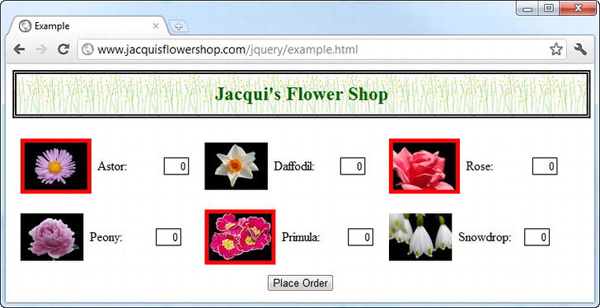
Figure 8-4. Removing attributes from elements
Working with Properties
For each form of the attr method, there is a corresponding prop method. The difference is that the prop methods deal with properties defined by the HTMLElement object, rather than attribute values. Often, the attributes and properties are the same, but this isn't always the case. A simple example is the class attribute, which is represented in the HTMLElement object using the className property. Listing 8-7 shows the use of the prop method to read this property.
Listing 8-7. Using the prop Method to Read a Property Value
...

<script type="text/javascript">

    $(document).ready(function() {

        $('*[class]').each(function(index, elem) {

            console.log("Element:" + elem.tagName + " " + $(elem).prop("className"));

        });

    })

</script>

...
In this example, I select all of the elements that have a class attribute and use the each method to enumerate them. For each element, I print out the type and the value of the className property.
Working with Classes
Although you can use the general attribute methods to manage classes, jQuery provides a set of much more convenient methods. These methods are described in Table 8-3. The most common use for classes in an HTML document is to cause the browser to apply a set of CSS properties defined in a style element. See Chapter 8 for details.

You can assign elements to a class with the addClass method, remove elements from classes using the removeClass method, and determine whether an element belongs to a class using the hasClass method. Listing 8-8 demonstrates all three methods in use.
Listing 8-8. Adding, Removing, and Testing for Class Membership
...

<style type="text/css">

    img.redBorder {border: thick solid red}

    img.blueBorder {border: thick solid blue}

</style>

<script type="text/javascript">

    $(document).ready(function() {


        $('img').addClass("redBorder");

        $('img:even').removeClass("redBorder").addClass("blueBorder");


        console.log("All elements: " + $('img').hasClass('redBorder'));

        $('img').each(function(index, elem) {

            console.log("Element: " + $(elem).hasClass('redBorder') + " " + elem.src);

        });


    });

</script>

...
To begin, I have used a style element to define two styles that will be applied based on class membership. Classes don't have to be used to manage CSS, but they make demonstrating the effect of changes easier in this chapter.
To begin with, I select all of the img elements in the document and assign them to the redBorder class using the addClass method. I then select the even-numbered img elements, remove them from the redBorder class, and assign them to the blueBorder class using the removeClass method.
![]() Tip The
Tip The addClass method does not remove any existing classes from the elements; it just adds the new class in addition to those classes that have already been applied.
Finally, I use the hasClass method to test for the redBorder class on the set of all img elements (which returns true if at least one of the elements is a member of the class) and each element individually. You can see the effect of the class membership in Figure 8-5.
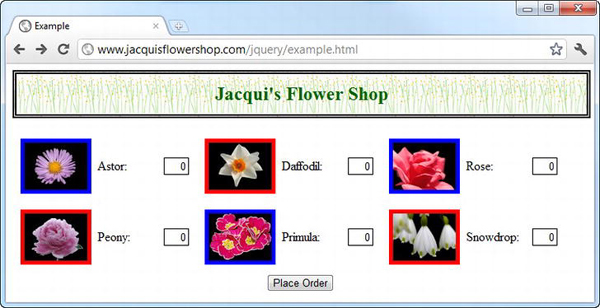
Figure 8-5. Applying styles through class membership
The output from the script, where I test for class membership, is as follows:
All elements: true

Element: false http://www.jacquisflowershop.com/jquery/astor.png

Element: true http://www.jacquisflowershop.com/jquery/daffodil.png

Element: false http://www.jacquisflowershop.com/jquery/rose.png

Element: true http://www.jacquisflowershop.com/jquery/peony.png

Element: false http://www.jacquisflowershop.com/jquery/primula.png

Element: true http://www.jacquisflowershop.com/jquery/snowdrop.png
Adding and Removing Classes Using a Function
You can decide dynamically which classes should be added or removed from a set of elements by passing a function to the addClass or removeClass method. Listing 8-9 shows the use of a function with the addClass method.
Listing 8-9. Using the addClass Method with a Function
...

<style type="text/css">

    img.redBorder {border: thick solid red}

    img.blueBorder {border: thick solid blue}

</style>

<script type="text/javascript">

    $(document).ready(function() {

        $('img').addClass(function(index, currentClasses) {
            if (index % 2 == 0) {

                return "blueBorder";

            } else {

                return "redBorder";

            }

        });

    });

</script>

...
The arguments to the function are the index of the element and the current set of classes for which the element is a member. As with similar functions, the this variable is set to the HTMLElement object of the element being processed. You return the class that you want the element to join. In this example, I use the index argument to assign alternate elements to either the blueBorder or redBorder class. The effect is the same as the one shown in Figure 8-5.
You take a similar approach to removing elements from classes. You pass a function to the removeClass method, as shown in Listing 8-10.
Listing 8-10. Removing Elements from Classes Using a Function
...

<style type="text/css">

    img.redBorder {border: thick solid red}

    img.blueBorder {border: thick solid blue}

</style>

<script type="text/javascript">

    $(document).ready(function() {


        $('img').filter(':odd').addClass("redBorder").end()

            .filter(':even').addClass("blueBorder");


        $('img').removeClass(function(index, currentClasses) {

            if ($(this).closest('#row2').length > 0

                && currentClasses.indexOf('redBorder') > -1) {

                    return "redBorder";

            } else {

                return "";

            }

        });

    });

</script>

...
In this script, the function I pass to the removeClass method uses the HTMLElement object and the current set of classes to remove the redBorder class from any img element that is a member and that is a descendant of the element with the ID of row2. You can see the effect of this script in Figure 8-6.
![]() Tip Notice that I return the empty string when I don't want to remove any classes. If you don't return a value, then jQuery removes all of the classes from the element.
Tip Notice that I return the empty string when I don't want to remove any classes. If you don't return a value, then jQuery removes all of the classes from the element.
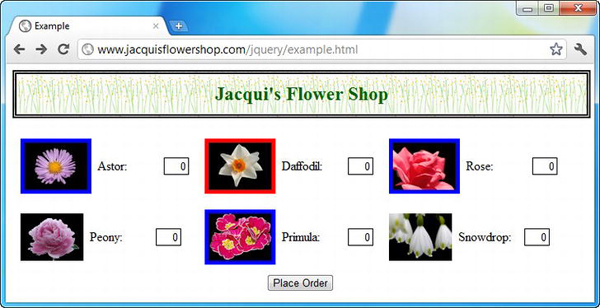
Figure 8-6. Removing classes with a function
Toggling Classes
In its most basic form, toggling a class means adding it to any element that is not a member and removing it from any element that it. You can achieve this effect by passing the name of the class you want to toggle to the toggleClass method, as shown in Listing 8-11.
Listing 8-11. Using the toggleClass Method
...

<style type="text/css">

    img.redBorder {border: thick solid red}

    img.blueBorder {border: thick solid blue}

</style>

<script type="text/javascript">

    $(document).ready(function() {


        $('img').filter(':odd').addClass("redBorder").end()

            .filter(':even').addClass("blueBorder");


        $("<button>Toggle</button>").appendTo("#buttonDiv").click(doToggle);
        function doToggle(e) {

            $('img').toggleClass("redBorder");

            e.preventDefault();

        };


    });

</script>

...
I start this script by applying the redBorder class to the odd-numbered img elements and the blueBorder class to the even-numbered ones. I then create a new button element and append it to the element whose id is buttonDiv. This places my new button alongside the Place Order button that is already on the page. I have used the click method to specify a function that jQuery will invoke when the user clicks the button. This is part of the jQuery support for events, which I describe fully in Chapter 9.
The function that is executed when the button is clicked is called doToggle, and the key statement is this one:
$('img').toggleClass("redBorder");
This statement selects all of the img elements in the document and toggles the redBorder class. The argument to the function and the call to the preventDefault method are not important in this chapter. I'll explain these in Chapter 9. You can see the effect of this script in Figure 8-7, although this kind of example makes most sense when you load the document into a browser and click the button yourself.
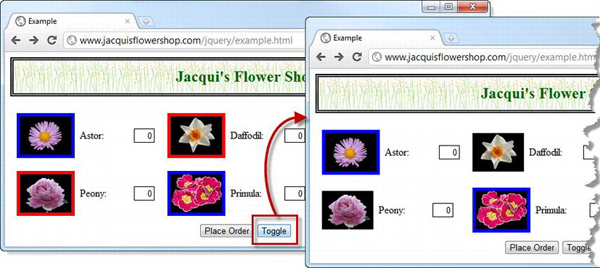
Figure 8-7. Toggling class membership with the toggleClass method
If you are observant, you will notice something a little odd in the figure. Those elements with red borders no longer have them, but the elements that started with blue borders still have blue borders. What happened was that jQuery removed the redBorder class from the odd-numbered img elements and added it to the even-numbered element, just as expected, but the element to which the redBorder class was added is also a member of blueBorder. The blueBorder style is defined after redBorder in the style element, which means that its property values have higher precedence, as I explained in Chapter 3. So, the class toggling is working, but you have to take into account the subtleties of CSS as well. If you want the red borders to show through, then you can reverse the declaration order of the styles, as shown in Listing 8-12.
Listing 8-12. Matching Style Declaration to Suit Class Toggling
...

<style type="text/css">

    img.blueBorder {border: thick solid blue}

    img.redBorder {border: thick solid red}

</style>

<script type="text/javascript">

    $(document).ready(function() {

        $('img').filter(':odd').addClass("redBorder").end()

            .filter(':even').addClass("blueBorder");


        $("<button>Toggle</button>").appendTo("#buttonDiv").click(doToggle);


        function doToggle(e) {

            $('img').toggleClass("redBorder");

            e.preventDefault();

        };


</script>

...
Now when an element belongs to both the blueBorder and redBorder classes, the redBorder setting for the border property will be used by the browser. You can see the effect of this change in Figure 8-8.
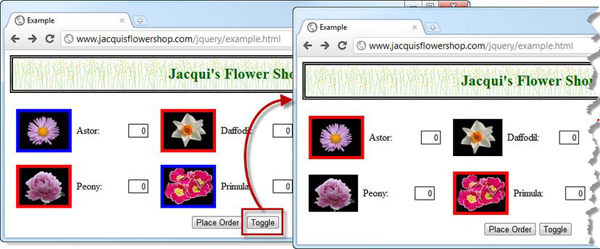
Figure 8-8. The effect of coordinating the CSS declaration order with class toggling
Toggling Multiple Classes
You can supply multiple class names, separated by a space, to the toggleClass method, and each will be toggled for the selected elements. Listing 8-13 shows a single example.
Listing 8-13. Toggling Multiple Classes
...

<style type="text/css">

    img.blueBorder {border: thick solid blue}

    img.redBorder {border: thick solid red}

</style>

<script type="text/javascript">

    $(document).ready(function() {


        $('img').filter(':odd').addClass("redBorder").end()

            .filter(':even').addClass("blueBorder");


        $("<button>Toggle</button>").appendTo("#buttonDiv").click(doToggle);


        function doToggle(e) {

            $('img').toggleClass("redBorder blueBorder");

            e.preventDefault();

        };


    });

</script>

...
In this example, I toggle the redBorder and blueBorder classes on all of the img elements. You can see the effect in Figure 8-9.
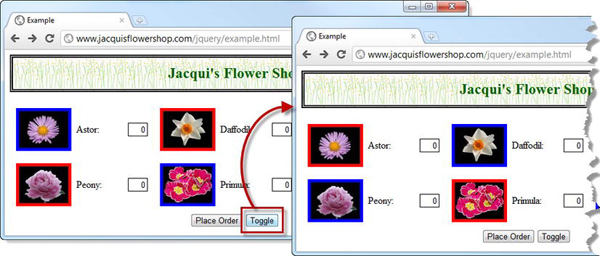
Figure 8-9. Toggling multiple elements
Toggling All Classes
You can toggle all of the classes that a set of elements belong to by calling the toggleClass method with no arguments. This is a clever technique because jQuery stores the classes that have been toggled so they are applied and removed correctly. Listing 8-14 contains an example of this use of the method.
Listing 8-14. Toggling All of the Classes for Selected Elements
...

<style type="text/css">

    img.blueBorder {border: thick solid blue}

    img.redBorder {border: thick solid red}

    label.bigFont {font-size: 1.5em}

</style>

<script type="text/javascript">

    $(document).ready(function() {


        $('img').filter(':odd').addClass("redBorder").end()

            .filter(':even').addClass("blueBorder");

        $('label').addClass("bigFont");


        $("<button>Toggle</button>").appendTo("#buttonDiv").click(doToggle);


        function doToggle(e) {

            $('img, label').toggleClass();

            e.preventDefault();

        };


    });

</script>

...
In this example, I used the addClass method to add classes to the img and label elements. When the Toggle button is clicked, I select those same elements and call the toggleClass method without any arguments. You get a very specific effect, which is shown in Figure 8-10.
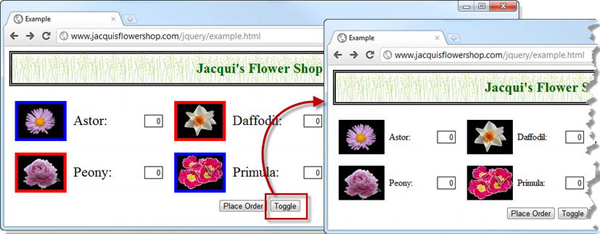
Figure 8-10. Toggling all of the classes for an element
When you first click the button, all of the classes are toggled off for the selected elements. jQuery makes a note of which classes were removed so that they can be reapplied when you click the button again.
Toggling Classes in One Direction
You can limit the way that toggling is performed by passing a boolean argument to the toggleClass method. If you pass false, the classes will only be removed, and if you pass true, the classes will only be added. This is the same effect you achieved using the addClass and removeClass methods, so I tend not to use this feature. Listing 8-15 gives an example.
Listing 8-15. Restricting the Toggle Direction
...

<style type="text/css">

    img.blueBorder {border: thick solid blue}

    img.redBorder {border: thick solid red}

</style>

<script type="text/javascript">

    $(document).ready(function() {


        $('img').filter(':odd').addClass("redBorder").end()

            .filter(':even').addClass("blueBorder");


        $("<button>Toggle On</button>").appendTo("#buttonDiv").click(doToggleOn);

        $("<button>Toggle Off</button>").appendTo("#buttonDiv").click(doToggleOff);


        function doToggleOff(e) {

            $('img, label').toggleClass("redBorder", false);

            e.preventDefault();
        };

        function doToggleOn(e) {

            $('img, label').toggleClass("redBorder", true);

            e.preventDefault();

        };

    });

</script>

...
I have added two buttons to the document, each of which will toggle the redBorder class in only one direction. Once one of the buttons has been clicked, it will have no further effect until the other button is clicked too (because each button can toggle in only one direction).
Toggling Classes Dynamically
You can decide which classes should be toggled for elements dynamically by passing a function to the toggleClass method. Listing 8-16 provides a simple demonstration.
Listing 8-16. Toggling Classes with a Function
...

<style type="text/css">

    img.blueBorder {border: thick solid blue}

    img.redBorder {border: thick solid red}

</style>

<script type="text/javascript">

    $(document).ready(function() {


        $('img').addClass("blueBorder");

        $('img:even').addClass("redBorder");


        $("<button>Toggle</button>").appendTo("#buttonDiv").click(doToggle);


        function doToggle(e) {

            $('img').toggleClass(function(index, currentClasses) {

                if (index % 2 == 0) {

                   return "redBorder";

                } else {

                    return "";

                }

            });

            e.preventDefault();

        };

    });

</script>

...
I apply the blueBorder class to all of the img elements and the redBorder class to the even-numbered img elements. The arguments to the function are the index of the element you are processing and the current set of classes it belongs to. In addition, the this variable is set to the HTMLElement object for the current element. The result from the function is the name of the classes that should be toggled. If you don't want to toggle any classes for the elements, then you return the empty string (not returning a result for an element toggles all of its classes).
Working with CSS
In an earlier example, I used the basic attribute methods to set the value of the style attribute, thereby defining values for a CSS property for a set of elements. jQuery provides a set of convenience elements that make dealing with CSS much easier. The most broadly useful of these methods is css, which is described in Table 8-4.
![]() Tip These methods operate on the
Tip These methods operate on the style attribute of individual elements. If you want to work with styles defined in a style element, then you should use the class-related methods described earlier in this chapter.
When you read the value of a property using the css method, you receive the value only from the first element in the jQuery object. However, when you set a property, the change is applied to all of the elements. Listing 8-17 shows the basic use of the css property.
Listing 8-17. Using the css Method to Get and Set CSS Property Values
...

<script type="text/javascript">

    $(document).ready(function() {

        var sizeVal = $('label').css("font-size");

        console.log("Size: " + sizeVal);

        $('label').css("font-size", "1.5em");

    });

</script>

...
In this script, I select all of the label elements and use the css method to get the value of the font-size property and write it to the console. I then select all of the label elements again and apply a new value for the same property to all of them.
![]() Tip Although I used the actual property name (
Tip Although I used the actual property name (font-size) and not the camel-case property name defined by the HTMLElement object (fontSize), jQuery happily supports both.
The output of the script is as follows:
Size: 16px
![]() Tip Setting a property to the empty string ("") has the effect of removing the property from the element's
Tip Setting a property to the empty string ("") has the effect of removing the property from the element's style attribute.
Setting Multiple CSS Properties
You can set multiple properties in two different ways. The first is simply by chaining calls to the css method, as shown in Listing 8-18.
Listing 8-18. Chaining Calls to the css Method
...

<script type="text/javascript">

    $(document).ready(function() {

        $('label').css("font-size", "1.5em").css("color", "blue");

    });

</script>

...
In this script, I set values for the font-size and color properties. You can achieve the same effect using a map object, as shown in Listing 8-19.
Listing 8-19. Setting Multiple Value Using a Map Object
...

<script type="text/javascript">

    $(document).ready(function() {

        var cssVals = {

            "font-size": "1.5em",

            "color": "blue"

        };
        $('label').css(cssVals);

    });

</script>

...
Both of these scripts create the effect shown in Figure 8-11.
Figure 8-11. Setting multiple properties
Setting Relative Values
The css method can accept relative values. These are numeric values that are preceded by += or -= and that are added to or subtracted from the current value. This technique can be used only with numeric units. Listing 8-20 gives a demonstration.
Listing 8-20. Using Relative Values with the css Method
...

<script type="text/javascript">

    $(document).ready(function() {


        $('label:odd').css("font-size", "+=5")

        $('label:even').css("font-size", "-=5")


    });

</script>

...
These values are read as being in the same units as are returned when you read the property value. In this case, I have increased the font size of the odd-numbered label elements by 5 pixels and decreased it for the even-numbered label elements by the same amount. You can see the effect in Figure 8-12.
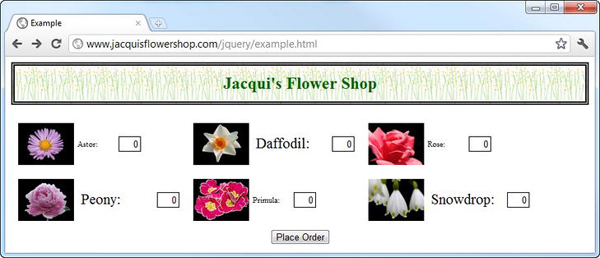
Figure 8-12. Using relative values
Setting Properties Using a Function
You can set property values dynamically by passing a function to the css method. Listing 8-21 provides a demonstration. The arguments passed to the function are the index of the element and the current value of the property. The this variable is set to the HTMLElement object for the element, and you return the value you want to set.
Listing 8-21. Setting CSS Values with a Function
...

<script type="text/javascript">

    $(document).ready(function() {

        $('label').css("border", function(index, currentValue) {

            if ($(this).closest("#row1").length > 0) {

                return "thick solid red";

            } else if (index % 2 == 1) {

                return "thick double blue";

            }

        });

    });

</script>

...
You can see the effect of this script in Figure 8-13.

Figure 8-13. Setting CSS property values with a function
Using the Property-Specific CSS Convenience Methods
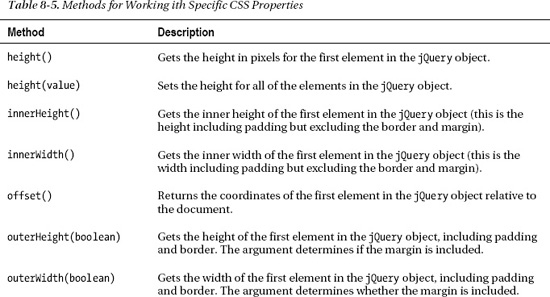
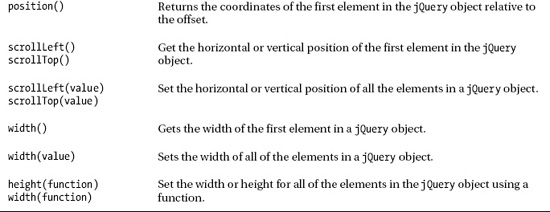
In addition to the css method, jQuery defines a number of methods that can be used to get or set specific properties. These methods are described in Table 8-5.
Most of these methods are self-evident, but a couple warrant explanation. The results from the offset and position methods is an object that has top and left properties, indicating the location of the element. Listing 8-22 provides a demonstration using the position method.
Listing 8-22. Using the position Method
...

<script type="text/javascript">

    $(document).ready(function() {


        var pos = $('img').position();

        console.log("Position top: " + pos.top + " left: " + pos.left);


    });

</script>

...
This script writes out the value of the top and left properties of the object returned by the method. The result is as follows:
Position top: 108 left: 18
Setting the Width and Height Using a Function
You can set the width and height for a set of elements dynamically by passing a function to the width or height method. The arguments to this method are the index of the element and the current property value. As you might expect by now, the this variable is set to the HTMLElement of the current element, and you return the value you want assigned. Listing 8-23 provides an example.
Listing 8-23. Setting the Height of Elements Using a Function
...

<script type="text/javascript">

    $(document).ready(function() {


        $('#row1 img').css("border", "thick solid red")

            .height(function(index, currentValue) {

                return (index + 1) * 25;

            });

    });

</script>

...
In this script, I use the index value as a multiplier for the height. You can see the effect in Figure 8-14.
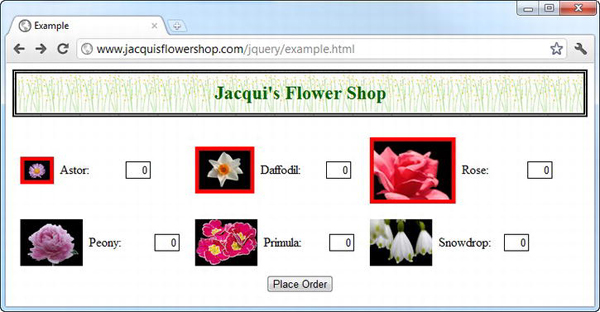
Figure 8-14. Using a function to set the height for elements
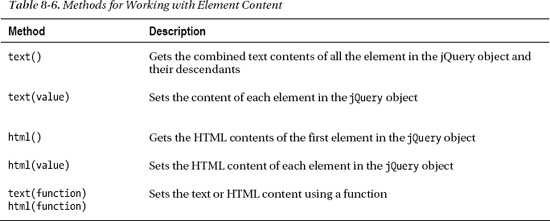
Working with Element Content
You have been looking at the attributes of elements so far in this chapter, but jQuery also provides you with the means to work with the content of elements as well. Table 8-6 describes the methods available for this purpose.
Unusually for jQuery, when you use the text method without arguments, the result that you receive is generated from all of the selected elements. The html method is more consistent with the rest of jQuery and returns just the content from the first element, as Listing 8-24 shows.
Listing 8-24. Using the html Method to Read Element Content
...

<script type="text/javascript">

    $(document).ready(function() {

        var html = $('div.dcell').html();

        console.log(html);

    });

</script>

...
This script uses the html method to read the HTML contents of the first element matched by the div.dcell selector. This is written to the console, producing the following results. Notice that the HTML of the element itself is not included.
<img src="astor.png">

<label for="astor">Astor:</label>

<input name="astor" value="0" required="">
Setting Element Content
You can set the content of elements using either the html or text method. My flower shop example document doesn't have any text content to speak of, so Listing 8-25 shows how to use the html method.
Listing 8-25. Using the html Method to Set Element Content
...

<script type="text/javascript">

    $(document).ready(function() {

        $('#row2 div.dcell').html($('div.dcell').html());

    });

</script>

...
This script sets the HTML contents of the div elements in the dcell class that are descendants of the row2 element. For the content I have used the html method to read the HTML from the first div.dcell element. This has the effect of setting the lower row of cells in the layout to have the astor content, as shown in Figure 8-15.

Figure 8-15. Setting the content of elements with the html method
Setting Element Content Using a Function
As with many of the other methods in this chapter, you can use the html and text methods with a function to set content dynamically. In both cases, the arguments are the index of the element in the jQuery object and the current text or HTML content. The this variable is set to the element's HTMLElement object, and you return the value you want to set as the result from the function. Listing 8-26 shows how you can use a function with the text method.
Listing 8-26. Setting Text Content Using a Function
...

<script type="text/javascript">

    $(document).ready(function() {

        $('label').css("border", "thick solid red").text(function(index, currentValue) {

            return "Index " + index;

        });

    });

</script>

...
In this script I set the text content of the label elements using the index value (I also use the css method to add a border to the elements I change). You can see the result in Figure 8-16.
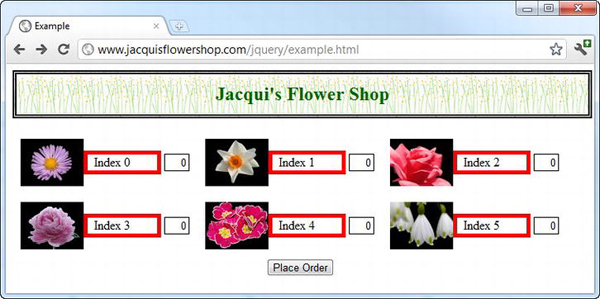
Figure 8-16. Setting text content using a function
Working with Form Elements
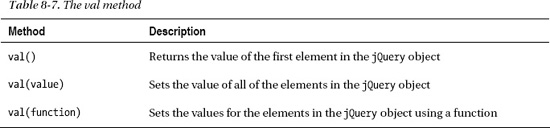
You can get and set the value of form elements (such as input) using the val method, which is described in Table 8-7.
Listing 8-27 shows how you can use the val method to get the value from the first element in the jQuery object. In this script, I have used the each method so that I can enumerate the values of the set of input elements in the document.
Listing 8-27. Using the val Method to Get the Value from an input Element
...

<script type="text/javascript">

    $(document).ready(function() {

       $('input').each(function(index, elem) {

            console.log("Name: " + elem.name + " Val: " + $(elem).val());

       });

    });

</script>

...
I write the values to the console, which produces the following output:
Name: astor Val: 0

Name: daffodil Val: 0

Name: rose Val: 0

Name: peony Val: 0

Name: primula Val: 0

Name: snowdrop Val: 0
Setting Form Element Values
You can use the val method to set the value of all of the elements in a jQuery object by simply passing the value you want as an argument to the method. Listing 8-28 provides a demonstration.
Listing 8-28. Setting Element Values with the val Method
...

<script type="text/javascript">

    $(document).ready(function() {
        $("<button>Set Values</button>").appendTo("#buttonDiv").click(setValues);


        function setValues(e) {

            $('input').val(100);

            e.preventDefault();

        }

    });

</script>

...
In this script I have added a button element to the document and specified that the setValues function should be called when it is clicked. The function selects all of the input elements in the document and uses the val method to set their value to 100. You can see the effect in Figure 8-17.
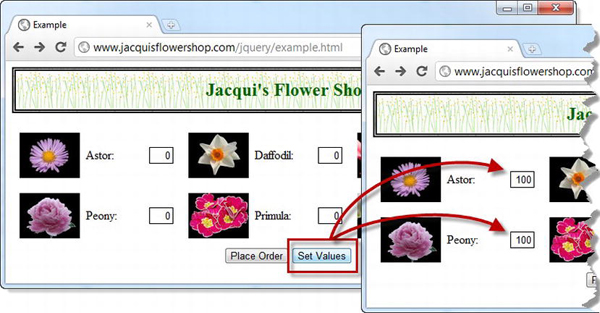
Figure 8-17. Using the val method to set input element values
Setting Form Element Values Using a Function
As you might expect by now, you can also use a function to set values with the val method. The arguments to the method are the index of the element and the present values. The this variable is set to the HTMLElement object representing the element being processed. By using the val method in this way, you can set new values dynamically, as demonstrated in Listing 8-29.
Listing 8-29. Using the val Method with a Function
...

<script type="text/javascript">

    $(document).ready(function() {

        $('input').val(function(index, currentVal) {

            return (index + 1) * 100;

        });

    });

</script>

...
In this example, I set the value based on the index argument. You can see the effect in Figure 8-18.
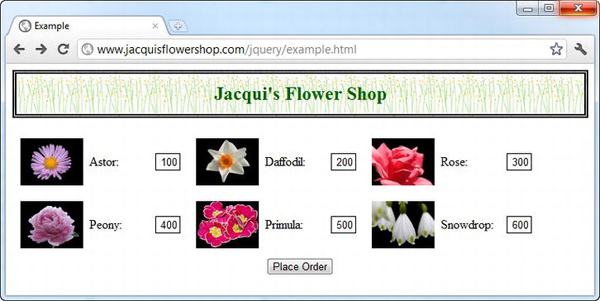
Figure 8-18. Setting the values dynamically using the val method with a function
Associating Data with Elements
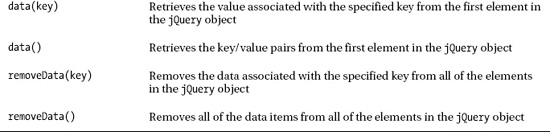
jQuery allows you to associate arbitrary data with an element, which you can then test for and retrieve later. Table 8-8 describes the methods associated with this feature.

Listing 8-30 demonstrates setting, testing for, reading, and deleting data values.
![]() Note When you use the clone method, the data you have associated with elements is removed from the newly copied elements unless you explicitly tell jQuery that you want to keep it. See Chapter 7 for details of the
Note When you use the clone method, the data you have associated with elements is removed from the newly copied elements unless you explicitly tell jQuery that you want to keep it. See Chapter 7 for details of the clone method and how to preserve the data.
Listing 8-30. Working with Element Data
...

<script type="text/javascript">

    $(document).ready(function() {


        // set the data

        $('img').each(function () {

           $(this).data("product", $(this). siblings("input[name]").attr("name"));

        });


        // find elements with the data and read the values

        $('*').filter(function() {

            return $(this).data("product") != null;

        }).each(function() {

           console.log("Elem: " + this.tagName + " " + $(this).data("product"));

        });


        // remove all data

        $('img').removeData();


    });

</script>

...
There are three stages to this script. In the first, I use the data method to associate an item of data with the product key. I get the data by navigating from each img element to the input sibling that has a name attribute.
In the second state, I select all of the elements in the document and then use the filter method to find those that have a value associated with the product key. I then use the each method to enumerate those elements and write the data values to the console. This is duplicative, but I wanted to demonstrate the best technique for selecting elements that have data. There is no dedicated selector or method, so you must make do with the filter method and a function.
Finally, I use the removeData to remove all data from all of the img elements. This script produces the following output on the console:
Elem: IMG astor

Elem: IMG daffodil

Elem: IMG rose

Elem: IMG peony

Elem: IMG primula

Elem: IMG snowdrop
Working with HTML5 Data Attributes
The HTML5 specification defines data attributes, which also allow you to associate data with elements. Data attributes, also known as expand attributes, have names that are prefixed with data, and they are useful for adding extra meaning to your element above and beyond what you can achieve with classes. The data method gets and sets data attributes values automatically, as demonstrated in Listing 8-31.
Listing 8-31. Using the data Method with HTML5 Data Attributes
<!DOCTYPE html>

<html>

<head>

    <title>Example</title>

    <script src="jquery-1.7.js" type="text/javascript"></script>

    <link rel="stylesheet" type="text/css" href="styles.css"/>

    <script type="text/javascript">

        $(document).ready(function() {

            $('div.dcell').each(function () {

               var productVal = $(this).data("product");

               console.log("Product: " + productVal);

            });

        });

    </script>

</head>

<body>

    <h1>Jacqui's Flower Shop</h1>

    <form method="post">

        <div id="oblock">

            <div class="dtable">

                <div id="row1" class="drow">

                    <div class="dcell" data-product="astor">

                        <img src="astor.png"/><label for="astor">Astor:</label>

                        <input name="astor" value="0" required />

                    </div>
                    <div class="dcell" data-product="daffodil">

                        <img src="daffodil.png"/><label for="daffodil">Daffodil:</label>

                        <input name="daffodil" value="0" required />

                    </div>

                    <div class="dcell" data-product="rose">

                        <img src="rose.png"/><label for="rose">Rose:</label>

                        <input name="rose" value="0" required />

                    </div>

                </div>

            </div>

        </div>

        <div id="buttonDiv"><button type="submit">Place Order</button></div>

    </form>

</body>

</html>
In this example, I have added HTML5 data attributes to a cut-down version of the example document. The script selects the elements with the data attributes and uses the data method to retrieve the associated values and print them to the console. Notice that I omit the data- part of the attribute name; for example, I refer to data-product simply as product. Here is the output from the script:
Product: astor

Product: daffodil

Product: rose
![]() Tip The data method takes the data attributes into account when setting values as well. When you specify a key, such a
Tip The data method takes the data attributes into account when setting values as well. When you specify a key, such a product, the data method checks to see whether there is a corresponding HTML5 data attribute, such as data-product. If there is, then the value you specified is assigned to the attribute. If not, then the data is stored internally by jQuery.
Summary
In this chapter, I showed you the different ways that you can manipulate elements in the DOM. I showed you how to get and set attributes, including the jQuery convenience methods for working with classes and CSS properties. I also showed you how to get and set the text or HTML content of elements and how jQuery supports associated arbitrary data with elements, both through the HTML5 data attributes and through its own internal mechanism.