Basics of process control in textile manufacturing
Abstract:
New technologies are constantly being developed and the service life of products is becoming shorter due to changes in customer taste. Statistical process control (SPC) methods for short production runs are therefore increasingly important. Multistage process surveillance and fault diagnosis have become a necessity. Process control incorporating SPC and hybrid approaches are discussed in this chapter. Overall the chapter helps in building a sound understanding about process control with a flavour of different approaches that are helpful in analysing a process which further helps in taking appropriate decisions.
1.1 Introduction
In today’s dynamic manufacturing environment there is a constant need for improvement in processes. A company cannot rest on past performance and expect to remain successful. Customers’ expectations change rapidly and manufacturing processes have become very demand-driven. More precise specifications present a new challenge that may require the upgrading of existing processes and modern technologies. As a result, process control has become more challenging. Pressure on time and resources, the need for faster delivery, defect-free products, and the reliability and durability of parts and processes, are some of the critical factors facing manufacturing enterprises. Process control plays a key role in building recognition in a competitive market.
Modern technology is capable of the simultaneous control of many variables and the collection of data may appear easy. However, process control also involves costs, for example:
It is important to be aware of the goals and benefits of process control at the outset. Process control can add value if used effectively in decision making, for example:
• If the process is under control, the desired product quality will be achieved.
• If process analysis shows a technology is not serving its purpose, it can be modified or replaced to improve product quality, save costs or improve productivity.
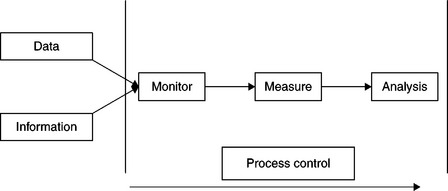
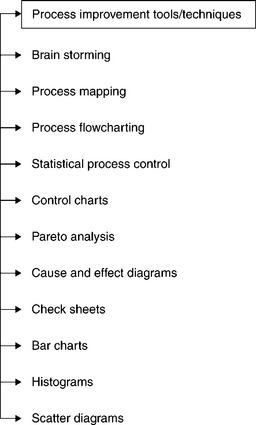
Some basic steps in process control are shown in Fig. 1.1. Some of the tools in process analysis, measurement and control are shown in Fig. 1.2. These techniques are discussed later in the chapter.
1.2 Process mapping, analysis and control
Product quality is directly dependent upon the process quality. To achieve an excellent quality and defect-free operations process mapping becomes very important. It starts with understanding the process, its approach and the application level and presenting the information with graphical representation. Once the process mapping is done, the control and analysis part comes into picture. This allows us to determine whether the process is in control or not and to analyse if the quality improvement efforts have the desired effect.
This is discussed in detail in the following subsections.
1.2.1 Process mapping
One of the fundamental steps in understanding or improving a process is process mapping. Information about the activities/steps that take place in a process is gathered and mapped so as to create a model representing the complete process. Complex interactions may be represented in a simplified manner. Activities can be grouped into several sub-processes. By the use of process maps, improvement teams are better able to understand the process and become more efficient in ensuring effective control and finding opportunities for improvement.
To ensure process control is effective, the correct product attributes must first be identified. Data or information about the product is collected. The specific characteristics of the product are referred to as the critical attributes and determine the type of measurement. Not all attributes will be critical for the customer. Some may be very important while others may add little value to the product. It is necessary to use appropriate tools to determine a ranking procedure. Among these may be failure mode and effect analysis (FMEA), which analyses the manner in which failure is observed, the causes of the failure, and the effect of failure on the product and other operations.
A process flowchart is an important tool in the construction of a process and provides a snapshot of the complete process. Standard symbols are used for drawing the flowchart. Through process flowcharting, a conclusion may be drawn as to why any redundant operations are being carried out, the final objective being to seek opportunities for process improvement.
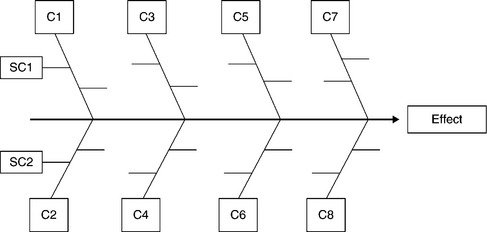
A cause-and-effect diagram is also known as the Fishbone or Ishikawa diagram. It is an effective way of mapping the inputs that affect quality. It is also a very effective tool in problem solving.
In this approach, as shown in Fig. 1.3, the potential causes of the problem are written as C1 to C8. Then the sub-causes (SC1, SC2, etc.) that are relevant to the principal causes are identified. This method is very useful for identifying the causes of a problem. Brainstorming sessions may also be useful in understanding the possible causes of a problem.
1.2.2 Process analysis and control
Once a process has been mapped, its performance can be measured and assessed. It is important to be aware of the relationship between a manufacturing control system and statistical process control (SPC) system. In a manufacturing control system, the processes to be carried out are carefully planned and executed according to the initial plan. A processing run of the chosen products is processed in a manufacturing facility as defined by the manufacturing model. An SPC analysis is then carried out on the processed units to identify and analyse the process. The manufacturing facility is then modified according to the SPC analysis. These tools and techniques help a production manager to adjust a process and to prevent it from going out of control. An uncontrolled process may cause considerable wastage of resources and time. Organisations alert to this will invest in creating and upgrading the process control systems in their manufacturing facilities.
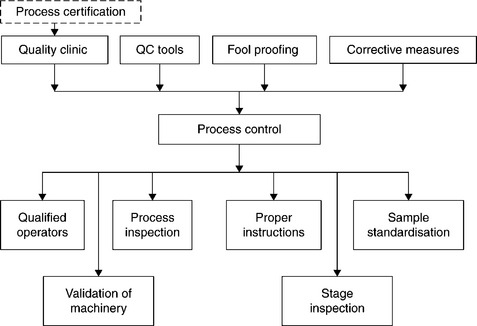
Various factors are important in controlling the different stages of a process. These are presented in Fig. 1.4. Defects are examined with the help of quality tools. Problems that are solvable online are taken care of by line staff. More complex problems are dealt with in quality clinics. The aim of these is to ensure that durable, mistake-proof corrective actions are taken. Among the tools used in quality clinics is Root Cause Analysis. The processes that have the most impact on quality are identified and studied in detail to assess how they can be enhanced. Once implemented, the revised process is tested. The quality team will then carry out a final inspection by selecting samples according to a standard plan.
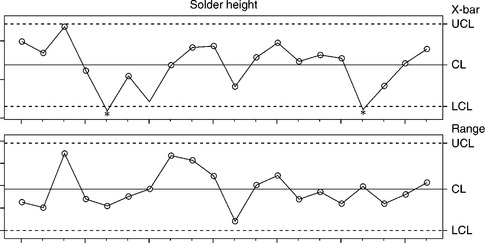
A check sheet is a tool to help in collecting the data in an efficient and organised way. Data is categorised to simplify the task of analysis. The data is collected and ordered by adding check marks. A simple example is given in Table 1.1. Control charts are used to monitor processes with the help of measures such as arithmetic means and other ranges. Control charts measure limits above and below the mean. These are called the upper and lower control limits. These control charts give real time information about the process and are very helpful in detecting and predicting variations when used with SPC. A typical control chart consists of a centre line and two control limits (upper and lower). The control limits are normally located at ± 3σ of this statistic and the centre line refers to the average level of the statistically controlled process. The X bar and R (Range) chart are the most commonly used charts for monitoring variations and measuring variable quality characteristics. If a particular variation is observed in the process, it is necessary to identify an assignable cause for this variation. If observations show fluctuations outside the control limits, the process is defined as going out of control and the assignable causes must be eliminated in order to bring it back under control. However, a process may be defined as out of control even if all the observed points are within the control limits (Montgomery, 1996). This occurs when an unnatural pattern is displayed. Clues from this pattern of observation provide the user with information about the process and assist in eliminating the causes of variation.
In Fig. 1.5, the X bar and R chart show the observations recorded at different time intervals for the solder heights. The central limit (CL), the upper (UCL) and lower (LCL) control limits are set according to the process requirements. In the R chart, all observations are within the control limits, whereas in the X chart, the observations marked with (*) are below the LCL, representing an out-of-control process. This shows that the process average is influenced by some external factor and corrective actions are needed to eliminate the causes.
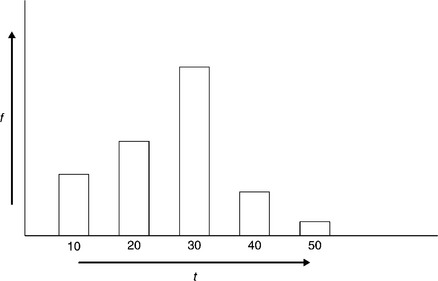
A bar chart is a visual display tool in which the relative sizes of the measured data are displayed by the height of the bars. The bars are separated to show where data are not continuous. The bar chart helps in comparing different types of data. A scatter diagram gives a graphical representation of the data. It shows the changes in a variable between one state and another. These variables are plotted at right angles to each other and the scatter marks made accordingly. This tool shows how two variables are related, how one variable changes if another is changed, and if there is a relationship between them. Many predictions can be made depending on the range of data available. A histogram shows the probability of a particular value occurring. Here, the data are grouped in cells and the relative frequency represented in bars. Figure 1.6 illustrates a histogram taking frequency (f) and time (t) (or any other parameter) into consideration on the vertical and horizontal axes respectively. It is used to assess large amounts of data with a wide range.
1.3 Statistical process control (SPC) and improving processes
Statistical techniques can be applied to data at diverse levels of organisations to identify when a process is behaving unusually. Further, each organisation has numerous processes and variables that can affect product and service outcomes such as quality, productivity etc. Hence, there is always a scope for improvement. Since the improvement is an ongoing process and requires substantial efforts to achieve better results.
The detailed discussion is as follows.
1.3.1 SPC
SPC is a toolkit for managing processes. It is a method of controlling manufacturing processes to ensure that the outputs conform to specifications.
A process may go out of control for various reasons, which may include variability in materials and machinery, variability in the process parameters, or may be due to some chance variations. A process running out of control is a cause of concern and immediate steps must be taken to identify the causes. SPC provides the means of analysing such a process. SPC was first developed in the USA during the 1940s. Initially, it was largely ignored until the Japanese (who were introduced to SPC by W. Edwards Deming in 1950) launched a national effort to improve the quality and productivity of manufacturing (Ishikawa, 1985). In SPC, decisions are taken on the basis of information for a particular process in a data recording system. SPC incorporates various tools such as control charts, histograms and check sheets, which are used for recording and analysing data.
SPC attempts to understand the critical variables in each sequence of a manufacturing process and their intercorrelation. Through statistical sampling and experimentation, these interrelations may be understood and thus rendered controllable (Bushe, 1988). In Japanese factories, workers sample parts as they move through the manufacturing processes using control charts. If any deviation from the specifications is found, it is readjusted. Therefore all finished products meet the specifications. Discovery of the location of deviations improves the tolerances and capabilities of the processes and enhances continuous improvement of product quality and efficiency. There can be various cultural issues in understanding and implementing SPC successfully in the workplace. As an example, factories tend to be highly segmented in their technical, structural, cultural and political dimensions. Work is also highly segmented and there is a tendency to deal with each problem in isolation. However, SPC takes a holistic approach and requires multivariate thinking and working.
Artificial intelligence (AI) has great potential in an automated SPC system (Medsker, 1995). In this system, control and diagnosis are done by neural networks and expert systems respectively. The neural networks are used for control-chart pattern recognition and the expert systems are used for monitoring variations in the process. The expert system contains the process-specific knowledge, which enables it to diagnose an out-of-control process and to suggest what corrective actions could be taken. By incorporating quality–cost simulation technology, expert systems such as IntelliSPC have been able to monitor and predict costs over time (Kuo and Huang, 1997; Guh et al., 1999).
Consistency in quality and machine utilisation is very important in the Flexible Manufacturing System (FMS). FMS can be modelled with Petri nets. However, these models lack the functionality of SPC and therefore do not make possible a complete FMS. To overcome this, the Petri net-based SPC model is used where measured data from the inspection machines and sensor data from the devices is utilised. The cause/effect of the product’s defects and quality can be analysed by the Petri net-based SPC model and the diagnosis can easily be integrated into the model.
1.3.2 Improving processes
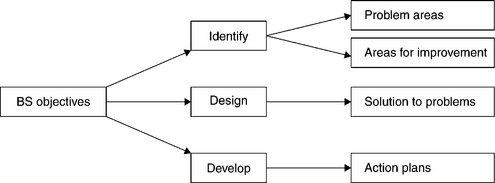
A brainstorming (BS) process may be called to discuss the improvement plans for a process. The problem brief is assisted by the process maps. The BS process is carried out without any criticism or comparison and all ideas are recorded for further analysis. BS is an effective tool for opening out the thinking horizon and focusing on a problem to generate ideas that may be used for improving the process. It can also be used with the cause-and-effect tool. A large number of ideas are generated that may be used in numerous situations. Some objectives of BS and their classification is presented in Fig. 1.7.
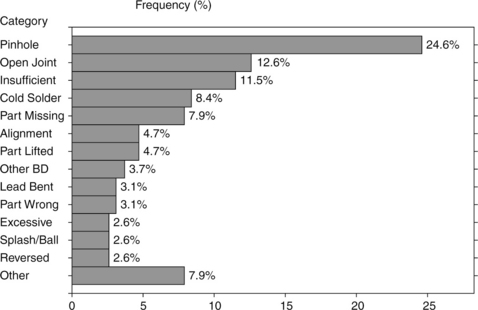
Pareto analysis can be used to analyse the ideas generated by the BS. The causes having the greatest impact are identified through analysis The data are represented in the form of a bar chart ranked in the descending order of their frequencies. This analysis typically shows that 80% of the effect corresponds to 20% of the causes and is therefore known as the 80/20 rule. Pareto analysis is used to examine the relative contribution of different defects/ causes which lead to rejection. The relative frequency of different categories of defects is ranked by means of the Pareto diagram. The quality-control team can then assess the contribution of various defects and prioritise accordingly for their removal. Figure 1.8 illustrates the use of Pareto analysis to analyse faults in a printed circuit board related to soldering. It is clear from Fig. 1.8 that the pin hole is the principal defect, followed by the open joint and so on. The corrective actions may then be prioritised accordingly.
1.4 Future trends
SPC has become one of the most commonly used tools for maintaining acceptable and stable levels of quality in modern manufacturing. The modern manufacturing environment is focused on computer integrated manufacturing and the challenges lie in developing advanced computer algorithms and process controls to implement the SPC tasks automatically.
Currently, the focus is on unit process-control methods such as run-2-run (R2R), unit process development and transfer and improvements in the methods to ensure component functionality and reliability. Considerable potential has been identified in the manufacturing of health-related systems and various health-monitoring systems have been developed or are in the development stages.
Much work is being done on the process of prediction and the improvement of product parameters and yield. New methods which help in process improvement, such as virtual metrology have been developed, incorporating control density improvement and the reduction of measurement operations. Models for data visualisation and analysis are in progress and still more effective models related to process improvement are to be developed.
The modern manufacturing world is demanding more precise and accurate methods for meeting industrial expectations. Advanced process control methods are always necessary across a variety of applications. More sophisticated methods of fault diagnosis are therefore being developed by researchers. Sensor implementation and integration with numerically controlled machines are developing rapidly. Investment in sensor technology that provides real time information for modern computer integrated manufacturing is increasing and more research is under way to meet the requirements of industries worldwide.
1.5 References
Bushe, G.R. Cultural contradictions of statistical process control in American manufacturing organizations. Journal of Management. 1988; 14(1):19–33.
Guh, R.S., Tannock, J.D.T., O Brien, C. IntelliSPC: a hybrid intelligent tool for on-line economical statistical process control. Expert Systems with Applications. 1999; 17(3):195–212.
Ishikawa, K. What is total quality control?. Prentice-Hall, Englewood Cliffs, NJ, USA: The Japanese Way; 1985.
Kuo, C.H., Huang, H.P., Colored timed PETRI NET based statistical process control and fault diagnosis to flexible manufacturing systemsProceedings of the 1997 IEEE International Conference on Robotics and Automation Albuquerque. USA: New Mexico, April 1997.
Montgomery, D.C. Introduction to Statistical Quality Control, 3rd Ed. New York, USA: Wiley; 1996.
Medsker, L.R. Hybrid Intelligent Systems. Boston, MA, USA: Kluwer Academic Publishers; 1995.

