
This section will guide you through installing Partuza on a local Apache server on Windows, which allows you to host the sample OpenSocial social networking container at http://partuza/.
Partuza requires a MySQL database installation, which is used to store all social and user information for the container. Since this is the storage backbone for Partuza, this is where we will start. If MySQL is already installed on your computer, you may skip this step.
Go to http://www.mysql.com/downloads/mysql/ to download the recommended MySQL MSI installer (either 32-bit or 64-bit, depending on your Windows version). Once the download is complete, double-click the .msi file to begin the installation. On the first screen that appears, click Next, which will take you to another screen where you can select a configuration type. Select Standard Configuration from the options and click Next; the installer will now create a general-purpose configuration, which you can fine-tune later as needed.
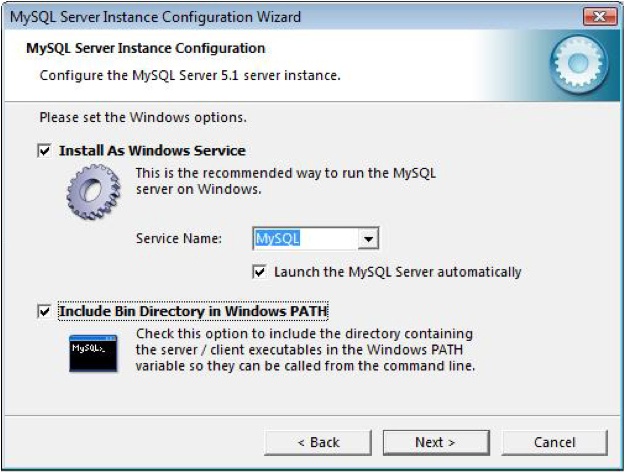
Next, you will be presented with a screen where you set Windows options for the installation. Select both “Install As Windows Service” and “Include Bin Directory in Windows PATH.” The second option allows us to work with the MySQL instance through the command line. Your configuration settings should look like Figure 3-4.
Once you’ve selected these options, click Next. The next screen presents security options for the MySQL installation. Make sure that Modify Security Settings is selected, and enter in a new root password. There is no need to create an anonymous account for this installation, so leave that option unchecked. Click Next and then click Execute to finalize the installation.
MySQL is now installed, and your Start menu should include a MySQL
directory. Within that directory is an executable called MySQL Command
Line Client, which allows you to work with your MySQL databases through
the command line. To test the installation, load this program. You’ll be
asked for the password you entered as the root password during the
installation. You should now be presented with the mysql> prompt, from which you can enter SQL
commands. View your current databases by entering show databases;.
Once you press Enter, you will be presented with a list of the current databases on your system, which should look similar to this:
mysql> show databases;
+--------------------+
| Database           |
+--------------------+
| information_schema |
| mysql              |
+--------------------+
2 rows in set (0.00 sec)
Now that you’ve verified the installation, you can close the MySQL command-line utility.
The next step is optional but very much recommended for users who are not familiar or comfortable with working in a command-line SQL environment, or for those who prefer a richer set of tools. We will install a visualization utility called phpMyAdmin on top of the MySQL installation; this utility will allow us to work quickly with databases and tables, import database configuration settings, and explore a host of other features. The next steps for installing Partuza will assume that phpMyAdmin has been installed on the system.
Go to the phpMyAdmin download site at http://www.phpmyadmin.net/ and click the option to download the most recent version of the tool (click the Download text instead of the .zip/.gz text). This presents you with a number of download options for phpMyAdmin. Download the .zip packages for all languages or just English. Once you’ve downloaded the file, unzip it.
The content of the zip file is a folder containing all of the source and configurations needed to run phpMyAdmin. Copy the folder over to the root of your localhost directory and rename the folder to phpmyadmin to make it easier to load from localhost.
phpMyAdmin has several core requirements for the PHP installation on the host it runs on, including:
PHP version 5.2.0 or newer with session support and the standard PHP library (SPL) extension.
zip extension to support uploading zip files.
mbstring and type extensions to support multibyte strings (UTF-8, which is currently the default).
gd2 extension to display inline thumbnails of JPEGs (“image/jpeg: inline”) with their original aspect ratio.
mcrypt extension if using the “cookie” authentication method. mcrypt is also strongly suggested for most users and is required in 64-bit machines. In addition, not using mcrypt will cause phpMyAdmin to load pages significantly slower.
Now that we have our requirements down, let’s make the necessary adjustments to get phpMyAdmin working. Load your php.ini file (e.g., C:phpphp.ini) for editing.
Search for the following lines and make sure they are enabled (i.e., remove any leading semicolons from each line):
extension=php_bz2.dll
extension=php_mbstring.dll
extension=php_zip.dll
extension=php_mcrypt.dll
In addition, search for “short_open_tag” and ensure that its value is set to On. Close the php.ini file and restart Apache.
We now meet the requirements for running phpMyAdmin, so let’s go ahead and configure our database connections. Create a directory called “config” under the phpadmin folder within localhost and make sure that it is not read-only (right-click it and select Properties for details). This is a manual security step that will be used to output the required database and system configuration settings.
In a browser, load http://localhost/phpmyadmin/setup/index.php to begin the visual configuration of phpMyAdmin. On the page that loads, you will see that no servers have been configured yet. Click New Server to add one. This new page provides you with basic configuration settings for the server. Configure the server with the following settings, leaving blank anything not listed:
Server hostname: localhost
Connection type: tcp
PHP extension to use: mysqli (make sure the extension is turned on)
Authentication type: cookie
User for config auth: root
Password for config auth: enter the password you used for the MySQL root account
Click Save to return to the previous screen, and click Save at the bottom of that screen as well. Your config file will now be created in the config directory we set up earlier. Move the config file from phpmyadmin/config/config.inc.php to phpmyadmin/config.inc.php so that phpMyAdmin can use it. Once you’ve moved the file, delete the config directory.
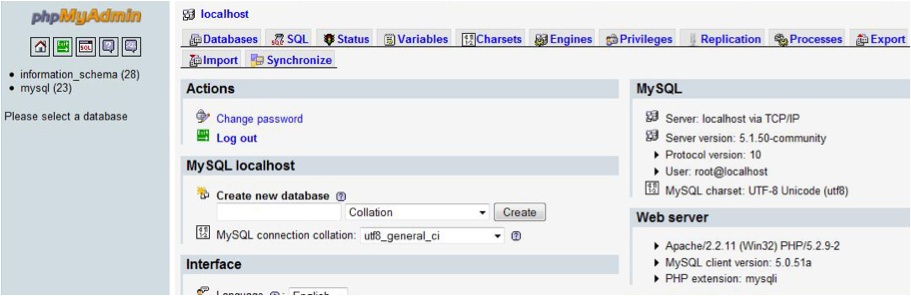
phpMyAdmin should now be configured to work with your database. To test the installation, go to http://localhost/phpmyadmin/index.php in a browser (make sure you have cookies enabled). To view the panel, log in with root and the password you entered earlier. You should see something similar to Figure 3-5.
Under “Create new database” below the “MySQL localhost” heading,
enter partuza (case sensitive).
Click the drop-down box to the right of the input field, select
“utf8_unicode_ci” from the bottom
of the list, and then click Create to create the database that Partuza
will use.
Once the database has been created, the database screen will come up. At the top of the page, click the Import tab. At the top of the new screen, you’ll see a button to “Browse” for a file to import. Click that button and select the partuza.sql file in your partuza directory at C:Program FilesApache Software FoundationApachehtdocspartuza. Finally, click Go at the bottom right of the screen. This will import all the tables Partuza requires into the new database. You should see a success message once the import is complete.
Now that all the prerequisites are in place for Partuza, we can download and set up the project on top of Shindig. We need to create a new directory within localhost for Partuza and then download the source code to that directory. Open a command prompt and input the following (substituting localhost paths for your own):
mkdir C:Program FilesApache Software FoundationApachehtdocspartuza
cd C:Program FilesApache Software FoundationApachehtdocspartuza
svn co http://partuza.googlecode.com/svn/trunk/ .
The code required to run Partuza will now download to the current directory. Once it has completed, close the command prompt. Next, we have to add a virtual host entry for Partuza to allow us to load it from http://partuza/. Edit the Apache virtual host file at C:Program FilesApache Software FoundationApacheconfextrahttpd-vhosts.conf and add the following entry to the bottom of the file:
<VirtualHost *:80>
 ServerName partuza
 DocumentRoot "C:Program FilesApache Software
     FoundationApachehtdocspartuzahtml"
 <Directory>
  AllowOverride All
 </Directory>
</VirtualHost>
Save and close the httpd-vhosts.conf file. Now we can add the hosts reference to tell Windows that there is a virtual host reference available for http://partuza/. Open your Windows hosts file at C:WindowsSystem32driversetchosts.
There should be an existing entry for localhost and shindig, such as:
127.0.0.1 localhost shindig
We need to add the Partuza reference to this entry so we can reference our new shindig directory. Your new entry should look like this:
127.0.0.1 localhost shindig partuza
Save and close that file. There are a few Partuza configuration settings that we need to adjust to get it working on localhost.
Within the downloaded Partuza files, edit partuza/html/index.php. Search for the following line:
$uri = $_SERVER["REQUEST_URI"];
And change it to:
$uri = PartuzaConfig::get('library_root') . $_SERVER["REQUEST_URI"];This change enables Partuza to load files from the right path on your local machine. Next, edit partuza/html/config.php. Search for the following line:
'db_passwd' => ''
and add your MySQL database password as the value. Now Partuza can connect to the MySQL partuza database.
The final step is to configure Shindig to use Partuza. Navigate to your C:Program FilesApache Software FoundationApachehtdocsshindigphpconfig directory and create a new file called “local.php.” Edit this file and input the following code block:
<?php
$shindigConfig = array(
    'person_service' => 'PartuzaService',
    'activity_service' => 'PartuzaService',
    'app_data_service' => 'PartuzaService',
    'messages_service' => 'PartuzaService',
    'oauth_lookup_service' => 'PartuzaOAuthLookupService',
    'extension_class_paths' => 'C:Program FilesApache Software
                                FoundationApachehtdocspartuzaShindig'
);
Save and close the file, and then restart Apache to have the settings take effect. This new file will override the default Shindig configuration variables, which allows Partuza and Shindig to play nicely together and work as one cohesive unit.
Partuza should now be configured to work with Shindig and MySQL.