Why Filters Are Gone
In previous versions of Illustrator, users were given the choice of adding shadows, glows, feathers, and other visual adornments to objects with Filters or Effects. Because of the redundancy—for example, both features offered a Drop Shadow option—users were understandably confused: Which was the best method?
Filters created literal content: For example, the Drop Shadow filter generated the shadow as an embedded image. The Zig Zag filter repositioned points on the object and added new points, permanently altering the shape of the object.
By contrast, effects are live appearances, not literal content: No pixels are generated by the Drop Shadow effect until the Illustrator file is printed (that is, when a print stream is generated by choosing File > Print) or exported to a PDF. The true underlying shape of an object using the Zig Zag effect is not changed in the Illustrator file (Figure 10.12).
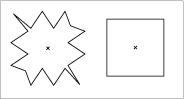
Figure 10.12. The object on the left was distorted with the Zig Zag effect. But under the hood, it’s still the same old rectangle (right). This allows you to experiment more freely, or return to the original shape with no penalty. If you want to tweak individual points of the Zig Zag effect, use Expand to convert the object to editable vectors.
Filters were a vestige of the olden days, when Illustrator was governed by the limitations of the PostScript imaging model. Illustrator 9 was the first version of Illustrator to go beyond PostScript limitations by adopting the expanded Adobe Graphics Model (shared by Acrobat 5 and InDesign 2.0) with support for transparency and live effects.
Both filters and effects were offered in versions of Illustrator up through CS3, but Illustrator CS4 no longer includes filters. Since effects can be expanded to become literal pixel and vector content, filters have actually been redundant for several versions, so they’ve now been laid to rest.
Using Effects
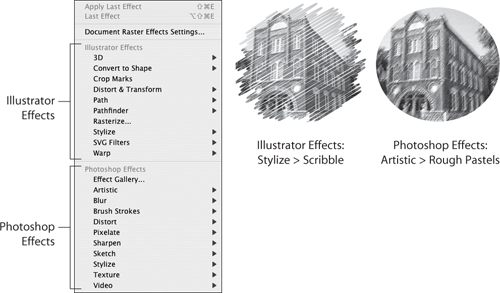
The Effects menu is divided into two sections—Illustrator Effects and Photoshop Effects. The Illustrator Effects are applied to the interiors and the edges of vector objects, including objects being used as Clipping Masks for placed images. The SVG filters generate raster content for the interior of an object without modifying the edge of the object. Photoshop Effects are applied only to the interior of vector objects, including those used as Clipping Masks (Figure 10.13).
Figure 10.13. With the exception of the SVG filters, effects listed in the Illustrator Effects section of the Effects menu affect the interior and the edge of the object (above, left). The Photoshop Effects are applied only to the interior of the object (above, right). This example uses a placed image in a Clipping Mask.
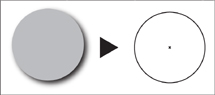
Some effects, such as glows or shadows, can only be accomplished with pixels. But since such effects are potential pixels, not literal pixels, Illustrator generates potential pixels. If you switch to Outline view, you don’t see the outline of an image placed for an effect such as a shadow. That’s because there isn’t a shadow image (Figure 10.14). The shadow doesn’t turn into literal pixels until the file is exported or imaged.
Figure 10.14. Effect > Stylize > Drop Shadow uses imaginary pixels to display a shadow. Those pixels don’t become literal pixels until the file is exported or imaged.
Document Raster Effects Settings
You might notice that dialogs for pixel-based effects don’t offer an option to specify the resolution of these effects. The control for effects resolution is hiding in plain sight: Choose Effect > Document Raster Effects Settings (Figure 10.15).
Figure 10.15. The default Document Raster Effects value is 300 ppi, which is appropriate for artwork created to print at 100 percent size. If the artwork will be greatly scaled up (for example, if you are working at half size), you may want to increase the ppi accordingly. Note that the default behavior is to preserve spot colors.
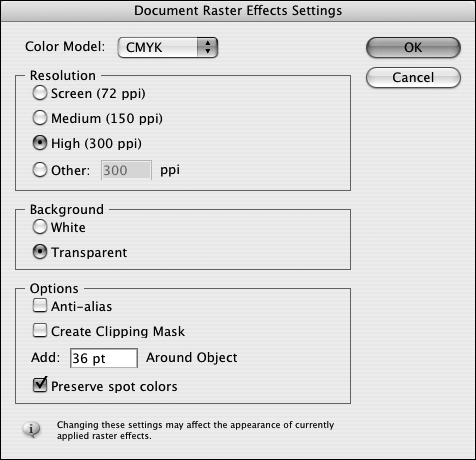
The resolution setting in the Document Raster Effects dialog governs all pixel-based effects, including drop shadows, feathering, the shading on 3D extrusions, and some Graphic Styles confections.
Consider the computational overhead involved in generating these pixels on the fly. In a complex drawing, rendering such effects at full resolution can cause your computer to slow to a crawl. Want to speed things up? You can work on your drawing with the Document Raster Effects value set to 72 ppi (or lower, if you like) and achieve pretty zippy performance. Then, when you’re ready to finalize the drawing, change the setting to your final intended resolution. Since effects such as shadows aren’t literal, changing the Document Raster Effects setting causes these effects to regenerate at the new resolution value.
If the document uses lots of effects, be prepared for a slow redraw as the screen refreshes at the new resolution. Look on the bright side—you might use this as an opportunity to convince your boss that you really do need that newer, faster computer: “See how long this takes? You can’t expect me to meet deadlines with this old, slow computer...”
There is no penalty (other than the time required for redraw) for repeatedly altering the Raster Effects setting; any effects will redraw at the new resolution immediately (Figure 10.16). Since the pixels are generated on the fly, there is no resampling.
Figure 10.16. Using a Document Raster Effects of 72 ppi for effects (left) can speed up performance. Change the value to 300 ppi, and the shadow resolution changes immediately (right).

If you place a native Illustrator file into InDesign, the resolution of any raster effects is not influenced by any settings in InDesign (such as the Transparency Flattener Preset). If you open the Illustrator file in Photoshop, the image will take on the resolution you assign in the Open dialog, but any raster effects will maintain their appearance from Illustrator. For example, if an Illustrator file whose raster effects resolution is 72 ppi is opened in Photoshop at 300 ppi, the image will be 300 ppi, but the raster effects will retain their coarse, pixelated appearance, as if they had been scaled to 300 ppi using the Nearest Neighbor setting.
When you create a new Illustrator document, the document profile or template you choose as a starting point dictates the raster effects resolution for the document. However, you can click the Advanced arrow to show more options, and choose from 72, 150, or 300 ppi instead. Once you have begun working in the document, you can specify any raster effects resolution you want.