Acrobat Distiller
Distiller’s purpose is to convert PostScript to PDF. Period. Create a PostScript file by printing or exporting PostScript from an application (using Adobe PDF as the target printer), and then drag and drop the PostScript file onto the Distiller window. Distiller uses the settings currently selected in the application. You can also open a PostScript file through File > Open on the Distiller menu. Distiller will process EPS files as well, provided you have the necessary fonts on your computer (or they’re embedded in the EPS file). If you’ve fed a healthy PostScript file to Distiller and chosen the correct job option, you’ll watch the progress bar fill up, and soon you’ll have a PDF file. If you’ve dragged multiple PostScript files into Distiller, they’ll be listed in the queue box at the bottom of the Distiller window, in which you can reorder, cancel, or pause queued jobs.
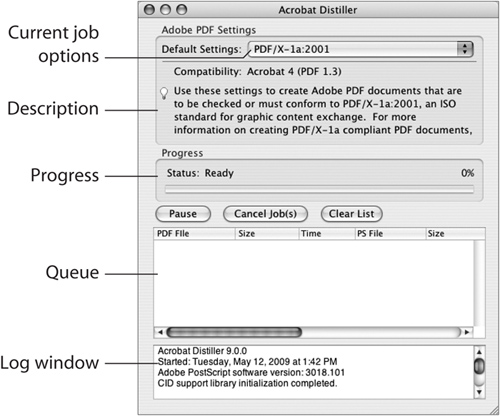
Distiller isn’t very flashy. When you launch the application, all that appears is a floating window that looks like a disembodied dialog (Figure 12.1). There are no tool panels or other obvious controls. But there’s much more than meets the eye. Some of the menu commands are way up at the top of the monitor on the Macintosh in the standard location for menu commands in Macintosh applications, but they are seemingly completely separate from the floating window that you see. Distiller’s presentation on Windows is a bit more sensible—the menu commands are right on the top rim of the Distiller window.
Figure 12.1. Acrobat Distiller may not look complicated when you open it, but there’s a powerful PDF-generating engine under the hood. Select a preset PDF recipe from the Default Settings list, or create your own job options by choosing Settings > Edit Adobe PDF Settings from the menu at the top of your computer screen on the Macintosh (not shown here) or the top edge of the Distiller window (Windows).
As each PDF is created, a small PDF icon appears next to its name in the list. Double-click the entry in the queue window, and the PDF file opens in Acrobat (great if you’re not sure where you saved the file). If Distiller can’t create a PDF file, the log at the bottom of the Distiller window will contain an explanation of the problem, although it doesn’t contain any suggestions to help you.
There are two other doorways into Distiller...
First, if you need to convert more than the occasional PostScript file, you may wish to create what’s called a watched folder, which allows you to batch-distill multiple PostScript files. This is especially useful if you need to convert many PostScript files with the same Distiller settings. Note that the software license for Distiller dictates that you are to use it to process PostScript files only for yourself or for others who also own a license for Distiller.
To create a watched folder, first create a folder to be used as the target folder. Then, choose Settings > Watched Folders from the Distiller menu (remember, it’s way up at the top of your monitor on the Mac). In the Watched Folder window (Figure 12.2), click Add Folder, and then navigate to the folder you created to earmark the folder to be watched by Distiller.
Figure 12.2. The Watched Folder window includes controls for designating folders for Distiller processing as well as options for editing the settings that are used.

By default, the PostScript files will be processed using the current settings in Distiller. However, you can modify these settings by clicking the Edit Settings button and then modifying the settings options. You can choose to delete the PostScript files once they’re converted to PDF files or have Distiller move the PostScript files into another folder after processing. When you click the OK button, Distiller will create two folders inside your watched folder. One is the In folder, where you’ll drop the PostScript files to be processed. The other folder created is the Out folder, where Distiller will place the finished PDF files (and the processed PostScript files, if you choose that option). Note that you must drop PostScript files directly into the In folder, not just loose into the enclosing watched folder.
The other doorway to Distiller is the Acrobat “printer,” named Adobe PDF 9, that’s created on your system during Acrobat installation. (Depending on the version of Acrobat installed, the name you see may be slightly different, but you should be able to recognize it easily.) Printing to this target printer generates PostScript and immediately awakens Distiller (albeit hidden in the background) to process it using the last settings that were selected in Distiller. However, depending on the application from which you are printing, the Print dialog may allow you to select other job options without opening Distiller first.
How do you select the right settings for a print-ready PDF? It’s best if your print service provider gives you definite specifications for creating a PDF that fits their workflow. Better yet, if your print service provider supplies preferred PDF settings, import the settings into one of the Creative Suite applications to make the settings available to all the applications.
Lacking such guidance, you’re almost always safe choosing PDF/X-1a as a start, and then making one minor modification: Make sure that you choose to retain any bleed. Double-check the Marks and Bleed options when generating a PDF from Illustrator or InDesign to ensure that sufficient bleed is included. Photoshop will automatically include the entire image; it doesn’t have a concept of bleed.
Even If You’re Not Using Distiller...However you’re creating PDF files—whether you’re exporting, using Distiller, printing to the Adobe PDF printer, or using some other, proprietary solution—the issues are the same. You have to know how to handle image compression and resampling, font embedding and subsetting, color space, and Acrobat version compatibility. So, although the next few sections are geared toward using Distiller to create PDFs, please view the following pages as a general roadmap to PDF creation issues regardless of the method you’re using. |
All the Creative Suite applications offer PDF/X presets. But if the PDF-export function in a non-Adobe application doesn’t offer named versions of PDF settings, how can you create a PDF that is compliant with the PDF/X-1a specification? It’s not difficult, but you need to stick to some basics:
Set compatibility to Acrobat 4.0. While this may seem old-fashioned given that Acrobat at this writing is at version 9.0, the PDF/X-1a specification stipulates Acrobat 4.0 compatibility. This is to accommodate the capabilities of older RIPs, many of which prefer Acrobat 4.0-flavored PDF files. Since Acrobat 4.0-compatible PDF files don’t contain live transparency, there’s less chance that a RIP that is not PDF based will incorrectly process the file.
Set image resolution to 300 ppi for typical 150-line screen work, and to 200 ppi for 133-line screen jobs (more about image handling in a moment). Consult with your print service provider to find out the line screen that will be used on your job. If you don’t know, you’re safe using 300 ppi.
Set image compression to Automatic (JPEG).
Ensure that all image content is CMYK or spot or some combination thereof. Convert any RGB content to CMYK.
Set font embedding to embed fonts. Enable subsetting, and set the subsetting threshold to 100 percent.