
The X Window System, the graphical networking interface found on many Linux distributions, provides the basis for a wide range of graphical tools and window managers. More commonly known as just X, it can also be referred to as X11R7 and X11 (such as that found on Mac OS X). Coming from the world-renowned Massachusetts Institute of Technology, X has gone through several versions, each of which has extended and enhanced the technology. The open source implementation is managed by the X.Org foundation, the board of which is made up of several key figures from the open source world.
Confusingly, X is available in two different versions: X11R6.9 and X11R7. Both of them share the same source code base, but X11R7 is modularized, meaning that the source code was broken down into smaller modules making it easier for developers to work on. It does not matter which you use as an end user; both of them have exactly the same functionality. The version of X included with Fedora 6 is X11R7, which was released in December 2005.
The best way to think about how X works is to see it as a client/server system. The X server provides services to programs that have been developed to make the most of the graphical and networking capabilities that are available under the server and in the supported libraries. X.Org provides versions for many different platforms, including Linux and Mac OS X. Originally implemented as XFree86, X.Org was forked when a row broke out over certain restrictions that were going to be included in the XFree86 license. Taking a snapshot of code that was licensed under the previous version of the license, X.Org drove forward with its own implementation based on the code. Almost in unison, most Linux distributions turned their back on XFree86 and switched their development and efforts to X.Org.
In this chapter you will learn how to work with the version of X that is included with Fedora. We will look at the fundamentals of X, as well as how to get X to work with any upgrades that might affect it, such as a new graphics card or that new flat panel display you just bought.
The underlying engine of X11 is the X protocol, which provides a system of managing displays on local and remote desktops. The protocol uses a client/server model that allows an abstraction of the drawing of client windows and other decorations locally and over a network. An X server draws client windows, dialog boxes, and buttons that are specific to the local hardware and in response to client requests. The client, however, does not have to be specific to the local hardware. This means that system administrators can set up a network with a large server and clients and enable users to view and use those clients on workstations with totally different CPUs and graphics displays.
Note
What better way to demonstrate the capability of X to handle remote clients than by using its capabilities to produce this chapter. Although the OpenOffice.org file for this chapter resided on a Mac mini (running Fedora), the display and keyboard used were actually part of an Acer Ferrari notebook running Ubuntu 6.06 LTS, via an ethernet connection. Revisions were done using a Logitech keyboard and mouse of a desktop machine running Fedora 6, again connected to the Mac mini via X, but this time using a wireless connection.
Because X offers users a form of distributed processing, this means that Fedora can be used as a very cheap desktop platform for clients that connect to a powerful X server. The more powerful the X server, the larger the number of X-based clients that can be accommodated. This functionality can breathe new life into older hardware, pushing most of the graphical processing on to the server. A fast network is a must if you intend to run many X clients because X can become bandwidth-hungry.
X is hugely popular in the UNIX and Linux world for a variety of reasons. The fact that it supports nearly every hardware graphics system is a strong point, as well as strong multiplatform programming standards give it a solid foundation of developers committed to X. Another key benefit of X is its networking capability, which plays a central point in administration of many desktops and can also assist in the deployment of a thin-client computing environment. Being able to launch applications on remote desktops and also standardize installations serve to highlight the versatility of this powerful application.
More recent versions of X have also included support for shaped windows (that is, nonrectangular), graphical login managers (also known as display managers), and compressed fonts. Each release of X brings more features designed to enhance the user experience, including being able to customize how X client applications appear, right down to buttons and windows. Most office and home environments run Linux and X on their local machines. The more-enlightened companies and users harness the power of the networking features of X, enabling thin-client environments and allowing the use of customized desktops designed specifically for that company. Having applications launch from a single location makes the lives of system administrators a lot easier because they have to work on only one machine, rather than several.
X11R7 is the X server that is used with Fedora. The base Xorg distribution consists of 30 RPM packages (almost 120MB), which contain the server, along with support and development libraries, fonts, various clients, and documentation. An additional 1,000 or more X clients, fonts, and documentation are also included with Fedora.
Note
A full installation of X and related X11R7 files can consume more—usually much more—than 170MB of hard drive space. This is because additional clients, configuration files, and graphics (such as icons) are under the /usr/bin and /usr/share directory trees. You can pare excessive disk requirements by judiciously choosing which X-related packages (such as games) to install on workstations. However, with the increased capacity of most desktop PC hard drives today, the size requirements are rarely a problem, except in configuring thin-client desktops or embedded systems.
The /usr directory and its subdirectories contain the majority of Xorg’s software. Some important subdirectories are
/usr/bin—. This is the location of the X server and various X clients. (Note that not all X clients require active X sessions.)/usr/include—. This is the path to the files necessary for developing X clients and graphics such as icons./usr/lib—. This directory contains required software libraries to support the X server and clients./usr/lib/X11—. This directory contains fonts, default client resources, system resources, documentation, and other files that are used during X sessions and for various X clients. You will also find a symbolic link to this directory, namedX11, under the/usr/libdirectory./usr/lib/modules—. This path to drivers and the X server modules used by the X server enables use of various graphics cards./usr/X11/man—. This directory contains directories of man pages for X11 programming and clients.
The main components required for an active local X session are installed on your system if you choose to use a graphical desktop. These components are the X server, miscellaneous fonts, a terminal client (that is, a program that provides access to a shell prompt), and a client known as a window manager. Window managers, which are discussed later in this chapter (see the section “Selecting and Using Window Managers”), administer onscreen displays, including overlapping and tiling windows, command buttons, title bars, and other onscreen decorations and features.
The most important file for Xorg is the xorg.conf configuration file, which can be located in the /etc/X11 directory. This file contains configuration information that is vital for X to function correctly, and is usually created during the installation of Fedora. Should you need to change anything post-install, you should use the system-config-display application, which we will cover later in this chapter. Information relating to hardware, monitors, graphics cards, and input devices is stored in the xorg.conf file, so be careful if you decide to tinker with it in a text editor!
Of course, we would not send you in blindly to edit such an important file. Let us take a look at the contents of the file so that you can get an idea of what X is looking for. The components, or sections, of the xorg.conf file specify the X session or server layout, along with pathnames for files that are used by the server, any options relating directly to the server, any optional support modules needed, information relating to the mouse and keyboard attached to the system, the graphics card installed, the monitor in use, and of course the resolution and color depth that Fedora uses. Of the 12 sections of the file, these are the essential components:
ServerLayout—. Defines the display, defines one or more screen layouts, and names input devices.Files—. Defines the location of colors, fonts, or port number of the font server.Module—. Tells the X server what graphics display support code modules to load.InputDevice—. Defines the input devices, such as the keyboard and mouse; multiple devices can be used.Monitor—. Defines the capabilities of any attached display; multiple monitors can be used.Device—. Defines one or more graphics cards and specifies what optional features (if any) to enable or disable.Screen—. Defines one or more resolutions, color depths, perhaps a default color depth, and other settings.
The following sections provide short descriptions of these elements; the xorg.conf man page contains full documentation of all the options and other keywords you can use to customize your desktop settings.
As noted previously, the ServerLayout section of the xorg.conf file defines the display and screen layouts, and it names the input devices. A typical ServerLayout section from an automatically configured xorg.conf file might look like this:
Section "ServerLayout"
        Identifier     "single head configuration"
        Screen      0  "Screen0" 0 0
        InputDevice    "Mouse0" "CorePointer"
        InputDevice    "Keyboard0" "CoreKeyboard"
        InputDevice    "DevInputMice" "AlwaysCore"
EndSection
In this example, a single display is used (the numbers designate the position of a screen), and two default input devices, Mouse0 and Keyboard0, are used for the session.
The Files section of the xorg.conf file might look like this:
Section "Files"
    RgbPath      "/usr/lib/X11/rgb"
    FontPath    "unix/:7100"
EndSection
This section lists available session colors (by name, in the text file rgb.txt) and the port number to the X font server. The font server, xfs, is started at boot time and does not require an active X session. If a font server is not used, the FontPath entry could instead list each font directory under the /usr/X11R6/lib/X11/fonts directory, as in this example:
FontPath "/usr/lib/X11/fonts/100dpi"
FontPath "/usr/lib/X11/fonts/misc"
FontPath "/usr/lib/X11/fonts/75dpi"
FontPath "/usr/lib/X11/fonts/type1"
FontPath "/usr/lib/X11/fonts/Speedo"
...
These directories contain the default compressed fonts that are available for use during the X session. The font server is configured by using the file named config under the /etc/X11/fs directory. This file contains a listing, or catalog, of fonts for use by the font server. By adding an alternate-server entry in this file and restarting the font server, you can specify remote font servers for use during X sessions. This can help centralize font support and reduce local storage requirements (even though only 25MB is required for the almost 5,000 fonts installed with Fedora and X).
The Module section of the xorg.conf file specifies loadable modules or drivers to load for the X session. This section might look like this:
Section "Module"
        Load  "dbe"
        Load  "extmod"
        Load  "fbdevhw"
        Load "glx"
        Load "record"
        Load  "freetype"
        Load  "type1"
        Load  "dri"

EndSection
These modules can range from special video card support to font rasterizers. The modules are located in subdirectories under the /usr/lib/modules directory.
The InputDevice section configures a specific device, such as a keyboard or mouse, as in this example:
Section "InputDevice"
        Identifier  "Keyboard0"
        Driver      "kbd"

        Option  "XkbModel"      "pc105"
        Option  "XkbLayout"     "us"
EndSection
Section "InputDevice"
        Identifier  "Mouse0"
        Driver      "mouse"
        Option      "Protocol" "IMPS/2"
        Option      "Device" "/dev/input/mice"
        Option      "ZAxisMapping" "4 5"
        Option      "Emulate3Buttons" "yes"
EndSection
You can configure multiple devices, and there might be multiple InputDevice sections. The preceding example specifies a basic keyboard and a two-button PS/2 mouse (actually, a Dell touchpad pointer). An InputDevice section that specifies use of a USB device could be used at the same time (to enable mousing with PS/2 and USB pointers) and might look like this:
Section "InputDevice"
        Identifier  "Mouse0"
        Driver      "mouse"
        Option      "Device" "/dev/input/mice"
        Option      "Protocol" "IMPS/2"
        Option      "Emulate3Buttons" "off"
        Option      "ZAxisMapping" "4 5"
EndSection
Note
If you change your computer’s pointing device, you should then run Fedora’s system-config-mouse client, which automatically updates your system’s xorg.conf file.
Caution
From Fedora Core 3 onward, the location for the mouse device changed from /dev/mouse to /dev/input/mice. Unfortunately, when system-config-display writes the xorg.conf file, it sometimes gets a little confused and still maps the mouse to /dev/mouse rather than /dev/input/mice. This is where a little knowledge of vi comes in handy!
The Monitor section configures the designated display device as declared in the ServerLayout section, as shown in this example:
Section "Monitor"
        Identifier   "Monitor0"
        VendorName   "Monitor Vendor"
        ModelName    "Monitor Model"
        DisplaySize  300     220
        HorizSync   31.5-48.5
        VertRefresh 50-70
        Option "dpms"
EndSection
Note that the X server automatically determines the best video timings according to the horizontal and vertical sync and refresh values in this section. If required, old-style mode-line entries (used by distributions and servers prior to XFree86 4.0) might still be used. If the monitor is automatically detected when you configure X (see the “Configuring X” section, later in this chapter), its definition and capabilities are inserted in your xorg.conf file from the MonitorsDB database. This database contains more than 600 monitors and is located in the /usr/share/hwdata directory.
The Device section provides details about the video graphics chipset used by the computer, as in this example:
Section "Device"
        Identifier  "Videocard0"
        Driver      "radeon"
        VendorName  "Videocard vendor"
        BoardName   "ATI Radeon Mobility M6"

EndSection
This example identifies an installed video card as using an ATI Mobility M6 graphics chipset. The Driver entry tells the Xorg server to load the radeon_drv.o module from the /usr/lib/modules/drivers directory. Different chipsets have different options. For example, here’s the entry for a NeoMagic video chipset:
Section "Device"
        Identifier   "NeoMagic (laptop/notebook)"
        Driver       "neomagic"
        VendorName   "NeoMagic (laptop/notebook)"
        BoardName     "NeoMagic (laptop/notebook)"
    Option     "externDisp"
    Option     "internDisp"
EndSection
In this example, the Device section specifies the driver for the graphics card (neomagic_drv.o) and enables two chipset options (externDisp and internDisp) to allow display on the laptop’s LCD screen and an attached monitor.
The Xorg server supports hundreds of different video chipsets. If you configure X11 but subsequently change the installed video card, you need to edit the existing Device section or generate a new xorg.conf file, using one of the X configuration tools discussed in this chapter, to reflect the new card’s capabilities. You can find details about options for some chipsets in a companion man page or in a README file under the /usr/lib/_X11/doc directory. You should look at these sources for hints about optimizations and troubleshooting.
The Screen section ties together the information from the previous sections (using the Screen0, Device, and Monitor Identifier entries). It can also specify one or more color depths and resolutions for the session. Here’s an example:
Section "Screen"
        Identifier "Screen0"
        Device     "Videocard0"
        Monitor    "Monitor0"
        DefaultDepth     24
        SubSection "Display"
                Viewport   0 0
                Depth     16
                Modes    "1024x768" "800x600" "640x480"
        EndSubSection
EndSection
In this example a color depth of thousands of colors and a resolution of 1024×768 is the default, with optional resolutions of 800×600 and 640×480. Multiple Display subsection entries with different color depths and resolutions (with settings such as Depth 24 for millions of colors) can be used if supported by the graphics card and monitor combination. You can also use a DefaultDepth entry (which is 24, or thousands of colors, in the example), along with a specific color depth to standardize display depths in installations.
You can also specify a desktop resolution larger than that supported by the hardware in your monitor or notebook display. This setting is known as a virtual resolution in the Display subsection. This allows, for example, an 800×600 display to pan (that is, slide around inside) a virtual window of 1024×768.
Although the Fedora installer can be used to configure X during installation, problems can arise if the PC’s video card is not recognized. If you are unable to configure X during installation (refer to Chapter 3, “Installing Fedora”), do not specify booting to a graphical configuration and skip the X configuration portion of the installation. Note that some installs, such as for servers, don’t require that X be configured for use to support active X sessions, but might require installation of X and related software to support remote users and clients.
You can use the following configuration tools, among others, to create a working xorg.conf file:
system-config-display—. This is Fedora’s graphical configuration tool, which launches an X session to create anxorg.conffile.Xorg—. The X server itself can create a skeletal working configuration.
The following sections discuss how to use each of these software tools to create a working xorg.conf file.
You can use the system-config-display client to create or update an xorg.conf file. You can start by clicking the Display menu item from the desktop panel’s System Settings menu if you are already running X, but you can also begin, as root, by starting the client from the command line during a console session, like this:
# system-config-display
The screen clears, and system-config-display attempts to start an X session. If you start this client during an X session, its main window appears, as shown in Figure 6.1.
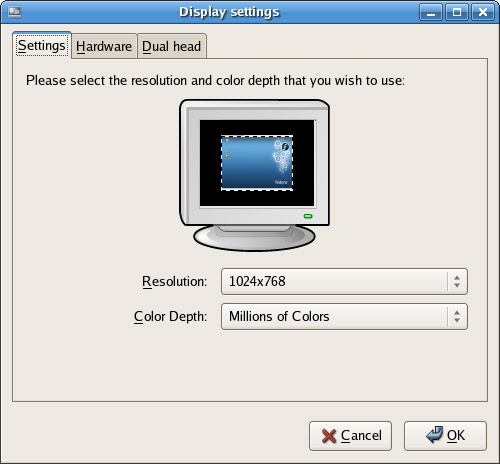
The Display Settings main screen is a dialog showing the current monitor and video card settings (if configured). You can change the resolution (horizontal and vertical pixels) and color depth (number of supported colors) by clicking one or the other of the drop-down menus. Click the OK or Cancel button to save or cancel any change.
If you click the Hardware tab, other configuration options become available, as shown in Figure 6.2.
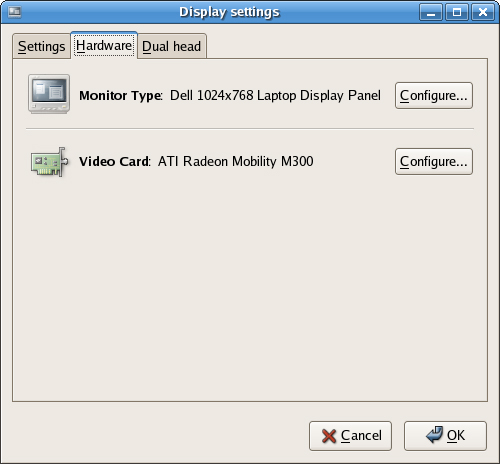
Click the Configure button in the Monitor Type area of the Hardware tab dialog to change your Monitor settings, as shown in Figure 6.3. You can use this dialog to configure a different monitor or to change current monitor settings.

First, scroll through the list of monitor brands (from the MonitorDB database), and then click the small triangle to the left of the name of the manufacturer or type. You will then see a list of model names. Click to select one, and when you are finished, click the OK button to use the new settings or click the Cancel button to abort changes.
To configure a video card, you can click the Video Card area’s Configure button in the Hardware tab dialog. The Video Card dialog appears, as shown in Figure 6.4.

You can scroll through the list of video cards. You can click one to select it and when you are finished, click the OK button to finalize your selection.
If your video card supports the use of two or more monitors, you can use the Dual head tab to configure multiple monitor support. Xorg supports multiple displays using a feature named Xinerama. This feature enables multiple monitors to appear as a single display, and each display can be located in any quadrant of a screen’s layout.
To use Xinerama for your desktop sessions, you must start the Xorg server with its +xinerama option. Your xorg.conf file must also have proper settings, and each display must be capable of supporting identical color depth (usually 16bpp or thousands of colors). Details about using Xinerama with Xorg can be found in the Xorg man page and in the Xinerama HOWTO at http://www.tldp.org/HOWTO/Xinerama-HOWTO/.
When you have finished your changes to your X server settings, click the OK button. You will then see a dialog advising that you have to log out and then log back in (or exit your X session and restart X) to use the new settings.
The new settings will be stored in a new xorg.conf file under the /etc/X11 directory. If you find that the new settings do not work, you can simply copy the backup xorg.conf file named xorg.conf.backup to xorg-conf in the same directory to revert to your original settings.
You can create the xorg.conf file manually by typing one from scratch using a text editor, but you can also create one automatically by using the Xorg server or configuration utilities (as discussed in the previous sections). As the root operator, you can use the following on the server to create a test configuration file:
# X -configure
After you press Enter, a file named xorg.conf .new is created in root’s home directory, the /root directory. You can then use this file for a test session, like this:
# X –config /root/xorg.conf.new
You can start X sessions in a variety of ways. The Fedora installer sets up the system initialization table /etc/inittab to have Linux boot directly to an X session using a display manager (that is, an X client that provides a graphical login). After you log in, you use a local session (running on your computer) or, if the system is properly configured, an X session running on a remote computer on the network. Logging in via a display manager requires you to enter a username and password. You can also start X sessions from the command line. The following sections describe these two methods.
An X display manager presents a graphical login that requires a username and password to be entered before access is granted to the X desktop. It also allows you to choose a different desktop for your X session. Whether or not an X display manager is presented after you boot Linux is controlled by a runlevel—a system state entry in /etc/inittab. The following runlevels are defined in the file:
# 0 - halt (Do NOT set initdefault to this)
# 1 - Single user mode
# 2 - Multiuser, without NFS (The same as 3, if you do not have networking)
# 3 - Full multiuser mode
# 4 - unused
# 5 - X11
# 6 - reboot (Do NOT set initdefault to this)
Runlevel 5 is used for multiuser mode with a graphical X login via a display manager; booting to runlevel 3 provides a console, or text-based, login. The initdefault setting in the /etc/inittab file determines the default runlevel:
id:5:initdefault:
In this example, Linux boots and then runs X.
The default display manager might also be specified in /etc/inittab, like this:
x:5:respawn:/usr/bin/xdm –nodaemon
However, Fedora uses a shell script named prefdm, found under the /etc/X11 directory, to set the display manager:
x:5:respawn:/etc/X11/prefdm –nodaemon
According to this script, the display manager is based on the file named desktop under the /etc/sysconfig directory. The words GNOME, KDE, and XDM following a DESKTOP= entry determine what display manager is used for login. The following sections describe how to configure the three most commonly used display managers: gdm, kdm, and xdm.
The gdm display manager is part of the GNOME library and client distribution included with Fedora and provides a graphical login when a system boots directly to X. Its login (which is actually displayed by the gdmlogin client) hosts pop-up menus of window managers, languages, and system options for shutting down (halting) or rebooting the workstation. Although you can edit (as root) gdm.conf under the /etc/X11/gdm directory to configure gdm, a much better way to configure GNOME’s display manager is to use the gdmsetup client.
You can use the gdmsetup client to configure many aspects and features of the login display. You launch this client from the GNOME desktop panel’s System Settings Login Screen menu item, or from the command line, like this:
# gdmsetup &
After you press Enter, you see the gdmsetup window, as shown in Figure 6.5.
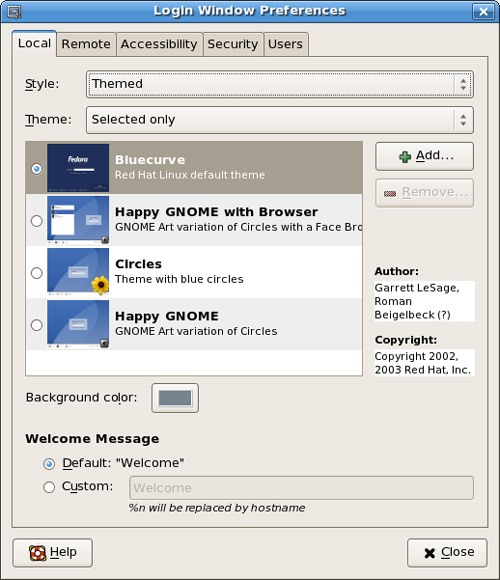
You can specify settings for security, remote network logins, the X server, and session and session chooser setup by clicking on the tabs in the GDM Setup dialog.
The kdm client, which is part of the KDE X desktop suite, offers a graphical login similar to gdm. You configure kdm by running the KDE Control Center client kcontrol, as the root operator, by clicking the Control Center menu item from the KDE kicker or desktop panel menu. You can also start KDE Control Center by using the kcontrol client at the command line like so:
$ kcontrol &
In the Index tab of the left pane of the KDE Control Center window, you click the System Administration menu item to open its contents, and then you click the Login Manager menu item. The right pane of the Control Center window displays the tabs and configuration options for the kdm Login Manager, as shown in Figure 6.6.
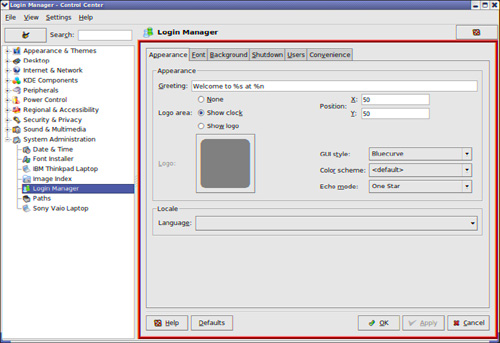
To make any changes to the KDE display manager while logged in as a regular user, you must first click the Administrator Mode button, and then enter the root operator password. You can click on a tab in the Control Center dialog to set configuration options. Options in these tabs allow you to control the login display, prompts, user icons, session management, and configuration of system options (for shutting down or rebooting). After you make your configuration choices in each tab, click the Apply button to apply the changes immediately; otherwise, the changes are applied when the X server restarts.
The xdm display manager is part of the Xorg distribution and offers a bare-bones login for using X. Although it is possible to configure xdm by editing various files under the /etc/X11/xdm directory, GNOME and KDE offer a greater variety of options in display manager settings. The default xdm login screen’s display is handled by the xsetroot client, which is included with Xorg, and Owen Taylor’s xsri client, as specified in the file Xsetup_0 in the xdm directory under /etc/X11. The xsri client can be used to set the background color of the login display’s desktop and to place an image in the initial display.
If you have Fedora set to boot to runlevel 3, a text-based console login, you can start an X session from the command line. You use the startx command (which is actually a shell script) to do so. You launch the X server and an X session by using startx, like this:
$ startx
startx first looks in your home directory for a file named .xinitrc. This file can contain settings that will launch an alternative desktop and X clients for your X session. The default system .xinitrc is found in the /etc/X11/xinit directory, but a local file can be used instead to customize an X session and launch default clients. For example, you can download and install the mlvwm window manager, which is available from http://www2u.biglobe.ne.jp/~y-miyata/mlvwm.html in the /usr/local/bin directory. You can then use the mlvwm desktop for your X session along the xterm terminal client by creating an .xinitrc file that contains the following:
xterm &
exec /usr/bin/mlvwm
Using a custom .xinitrc is not necessary if you’re using Fedora’s desktop, which runs X and either a GNOME-aware window manager or KDE as a desktop environment.
You can also use the startx command with one or more command-line options. These options are passed to the X server before it launches an X session. For example, you can use startx to specify a color depth for an X session by using the -depth option, followed by a number such as 8, 16, 24, or 32 for 256, thousands, or millions of colors (as defined in the X configuration file and if supported). Using different color depths can be useful during development for testing how X clients look on different displays, or to conserve use of video memory, such as when trying to get the highest resolution (increased color depth can sometimes affect the maximum resolution of older video cards).
For example, to start a session with thousands of colors, you use the startx command like this:
$ startx -- -depth 16
Another option that can be passed is a specific dots-per-inch (dpi) resolution that is to be used for the X session. For example, to use 100 dpi, you use the -dpi option followed by 100, like this:
$ startx -- -dpi 100
You can also use startx to launch multiple X sessions. This feature is due to Linux support for virtual consoles, or multiple text-based displays. To start the first X session, you use the startx command followed by a display number, or an X server instance (the first is 0, using screen 0) and a number that represents a virtual console. The default console used for X is number 7, so you can start the session like this:
$ startx -- :0 vt7
After X starts and the window manager appears, you press Ctrl+Alt+F2 and then log in again at the prompt. Next, you start another X session like this, specifying a different display number and virtual console:
$ startx -- :1 vt8
Another X session starts. To jump to the first X session, press Ctrl+Alt+F7. You use Ctrl+Alt+F8 to return to the second session. If you exit the current session and go to another text-based login or shell, you use Alt+F7 or Alt+F8 to jump to the desired session.
Using startx is a flexible way to launch X sessions, but multiple sessions can be confusing, especially to new users, and are a horrific resource drain on a system that does not have enough CPU horsepower and memory. A better approach is to use multiple workspaces, also known as virtual desktops, as discussed in the following section.
A window manager is usually launched immediately after the X server starts. The window manager looks after the general look and feel of the interface, as well as the actual drawing of scrollbars, buttons, and so on. A window manager is essential to interact with the X server; without one, X client windows would not be able to be moved around or resized. Linux allows for a wide variety of window managers, and each window manager caters for specific requirements. This variety is one of the features that makes Linux and X itself more popular.
A window manager provides the user with a graphical interface to X, as well as a customized desktop which includes the look and feel of the window manager. Things such as icons, panels, windows, grab handles, and scroll bars are defined by the window manager’s general settings and are usually unique to that window manager.
A window manger might also provide menuing on the root desktop or after a button is clicked in a client’s window title bar. Some window managers support the use of special keyboard keys to move the pointer and emulate mouse button clicks. Another feature is the capability to provide multiple workspaces, or a virtual desktop, which is not the same as the virtual screen; whereas a virtual screen is a desktop that is larger than the display, a virtual desktop offers two, four, or eight additional complete workspaces.
Some window managers support advanced features, such as dragging and dropping of icons that represent files or system devices. This allows the user to easily copy, print, delete, link, or move files—even over a network or the Internet.
Note
Many different window managers are available for Linux. You do not have to use Fedora’s default selection of window managers. This is part of the freedom of using Linux and a testament to the flexibility of the X architecture. You can download, install, and run nearly any other window manager for X without problems. One of the best places to find links and information to other window managers is Matt Chapman’s Window Managers for X page, at http://xwinman.org/. Many of these window managers can be downloaded and installed by using RPM, apt, or yum, or built and installed from source. For those of you who do not realize it, Fedora Core 4 ships with the GNOME 2.10 window manager as standard.
The following sections describe how to select a default desktop, switch to a different desktop, and configure different window managers for X.
You can use Fedora’s switchdesk client to change the default window manager or desktop environment such as GNOME or KDE. A desktop environment includes a window manager and a suite of related clients, such as productivity or utility applications. Most desktop environments also include the capability to save a session state (such as running applications, the applications’ window size and positions, and so on), using a feature known as session management.
You can also use the switchdesk utility when running X or at a text-based console, along with a keyword (such as GNOME or KDE), to set the default X desktop before launching X. For example, to specify that you want to use the KDE desktop environment as the default, you use switchdesk like this:
$ switchdesk KDE
Red Hat Linux switchdesk 4.0
Copyright (C) 1999-2004 Red Hat, Inc
Redistributable under the terms of the GNU General Public License
Desktop now set up to run KDE.
For system defaults, remove /home/andrew/.Xclients
This example shows that the default X session will now use KDE. Settings are saving in the file named .Xclients in the home directory. You can launch switchdesk during an X session by clicking the Desktop Switching Tool menu item from the System Settings More System Setting menu or from the command line of an X11 terminal like this:
$ switchdesk &
After you press Enter, you get a graphical dialog offering a choice of window managers for X sessions (depending on the window managers that are installed on the system), as shown in Figure 6.7.
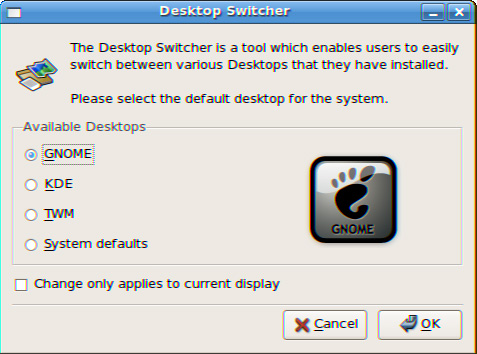
Choosing a window manager is a matter of preference, necessity, or policy. You might prefer to use one of the older window managers—such as the Tab Window Manager (twm) or the Motif Window Manager (mwm)—on legacy PCs because they have fewer system resource requirements (that is, they require less hard drive space, CPU horsepower, and system memory). Newer desktop environments require 64MB or even more memory for good performance. The following sections describe some of the most popular window managers and their uses.
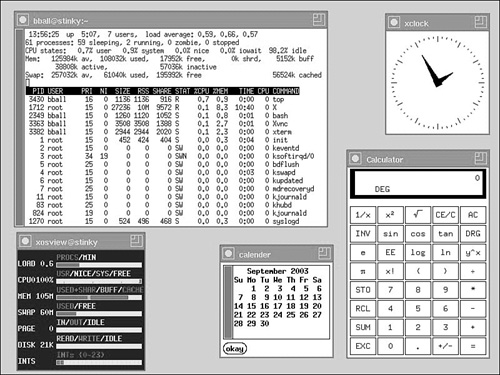
The Tab Window Manager (twm), which is included with Xorg and also sometimes known as Tom’s Window Manager, is a legacy client that provides modest but essential features in a small (less than 1MB) memory footprint. It supports window decorations, menus, icons, and other features, but it does not support virtual desktops, session management, and other features, such as drag and drop.
The twm window manager is used as a fallback, or failsafe, window manager for Fedora as it requires much less video and system memory. It is included with the Xorg software distribution and will be used as your window manager after you log in or start X in the event the system or your default window manager settings are lost or unusable. The twm resource file, system.twmrc, is located under the /etc/X11/twm directory. You can configure this file to provide a default desktop with a custom application menu if you save your settings to a file named .twmrc in your home directory. The format of this configuration file is documented in the twm man page.
A sample twm desktop is shown in Figure 6.8, displaying the xosview, xclock, xcalc, and xterm clients. The default desktop color can be changed using the xsetroot client. You access the desktop menu in twm by left-clicking in a blank area of the main window, known as the root display.
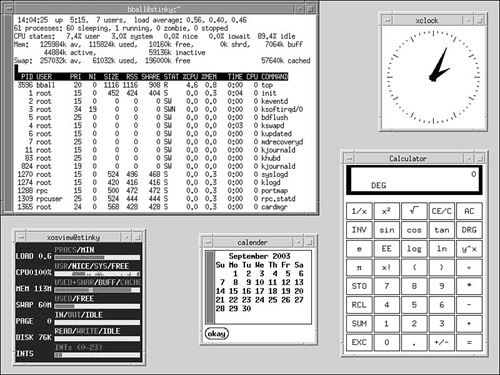
mwm, the Motif Window Manager, is included with Fedora to provide a legacy X desktop. It is a clone window manager that closely mimics the original mwm window manager that was part of the OSF/Motif distribution from The Open Software Foundation. The mwm window manager is part of a Motif 1.2–compatible set of programming libraries and development files named LessTif.
mwm can even use the same configuration files as the OSF/Motif version. mwm’s default resource file is located in /etc/X11/ system.mwmrc. You can edit this file to provide custom settings when it is located in your home directory and is named .mwmrc.
A sample mwm desktop is shown in Figure 6.9. Note that the Motif Window Manager offers more sophisticated window decorations (controls such as borders and title bar items) than the twm window manager.
Recent development work carried out on X has allowed the introduction of a number of hardware-accelerated effects within Fedora and its window managers. No longer do you have to drool at your Mac OS X using colleagues when they work; now Fedora has a whole load of ‘wow’ effects designed to add that professional touch to Linux.
Up until recently, enabling these desktop effects has required a lot of work involving downloading specific packages and also configuring some of them using the console. However, with Fedora 6 this has been largely done away with, and there is very little that you need to do in order to get access to the effects.
Fedora relies upon the Compiz window manager, which to most end users will not appear any differently to Metacity, the standard window manager in use by Fedora. You will need to retrieve and install compiz using either yum or Applications, Add/Remove Software. You will also need to make sure you have the latest version of drivers for your graphics card/chipset; We cover this in Chapter 13, “Games.”
Note
You may wonder why installation of graphics drivers are placed alongside information on games. This is because, for the most part, 3D acceleration is not a necessity if you are using Fedora for productivity. However, if you are intending to work off a bit of aggression by blowing away some opponents in Unreal Tournament, then you are going to need 3D acceleration enabled, and you will need the specific graphics drivers for that.
Once you have installed Compiz you will find a new menu option under System, Preferences, called Desktop Effects. Open it up and select the option to Enable Desktop Effects. After a couple of seconds, a prompt will come up asking you to try out your new settings. Grab hold of the window title bar and move it around. If everything has gone according to plan, it should wobble! Click Keep Settings to save the settings and welcome to a world of fancy effects.
The most obvious effect is that of ‘wobbly windows,’ which provides a fluid effect when you move your windows around the desktop area. If you hold down the Ctrl and Alt keys and press either the left or right cursor button, your desktop should move as if it is part of a cube, taking you from one virtual desktop to another.
This technology is still very much in it’s infancy, so expect great things in future versions!
A desktop environment for X provides one or more window managers and a suite of clients that conform to a standard graphical interface based on a common set of software libraries. When they are used to develop associated clients, these libraries provide graphical consistency for the client windows, menus, buttons, and other onscreen components, along with some common keyboard controls and client dialogs. The following sections briefly discuss the two desktop environments that are included with Fedora: GNOME and KDE.
The GNOME project, which was started in 1997, is the brainchild of programmer whiz Miguel de Icaza. GNOME provides a complete set of software libraries and clients. GNOME depends on a window manager that is GNOME-aware. This means that to provide a graphical desktop with GNOME elements, the window manager must be written to recognize and use GNOME. Some compliant window managers that are GNOME-aware include Havoc Pennington’s metacity (the default GNOME window manager), Enlightenment, Window Maker, IceWM, and sawfish.
Fedora uses GNOME’s user-friendly suite of clients to provide a consistent and user-friendly desktop. GNOME is a staple feature of Red Hat’s commercial Linux distributions and Fedora because Red Hat actively supports its development. GNOME clients are found under the /usr/bin directory, and GNOME configuration files are stored under the /etc/gnome and /usr/share/gnome directories, with user settings stored in the home directory under .gnome.
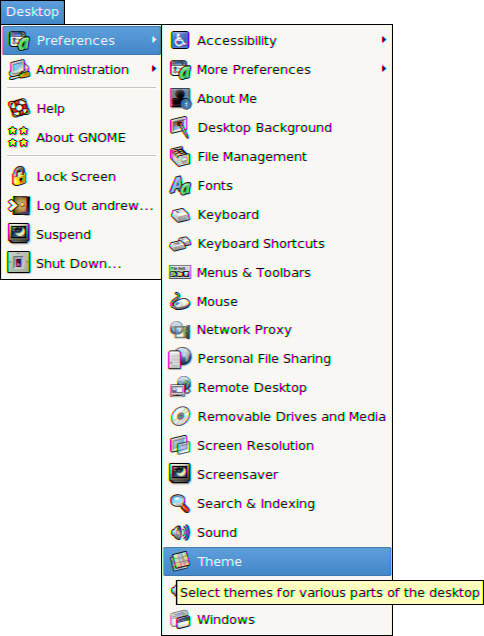
A representative GNOME desktop, running the gconftool-2 client used for setting themes, is shown in Figure 6.10.
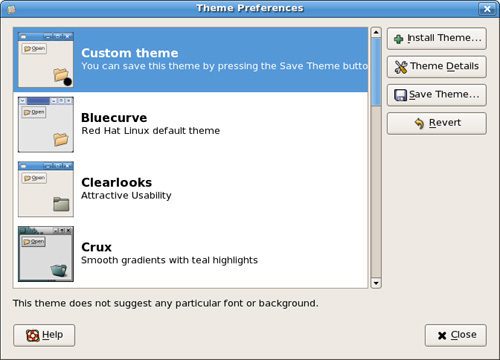
You can configure your desktop in various ways and by using different menu items under the Preferences menu, which can be found as part of the main Desktop menu. The myriad of configurations options allow you to tailor every aspect of your system’s look and feel. In Figure 6.11 you can see a selection of the preferences options available to you.
KDE, which is included with Fedora, has been available for Linux, Xorg, and XFree86 since 1996. KDE is a graphical desktop environment that offers a huge suite of clients, including a free office suite named KOffice. KDE clients are located under the /usr/bin directory, and nearly all clients have a name that begins with k.
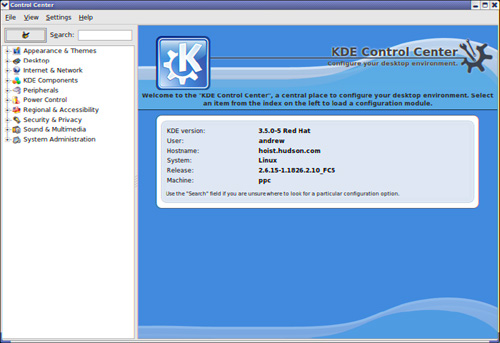
The .kde directory in your home directory contains custom settings and session information. You can use KDE’s Control Center, as shown in Figure 6.12, to customize desktop settings. You can launch this client by clicking the Control Center menu item from KDE’s desktop menu (hosted by the panel along the bottom of your desktop, known as the kicker) or from the command line, like so:
$ kcontrol &
http://www.x.org/—Curators of the X Window System.
http://www.x.org/Downloads_mirror.html—Want to download the source to the latest revision of X? Start at this list of mirror sites.
http://www.xfree86.org/—Home of The XFree86 Project, Inc., which has provided a graphical interface for Linux for nearly 10 years.
http://www.kde.org/—The place to get started when learning about KDE and the latest developments.
http://www.gnome.org/—The launch point for more information about GNOME, links to new clients, and GNOME development projects.
http://people.redhat.com/~hp/metacity/—Havoc Pennington’s metacity download page, where you can get the latest full-source version of this window manager.
http://sawmill.sourceforge.net/—The home page for the sawfish window manager (formerly called sawmill).
http://www.windowmaker.org/—The source for the latest version of Window Maker.
http://www.icewm.org/—IceWM’s home page.
http://www.lesstif.org/—The home page of the LessTif project, which aims to provide GNU GPL versions of OSF/Motif-compatible software libraries.
http://scwm.sourceforge.net/—The home page of a lightweight, yet virtual desktop-enabled, window manager.
http://www.fvwm.org/—The home page for FVWM2, where you can download the latest version.
http://www.novell.com/products/desktop/—The place to get started with Ximian GNOME.