
There are two things in this world that you can never have enough of: time and bandwidth. Fedora comes with a proxy server—Squid—that enables you to cache web traffic on your server so that websites load faster and users consume less bandwidth.
A proxy server lies between client machines—the desktops in your company—and the Internet. As clients request websites, they do not connect directly to the Web and send the HTTP request. Instead, they connect to the local proxy server. The proxy then forwards their request on to the Web, retrieves the result, and hands it back to the client. At its simplest, a proxy server really is just an extra layer between client and server, so why bother?
The three main reasons for deploying a proxy server are
Content control—. You want to stop people whiling away their work hours reading the news or downloading MP3s.
Speed—. You want to cache common sites to make the most of your bandwidth.
Security—. You want to monitor what people are doing.
Squid is capable of achieving all of these goals and more.
Squid installation is handled through the Add/Remove Software dialog. The Squid package is confusingly located under the Web Server group; this has the downside of installing Apache alongside Squid whether you like it or not. That said, you can (and should) deselect other autoinstall packages that you do not need from the Web Server category.
After Squid is installed, switch to the console and use su to get to the root account. You should run the command chkconfig --level 345 squid on to run Squid at runlevels 3, 4, and 5, like this:
[root@susannah ~]# chkconfig --list squid
squid    0:off 1:off 2:off 3:off 4:off 5:off 6:off
[root@susannah ~]# chkconfig --level 345 squid on
[root@susannah ~]# chkconfig --list squid
squid    0:off 1:off 2:off 3:on 4:on 5:on 6:off
That runs Squid the next time the system switches to runlevel 3, 4, or 5, but it will not run it just yet.
Before you configure your new Squid server, you should set up the local web browser to use Squid for its web access. This allows you to test your rules as you are working with the configuration file.
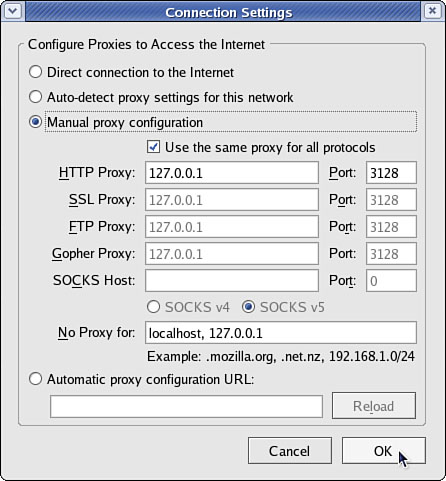
To configure Firefox, select Preferences from the Edit menu. From the dialog that appears, click the Connection Settings button (near the bottom on the General tab) and select the option Manual Proxy Configuration. Check the box beneath it, Use the Same Proxy for All Protocols; then enter 127.0.0.1 as the IP address and 3128 as the port number. See Figure 26.1 for how this should look. If you are configuring a remote client, specify the IP address of the Squid server instead of 127.0.0.1.
For Konqueror, go to the Settings menu and select Configure Konqueror. From the left tab, scroll down to Proxy, select Manually Specify the Proxy Settings, and then click Setup. Enter 127.0.0.1 as the proxy IP address and 3128 as the port. As with Firefox, if you are configuring a remote client, specify the IP address of the Squid server instead of 127.0.0.1.
Internet Explorer’s proxy settings are in Tools/Internet Options. From the Connections tab, click the LAN Settings button and enable the Use a Proxy Server for Your LAN option. Enter the address as the IP of your Squid machine, and then specify 3128 as the port.
The main Squid configuration file is /etc/squid/squid.conf, and the default Fedora configuration file is full of comments to help guide you. The default configuration file allows full access to the local machine but denies the rest of your network. This is a secure place to start; we recommend you try all the rules on yourself (localhost) before rolling them out to other machines.
Before you start, open two terminal windows as root. In the first, change to the directory /var/log/squid and run this command:
tail -f access.log cache.log
That command reads the last few lines from both files and (thanks to the -f flag) follows them so that any changes appear in there. This allows you to watch what Squid is doing as people access it. We will refer to this window as the log window, so keep it open. In the other window (as root, remember), bring up the file /etc/squid/squid.conf in your favorite editor. This window will be referred to as the config editor, and you should keep it open also.
To get started, search for the string acl all—this brings you to the access control section, which is where most of the work needs to be done. There is a lot you can configure elsewhere, but unless you have unusual requirements, you can leave the defaults in place.
Note
The default port for Squid is 3128, but you can change that by editing the http_port line. Alternatively, you can have Squid listen on multiple ports by having multiple http_port lines: 80, 8000, and 8080 are all popular ports for proxy servers.
The acl lines make up your access control lists. The first 16 or so lines define the minimum recommended configuration for setting up which ports to listen to, and so on. You can safely ignore them. If you scroll down further (past another short block of comments), you come to the http_access lines, which are combined with the acl lines to dictate who can do what. You can (and should) mix and match acl and http_access lines to keep your configuration file easy to read.
Just below the first block of http_access lines is a comment like # INSERT YOUR OWN RULE(S) HERE TO ALLOW ACCESS FROM YOUR CLIENTS. This is just what we are going to do. First, though, scroll just a few lines further and you should see these two lines:
http_access allow localhost
http_access deny all
They are self-explanatory: The first says, “allow HTTP access to the local computer, but deny everyone else.” This is the default rule, as mentioned earlier. Leave that in place for now, and run service squid start to start the server with the default settings. If you have not yet configured the local web browser to use your Squid server, do so now so you can test the default rules.
In your web browser (Firefox is assumed from here on, but it makes little difference), go to the URL http://fedora.redhat.com. You should see it appear as normal in the browser, but in the log window you should see a lot of messages scroll by as Squid downloads the site for you and stores it in its cache. This is all allowed because the default configuration allows access to the localhost.
Go back to the config editor window and add the following before the last two http_access lines:
http_access deny localhost
So, the last three lines should look like this:
http_access deny localhost
http_access allow localhost
http_access deny all
Save the file and quit your editor. Then, run this command:
kill -SIGHUP `cat /var/run/squid.pid`
That command looks for the PID of the Squid daemon and then sends the SIGHUP signal to it, which forces it to reread its configuration file while running. You should see a string of messages in the log window as Squid rereads its configuration files. If you now go back to Firefox and enter a new URL, you should see the Squid error page informing you that you do not have access to the requested site.
The reason you are now blocked from the proxy is because Squid reads its ACL lines in sequence, from top to bottom. If it finds a line that conclusively allows or denies a request, it stops reading and takes the appropriate action. So, in the previous lines, localhost is being denied in the first line and allowed in the second. When Squid sees localhost asking for a site, it reads the deny line first and immediately sends the error page—it does not even get to the allow line. Having a deny all line at the bottom is highly recommended so that only those you explicitly allow are able to use the proxy.
Go back to editing the configuration file and remove the deny localhost and allow localhost lines. This leaves only deny all, which blocks everyone (including the localhost) from accessing the proxy. Now we are going to add some conditional allow statements: We want to allow localhost only if it fits certain criteria.
Defining access criteria is done with the acl lines, so above the deny all line, add this:
acl newssites dstdomain news.bbc.co.uk slashdot.org
http_access allow newssites
The first line defines an access category called newssites, which contains a list of domains (dstdomain). The domains are news.bbc.co.uk and slashdot.org, so the full line reads, “create a new access category called newssites, which should filter on domain, and contain the two domains listed.” It does not say whether access should be granted or denied to that category; that comes in the next line. The line http_access allow newssites means, “allow access to the category newssites with no further restrictions.” It is not limited to localhost, which means this applies to every computer connecting to the proxy server.
Save the configuration file and rerun the kill -SIGHUP line from before to restart Squid; then go back to Firefox and try loading http://fedora.redhat.com. You should see the same error as before because that was not in our newssites category. Now try http://news.bbc.co.uk, and it should work. However, if you try http://www.slashdot.org, it will not work, and you might also have noticed that the images did not appear on the BBC News website either. The problem here is that specifying slashdot.org as the website is very specific: It means that http://slashdot.org will work, whereas http://www.slashdot.org will not. The BBC News site stores its images on the site http://newsimg.bbc.co.uk, which is why they do not appear.
Go back to the configuration file, and edit the newssites ACL to this:
acl newssites dstdomain .bbc.co.uk .slashdot.org
Putting the period in front of the domains (and in the BBC’s case, taking the news off also) means that Squid will allow any subdomain of the site to work, which is usually what you will want. If you want even more vagueness, you can just specify .com to match *.com addresses.
Moving on, you can also use time conditions for sites. For example, if you want to allow access to the news sites in the evenings, you can set up a time category using this line:
acl freetime time MTWHFAS 18:00-23:59
This time, the category is called freetime and the condition is time, which means we need to specify what time the category should contain. The seven characters following that are the days of the week: Monday, Tuesday, Wednesday, tHursday, Friday, sAturday, and sUnday. Thursday and Saturday use capital H and A so that they do not clash with Tuesday and Sunday.
With the freetime category defined, you can change the http_access line to include it, like this:
http_access allow newssites freetime
For Squid to allow access now, it must match both conditions—the request must be for either *.bbc.co.uk or slashdot.org, and during the time specified. If either condition does not match, the line is not matched and Squid continues looking for other matching rules beneath it. The times you specify here are inclusive on both sides, which means users in the freetime category will be able to surf from 18:00:00 until 23:59:59.
You can add as many rules as you like, although you should be careful to try to order them so that they make sense. Keep in mind that all conditions in a line must be matched for the line to be matched. Here is a more complex example:
You want a category
newssitesthat contains serious websites people need for their work.You want a category
playsitesthat contains websites people do not need for their work.You want a category
worktimethat stretches from 09:00 to 18:00.You want a category
freetimethat stretches from 18:00 to 20:00, when the office closes.You want people to be able to access the news sites, but not the play sites, during working hours.
You want people to be able to access both the news sites and the play sites during the free time hours.
To do that, you need the following rules:
acl newssites dstdomain .bbc.co.uk .slashdot.org
acl playsites dstdomain .tomshardware.com fedora.redhat.com
acl worktime time MTWHF 9:00-18:00
acl freetime time MTWHF 18:00-20:00
http_access allow newssites worktime
http_access allow newssites freetime
http_access allow playsites freetime
Notice that there are two http_access lines for the newssites category: one for worktime and one for freetime. This is because all the conditions must be matched for a line to be matched. The alternative would be to write this:
http_access allow newssites worktime freetime
However, if you do that and someone visits news.bbc.co.uk at 2:30 p.m. (14:30) on a Tuesday, Squid will work like this:
Is the site in the
newssitescategory? Yes, continue.Is the time within the
worktimecategory? Yes, continue.Is the time within the
freetimecategory? No; do not match rule, and continue searching for rules.
It is because of this that two lines are needed for the worktime category.
One particularly powerful way to filter requests is with the url_regex ACL line. This allows you to specify a regular expression that is checked against each request: If the expression matches the request, the condition matches.
For example, if you want to stop people downloading Windows executable files, you would use this line:
acl noexes url_regex -i exe$
The dollar sign means “end of URL,” which means it would match http://www.somesite.com/virus.exe but not http://www.executable.com/innocent.html. The -i part means “case-insensitive,” so the rule will match .exe, .Exe, .EXE, and so on. You can use the caret sign (^) for “start of URL.”
For example, you could stop some pornography sites using this ACL:
acl noporn url_regex -i sex
Do not forget to run the kill -SIGHUP command each time you make changes to Squid; otherwise, it will not reread your changes. You can have Squid check your configuration files for errors by running squid -k parse as root. If you see no errors, it means your configuration is finetop people downloading Windows executable files, you would use this line.
The configuration options so far have been basic, and there are many more you can use to enhance the proxying system you want.
After you are past deciding which rules work for you locally, it is time to spread them out to other machines. This is done by specifying IP ranges that should be allowed or disallowed access, and you enter these into Squid using more ACL lines.
If you want to, you can specify all the IP addresses on your network, one per line. However, for networks of more than about 20 people or using DHCP, that is more work than necessary. A better solution is to use classless interdomain routing (CIDR) notation, which allows you to specify addresses like this:
192.0.0.0/8
192.168.0.0/16
192.168.0.0/24
Each line has an IP address, followed by a slash and then a number. That last number defines the range of addresses you want covered and refers to the number of bits in an IP address. An IP address is a 32-bit number, but we are used to seeing it in dotted-quad notation: A.B.C.D. Each of those quads can be between 0 and 255 (although in practice some of these are reserved for special purposes), and each is stored as an 8-bit number.
The first line in the previous code covers IP addresses starting from 192.0.0.0; the /8 part means that the first 8 bits (the first quad, 192) is fixed and the rest is flexible. So, Squid treats that as addresses 192.0.0.0, 192.0.0.1, through to 192.0.0.255, and then 192.0.1.0, 192.0.1.1, all the way through to 192.255.255.255.
The second line uses /16, which means Squid allows IP addresses from 192.168.0.0 to 192.168.255.255. The last line has /24, which allows from 192.168.0.0 to 192.168.0.255.
These addresses are placed into Squid using the src ACL line, like this:
acl internal_network src 10.0.0.0/24
That line creates a category of addresses from 10.0.0.0 to 10.0.0.255. You can combine multiple address groups together, like this:
acl internal_network src 10.0.0.0/24 10.0.3.0/24 10.0.5.0/24 192.168.0.1
That example allows 10.0.0.0–10.0.0.255, and then 10.0.3.0–10.0.3.255, and finally the single address 192.168.0.1.
Keep in mind that, if you are using the local machine and you have the web browser configured to use the proxy at 127.0.0.1, the client IP address will be 127.0.0.1, too. So, make sure that you have rules in place for localhost.
As with other ACL lines, you need to enable them with appropriate http_access allow and http_access deny lines.
To help you fully understand how Squid access control works, and also to help give you a head start developing your own rules, the following are some ACL lines you can try. Each line is preceded with one or more comment lines (starting with a #) explaining what it does:
# include the domains news.bbc.co.uk and slashdot.org
# and not newsimg.bbc.co.uk or www.slashdot.org.
acl newssites dstdomain news.bbc.co.uk slashdot.org

# include any subdomains or bbc.co.uk or slashdot.org
acl newssites dstdomain .bbc.co.uk .slashdot.org

# only include sites located in Canada
acl canadasites dstdomain .ca

# only include working hours
acl workhours time MTWHF 9:00-18:00

# only include lunchtimes
acl lunchtimes time MTWHF 13:00-14:00

# only include weekends
acl weekends time AS 00:00-23:59

# include URLs ending in ".zip". Note: the  is important,
# because "." has a special meaning otherwise
acl zipfiles url_regex -i .zip$

# include URLs starting with https
acl httpsurls url_regex -i ^https

# include all URLs that match "hotmail"
url_regex hotmail url_regex -i hotmail

# include three specific IP addresses
acl directors src 10.0.0.14 10.0.0.28 10.0.0.31
# include all IPs from 192.168.0.0 to 192.168.0.255
acl internal src 192.168.0.0/24

# include all IPs from 192.168.0.0 to 192.168.0.255
# and all IPs from 10.0.0.0 to 10.255.255.255
acl internal src 192.168.0.0/24 10.0.0.0/8
When you have your ACL lines in place, you can put together appropriate http_access lines. For example, you might want to use a multilayered access system so that certain users (for example, company directors) have full access, whereas others are filtered. For example:
http_access allow directors
http_access deny hotmail
http_access deny zipfiles
http_access allow internal lunchtimes
http_access deny all
Because Squid matches those lines in order, directors will have full, unfiltered access to the Web. If the client IP address is not in the directors list, the two deny lines are processed so that the user cannot download .zip files or read online mail at Hotmail. After blocking those two types of requests, the allow on the fourth line allows internal users to access the Web, as long as they do so only at lunch time. The last line (which is highly recommended) blocks all other users from the proxy.
http://www.squid-cache.org/—The home page of the Squid Web Proxy Cache.
http://squid-docs.sourceforge.net/latest/book-full.html—The home page of Squid: A User’s Guide, a free online book about Squid.
http://www.faqs.org/docs/securing/netproxy-squid.html—A brief online guide to configuring a local Squid server.
http://squid.visolve.com/squid/index.htm/—The home page of a company that can provide commercial support and deployment of Squid.
http://squid.visolve.com/squid/reverseproxy.htm—ViSolve’s guide to setting up Squid to reverse proxy to cache a local web server for external visitors.
As well as these URLs, there are two excellent books on the topic of web caching. The first is Squid: The Definitive Guide (O’Reilly) by Duane Wessels, ISBN: 0-596-00162-2. The second is Web Caching (O’Reilly) also by Duane Wessels, ISBN: 1-56592-536-X.
Of the two, the former is more practical and covers the Squid server in depth. The latter is more theoretical, discussing how caching is implemented. Wessels is one of the leading developers on Squid, so both books are of impeccable technical accuracy.