
Although Microsoft intended it for Windows, Microsoft’s .NET platform has grown to encompass many other operating systems. No, this isn’t a rare sign of Microsoft letting customers choose which OS is best for them—instead, the spread of .NET is because of the Mono project, that is a free re-implementation of .NET available under the a GPL license.
Because of the potential for patent complications, it took Red Hat a long time to incorporate Mono into Fedora, but it’s here now and works just fine. What’s more, Mono supports both C# and Visual Basic.NET, as well as the complete .NET 1.0 and 1.1 frameworks (and much of the 2.0 framework too), making it quick to learn and productive to use.
Linux already has numerous programming languages available to it, so why bother with Mono and .NET? Here are my top five reasons:
.NET is “compile once, run anywhere”, that means you can compile your code on Linux and run it on Windows, or the reverse.
Mono supports C#, that is a C-like language with many improvements to help make it object-oriented and easier to use.
.NET includes automatic garbage collection to remove the possibility of memory leaks.
.NET comes with built-in security checks to ensure that buffer overflows and many types of exploits are a thing of the past.
Mono uses a high-performance just-in-time compiler to optimize your code for the platform it’s running on. This lets you compile it on a 32-bit machine, then run it on a 64-bit machine and have the code dynamically re-compiled for maximum 64-bit performance.
At this point, Mono is probably starting to sound like Java, and indeed it shares several properties with it. However, Mono has the following improvements:
The C# language corrects many of the irritations in Java, while keeping its garbage collection.
.NET is designed to let you compile multiple languages down to the same bytecode, including C#, VB.NET, and many others. The Java VM is primarily restricted to the Java language.
Mono even has a special project (known as “IKVM”) that compiles Java source code down to .NET code that can be run on Mono.
Mono is completely open source!
Whether you’re looking to create command-line programs, graphical user interface apps, or even Web pages, Mono has all the power and functionality you need.
Mono should already be installed on your system, however it is only installed for end users rather than for developers—we need to install a few more packages in order to make it usable for programming. Start up Add/Remove Software, and, from the List view, make sure the following packages are selected: mono-core, mono-data, mono-data-sqlite, mono-debugger, mono-devel, monodevelop, monodoc, mono-extras, mono-jscript, mono-locale-extras, mono-nunit, mono-web, and mono-winforms. That gives you the basics to do Mono development, plus a few extra bits and pieces if you want to branch out a bit.
If you want to do some exciting things with Mono, there are lots of Mono-enabled libraries available. Try going to the Search view and search for “sharp” to bring up the list of .NET-enabled libraries that we can use with Mono—the suffix is used because C# is the most popular .NET language. In this list you’ll see things such as avahi-sharp, dbus-sharp, evolution-sharp, gecko-sharp2, gmime-sharp, gnome-sharp, gtk-sharp2, gtksourceview-sharp, and ipod-sharp—we recommend you at least install the gtk-sharp2 libraries (including the development package), as these are used to create graphical user interfaces for Mono.
But for now, let’s get you up and running with Mono on the command line. Mono is split into two distinct parts: the compiler and the interpreter. The compiler turns your source code into an executable, and is called “gmcs”. The interpreter actually runs your code as a working program, as is just called “mono”. You should by now have installed MonoDevelop, so go the Applications menu, choose Programming, then MonoDevelop to start it up.
Tip
You don’t have to use MonoDevelop to write your code, but it helps—syntax highlighting, code completion, and drag-and-drop GUI designers are just a few of its features.
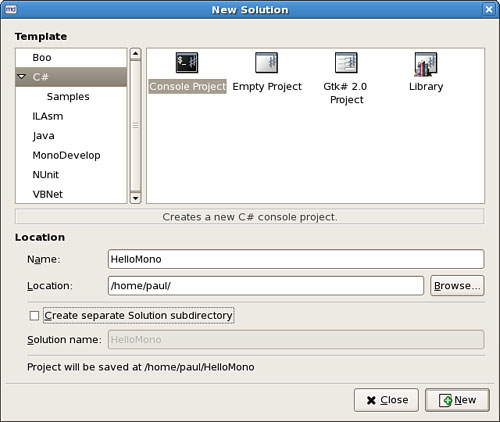
When MonoDevelop has loaded, go to the File menu and choose New Project. From the left of the window that appears, choose C#, then Console Project. Give it a name and choose a location to save it—all being well you should see something similar to Figure 34.1. When you’re ready, click New to have MonoDevelop generate your project for you.
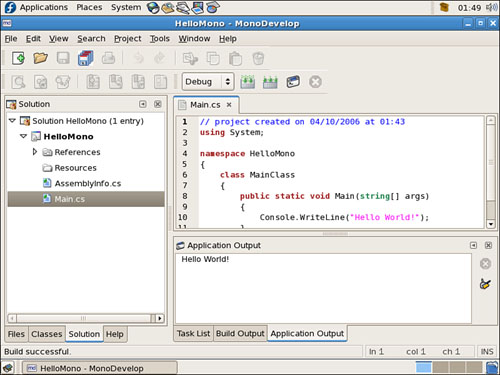
The default Console Project template creates a program that prints a simple message to the command line: the oh-so-traditional “Hello World!” Change it to something more insightful if you want, then press F5 to build and run the project. Just following the code view is a set of tabs where debug output is printed. One of those tabs, Application Output, will become selected when the program runs, and you’ll see “Hello World!” (or the message you chose) printed there—not bad given that we haven’t written any code yet! You can see how this should look in Figure 34.2.
As you can guess from its name, C# draws very heavily on C and C++ for its syntax, but it borrows several ideas from Java too. C# is object-oriented, which means your program is defined as a class, that is then instantiated through the Main() method call. To be able to draw on some of the .NET framework’s many libraries, you need to add “using” statements at the top of your files—by default there’s just using System; that enables you to get access to the console to write your message.
If you’ve come from C or C++, you’ll notice that there are no header files in C#: your class definition and its implementation are all in the same file. You might also have noticed that the Main() method accepts the parameter “string[] args”, that is C#-speak for “an array of strings”. C never had a native “string” data type, whereas C++ acquired it rather late in the game, and so both languages tend to use the antiquated char* data type to point to a string of characters. In C#, “string” is a data type all its own, and comes with built-in functionality such as the capability to replace substrings, the capability to trim off whitespace and the capability to convert itself to upper- or lowercase if you want it to. Strings are also Unicode friendly out of the box in .NET, so that’s one fewer thing for you to worry about.
The final thing you might have noticed—at least, if you had looked in the directory where MonoDevelop placed your compiled program (usually /path/to/your/project/bin/Debug)—that Mono uses the Windows-like .exe file extension for its programs. This is because Mono aims to be 100% compatible with Microsoft .NET, which means you can take your Hello World program and run it unmodified on a Windows machine and have the same message printed.
We’re going to expand your little program by having it print all the parameters passed to it, one per line. In C# this is—rather sickeningly—just one line of code. Add this just after the existing Console.WriteLine() line in your program:
foreach (string arg in args) Console.WriteLine(arg);
The foreach keyword is a special kind of loop designed to iterate over an array of finite size. The “for” array exists in C#, and lets you loop a certain number of times; the while array exists too, and lets you loop continuously until you tell it to break. But the foreach loop is designed to loop over arrays that have a specific number of values, but when you don’t know how many values that will be. You get each value as a variable of any type you want—in the preceding code we say “string arg in args”, that means “for each array element in args, give it to me as the variable “arg” of type “string”. Of course, args is already an array of strings, so no data type conversion will actually take place here—but it could do, if we wanted to convert classes or the like.
After we have each individual argument, we call WriteLine() to print it. This works whether there’s one argument or a hundred arguments—or even if there are no arguments at all (in which case the loop doesn’t execute at all).
As you saw in the parameter list for Main() and the arg variable in your foreach loop, C# insists that each variable has a distinct data type. You can choose from quite a variety: “Boolean” for true/false values; “string” for text; “int” for numbers, “float” for floating-point numbers; and so on. If you want to be very specific, you can use “int32” for a 32-bit integer (covering from -2147483648 to 2147483648) or “int64” for a 64-bit integer (covering even larger numbers). But on the whole you can just use “int” and leave C# to work it out itself.
So, let’s modify your program to accept two parameters, add them together as numbers, then print the result. This gives you a chance to see variable definitions, conversion, and mathematics, all in one. Edit the Main() method to look like this:
public static void Main (string[] args)
{
   int num1 = Convert.ToInt32(args[0]);
   int num2 = Convert.ToInt32(args[1]);
   Console.WriteLine("Sum of two parameters is: " + (num1 + num2)");
}
As you can see, each variable needs to be declared with a type (int) and a name (num1 and num2), so that C# knows how to handle them. Your args array contains strings, so we need to explicitly convert the strings to integers with the Convert.ToInt32() method. Finally, the actual addition of the two strings is done at the end of the method, while they are being printed. Note how C# is clever enough to have integer + integer be added together (in the case of num + num2), whereas string + integer attaches the integer to the end of the string (in the case of “Sum of two parameters is:” + the result of num1 + num2). This isn’t by accident: C# tries to convert data types cleverly, and will only warn you if it can’t convert a data type without losing some data. For example, if you try to treat a 64-bit integer as a 32-bit integer, it will warn you because you might be throwing a lot of data away.
Right now your program crashes in a nasty way if users don’t provide at least two parameters. The reason for this is that we use arg[0] and arg[1] (the first and second parameters passed to your program) without even checking whether any parameters were passed in. This is easily solved: args is an array, and arrays can tell us their size. If the size doesn’t match what we expect, we can bail out.
Add this code at the start of the Main() method:
if (args.Length != 2) {
   Console.WriteLine("You must provide exactly two parameters!");
   return;
}
The new piece of code in there is return, that is a C# keyword that forces it to exit the current method. As Main() is the only method being called, this has the effect of terminating the program because the user didn’t supply two parameters.
Using the Length property of args, it is now possible for you to write your own Main() method that does different things depending on how many parameters are provided. To do this properly, you need to use the else statement, and nest multiple if statements like this:
if (args.Length == 2) {
   /// whatever...
} else if (args.Length == 3) {
   /// something else
} else if (args.Length == 4) {
   /// even more
} else {
   /// only executed if none of the others are
}
Fedora ships with several Mono-built programs as standard, including Tomboy and Beagle. It also comes with a fair collection of .NET-enabled libraries, some of which you probably already installed earlier. The nice thing about Mono is that it lets you build on these libraries really easily: you just import them with a using statement, then get started.
To demonstrate how easy it is to build more complicated Mono applications, we’re going to produce two: one using Beagle, the super-fast file indexer, and one using Gtk#, the GUI toolkit that’s fast becoming the standard for Gnome development. Both have their own API that take some time to master fully, but you can get started with them in minutes.
Beagle is the de facto Linux search tool for Gnome, and is also used by several KDE-based programs. It works by scanning your computer in the background, then monitoring for filesystem changes so that its data always stays up to date. However, the magic is that it indexes data cleverly—if you tag your images, it will read those tags. If you have album and artist data in your MP3s, it will read that data too. It also reads your emails, your instant messenger conversations, your web browser history and much more—and provides all this data in one place, so if you search for “firefox” you’ll find the application itself, all the times you’ve mentioned Firefox in your emails, and so on.
In MonoDevelop, go to File > New Project, select C#, then choose Console Project. Give it the name BeagleTest, and tell MonoDevelop not to create a separate directory for the solution. You’ll be back at the default Hello World program, but you’re going to change that. First, you need to tell Mono that you want to use Beagle and Gtk#. No, you’re not going to create a GUI for your search, but you do want to take advantage of Gtk#’s idle loop system—I’ll explain why soon.
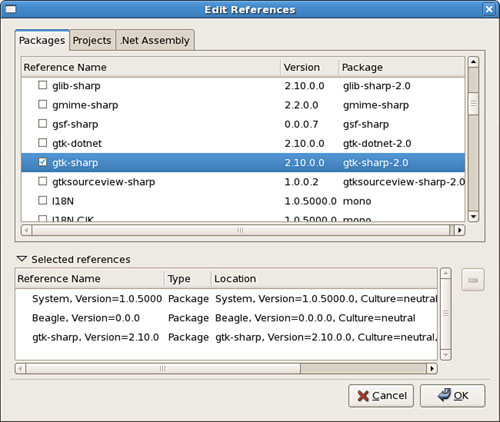
To add references to these two libraries, right-click on the word References in the left pane (just above “Resources”) and select “Edit References”. A new window will appear (shown in Figure 34.3), and from that you should make sure “Beagle” and “gtk-sharp” are selected. Now click OK, and the References group on the left should expand so that you can see you have Beagle, gtk-sharp, and System (the last one is the default reference for .NET programs).
Now it’s time to write the code. At the top of the Main.cs file (your main code file), you’ll need to edit the using statements to look like this:
using System;
using System.Collections;
using Beagle;
using Gtk;
The BeagleTest namespace and MainClass class aren’t changing, but we do need to edit the Main() method so that we can run your Beagle query. Here’s how it should look, with C# comments (//, as in C++) sprinkled throughout to help you understand what’s going on:
public static void Main(string[] args)
{

    Application.Init();

    // "Query" is the main Beagle search type. It does lots of magic for us – we
just need to provide it with a search term and tell it where to search
    Query q = new Query();

    // these two are callback functions. What we're saying is, when a hit is
returned (ie, when Beagle finds something, it should run our OnHitsAdded() method.
We haven't written that yet, but we'll get there soon.
    q.HitsAddedEvent += OnHitsAdded;
    q.FinishedEvent += OnFinished;

    // these two tell Beagle where to search
    q.AddDomain(QueryDomain.Neighborhood);
    q.AddDomain(QueryDomain.Global);

    // finally, we tell Beagle to search for the first word provided to our command
(args[0]), then ask is to asynchronously run its search. That is, it runs in the
background and let our program continue running
    q.AddText(args[0]);
    q.SendAsync();

    // tell Gtk# to run
    Application.Run();
}
The only thing I haven’t explained in there is the Gtk# stuff, but you might already have guessed why it’s needed. The problem is this: Beagle runs its search asynchronously, that means that it returns control to your program straight away. Without the Application.Run() call, the SendAsync() method will be the last thing your program did, which meant that it will terminate itself before Beagle actually had chance to return any data. So, what you’re using Gtk# for is as an idle loop: when you call Run(), Gtk# will make sure your program carries on running until you tell it to quit, giving Beagle enough time to return its results.
Now, let’s take a look at the OnHitsAdded and OnFinished methods, that get called whenever Beagle finds something to return and when it’s finished searching, respectively:
static void OnHitsAdded (HitsAddedResponse response)
{

    // sometimes Beagle can return multiple hits (files) in each response, so we
need to go through each one and print it out line by line
    foreach(Hit hit in response.Hits)
    {
        // the Uri of hits is its location, which might be on the web, on your
filesystem, or somewhere else
        Console.WriteLine("Hit: " + hit.Uri);
    }
}

static void OnFinished(FinishedResponse response)
{
    // the application is done, we can tell Gtk# to quit now
    Application.Quit();
}
When you’re done, press F8 to compile your program. If you encounter any errors, you have typed something incorrectly, so check carefully against the preceding text. Now open a terminal, change to the directory where you created your project, then look inside for the bin/Debug subdirectory. All being well, you should find the BeagleTest.exe file in there, which you can run like this:
mono BeagleTest.exe hello
If you get a long string of errors when you run your program, try running this command first: export MONO_PATH=/usr/lib/beagle. That tells Mono where to look for the Beagle library, which is probably your problem.
Gtk# was included with Gnome by default for the first time in Gnome 2.16, but it had been used for a couple of years prior to that and so was already mature. MonoDevelop comes with its own GUI designer called Stetic, which lets you drag and drop GUI elements on to your windows to design them.
To get started, go to File > New Project in MonoDevelop, choose C#, then Gtk# 2.0 project. Call it GtkTest, and deselect the box asking MonoDevelop to make a separate directory for the solution. You’ll find that Main.cs contains a little more code this time, as it needs to create and run the Gtk# application. However, the actual code to create your GUI lives in User Interface in the left pane. If you open up that group, you’ll see MainWindow, which, when double-clicked, brings up MonoDevelop’s GUI designer.
There isn’t space for me to devote much time to GUI creation, but it’s very easy for you to drag and drop the different window widgets onto your form to see what properties they have. The widgets are all listed on the top-right of the GUI designer, with widget properties on the bottom-right.
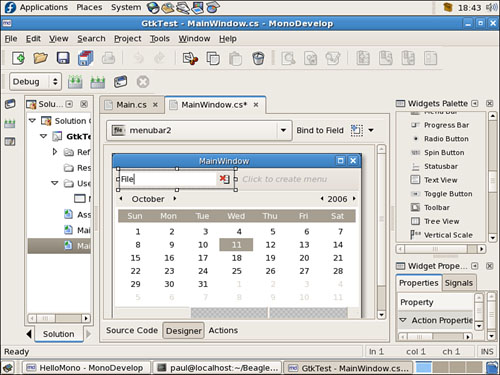
For now, drag a button widget onto your form. It will automatically take up all the space on your window. If you don’t want this to happen, try placing one of the containers down first, then putting your button in there. For example, if you want a menu bar at the top, then a calendar, then a status bar, drop the VBox pane onto the window first, then drop each of those widgets into the separate parts of the VPane as shown in Figure 34.4.
Your button will have the text “button1” by default, so click on it to select it, then look in the properties pane for “Label”. It might be hidden away in the Button Properties group, so you’ll need to make sure that’s open. Change the label to “Hello”. At the top of the properties pane is a tab saying “Properties” (where you are right now), and another saying “Signals”. Signals are the events that happen to your widgets, such as the mouse moving over them, someone typing, or, of interest to us, when your button has been clicked. Look inside the Button Signals group for Clicked and double-click on it. MonoDevelop will automatically switch you to the code view, with a pre-created method to handle button clicks.
Type this code into the method:
button1.Label = "World!";
You need to make one last change before you try compiling. MonoDevelop doesn’t automatically give you variables to work with each item in your windows—you need to ask for them explicitly. Beneath the code window you will see a button saying Designer—click that to get back to your GUI designer window. Now click the button you created, then click the button marked “Bind to Field”. This will edit your code to create the button1 variable (if you click “Source Code” you’ll see the variable near the top). Now press F5 to compile and run, and try clicking the button!
http://www.mono-project.com/—The homepage of the Mono project is packed with information to help you get started. You can also download new Mono versions from here, if there’s something you desperately need.
http://www.monodevelop.com/—The MonoDevelop project has its own site, which is the best place to look for updates.
http://www.icsharpcode.net/OpenSource/SD/—MonoDevelop started life as a port of SharpDevelop—if you happen to dual-boot on Windows, this might prove very useful to you.
http://msdn.microsoft.com/vcsharp/—We don’t print many Microsoft URLs in this book, but this one is important: it’s the homepage of their C# project, that can be considered the spiritual home of C# itself.
The Number One book we refer to for C# information is Jesse Liberty’s Programming C# (O’Reilly, ISBN 0-596-00699-3). It’s compact, it’s comprehensive, and it’s competitively priced. If you’re very short on time and want the maximum detail (admittedly, with rather limited readability), you should try The C# Programming Language, that was co-authored by the creator of C#, Anders Hejlsberg (Addison-Wesley, ISBN: 0-321-33443-4). For a more general book on the .NET framework and all the features it provides, you might find .NET Framework Essentials (O’Reilly, ISBN: 0-596-00505-9) useful.