
One of the most important things you need to learn while using Fedora is effective user administration. Whether you are setting up a system for use just by yourself, sharing it among a family of five, or even working with a machine that has to handle several thousand different users, it is important that you understand how to effectively assign user permissions and lock down the areas you want to protect. Equally important is the ability to fine-tune user access rights, to enable people to do what they need to do, and not necessarily what they want to!
Managing users includes managing home directories and settings that are unique to each user. You also have to examine how much of the overall system you want to give the users access to, as well as establish good password practice. We will cover all these tasks among others, which will teach you how to effectively manage the users of your system. We will also take a look at the super-user account so that you can understand why it is so important and also how to let others access some, if not all, of the super-user’s power.
Every Fedora installation typically contains three types of accounts: the super-user, the day-to-day user, and the system user. Each type is important in its own right and you must know what each is responsible for. Without working together, Fedora would have a hard time doing anything!
All users must have accounts on the system. Fedora uses the /etc/passwd file to hold information on user accounts. Each user, regardless of type, will have a one-line entry of account information stored in the /etc/passwd text file.
Each account entry contains a username (used for logging in), a password field containing an x (as passwords are actually contained in /etc/shadow), a user ID (UID), and a group ID (GID). The fifth field contains optional human ID information, such as real name, office location, phone number, and so on. The last two fields are the location of the user’s home directory and the user’s default login shell. See the “The Password File” section later in this chapter for more information.
Like other Linux distributions, Fedora makes use of the established UNIX file ownership and permission system. Each file (which can include directories and even devices) can be assigned one or more of read, write, and/or execute permissions. These can be assigned further to the owner, a member of a group, or anyone on the system. File security is drawn from combining ownership and permissions. The system administrator (most commonly referred to as the super-user) has total responsibility to make sure that users have proper UIDs and GIDs, as well as ensuring that sensitive files (which can include important system files) are locked down using file permissions.
Regardless of how many system administrators are present on the system, there can only be one root user. This is the user who has access to everything, and can grant or take away any privileges on the system. The root user has a user ID of 0 and a group ID of 0, making it unique among all other users on the system. The root user can use any program, manipulate any file, go anywhere in the file system, and do anything within the Fedora system. For reasons of security, that kind of raw power should only be given to a single trusted individual.
It is often practical for that power to be delegated by the root user to other users. This delegation is referred to as an elevation of privileges, and these individuals are known as super-users because they enjoy the same powers that root enjoys. This approach is normally used only on large systems in which one person cannot effectively act as the sole system administrator.
Note
On your Fedora system, when you log in as root, you are root or the super-user. In this chapter, the terms root, super-user, system administrator, and sysadmin are used interchangeably, although they need not all refer to a single person.
A regular user is someone who logs onto the system to make use of it for nonadministrative tasks such as word processing or email. These users do not need to make systemwide changes, nor do they have to manage any other users. However, they might want to be able to change settings that are specific to them (for instance, a desktop background). Of course, depending on how draconian the root user is, regular users might not even be able to do that!
The super-user grants privileges to regular users by means of file and directory permissions. (Those are covered in Chapter 5, “First Steps with Fedora.”) For example, if the super-user does not want you to change your settings in ~/.profile (the ~ is a shell shortcut representing your home directory; see Chapter 15, “Automating Tasks”), root can alter the permissions so that you may read from, but not write to, that file.
Caution
Because of the potential for making a catastrophic error as the super-user (using the command rm -rf /* is the classic example, but do not ever try it!), always use your system as a regular user and become root only temporarily to do sysadmin duties. While you are on a multiuser system, you should consider this advice an absolute rule; if root were to delete the wrong file or kill the wrong process, the results could be disastrous for the business. On your home system, you can do as you please and running as root makes many things easier, but less safe. In any setting, however, the risks of running as root full-time are significant.
The third type of user is the system user. The system user is not a person, but rather an administrative account that the system uses during day to day running of various services. For example, the system user named xfs owns the X11 font server and all the associated files. Only itself and root can have access to these files—no one else can access or make changes to these files. System users do not have a home directory or password, nor do they permit access to the system through a login prompt.
You will find a list of all the users on a system in the /etc/passwd file. Fedora refers to these users as the standard users because they are found on every Fedora computer as the default set of system (or logical) users provided during the initial installation. This “standard” set differs among Linux distributions.
A computer is, by its very nature, a number-oriented machine. It identifies users and groups by numbers known as the user ID (UID) and group ID (GID). The alphabetic names displayed on your screen are there exclusively for your ease of use.
As was already mentioned, the root user is UID 0. Numbers from 1 through 499 and 65,534 are the system, or logical, users. Regular users have UIDs beginning with 500; Fedora assigns them sequentially beginning with this number.
With only a few exceptions, the GID is the same as the UID. Those exceptions are system users who need to act with root permissions: sync, shutdown, halt, and operator.
Fedora creates a private GID for every UID of 500 and greater. The system administrator can add other users to a GID or create a totally new group and add users to it. Unlike Windows NT and some UNIX variants, a group cannot be a member of another group in Linux.
As you learned in Chapter 5, permissions are of three types: read, write, and execute (r, w, x). For any file or directory, permissions can be established in three categories: user, group, and global. In this section, we focus on group permissions, but there is a highlight of the commands used to change the group, user, or access permissions of a file or directory:
chgrp—. Changes the group ownership of a file or directorychown—. Changes the owner of a file or directorychmod—. Changes the access permissions of a file or directory
These commands, which modify file ownerships and permissions, can be used to model organizational structures and permissions in the real world onto your Fedora system (see the next section, “Managing Groups”). For example, a human resources department can share health-benefit memos to all company employees by making the files readable (but not writable) by anyone in an accessible directory. On the other hand, programmers in the company’s research and development section, although able to access each other’s source code files, would not have read or write access to HR pay-scale or personnel files (and certainly would not want HR or Marketing poking around R&D).
These commands are used to easily manage group and file ownerships and permissions from the command line. It is essential that you know these commands because sometimes you might have only a command-line interface to work with; perhaps some idiot system administrator set incorrect permissions on X11, rendering the system incapable of working with a graphical interface.
Groups can make managing users a lot easier. Rather than having to assign individual permissions to every user, you can use groups to grant or revoke permissions to a large number of users quickly and easily. Setting group permissions allows you to set up workspaces for collaborative working and also to control what devices can be used, such as external drives or DVD writers. This approach also represents a secure method of limiting access to system resources to only those users who need them. As an example, the sysadmin could put the users andrew, paul, damon, bernice, mark, and vanessa in a new group named unleashed. Those users could each create files intended for their group work and chgrp those files to unleashed.
Now, everyone in the unleashed group—but no one else except root—can work with those files. The sysadmin would probably create a directory owned by that group so its members could have an easily accessed place to store those files. The sysadmin could also add other users like bernice and ildiko to the group and remove existing users when their part of the work is done. The sysadmin could make the user andrew the group administrator so that andrew could decide how group membership should be changed. You could also put restrictions on the DVD writer so that only andrew could burn DVDs, thus protecting sensitive material from falling into the wrong hands.
Different UNIX operating systems implement the group concept in various ways. Fedora uses a scheme called UPG, the User Private Group, in which all users are assigned to a group with their own name by default. (The user’s username and group name are identical.) All the groups are listed in /etc/group file. Here is a partial list of a sample /etc/group file:
# cat /etc/group
root:x:0:root
bin:x:1:root,bin,daemon
daemon:x:2:root,bin,daemon
sys:x:3:root,bin,adm
adm:x:4:root,adm,daemon
tty:x:5:
disk:x:6:root
lp:x:7:daemon,lp
mem:x:8:
kmem:x:9:
wheel:x:10:root
mail:x:12:mail,postfix
news:x:13:news
uucp:x:14:uucp
man:x:15:
games:x:20:
gopher:x:30:
dip:x:40:
ftp:x:50:
lock:x:54:
nobody:x:99:
users:x:100:
dbus:x:81:
floppy:x:19:
vcsa:x:69:
nscd:x:28:
rpm:x:37:
haldaemon:x:68:
utmp:x:22:
netdump:x:34:
slocate:x:21:
sshd:x:74:
rpc:x:32:
rpcuser:x:29:
nfsnobody:x:65534:
mailnull:x:47:
smmsp:x:51:
pcap:x:77:
apache:x:48:
xfs:x:43:
ntp:x:38:
gdm:x:42:
named:x:25:
dovecot:x:97:
postdrop:x:90:
postfix:x:89:
andrew:x:500:
In this example, there are a number of groups, mostly for services (mail, ssh, and so on) and devices (floppy, disk, and so on). As previously mentioned, the system services groups enable those services to have ownership and control of their files. For example, adding postfix to the mail group, as shown previously, enables the postfix application to access mail’s files in the manner that mail would decide for group access to its file. Adding a regular user to a device’s group permits the regular user to use the device with permissions granted by the group owner. Adding user andrew to the group floppy, for example, would allow andrew to use the floppy drive device. You will learn how to add and remove users from groups in the next section.
Fedora provides several command-line tools for managing groups as well as graphical tools. Many experienced sysadmins prefer the command-line tools because they are quick and easy to use and they can be included in scripts if the sysadmin desires to script a repetitive task. Here are the most commonly used group management command-line tools:
groupadd—. This command creates and adds a new group.groupdel—. This command removes an existing group.groupmod—. This command creates a group name or GIDs, but doesn’t add or delete members from a group.gpasswd—. This command creates a group password. Every group can have a group password and an administrator. Use the-Aargument to assign a user as group administrator.useradd -G—. The-Gargument adds a user to a group during the initial user creation. (More arguments are used to create a user.)usermod -G—. This command allows you to add a user to a group as long as the user is not logged in at the time.grpck—. A command for checking the/etc/groupfile for typos.
As an example, there is a DVD-RW device (/dev/scd0) on our computer that the sysadmin wants a regular user named vanessa to have access to. To grant vanessa that access, we would use these steps:
Add a new group with the
groupaddcommand:# groupadd dvdrwChange the group ownership of the device to the new group with the
chgrpcommand:# chgrp dvdrw /dev/scd0Add the approved user to the group with the
usermodcommand:# usermod -G dvdrw vanessaMake user
shelleythe group administrator with thegpasswdcommand so that she can add new users to the group:# gpasswd -A vanessa
Now, the user vanessa has permission to use the DVD-RW drive, as would anyone else added to the group by the super-user or vanessa because she is now also the group administrator and can add users to the group.
The sysadmin can also use the graphical interface that Fedora provides, as shown in Figure 14.1. It is accessed as the Users and Groups item from the Administration menu item.

You will note that the full set of group commands and options are not available from the graphical interface, limiting the usefulness of the GUI to a subset of the most frequently used commands. You learn more about using the Fedora User Manager GUI in the next section of this chapter.
We have mentioned users previously, but in this section we examine how the sysadmin can manage the users. Users must be created, assigned a UID, provided a home directory, provided an initial set of files for their home directory, and assigned to groups so that they can use the system resources securely and efficiently. The system administrator might elect to restrict a user’s access not only to files, but to the amount of disk space they use as well. (You can learn more about that in the “Managing Disk Quotas” section of Chapter 7, “Managing Software.”)
Fedora provides several command-line tools for managing users as well as graphical tools. Many experienced sysadmins prefer the command-line tools because they are quick and easy to use and they can be included in scripts if the sysadmin desires to script a repetitive task. Here are the most commonly used commands used to manage users:
useradd—. This command is used to add a new user account to the system. Its options permit the sysadmin to specify the user’s home directory and initial group or to create the user with the default home directory and group assignments.useradd -G—. This command sets the system defaults for creating the user’s home directory, account expiration date, default group, and command shell. See the specific options inmanuseradd. Used without any arguments, it displays the defaults for the system. The default set of files for a user are found in/etc/skel.Note
The set of files initially used to populate a new user’s home directory are kept in
/etc/skel. This is very convenient for the system administrator because any special files, links, or directories that need to be universally applied can be placed in/etc/skeland will be duplicated automatically with appropriate permissions for each new user.# ls -al /etc/skel total 16 drwxr-xr-x 2 root root 1024 Aug 22 22:55 drwxr-xr-x 100 root root 8192 Sep 21 21:08 -rw-r--r-- 1 root root 24 Jul 12 09:11 .bash logout -rw-r--r-- 1 root root 176 Jul 12 09:11.bash profile -rw-r--r-- 1 root root 124 Jul 12 09:11 .bashrc
Each line provides the file permissions, the number of files housed under that file or directory name, the file owner, the file group, the file size, the creation date, and the filename.
As you can see, root owns every file here, but the
addusercommand (a symbolic link to the actual command nameduseradd) copies everything in/etc/skelto the new home directory and resets file ownership and permissions to the new user.Certain user files might exist that the system administrator does not want the user to change; the permissions for those files in
/home/usernamecan be reset so that the user can read them but can’t write to them.userdel—. This command completely removes a user’s account (thereby eliminating that user’s home directory and all files it contains).passwd—. This command updates the authentication tokens used by the password management system.Tip
To lock a user out of his account, use the command
# passwd -l usernameThis prepends an
!(exclamation point, also called a bang) to the user’s encrypted password; the command to reverse the process uses the-uoption. This is a more elegant and preferred solution to the problem than the traditional UNIX way of manually editing the file.usermod—. This command changes several user attributes. The most commonly used arguments are-sto change the shell and-uto change theUID. No changes can be made while the user is logged in or running a process.chsh—. This command changes the user’s default shell. For Fedora, the default shell is/bin/bash, known as the Bash, or Bourne Again Shell.
The command-line approach to adding this user is actually quite simple and can be accomplished on a single line. In the example shown here, the sysadmin uses the useradd command to add the new user bernice. The command adduser (a variant found on some UNIX systems) is a symbolic link to useradd, so both commands work the same. In this example, we use the -p option to set the password the user requested; we use the -s option to set his special shell, and the -u option to specify his UID. (If we created a user with the default settings, we would not need to use these options.) All we want to do can be accomplished on one line:
# useradd bernice -p sTitcher -s /bin/zsh -u 507
The sysadmin can also use the graphical interface that Fedora provides, as shown in Figure 14.2. It is accessed as the Users and Groups item from the Administration menu item. Here, the sysadmin is adding a new user to the system where user bernice uses the bash command shell.
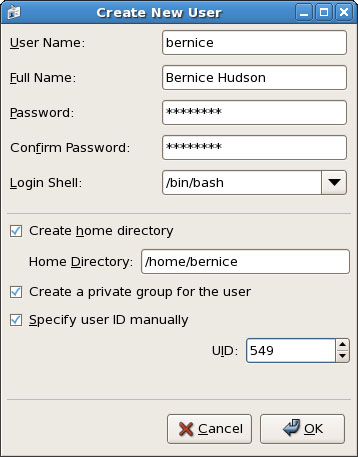
These are the steps we used to add the same account as shown in the preceding command, but using the graphical User Manager graphical interface:
Launch the Fedora User Manager graphical interface by clicking on the Users and Groups menu item found in the System Settings menu.
Click the Add User button to bring up the Add User dialog window.
Fill in the form with the appropriate information as described in the first paragraph in this section.
Click the drop-down Login Shell menu to select the
bashshell.Check the Specify User ID box to permit access to the UID dialog.
Using the arrows found in the UID dialog, increment the UID to
5413.Click OK to save the settings.
Note that the user is being manually assigned the UID of 549 because that is her UID on another system machine that will be connected to this machine. Because the system only knows her as 549 and not as bernice, the two machines would not recognize bernice as the same user if two different UIDs were assigned.
Note
A Linux username can be any alphanumeric combination that does not begin with a special character reserved for shell script use (see Chapter 15 for disallowed characters, mostly punctuation characters). In Chapter 5 we told you that usernames are typically the user’s first name plus the first initial of her last name. That is a common practice on larger systems with many users because it makes life simpler for the sysadmin, but is neither a rule nor a requirement.
Monitoring user activity is part of the sysadmin’s duties and an essential task in tracking how system resources are being used. The w command tells the sysadmin who is logged in, where he is logged in, and what he is doing. No one is able to hide from the super-user. The w command can be followed by a specific user’s name to show only that user.
The ac command provides information about the total connect time of a user measured in hours. It accesses the /var/log/wtmp file for the source of its information. The ac command is most useful in shell scripts to generate reports on operating system usage for management review.
Tip
Interestingly, a phenomenon known as timewarp can occur in which an entry in the wtmp files jumps back into the past and ac shows unusual amounts of time accounted for users. Although this can be attributed to some innocuous factors having to do with the system clock, it is worthy of investigation by the sysadmin because it can also be the result of a security breach.
The last command searches through the /var/log/wtmp file and lists all the users logged in and out since that file was first created. The user reboot exists so that you might know who has logged in since the last reboot. A companion to last is the command lastb, which shows all failed, or bad, logins. It is useful for determining whether a legitimate user is having trouble or a hacker is attempting access.
Passwords are an integral part of Linux security, and they are the most visible part to the user. In this section, you learn how to establish a minimal password policy for your system, where the passwords are stored, and how to manage passwords for your users.
An effective password policy is a fundamental part of a good system administration plan. The policy should cover
Allowed and forbidden passwords
Frequency of mandated password changes
Retrieval or replacement of lost or forgotten passwords
Password handling by users
The password file is /etc/passwd, and it is the database file for all users on the system. The format of each line is as follows:
username:password:uid:gid:gecos:homedir:shell
The fields are self-explanatory except for the gecos field. This field is for miscellaneous information about the user, such as the user’s full name, his office location, office and home phone numbers, and possibly a brief text message. For security and privacy reasons, this field is little used nowadays, but the system administrator should be aware of its existence because the gecos field is used by traditional UNIX programs such as finger and mail. For that reason, it is commonly referred to as the finger information field. The data in this field will be comma delimited; the gecos field can be changed with the cgfn (change finger) command.
Note that a colon separates all fields in the /etc/passwd file. If no information is available for a field, that field is empty, but all the colons remain.
If an asterisk appears in the password field, that user will not be permitted to log on. Why does this feature exist? So that a user can be easily disabled and (possibly) reinstated later without having to be created all over again. The system administrator manually edits this field, which is the traditional UNIX way of accomplishing this task. Fedora provides improved functionality with the passwd -l command mentioned earlier.
Several services run as pseudo-users, usually with root permissions. These are the system, or logical, users mentioned previously. You would not want these accounts available for general login for security reasons, so they are assigned /sbin/nologin as their shell, which prohibits any logins from those “users.”
A list of /etc/passwd reveals
# cat /etc/passwd
root:x:0:0:root:/root:/bin/bash
bin:x:1:1:bin:/bin:/sbin/nologin
daemon:x:2:2:daemon:/sbin:/sbin/nologin
adm:x:3:4:adm:/var/adm:/sbin/nologin
lp:x:4:7:lp:/var/spool/lpd:/sbin/nologin
sync:x:5:0:sync:/sbin:/bin/sync
shutdown:x:6:0:shutdown:/sbin:/sbin/shutdown
halt:x:7:0:halt:/sbin:/sbin/halt
mail:x:8:12:mail:/var/spool/mail:/sbin/nologin
news:x:9:13:news:/etc/news:
uucp:x:10:14:uucp:/var/spool/uucp:/sbin/nologin
operator:x:11:0:operator:/root:/sbin/nologin
games:x:12:100:games:/usr/games:/sbin/nologin
gopher:x:13:30:gopher:/var/gopher:/sbin/nologin
ftp:x:14:50:FTP User:/var/ftp:/sbin/nologin
nobody:x:99:99:Nobody:/:/sbin/nologin
dbus:x:81:81:System message bus:/:/sbin/nologin
vcsa:x:69:69:virtual console memory owner:/dev:/sbin/nologin
nscd:x:28:28:NSCD Daemon:/:/sbin/nologin
rpm:x:37:37::/var/lib/rpm:/sbin/nologin
haldaemon:x:68:68:HAL daemon:/:/sbin/nologin
netdump:x:34:34:Network Crash Dump user:/var/crash:/bin/bash
sshd:x:74:74:Privilege-separated SSH:/var/empty/sshd:/sbin/nologin
rpc:x:32:32:Portmapper RPC user:/:/sbin/nologin
rpcuser:x:29:29:RPC Service User:/var/lib/nfs:/sbin/nologin
nfsnobody:x:65534:65534:Anonymous NFS User:/var/lib/nfs:/sbin/nologin
mailnull:x:47:47::/var/spool/mqueue:/sbin/nologin
smmsp:x:51:51::/var/spool/mqueue:/sbin/nologin
pcap:x:77:77::/var/arpwatch:/sbin/nologin
apache:x:48:48:Apache:/var/www:/sbin/nologin
xfs:x:43:43:X Font Server:/etc/X11/fs:/sbin/nologin
ntp:x:38:38::/etc/ntp:/sbin/nologin
gdm:x:42:42::/var/gdm:/sbin/nologin
named:x:25:25:Named:/var/named:/sbin/nologin
dovecot:x:97:97:dovecot:/usr/libexec/dovecot:/sbin/nologin
postfix:x:89:89::/var/spool/postfix:/sbin/nologin
andrew:x:500:500:Andrew Hudson:/home/andrew:/bin/bash
Note that all the password fields do not show a password, but contain an x because they are shadow passwords, a useful security enhancement to Linux, discussed in the following section.
It is considered a security risk to keep any password in /etc/passwd because anyone with read access can run a cracking program on the file and obtain the passwords with little trouble. To avoid this risk, shadow passwords are used so that only an x appears in the password field of /etc/passwd; the real passwords are kept in /etc/shadow, a file that can only be read by the sysadmin (and PAM, the Pluggable Authentication Modules authentication manager; see the “PAM Explained” sidebar for an explanation of PAM).
Special versions of the traditional password and login programs must be used to enable shadow passwords. Shadow passwords are automatically enabled during the installation phase of the operating system on Fedora systems.
Let’s examine a listing of the shadow companion to /etc/passwd, the /etc/shadow file:
# cat /etc/shadow
root:*:13121:0:99999:7:::
daemon:*:13121:0:99999:7:::
bin:*:13121:0:99999:7:::
sys:*:13121:0:99999:7:::
sync:*:13121:0:99999:7:::
games:*:13121:0:99999:7:::
man:*:13121:0:99999:7:::
lp:*:13121:0:99999:7:::
mail:*:13121:0:99999:7:::
news:*:13121:0:99999:7:::
uucp:*:13121:0:99999:7:::
proxy:*:13121:0:99999:7:::
www-data:*:13121:0:99999:7:::
backup:*:13121:0:99999:7:::
list:*:13121:0:99999:7:::
irc:*:13121:0:99999:7:::
gnats:*:13121:0:99999:7:::
nobody:*:13121:0:99999:7:::
dhcp:!:13121:0:99999:7:::
syslog:!:13121:0:99999:7:::
klog:!:13121:0:99999:7:::
andrew:$1$z/9LTBHL$omt7QdYk.KJL7rwBiM0511:13121:0:99999:7:::
cupsys:!:13121:0:99999:7:::
fetchmail:!:13121:0:99999:7:::
messagebus:!:13121:0:99999:7:::
hal:!:13121:0:99999:7:::
saned:!:13121:0:99999:7:::
gdm:!:13121:0:99999:7:::
hplip:!:13121:0:99999:7:::
The fields are separated by colons and are, in order:
The user’s login name.
The encrypted password for the user.
The number of days since January 1, 1970 that the password was last changed. This date is known in UNIX circles as the epoch. Just so you know, the billionth second since the epoch occurred was in September 2001; that was the UNIX version of Y2K—not much happened because of it.
The number of days before the password can be changed (prevents changing a password and then changing it back to the old password right away—a dangerous security practice).
The number of days after which the password must be changed. This can be set to force the change of a newly issued password known to the system administrator.
The number of days before the password expiration that the user is warned it will expire.
The number of days after the password expires that the account is disabled (for security).
The number of days since January 1, 1970 that account has been disabled.
The final field is a “reserved” field and is not currently allocated for any use.
Note that password expiration dates and warnings are disabled by default in Fedora. These features are not used on home systems and usually not used for small offices. It is the sysadmin’s responsibility to establish and enforce password expiration policies.
The permissions on the /etc/shadow file should be set so that it is not writable or readable by regular users: The permissions should be 600.
Selecting appropriate user passwords is always an exercise in trade-offs. A password such as password (don’t laugh, it has been used too often before in the real world) is just too easy to guess by an intruder as are simple words or number combinations (a street address, for example). A security auditor for one of my former employers used to take the cover sheet from an employee’s personnel file (which contained the usual personal information of name, address, birth date, and so on) and then attempt to log on to a terminal with passwords constructed from that information—and often succeeded in logging on.
On the other hand, a password such as 2a56u'"F($84u&#^Hiu44Ik%$([#EJD is sure to present great difficulty to an intruder (or an auditor). However, that password is so difficult to remember that it would be likely that the password owner would write that password down and tape it next to her keyboard. I worked for a business in which the safe combination was written on the ceiling tile over the safe; the manager could not remember it and was told he should not keep it on a piece of paper in his wallet. This is but one of many examples of poor security in the field.
The sysadmin has control, with settings in the /etc/shadow file, over how often the password must be changed. The settings can be changed using a text editor, the change command, or a configuration tool such as Fedora’s User Manager, as shown in Figure 14.1. Click on the Password Info tab under that particular user’s Properties to set individual password policies.
On a large system, there might be times when a large number of users and their passwords need some attention. The super-user can change passwords in a batch by using the chpasswd command, which accepts input as a name/password pair per line in the following form:
# chpasswd username:password
Passwords can be changed en masse by redirecting a list of name and password pairs to the command. An appropriate shell script can be constructed with the information gleaned from this chapter.
However, Fedora also provides the newusers command to add users in a batch from a text file. This command also allows a user to be added to a group, and a new directory can be added for the user as well.
It may be necessary for regular users to run a command as if they were the root user. They usually do not need these powers, but they might on occasion—for example, to temporarily access certain devices or run a command for testing purposes.
There are two ways to run commands with root privileges: The first is useful if you are the super-user and the user; the second if you are not the regular user (as on a large, multiuser network).
What if you are also root, but are logged on as a regular user because you are performing nonadministrative tasks and you need to do something that only the super-user can do? The su command is available for this purpose.
Note
A popular misconception is that the su command is short for super-user; it just means substitute user. An important but often overlooked distinction is that between su and su -. In the former instance, you become that user but keep your own environmental variables (like paths). In the latter, you inherit the environment of that user. This is most noticeable when you use su to become the super-user, root. Without appending the -, you do not inherit the path variable that includes /bin or /sbin, so you must always enter the full path to those commands when you just su to root.
Because almost all Linux file system security revolves around file permissions, it can be useful to occasionally become a different user with permission to access files belonging to other users or groups or to access special files (such as the communications port /dev/ttyS0 when using a modem or the sound device /dev/audio when playing a game). You can use the su command to temporarily switch to another user identity, and then switch back.
Tip
It is never a good idea to use an Internet Relay Chat (IRC) client as the root user, and you might not want to run it using your regular user account. Simply create a special new user just for IRC and su to that user in a terminal widow to launch your IRC client.
The su command spawns a new shell, changing both the UID and GID of the existing user and automatically changes the environmental variables associated with that user, known as inheriting the environment. Refer to Chapter 5 for more information on environmental variables.
The syntax for the su command is
$ su option username arguments
The man page for su gives more details, but some highlights of the su command are
-c, --command COMMAND
      pass a single COMMAND to the shell with -c

-m, --preserve-environment
      do not reset environment variables

-l    a full login simulation for the substituted user,
      the same as specifying the dash alone
You can invoke the su command in different ways that yield diverse results. By using su alone, you can become root, but you keep your regular user environment. This can be verified by using the printenv command before and after the change. Note that the working directory (you can execute pwd as a command line to print the current working directory) has not changed. By executing the following, you become root and inherit root’s environment:
$ su -
By executing the following, you become that user and inherit the super-user’s environment—a pretty handy tool. (Remember: Inheriting the environment comes from using the dash in the command; omit that, and you keep your “old” environment.) To become another user, specify a different user’s name on the command line:
$ su - other_user
When leaving an identity to return to your usual user identity, use the exit command. For example, while logged on as a regular user,
$ su - root
the system prompts for a password:
Password:
When the password is entered correctly, the root user’s prompt appears:
#
To return to the regular user’s identity, just type
# exit
This takes you to the regular user’s prompt:
$
If you need to allow other users access to certain commands with root privileges, it is necessary to give them the root password so that they can use su—that definitely is not a very secure solution. The next section describes a more flexible and secure method of allowing normal users to perform selected root tasks.
It is often necessary to delegate some of the authority that root wields on a system. For a large system, this makes sense because no single individual will always be available to perform super-user functions. The problem is that UNIX permissions come with an all-or-nothing authority. Enter sudo, an application that permits the assignment of one, several, or all of the root-only system commands.
After it is configured, using sudo is simple. An authorized user merely precedes the super-user-authority-needed command with the sudo command, like so
$ sudo command
After getting the user’s password, sudo checks the /etc/sudoers file to see whether that user is authorized to execute that particular command; if so, sudo generates a “ticket” for a specific length of time that authorizes the use of that command. The user is then prompted for his password (to preserve accountability and provide some measure of security) and then the command is run as if root had issued it. During the life of the ticket, the command can be used again without a password prompt. If an unauthorized user attempts to execute a sudo command, a record of the unauthorized attempt is kept in the system log and a mail message is sent to the super-user.
Three man pages are associated with sudo: sudo, sudoers, and visudo. The first covers the command itself, the second the format of the /etc/sudoers file, and the third the use of the special editor for /etc/sudoers. You should use the special editing command because it will check the file for parse errors and lock the file to prevent others from editing it at the same time. The visudo command uses the vi editor, so you might need a quick review of the vi editing commands found in Chapter 5 in the section “Working with vi.” You begin the editing by executing the visudo command with
# visudo
The default /etc/sudoers file looks like this:
# sudoers file.
#
#
# This file MUST be edited with the 'visudo' command as root.
#
# See the sudoers man page for the details on how to write a sudoers file.
#

# Host alias specification

# User alias specification

# Cmnd alias specification

# Defaults specification

# User privilege specification
root    ALL=(ALL) ALL

# Uncomment to allow people in group wheel to run all commands
# %wheel        ALL=(ALL)       ALL

# Same thing without a password
# %wheel        ALL=(ALL)       NOPASSWD: ALL

# Samples
# %users ALL=/sbin/mount /cdrom,/sbin/umount /cdrom
# %users localhost=/sbin/shutdown -h now
The basic format of a sudoers line in the file is
user host_computer=command
The user can be an individual user or a group (prepended by a % to identify the name as a group). The host_computer is normally ALL for all hosts on the network and localhost for the local machine, but the host computer can be referenced as a subnet of any specific host. The command in the sudoers line can be ALL, a list of specific commands, or a restriction on specific commands (formed by prepending a ! to the command). A number of options are available for use with the sudoers line, and aliases can be used to simplify the assignment of privileges. Again, the sudoers man page will give the details, but here are a few examples:
If we uncomment the line,
# %wheel ALL=(ALL) NOPASSWD: ALL
any user we add to the wheel group can execute any command without a password.
Suppose that we want to give user vanessa permission across the network to be able to add users with the graphical interface. We would add the line
vanessa ALL=/system-config-users
or perhaps grant permission only on her local computer:
vanessa 192.168.1.87=/usr/bin/system-config-users
If we want to give the editor group systemwide permission with no password required to delete files,
%editors ALL=NOPASSWD: /bin/rm
If we want to give every user permission with no password required to mount the CD drive on the localhost,
ALL localhost=NOPASSWD:/sbin/mount /dev/scd0 /mnt/cdrom /sbin/umount/mnt/cdrom
It is also possible to use wildcards in the construction of the sudoers file. Aliases can be used as well to make it easier to define users and groups. Although the man page for sudoers contains some examples, http://www.komar.org/pres/sudo/toc.html provides illustrative notes and comments of sudo use at a large aerospace company. The sudo home page at http://www.sudo.ws/ is also a useful resource for additional explanations and examples.
The following command presents users with a list of the commands they are entitled to use:
$ sudo -l
Using restricted shells is actually the opposite of granting additional privileges to users. There might be situations in which you want to restrict a user to a very specific subset of privileges permitted to other users. If you have a desire to severely restrict what a user can do (for reasons of security, distribution of a turnkey system, or custom system installation), you can provide him with a restricted shell. To run a restricted bash shell, you would use the -r option. It is easy to try yourself, just enter the following at your prompt:
$ bash -r
Then try to do something that you could do before as a regular user, such as listing the files in your home directory:
$ ls -a
You then see
bash: ls: No such file or directory
The cd command, redirection, using / in command names, and several other commands and options are also disabled in the restricted shell. (The man page for bash details specific restrictions; the appropriate information is at the very end of the very long man page.) Do not rely on a restricted shell as your only means of controlling user activity; although using restricted shells applies some tight restrictions, a very determined user might find a way to confound the restrictions. Always use appropriate permission and password controls as well.
It is useful to know what happens during the process when a user attempts to log in—if for nothing else than troubleshooting for that one user in the accounting department who cannot get logged on to run the payroll program and get the payroll checks printed on time. Understanding this process also involves understanding the purpose of the default user installation files that are found in /etc/skel. This section helps illuminate the login process for you.
The login process is used for entering, or “signing on” to a system and is summarized in steps as follows:
Login prompts for a username.
If the
/etc/nologinfile exists and the user is not root, a warning message is issued and the login process is halted. The/etc/nologinfile is typically used when the system will be shut down shortly and new logins should be restricted.The
/etc/userttyfile is examined to see whether any restrictions are specified for the user. As a security measure, root logons can be restricted to specific terminals and regular users can have the same restrictions placed on them as necessary.The system prompts for a password; it is checked against the encrypted password kept in
/etc/shadow. Unsuccessful attempts are logged via thesyslogfacility and can be reviewed with thelastdcommand.The UID and the GID of the
tty(terminal) being used are set.The
TERMenvironment, if it has been set, is preserved.The
HOME,PATH,SHELL,TERM,MAIL, andLOGNAMEenvironment variables are set. (If the-poption is used, all preexisting environmental variables are preserved.)The
PATHdefaults to/usr/local/bin:/bin:/usr/bin:for normal users and to/sbin:/bin:/usr/sbin:/usr/binfor root.Normal greeting messages and mail checking are disabled if the file
.hushloginexists in the users’ home directory; otherwise, those messages are displayed at the end of the logon process.The user’s command shell is started at this point, presenting the user with a command prompt. If no shell is specified for the user in
/etc/passwd,/bin/shis used by default. (Some UNIX operating systems will just log you back out.) If no home directory is specified in/etc/passwd,/is used.
When you log in as a regular user, the files that control your environment are found in your /home/username directory. These configuration files are normally hidden from view because their filename is preceded by a period (as in .bashrc—these are known as dot files).
The name of the file indicates which program it is associated with. The files .bash_logout, .bash_profile, and .bashrc all determine how the bash shell is used by the user. (These files can, of course, be preset by the system administrator with the user given only read access, so the files cannot be changed. Other shells have their own associated files.)
The .screenrc file determines the console screen environment, and the .Xdefaults file determines much the same thing for X11. For Fedora, the .dmrc file sources the file /etc/X11/dm/Sessions/Default.desktop, which sets the default desktop for the entire system. The .Xclients-default file is created by running the switchdesk command (the Desktop Switching Tool is the name of the GUI interface) to change the default desktop for that user. You would use this command if you occasionally launched X11 from the command line and desired to change your default desktop. Fedora sets the default as GNOME.
Other files might be present depending on the system and the system administrator. The point is that the environment of each user can be set globally through the use of files in /etc/skel and individually by allowing user modification of the files in their /home directory (or not, depending on the system administration policies).
The system logs all user logins, as well as all users of su and sudo commands for the sysadmin’s review. (The init, syslogd, and klogd applications create the logs.) Modern security-monitoring programs (or simple scripts you create) can scan these files (such as /var/log/messages) for anomalies and signal possible security violations.
On large systems with many users, you need to control the amount of disk space a user has access to. Disk quotas are designed for this purpose. Quotas, managed per each partition, can be set for both individual users as well as groups; quotas for the group need not be as large as the aggregate quotas for the individuals in the groups.
When files are created, both a user and a group own them; ownership of the files is always part of the metadata about the files. This makes quotas based on both users and groups easy to manage.
Note
Disk quota management is never done on a home system and rarely, if ever, done on a small office system.
To manage disk quotas, you must have the quota package installed on your system; it is usually installed by default. Quota management with Fedora is not enabled by default and has traditionally been enabled and configured manually by system administrators. Sysadmins use the family of quota commands, such as quotacheck to initialize the quota database files, edquota to set and edit user quotas, setquota to configure disk quotas, and quotaon or quotaoff to control the service. (Other utilities include warnquota for automatically sending mail to users over their disk space usage limit.)
To reiterate, quotas might not be enabled by default, even if the quota software package is installed on your system. When quotas are installed and enabled, you can see which partitions have either user quotas, group quotas, or both by looking at the fourth field in the /etc/fstab file. For example, one line in /etc/fstab shows that quotas are enabled for the /home partition:
/dev/hda5 /home ext3 defaults,usrquota,grpquota 1 1
The root of the partition with quotas enabled will have the files aquota.user or aquota.group in them (or both files, if both types of quotas are enabled), and the files will contain the actual quotas. The permissions of these files should be 600 so that users cannot read or write to them. (Otherwise, users would change them to allow ample space for their music files and Internet art collections.) To initialize disk quotas, the partitions must be remounted. This is easily accomplished with the following:
# mount -o ro,remount partition_to_be_remounted mount_point
The underlying console tools (complete with man pages) are
Manual configuration of quotas involves changing entries in your system’s file system table, /etc/fstab, to add the usrquota mount option to the desired portion of your file system. As an example in a simple file system, quota management can be enabled like this:
LABEL=/ / ext3 defaults,usrquota 1 1
Group-level quotas can also be enabled by using the grpquota option. As the root operator, you must then create a file (using our example of creating user quotas) named aquota.user in the designated portion of the file system, like so:
# touch /quota.user
You should then turn on the use of quotas using the quotaon command:
# quotaon -av
You can then edit user quotas with the edquota command to set hard and soft limits on file system use. The default system editor (vi unless you change your EDITOR environment variable) will be launched when editing a user’s quota.
Any user can find out what her quotas are with
$ quota -v
Note
There are no graphical tools supported by Fedora that can be used to configure disk quotas. A Quota mini-HOWTO is maintained at http://www.tldp.org/HOWTO/mini/Quota.html.
http://howtos.linux.com/howtos/User-Authentication-HOWTO/index.shtml—The User-Authentication HOWTO describes how user and group information is stored and used for authentication.
http://www.ibiblio.org/pub/Linux/docs/HOWTO/other-formats/html_single/Shadow-Password-HOWTO.html—The Shadow-Password HOWTO delves into the murky depths of shadow passwords and even discusses why you might not want to use them.
http://www.ibiblio.org/pub/Linux/docs/HOWTO/other-formats/html_single/_Security-HOWTO.html—A must-read HOWTO, the Security HOWTO is a good overview of security issues. Especially applicable to this chapter are sections on creating accounts, file permissions, and password security.
http://www.secinf.net/unix_security/Linux_Administrators_Security_Guide/—A general guide, the Linux System Administrator’s Security Guide has interesting sections on limiting and monitoring users.
http://www.ibiblio.org/pub/Linux/docs/HOWTO/other-formats/html_single/Config-HOWTO.html—How can you customize some user-specific settings? The Config HOWTO Software Configuration gives some advice.
http://www.ibiblio.org/pub/Linux/docs/HOWTO/other-formats/html_single/Path.html—How can one know the true path? The Path HOWTO sheds light on this issue. You need to understand paths if you want to guide the users to their data and applications.
http://www.courtesan.com/sudo/—The SU peruser DO command is a powerful and elegant way to delegate authority to regular users for specific commands.
http://www.kernel.org/pub/linux/libs/pam/index.html—The Pluggable Authentication Modules suite contains complex and highly useful applications that provide additional security and logging for passwords. PAM is installed by default in Fedora. It is not necessary to understand the intricacies of PAM to use it effectively.
http://localhost/localdomain/—Your Fedora system contains man and info pages on just about everything covered here. Use man -k to search on a keyword.