
A Linux file system is more than just a format for your hard drive or floppy disk and more than just the disk itself or the formatting process. The file system is the structure and organization of data on a data storage device. In other words, it is how your data is organized and stored in files, disk drives, and removable media.
In this chapter, you learn about the structure of the disks themselves, the file systems that can be placed on them, and how to work with those file systems. You also learn some background and history about the file systems that Linux can use. This chapter provides some basic information about the file system’s default settings, as well as how you can adapt those settings to better match your system and its needs. At the end of the chapter, you learn how to build a test file system and use the loopback file system so that you can safely explore all the file system commands without risking any damage to your system.
Also covered are the use of the file system table, fstab, and instructions for formatting ext3, reiserfs, and DOS drives. This chapter also discusses the special files for character and block devices, as well as the device file system, devfs. The “Reference” section is full of sources with extensive information on file system-related topics.
The Fedora file system, like all UNIX file systems, is used for storing not only data, but also metadata—information about the files, such as who the file owner is, what permissions are associated with the file, and other file attributes.
The Fedora file system is much more complex than most people care to know about. Its features are patterned after features found on commercial UNIX systems, as well as those included in research or experimental file systems.
Fortunately, the native Linux file system is robust and works well with the default settings. Fedora has conveniently provided an easy-to-use setup tool for use during the installation, but here, you also learn how to manage file system settings manually.
Providing a great deal of flexibility, the file system support allows Linux users to access files on file systems used by other operating systems, many of which are obscure. A sampling of the Fedora kernel modules for supported file systems is as follows:
cramfs—. Compressed ROM file systemext3—. Linux Extended File System 3 (adds journaling to ext2). Note: Work is now underway to develop ext4, which will build upon ext3.fat—. Microsoft File Allocation Table file system: FAT 12 and FAT 16hfs—. Macintosh: Hierarchical file systemjfs—. IBM’s journaled file systemmsdos—. Microsoft File Allocation Table -16nfs—. Network file systemntfs—. Windows NT, Windows 2000, Windows XPreiserfs—. Reiser file systemromfs—. ROM file systemsmbfs—. File system based on the use of the Shared Message Block protocol used by Microsoft and Sambaudf—. Universal Disk Format (DVD-ROM file system)ufs—. UNIX file system used on BSD, Sun, and Mac OS Xumsdos—. MS-DOS file system with Linux permissionsvfat—. Microsoft File Allocation Table file system known as FAT32
Support for ext3, ext2, NFS, and iso9660 file systems is compiled into the Linux kernel; all others are available as modules.
There is not an exact correlation between the file system source code and the modules compiled for the default kernel. The kernel documentation for the file systems can be found at /usr/src/linux-2.6/Documentation/file systems/. The usage of some of these file system modules is mentioned in the man page for mount.
If you were to visualize the file system on the physical disk, it would resemble a series of boxes known as blocks. The first block on the disk is a special block that contains the boot sector; subsequent blocks contain the operating system, applications, and your data.
Each individual block is made up of smaller groups of data:
A superblock (called by that name because it contains redundant information about the overall file system).
Redundant file system descriptors—All the redundant information is useful for reliability and recovery from disasters and errors.
A bitmap of the block.
A bitmap of the inode table.
Information from the inode table.
The data blocks themselves.
How big are these blocks? The default size is 1,024 bytes, but the size can be made smaller or larger when the file system is first created. The optimum size is determined by the application of the particular machine. If you typically use very large files, a larger block size can speed up disk I/O operations at the expense of slower I/O for smaller files; the reverse is also true. For an individual system, block size might require monitoring over time and benchmarking before an optimal value is determined. For most users, the defaults have been found satisfactory.
File system partitions are ways to organize blocks of data on the physical drive media and are parts of the overall file system on your computer. No single universal partition format exists. In addition to the commonly used DOS partition format (used by Linux as well), Fedora also provides support for the following partition types:
Amiga
Macintosh (compiled into the kernel)
BSD (compiled into the kernel)
SunOS/Solaris (compiled into the kernel)
UnixWare slices (compiled into the kernel)
SGI (compiled into the kernel)
Windows Logical Disk Manager
Note
Other modules and support are likely available if you care to search the Internet for them; try searching on the keyword file systems on http://freshmeat.net/ and http://www.google.com/linux/. As is always the case with open-source operating systems, any skilled and enterprising soul can write his own file system modules.
We can separate file systems into two broad categories: those that can be used over a network and local disk file systems. You are provided with all the applications necessary to work with both categories of file systems when using Fedora Core Linux.
Network file systems are physically stored somewhere other than your local computer but appear as if they are mounted on your local computer.
Note
Mounting is the UNIX method of attaching a file system (also referred to as a volume) to the file system tree at a mount point. Using the mount command is covered later in this chapter.
Some common network file system types are
NFS—. The Network File System was developed by Sun and is in common use. It has no built-in security because it was originally designed to run over friendly networks. Although considered problematic by some, it is easy to implement. It is typically used between UNIX peers. Fedora Core supports client and server installations of this file system.Coda—. Similar toNFS,Codaoffers support for disconnected operation and security caching (keeping a local copy of files in case the network connection is lost). Fedora Core provides only kernel compatibility withCoda; the actual client and server code is available from http://www.coda.cs.cmu.edu/.InterMezzo—. Similar in features toCoda,InterMezzois a GPL project. The server daemon can be obtained from http://www.inter-mezzo.org/.SMB—. The network-focused Server Message Block protocol was developed by Microsoft. The Linux implementation is known as Samba and is one of the most advanced open-source projects available. It is typically used between Linux and Microsoft Windows peers. Netatalk is the Macintosh equivalent protocol.
Disk file systems are found on a physical device; they are the hard drive in your desktop or laptop computer. Some common disk file system types are
FATis a disk-oriented, table-based (a linked list) file system used by Microsoft. It has been regularly extended to add functionality. Microsoft’s Enterprise-level file system is known asNTFS. (You learn more about this system in “DOS File Systems,” later in this chapter.)ext2,ext3, andreiserfsare inode-based. (You learn aboutreiserfsin “The Reiser File System (reiserfs),” later in this chapter.)
The JFS (Journaled File System from IBM) and XFS (from Silicon Graphics) file systems are available for use with Fedora Core Linux, but primarily as migration aids for those migrating existing file systems to Linux.
A journaling file system adds a journal, or hidden file, to the data on the drive. Because of the way data is written to a disk, the kernel might be holding some of the data while it is deciding where to place it. If your computer were to suffer a failure, that cached data would be lost. A journaling file system keeps that data in a special place until the kernel decides to formally write it to the disk. If a system failure occurs, a special application (fsck) knows that the data was never formally written and will make certain that it is written in the correct place. This ensures that no data is lost. Journaling file systems are actually much more complex than this, but the mechanics of them are beyond the scope of this chapter. Journaling file systems such as ext3, reiserfs, JFS, and XFS are major improvements over older, nonjournaling file systems.
Your installation of Fedora might have its own unique set of useable virtual file system modules. You can view the file systems that your system can access right now (and verify your kernel’s support for these file systems) by using the following command:
# cat /proc/file systems
Your output will vary, depending on your system’s hardware and kernel settings. The test system we used for this chapter presented this output:
nodev rootfs
nodev bdev
nodev proc
nodev sockfs
nodev tmpfs
nodev shm
nodev pipefs
      ext2
nodev ramfs
      iso9660
nodev devpts
      ext3
nodev usbdevfs
nodev usbfs
      ReiserFS
      vfat
nodev nfs
nodev autofs
nodev binfmt_misc
The entries not preceded by nodev are not of interest to us because they do not tell us any information about the file system. On this machine, the ext2, ext3, vfat, reiserfs, and iso9660 file systems are supported. Modules for other file systems could be loaded if needed.
Red Hat had invested heavily in the development of the ext3 file system and provides support for the ext3 file system as the journaling file system for its distribution. Red Hat (and now Fedora) does not provide that level of support for other file systems. Other distributions, such as SUSE and Mandriva, support the Reiser file system, which is covered later.
The ext3 file system is an update to the ext2 file system, which has been one of the most popular Linux file systems for some time. You can choose to use the ext3 file system during a fresh install or automatically convert to an ext3 file system when you upgrade your present system to the current version of Fedora Core Linux. All the ext2 tools provided by Fedora Core have been upgraded to work with both ext2 and ext3. We mention the ext2 tools only because you will see the ext2 file system mentioned frequently; ext3, as supplied with Fedora Core Linux, is completely compatible with ext2.
Fedora’s rationale for choosing ext3 might be compelling. Although it provides availability, data integrity, and speed similar to other file system choices, ext3 has one unique advantage: It is an easy transition from ext2 to ext3, and the transition is forgiving of mistakes along the way. It is also potentially possible to recover a deleted file from an ext3 file system; such a recovery is not possible at all for a reiserfs file system.
Note
The downside to using ext3 seems to be performance related. A recent benchmarking evaluation (see http://fsbench.netnation.com/) of all Linux file systems placed ext3 at the bottom for general performance. What the study really demonstrates is that you must match the file system to the application for best all-around performance.
The ext3 file system can accommodate files as large as 2TB, directories as large as 2TB, and a maximum filename length of 255 characters. (With special kernel patches, this limit can be increased to 1,024 characters if the standard length is insufficient for your use.) The ext3 file system can allocate and use empty space in a very efficient manner.
The usage of space is so efficient that ext3 file systems typically do not need defragmenting (rearranging the files to make them contiguous). The dynamic allocation of resources is also the source of one Achilles heel for the file system. When a file is deleted, its inode is erased and the data blocks associated with it are freed; they might very well be reallocated immediately, and the old data lost forever.
Note
A defragmentation program for the ext2 file system does exist, but it is infrequently used, is not typically included with standard Linux distributions such as Fedora Core Linux, and is not recommended for general use. The ext2/3 file system assigns blocks of space for files based on their parent directories; this spaces files out all over the physical disk, leaving room to keep files contiguous and reduce fragmentation. However, a file system full of files at 90% of its capacity can become badly fragmented.
Every file system varies in structure, depending on its efficiency, security, and even proprietary designs to limit cross-compatibility deliberately. The ext3 file systems were designed to follow UNIX design concepts, particularly “everything is a file.”
For example, a directory in the ext3 file system is simply a file; that file contains the names of the files to be found in that directory, and the locations of those files. The list of names is linked so that space is not wasted because of varying filename lengths.
The ext3 file system has several options that, depending on your needs, allow you to select how much information is journaled. According to Red Hat, the typical journal requires a second or so to be read and recovered. The time needed to recover from an improper shutdown of a journaled file system is not dependent on the file system size, but the amount of data in the journal.
The default setting provided by Fedora is adequate for most needs. The optimal choice depends on so many factors (computer usage, hardware used, and testing and evaluation methods) that a meaningful discussion is beyond the scope of this chapter. You learn in this chapter what the choices are and how they differ, but whether a choice is right for you can only be determined on an individual basis.
Like all journaling file systems, the traditional file system check (fsck) is not necessary on an ext3 file system. Although only mildly annoying on a 20GB drive on your machine at home, imagine the seemingly endless hours that an fsck would take to run on a terabyte of data. This feature is shared in common with the other journaling file systems.
When choosing journaling options, you can trade off data integrity (keeping your data current and valid) for data transfer speed in your file system’s operation; you cannot have both because of the nature of the file system design. You can choose to expose some of your data to potential damage in the case of an improper shutdown in exchange for faster data handling, or you can sacrifice some speed to keep the state of the file system consistent with the state of the operating system.
Three modes available as options to ext3 are as follows:
writeback—. Enables old data to stay in the file system, attaining the fastest speed possible. It does not schedule any data writes; it just enables the kernel’s 30-secondwritebackcode to flush the buffer.ordered—. Keeps the data consistent, but with some sacrifice in speed (the default mode for Fedora).journal—. Requires more disk space to journal more data. You might see slower performance because data is written twice, but there are some speed benefits if you are doing synchronous data writes as in database operations.
For most of us, the default selection represents a good trade-off. Fedora Core supports booting from an ext3 formatted root file system with the proper drivers loaded in the initrd image.
The mode is selected by using the appropriate mount option in /etc/fstab. For example, to set the file system mode to the fastest of the three modes, use data=writeback as the option. For more details, enter man mount.
The file system integrity is assured using fsck, or file system check, program—one of five commands in the library that are used to maintain and modify the ext3 file system.
When fsck is run, it performs a sequential analysis of the file system information available in the file system if it detects a directory that cannot be traced back to the root or an undeleted file with a zero link count. It places these directories and files in the /lost+found directory that is created on each physical partition by the file system formatting process. Some blocks are reserved for this and other uses of the super-user. It is possible to reduce this allocation to free additional space for regular users by special arguments to the formatting program mke2fs.
To run the fsck command, use the name of the file system as the argument. You must ensure that the file system you want to check is unmounted by using the umount command. If you want to fsck the file system at /dev/hdc, for example, do this:
# fsck /dev/hdc
Tip
If you are logged on as a regular user and su to root using su, you do not inherit root’s environment and path, meaning that the preceding command will not work without using the full path: /usr/sbin/fsck.
Either type the full path each time, or become root with su -, which causes you to inherit root’s environment and path; you have less to type.
The file system state is tracked in the ext3 file systems. A special field in the superblock tells the kernel that, after the file system is mounted read/write, it is marked as not clean; when it is properly unmounted, it is marked as clean. If a file system is not unmounted properly, it could contain corrupt data because all the file data might not have been written to it. (This is what the journaling file systems such as ext3 strive to eliminate.) When the system is booted, this flag is checked and if it is not clean, the program fsck is run. Internally, fsck is actually a wrapper program that runs the appropriate version of fsck for the file system in use: fsck.minix, fsck.ext2, fsck.ext3, fsck.reiserfs, fsck.msdos, and fsck.vfat. If the kernel detects an inconsistency in the superblock field, the file system is marked erroneous, and the file system check is forced even if other indicators suggest that fsck does not need to be run.
By default, the system will run fsck on a file system after a periodic number of reboots, regardless of the status of the clean flag. This behavior is triggered by a mount counter kept in the superblock or after a predetermined amount of time has elapsed since the last reboot (information also kept in the superblock). These parameters can be adjusted through the tune2fs command; this command can also be used to modify how the kernel handles the erroneous flag and, interestingly, the number of blocks reserved for the super-user, also known as root. This latter option is useful on very large or very small disks to make more disk space available to the user.
Although ext3 is certainly an acceptable root file system, there are other alternatives. No operating systems can support as many root file systems as Linux, but you should be aware that every file system has its strengths and weaknesses. Some are better with small files, some are better with large files, some are better at writing data, and some better at reading data. Unfortunately, there is no one perfect file system. The following sections discuss some of the other common file systems available for use with Fedora.
The other popular journaling file system for Linux is the written-from-scratch Reiser file system, reiserfs. It is used primarily in the SUSE distribution, which supports booting from a reiserfs root file system. reiserfs offers similar features to ext3, but there is no easy migration path from an already existing ext2 partition, as you learn to do in “Converting an Existing ext2 File System to ext3,” later in this chapter. In the past, reiserfs didn’t work well over NFS mounts, but recent versions of the nfsd daemon have fixed those problems. Fedora Core does offer reiserfs, but does not offer support for booting from it as the root partition file system, nor does it offer the choice to format non-root partitions as reiserfs during the installation process.
reiserfs is offered primarily for compatibility with existing reiserfs partitions you might want to access. Although the Reiser file system can be used as a root file system (meaning that Linux can be booted from a Reiser file system), Fedora has chosen not to support that option. The main problem is that reiserfs does not, at the time of writing, play nicely with SELinux and is therefore not recommended either by Red Hat or the NSA (SELinux’s developers).
Note
The reiserfs file system has undergone a major update and release with Reiser4. The project, sponsored by The Defense Advanced Research Projects Agency (DARPA), aims to introduce improvements in a number of areas, such as maximum number of directories, files, links, sizes of individual files and size of the file system (nearly 18 terabytes). Other improvements include performance and encryption.
Two commercial UNIX file systems have been ported (rewritten) to allow them to be used in Linux. IBM has provided its Journaled File System (JFS) that is used with its commercial UNIX named AIX. Silicon Graphics, Inc. (SGI) has provided its XFS file system used by its commercial UNIX named IRIX. Because these file systems are generally suited for enterprise systems rather than home or small office systems, it seems likely that they are offered in Fedora Core Linux to ease the transition of IRIX and AIX users to Linux by eliminating the need for these users to reformat their very large file systems.
Beginning with kernel 2.6, XFS is fully supported in the kernel.
The extent of DOS file system support in Linux is often surprising to newcomers, but the DOS file system proved to be a viable option in the early years of Linux. Because Microsoft has been the dominant operating system on Intel computers, Linux has always worked toward coexistence with DOS.
Microsoft DOS and the consumer-oriented Windows operating systems use a file system known as FAT (File Allocation Table). FAT32 is the typical system used today. The number following the FAT name indicates the size of the space for naming address pointers; the more space, the larger a section of contiguous space can be identified and accessed. FAT32 is the most recent version of FAT, and it is backward compatible with other versions of FAT. Older versions are not forward compatible.
The Fedora kernel can access all versions of FAT-formatted partitions (including floppy disks) using the vfat kernel module.
If you use CD-ROM or DVD-ROM media, you need to understand a little bit about the file system and how it works with Linux. To the average user, the file system of a CD-ROM looks just like a native Linux file system. It is not the native file system, but the features of the Virtual File System make it possible for it to appear that way. The CD-ROM file system standards continue to evolve to accommodate new technology.
The file system typically used on a CD-ROM is known as iso9660, the name of the standard that defines the format. Each operating system translates the iso9660 file system into the native file system of the operating system (with some restrictions). Several extensions have been created to address certain special needs. The Rock Ridge extension allows long filenames and UNIX-like symbolic links. The Joliet extension allows Unicode characters and long filenames, useful when dealing with non-English languages. El Torito CDs contain a bootable image and, with a suitable BIOS, can boot an operating system from the CD.
The Universal Disk Format (UDF) is the file system used on DVD discs. UDF has a number of built-in features such as allowing larger files, having improved file descriptors, and packet writing that the iso9660 file system cannot easily accommodate. The UDF format is the next step in compact disc technology.
To create a file system on a disk that has never had a partition table on it or to change the partition table (called repartitioning the disk), you must first create the new partition table. In this section, you begin by learning about the basic structure and workings of the disk as a storage device. This information is fundamental to your understanding of the file system creation process. You then learn to create a partition table using the fdisk and GNUparted commands. As with all similar Linux commands, each has its own strengths and weaknesses and none is a perfect choice for all situations. In the end, the partition table you create will be the same no matter which command you use. You then learn to create the file system, using commands appropriate for the type of file system you want to create.
Note
The Microsoft version of fdisk creates both a partition table and the bootloader. In Linux, fdisk only creates the partition table. The bootloader is created later by LILO, GRUB, or another bootloader; no bootloader is necessary to create a file system and store data on a disk, just a partition table.
In fact, IDE disks physically installed as something other than /dev/hda (such as /dev/hdc, the secondary master drive) will not have a bootloader written to them; the space where the bootloader code normally resides will likely be blank. For SCSI disks, the drive designated in the BIOS as the bootable drive will have the bootloader written to it.
Because data storage devices are central to the file system, it is important to understand the workings of the most common data storage device: the hard disk drive. Although they work with a different medium, the basic storage functions of floppy disks and removable disk drives are similar to those of the hard disk.
Mechanically, the hard drive is a metal box that encloses disks, also known as platters, which have a magnetic coating on each side. Multiple disks are typically connected to the same spindle and rotated by a motor. The read and write heads for each side of the disk are moved by a second motor to position them over the area of the disk where the data you are looking for is stored. Each platter is organized into cylinders (the default size is 512 bytes) and sectors, and each platter has a head. Each drive has some electronics on a controller card that, along with the disk controller card on the motherboard of the computer, are capable of placing the heads at the correct space to retrieve the data.
The three components, cylinders, heads, and sectors (CHS), are referred to as the drive geometry and are used to identify specific locations on the drive. The CHS information for the drive is detected by the system BIOS and passed on to the operating system.
The first sector of the disk is called the MBR, or Master Boot Record. It is the most important sector on the disk because it contains the bootloader code and the partition table (the table containing pointers to beginning and end of the logical partitions on the disk). The BIOS gets the system’s hardware ready, and then executes the bootloader code. The bootloader code and the bootloader program load the kernel and turn over control of the system to the kernel. Then, Linux is on its way to providing us with one of the best operating system experiences in the world.
The MBR sector is 512 bytes long; the first 446 bytes contain the bootloader code. The next 64 bytes contain the partition table, and the final 2 bytes contain a special code (the hexadecimal values of 55 and AA, respectively) that identifies that sector as the MBR. More details about the MBR can be found Chapter 17, “Backing Up, Restoring, and Recovery.”
Fedora Core provides several tools to create, examine, and modify the partition table. Because not all the tools we review are likely to be installed on your system (or other system you might be working on for now), this chapter describes making a partition table using some command-line and graphical tools that Fedora Core Linux provides.
The partition table only has enough room for four partitions. When the format was first created, it must have been assumed that four would be plenty. Complex, modern systems with very large hard drives make multiple partitions desirable for any number of unique reasons. To get around this problem, one of the four partitions—typically, partition number four—can be used as an extended partition. In other words, in the partition table, it looks like a big partition taking up the rest of the disk. Actually, it is a link to a table that contains the offsets to as many as 63 partitions for IDE disks and 15 for SCSI disks. One extended partition is chained to the next one in this manner.
Caution
Fedora and Red Hat have modified their supplied version of fdisk to limit the number of IDE partitions to 15 to match the limit for SCSI disks. That’s a problem if you already have more than 15 IDE partitions because fdisk will simply delete those partitions without warning if you use it! If you have less than 15 partitions, there will be no problem. If this causes a problem for you, compile your own fdisk from pristine sources and file a bug report with Fedora/Red Hat.
Note
Zip disks are typically delivered with a single partition numbered 4. This has some arcane relevance to Apple computer users, but is of no importance to Linux users who are free to use any valid number they choose.
The Linux fdisk command edits the partition table. You must be the super-user (root) before you can run fdisk (also said in Linux shorthand as “run fdisk as root”). Only hard drives (IDE and SCSI) can be accessed with fdisk, and you must use the device name as an argument. USB hard drives are accessed under SCSI emulation and are treated just as if they were SCSI devices. For example, to open fdisk and use it on the first IDE hard drive on the system, you would type this:
# fdisk /dev/hda
and you would see something like this:
# fdisk /dev/hda
The number of cylinders for this disk is set to 4982. There is nothing wrong with that, but this is larger than 1024, and in certain setups could cause problems with software that runs at boot time:
1) software that runs at boot time (e.g., old versions of LILO)
2) booting and partitioning software from other OSes (e.g., DOS FDISK or the OS/2 FDISK)
Pressing the m key displays the help screen as follows:
Command (m for help): m
Command action
  a  toggle a bootable flag
  b  edit bsd disklabel
  c  toggle the dos compatibility flag
  d  delete a partition
  l  list known partition types
  m  print this menu
  n  add a new partition
  o  create a new empty DOS partition table
  p  print the partition table
  q  quit without saving changes
  s  create a new empty Sun disklabel
  t  change a partition's system id
  u  change display/entry units
  v  verify the partition table
  w  write table to disk and exit
  x  extra functionality (experts only)
Pressing the p key will display the volume’s partition information as follows (note that your drive information will be different):
Command (m for help): p

Disk /dev/hda: 255 heads, 63 sectors, 4982 cylinders
Units = cylinders of 16065 * 512 bytes

  Device Boot  Start    End   Blocks  Id System
/dev/hda1  *       1    383  3076416   b Win95 FAT32
/dev/hda2        384    387    32130  83 Linux
/dev/hda3        388   1025  5124735  83 Linux
/dev/hda4       1026   4982 31784602+  5 Extended
/dev/hda5       1026   1042   136521  82 Linux swap
/dev/hda6       1043   1552  4096543+ 83 Linux
/dev/hda7       1553   4102 20482843+ 83 Linux
/dev/hda8       4103   4500  3196903+ 83 Linux
/dev/hda9       4501   4982  3871633+ 83 Linux
Older versions of fdisk would default to /dev/hda. The author of fdisk decided that wasn’t a good thing, so now you must always type the device name.
Tip
The fdisk command is dangerous to explore only if you write the changes to the partition table. Because you are specifically asked whether you want to do this, poke around to satisfy your curiosity and avoid pressing the w key when you’re done; just use q to quit. Armed with this knowledge, do not feel too shy if you’re curious about the partition table. But if you really do not want to take a chance on breaking anything, play it safe and use the -l (that’s the letter L, not the numeral 1) as in
# fdisk -l /dev/had
fdisk happily prints the contents of the partition table to the screen (often referred to as stdout, or standard output) and exits without placing you in the edit mode.
It is always a good idea to keep a hard copy of your edited partition table. You can redirect the output of fdisk -l to a file
# fdisk -l device > mypartitiontable.txt
or send it to the printer with
# fdisk -l device | kprinter
In the first example, a redirector symbol (>) is used to redirect the listing from stdout to a file. In the second example, we used a pipe (|) to send the output directly to the printer (assuming that you have one connected).
Now that you are running fdisk as root, you can create a partition table. We will assume that you have installed a brand-new drive as /dev/hdb (the Primary Slave IDE device) and want to partition the entire drive as a single partition. Launch fdisk with
# fdisk /dev/hdb
Use the n key to create a new partition, and fdisk prompts you for the beginning cylinder:
First Cylinder (1-9729, default 1) :
Press the Enter key to accept the default of 1. Now, fdisk prompts
Using the default value of 1
Last Cylinder or +size or +sixeM or +sizeK (2-9729, default 9729) :
Here, you can give the size in cylinders, the size in kilobytes, the size in megabytes, or accept the default value (which is the last cylinder on the disk). Press the Enter key to accept the default.
Using default value of 9729
And we are back at the fdisk prompt:
Command (m for help) :
Enter the w command to write the new partition table to the disk, and fdisk exits, returning you to the command prompt.
In the past, Red Hat used a partition editor during its installation process named Disk Druid; the underlying code for Disk Druid has been replaced by GNUparted (also known simply as parted, the name of the command itself). GNUparted is the GNU partition editor and a very powerful utility. You use parted to create, delete, move, resize, and copy ext2, ext3, and FAT32 partitions. Although GNUparted displays a GUI interface during the installation process, it really is a console utility. GNUparted can be used from the command line.
After you partition the disk for a specific file system, you can create the file system on it. In the DOS world, this two-part process is described by DOS as low-level formatting (creating the partitions and partition table) and formatting (creating the file system). In the UNIX world, the latter is known as creating a file system. In this section, you learn how to create a file system in Linux.
An unformatted disk storage device (a floppy disk, hard disk drive, or removable media) typically arrives to you with a low-level format, which has been done with a tool such as fdisk or superformat. Although the disk might have a boot block and partition information, it typically lacks the file structure needed for a file system.
Note
If you are preparing to create a file system on any device other than a floppy disk, examine it with fdisk or another utility of your choice and modify the partition table accordingly (following the instructions you saw in the preceding sections of this chapter).
To create the file system structure, you need to do what is sometimes referred to as a high-level format. For FAT file systems, this is accomplished by the format command. In Linux, you use the mke2fs -j command to create an ext3 file system.
Note
If you are creating a Reiser file system, use the mkreiserfs command. To create a DOS file system, use the mkdosfs command. Other commands for other file systems include
mkfs.bfs—. The SCO file system
mkfs.ext2—. The ext2 file system
mkfs.minix—. The minix file system
mkfs.msdos—. The MS-DOS file system
mkfs.vfat—. The FAT32 file system
The mke2fs command is used to create both the ext2 and the ext3 file systems. At its simplest, the command is used as
# mke2fs partition
such as
# mke2fs /dev/hdc4
Here are some of the most useful options for mke2fs:
-c—. This option checks for bad blocks during file system creation.-N—. This option overrides the default number of inodes created. (The default number is usually a good choice, but you might need to use this option to allow additional useable disk space.)-m—. This option frees up some space on the disk, but you do so at your peril. By default, the system allocates 5% of the blocks to the super-user—to be used in file recovery duringfsck. You can lower that allocation, but you might not leave enough blocks forfsckto recover enough files.-L—. This option gives the volume a label, which is useful if you need to be reminded what the file system is used for; it also provides some flexibility in identifying volumes in/etc/fstab.-S—. This option is a last-ditch effort for recovering a broken file system; it writes only the superblock and descriptors, leaving the information in the inodes unchanged. Always runfsckafter using this option.
As you can see, mke2fs offers a few options to make more space available for the regular users. But that extra space always comes from the super user’s space for recovering damaged files. The default settings accommodate most users, so think carefully before using one of these options. Hard disks are getting less expensive all the time, so adding another might be a better solution.
To make a new ext3 file system, you use the mke2fs command with the -j or -J option, or call the command as mkfs.ext3. Use the tune2fs command on an existing ext2 file system to add journaling. You learn how to convert an existing ext2 file system into an ext3 file system later in this chapter. Here, x represents a partition:
# tune2fs /dev/hdx -j
Some arguments you can use with this command include
-j—. This option adds anext3journal to the new file system using the default values. Note that you must be using a kernel that hasext3support to actually make use of the journal.-Jjournal-options—. This option overrides the defaultext3journal parameters so that you can choose the options you desire. The following journal options are comma separated and can take an argument using the=sign.size=journal-size—. This option creates a journal ofjournal-sizemegabytes. With a minimum size of 1,024 blocks, it cannot be more than 102,400 blocks. There must be enough free space in the file system to create a journal of that size.device=external-journal—. This option associates the file system with a journal not contained within the file system (one that must have already been created with the commandmke2fs -Ojournal_device journal_name); in other words, the journal and the data files do not have to be on the same device.
To select the ext3 journaling mode, you must add the appropriate entry in /etc/fstab.
Because the ext3 file system is a new version of the ext2 file system with journaling added, it supports the same options as ext2, as well as the following additions:
noload—. This option disables theext3file system’s journal when mounting; it becomes anext2file system.data=journal / data=ordered / data=writeback—. This option specifies the journaling mode;orderedis the default. Metadata is always journaled.journal—. The slowest, but most secure mode because all the data is written to the journal before it is written to the regular file system.ordered—. This is the default mode in which all data is written to the main file system prior to its metadata being committed to the journal.writeback—. With this option, data can be written into the main file system after its metadata has been committed to the journal. This option enables old data to appear in files after a crash and journal recovery, but it is the fastest option.
The Reiser file system journals file data and handles smaller files more efficiently than the ext3 file system. Although it is suitable for use as the root file system, Fedora Core does not officially support its use in that way. You use the mkreiserfs command to create a Reiser file system. The default values for mkreiserfs work well. To create a Reiser file system, use
# mkreiserfs device
It is possible to create DOS file systems without owning any Microsoft software using the mkdosfs command. To create a DOS file system in an image file, use the -C option. The -n option allows you to specify a volume label. To create a 1.4MB DOS file system as an image file with the label dosfloppy, the sector size (-S) should be 512 and the block count should be 1440. Use the -v option to provide verbose output so that we can observe what happens.
# mkdosfs -n dosfloppy -v -C floppy.img -S 512 1440
A complete review of all the argument options and syntax for creating a DOS file system can be found in the man page for mkdosfs. The new file system must be mounted (as described in the following section) and then formatted with the mformat command.
File systems in UNIX are very flexible in that they need not be physically present on your computer; you can have network access to other file systems on other machines. The Linux file system structure (the Virtual File System we spoke of at the beginning of the chapter) makes it appear as if all the file systems, regardless of type and location, are local and mounted somewhere on the root file system. As the system administrator, you decide what file systems are to be made available and where they will be attached, or mounted, to the root file system. The standard arrangement of the file system tree is that installed by default by Fedora. The source of that standard arrangement is found in the file system hierarchy standards. Although a detailed discussion of those standards is beyond the scope of this section, they can be examined at http://www.pathname.com/fhs/. In this section, you learn how to mount file systems to the root file system and add file systems to the system, and you learn the traditional mount points of commonly used file systems as well.
In Linux (and its UNIX cousins), all file systems—whether local, remote, images on a disk, or in memory—are mounted on a single point known as root (which is not the same as the root operator, also known as the super-user). This mount point is written as a forward slash, /, which is read and pronounced “root.” The resulting file directory hierarchy all starts from /. After they are mounted, the physical location of the files is unimportant because they all appear to be local.
Even if the file systems are different (FAT, ext2, HPFS, NTFS, and so on), the Linux kernel modules and the VFS make them all appear as part of the directory tree as native files. Listing the file systems as native files obviates the need for any applications to be aware of the physical location of the file or the true nature of the native file system. As a result, programming these applications is simplified because the applications have to work only with what they think are local, native files.
Any file system can be mounted anywhere, but some places are more traditional than others. Removable media devices are traditionally mounted under the /mnt directory (for example, floppy drives on /mnt/floppy and CD-ROM drives on /mnt/cdrom). The /mnt directory is the traditional place to mount removable or remote file systems that are unrelated to the local system directories that branch from the root mount point.
File systems are mounted with the mount command and unmounted, curiously enough, with the umount command.
During the installation, you have the opportunity to decide where and how your partitions will be mounted. You indicate your choices, and Fedora Core automatically stores them in /etc/fstab, the file system table, for you. The mount command looks at /etc/fstab and mounts the file system according to those set preferences. You learn more about the file system table later in this section.
The syntax for mount is
mount -t type file system_to_be mounted mount_point
Here are the components of the mount command, and a brief explanation of each:
type—. Always preceded by the-targument and followed by a space, and then the type of file system you are mounting. Typical file system types areext2,ext3,vfat,iso9660,hpfs,hfs,ntfs, and others. For many file systems,mountcan detect what type they are automatically, and the-targument is superfluous (and is replaced withauto).file system_to_be mounted(as represented by the partition on which it resides)—. This is the device name of the file system you want tomount, typically in the form of/dev/hdx,/dev/scx, or/dev/fdx.mount_point—. The place in the directory tree where you want to mount the file system. Curiously, you can mount a file system over part of an existing file system. For example, if you have an existing directory at/foowith a single file namedbar, and you mount a file system at/foothat includes a file namedsnafu, a listing of the directory/foowill not show the filebar, but only the filesnafu. To show both files is a feature called transparency, which unfortunately is not in the current Linux repertoire.
The only real restriction to “mount anything anywhere” is that the critical system files in /bin, /etc, /lib, /dev, /proc, and /tmp need to be accessed at bootup, which typically means that they need to be on the same physical disk. If they cannot be accessed at bootup, Linux will not load and run.
Here are a few examples of using the mount command:
Mounting a floppy:
# mount -t vfat /dev/fd0 /mnt/floppy
Mounting a CD-ROM:
# mount -t iso9660 /dev/scd0 /mnt/cdrom
Mounting a Network File System (NFS) volume:
# mount -t nfs remote_host:/dir [options] mount_point
Numerous mount options exist. These options are used primarily in the /etc/fstab file. You can invoke a mount option by preceding it (or a comma-delimited string of options) with the -o switch. The mount options are listed in the fstab section of this chapter.
To unmount a file system, use the umount command with the following syntax:
umount mount_point
You can also unmount by device name:
umount device_name
Caution
Do not use umount -a to unmount everything that the system does not require to run (or is not currently using). Unmounting everything is a particularly bad idea on a multiuser, networked system because your users will undoubtedly lose access to some or all their files. So, as any good sysadmin will tell you, do not do that.
A special file, /etc/fstab, exists to provide the system with predetermined options and mount points so that the file systems can be automatically or manually mounted with minimal typing and without having to recall arcane Linux syntax.
The /etc/fstab file can only be written to by the super-user. The commands fsck, mount, and umount all read information from /etc/fstab. Each file system gets its own line with the information separated by tabs.
On each line of fstab, the first field indicates the block device or remote file system that will be mounted. The second field identifies the mount point on the local system where the file system will be mounted. The third field is the file system type, and the fourth field is a comma-delimited list of mount options. Options include
exec—. If this option is specified, binaries can be executed from this file system.noauto—. This means that the-aoption will not cause the file system to be mounted and it will not be mounted at bootup.noexec—. If this option is specified, binaries cannot be executed from this file system.nosuid—. This option does not permitset-user-identifierorset-group-identifierbits to take effect.ro—. This option mounts the file system as read-only.sync—. Reading from and writing to the files are done synchronously.user—. This option allows a regular (not just root) user to mount the file system, but it includes the optionsnoexec,nosuid, andnodevby default unless they are overridden byexec,dev, andsuid.
For iso9660 file systems, the interesting option is unhide, which shows hidden and associated files.
The fstab man pages contain an in-depth description of fstab and its options.
The fifth field of /etc/fstab is used by dump (a traditional UNIX backup program) to determine whether the file system should be dumped (backed up); 1 is yes, and 0 is no. Default values are set for you during the initial installation. They are of concern only if you actually use dump; then you would set the value to 1 for the file systems you wanted to back up.
The sixth field is used by fsck to determine how fsck needs to interact the file system—0 means that fsck is never run on the file system (a FAT32 file system, for example); 1 means that fsck will be run on the drive at a predetermined time. 2 is recommended for nonroot file systems so that fsck is not run on them as frequently.
Here is a simple /etc/fstab file from a system with a RAID0 ext3 root partition and dual-booted with MS Windows:
LABEL=/12     /              ext3    defaults              1 1
none          /dev/pts       devpts  gid=5,mode=620        0 0
none          /proc          proc    defaults              0 0
none          /dev/shm       tmpfs   defaults              0 0
/dev/hda11    swap           swap    defaults              0 0
/dev/cdrom    /mnt/cdrom     iso9660 noauto,owner,kudzu,ro 0 0
/dev/fd0      /mnt/floppy    auto    noauto,owner,kudzu    0 0
/dev/hda1     /mnt/win_c     vfat    auto,quiet,exec       0 0
Notice the two entries marked with the kudzu option. This is the result of the actions of updfstab, which keeps fstab synchronized with the state of any removable devices on the system such as CD-ROMs, floppy drives, Zip and Jaz drives, LS-120 drives, and some digital cameras. The quiet option shown for the Windows partition will suppress error messages and is recommended if you use the Wine application.
Note
Device labels can be very useful. You can use the label in /etc/fstab, and if you have many devices, their labels might be easier for you to remember and track than would their device names. You can also shuffle around partitions without editing fstab, just by changing their labels. The e2label command is easier to remember than the analogous tune2fs command.
The command e2label can display or change the label of a device. (You also can change a device label with tune2fs -L.) For example, to change the label of /dev/hda4 to archives, use
# e2label /dev/hda4 archives
As mentioned earlier, you record mounting preferences in /etc/fstab during installation. You need to modify /etc/fstab only if you make changes to your mounts or desire to change the default settings to address the specific needs of your system.
As long as the super-user understands the syntax and options of the fstab file, she can edit the file with any text editor.
The usermount graphical file system management client is available for use with Fedora Core Linux. Although Fedora Core provides usermount as the default file system–mounting tool, it is not as feature-rich as KDiskFree, which is installed when you select the KDE desktop during installation.
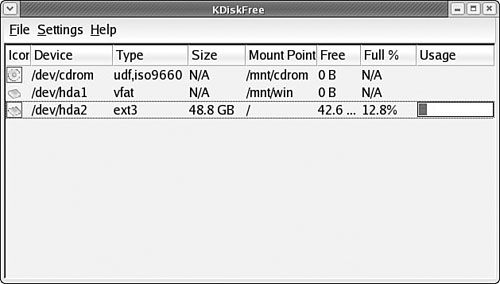
The K Desktop Environment (KDE) provides several disk- and file system–related utilities. You might find one or more available on your Fedora Core system if you select KDE for installation. Found in the Extras menu under System Tools, the KDiskFree menu item (it is kdf from a command line) displays all the file systems noted in the /etc/fstab file, presents information about them, and allows you to easily mount and unmount them (see Figure 39.1). KWikDisk enables mounts and unmounts from a panel applet.
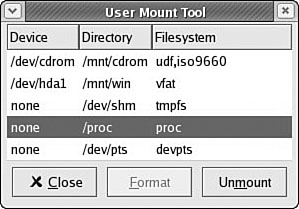
The User Mount Tool, accessed from the System Tools menu as the Disk Management menu item, is a convenient way to mount and unmount file systems (see Figure 39.2). It also allows you to format floppy disks.
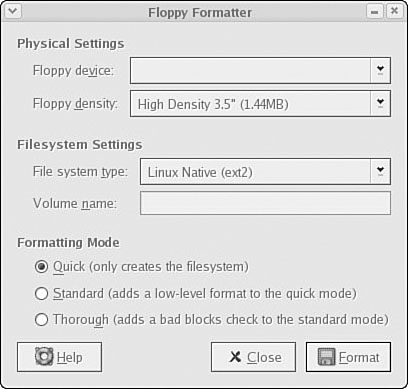
Floppy Formatter is a KDE tool used to easily format a floppy in ext2 or FAT format. You can start it by choosing System Tools, Floppy Formatter. Floppy Formatter can format floppy disks in 3.5″ and 5.25″ high- and low-density formats (see Figure 39.3).
Many home users start with a single disk partition that mounts not only the root file system files, but also all the other files. Although this might work quite well for most home users, there might come a time when the physical disk becomes full. Adding another drive and moving part of the file system there is not difficult, but it is the source of many questions from new Linux users. This section of the chapter explains how to do this kind of file system relocation.
In this example, we will install a new IDE hard drive to /dev/hdb (the primary slave drive), create a single partition on it, format it as an ext3 file system, and move all the user files located in /home to it. When done, we will make it mount, by default, at the /home mount point by editing the /etc/fstab file.
First, physically install the drive, making certain that the master/slave jumpers are set correctly to set the drive as a slave drive. Also be certain that the jumpers are set correctly on the existing master drive. (Some drives require a different jumper setting, depending on whether they are a single master drive or a master drive with a slave drive; others offer a “cable-select” option to automatically set the drive status.) Failing to ensure that the jumpers are set correctly is a common error made even by people who are familiar with computer hardware.
After you have installed the drive, it must be correctly detected by the BIOS. Many modern BIOSes have an autodetect feature, or you can manually enter the drive CHS information in the BIOS (found on the drive label or documentation).
Note
Linux can ignore the BIOS-provided CHS information and use information that you provide when loading the kernel, passing it as a kernel argument. Although this is a very powerful Linux option, it is now only used when working with obsolete BIOSes from more than three or four years ago and when you are attempting to use a hard drive that is larger than the BIOS was designed to address. In these cases, the CHS information helps the bootloader program know where the kernel is on the disk and helps the kernel understand how the data on the drive is organized, enabling Linux to make older hardware remain useful long after it has become obsolete. For more detailed information, you can look at the Large Disk HOWTO and the BootPrompt HOWTO if you have problems with drive geometry and the BIOS.
Most modern large drives use the LBA setting (Logical Block Addressing) to deal with the BIOS size limitations. If the drive is not detected, check the power connection, the IDE cable connection (the red stripe usually goes next to the power connector, but always double-check), and the master/slave jumpers. If all these are fine, you might have a bad drive, or the two hard drives might not be playing nice with each other (especially if they were made by different manufacturers).
To check further, reset the jumper of the new drive to make it the master drive, disconnect the old drive, and plug in the new one in its place. If the new drive is now correctly detected, suspect some incompatibility between the drives. Always make cable changes to the drives with the power off, or you will damage the drive.
Tip
If you were to examine the partition table with a hexadecimal editor, you would find only 10 bits in which to store the partition’s cylinder offset (an index to data on the disk); no disk can have any more than 1,024 cylinders.
One creative way to get around that limitation is to increase the number of heads so that the number of cylinders can remain small enough to fit the partition table. This scheme is known as Logical Block Addressing, or LBA. Modern BIOSes (post-1998 or so) support it, but older ones do not. But because Linux is capable of being told about the drive geometry at boot time, it is not as big a problem to Linux users as it is to users of other operating systems. For more detailed information, you can look at the Large Disk HOWTO and the BootPrompt HOWTO if you have problems with large hard disks.
After it is installed and recognized by the BIOS, a partition table needs to be created. Use fdisk (or the program of your choice) to create a single partition on the drive, remembering to write the changes to the MBR before you exit the program (refer to “Creating the Partition Table,” earlier in this chapter).
Formatting the drive is next. Because we are creating a new ext3 file system, we use the j option, as
# mke2fs -cj /dev/hdb1
Notice that we are checking the drive (using the -c option) for bad blocks as we format. Even though it adds considerable time to formatting the drive, an initial bad block check is always a good idea. The program will identify bad blocks and not use them; bad blocks would only corrupt our data if we didn’t mark the file system to ignore them.
For the example that follows, it is assumed that /home was a directory that was part of the partition mounted at /, not a separate partition to begin with.
Here, we create a temporary mount point and mount the new partition:
# mkdir /mnt/newpartition

# mount -t ext3 /dev/hdb1 /mnt/newpartition
It is now time to copy all the files from /home to /mnt/newpartition. It is important that we preserve the time and date stamps for the files and the permissions. We’re copying entire directories and subdirectories, so we use one of our three basic copying methods (tar, cpio, or cp) that best accommodates this:
# cp -a /home/* /mnt/newpartition
We need to modify /etc/fstab so that our new ext3 partition will be mounted correctly:
/dev/hdb1 /home ext3 defaults 1 2
Here, we have chosen to use the default mount options for the ext3 partition. The defaults are identical to those for the ext2 file system, as well as additionally selecting the default data=ordered journaling mode.
Anytime we reboot, the new partition containing the copied files will automatically be mounted at /home. But before we do that, cd to /home and enter this:
# touch thisistheoldhomepartition
Now we can mount the new partition:
# umount /mnt/newpartition

# mount /dev/hdb1 /home
Note that if you enter
# ls -al /home
you will not see the thisistheoldhomepartition file we created with the touch command. So, what happened to the old files? They are still there, but just hidden because we mounted a directory “over” them. When we are satisfied that all is well, we can unmount our newly created home partition and delete the files in the partition that contains the thisistheoldhomepartition file.
The previous example showed you how to add a new drive to overcome a lack of disk space. What if this could be done without all the mounting and file copying? That’s where logical volume management (LVM) is useful. Using LVM, disk space from multiple drives can be pooled into a single logical volume.
As with any new technology, there is a steep learning curve involved in using LVM, not the least of which is its vocabulary. Within this vocabulary, partitions are known as physical volumes, or pvs. We add pvs to a volume group that defines a logical volume on which we can create our file system.
On a heavily used system, the files being backed up can change during the backup, and the restored files might be in an unstable condition. LVM can also make snapshots of the logical volume that can then be mounted and backed up.
For more information on LVM under Linux, read the LVM HOWTO at http://tldp.org/HOWTO/LVM-HOWTO/, which explains the terminology and provides a guide to setting up and using LVM on a Linux system.
Different people have various learning styles. For those of you who prefer examples rather than lectures, here are a few practical examples in which you learn how to create a file system within a file and mount it using the loopback file system—a special file system that allows us to accomplish this useful feat. You can use the file system you create to experiment with and practice almost all the commands found in this chapter with no fear of damaging your system.
Because most of us do not have a spare computer or hard drive on which to experiment and practice, we can make one of our own by creating an image file containing the file system of our choice and using the loopback file system to mount it. That way, we do not run the risk of accidentally wreaking havoc on the system itself. Although you could also use a floppy drive for these same exercises, their small size limits your flexibility.
Use the dd command to create a file with a block size of 1,024 bytes (a megabyte) and create a file that is 10MB in size. (You need to have enough free space on your hard drive to hold a file this big, so adjust the size accordingly.) We want 10,000 1KB (1,024-byte) blocks, so we select a count of 10000.
If we wanted a floppy-sized image, we would have selected a block size (bs) of 512 and a count of 2880 for a 1.4MB floppy or 5760 for a 2.88MB floppy. Here’s how to do that:
# dd if=/dev/zero of=/tmp/fedoratest.img bs=1024 count=10000
We see the computer respond with the following:
10000+0 records in
10000+0 records out
If we check our new file command, we see this:
# file /tmp/fedoratest.img
/tmp/fedoratest.img: data
Now we need to make the system think that the file is a block device instead of an ASCII file, so we use losetup, a utility that associates loop devices with regular files or block devices; we will be using the loopback device, /dev/loop0.
# losetup /dev/loop0 /tmp/fedoratest.img
Now we can format the file as an ext2 file system:
# mke2fs /dev/loop0
We see the computer respond as follows:
mke2fs 1.27 (8-Mar-2003)
File System label=
OS type: Linux
Block size=1024 (log=0)
Fragment size=1024 (log=0)
2512 inodes, 10000 blocks
500 blocks (5.00%) reserved for the super user
First data block=1
2 block groups
8192 blocks per group, 8192 fragments per group
1256 inodes per group
Superblock backups stored on blocks:
    8193

Writing inode tables: done
Writing superblocks and file system accounting information: done

This file system will be automatically checked every 21 mounts or 180 days,
whichever comes first. Use tune2fs -c or -i to override.
After your test file system has been created, you can experiment with the different options for the formatting commands you will be using. It will be useful to make a mount point for our image file
# mkdir /mnt/image
# mount /dev/loop0 /mnt/image
We can do this now because we already have the loopback file system associated with the image file. Later on if we remount it, we must use the following format to use the loopback option:
# mount -o loop /tmp/fedoratest.img /mnt/image
After mounting the new file system, we can look at it and see that the /lost+found directory has been created on it and that the df command returns
# df -h /mnt/image
File System      Size Used Avail Use% Mounted on /dev/loop0
9.5M 13k 8.9M    1% /mnt/image
To unmount it, use this:
# umount /mnt/image
Make a backup of the image just in case we break the original:
# cp /tmp/fedoratest.img fedoratest.bak
After the test file system is created, you can create directories, copy files to it, delete files, attempt to recover them, and, in general, create controlled chaos on your computer while you are learning and practicing valuable skills. If you damage the file system on the image beyond repair, unmount it, delete it, and create a new one (or copy a new one from that backup).
Remember that to do almost any kind of file system manipulation (formatting, checking, and so on), you should unmount the file system; by doing so, you avoid having any writes made to the file system, which would corrupt it.
How do you remount partitions on a running system? For example, to remount the /home partition (assuming that it is on a separate physical partition from root) as read-only to run fsck on it and then remount it as read-write, use the remount option for mount:
# mount -o ro,remount /home
Note
Remounting will not work if a normal user is logged in because /home will be busy (in use). You might need to switch to runlevel 1 (init 1), which is single-user mode, to remount /home.
Now we can run fsck on the partition. When done,
# mount -o rw,remount /home
puts it back in service.
If you reboot your system to mount the root file system read-only for maintenance (enter the maintenance mode, s, as described in Chapter 15)
# mount -o rw,remount /
will remount it read-write and you can continue on. That’s easier than unmounting and remounting the device.
An existing ext2 file system is easily converted to ext3 to take advantage of the benefits of journaling. After you convert an existing file system, any other operating system—including BeOS, Windows (with the appropriate drivers), and other UNIX systems that have drivers to access ext2 partitions—can access ext3 partitions. To those operating systems (and their drivers), your converted file system still looks just like an ext2 file system.
To begin the conversion to ext3, you use the tune2fs utility to add the journal to an existing ext2 file system. In this example, you are changing /dev/hda2, an already formatted ext2 partition.
# tune2fs -j /dev/hda2
It does not matter whether hda2 is mounted or unmounted at the time of the migration; if it is mounted, you will see a new file, .journal, in the directory.
Next, edit the line for /dev/hda2 in /etc/fstab and change the value from ext2 to ext3. It will be mounted as an ext3 file system the next time you reboot.
Note
If you have decided to convert your root file system to take advantage of the benefits of the ext3 file system, bear in mind that you cannot run tune2fs -j on it while it is unmounted because you cannot unmount the root file system. Because the file system is mounted when you run tune2fs -j, the .journal file on it will be visible when you finish the migration.
When compiling a new kernel, make certain to include ext3 file system support in your new kernel by selecting that choice in your kernel configuration (see Chapter 39, “Kernel and Module Management”). Also, note that you do not need to perform the actions described in the next section if you have just freshly installed.
You need to create an initrd image file to load the ext3 driver and mount the root partition as an ext3 partition. The initrd file is an initial ramdisk that contains a small kernel and enough of the Linux OS to load drivers so that the real kernel and the rest of the operating system can load.
Note
If you forget to create the initrd file, your system will still boot, but it will mount the root partition as ext2. That’s very clever—none of the other journaling file systems are as forgiving.
To create the file, run the mkinitrd utility before you reboot.
# mkinitrd /boot/initrd-2.6.7-1.478.img 2.6-7-1.478
The first argument is the name of the initrd file that will be placed in the /boot directory. The name can be anything; the name shown here follows the usual naming convention; you can find a number of other naming options in the mkinitrd man page. The second argument after the mkinitrd command is the version of the kernel you want to use. The value you enter here does not have to be the version you are currently using, but it must match the version you use when you boot (and the kernel must support ext3).
After you run the utility, edit /boot/grub.conf or /etc/lilo.conf to change the initrd loaded at boot time. For GRUB, add this same line beneath the kernel line in the section that references your kernel:
initrd (hd0,0)/boot/initrd-2.6.7-1.478.img
If you use LILO, add the following line to the appropriate LILO stanza:
initrd=/boot/initrd-2.6.7-1.478.img
The initrd.img file is automatically created during the installation process (if necessary) or with the mkinitrd command. You never need to examine it, but if you are curious about what’s in the initrd.img file, just take a look: It is really just a gzipped ext2 file system. To examine it, first copy it to the /tmp directory and add the .gz suffix to it:
# cp /boot/initrd-2.6.7-1.478.img /tmp/initrd-2.6.7-1.478.img.gz
If your system does not have an initrd.img file in /boot, mount your boot floppy and see if it has one. Next, uncompress it as follows:
# gunzip /tmp/initrd-2.6.7-1.478.img.gz
# mount -o loop /tmp/initrd-2.6.7-1.478.img /mnt/image
and browse the directory to your heart’s content.
Not every system will have an initrd.img file. It is typically used to load device drivers for file systems (such as Reiser) or hardware (such as the Promise RAID IDE controller) that must be in place before the system can continue booting. Some floppy-disc–based Linux distributions use initrd.img to load a minimal operating system that can then uncompress and load the working file system from the floppy.
You can also mount .iso images in the same way, but remember that they are always read-only because of the nature of the underlying iso9660 file system; you can write to the other images unless you explicitly mount them as read-only. If you want to read and write to the files in an ISO file system, you must first copy the files to a device that is mounted read-write, make your changes, and then use mkisofs to create a new .iso image. This is a common “gotcha” for many users.
For UNIX and Linux, everything is a file. In this section, you learn about special types of files found in Linux that represent all the devices found on your system and handle all the input and output on your system. You also learn how to identify and create them.
If you have installed the kernel documentation, it will contain a text file named /usr/src/linux-2.6/Documentation/devices.txt, an excerpt of which reads
3 char Pseudo-TTY slaves
    0 = /dev/ttyp0      First PTY slave
    1 = /dev/ttyp1      Second PTY slave
     ...
  255 = /dev/ttyef 256th PTY slave

  These are the old-style (BSD) PTY devices; Unix98
  devices are on major 136 and above.

 block  First MFM, RLL and IDE hard disk/CD-ROM interface
      0 = /dev/hda       Master: whole disk (or CD-ROM)
      64 = /dev/hdb      Slave: whole disk (or CD-ROM)

   For partitions, add to the whole disk device number:
     0 = /dev/hd? Whole disk
     1 = /dev/hd?1 First partition
     2 = /dev/hd?2 Second partition
     ...
    63 = /dev/hd?63 63rd partition
    For Linux/i386, partitions 1-4 are the primary
    partitions, and 5 and above are logical partitions.
    Other versions of Linux use partitioning schemes
    appropriate to their respective architectures.
The number 3 at the upper left of the preceding listing represents the major number that identifies a class of device. In this case, major 3 identifies both character devices (pseudo-TTY slaves) and block devices (IDE drives). The columns of numbers that follow under the device types are called the minor numbers; any device can be identified uniquely by its major and minor number. Linux uses these numbers internally; you usually see the name of the device as it is listed in the /dev directory. The major/minor numbers do show up in kernel error messages from time to time, and understanding the numbers helps you debug the problem. As you will see in the next section, the mknod command needs to be told those numbers in order to create a device. Take some time to browse the entire file because it contains some interesting information that provides answers to many frequently asked questions.
The /dev directory contains all the special files known as device files. The files are placed in /dev during the original installation, and you can also create device files to go there if you need them.
During the normal operation of Linux, you never need to bother with the files in /dev, but if you want to look at all the files in /dev, use this command:
# ls -l --sort=none /dev | less
The --sort=none argument keeps the devices mostly grouped by major numbers for your viewing convenience; redirecting the output of the command (known as piping) through the less command allows you to use the PageUp and PageDown keys to navigate the long list rather than have it scroll off the screen. There are too many devices to list here, but they will all be either block or character devices.
A character device is a file that handles data one character at a time and processes data sequentially. Examples include TTY (display console) devices, SCSI tape drives, the keyboard, audio devices, the Coda network file system, among others.
Block devices are files that have a beginning, an end, and a fixed size; data can be written and read from anywhere inside them in any order. Because a block device can be much larger than the data it contains, utilities such as tar and cpio work with the files’ data rather than the size, so they can store and retrieve the data directly off the block device rather than require a formatted file on a block device. (You can see how those commands are used in Chapter 17.) This works especially well with tape devices because they are character devices rather than block devices and are not formatted in the way that block devices are formatted.
Special devices are block or character devices established for a special purpose. Two special devices of interest are
/dev/null—. This is the null device, also called the bit bucket. Any output written to it is discarded. It is useful to redirect messages to it when you do not want them displayed on the standard output or written to a file. For example,$ ls 2> /dev/null
displays the file listing to the screen, but does not display any error messages even though the
lscommand might generate one; we redirected the standard error messages (2>) to/dev/null. Almost all commands generate messages to the standard output and standard error when run, and sometimes, as when running a script, it is useful to not see the messages./dev/zero—. This device has an inexhaustible supply of zeros; use all you want—it makes more. It is very useful for writing strings of zeros to a device or file, such as when preparing an image of a file system (perhaps to be copied onto compact flash or other media).
The traditional naming system for block and character devices has been in use for a while. In /usr/src/linux-2.6/Documentation/devices.txt, the device name for the first partition of the first IDE disk would be /dev/hda1. If it were a SCSI disk, it would be /dev/sda1 (shown elsewhere in the devices.txt file).
All device names are included in devices.txt, and all the devices that have been created on your system are listed in the /dev directory. That directory also can hold links; for example, /dev/cdrom can actually be a link back to the actual device that is your CD-ROM (perhaps /dev/hdc? or /dev/scd0?). /dev/mouse and /dev/modem are commonly used symbolic links in the /dev directory.
If you need a device file in /dev that’s not already there for some reason, you can create the special file with the mknod command. You might have noticed that /dev lists devices that you do not have. That’s because the device’s listing must appear in /dev before the system can use the actual device; if you install the hardware at some point in the future, the system will not create the device files on-the-fly. So, if you’re preparing to install a device, and you check /dev but find that it does not contain the device’s file, you can create the file with mknod.
Creating files with mknod is a straightforward process as long as you know what type of device you are creating the file for and what the device’s major and minor numbers are.
The syntax of mknod is
# mknod [OPTION]..NAME TYPE[MAJOR MINOR]
The useful option -m allows you to set the mode at file creation instead of doing it separately with the chmod command.
You can obtain the values for NAME, TYPE, MAJOR, and MINOR from devices.txt, which even has a block of experimental numbers if you are inclined to experiment.
http://www.ibiblio.org/pub/Linux/docs/HOWTO/other-formats/html_single/FileSystems-HOWTO.html—In the File Systems HOWTO, you’ll find extensive information on native Linux file systems, as well as more exotic file systems.
http://www.ibiblio.org/pub/Linux/docs/HOWTO/other-formats/html_single/Partition.html—A great deal of detailed information is contained in the Linux Partition HOWTO on partitions and their requirements.
http://batleth.sapienti-sat.org/projects/FAQs/ext3-faq.html—The Linux ext3 FAQ is an unofficial FAQ with some useful info, especially for converting an ext3 partition back to ext2.
http://www.ibiblio.org/pub/Linux/docs/HOWTO/other-formats/html_single/Ext2fs-Undeletion.html—You deleted a file on your ext2/3 partition? The Linux Ext2fs Undeletion mini HOWTO is there to help you out.
http://www.ibiblio.org/pub/Linux/docs/HOWTO/other-formats/html_single/Ext2fs-Undeletion-Dir-Struct.html—You deleted a directory on your ext2/3 partition? Read the Ext2fs Undeletion of Directory Structures HOWTO to see how to rescue your data.
http://www.ibiblio.org/pub/Linux/docs/HOWTO/other-formats/html_single/Loopback-Root-FS.html—Here’s the concept: Not only can we have a traditional file system, but also we can have a file system inside a large file located on some other file system. The Loopback Root File System HOWTO examines how this is done.
http://www.ibiblio.org/pub/Linux/docs/HOWTO/other-formats/html_single/Loopback-Encrypted-FileSystem-HOWTO.html—You can use the loopback device to mount an encrypted file system, for example /home, for security reasons.
http://www.ibiblio.org/pub/Linux/docs/HOWTO/other-formats/html_single/LVM-HOWTO.html—Throw away those concepts that marry physical disks to finite-sized file systems; the Logical Volume Manager HOWTO explains how to overcome that kind of restrictive thinking.
http://linux.org.mt/article/lvm—A good overview and discussion of logical volume managers.
http://www.coda.cs.cmu.edu/—The Coda network file system home page.
http://www.inter-mezzo.org/—The InterMezzo network file system home page.
http://www.math.ualberta.ca/imaging/snfs/—Secure NFS via an SSH Tunnel is a very interesting attempt to address a security shortcoming of NFS over a public network.
http://www.ibiblio.org/pub/Linux/docs/HOWTO/other-formats/html_single/UMSDOS-HOWTO.html—If you are interested in using the umsdos file system, the UMSDOS HOWTO provides ample information to you.
http://www.ibiblio.org/pub/Linux/docs/HOWTO/other-formats/html_single/NFS-Root.html—The NFS-Root mini HOWTO.
http://www.ibiblio.org/pub/Linux/docs/HOWTO/other-formats/html_single/NFS-Root-Client-mini-HOWTO.html—Explains in detail how to set up and use NFS for exporting root file systems.
http://www.ibiblio.org/pub/Linux/docs/HOWTO/other-formats/html_single/Multi-Disk-HOWTO.html—The Multi Disk System Tuning HOWTO contains explanations of the drive and controller hardware that are useful, as well as discussion of file systems. It offers an interesting section on optimizing multidisk setups.
http://www.ibiblio.org/pub/Linux/docs/HOWTO/other-formats/html_single/Software-RAID-HOWTO.html—The Software-RAID HOWTO is an excellent tour de force of software RAID.
http://www.ibiblio.org/pub/Linux/docs/HOWTO/other-formats/html_single/Tips-HOWTO.html—The Linux Tips HOWTO provides some useful tips that make it worth the time to read because it addresses some file system problems such as “Is there enough free space?” and “How do I move directories between file systems?”
http://www.ibiblio.org/pub/Linux/docs/HOWTO/other-formats/html_single/Large-Disk-HOWTO.html—Still unsure about drive geometry, the limits to LILO and GRUB, and those very large disks? The Large Disk HOWTO goes into useful detail about that. It also tells you how to handle disks that use disk managers such as OnTrack and EZ_Drive.
http://www.ibiblio.org/pub/Linux/docs/HOWTO/other-formats/html_single/BootPrompt-HOWTO.html—The BootPrompt HOWTO informs you of boot time arguments that can be passed to the kernel to deal with misbehaving hardware, configure non-PNP devices, and so on. For this chapter, section 7, “Hard Disks,” is most useful.
http://www.namesys.com/—Details about the improvements in reiserfs and the release of Reiser4 (see http://www.namesys.com/v4/v4.html).
http://www.linux-usb.org/USB-guide/x498.html—The USB Guide for mass storage and other USB devices. If you have a USB device and need to know if it is supported and how to access it, check here. (Tip: USB storage devices are emulated as SCSI devices.)