
Over a very short space of time, digital cameras and digital imagery have suddenly become extremely popular, to the point where some traditional film camera manufacturers are switching solely to digital. This meteoric rise has led to an increase in the number of applications that can handle digital imagery. Linux, thanks to its rapid pace of development, is now highly regarded as a multimedia platform of choice when editing digital images. Did you know that CGI effects for the film The Lord of the Rings were produced using Linux workstations and hundreds of Linux servers, all running Fedora?
This section of the chapter discusses The GIMP, a powerful graphics manipulation tool. (You learned about the other graphics tools that Fedora provides in Chapter 10, “Multimedia Applications.”) You also learn about graphic file formats supported by Fedora, as well as some tools you can use to convert them if the application you want to use requires a different format.
One of the best graphics clients available is The GIMP. The GIMP is a free, GPLed image editor with sophisticated capabilities that can import and export more than 30 different graphics formats, including files created with Adobe Photoshop. It is often compared with Photoshop, and The GIMP represents one of the GNU Project’s first significant successes. Many images in Linux were prepared with The GIMP.
The GIMP can be found under the Applications, Graphics menu or can be started by using the command line, like this:
$ gimp &
You see an installation dialog box when The GIMP is started for the first time, and then a series of dialog boxes that display information regarding the creation and contents of a local GIMP directory. This directory can contain personal settings, preferences, external application resource files, temporary files, and symbolic links to external software tools used by the editor.
After the initial configuration has finished, The GIMP’s main windows and toolboxes appear. The GIMP’s main window contains tools used for selecting, drawing, moving, view enlarging or reducing, airbrushing, painting, smudging, copying, filling, and selecting color. Depending on the version installed on your system, the toolbox can host more than 25 different tools.
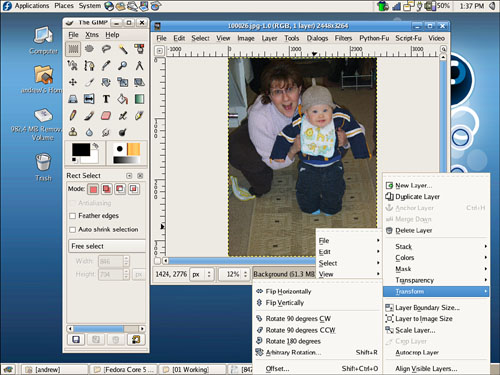
The toolbox’s File, Xtns, and Help menus are used for file operations (including the capability to send the current image by electronic mail), image acquisition or manipulation, and documentation, respectively. If you right-click an open image window, you see the wealth of The GIMP’s menus, as shown in Figure 11.1.
Most digital cameras used in connection with Fedora fall into one of two categories: webcams (small, low-resolution cameras connected to the computer’s interface) or handheld digital cameras that record image data on disks or memory cards for downloading and viewing on a PC. Fedora supports both types. Other types of cameras, such as surveillance cameras that connect directly to a network via wire or wireless connections, need no special support (other than a network connection and viewing software) to be used with a Linux computer.
Fedora supports hundreds of different digital cameras, from early parallel-port (CPiA chipset-based) cameras to today’s newer USB-based cameras. You can even use Intel’s QX3 USB microscope with Fedora. If you prefer a standalone network-based webcam, explore the capabilities of Linux-based cameras from Axis (at http://www.axis.com/products/video/camera/productguide.htm). The following sections describe some of the more commonly used still camera hardware and software supported by Fedora.
Webcams are typically small, low-resolution cameras connected to your computer via a parallel port or USB port. The camera can act in two modes: streaming (for a series of images of a moving object) and grabbing (for a single still image). The most common uses for webcams include videoconferencing and web voyeurism. The latter is not as lurid as it might sound, although some webcam sites are notorious for their pornographic content. Webcams can be used to send almost-live images to an online correspondent; many people include screen grabs of themselves at their computer workstations just because they can.
You can use any of the video applications that can access a video4linux device to view webcam or still camera images in Fedora. You also can use GnomeMeeting (discussed in Chapter 8, “On the Internet: Surfing the Web, Writing Email, and Reading the News”) as a viewer for your webcam.
Not all webcams are supported in Linux and the drivers are based on the chipset used, rather than the model or manufacturer. Some of the files in /usr/src/linux-2.6/Documentation/usb contain information about USB webcams and drivers supported by Fedora, including
ibmcam.txtov511.txtphillips.txtse401.txtstv0608.txt
Documentation on parallel port cameras, including the CQ cam (Cqcam.txt) and CPiA camera (README.cpia), is found in /usr/src/linux-2.6/Documentation/video4linux/ if you have installed the kernel documentation on your computer.
Tip
Unfortunately, most of the documentation provided for webcams is abysmal, and it is difficult to associate the webcam you just purchased with a related driver. If you are interested in a particular USB webcam, but are not sure whether it is supported by Linux, browse to http://www.qbik.ch/usb/devices/showdevcat.php?id=9.
Digital cameras are one of the major success stories of the last few years. Now you can take pictures and see previews of your pictures immediately. The pictures themselves are stored on discs or memory cards that can be easily plugged into Fedora for further manipulation using The GIMP or other software. Unfortunately, most of the supplied software that comes with the cameras tend to be for Windows users only, making you reliant on the packages supplied with Fedora.
Thankfully, due to the good development carried out in Fedora and GNOME, you are now able to plug pretty much any camera into your computer using a USB interface and Fedora automatically recognizes the camera as a USB mass storage device. You can even set Fedora to recognize when a camera is plugged in so that it automatically imports your photographs for you.
To do this, you need to set up your settings for removable drives and media. You can find this in the System, Preferences menu. Click the Cameras tab and select the option to import digital photographs when connected (see Figure 11.2).

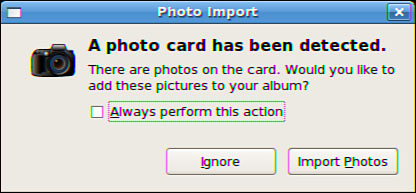
Now whenever you connect a digital camera to your computer GNOME automatically detects it (see Figure 11.3), and asks whether you want to import the photographs.
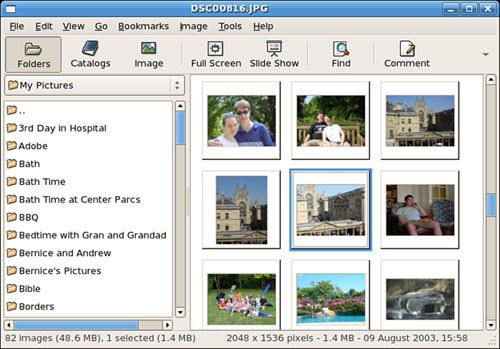
By default GNOME uses the excellent gThumb package (see Figure 11.4), which, although basic-looking, offers an easy-to-use interface and powerful cataloging capabilities.
With the inclusion of Mono into Fedora Extras, Fedora now has access to the superb F-Spot photo management application. However, F-Spot is not installed by default, so you have to do a quick install by using the command
# yum install f-spot
which retrieves the F-Spot program and the other required components.
When F-Spot is installed, you can find it under the Applications, Graphics menu listed as F-Spot Photo Manager. If you have used the popular Google Picasa application, you will feel instantly at home with F-Spot because it is similar in many ways.
The first time you open F-Spot, you are asked to import your first batch of photographs as shown in Figure 11.5. You can also assign a tag to them, if you want to track particular types of photographs. You might want to allow F-Spot to copy the photograph to a new directory, Photos—something that helps you organize your photos on the system.

When you are ready, click Import to let F-Spot import the photos into the library. The pictures appear in the F-Spot library, and are stored according to the date they were taken. This information is given to F-Spot by the EXIF information that your camera stores each time you take a picture. In Figure 11.6, you can see the standard F-Spot window.

You browse through your photographs using the timeline across the top of the window and you can do some minor editing by double-clicking on any photograph. F-Spot is still in its infancy, but development is ongoing, so keep a eye open for any major updates.
With the rise of digital photography, there has been an equal decline in the need for image scanners. However, there are still times that you want to use a scanner; thankfully, Fedora makes it easy.
You can also use many types of image scanners with The GIMP. In the past, the most capable scanners required a SCSI port. Today, however, most scanners work through a USB port. You must have scanner support enabled for Linux (usually through a loaded kernel module, scanner.o) before using a scanner with The GIMP.
Although some scanners can work via the command line, you will enjoy more productive scanning sessions using a graphical interface because image manipulation tasks, such as previewing and cropping, can save time before actually scanning an image. Most scanners in use with Linux use the Scanner Access Now Easy (SANE) package that supports and enables graphical scanning sessions.
SANE consists of two software components. A low-level driver enables the hardware support and is specific to each scanner. Next, a graphical scanner interface X client known as xsane is used as a plug-in or ancillary program (or script) that adds features to The GIMP.
Note
Although xsane is commonly used as a GIMP plug-in, it can also be used as a standalone program. Another useful program is Joerg Schulenburg’s gocr client, used for optical character recognition (OCR). Although not a standalone application, it is included in the Kooka scanning application. This program works best with 300 dots per inch (dpi) scans in several different graphics formats. OCR is a resource-intensive task and can require hundreds of megabytes of disk storage!
A list of currently supported scanners can be found at http://www.sane-project.org/sane-supported-devices.html. Unfortunately, if your scanner doesn’t appear on the list, you should not expect it to work with the SANE software. There is also a list on that same page for drivers not yet included, but you must be able to compile the application from source to use them.
Supported USB scanners are automatically detected and the appropriate driver is loaded automatically. The USB devices tell the USB system several pieces of information when they are connected—the most important of which are the vendor ID and the device ID. This identification is used to look up the device in a table and load the appropriate driver.
Many scanners are supported in Linux. If yours is not, it still might be possible to use it. The Kooka and xsane scanner applications are included with Fedora and are fairly straightforward to use. They can both be found in the Graphics menu as the Scanning and Scan & OCR Program menu items.
Image file formats are developed to serve a specific technical purpose (lossless compression, for example, where the file size is reduced without sacrificing image quality) or to meet a need for a proprietary format for competitive reasons. Many file formats are covered by one or more patents. For example, the GIF format has fallen into disfavor with the open-source crowd because the patent holder has only recently decided to begin enforcing his patent rights.
If you want to view or manipulate an image, you need to identify the file format to choose the right tool for working with the image. The file’s extension is your first indicator of the file’s format. The graphics image formats supported by the applications included with Red Hat include
.bmp—. Bitmapped graphics, commonly used in Microsoft Windows.cgm—. Computer graphics metafile.g3—. CCITT Group 3 FAX image.gif—. CompuServe graphics interchange format.ico—. Microsoft Windows icon image.jpg—. Joint Photographic Experts Group.mng—. Multiple-image network graphic image.pbm—. Portable bitmap file format.pcx—. IBM Paintbrush.pgm—. Portable graymap file format.png—. Portable network graphics.pnm—. Portable anymap.ppm—. Portable pixmap file format.rgb—. Raw red, green, and blue samples.rs—. Sun raster image.svg—. Scalable vector graphics.tif—. Tagged image file format.xbm—. X bitmap image.xpm—. X Pixmap image, commonly used for Linux icon images
An extensive list of image file extensions can be found in the man page for ImageMagick, an excellent application included with Fedora, which you learn more about in upcoming sections of this chapter.
Tip
Fedora includes dozens of graphics conversion programs, and there are few, if any, graphics file formats that cannot be manipulated when using Linux. These commands can be used in Perl scripts, shell scripts, or command-line pipes to support many types of complex format conversion and image manipulation tasks. See the man pages for the ppm, pbm, pnm, and pgm families of commands. Also see the man page for the convert command, which is part of a suite of extremely capable programs included with the ImageMagick suite.
Often, a file you want to manipulate in some way is in a format that cannot be used by either your graphics application or the final application. The solution is to convert the image file—sometimes through several formats. The convert utility from ImageMagick is useful as is the netpbm family of utilities. If it is not already installed, ImageMagick can be installed with the Add Remove Software GUI found in the System Settings menu; the netpbm tools are always installed by default.
The convert utility converts between image formats recognized by ImageMagick. Color depth and size also can be manipulated during the conversion process. You can use ImageMagick to append images, surround them with borders, labels, rotate and shade them, and perform other manipulations well-suited to scripting. Commands associated with ImageMagick include display, animate, identify, and import. The application supports more than 130 different image formats—all listed in the man page for ImageMagick.
The netpbm tools are installed by default because they compose the underpinnings of graphics format manipulation. The man page for each image format lists related conversion utilities; the number of those utilities gives you some indication of the way that format is used and shows how one is built on another:
The man page for
ppm, the portable pixmap file format, lists 47 conversion utilities related toppm. This makes sense becauseppm, or portable pixmap, is considered the lowest common denominator for color image files. Because of this, it is often used as an intermediate format.The man page for
pgm, the portable graymap file format, lists 22 conversion utilities. This makes sense becausepgmis the lowest common denominator for grayscale image files.The man page for
pnm, the portable anymap file format, lists 31 conversion utilities related to it. However, there is no format associated withpnmbecause it operates in concert withppm,pgm, andpbm.An examination of the man page for
pbm, the portable bitmap file format, reveals no conversion utilities. It’s a monochrome format and serves as the foundation of the other related formats.
You can use graphics manipulation tools to capture images that are displayed on your computer screen. Although this technique was used for the production of this book, it has broader uses; there is truth to the cliché that a picture is worth a thousand words. Sometimes it is easier to show an example than it is to describe it.
A captured screen image (also called a screen grab or a screenshot) can be used to illustrate an error in the display of an application (a font problem, for example) or an error dialog that is too complex to copy down by hand. You might just want to share an image of your beautifully crafted custom desktop configuration with your friends or illustrate your written documents. In this section, you learn how to capture screen images for these and other purposes.
When using the GNOME desktop, you can take advantage of the built-in screenshot mechanism (gnome-panel-screenshot). Access this tool by pressing the Print Screen key. (Alt+Print Screen takes a screenshot of only the window that has focus on a desktop.) Captured images are saved in .png format.
You also can capture screen images from a remote computer using tools supported by Fedora. The import command (one of ImageMagick’s commands) was used to take the screenshots for this book; for example, using a local computer and a remote computer on a LAN.
First, we ran $ xhost + on the remote computer to allow another computer access to the X server on the remote machine; the command to take the screenshot is run on our local machine like this:
$ import -window root -display 192.168.2.4:0 12fig07.jpg
This utility made a difficult task easy because the publisher required the screenshots be done from an 800×600 screen (too small to comfortably work in) to accommodate its printing and production equipment.
We could also have used the classic UNIX tool xwd to take screenshots. The command would have looked similar to that of import:
$ xwd -root -display 192.168.2.4:0 -out 12fig07.jpg
Although the screenshots could have been taken with The GIMP and saved in the appropriate format, we would have had to run The GIMP on that computer and navigate the menus every time we captured an image—the remote option of import was very convenient.
We did not use Ksnapshot (not included in the menus, but available from the command line) because it does not support the .pcx format the publisher used to use and it must be run locally. However, it can take screenshots easily and is our preferred tool for use on a single machine.
http://www.gimp.org—Home page of The GIMP (GNU Image Manipulation Program).
http://www.gnome.org/projects/f-spot/—Home page of the F-Spot project.
http://www.linuxformat.co.uk—Website of Linux Format, home of a long-running GIMP tutorial by Michael J Hammel.
http://www.exif.org—More information on EXIF and how it is used in digital cameras.
http://www.sane-project.org—Home page of the SANE (Scanner Access Now Easy) project.
http://www.imagemagick.org—Home page for ImageMagick.
http://www.codeweavers.com—Home of the popular crossover office; required if you want to try to run Photoshop under Linux.
http://gimp.net/tutorials/—Official tutorials for The GIMP.