
This chapter is an introduction to MySQL and PostgreSQL, two database systems that are included with Fedora. You’ll learn what these systems do, how the two programs compare, and how to consider their advantages and disadvantages. This information can help you choose and deploy which one to use for your organization’s database needs.
The database administrator (DBA) for an organization has several responsibilities, which vary according to the size and operations of the organization, supporting staff, and so on. Depending on the particular organization’s structure, if you are the organization’s DBA, your responsibilities might include the following:
Installing and maintaining database servers—. You might install and maintain the database software. Maintenance can involve installing patches as well as upgrading the software at the appropriate times. As DBA, you might need to have root access to your system and know how to manage software (refer to Chapter 7, “Managing Software”). You also need to be aware of kernel, file system, and other security issues.
Installing and maintaining database clients—. The database client is the program used to access the database (you’ll learn more about that later in this chapter, in the section “Database Clients”), either locally or remotely over a network. Your responsibilities might include installing and maintaining these client programs on users’ systems. This chapter discusses how to install and work with the clients from both the Linux command line and through its graphical interface database tools.
Managing accounts and users—. Account and user management include adding and deleting users from the database, assigning and administering passwords, and so on. In this chapter, you will learn how to grant and revoke user privileges and passwords for MySQL and PostgreSQL while using Fedora.
Ensuring database security—. To ensure database security, you need to be concerned with things such as access control, which ensures that only authorized people can access the database, and permissions, which ensure that people who can access the database cannot do things they should not do. In this chapter, you will learn how to manage Secure Shell (SSH), web, and local GUI client access to the database. Planning and overseeing the regular backup of an organization’s database and restoring data from those backups are other critical components of securing the database.
Ensuring data integrity—. Of all the information stored on a server’s hard disk storage, chances are the information in the database is the most critical. Ensuring data integrity involves planning for multiple-user access and ensuring that changes are not lost or duplicated when more than one user is making changes to the database at the same time.
Database services under Linux that use the software discussed in this chapter are based on a client/server model. Database clients are often used to input data and to query or display query results from the server. You can use the command line or a graphical client to access a running server. Databases generally come in two forms: flat-file and relational. A flat-file database can be as simple as a text file with a space, tab, or some other character delimiting different parts of the information. One example of a simple flat file database is the Fedora /etc/passwd file. Another example could be a simple address book that might look something like this:
Doe~John~505 Some Street~Anytown~NY~12345~555-555-1212
You can use standard UNIX tools such as grep, awk, and perl to search for and extract information from this primitive database. Although this might work well for a small database such as an address book that only one person uses, flat-file databases of this type have several limitations:
They do not scale well—. Flat-file databases cannot perform random access on data. They can perform only sequential access. This means they have to scan each line in the file, one by one, to look for specific information. As the size of the database grows, access times increase and performance decreases.
Flat file databases are unsuitable for multiuser environments—. Depending on how the database is set up, it either enables only one user to access it at a time or allows two users to make changes simultaneously, and the changes could end up overwriting each other and cause data loss.
These limitations obviously make the flat-file database unsuitable for any kind of serious work in even a small business—much less in an enterprise environment. Relational databases, or relational database management systems (RDBMSs) to give them their full name, are good at finding the relationships between individual pieces of data. An RDBMS stores data in tables with fields much like those in spreadsheets, making the data searchable and sortable. RDBMSs are the focus of this chapter.
Oracle, DB2, Microsoft SQL Server, and the freely available PostgreSQL and MySQL are all examples of RDBMSs. The following sections discuss how relational databases work and provide a closer look at some of the basic processes involved in administering and using databases. You will also learn about SQL, the standard language used to store, retrieve, and manipulate database data.
An RDBMS stores data in tables, which you can visualize as spreadsheets. Each column in the table is a field; for example, a column might contain a name or an address. Each row in the table is an individual record. The table itself has a name you use to refer to that table when you want to get data out of it or put data into it. Figure 22.1 shows an example of a simple relational database that stores name and address information.
Table 22.1. In this visualization of how an RDBMS stores data, the database stores four records (rows) that include name and address information, divided into seven fields (columns) of data.
last_name | first_name | address | city | state | zip | phone |
Doe | John | 501 Somestreet | Anytown | NY | 55011 | 555-555-1212 |
Doe | Jane | 501 Somestreet | Anytown | NY | 55011 | 555-555-1212 |
Palmer John | 205 | Anystreet | Sometown | NY | 55055 | 123-456-7890 |
Johnson | Robert | 100 Easystreet | Easytown | CT | 12345 | 111-222-3333 |
In the example shown in Figure 22.1, the database contains only a single table. Most RDBMS setups are much more complex than this, with a single database containing multiple tables. Figure 22.2 shows an example of a database named sample_database that contains two tables.

In the sample_database example, the phonebook table contains four records (rows) and each record hold three fields (columns) of data. The cd_collection table holds eight records, divided into five fields of data.
If you are thinking that there is no logical relationship between the phonebook table and the cd_collection table in the sample_database example, you are correct. In a relational database, users can store multiple tables of data in a single database—even if the data in one table is unrelated to the data in others.
For example, suppose that you run a small company that sells widgets and you have a computerized database of customers. In addition to storing each customer’s name, address, and phone number, you want to be able to look up outstanding order and invoice information for any of your customers. You could use three related tables in an RDBMS to store and organize customer data for just those purposes. Figure 22.3 shows an example of such a database.

In the example in Figure 22.3, we have added a Customer ID field to each customer record. This field holds a customer ID number that is the unique piece of information that can be used to link all other information for each customer to track orders and invoices. Each customer is given an ID unique to him; two customers might have the same data in their name fields, but their ID field values will never be the same. The Customer ID field data in the Orders and Overdue tables replaces the Last Name, First Name, and Shipping Address field information from the Customers table. Now, when you want to run a search for any customer’s order and invoice data, you can search based on one key rather than multiple keys. You get more accurate results in faster, easier-to-conduct data searches.
Now that you have an idea of how data is stored in an RDBMS and how the RDBMS structure enables you to work with that data, you are ready to learn how to input and output data from the database. This is where SQL comes in.
SQL (pronounced “S-Q-L”) is a database query language understood by virtually all RDBMSs available today. You use SQL statements to get data into and retrieve data from a database. As with statements in any language, SQL statements have a defined structure that determines their meanings and functions.
As a DBA, you should understand the basics of SQL, even if you will not be doing any of the actual programming yourself. Fortunately, SQL is similar to standard English, so learning the basics is simple.
As mentioned previously, an RDBMS stores data in tables that look similar to spreadsheets. Of course, before you can store any data in a database, you need to create the necessary tables and columns to store the data. You do this by using the CREATE statement. For example, the cd_collection table from Figure 22.2 has five columns, or fields: id, title, artist, year, and rating.
SQL provides several column types for data that define what kind of data will be stored in the column. Some of the available types are INT, FLOAT, CHAR, and VARCHAR. Both CHAR and VARCHAR hold text strings, with the difference being that CHAR holds a fixed-length string, whereas VARCHAR holds a variable-length string.
There are also special column types, such as DATE, that only take data in a date format, and ENUMs (enumerations), which can be used to specify that only certain values are allowed. If, for example, you wanted to record the genres of your CDs, you could use an ENUM column that accepts only the values POP, ROCK, EASY_LISTENING, and so on. You will learn more about ENUM later in this chapter.
Looking at the cd_collection table, you can see that three of the columns hold numerical data and the other two hold string data. In addition, the character strings are of variable length. Based on this information, you can discern that the best type to use for the text columns is type VARCHAR, and the best type to use for the others is INT. You should notice something else about the cd_collection table: One of the CDs is missing a rating, perhaps because we have not listened to it yet. This value, therefore, is optional; it starts empty and can be filled in later.
You are now ready to create a table. As mentioned before, you do this by using the CREATE statement, which uses the following syntax:
CREATE TABLE table_name (column_namecolumn_type(parameters) options, ...);
You should know the following about the CREATE statement:
SQL commands are not case sensitive—. For example,
CREATE TABLE,create table, andCreate Tableare all valid.Whitespace is generally ignored—. This means you should use it to make your SQL commands clearer.
The following example shows how to create the table for the cd_collection database:
CREATE TABLE cd_collection
(
id INT NOT NULL,
title VARCHAR(50) NOT NULL,
artist VARCHAR(50) NOT NULL,
year VARCHAR(50) NOT NULL,
rating VARCHAR(50) NULL
);
Notice that the statement terminates with a semicolon. This is how SQL knows you are finished with all the entries in the statement. In some cases, the semicolon can be omitted, and we will point out these cases when they arise.
Tip
SQL has a number of reserved keywords that cannot be used in table names or field names. For example, if you keep track of CDs you want to take with you on vacation, you would not be able to use the field name select because that is a reserved keyword. Instead, you should either choose a different name (selected?) or just prefix the field name with an f, such as fselect.
After you create the tables, you can put data into them. You can insert data manually with the INSERT statement, which uses the following syntax:
INSERT INTO table_name VALUES('value1', 'value2', 'value3', ...);
This statement inserts value1, value2, and so on into the table table_name. The values that are inserted constitute one row, or record, in the database. Unless specified otherwise, values are inserted in the order in which the columns are listed in the database table. If, for some reason, you want to insert values in a different order (or if you want to insert only a few values and they are not in sequential order), you can specify which columns you want the data to go in by using the following syntax:
INSERT INTO table_name (column1,column4) VALUES('value1', 'value2');
You can also fill multiple rows with a single INSERT statement, using syntax such as the following:
INSERT INTO table_name VALUES('value1', 'value2'),('value3', 'value4');
In this statement, value1 and value2 are inserted into the first row and value3 and value4 are inserted into the second row.
The following example shows how you would insert the Nevermind entry into the cd_collection table:
INSERT INTO cd_collection VALUES(9, 'Nevermind', ''Nirvana', '1991, ''NULL);
MySQL requires the NULL value for the last column (rating) if you do not want to include a rating. PostgreSQL, on the other hand, lets you get away with just omitting the last column. Of course, if you had columns in the middle that were null, you would need to explicitly state NULL in the INSERT statement.
Normally, INSERT statements are coded into a front-end program so that users adding data to the database do not have to worry about the SQL statements involved.
Of course, the main reason for storing data in a database is so that you can later look up, sort, and generate reports on that data. Basic data retrieval is done with the SELECT statement, which has the following syntax:
SELECT column1, column2, column3 FROM table_name WHERE search_criteria;
The first two parts of the statement—the SELECT and FROM parts—are required. The WHERE portion of the statement is optional. If it is omitted, all rows in the table table_name are returned.
The column1, column2, column3 indicates the name of the columns you want to see. If you want to see all columns, you can also use the wildcard * to show all the columns that match the search criteria. For example, the following statement displays all columns from the cd_collection table:
SELECT * FROM cd_collection;
If you wanted to see only the titles of all the CDs in the table, you would use a statement such as the following:
SELECT title FROM cd_collection;
To select the title and year of a CD, you would use the following:
SELECT title, year FROM cd_collection;
If you want something a little fancier, you can use SQL to print the CD title followed by the year in parentheses, as is the convention. Both MySQL and PostgreSQL provide string concatenation functions to handle problems such as this. However, the syntax is different in the two systems.
In MySQL, you can use the CONCAT() function to combine the title and year columns into one output column, along with parentheses. The following statement is an example:
SELECT CONCAT(title," (",year, ")") AS TitleYear FROM cd_collection;
That statement lists both the title and year under one column that has the label TitleYear. Note that there are two strings in the CONCAT() function along with the fields—these add whitespace and the parentheses.
In PostgreSQL, the string concatenation function is simply a double pipe (||). The following command is the PostgreSQL equivalent of the preceding MySQL command:
SELECT (genus||'' ('||species||')') AS TitleYear FROM cd_collection;
Note that the parentheses are optional, but they make the statement easier to read. Once again, the strings in the middle and at the end (note the space between the quotes) are used to insert spacing and parentheses between the title and year.
Of course, more often than not, you do not want a list of every single row in the database. Rather, you want to find only rows that match certain characteristics. For this, you add the WHERE statement to the SELECT statement. For example, suppose that you want to find all the CDs in the cd_collection table that have a rating of 5. You would use a statement like the following:
SELECT * FROM cd_collection WHERE rating = 5;
Using the table from Figure 22.2, you can see that this query would return the rows for Trouser Jazz, Life for Rent, and The Two Towers. This is a simple query, and SQL is capable of handling queries much more complex than this. Complex queries can be written using logical AND and logical OR statements. For example, suppose that you want to refine the query so that it lists only those CDs that were not released in 2003. You would use a query like the following:
SELECT * FROM cd_collection WHERE rating = 5 AND year != 2003;
In SQL, != means “is not equal to.” Once again looking at the table from Figure 22.2, you can see that this query returns the rows for Trouser Jazz and The Two Towers but doesn’t return the row for Life for Rent because it was released in 2003.
So, what if you want to list all the CDs that have a rating of 3 or 4 except those released in the year 2000? This time, you combine logical AND and logical OR statements:
SELECT * FROM cd_collection WHERE rating = 3 OR rating = 4 AND year != 2000;
This query would return entries for Mind Bomb, Natural Elements, and Combat Rock. However, it wouldn’t return entries for Adiemus 4 because it was released in 2000.
Tip
One of the most common errors among new database programmers is confusing logical AND and logical OR. For example, in everyday speech, you might say “Find me all CDs released in 2005 and 2006.” At first glance, you might think that if you fed this statement to the database in SQL format, it would return the rows for For All You’ve Done and Life for Rent. In fact, it would return no rows at all. This is because the database interprets the statement as “Find all rows in which the CD was released in 2005 and was released in 2006.” It is, of course, impossible for the same CD to be released twice, so this statement would never return any rows, no matter how many CDs were stored in the table. The correct way to form this statement is with an OR statement instead of an AND statement.
SQL is capable of far more than is demonstrated here. But as mentioned before, this section is not intended to teach you all there is to know about SQL programming; rather, it teaches you the basics so that you can be a more effective DBA.
If you are just starting out and learning about using a database with Linux, the first logical step is to research which database will best serve your needs. Many database software packages are available for Linux; some are free, and others cost hundreds of thousands of dollars. Expensive commercial databases, such as Oracle, are beyond the scope of this book. Instead, this chapter focuses on two freely available databases: MySQL and PostgreSQL.
Both of these databases are quite capable, and either one could probably serve your needs. However, each database has a unique set of features and capabilities that might serve your needs better or make developing database applications easier for you.
Until recently, the speed choice was simple: If the speed of performing queries was paramount to your application, you used MySQL. MySQL has a reputation for being an extremely fast database. Until recently, PostgreSQL was quite slow by comparison.
Newer versions of PostgreSQL have improved in terms of speed (when it comes to disk access, sorting, and so on). In certain situations, such as periods of heavy simultaneous access, PostgreSQL can be significantly faster than MySQL, as you will see in the next section. However, MySQL is still extremely fast when compared to many other databases.
To prevent data corruption, a database needs to put a lock on data while it is being accessed. As long as the lock is on, no other process can access the data until the first process has released the lock. This means that any other processes trying to access the data have to wait until the current process completes. The next process in line then locks the data until it is finished, and the remaining processes have to wait their turn, and so on.
Of course, operations on a database generally complete quickly, so in environments with a small number of users simultaneously accessing the database, the locks are usually of such short duration that they do not cause any significant delays. However, in environments in which many people are accessing the database simultaneously, locking can create performance problems as people wait their turn to access the database.
Older versions of MySQL lock data at the table level, which can be considered a bottleneck for updates during periods of heavy access. This means that when someone writes a row of data in the table, the entire table is locked so that no one else can enter data. If your table has 500,000 rows (or records) in it, all 500,000 rows are locked any time 1 row is accessed. Once again, in environments with a relatively small number of simultaneous users, this doesn’t cause serious performance problems because most operations complete so quickly that the lock time is extremely short. However, in environments in which many people are accessing the data simultaneously, MySQL’s table-level locking can be a significant performance bottleneck.
PostgreSQL, on the other hand, locks data at the row level. In PostgreSQL, only the row currently being accessed is locked. The rest of the table can be accessed by other users. This row-level locking significantly reduces the performance impact of locking in environments that have a large number of simultaneous users. Therefore, as a general rule, PostgreSQL is better suited for high-load environments than MySQL.
The MySQL release bundled with Fedora gives you the choice of using tables with table-level or row-level locking. In MySQL terminology, MyISAM tables use table-level locking and InnoDB tables use row-level locking.
Note
MySQL’s data locking methods are discussed in more depth at http://www.mysql.com/doc/en/Internal_locking.html. You can find more information on PostgreSQL’s locking at http://www.postgresql.org/idocs/index.php?locking-tables.html.
Another way MySQL and PostgreSQL differ is in the amount of protection they provide for keeping data from becoming corrupted. The acronym ACID is commonly used to describe several aspects of data protection:
Atomicity—. This means that several database operations are treated as an indivisible (atomic) unit, often called a transaction. In a transaction, either all unit operations are carried out or none of them are. In other words, if any operation in the atomic unit fails, the entire atomic unit is canceled.
Consistency—. Ensures that no transaction can cause the database to be left in an inconsistent state. Inconsistent states can be caused by database client crashes, network failures, and similar situations. Consistency ensures that, in such a situation, any transaction or partially completed transaction that would cause the database to be left in an inconsistent state is rolled back, or undone.
Isolation—. Ensures that multiple transactions operating on the same data are completely isolated from each other. This prevents data corruption if two users try to write to the same record at the same time. The way isolation is handled can generally be configured by the database programmer. One way that isolation can be handled is through locking, as discussed previously.
Durability—. Ensures that, after a transaction has been committed to the database, it cannot be lost in the event of a system crash, network failure, or other problem. This is usually accomplished through transaction logs. Durability means, for example, that if the server crashes, the database can examine the logs when it comes back up and it can commit any transactions that were not yet complete into the database.
PostgreSQL is ACID-compliant, but again MySQL gives you the choice of using ACID-compliant tables or not. MyISAM tables are not ACID-compliant, whereas InnoDB tables are. Note that ACID compliancy is no easy task: All the extra precautions incur a performance overhead.
Subqueries allow you to combine several operations into one atomic unit, and they enable those operations to access each other’s data. By using SQL subqueries, you can perform some extremely complex operations on a database. In addition, using SQL subqueries eliminates the potential problem of data changing between two operations as a result of another user performing some operation on the same set of data. Both PostgreSQL and MySQL have support for subqueries in this release of Fedora.
A procedural language is an external programming language that can be used to write functions and procedures. This allows you to do things that aren’t supported by simple SQL. A trigger allows you to define an event that will invoke the external function or procedure you have written. For example, a trigger can be used to cause an exception if an INSERT statement containing an unexpected or out-of-range value for a column is given.
For example, in the CD tracking database, you could use a trigger to cause an exception if a user entered data that did not make sense. PostgreSQL has a procedural language called PL/pgSQL. Although MySQL has support for a limited number of built-in procedures and triggers, it does not have any procedural language. This means you cannot create custom procedures or triggers in MySQL, although the same effects can often be achieved through creative client-side programming.
A free and stable version of MySQL is included with Fedora. MySQL is also available from the website http://www.mysql.com/. The software is available in source code, binary, and RPM format for Linux. You can elect to have MySQL installed when you install Fedora or later use the system-config-packages client to add the software to your system. See Chapter 7 for the details on adding (or removing) software.
After you install MySQL, you need to initialize the grant tables, or permissions to access any or all databases and tables and column data within a database. You can do this by issuing mysql_install_db as root. This command initializes the grant tables and creates a MySQL root user.
Caution
The MySQL data directory needs to be owned by the user as which MySQL will run (changing ownership using the chown command). In addition, only this user should have any permissions on this directory. (In other words, the permissions should be set to 700 by using chmod.) Setting up the data directory any other way creates a security hole.
Running mysql_install_db should generate output similar to the following:
# mysql_install_db
Preparing db table
Preparing host table
Preparing user table
Preparing func table
Preparing tables_priv table
Preparing columns_priv table
Installing all prepared tables
020916 17:39:05 /usr/libexec/mysqld: Shutdown Complete
...
The command prepares MySQL for use on the system and reports helpful information. The next step is to set the password for the MySQL root user, which is discussed in the following section.
Caution
By default, the MySQL root user is created with no password. This is one of the first things you must change because the MySQL root user has access to all aspects of the database. The following section explains how to change the password of the user.
To set a password for the root MySQL user, you need to connect to the MySQL server as the root MySQL user; you can use the command mysql -u root to do so. This command connects you to the server with the MySQL client. When you have the MySQL command prompt, issue a command like the following to set a password for the root user:
mysql> SET PASSWORD FOR root = PASSWORD("secretword");
secretword should be replaced by whatever you want to be the password for the root user. You can use this same command with other usernames to set or change passwords for other database users.
After you enter a password, you can exit the MySQL client by typing exit at the command prompt.
In MySQL you create a database by using the CREATE DATABASE statement. To create a database, you connect to the server by typing mysql -u root -p and pressing Enter. After you do so, you are connected to the database as the MySQL root user and prompted for a password. After you enter the password, you are placed at the MySQL command prompt. Then you use the CREATE DATABASE command. For example, the following commands create a database called animals:
# mysql -u root -p
Enter password:
Welcome to the MySQL monitor. Commands end with ; or g.
Your MySQL connection id is 1 to server version: 3.23.58

Type 'help;' or 'h' for help. Type 'c' to clear the buffer.

mysql> CREATE DATABASE animals;
Query OK, 1 row affected (0.00 sec)
mysql>
Another way to create a database is to use the mysqladmin command, as the root user, with the create keyword and the name of a new database. For example, to create a new database named reptiles, you use a command line like this:
# mysqladmin -u root -p create reptiles
You probably want to grant yourself some privileges, and eventually you will probably want to grant privileges to other users. Privileges, also known as rights, are granted and revoked on four levels:
Global level—. These rights allow access to any database on a server.
Database level—. These rights allow access to all tables in a database.
Table level—. These rights allow access to all columns within a table in a database.
Column level—. These rights allow access to a single column within a database’s table.
Note
Listing all the available privileges is beyond the scope of this chapter. See the MySQL documentation for more information.
To add a user account, you connect to the database by typing mysql -u root -p and pressing Enter. You are then connected as the root user and prompted for a password. (You did set a password for the root user, as instructed in the last section, right?) After you enter the root password, you are placed at the MySQL command prompt.
To grant privileges to a user, you use the GRANT statement, which has the following syntax:
grant what_to_grant ON where_to_grant TO user_name IDENTIFIED BY 'password';
The first option, what_to_grant, is the privileges you are granting to the user. These privileges are specified with keywords. For example, the ALL keyword is used to grant global-, database-, table-, and column-level rights for a specified user.
The second option, where_to_grant, specifies the resources on which the privileges should be granted. The third option, user_name, is the username to which you want to grant the privileges. Finally, the fourth option, password, is a password that should be assigned to this user. If this is an existing user who already has a password and you are modifying permissions, you can omit the IDENTIFIED BY portion of the statement.
For example, to grant all privileges on a database named sampledata to a user named foobar, you could use the following command:
GRANT ALL ON animals.* TO foobar IDENTIFIED BY 'secretword';
The user foobar can now connect to the database sampledata by using the password secretword, and foobar has all privileges on the database, including the ability to create and destroy tables. For example, the user foobar can now log in to the server (by using the current hostname—shuttle2, in this example), and access the database like so:
$ mysql -h shuttle2 -u foobar -p animals
Enter password:
Welcome to the MySQL monitor. Commands end with ; or g.
Your MySQL connection id is 43 to server version: 3.23.58

Type 'help;' or 'h' for help. Type 'c' to clear the buffer.

mysql>
Note
See the section “The MySQL Command-Line Client” later in this chapter for additional command-line options.
Later, if you need to revoke privileges from foobar, you can use the REVOKE statement. For example, the following statement revokes all privileges from the user foobar:
REVOKE ALL ON animals FROM foobar;
Advanced database administration, privileges, and security are very complex topics that are beyond the scope of this book. See the “Reference” section at the end of this chapter for links to online documentation. You can also check out Luke Welling’s and Laura Thompson’s book PHP and MySQL Development from Sams Publishing.
If you do not want to use the version of PostgreSQL bundled with Fedora, the latest PostgreSQL binary files and source are available at http://www.postgresql.org/. The PostgreSQL RPMs are distributed as several files. At a minimum, you probably want the postgresql, postgresql-server, and postgresql-libs RPMs. You should see the README.rpm-dist file in the FTP directory ftp://ftp.postgresql.org/pub/ to determine whether you need any other packages.
If you are installing from the Fedora RPM files, a necessary postgres user account (that is, an account with the name of the user running the server on your system) is created for you automatically:
$ fgrep postgres /etc/passwd
postgres:x:26:26:PostgreSQL Server:/var/lib/pgsql:/bin/bash
Otherwise, you need to create a user called postgres during the installation. This user shouldn’t have login privileges because only root should be able to use su to become this user and no one will ever log in directly as the user. (Refer to Chapter 14, “Managing Users,” for more information on how to add users to a Fedora system.) After you have added the user, you can install each of the PostgreSQL RPMs you downloaded using the standard rpm -i command for a default installation.
After the RPMs are installed, you need to initialize the data directory. To do so, you must first create the data directory and you must be the root user. The following example assumes that the data directory is /usr/local/pgsql/data.
Create the /usr/local/pgsql/data directory (using mkdir) and change the ownerships of the directory (using chown and chgrp) so it is owned by the user postgres. Then use su and, as the user postgres, issue the following commands:
# mkdir /usr/local/pgsql
# chown postgres /usr/local/pgsql
# chgrp postgres /usr/local/pgsql
# su - postgres
-bash-2.05b$ initdb -D /usr/local/pgsql/data
The files belonging to this database system will be owned by user "postgres".
This user must also own the server process.

The database cluster will be initialized with locale en_US.UTF-8.
This locale setting will prevent the use of indexes for pattern matching
operations.  If that is a concern, rerun initdb with the collation order
set to "C".  For more information see the Administrator's Guide.

creating directory /usr/local/pgsql/data... ok
creating directory /usr/local/pgsql/data/base... ok
creating directory /usr/local/pgsql/data/global... ok
creating directory /usr/local/pgsql/data/pg_xlog... ok
creating directory /usr/local/pgsql/data/pg_clog... ok
creating template1 database in /usr/local/pgsql/data/base/1... ok
creating configuration files... ok
initializing pg_shadow... ok
enabling unlimited row size for system tables... ok
initializing pg_depend... ok
creating system views... ok
loading pg_description... ok
creating conversions... ok
setting privileges on built-in objects... ok
vacuuming database template1... ok
copying template1 to template0... ok
Success. You can now start the database server using:

 /usr/bin/postmaster -D /usr/local/pgsql/data
or
 /usr/bin/pg_ctl -D /usr/local/pgsql/data -l logfile start
This initializes the database and sets the permissions on the data directory to their correct values.
Caution
The initdb program sets the permissions on the data directory to 700. You should not change these permissions to anything else to avoid creating a security hole.
You can start the postmaster program with the following command (make sure that you are still the user postgres):
$ postmaster -D /usr/local/pgsql/data &
If you have decided to use a directory other than /usr/local/pgsql/data as the data directory, you should replace the directory in the postmaster command line with whatever directory you are using.
Tip
By default, Fedora makes the PostgreSQL data directory /var/lib/pgsql/data. This isn’t a very good place to store the data, however, because most people do not have the necessary space in the /var partition for any kind of serious data storage. Note that if you do change the data directory to something else (such as /usr/local/pgsql/data, as in the examples in this section), you need to edit the PostgreSQL startup file (named postgres) located in /etc/rc.d/init.d to reflect the change.
Creating a database in PostgreSQL is straightforward, but it must be performed by a user who has permissions to create databases in PostgreSQL—for example, initially the user named postgres. You can then simply issue the following command from the shell prompt (not the PSQL client prompt, but a normal shell prompt):
# su - postgres
-bash-2.05b$ createdb database
where database is the name of the database you want to create.
The createdb program is actually a wrapper that makes it easier to create databases without having to log in and use psql. However, you can also create databases from within psql with the CREATE DATABASE statement. Here’s an example:
CREATE DATABASE database;
You need to create at least one database before you can start the pgsql client program. You should create this database while you’re logged in as the user postgres. To log in as this user, you need to use su to become root and then use su to become the user postgres. To connect to the new database, you start the psql client program with the name of the new database as a command-line argument, like so:
$ psql sampledata
If you don’t specify the name of a database when you invoke psql, the command attempts to connect to a database that has the same name as the user as which you invoke psql (that is, the default database).
To create a database user, you use su to become the user postgres from the Linux root account. You can then use the PostgreSQL createuser command to quickly create a user who is allowed to access databases or create new database users, like this:
$ createuser phudson
Shall the new user be allowed to create databases? (y/n) y
Shall the new user be allowed to create more new users? (y/n) y
CREATE USER
In this example, the new user named phudson is created and allowed to create new databases and database users (you should carefully consider who is allowed to create new databases or additional users).
You can also use the PostgreSQL command-line client to create a new user by typing psql along with name of the database and then use the CREATE USER command to create a new user. Here is an example:
CREATE USER foobar ;
To delete a database user, you use the dropuser command, along with the user’s name, and the user’s access is removed from the default database, like this:
$ dropuser msmith
DROP USER
You can also log in to your database by using psql and then use the DROP USER commands. Here’s an example:
$ psql demodb
Welcome to psql, the PostgreSQL interactive terminal.

Type: copyright for distribution terms
 h for help with SQL commands
 ? for help on internal slash commands
 g or terminate with semicolon to execute query
 q to quit

demodb=# DROP USER msmith ;
DROP USER
demodb=# q
$
As in MySQL, granting and revoking privileges in PostgreSQL is done with the GRANT and REVOKE statements. The syntax is the same as in MySQL except that PostgreSQL doesn’t use the IDENTIFIED BY portion of the statement because with PostgreSQL, passwords are assigned when you create the user with the CREATE USER statement, as discussed previously. Here is the syntax of the GRANT statement:
GRANT what_to_grant ON where_to_grant TO user_name;
The following command, for example, grants all privileges to the user foobar on the database sampledata:
GRANT ALL ON sampledata TO foobar;
To revoke privileges, you use the REVOKE statement. Here is an example:
REVOKE ALL ON sampledata FROM foobar;
This command removes all privileges from the user foobar on the database sampledata.
Advanced administration and user configuration are complex topics. This section cannot begin to cover all the aspects of PostgreSQL administration or of privileges and users. For more information on administering PostgreSQL, see the PostgreSQL documentation or consult a book on PostgreSQL, such as PostgreSQL (Sams Publishing).
Both MySQL and PostgreSQL use a client/server system for accessing databases. In the simplest terms, the database server handles the requests that come into the database and the database client handles getting the requests to the server as well as getting the output from the server to the user.
Users never interact directly with the database server even if it happens to be located on the same machine they are using. All requests to the database server are handled by a database client, which might or might not be running on the same machine as the database server.
Both MySQL and PostgreSQL have command-line clients. A command-line client is a very primitive way of interfacing with a database and generally isn’t used by end users. As a DBA, however, you use the command-line client to test new queries interactively without having to write front-end programs for that purpose. In later sections of this chapter, you will learn a bit about the MySQL graphical client and the web-based database administration interfaces available for both MySQL and PostgreSQL.
The following sections examine two common methods of accessing a remote database, a method of local access to a database server, and the concept of web access to a database.
Note
You should consider access and permission issues when setting up a database. Should users be able to create and destroy databases? Or should they only be able to use existing databases? Will users be able to add records to the database and modify existing records? Or should users be limited to read-only access to the database? And what about the rest of the world? Will the general public need to have any kind of access to your database through the Internet? As DBA, you must determine the answers to these questions.
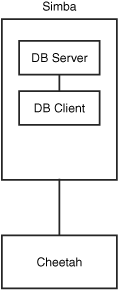
Two types of remote database access scenarios are briefly discussed in this section. In the first scenario, the user directly logs in to the database server through SSH (to take advantage of the security benefits of encrypted sessions) and then starts a program on the server to access the database. In this case, shown in Figure 22.4, the database client is running on the database server itself.
In the other scenario, shown in Figure 22.5, the user logs in to a remote host through SSH and starts a program on it to access the database, but the database is actually running on a different system. Three systems are now involved: the user’s workstation, the remote host running the database client, and the remote host running the database server.
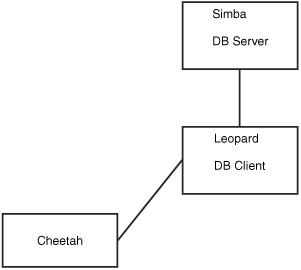
The important thing to note in Figure 22.5 is the middleman system leopard. Although the client is no longer running on the database server itself, it isn’t running on the user’s local workstation, either.
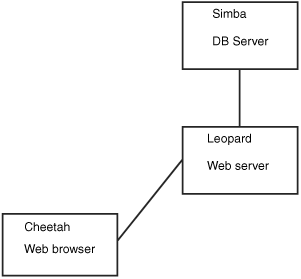
A user can log in to the database server by using a graphical client (which could be running on Windows, Macintosh OS, or a UNIX workstation). The graphical client then connects to the database server. In this case, the client is running on the user’s workstation. Figure 22.6 shows an example.

In this section, we look at two basic examples of web access to the database server. In the first example, a user accesses the database through a form located on the World Wide Web. At first glance, it might appear that the client is running on the user’s workstation. Of course, in reality it is not; the client is actually running on the web server. The web browser on the user’s workstation simply provides a way for the user to enter the data that he wants to send to the database and a way for the results sent from the database to be displayed to the user. The software that actually handles sending the request to the database is running on the web server in the form of a CGI script; a Java servlet; or embedded scripting such as the PHP or Sun Microsystems, Inc.’s JavaServer Pages (JSP).
Often, the terms client and front end are used interchangeably when speaking of database structures. However, Figure 22.7 shows an example of a form of access in which the client and the front end aren’t the same thing at all. In this example, the front end is the form displayed in the user’s web browser. In such cases, the client is referred to as middleware.
In another possible web access scenario, it could be said that the client is a two-piece application in which part of it is running on the user’s workstation and the other part is running on the web server. For example, the database programmer can use JavaScript in the web form to ensure that the user has entered a valid query. In this case, the user’s query is partially processed on her own workstation and partially on the web server. Error checking is done on the user’s own workstation, which helps reduce the load on the server and also helps reduce network traffic because the query is checked for errors before being sent across the network to the server.
The MySQL command-line client is mysql, and it has the following syntax:
mysql [options] [database]
Some of the available options for mysql are discussed in Table 22.1. database is optional, and if given, it should be the name of the database to which you want to connect.
Table 22.1. Command-Line Options to Use When Invoking mysql
Option | Action |
|---|---|
| Connects to the remote host |
| Connects to the database as the user |
| Prompts for a password. This option is required if the user you are connecting as needs a password to access the database. Note that this is a lowercase |
| Specifies |
| Displays a help message. |
More options are available than are listed in Table 22.1, but these are the most common options. See the man page for mysql for more information on the available options.
Caution
Although mysql allows you to specify the password on the command line after the -p option, and thus allows you to avoid having to type the password at the prompt, you should never invoke the client this way. Doing so causes your password to display in the process list, and the process list can be accessed by any user on the system. This is a major security hole, so you should never give your password on the mysql command line.
You can access the MySQL server without specifying a database to use. After you log in, you use the help command to get a list of available commands, like this:
mysql> help

MySQL commands:
Note that all text commands must be first on line and end with ';'
help (h) Display this help.
? (?) Synonym for `help'.
clear (c) Clear command.
connect (
) Reconnect to the server. Optional arguments are db and host.
edit (e) Edit command with $EDITOR.
ego (G) Send command to mysql server, display result vertically.
exit (q) Exit mysql. Same as quit.
go (g) Send command to mysql server.
nopager (
) Disable pager, print to stdout.
notee (	) Don't write into outfile.
pager (P) Set PAGER [to_pager]. Print the query results via PAGER.
print (p) Print current command.
quit (q) Quit mysql.
rehash (#) Rebuild completion hash.
source (.) Execute a SQL script file. Takes a file name as an argument.
status (s) Get status information from the server.
tee (T) Set outfile [to_outfile]. Append everything into given outfile.
use (u) Use another database. Takes database name as argument.
You can then access a database by using the use command and the name of a database that has been created (such as animals) and that you are authorized to connect to, like this:
mysql> use animals
Database changed
mysql>
You invoke the PostgreSQL command-line client with the command psql. Like mysql, psql can be invoked with the name of the database to which you would like to connect. Also like mysql, psql can take several options. These options are listed in Table 22.2.
Table 22.2. Command-Line Options to Use When Invoking psql
Option | Action |
|---|---|
| Connects to the remote host |
| Specifies |
| Connects to the database as the user |
| Prompts for a password after connecting to the database. In PostgreSQL 7 and later, password prompting is automatic if the server requests a password after a connection has been established. |
| Displays a help message. |
Several more options are available in addition to those listed in Table 22.2. See the psql’s man page for details on all the available options.
If you’d rather interact with a database by using a graphical database client than with the command-line clients discussed in the previous section, you’re in luck: A few options are available.
MySQL has an official graphical client, called MySQLGUI. MySQLGUI is available in both source and binary formats from the MySQL website at http://www.mysql.com/.
Web-based administration interfaces are also available for MySQL and PostgreSQL. phpMyAdmin and phpPgAdmin are two such products. Both of these products are based on the PHP-embedded scripting language and therefore require you to have PHP installed. Of course, you also need to have a web server installed.
The following are references for the databases mentioned in this chapter.
http://www.mysql.com/—This is the official website of the MySQL database server. Here you can find the latest versions as well as up-to-date information and online documentation for MySQL. You can also purchase support contracts here. You might want to look into this if you will be using MySQL in a corporate setting. (Many corporations balk at the idea of using software for which the company has no support contract in place.)
http://www.postgresql.org/—This is the official website of the PostgreSQL database server. You are asked to select a mirror when you arrive at this site. After you select a mirror, you are taken to the main site. From there, you can find information on the latest versions of PostgreSQL and read the online documentation.
http://www.postgresql.org/docs/8.1/interactive/tutorial-start.html—This interactive HTML documentation tree is a great place to get started with learning how to use PostgreSQL.
http://www.pgsql.com/—This is a commercial company that provides fee-based support contracts for the PostgreSQL database.