
This chapter covers the configuration and management of the Apache web server. The chapter includes an overview of some of the major components of the server and discussions of text-based and graphical server configuration. You will see how to start, stop, and restart Apache using the command line and the Red Hat utilities included with Fedora. The chapter begins with some introductory information about this popular server and then shows you how to install, configure, and start using Apache.
Apache is the most widely used web server on the Internet today, according to a Netcraft survey of active websites in January 2005, which is shown in Table 21.1.
Note that these statistics do not reflect Apache’s use on internal networks, known as intranets.
The name Apache appeared during the early development of the software because it was “a patchy” server, made up of patches for the freely available source code of the NCSA HTTPd web server. For a while after the NCSA HTTPd project was discontinued, a number of people wrote a variety of patches for the code, to either fix bugs or add features they wanted. A lot of this code was floating around and people were freely sharing it, but it was completely unmanaged.
After a while, Brian Behlendorf and Cliff Skolnick set up a centralized repository of these patches, and the Apache project was born. The project is still composed of a small core group of programmers, but anyone is welcome to submit patches to the group for possible inclusion in the code.
There’s been a surge of interest in the Apache project over the past several years, partially buoyed by a new interest in open source on the part of enterprise-level information services. It’s also due in part to crippling security flaws found in Microsoft’s Internet Information Services (IIS); the existence of malicious web task exploits; and operating system and networking vulnerabilities to the now-infamous Code Red, Blaster, and Nimda worms. IBM made an early commitment to support and use Apache as the basis for its web offerings and has dedicated substantial resources to the project because it makes more sense to use an established, proven web server.
In mid-1999, The Apache Software Foundation was incorporated as a nonprofit company. A board of directors, elected on an annual basis by the ASF members, oversees the company. This company provides a foundation for several open-source software development projects, including the Apache Web Server project.
The best places to find out about Apache are the Apache Software Foundation’s website, http://www.apache.org/, and the Apache Week website, http://www.apacheweek.com/, where you can subscribe to receive Apache Week by email to keep up on the latest developments in the project, keep abreast of security advisories, and research bug fixes.
Tip
You’ll find an overview of Apache in the Apache Software Foundation’s frequently asked questions (FAQs) at http://httpd.apache.org/docs-2.0/faq/. In addition to extensive online documentation, you can also find the complete documentation for Apache in the HTML directory of your Apache server. You can access this documentation by looking at http://localhost/manual/index.html on your new Fedora system with one of the web browsers included on your system. You’ll need to have Apache running on your system!
Fedora ships with Apache 2.0, and the server (named httpd) is included on this book’s CD-ROMs and DVD. You can obtain the latest version of Apache as an RPM installation file from a Fedora FTP server; upgrade using up2date, yum, or apt-get; or get the source code from the Apache website and, in true Linux tradition, build it for yourself.
To determine the version of Apache included with your system, use the web server’s -V command-line option like this:
$ /usr/sbin/httpd -V | cat
Server version: Apache/2.0.50
Server built:   Jun 29 2004 11:11:55
Server's Module Magic Number: 20020903:8
Architecture:   32-bit
Server compiled with....
The output displays the version number, build date and time, platform, and various options used during the build. You can use the -v option to see terser version information.
You can install Apache from RPMs or build it yourself from source code. The Apache source builds on just about any UNIX-like operating system and on Win32. If you elect to install the Web Server group of files when first installing Fedora, Apache and related software and documentation in 17 packages are installed automatically.
If you’re about to install a new version of Apache, you should shut down the old server. Even if it’s unlikely that the old server will interfere with the installation procedure, shutting it down ensures that there will be no problems. If you don’t know how to stop Apache, see the “Starting and Stopping Apache” section later in this chapter.
You can find the Apache RPM on the Fedora Core installation media, on the Fedora FTP server, or at one of its many mirror sites. Check the fedora.redhat.com site as often as possible to download updates as they become available. Updated RPM files usually contain important bug and security fixes. When an updated version is released, install it as quickly as possible to keep your system secure.
Note
Check the Apache site for security reports. Browse to http://httpd.apache.org/security_report.html for links to security vulnerabilities for Apache 1.3 and 2.0. Subscribe to a support list or browse through up-to-date archives of all Apache mailing lists at http://httpd.apache.org/mail/ (for various articles) or http://httpd.apache.org/lists.html (for comprehensive and organized archives).
If you want the most recent, experimental version of Apache for testing, check Red Hat’s Rawhide distribution, which is also available on the Fedora FTP server (http://download.fedora.redhat.com/pub/fedora/linux/core/development/). This distribution is experimental and always contains the latest versions of all RPMs. However, note that the Apache package might depend on new functionality available in other RPMs. Therefore, you might need to install many new RPMs to be able to use packages from Rawhide. If you still want to use an Apache version from the Rawhide distribution for testing, a better option might be to download the source code RPM (SRPM) and compile it yourself. That way, you avoid dependencies on other new packages. (Refer to the “Working with Source RPM Files” section in Chapter 7, “Managing Software,” for information about building and installing packages from SRPM files.)
Caution
You should be wary of installing experimental packages, and never install them on production servers (that is, servers used in “real life”). Very carefully test the packages beforehand on a host that isn’t connected to a network!
After you have obtained an Apache RPM, you can install it with the command-line rpm tool by typing the following:
rpm -Uvh latest_apache.rpm
where latest_apache.rpm is the name of the latest Apache RPM. For more information on installing packages with RPM, refer to Chapter 7.
The Apache RPM installs files in the following directories:
/etc/httpd/conf—. This directory contains the Apache configuration file,httpd.conf. See the section “Configuring Apache for Peak Performance” later in this chapter for more information./etc/rc.d/—. The tree under this directory contains the system startup scripts. The Apache RPM installs a startup script namedhttpdfor the web server under the/etc/rc.d/init.ddirectory. This script, which you can use to start and stop the server from the command line, also automatically starts and stops the server when the computer is halted, started, or rebooted./var/www—. The RPM installs the default server icons, Common Gateway Interface (CGI) programs, and HTML files in this location. If you want to keep web content elsewhere, you can do so by making the appropriate changes in the server configuration files./var/www/ manual/—. If you’ve installed theapache-manualRPM, you’ll find a copy of the Apache documentation in HTML format here. You can access it with a web browser by going to http://localhost/manual/./usr/share/man—. Fedora’s Apache RPM also contains man pages, which are placed underneath this directory. For example, thehttpdman page is in section 8 of themandirectory./usr/sbin—. The executable programs are placed in this directory. This includes the server executable itself, as well as various utilities./usr/bin—. Some of the utilities from the Apache package are placed here—for example, thehtpasswdprogram, which is used for generating authentication password files./var/log/httpd—. The server log files are placed in this directory. By default, there are two important log files (among several others):access_loganderror_log. However, you can define any number of custom logs containing a variety of information. See the “Logging” section, later in this chapter, for more detail./usr/src/redhat/SOURCES/—. This directory might contain atararchive containing the source code for Apache and, in some cases, patches for the source. You must have installed the Apache SRPM for these files to be created.
When Apache is being run, it also creates the file httpd.pid, containing the process ID of Apache’s parent process in the /var/run/ directory.
There are several ways to obtain the source code for Apache. The Fedora Project provides SRPMs containing the source of Apache, which includes patches to make it work better with the Fedora Core distribution. The most up-to-date, stable binary version for Fedora can be installed via RPM packages using the up2date command or by installing a source RPM from Fedora’s source repository (browse to http://fedora.redhat.com and then click the Download link). When you install one of these SRPMs, a tar archive containing the Apache source is created in /usr/src/redhat/SOURCES/.
You can also download the source directly from http://www.apache.org/. The latest version at the time of this writing (2.0.50) is a 6MB compressed tape archive, and the latest pre-2.0 version of Apache is 1.3.31. Although many sites continue to use the older version (for script and other compatibility reasons), many new sites are migrating to or starting out using the latest stable version.
After you have the tar file, you must unroll it in a temporary directory, such as /tmp. Unrolling this tar file creates a directory called apache_version_number, where version_number is the version you’ve downloaded (for example, apache_1.3.21).
There are two ways to compile the source—the old, familiar way (at least, to those of us who have been using Apache for many years) by editing makefile templates, and the new, easy way using a configure script. You’ll first see how to build Apache from source the easy way. The configure script offers a way to have the source software automatically configured according to your system. However, manually editing the configuration files before building and installing Apache provides more control over where the software is installed and which capabilities or features are built in to Apache.
Tip
As with many software packages distributed in source code form for Linux and other UNIX-like operating systems, extracting the source code results in a directory that contains a README and an INSTALL file. Be sure to peruse the INSTALL file before attempting to build and install the software.
To build Apache the easy way, run the ./configure script in the directory just created. You can provide it with a --prefix argument to install it in a directory other than the default, which is /usr/local/apache/. Use this command:
# ./configure --prefix=/preferred/directory/
This generates the makefile that’s used to compile the server code.
Next, type make to compile the server code. After the compilation is complete, type make install as root to install the server. You can now configure the server via the configuration files. See the “Runtime Server Configuration Settings” section, later in this chapter, for more information.
Tip
A safer way to install a new version of Apache from source is to use the ln command to create symbolic links of the existing file locations (listed in the “Installing from the RPM” section earlier in this chapter) to the new locations of the files. This method is safer because the default install locations are different from those used when the RPM installs the files. Failure to use this installation method could result in your web server process not being started automatically at system startup.
Another safe way to install a new version of Apache is to first back up any important configuration directories and files (such as /etc/httpd) and then use the rpm command to remove the server. You can then install and test your new version and, if needed, easily restore your original server and settings.
It is strongly recommended that you use Fedora’s RPM version of Apache until you really know what happens at system startup. No “uninstall” option is available when installing Apache from source!
Files are placed in various subdirectories of /usr/local/apache (or whatever directory you specified with the --prefix parameter) if you build the server from source. Before version 1.3.4, files were placed in /usr/local/etc/httpd.
The following is a list of the directories used by Apache, as well as brief comments on their usage:
/usr/local/apache/conf—. This contains several subdirectories and the Apache configuration file,httpd.conf. See the “Editinghttpd.conf” section, later in this chapter, to learn more about configuration files./usr/local/apache—. Thecgi-bin,icons, andhtdocssubdirectories contain the CGI programs, standard icons, and default HTML documents, respectively./usr/local/apache/bin—. The executable programs are placed in this directory./usr/local/apache/logs—. The server log files are placed in this directory. By default, there are two log files—access_loganderror_log—but you can define any number of custom logs containing a variety of information (see the “Logging” section later in this chapter). The default location for Apache’s logs as installed by Fedora is/var/log/httpd.
At this point, you have installed your Apache server with its default configuration. Fedora provides a default home page named index.html as a test under the /var/www/html/usage directory. The proper way to run Apache is to set system initialization to have the server run after booting, network configuration, and any firewall configuration. See Chapter 15, “Automating Tasks,” for more information about how Fedora boots.
It is time to start it up for the first time. The following sections show how to start and stop Apache, or configure Fedora to start or not start Apache when booting.
You can start Apache from the command line of a text-based console or X terminal window, and you must have root permission to do so. The server daemon, httpd, recognizes several command-line options you can use to set some defaults, such as specifying where httpd reads its configuration directives. The Apache httpd executable also understands other options that enable you to selectively use parts of its configuration file, specify a different location of the actual server and supporting files, use a different configuration file (perhaps for testing), and save startup errors to a specific log. The -v option causes Apache to print its development version and quit. The -V option shows all the settings that were in effect when the server was compiled.
The -h option prints the following usage information for the server (assuming that you’re running the command as root):
# httpd -h
Usage: httpd [-D name] [-d directory] [-f file]
             [-C "directive"] [-c "directive"]
             [-k start|restart|graceful|stop]
             [-v] [-V] [-h] [-l] [-L] [-t]
Options:
  -D name           : define a name for use in <IfDefine name> directives
  -d directory      : specify an alternate initial ServerRoot
  -f file           : specify an alternate ServerConfigFile
  -C "directive"    : process directive before reading config files
  -c "directive"    : process directive after reading config files
  -e level          : show startup errors of level (see LogLevel)
  -E file           : log startup errors to file
  -v                : show version number
  -V                : show compile settings
  -h                : list available command line options (this page)
  -l                : list compiled in modules
  -L                : list available configuration directives
  -t -D DUMP_VHOSTS : show parsed settings (currently only vhost settings)
  -t                : run syntax check for config files
Other options include listing Apache’s static modules, or special, built-in independent parts of the server, along with options that can be used with the modules. These options are called configuration directives and are commands that control how a static module works. Note that Apache also includes nearly 50 dynamic modules, or software portions of the server that can be optionally loaded and used while the server is running.
The -t option is used to check your configuration files. It’s a good idea to run this check before restarting your server, especially if you’ve made changes to your configuration files. Such tests are important because a configuration file error can result in your server shutting down when you try to restart it.
Note
When you build and install Apache from source and don’t use Fedora’s Apache RPM files, start the server manually from the command line as root (such as when testing). You do this for two reasons:
The standalone server uses the default HTTP port (port 80), and only the super-user can bind to Internet ports that are lower than 1024.
Only processes owned by root can change their UID and GID as specified by Apache’s
UserandGroupdirectives. If you start the server under another UID, it runs with the permissions of the user starting the process.
Note that although some of the following examples show how to start the server as root, you should do so only for testing after building and installing Apache. Fedora is set up to run web service as the apache user if you install Apache using Fedora RPM files.
Fedora uses the scripts in the /etc/rc.d/init.d directory to control the startup and shutdown of various services, including the Apache web server. The main script installed for the Apache web server is /etc/rc.d/init.d/httpd, although the actual work is done by the apachectl shell script included with Apache.
Note
/etc/rc.d/init.d/httpd is a shell script and isn’t the same as the Apache server located in /usr/sbin. That is, /usr/sbin/httpd is the program executable file (the server); /etc/rc.d/init.d/httpd is a shell script that uses another shell script, apachectl, to control the server. See Chapter 15 for a description of some service scripts under /etc/rc.d/init.d and how the scripts are used to manage services such as httpd.
You can use the /etc/rc.d/init.d/httpd script and the following options to control the web server:
start—. The system uses this option to start the web server during bootup. You, as root, can also use this script to start the server.stop—. The system uses this option to stop the server gracefully. You should use this script, rather than thekillcommand, to stop the server.reload—. You can use this option to send theHUPsignal to thehttpdserver to have it reread the configuration files after modification.restart—. This option is a convenient way to stop and then immediately start the web server. If thehttpdserver isn’t running, it is started.condrestart—. The same as therestartparameter, except that it restarts thehttpdserver only if it’s actually running.status—. This option indicates whether the server is running; if it is, it provides the various PIDs for each instance of the server.
For example, to check on the status of your server, use the command
# /etc/rc.d/init.d/httpd status
This prints the following for me:
httpd (pid 15997 1791 1790 1789 1788 1787 1786 1785 1784 1781) is running...
This indicates that the web server is running; in fact, 10 instances of the server are currently running in this configuration.
In addition to the previous options, the httpd script also offers these features:
help—. Prints a list of valid options to thehttpdscript (which are passed onto the server as if called from the command line).configtest—. A simple test of the server’s configuration, which reportsStatus OKif the setup is correct. You can also usehttpd’s-toption to perform the same test, like this:# httpd -t
fullstatus—. Displays a verbose status report.graceful—. The same as therestartparameter, except that theconfigtestoption is used first and open connections are not aborted.
Instead of directly calling the /etc/rc.d/init.d/httpd script, you can use Red Hat’s service command to start, stop, and restart Apache. The service command is used with the name of a service (listed under /etc/rc.d/init.d) and an optional keyword:
# service <name_of_script> <option>
For example, you can use service with httpd and any option discussed in the previous section, like so:
# service httpd restart
This restarts Apache if it’s running or starts the server if it isn’t running.
The chkconfig command provides a command-line–based interface to Fedora’s service scripts. The command can be used to list and control which software services are started, restarted, and stopped for a specific system state (such as when booting up, restarting, or shutting down) and runlevel (such as single-user mode, networking with multitasking, or graphical login with X).
For example, to view your system’s current settings, take a look at Fedora’s default runlevel as defined in the system initialization table /etc/inittab using the grep command:
# grep id: /etc/inittab
id:3:initdefault:
This example shows that this Fedora system boots to a text-based login without running X11. You can then use the chkconfig command to look at the behavior of Apache for that runlevel:
# chkconfig --list | grep httpd
httpd           0:off 1:off 2:off 3:off 4:off 5:off 6:off
Here you can see that Apache is turned off for runlevels 3 and 5 (the only two practical runlevels in a default Fedora system, although you could create a custom runlevel 4 for Apache). Use --level, httpd, and the control keyword on to set Apache to automatically start when booting to runlevel 3:
# chkconfig --level 3 httpd on
You can then again use chkconfig to verify this setting:
# chkconfig --list | grep httpd
httpd           0:off   1:off   2:off   3:on   4:off   5:off   6:off
To have Apache also start when your system is booted to a graphical login using X, again use level, httpd, and the control keyword on, but this time, specify runlevel 5 like so:
# chkconfig --level 5 httpd on
Again, to verify your system settings, use
# chkconfig --list | grep httpd
httpd           0:off   1:off   2:off   3:on   4:off   5:on   6:off
Use the off keyword to stop Apache from starting at a particular runlevel.
You can also use a graphical version of the chkconfig command named system-config-services during an X session to set when Apache is started or stopped and at which runlevel. To start system-config-services, select the Services on the Server Settings menu from your desktop panel’s System Settings menu, or type the command in a terminal window like so:
$ system-config-services &
After you press Enter, you’re prompted for the root password (because you shouldn’t be running X as root).
This client is a graphical runlevel editor. To have Apache start when using runlevel 3, first use the Edit Runlevel menu to select runlevel 3 and then scroll through the list of services to find httpd. If you click the httpd check box, as shown in Figure 21.1, and then click the toolbar’s Save button, Apache is started at that runlevel the next time the system starts or reboots.
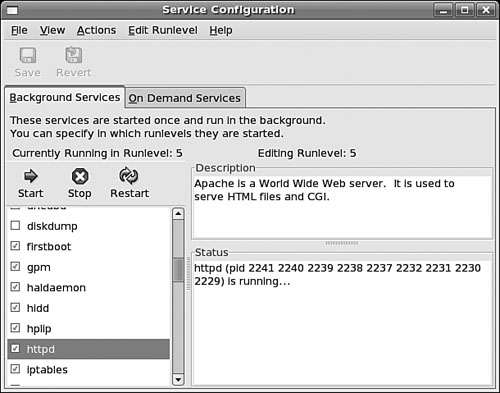
You can also use the Service Configuration client to instantly control a service. Use the Edit Runlevel menu to select the current runlevel in use; highlight httpd; and then click the Start, Stop, or Restart toolbar button.
At this point, the Apache server runs, but perhaps you want to change a behavior, such as the default location of your website’s files. This section talks about the basics of configuring the server to work the way you want it to work.
Runtime configurations are stored in just one file—httpd.conf, which is found under the /etc/httpd/conf directory. This configuration file can be used to control the default behavior of Apache, such as the web server’s base configuration directory (/etc/httpd), the name of the server’s process identification (PID) file (/etc/httpd/run/httpd.pid), or its response timeout (300 seconds). Apache reads the data from the configuration file when started (or restarted). You can also cause Apache to reload configuration information with the command /etc/rc.d/init.d/httpd reload, which is necessary after making changes to its configuration file. (You learned how to accomplish this in the earlier section, “Starting and Stopping Apache.”)
You perform runtime configuration of your server with configuration directives, which are commands that set options for the httpd daemon. The directives are used to tell the server about various options you want to enable, such as the location of files important to the server configuration and operation. Apache supports nearly 300 configuration directives using the following syntax:
directive option option...
Each directive is specified on a single line. See the following sections for some sample directives and how to use them. Some directives set only a value such as a filename, whereas others enable you to specify various options. Some special directives, called sections, look like HTML tags. Section directives are surrounded by angle brackets, such as <directive>. Sections usually enclose a group of directives that apply only to the directory specified in the section:
<Directory somedir/in/your/tree>
  directive option option
  directive option option
</Directory>
All sections are closed with a matching section tag that looks like this: </directive>. Note that section tags, like any other directives, are specified one per line.
Most of the default settings in the config file are okay to keep, particularly if you’ve installed the server in a default location and aren’t doing anything unusual on your server. In general, if you don’t understand what a particular directive is for, you should leave it set to the default value.
The following sections describe some of the configuration file settings you might want to change concerning operation of your server.
The ServerRoot directive sets the absolute path to your server directory. This directive tells the server where to find all the resources and configuration files. Many of these resources are specified in the configuration files relative to the ServerRoot directory.
Your ServerRoot directive should be set to /etc/httpd if you installed the RPM or /usr/local/apache (or whatever directory you chose when you compiled Apache) if you installed from the source.
The Listen directive indicates on which port you want your server to run. By default, this is set to 80, which is the standard HTTP port number. You might want to run your server on another port—for example, when running a test server that you don’t want people to find by accident. Don’t confuse this with real security! See the “File System Authentication and Access Control” section for more information about how to secure parts of your web server.
The User and Group directives should be set to the UID and group ID (GID) the server uses to process requests. In Fedora, set these configurations to a user with few or no privileges. In this case, they’re set to user apache and group apache—a user defined specifically to run Apache. If you want to use a different UID or GID, be aware that the server will run with the permissions of the user and group set here. That means in the event of a security breach, whether on the server or (more likely) in your own CGI programs, those programs run with the assigned UID. If the server runs as root or some other privileged user, someone can exploit the security holes and do nasty things to your site. Always think in terms of the specified user running a command such as rm -rf / because that would wipe all files from your system. That should convince you that leaving apache as a user with no privileges is probably a good thing.
Instead of specifying the User and Group directives using names, you can specify them using the UID and GID numbers. If you use numbers, be sure that the numbers you specify correspond to the user and group you want and that they’re preceded by the pound (#) symbol.
Here’s how these directives look if specified by name:
User apache
Group apache
Here’s the same specification by UID and GID:
User #48
Group #48
The ServerAdmin directive should be set to the address of the webmaster managing the server. This address should be a valid email address or alias, such as [email protected], because this address is returned to a visitor when a problem occurs on the server.
The ServerName directive sets the hostname that the server returns. Set it to a fully qualified domain name (FQDN). For example, set it to www.your.domain rather than simply www. This is particularly important if this machine will be accessible from the Internet rather than just on your local network.
You don’t need to set this unless you want a name other than the machine’s canonical name returned. If this value isn’t set, the server will figure out the name by itself and set it to its canonical name. However, you might want the server to return a friendlier address, such as www.your.domain. Whatever you do, ServerName should be a real domain name service (DNS) name for your network. If you’re administering your own DNS, remember to add an alias for your host. If someone else manages the DNS for you, ask that person to set this name for you.
Set this directive to the absolute path of your document tree, which is the top directory from which Apache serves files. By default, it’s set to /var/www/html/usage. If you built the source code yourself, DocumentRoot is set to /usr/local/apache/htdocs (if you didn’t choose another directory when you compiled Apache). Prior to version 1.3.4, this directive appears in srm.conf.
The UserDir directive disables or enables and defines the directory (relative to a local user’s home directory) where that user can put public HTML documents. It’s relative because each user has her own HTML directory. This setting is disabled by default but can be enabled to store user web content under any directory.
The default setting for this directive, if enabled, is public_html. Each user can create a directory called public_html under her home directory, and HTML documents placed in that directory are available as http://servername/~username, where username is the username of the particular user. Prior to version Apache version 1.3.4, this directive appears in srm.conf.
The DirectoryIndex directive indicates which file should be served as the index for a directory, such as which file should be served if the URL http://servername/_SomeDirectory/ is requested.
It’s often useful to put a list of files here so that if index.html (the default value) isn’t found, another file can be served instead. The most useful application of this is to have a CGI program run as the default action in a directory. If you have users who make their web pages on Windows, you might want to add index.htm as well. In that case, the directive would look like DirectoryIndex index.html index.cgi index.htm. Prior to version 1.3.4, this directive appears in srm.conf.
Apache version 2.0 and greater now uses a new internal architecture supporting multiprocessing modules (MPMs). These modules are used by the server for a variety of tasks, such as network and process management, and are compiled into Apache. MPMs enable Apache to work much better on a wider variety of computer platforms, and they can help improve server stability, compatibility, and scalability.
Apache can use only one MPM at any time. These modules are different from the base set included with Apache (see the “Apache Modules” section later in this chapter), but are used to implement settings, limits, or other server actions. Each module in turn supports numerous additional settings, called directives, which further refine server operation.
The internal MPM modules relevant for Linux include
mpm_common—. A set of 20 directives common to all MPM modulesprefork—. A nonthreaded, preforking web server that works similar to earlier (1.3) versions of Apacheworker—. Provides a hybrid multiprocess multithreaded server
MPM enables Apache to be used on equipment with fewer resources yet still handle massive numbers of hits and provide stable service. The worker module provides directives to control how many simultaneous connections your server can handle.
Note
Other MPMs are available for Apache related to other platforms, such as mpm_netware for NetWare hosts and mpm_winnt for Windows NT platforms. An MPM named perchild, which provides user ID assignment to selected daemon processes, is under development. For more information, browse to the Apache Software Foundation’s home page at http://www.apache.org/.
Apache also supports special configuration files, known as .htaccess files. Almost any directive that appears in httpd.conf can appear in an .htaccess file. This file, specified in the AccessFileName directive in httpd.conf (or srm.conf prior to version 1.3.4) sets configurations on a per-directory (usually in a user directory) basis. As the system administrator, you can specify both the name of this file and which of the server configurations can be overridden by the contents of this file. This is especially useful for sites in which there are multiple content providers and you want to control what these people can do with their space.
To limit which server configurations the .htaccess files can override, use the AllowOverride directive. AllowOverride can be set globally or per directory. For example, in your httpd.conf file, you could use the following:
# Each directory to which Apache has access can be configured with respect
# to which services and features are allowed and/or disabled in that
# directory (and its subdirectories).
#
# First, we configure the "default" to be a very restrictive set of
# permissions.
#
<Directory />
    Options FollowSymLinks
    AllowOverride None
</Directory>
To configure which configuration options are available to Apache by default, you must use the Options directive. Options can be None; All; or any combination of Indexes, Includes, FollowSymLinks, ExecCGI, and MultiViews. MultiViews isn’t included in All and must be specified explicitly. These options are explained in Table 21.2.
Table 21.2. Switches Used by the Options Directive
Switch | Description |
|---|---|
| None of the available options are enabled for this directory. |
| All the available options, except for |
| In the absence of an |
| Server-side includes (SSIs) are permitted in this directory. This can also be written as |
| Allows access to directories that are symbolically linked to a document directory. You should never set this globally for the whole server and only rarely for individual directories. This option is a potential security risk because it allows web users to escape from the document directory and could potentially allow them access to portions of your file system where you really don’t want people poking around. |
| CGI programs are permitted in this directory, even if it isn’t a directory defined in the |
| This is part of the |
The AllowOverrides directives specify which configuration options .htaccess files can override. You can set this directive individually for each directory. For example, you can have different standards about what can be overridden in the main document root and in UserDir directories. This capability is particularly useful for user directories, where the user doesn’t have access to the main server configuration files.
AllowOverrides can be set to All or any combination of Options, FileInfo, AuthConfig, and Limit. These options are explained in Table 21.3.
Table 21.3. Switches Used by the AllowOverrides Directive
Description | |
|---|---|
| The |
| The |
| The |
| The |
You’re likely to include material on your website that isn’t supposed to be available to the public. You must be able to lock out this material from public access and provide designated users with the means to unlock the material. Apache provides two methods for accomplishing this type of access: authentication and authorization. You can use different criteria to control access to sections of your website, including checking the client’s IP address or hostname, or requiring a username and password. This section briefly covers some of these methods.
Caution
Allowing individual users to put web content on your server poses several important security risks. If you’re operating a web server on the Internet rather than on a private network, you should read the WWW Security FAQ at http://www.w3.org/Security/Faq/www-security-faq.html.
One of the simplest ways to limit access to website material is to restrict access to a specific group of users, based on IP addresses or hostnames. Apache uses the allow and deny directives to accomplish this.
Both directives take an address expression as a parameter. The following list provides the possible values and use of the address expression:
allcan be used to affect all hosts.A hostname or domain name, which can either be a partially or a fully qualified domain name; for example,
test.gnulix.orgorgnulix.org.An IP address, which can be either full or partial; for example,
212.85.67or212.85.67.66.A network/netmask pair, such as
212.85.67.0/255.255.255.0.A network address specified in classless inter-domain routing (CIDR) format; for example,
212.85.67.0/24. This is the CIDR notation for the same network and netmask that were used in the previous example.
If you have the choice, it’s preferable to base your access control on IP addresses rather than hostnames. Doing so results in faster performance because no name lookup is necessary—the IP address of the client is included with each request.
You also can use allow and deny to provide or deny access to website material based on the presence or absence of a specific environment variable. For example, the following statement denies access to a request with a context that contains an environment variable named NOACCESS:
deny from env=NOACCESS
The default behavior of Apache is to apply all the deny directives first and then check the allow directives. If you want to change this order, you can use the order statement. Apache might interpret this statement in three different ways:
Order deny,allow—. Thedenydirectives are evaluated before theallowdirectives. If a host isn’t specifically denied access, it is allowed to access the resource. This is the default ordering if nothing else is specified.Order allow,deny—. Allallowdirectives are evaluated beforedenydirectives. If a host isn’t specifically allowed access, it is denied access to the resource.Order mutual-failure—. Only hosts that are specified in anallowdirective and at the same time do not appear in adenydirective are allowed access. If a host doesn’t appear in either directive, it is not granted access.
Consider this example. Suppose that you want to allow only persons from within your own domain to access the server-status resource on your web. If your domain were named gnulix.org, you could add these lines to your configuration file:
<Location /server-status>
    SetHandler server-status
    Order deny,allow
    Deny from all
    Allow from gnulix.org
</Location>
Authentication is the process of ensuring that visitors really are who they claim to be. You can configure Apache to allow access to specific areas of web content only to clients who can authenticate their identity. There are several methods of authentication in Apache; Basic Authentication is the most common (and the method discussed in this chapter).
Under Basic Authentication, Apache requires a user to supply a username and a password to access the protected resources. Apache then verifies that the user is allowed to access the resource in question. If the username is acceptable, Apache verifies the password. If the password also checks out, the user is authorized and Apache serves the request.
HTTP is a stateless protocol; each request sent to the server and each response are handled individually, and not in an intelligent fashion. Therefore, the authentication information must be included with each request. That means each request to a password-protected area is larger and therefore somewhat slower. To avoid unnecessary system use and delays, protect only those areas of your website that absolutely need protection.
To use Basic Authentication, you need a file that lists which users are allowed to access the resources. This file is composed of a plain text list containing name and password pairs. It looks very much like the /etc/passwd user file of your Linux system.
Caution
Don’t use /etc/passwd as a user list for authentication. When you’re using Basic Authentication, passwords and usernames are sent as base 64-encoded text from the client to the server—which is just as readable as plain text. The username and password are included in each request that is sent to the server. So, anyone who might be snooping on Net traffic would be able to get this information!
To create a user file for Apache, use the htpasswd command. This is included with the Apache package. If you installed using the RPMs, it is in /usr/bin. Running htpasswd without any options produces the following output:
Usage:
       htpasswd [-cmdps] passwordfile username
       htpasswd -b[cmdps] passwordfile username password

       htpasswd -n[mdps] username
       htpasswd -nb[mdps] username password
 -c Create a new file.
 -n Don't update file; display results on stdout.
 -m Force MD5 encryption of the password.
 -d Force CRYPT encryption of the password (default).
 -p Do not encrypt the password (plaintext).
 -s Force SHA encryption of the password.
 -b Use the password from the command line rather than prompting for it.
 -D Delete the specified user.
On Windows, TPF and NetWare systems the '-m' flag is used by default.
On all other systems, the '-p' flag will probably not work.
As you can see, it isn’t a very difficult command to use. For example, to create a new user file named gnulixusers with a user named wsb, you need to do something like this:
# htpasswd -c gnulixusers wsb
You would then be prompted for a password for the user. To add more users, you would repeat the same procedure, only omitting the -c flag.
You can also create user group files. The format of these files is similar to that of /etc/groups. On each line, enter the group name, followed by a colon, and then list all users, with each user separated by spaces. For example, an entry in a user group file might look like this:
gnulixusers: wsb pgj jp ajje nadia rkr hak
Now that you know how to create a user file, it’s time to look at how Apache might use this to protect web resources.
To point Apache to the user file, use the AuthUserFile directive. AuthUserFile takes the file path to the user file as its parameter. If the file path isn’t absolute—that is, beginning with a /—it’s assumed that the path is relative to the ServerRoot. Using the AuthGroupFile directive, you can specify a group file in the same manner.
Next, use the AuthType directive to set the type of authentication to be used for this resource. Here, the type is set to Basic.
Now you need to decide to which realm the resource belongs. Realms are used to group different resources that share the same users for authorization. A realm can consist of just about any string. The realm is shown in the Authentication dialog box on the user’s web browser. Therefore, you should set the realm string to something informative. The realm is defined with the AuthName directive.
Finally, state which type of user is authorized to use the resource. You do this with the require directive. The three ways to use this directive are as follows:
If you specify
valid-useras an option, any user in the user file is allowed to access the resource (that is, provided she also enters the correct password).You can specify a list of users who are allowed access with the
usersoption.You can specify a list of groups with the
groupoption. Entries in the group list, as well as the user list, are separated by a space.
Returning to the server-status example you saw earlier, instead of letting users access the server-status resource based on hostname, you can require the users to be authenticated to access the resource. You can do so with the following entry in the configuration file:
<Location /server-status>
    SetHandler server-status
    AuthType Basic
    AuthName "Server status"
    AuthUserFile "gnulixusers"
    Require valid-user
</Location>
If you have host-based as well as user-based access protection on a resource, the default behavior of Apache is to require the requester to satisfy both controls. But assume that you want to mix host-based and user-based protection and allow access to a resource if either method succeeds. You can do so using the satisfy directive. You can set the satisfy directive to All (this is the default) or Any. When set to All, all access control methods must be satisfied before the resource is served. If satisfy is set to Any, the resource is served if any access condition is met.
Here’s another access control example, again using the previous server-status example. This time, you combine access methods so that all users from the Gnulix domain are allowed access and those from outside the domain must identify themselves before gaining access. You can do so with the following:
<Location /server-status>
    SetHandler server-status
    Order deny,allow
    Deny from all
    Allow from gnulix.org
    AuthType Basic
    AuthName "Server status"
    AuthUserFile "gnulixusers"
    Require valid-user
    Satisfy Any
</Location>
There are more ways to protect material on your web server, but the methods discussed here should get you started and are probably be more than adequate for most circumstances. Look to Apache’s online documentation for more examples of how to secure areas of your site.
The Apache core does relatively little; Apache gains its functionality from modules. Each module solves a well-defined problem by adding necessary features. By adding or removing modules to supply the functionality you want Apache to have, you can tailor the Apache server to suit your exact needs.
Nearly 50 core modules are included with the basic Apache server. Many more are available from other developers. The Apache Module Registry is a repository for add-on modules for Apache, and it can be found at http://modules.apache.org/. The modules are listed in the modules directory under /etc/httpd/, but this directory is a link to the /usr/lib/httpd/modules directory where the modules reside (your list might look different):
mod_access.so       mod_cern_meta.so  mod_log_config.so     mod_setenvif.so
mod_actions.so      mod_cgi.so        mod_mime_magic.so     mod_speling.so
mod_alias.so        mod_dav_fs.so     mod_mime.so           mod_ssl.so
mod_asis.so         mod_dav.so        mod_negotiation.so    mod_status.so
mod_auth_anon.so    mod_dir.so        mod_perl.so           mod_suexec.so
mod_auth_dbm.so     mod_env.so        mod_proxy_connect.so  mod_unique_id.so
mod_auth_digest.so  mod_expires.so    mod_proxy_ftp.so      mod_userdir.so
mod_auth_mysql.so   mod_headers.so    mod_proxy_http.so     mod_usertrack.so
mod_auth_pgsql.so   mod_imap.so       mod_proxy.so          mod_vhost_alias.so
mod_auth.so         mod_include.so    mod_python.so         mod_autoindex.so
mod_info.so         mod_rewrite.so
Each module adds new directives that can be used in your configuration files. As you might guess, there are far too many extra commands, switches, and options to describe them all in this chapter. The following sections briefly describe a subset of those modules available with Fedora’s Apache installation.
mod_access controls access to areas on your web server based on IP addresses, hostnames, or environment variables. For example, you might want to allow anyone from within your own domain to access certain areas of your web. Refer to the “File System Authentication and Access Control” section earlier in this chapter for more information.
mod_alias manipulates the URLs of incoming HTTP requests, such as redirecting a client request to another URL. It also can map a part of the file system into your web hierarchy. For example,
Alias /images/ /home/wsb/graphics/
fetches contents from the /home/wsb/graphics directory for any URL that starts with /images/. This is done without the client knowing anything about it. If you use a redirection, the client is instructed to go to another URL to find the requested content. More advanced URL manipulation can be accomplished with mod_rewrite.
mod_asis is used to specify, in fine detail, all the information to be included in a response. This completely bypasses any headers Apache might have otherwise added to the response. All files with an .asis extension are sent straight to the client without any changes.
As a short example of the use of mod_asis, assume that you’ve moved content from one location to another on your site. Now you must inform people who try to access this resource that it has moved, as well as automatically redirect them to the new location. To provide this information and redirection, you can add the following code to a file with an .asis extension:
Status: 301 No more old stuff!
Location: http://gnulix.org/newstuff/
Content-type: text/html

<HTML>
 <HEAD>
  <TITLE>We've moved...</TITLE>
 </HEAD>
 <BODY>
   <P>We've moved the old stuff and now you'll find it at:</P>
   <A HREF="http://gnulix.org/newstuff/">New stuff</A>!.
 </BODY>
</HTML>
mod_auth uses a simple user authentication scheme, referred to as Basic Authentication, which is based on storing usernames and encrypted passwords in a text file. This file looks very much like UNIX’s /etc/passwd file and is created with the htpasswd command. Refer to the “File System Authentication and Access Control” section earlier in this chapter for more information about this subject.
The mod_auth_anon module provides anonymous authentication similar to that of anonymous FTP. The module enables you to define user IDs of those who are to be handled as guest users. When such a user tries to log on, he is prompted to enter his email address as his password. You can have Apache check the password to ensure that it’s a (more or less) proper email address. Basically, it ensures that the password contains an @ character and at least one . character.
An extension of the basic mod_auth module, instead of sending the user information in plain text, mod_auth_digest is sent via the MD5 Digest Authentication process. This authentication scheme is defined in RFC 2617. Compared to using Basic Authentication, this is a much more secure way of sending user data over the Internet. Unfortunately, not all web browsers support this authentication scheme.
To create password files for use with mod_auth_dbm, you must use the htdigest utility. It has more or less the same functionality as the htpasswd utility. See the man page of htdigest for further information.
The mod_autoindex module dynamically creates a file list for directory indexing. The list is rendered in a user-friendly manner similar to those lists provided by FTP’s built-in ls command.
mod_cgi allows execution of CGI programs on your server. CGI programs are executable files residing in the /var/www/cgi-bin directory and are used to dynamically generate data (usually HTML) for the remote browser when requested.
The mod_dir module is used to determine which files are returned automatically when a user tries to access a directory. The default is index.html. If you have users who create web pages on Windows systems, you should also include index.htm, like this:
DirectoryIndex index.html index.htm
mod_env controls how environment variables are passed to CGI and SSI scripts.
mod_expires is used to add an expiration date to content on your site by adding an Expires header to the HTTP response. Web browsers or cache servers won’t cache expired content.
mod_headers is used to manipulate the HTTP headers of your server’s responses. You can replace, add, merge, or delete headers as you see fit. The module supplies a Header directive for this. Ordering of the Header directive is important. A set followed by an unset for the same HTTP header removes the header altogether. You can place Header directives almost anywhere within your configuration files. These directives are processed in the following order:
Core server
Virtual host
<Directory>and.htaccessfiles<Location><Files>
mod_include enables the use of server-side includes on your server. See the “Dynamic Content” section later in the chapter for more information about how to use SSI.
mod_info provides comprehensive information about your server’s configuration. For example, it displays all the installed modules, as well as all the directives used in its configuration files.
mod_log_config defines how your log files should look. See the “Logging” section for further information about this subject.
The mod_mime module tries to determine the MIME type of files from their extensions.
The mod_mime_magic module tries to determine the MIME type of files by examining portions of their content.
Using the mod_negotiation module, you can select one of several document versions that best suits the client’s capabilities. There are several options to select which criteria to use in the negotiation process. You can, for example, choose among different languages, graphics file formats, and compression methods.
mod_proxy implements proxy and caching capabilities for an Apache server. It can proxy and cache FTP, CONNECT, HTTP/0.9, and HTTP/1.0 requests. This isn’t an ideal solution for sites that have a large number of users and therefore have high proxy and cache requirements. However, it’s more than adequate for a small number of users.
mod_rewrite is the Swiss army knife of URL manipulation. It enables you to perform any imaginable manipulation of URLs using powerful regular expressions. It provides rewrites, redirection, proxying, and so on. There’s very little that you can’t accomplish using this module.
mod_setenvif allows manipulation of environment variables. Using small snippets of text-matching code known as regular expressions, you can conditionally change the content of environment variables. The order in which SetEnvIf directives appear in the configuration files is important. Each SetEnvIf directive can reset an earlier SetEnvIf directive when used on the same environment variable. Be sure to keep that in mind when using the directives from this module.
mod_speling is used to enable correction of minor typos in URLs. If no file matches the requested URL, this module builds a list of the files in the requested directory and extracts those files that are the closest matches. It tries to correct only one spelling mistake.
You can use mod_status to create a web page containing a plethora of information about a running Apache server. The page contains information about the internal status as well as statistics about the running Apache processes. This can be a great aid when you’re trying to configure your server for maximum performance. It’s also a good indicator of when something’s amiss with your Apache server.
mod_ssl provides Secure Sockets Layer (version 2 and 3) and transport layer security (version 1) support for Apache. At least 30 directives exist that deal with options for encryption and client authorization and that can be used with this module.
mod_unique_id generates a unique request identifier for every incoming request. This ID is put into the UNIQUE_ID environment variable.
The mod_userdir module enables mapping of a subdirectory in each user’s home directory into your web tree. The module provides several ways to accomplish this.
mod_usertrack is used to generate a cookie for each user session. This can be used to track the user’s click stream within your web tree. You must enable a custom log that logs this cookie into a log file.
mod_vhost_alias supports dynamically configured mass virtual hosting, which is useful for Internet service providers (ISPs) with many virtual hosts. However, for the average user, Apache’s ordinary virtual hosting support should be more than sufficient.
There are two ways to host virtual hosts on an Apache server. You can have one IP address with multiple CNAMEs, or you can have multiple IP addresses with one name per address. Apache has different sets of directives to handle each of these options. (You learn more about virtual hosting in Apache in the next section of this chapter.)
Again, the available options and features for Apache modules are too numerous to describe completely in this chapter. You can find complete information about the Apache modules in the online documentation for the server included with Fedora or at the Apache Software Foundation’s website.
One of the more popular services to provide with a web server is to host a virtual domain. Also known as a virtual host, a virtual domain is a complete website with its own domain name, as if it were a standalone machine, but it’s hosted on the same machine as other websites. Apache implements this capability in a simple way with directives in the httpd.conf configuration file.
Apache now can dynamically host virtual servers by using the mod_vhost_alias module you read about in the preceding section of the chapter. The module is primarily intended for ISPs and similar large sites that host a large number of virtual sites. This module is for more advanced users and, as such, it is outside the scope of this introductory chapter. Instead, this section concentrates on the traditional ways of hosting virtual servers.
After you’ve configured your Linux machine with multiple IP addresses, setting up Apache to serve them as different websites is simple. You need only put a VirtualHost directive in your httpd.conf file for each of the addresses you want to make an independent website:
<VirtualHost 212.85.67.67>
ServerName gnulix.org
DocumentRoot /home/virtual/gnulix/public_html
TransferLog /home/virtual/gnulix/logs/access_log
ErrorLog /home/virtual/gnulix/logs/error_log
</VirtualHost>
Use the IP address, rather than the hostname, in the VirtualHost tag.
You can specify any configuration directives within the <VirtualHost> tags. For example, you might want to set AllowOverrides directives differently for virtual hosts than you do for your main server. Any directives that aren’t specified default to the settings for the main server.
Name-based virtual hosts enable you to run more than one host on the same IP address. You must add the names to your DNS as CNAMEs of the machine in question. When an HTTP client (web browser) requests a document from your server, it sends with the request a variable indicating the server name from which it’s requesting the document. Based on this variable, the server determines from which of the virtual hosts it should serve content.
Note
Some older browsers are unable to see name-based virtual hosts because this is a feature of HTTP 1.1 and the older browsers are strictly HTTP 1.0–compliant. However, many other older browsers are partially HTTP 1.1–compliant, and this is one of the parts of HTTP 1.1 that most browsers have supported for a while.
Name-based virtual hosts require just one step more than IP address-based virtual hosts. You must first indicate which IP address has the multiple DNS names on it. This is done with the NameVirtualHost directive:
NameVirtualHost 212.85.67.67
You must then have a section for each name on that address, setting the configuration for that name. As with IP-based virtual hosts, you need to set only those configurations that must be different for the host. You must set the ServerName directive because it’s the only thing that distinguishes one host from another:
<VirtualHost 212.85.67.67>
ServerName bugserver.gnulix.org
ServerAlias bugserver
DocumentRoot /home/bugserver/htdocs
ScriptAlias /home/bugserver/cgi-bin
TransferLog /home/bugserver/logs/access_log
</VirtualHost>

<VirtualHost 212.85.67.67>
ServerName pts.gnulix.org
ServerAlias pts
DocumentRoot /home/pts/htdocs
ScriptAlias /home/pts/cgi-bin
TransferLog /home/pts/logs/access_log
ErrorLog /home/pts/logs/error_log
</VirtualHost>
Tip
If you’re hosting websites on an intranet or internal network, users will likely use the shortened name of the machine rather than the FQDN. For example, users might type http://bugserver/index.html in their browser location field rather than http://bugserver.gnulix.org/index.html. In that case, Apache would not recognize that those two addresses should go to the same virtual host. You could get around this by setting up VirtualHost directives for both bugserver and bugserver.gnulix.org, but the easy way around it is to use the ServerAlias directive, which lists all valid aliases for the machine:
ServerAlias bugserver
For more information about VirtualHost, refer to the help system on http://localhost/_manual.
Apache provides for logging just about any web access information you might be interested in. Logging can help with
System resource management, by tracking usage
Intrusion detection, by documenting bad HTTP requests
Diagnostics, by recording errors in processing requests
Two standard log files are generated when you run your Apache server: access_log and error_log. They are found under the /var/log/httpd directory. (Others include the SSL logs ssl_access_log, ssl_error_log, and ssl_request_log.) All logs except for the error_log (by default, this is just the access_log) are generated in a format specified by the CustomLog and LogFormat directives. These directives appear in your httpd.conf file.
A new log format can be defined with the LogFormat directive:
LogFormat "%h %l %u %t "%r" %>s %b" common
The common log format is a good starting place for creating your own custom log formats. Note that most of the available log analysis tools assume that you are using the common log format or the combined log format—both of which are defined in the default configuration files.
The following variables are available for LogFormat statements:
| Remote IP address. |
| Local IP address. |
| Bytes sent, excluding HTTP headers. This is shown in Apache’s Combined Log Format (CLF). For a request without any data content, a |
Bytes sent, excluding HTTP headers. | |
| The contents of the environment variable |
| The filename of the output log. |
| Remote host. |
| Request protocol. |
| The contents of |
| Remote log name (from |
| Request method. |
| The contents of note |
| The contents of |
| The canonical port of the server serving the request. |
| The process ID of the child that serviced the request. |
| The contents of the query string, prepended with a |
| The first line of request. |
| Status. For requests that were internally redirected, this is the status of the original request— |
| The time, in common log time format. |
| The time, in the form given by |
| The seconds taken to serve the request. |
| Remote user from |
| The URL path requested. |
| The server name according to the |
| The canonical |
You can put a conditional in front of each variable to determine whether the variable is displayed. If the variable isn’t displayed, - is displayed instead. These conditionals are in the form of a list of numerical return values. For example, %!401u displays the value of REMOTE_USER unless the return code is 401.
You can then specify the location and format of a log file using the CustomLog directive:
CustomLog logs/access_log common
If it isn’t specified as an absolute path, the location of the log file is assumed to be relative to the ServerRoot.
The most common way to provide dynamic content on websites is with CGI programs. CGI is a specification of communication between server processes (such as programs that generate dynamic documents) and the server itself. SSIs allow output from CGI programs, or other programs, to be inserted into existing HTML pages.
Another way to add dynamic content to your website is to use PHP (PHP Hypertext Preprocessor [the name is recursive]). PHP is an HTML-embedded scripting language designed specifically for web use. The PHP module for Apache is one of the most popular third-party modules available.
By default, you can put any CGI program on your server in the directory defined by the ScriptAlias directive. CGI programs can be written in any language. The most popular languages for CGI programming are Perl and C. Chapter 30, “Using Perl,” provides more information about using the Perl scripting language.
These programs must be executable by the default Apache user, which means you must change the mode of the files to 555 so that the Apache user can execute them. By default, Apache runs in Fedora as a user named apache:
chmod 555 program.cgi
To execute CGI programs outside the ScriptAlias directory, you must enable the ExecCGI option for that directory. This is done in either your httpd.conf file or in an .htaccess file in the directory.
To test whether you have CGI configured correctly, try the CGI program in Listing 21.1. This program is written in Perl and displays the values of the HTTP environment variables.
Example 21.1. environment.pl
#!/usr/bin/perl -w

print <<EOF;
"Content-type: text/html"

<HTML>
 <HEAD>
  <TITLE>Simple CGI program</TITLE>
 </HEAD>
 <BODY>
EOF
for (keys %ENV) {
    print " $_ = $ENV{$_}<BR>
";
}
    print <<EOF;
     </BODY>
    </HTML>
EOF
If you’re going to write CGI programs in Perl, take some time to study the CGI modules that come bundled with Perl. An extensive Perl module library, which contains many modules designed to be used when writing CGIs, is accessible at http://www.cpan.org/.
If you are using many CGIs written in Perl, examine the mod_perl module. It embeds a Perl interpreter within the Apache server. Using this module results in faster execution times for your CGIs because you don’t need to start a new Perl interpreter for each request. You’ll find information about using mod_perl under the /usr/share/doc/_mod_perl-1.99_12/docs/ directory if you install it from this book’s DVD.
Server-side includes are directives written directly into an HTML page, which the server parses when the page is served to the web client. SSIs can be used to include other files, output from programs, or environment variables.
You can enable SSI with the XBitHack directive. XBitHack can be set to a value of on or off and can be set in either your configuration file or .htaccess files. If the XBitHack directive is on, it indicates that all files with the user-execute bit set should be parsed for SSI directives. This has two main advantages. One is that you don’t need to rename a file and change all links to that file simply because you want to add a little dynamic content to it. The other reason is more cosmetic: Users looking at your web content can’t tell by looking at the filename that you’re generating a page dynamically, so your wizardry is just a tiny bit more impressive.
Another positive side effect of using XBitHack is that it enables you to control how clients should cache your page. Pages containing SSI statements do not usually contain a Last-modified HTTP header. Therefore, they won’t be cached by proxies or web browsers. If you enable XBitHack, the group-execute bit for files controls whether a Last-modified header should be generated. It is set to the same value as the last modified time of the file. Be sure to use this only on files that really are supposed to be cached.
Another way to enable SSI is to indicate that files with a certain filename extension (typically .shtml) are to be parsed by the server when they’re served. This is accomplished with the following lines in your httpd.conf file:
# To use server-parsed HTML files
#
#AddType text/html .shtml
#AddHandler server-parsed .shtml
If you uncomment the AddType and AddHandler lines, you tell the server to parse all .shtml files for SSI directives. In addition to these directives, the following directive must be specified for directories in which you want to permit SSI:
Options Includes
This can be set in the server configuration file or in an .htaccess file.
SSI directives look rather like HTML comment tags. The syntax is as follows:
<!--#element attribute=value attribute=value ... -->
The element can be one of several directives, including
configechoexecfsizeflastmodincludeprintenvset
The following sections describe each of these directives and their uses.
The config directive enables you to set various configuration options to determine how the document parsing is handled. Because the page is parsed from top to bottom, config directives should appear at the top of the HTML document. Three configurations can be set with this command:
errmsg—. Sets the error message that’s returned to the client if something goes wrong while parsing the document. The default message is[an error occurred while processing this directive], but you can set the message to any text with this directive. For example,<!--#config errmsg="[It's broken, dude]" -->
sizefmt—. Sets the format used to display file sizes. You can set the value tobytesto display the exact file size in bytes or set it toabbrevto display the size in KB or MB. For example,<!--#config sizefmt="bytes" -->
timefmt—. Sets the format used to display times. The format of the value is the same as that of thestrftimefunction used by C (and Perl) to display dates, as shown in the following list:%%—Percent%a—Day of the week abbreviation%A—Day of the week%b—Month abbreviation%B—Month%c—ctimeformat:Sat Nov 19 21:05:57 1994%d—Numeric day of the month%e—DD%D—MM/DD/YY%h—Month abbreviation%H—Hour, 24-hour clock, leading zeroes%I—Hour, 12-hour clock, leading zeroes%j—Day of the year%k—Hour%l—Hour, 12-hour clock%m—Month number, starting with 1%M—Minute, leading zeroes%n—Newline%o—Ordinal day of month—1st, 2nd, 25th, and so on%p—AM or PM%r—Time format:09:05:57 PM%R—Time format:21:05%S—Seconds, leading zeroes%t—Tab%U—Week number; Sunday as first day of week%w—Day of the week, numerically; Sunday = 0%W—Week number; Monday as first day of week%x—Date format:11/19/94%X—Time format:21:05:57%y—Year (two digits)%Y—Year (four digits)%Z—Time zone in ASCII, such as PST
The echo directive displays any one of the include variables in the following list. Times are displayed in the time format specified by timefmt. Use the var attribute to indicate the variable to be displayed:
DATE_GMT—. The current date in Greenwich mean time.DATE_LOCAL—. The current date in the local time zone.DOCUMENT_NAME—. The filename (excluding directories) of the document requested by the user.DOCUMENT_URI—. The (%-decoded) URL path of the document requested by the user. Note that in the case of nested include files, this isn’t the URL for the current document.LAST_MODIFIED—. The last modification date of the document requested by the user.
The exec directive executes a shell command or a CGI program, depending on the parameters you provide. Valid attributes are cgi and cmd:
cgi—. The URL of a CGI program to be executed. The URL must be a local CGI, not one located on another machine. The CGI program is passed theQUERY_STRINGandPATH_INFOthat were originally passed to the requested document, so the URL specified cannot contain this information. You should useinclude virtualinstead of this directive.cmd—. A shell command to be executed. The results are displayed on the HTML page.
The fsize directive displays the size of a file specified by either the file or virtual attribute. Size is displayed as specified with the sizefmt directive:
file—. The path (file system path) to a file, either relative to the root if the value starts with/or relative to the current directory if it doesn’tvirtual—. The relative URL path to a file
Displays the last modified date of a file. The desired file is specified as with the fsize directive.
The include directive includes the contents of a file. The file is specified with the file and virtual attributes, as with fsize and flastmod.
If the file specified is a CGI program and IncludesNOEXEC isn’t set, the program is executed and the results are displayed. This is to be used in preference to the exec directive. You can pass a QUERY_STRING with this directive—something you can’t do with the exec directive.
This sets the value of a variable, and its attributes are var and value. For example,
<!--#set var="animal" value="cow" -->
Note
In your configuration files (or in .htaccess), you can specify Options IncludesNOEXEC to disallow the exec directive because this is the least secure of the SSI directives. Be especially cautious when web users are able to create content (such as a guest book or discussion board) and these options are enabled!
The variables whose attributes have been set by var and value can also be used elsewhere with some of the following directives.
Using the variables set with the set directive and the various environment and include variables, a limited flow control syntax can be used to generate a certain amount of dynamic content on server-parsed pages.
The syntax of the if/else functions is as follows:
<!--#if expr="test_condition" -->
<!--#elif expr="test_condition" -->
<!--#else -->
<!--#endif -->
expr can be a string, which is considered true if nonempty, or a variety of comparisons between two strings. Available comparison operators are =, !=, <, <=, >, and >=. If the second string has the format /string/, the strings are compared with regular expressions. Multiple comparisons can be strung together with && (AND) and || (OR). Any text appearing between the if/elif/else directives are displayed on the resulting page. An example of such a flow structure follows:
<!--#set var="agent" value="$HTTP_USER_AGENT" -->
<!--#if expr="$agent = /Mozilla/" -->
Mozilla!
<!--#else -->
Something else!
<!--#endif -->
This code displays Mozilla! if you’re using a browser that passes Mozilla as part of its USER_AGENT string, and it displays Something else! otherwise.
Some of Apache’s basic behavior can be configured using Red Hat’s system-config-httpd, a GUI tool for the X Window System. This can provide an easy way to configure settings, such as Apache’s user and group name, the location of PID and process lock files, or performance settings (such as the maximum number of connections), without manually editing configuration files.
Caution
If you use system-config-httpd, you shouldn’t try to manually edit the httpd.conf file. Manual changes are overwritten by the GUI client if you again use system-config-httpd!
Launch this client by using your X desktop panel’s Server Settings’ HTTP Server menu item or from the command line of an X terminal window, like this:
$ system-config-httpd &
After you press Enter, you’re asked to type the root password. You then see the main client window shown in Figure 21.2.

In the Main tab, you can set the server name, indicate where to send email addressed to the webmaster, and set the port that Apache uses. If you want, you can also configure specific virtual hosts to listen on different ports.
In the Virtual Hosts tab, you can configure the properties of each virtual host. The Name list box contains a list of all virtual hosts operating in Apache. Edit a virtual host by opening the Virtual Hosts Properties dialog box, shown in Figure 21.3. You do this by highlighting the name of a virtual host in the Name list box of the Virtual Hosts tab and clicking the Edit button at the right of the tab. Use the General Options item in the Virtual Hosts Properties dialog box to configure basic virtual host settings.
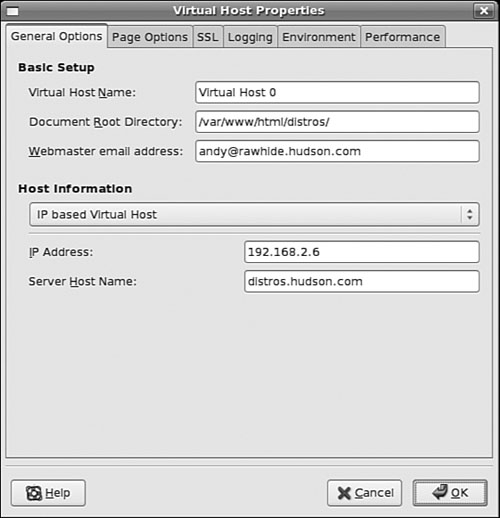
Click the Site Configuration listing in the General Options list of this dialog box to set defaults, such as which files are loaded by default when no files are specified (the default is index.*) in the URL.
The SSL listing in the General Options pane gives you access to settings used to enable or disable SSL, specify certificate settings, and define the SSL log filename and location. Select the Logging listing to access options for configuring where the error messages are logged, as well as where the transfer log file is kept and how much information is put in it.
Use the Environment Variables options to configure settings for the env_mod module, used to pass environment directives to CGI programs. The Directories section configures the directory options (such as whether CGI programs are allowed to run) as well as the order entries mentioned in the httpd.conf section.
The Server tab, shown in Figure 21.4, enables you to configure things such as where the lock file and the PID file are kept. In both cases, you should use the defaults. You can also configure the directory where any potential core dumps will be placed.

Finally, you can set which user and group Apache is to run as. As mentioned in a previous note, for security reasons, you should run Apache as the user named apache and as a member of the group apache.
Use the options in the Performance Tuning tab to configure Apache to provide peak performance in your system. Options in this tab set the maximum number of connections, connection timeouts, and number of requests per connection. When setting this number, keep in mind that for each connection to your server, another instance of the HTTPD program might be run, depending on how Apache is built. Each instance takes resources such as CPU time and memory. You can also configure details about each connection such as how long, in seconds, before a connection times out and how many requests each connection can make to the server. More tips on tuning Apache can be found in Chapter 35, “Performance Tuning.”
Of course, other web servers can be used with Fedora. Apache is by far the most popular, but this does not rule out the others. To determine the best web server for your use, consider the needs of the website you manage. Does it need heavy security (for e-commerce), multimedia (music, video, and pictures), or the capability to download files easily? How much are you willing to spend for the software? Do you need software that is easy to maintain and troubleshoot or that includes tech support? The answers to these questions might steer you to something other than Apache.
The following sections list some of the more popular alternatives to using Apache as your web server.
Despite the Netcraft numbers shown previously in Table 21.1, there is evidence that the Sun Java System Web Server (formerly known as the iPlanet Web Server, and subsequently Sun ONE Web Server) might be even more popular than Apache in strictly corporate arenas. Netcraft has rated Sun Java System Web Server number one in market share among Fortune 100 websites.
The server got its start as the Netscape Enterprise Server—one of the first powerful web servers ever to hit the market. Sun Java System Web Server comes in many flavors, and all of them are big. In addition to the enterprise-level web server that can be run on Red Hat, the software features application, messaging, calendar, and directory servers—just to name a few.
Sun Java System Web Server is great for handling big web needs, and it comes with an appropriately big price tag: $1,495 (U.S.) per CPU. It’s definitely not something to run the school website—unless your school happens to be a major state university with several regional campuses. For more information on Sun Java System Web Server, you can visit its website (http://wwws.sun.com/software/products/web_srvr/home_web_srvr.html).
If you’re looking for something a little more secure than Apache but still don’t want to lose the Apache functionality, you can purchase Stronghold from Red Hat Software. Although not a web server as such, Stronghold is a server add-on that provides 128-bit cryptography and security certificates to the Apache web server (which is included in your purchase of Stronghold). Stronghold supports SSL and TLS security standards, as well as many of the certificate standards on the market today.
The price for this kind of security is not particularly cheap. The software, which can be previewed at http://www.redhat.com/software/stronghold/, was advertised in 2004 at $995 (U.S.) per year.
Zope is another open source web server. Although it is still relatively young and might not have as much flexibility as Apache, it is making strong inroads in the web server market.
What makes Zope different from Apache is the fact that it is managed through a completely web-based graphic interface. This has broad appeal for those who are not enthused about a command-line–only interface.
Zope is a product of the Zope Corporation (formerly Digital Creations), the same firm that made the Python programming language. And, like all things open source, it is free. Information on Zope can be found at both http://www.zope.com/ (for the commercial version) and http://www.zope.org/ (for the open source version).
Fedora sites can also use the Zeus Web Server from Zeus Technology. This server offers a scalable SSL implementation, security settings across multiple websites, and an online administration server. The current price is $1,700 for a host platform with up to two CPUs, but load balancing via the Zeus Load Balancer costs $12,000 for each pair of load-balancing computers.
You can get more information about the Zeus Web Server at http://www.zeus.com/products/zws/.
There’s a plethora of Apache documentation online. For more information about Apache and the subjects discussed in this chapter, look at some of the following resources:
http://news.netcraft.com/archives/web_server_survey.html—A statistical graph of web server usage by 53,341,867 servers (as of August 2004). The research points out that Apache is, by far, the most widely used server for Internet sites.
http://www.apache.org/—Extensive documentation and information about Apache are available at The Apache Project website.
http://www.apacheweek.com/—You can obtain breaking news about Apache and great technical articles at the Apache Week site.
http://apachetoday.com/—Another good Apache site. Original content as well as links to Apache-related stories on other sites can be found at Apache Today’s site.
http://www.hwg.org/—HTML, CGI, and related subjects are available at The HTML Writers Guild site.
http://modules.apache.org/—Available add-on modules for Apache can be found at The Apache Module Registry website.
There are several good books about Apache. For example, Apache Server Unleashed (Sams Publishing), ISBN 0-672-31808-3.
For more information on Zope, see The Zope Book (New Riders Publishing), ISBN 0-7357-11372.