
IN THIS CHAPTER
In the early days of computing, file and printer sharing was pretty much impossible due to the lack of good networking standards and interoperability. If you wanted to use a printer connected to another computer, you had to save the file to a floppy disk and walk over.
Nowadays, both file and printer sharing have become second nature in a world where it is not unusual for someone to own more than one computer. Whether it be for sharing photographs amongst various computers, or having a central repository available for collaboration, file sharing is an important part of our information age. Alongside this is the need to be able to share printers; after all, no one wants to have to plug and unplug a computer to a printer just so they can print out a quick letter.
Whatever your reasons for needing to share files and printers across a network, you will find out how to do both in this chapter. We will look at how you can share files using the popular UNIX NFS protocol, as well as the more Windows-friendly Samba system. You will also find out how to configure network attached printers with interfaces such as JetDirect. We look at both graphical and command-line tools, so you should find something to suit the way you work.
NFS is the protocol developed by Sun Microsystems that allows computers to use a remote file system as if it were a real part of the local machine. A common use of NFS is to allow users’ home directories to appear on every local machine they use, thus eliminating the need to have physical home directories. This opens up hot-desking and other flexible working arrangements, especially because no matter where the user is, his home directory follows him around.
Another popular use for NFS is to share binary files between similar computers. If you have a new version of a package that you want all machines to have, you have to do the upgrade only on the NFS server, and all hosts running the same version of Fedora will have the same upgraded package.
NFS is installed by default on Fedora and consists of several programs that work together to provide the NFS server service. One is rpc.portmapper, which maps NFS requests to the correct daemon. Two others are rpc.nfsd, which is the NFS daemon, and rpc.mountd, which controls the mounting and unmounting of file systems.
To have NFS automatically started when Fedora boots, use command-line or graphical administrative utilities, such as chkconfig, ntsysv, or system-config-services. Make sure that you have the portmap service started because it is used as part of the service. One way to manually start or stop NFS is by directly calling its service control script nfs like this:
# /etc/rc.d/init.d/nfs start
Starting NFS services:              [ OK ]
Starting NFS quotas:                [ OK ]
Starting NFS daemon:                [ OK ]
Starting NFS mountd:                [ OK ]
In this example, NFS has been started. Use the stop keyword instead to stop the service. This approach to controlling NFS is handy, especially after configuration changes have been made. You can also use the service command or the graphical system-config-services client in the same way. See the next section on how to configure NFS support on your Fedora system.
The NFS server can be configured by editing the /etc/exports file. This file is similar to the /etc/fstab file in that it is used to set the permissions for the file systems being exported. The entries look like this:
/file/system yourhost(options) *.yourdomain.com(options) 192.15.69.0/24(options)
This shows three common clients to which to share /file/system. The first, yourhost, shares /file/system to just one host. The second, .yourdomain.com, uses the asterisk (*) as a wildcard to enable all hosts in yourdomain.com to access /file/system. The third share enables all hosts of the Class C network, 192.15.69.0, to access /file/share. For security, it is best not to use shares like the last two across the Internet because all data will be readable by any network the data passes by. Some common options are shown in Table 23.1.
The following is an example of an /etc/exports file:
# /etc/exports file for myhost.mydomain.com
/usr/local        yourhost(ro,show)
/home/ahudson    *.yourdomain.com(rw,hide,sync)
This file exports (makes available) /usr/local to yourhost. The mount is read-only (which is good for a directory of binary files that don’t get written to). It also allows users on yourhost to see the contents of file systems that might be mounted on /usr/local. The second export mounts /home/ahudson to any host in yourdomain.com. It doesn’t allow subsidiary file systems to be viewed, but you can read and write to the file system.
After you have finished with the /etc/exports file, the following command
# /usr/sbin/exportfs –r
exports all the file systems in the /etc/exports file to a list named xtab under the /var/lib/nfs directory, which is used as a guide for mounting when a remote computer asks for a directory to be exported. The -r option to the command reads the entire /etc/exports file and mounts all the entries. The exportfs command can also be used to export specific files temporarily. Here’s an example using exportfs to export a file system:
/usr/sbin/exportfs -o async yourhost:/usr/tmp
This command exports /usr/tmp to yourhost with the async option.
Be sure to restart the NFS server after making any changes to /etc/exports. If you prefer, you can use Fedora’s system-config-nfs graphical client to set up NFS while using the X Window System. Start the client by clicking the System Settings menu and then selecting the NFS Server menu item from the Server Settings menu. You can also start the client from the command line of an X terminal window, like so:
$ system-config-nfs &
After you press Enter, you are prompted for the root password. Type in the password and click OK, and you see the main window. Click the Add button, and you see the Add NFS Share dialog box (see Figure 23.1).

In the Directory text box, type in a name of a directory to be exported; in the Host(s) text box, type in a hostname or the IP address of a remote host that is to be allowed access to the directory. By default, a directory is exported as read-only, but you can choose read and write access by clicking either option in the Basic Permissions area of the dialog box. When finished, click the OK button, click the Apply button, and then use the File menu to quit.
To configure your host as an NFS client (to acquire remote files or directories), edit the /etc/fstab file as you would to mount any local file system. However, instead of using a device name to be mounted (such as /dev/hda1), enter the remote hostname and the desired file system to be imported. For example, one entry might look like this:
# Device             Mount Point Type Options       Freq Pass
yourhost:/usr/local  /usr/local  nfs  nfsvers=3,ro  0    0
Note
If you use autofs on your system, you need to use proper autofs entries for your remote NFS mounts. See the section 5 man page for autofs.
The options column uses the same options as standard fstab file entries with some additional entries, such as nfsvers=3, which specifies the third version of NFS. You can also use the mount command, as root, to quickly attach a remote directory to a local file system by using a remote host’s name and exported directory. For example,
# mount -t nfs 192.168.2.67:/music /music
After you press Enter, the entire remote directory appears on your file system. You can verify the imported file system using the df command like so:
# df
Filesystem          1k-blocks     Used Available Use% Mounted on
/dev/hda2            18714368  9642600   8121124  55% /
/dev/hda1               46636    13247     30981  30% /boot
none                   120016        0    120016   0% /dev/shm
192.168.2.67:/music  36875376 20895920  14106280  60% /music
Make sure that the desired mount point exists before using the mount command. When finished using the directory (perhaps for copying backups), the umount command can be used to remove the remote file system. Note that if you specify the root directory (/) as a mount point, you cannot unmount the NFS directory until you reboot (because Linux complains that the file system is in use).
Samba uses the Session Message Block (SMB) protocol to enable the Windows operating system (or any operating system) to access Linux files. Using Samba, you can make your Fedora machine look just like a Windows computer to other Windows computers on your network. You do not need to install Windows on your PC.
Samba is a very complex program—so much so that the book Samba Unleashed (Sams Publishing, 2000, ISBN 0-672-31862-8) is more than 1,200 pages long. The Samba man page (when converted to text) for just the configuration file is 330KB and 7,013 lines long. Although Samba is complex, setting it up and using it does not have to be difficult. There are many options, which account for some of Samba’s complexity. Depending on what you want, Samba’s use can be as easy or as difficult as you would like it to be.
Fortunately, Fedora includesthe Samba Web Administration Tool (SWAT), which can be used to configure Samba by using the Mozilla web browser. SWAT provides an easy way to start and stop the Samba server; set up printing services; define remote access permissions; and create Samba usernames, passwords, and shared directories. This section delves into the basics of configuring Samba, and you should first read how to manually configure Samba to get an understanding of how the software works. At the end of this section, you will see how to enable, start, and use SWAT to set up simple file sharing.
Like most of the software that comes with Fedora, Samba is licensed under the GPL and is free. It comes as both an RPM and as source code. In both cases, installation is straightforward and the software can be installed when you install Fedora or use RPM software packages. The Samba RPMs should be on one of your Fedora install disks, or the latest version can be downloaded from the Internet, preferably from The Fedora Project (at http://fedora.redhat.com/) or an authorized mirror site. Refer to Chapter 7, “Managing Software,” for more information on using RPM packages.
Installing from source code can be more time-consuming. If you do not want to install using Fedora’s default locations, however, installing from the source code is a more configurable method. Just download the source from http://www.samba.org/ and unpack the files. Change into the source directory and, as root, run the command ./configure along with any changes from the defaults. Then run make, make test (if you want), followed by make install to install Samba in the specified locations.
If you install Samba using your Fedora DVD, you can find a large amount of documentation in the directory tree starting at /usr/share/doc/samba*/doc/ in several formats, including PDF, HTML, and text, among others. Altogether, almost 3MB of documentation is included with the source code.
After Samba is installed, you can either create the file /etc/smb.conf or use the smb.conf file supplied with Samba, which is located by default under the /etc/samba directory with Fedora. Nearly a dozen sample configuration files can be found under the /usr/share/doc/samba*/examples directory.
Note
Depending on your needs, smb.conf can be a simple file of fewer than 20 lines or a huge file spanning many pages of text. If your needs are complex, I suggest picking up a copy of Samba Unleashed.
The /etc/samba/smb.conf file is broken into sections. Each section is a description of the resource shared (share) and should be titled appropriately. The three special sections are
[global]—. Establishes the global configuration settings (defined in detail in thesmb.confman page and Samba documentation, found under the/usr/share/doc/samba/docsdirectory)[homes]—. Shares users’ home directories and specifies directory paths and permissions[printers]—. Handles printing by defining shared printers and printer access
Each section in your /etc/samba/smb.conf configuration file should be named for the resource being shared. For example, if the resource /usr/local/programs is being shared, you could call the section [programs]. When Windows sees the share, it is called by whatever you name the section (programs in this example). The easiest and fastest way to set up this share is with the following example from smb.conf:
[programs]
path = /usr/local/programs
writeable = true
This bit shares the /usr/local/programs directory with any valid user who asks for it and makes that directory writable. It is the most basic share because it sets no limits on the directory.
Here are some parameters you can set in the sections:
The possibilities are almost endless. Any parameters set in the individual sections override the parameters set in the [global] section. The following section adds a few restrictions to the [programs] section:
[programs]
path = /usr/local/programs
writeable = true
valid users = ahudsonahudson
browseable = yes
create mode = 0700
The valid users entry limits userid to just ahudson. All other users can browse the directory because of the browseable = yes entry, but only ahudson can write to the directory. Any files created by ahudson in the directory give ahudson full permissions, but no one else will have access to the file. This is exactly the same as setting permissions with the chmod command. Again, there are numerous options, so you can be as creative as you want to when developing sections.
The [global] section set parameters establishes configuration settings for all of Samba. If a given parameter is not specifically set in another section, Samba uses the default setting in the [global] section. The [global] section also sets the general security configuration for Samba. The [global] section is the only section that does not require the name in brackets.
Samba assumes that anything before the first bracketed section not labeled [global] is part of the global configuration. (Using bracketed headings in /etc/samba/smb.conf makes your configuration file more readable.) The following sections discuss common Samba settings to share directories and printers. You will then see how to test your Samba configuration.
The [homes] section shares out Fedora home directories for the users. The home directory is shared automatically when a user’s Windows computer connects to the Linux server holding the home directory. The one problem with using the default configuration is that the user sees all the configuration files (such as .profile and others with a leading period in the filename) that he normally wouldn’t see when logging on through Linux. One quick way to avoid this is to include a path option in the [homes] section. To use this solution, each user who requires a Samba share of his home directory needs a separate “home directory” to act as his Windows home directory.
For example, this pseudo home directory could be a directory named share in each user’s home directory on your Fedora system. You can specify the path option when using SWAT by using the %u option when specifying a path for the default homes shares (see the section “Configuring Samba Using SWAT” later in this chapter). The complete path setting would be
/home/%u/share
This setting specifies that the directory named share under each user’s directory is the shared Samba directory. The corresponding manual smb.conf setting to provide a separate “home directory” looks like this:
[homes]
        comment = Home Directories
        path = /home/%u/share
        valid users = %S
        read only = No
        create mask = 0664
        directory mask = 0775
        browseable = No
If you have a default [homes] section, the share shows up in the user’s Network Neighborhood as the user’s name. When the user connects, Samba scans the existing sections in smb.conf for a specific instance of the user’s home directory. If there is not one, Samba looks up the username in /etc/passwd. If the correct username and password have been given, the home directory listed in /etc/passwd is shared out at the user’s home directory. Typically the [homes] section looks like this (the browseable = no entry prevents other users from being able to browse your home directory and is a good security practice):
[homes]
browseable = no
writable = yes
This example shares out the home directory and makes it writable to the user. Here’s how you specify a separate Windows home directory for each user:
[homes]
browseable = no
writable = yes
path = /path/to/windows/directories
The [printers] section works much like the [homes] section but defines shared printers for use on your network. If the section exists, users have access to any printer listed in your Fedora /etc/printcap file.
Like the [homes] section, when a print request is received, all the sections are scanned for the printer. If no share is found (with careful naming, there should not be unless you create a section for a specific printer), the /etc/printcap file is scanned for the printer name that is then used to send the print request.
For printing to work properly, printing services must be set up correctly on your Fedora computer. A typical [printers] section looks like the following:
[printers]
comment = Fedora Printers
browseable = no
printable = yes
path = /var/spool/samba
The /var/spool/samba is a spool path set just for Samba printing.
After you have created your /etc/smb.conf file, you can check it for correctness. This is done with the testparm command. This command parses through your /etc/smb.conf file and checks for any syntax errors. If none are found, your configuration file will probably work correctly. It does not, however, guarantee that the services specified in the file will work. It is merely making sure that the file is correctly written.
As with all configuration files, if you are modifying an existing, working file, it is always prudent to copy the working file to a different location and modify that file. Then you can check the file with the testparm utility. The command syntax is as follows:
# testparm /path/to/smb.conf.back-up
Load smb config files from smb.conf.back-up
Processing section "[homes]"
Processing section "[printers]"
Loaded services file OK.
This output shows that the Samba configuration file is correct, and, as long as all the services are running correctly on your Fedora machine, Samba should be working correctly. Now copy your old smb.conf file to a new location, put the new one in its place, and restart Samba with the command /etc/init.d/smb restart. Your new or modified Samba configuration should now be in place.
Now that your smb.conf file is correctly configured, you can start your Samba server daemon. This can be done with the /usr/sbin/smbd command, which (with no options) starts the Samba server with all the defaults. The most common option you will change in this command is the location of the smb.conf file; you change this option if you don’t want to use the default location /etc/smb/smb.conf. The -s option allows you to change the smb.conf file Samba uses; this option is also useful for testing whether a new smb.conf file actually works. Another useful option is the -l option, which specifies the log file Samba uses to store information.
To start, stop, or restart Samba from the command line, use the service command; the system-config-services client; or the /etc/rc.d/init.d/smb script with a proper keyword, such as start, like so:
# /etc/rc.d/init.d/smb start
The smbstatus command reports on the current status of your Samba connections. The syntax is
/usr/bin/smbstatus [options]
Some of the available options are shown in Table 23.2.
The smbclient command allows users on other Linux hosts to access your smb shares. You cannot mount the share on your host, but you can use it in a way that is similar to an FTP client. Several options can be used with the smbclient command. The most frequently used is -I followed by the IP address of the computer to which you are connecting. The smbclient command does not require root access to run:
smbclient -I 10.10.10.20 -Uusername%password
This gives you the following prompt:
smb: <current directory on share>
From here, the commands are almost identical to the standard UNIX/Linux FTP commands. Note that you can omit a password on the smbclient command line. You are then prompted to enter the Samba share password.
There are two ways to mount Samba shares to your Linux host. Mounting a share is the same as mounting an available media partition or remote NFS directory except that the Samba share is accessed using SMB. (See Chapter 39, “Managing the File System,” to see how to mount partitions.) The first method uses the standard Linux mount command:
mount -t smbfs //10.10.10.20/homes /mount/point -o username=ahudson,dmask=777,
 fmask=777
Note
The hostname can be substituted for an IP address if your name service is running or the host is in your /etc/hosts file.
This command mounts ahudson’s home directory on your host and gives all users full permissions to the mount. The permissions are equal to the permissions on the chmod command.
The second method produces the same results using the smbmount command as follows:
# smbmount //10.10.10.20/homes /mount/point -o username=ahudson,dmask-777,
 fmask=777
To unmount the share, use the standard
# umount /mount/point
These mount commands can also be used to mount true Windows client shares to your Fedora host. Using Samba, you can configure your server to provide any service Windows can serve, and no one but you will ever know.
The Samba team of developers has made administering Samba a snap with the Samba Web Administration Tool (SWAT). SWAT is a web-based configuration and maintenance interface that gets as close to a point-and-click Samba environment as possible. This section provides a simple example of how to use SWAT to set up SMB access to a user’s home directory and how to share a directory.
You need to perform a few steps before you can start using SWAT. First, make sure you have the Samba and the samba-swat RPM packages installed. You then enable SWAT access to your system by editing the /etc/xinetd.d/swat file by changing the following line:
disable = yes
Change the word yes to the word no, like so:
disable = no
Save the file, and then restart the xinetd daemon using either the system-config-services client or the xinetd shell script under /etc/rc.d/init.d like so:
# /etc/rc.d/init.d/xinetd restart
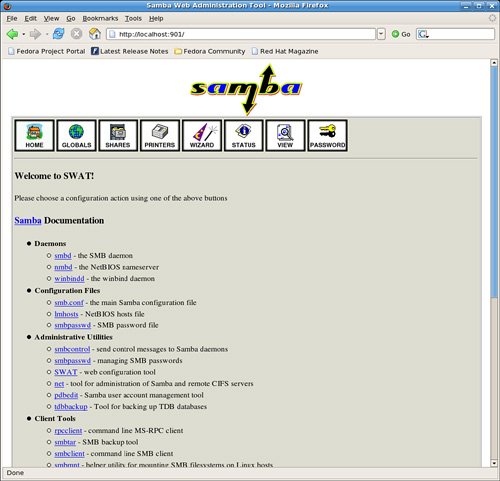
Next, start an X session, launch the Mozilla web browser, and browse to the http://localhost:901 uniform resource locator (URL). You are presented a login prompt. Enter the root username and password, and then click the OK button. The screen clears, and you see the main SWAT page, as shown in Figure 23.2.
Tip
You can also configure Samba using Fedora’s system-config-samba client. Launch the client from the command line of an X terminal window or select the System Settings, Samba Server menu item (as shown later in Figure 23.9).
First, click the GLOBALS icon in SWAT’s main page. You see a page similar to the one shown in Figure 23.3. Many options are in the window, but you can quickly set up access for hosts from your LAN by simply entering one or more IP addresses or a subnet address (such as 192.168.2.—note the trailing period, which allows access for all hosts; in this example, on the 192.168.2 subnet) in the Hosts Allow field under the Security Options section. If you need help on how to format the entry, click the Help link to the left of the field. A new web page appears with the pertinent information.

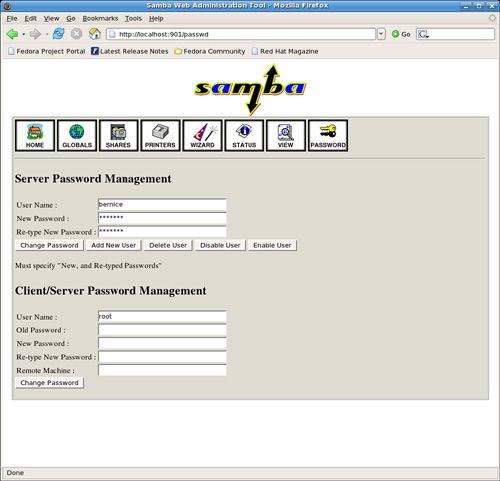
When finished, click the Commit Changes button to save the global access settings. The next step is to create a Samba user and set the user’s password. Click the PASSWORD icon on the main SWAT page (refer to Figure 23.2). The Server Password Management page opens, as shown in Figure 23.4. Type a new username in the User Name field; then type a password in the New Password and Re-type New Password fields.
Note
You must supply a username of an existing system user, but the password used for Samba access does not have to match the existing user’s password.
When finished, click the Add New User button. SWAT then creates the username and password and displays Added user username (where username is the name you entered). The new Samba user should now be able to gain access to the home directory from any allowed host if the Samba (smb) server is running.
For example, if you have set up Samba on a host named mini that has a user named andrew, the user can access the home directory on mini from any remote host (if allowed by the GLOBALS settings), perhaps by using the smbclient command like so:
$ smbclient //mini/andrew -U andrew
added interface ip=192.168.2.68 bcast=192.168.2.255 nmask=255.255.255.0
Password:
Domain=[MYGROUP] OS=[Unix] Server=[Samba 2.2.5]
smb: > pwd
Current directory is \miniandrew
smb: > quit
Click the STATUS icon (as shown in Figures 23.2 and 23.4) to view Samba’s status or to start, stop, or restart the server. You can use various buttons on the resulting web page to control the server and view periodic or continuous status updates.
You can also use SWAT to share a Linux directory. First, click the SHARES icon in the toolbar at the top of the main Samba page (refer to Figure 23.2). Type a share name in the Create Share field, and then click the Create Share button. The SWAT Shares page displays the detailed configuration information in a dialog box as shown in Figure 23.5, providing access to detailed configuration for the new Samba share.
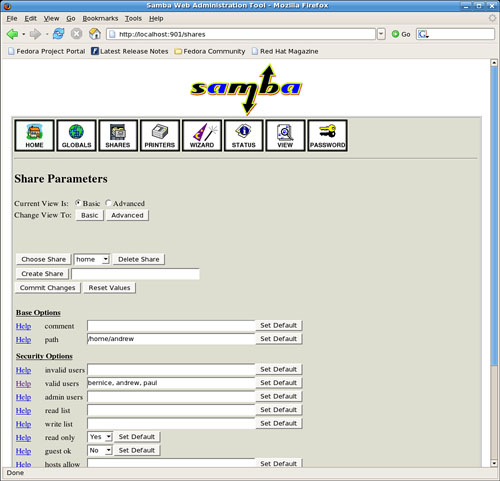
Type the directory name (such as /music) you want to share in the Path field under the Base options. Select No or Yes in the Read Only field under Security options to allow or deny read and write access. Select Yes in the Guest OK option to allow access from other users and specify a hostname, IP address, or subnet in the Hosts Allow field to allow access. Click the Commit Changes button when finished. Remote users can then access the shared volume. This is how a Linux server running Samba can easily mimic shared volumes in a mixed computing environment!
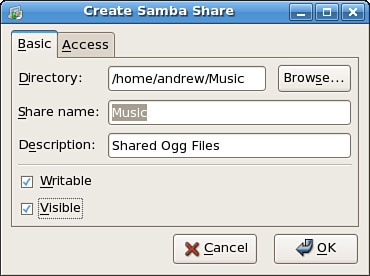
Alternatively, use the system-config-samba client (from the command line or the Server Settings Samba Server menu item on the System Settings menu). Figure 23.6 shows the properties of a shared directory named /music. Use the Add button to create new shares and the Properties button to edit the share’s access options. Use the Preferences menu to edit your Samba server’s general settings or to create and manage Samba users.
In Chapter 12, “Printing with Fedora,” we discussed how to set up and configure local printers as well as the associated print services. This section covers configuring printers for sharing and access across a network.
Offices all over the world benefit from using print servers and shared printers. In my office I have two printers connected to the network via a Mac mini with Fedora PPC so that my wife can print from downstairs using a wireless link, and I can print from my three computers in my office. It is a simple thing to do and can bring real productivity benefits, even in small settings.
Setting up remote printing service involves configuring a print server and then creating a remote printer entry on one or more computers on your network. This section introduces a quick method of enabling printing from one Linux workstation to another Linux computer on a LAN. You also learn about SMB printing using Samba and its utilities. Finally, this section discusses how to configure network-attached printers and use them to print single or multiple documents.
To set up printing from one Linux workstation to another across a LAN, you need root permission and access to both computers, but the process is simple and easy to perform.
First, log in or ssh to the computer to which the printer is attached. This computer will be the printer server. Use the hostname or ifconfig commands to obtain the hostname or IP address and write down or note the name of the printer queue. If the system uses LPRng instead of CUPS, you need to edit the file named /etc/lpd.perms. Scroll to the end of the file and look for the remote permission entry:
# allow local job submissions only
REJECT SERVICE=X NOT SERVER
Remote printing is not enabled by default, so you must comment out the service reject line with a pound sign (#):
# allow local job submissions only
#REJECT SERVICE=X NOT SERVER
Save the file, and then restart the lpd daemon.
This enables incoming print requests with the proper queue name (name of the local printer) from any remote host to be routed to the printer. After you finish, log out and go to a remote computer on your LAN without an attached printer.
Tip
LPRng, like CUPS, can be configured to restrict print services to single hosts, one or more specific local or remote users, all or part of a domain, or a LAN segment (by specifying an IP address range). An entry in /etc/lpd.perms, for example, to allow print requests only from hosts on 192.168.2.0, would look like this:
ACCEPT SERVICE=X REMOTEIP=192.168.2.0/255.255.255.0
The lpd.perms man page (included as part of the LPRng documentation) contains an index of keywords you can use to craft custom permissions. Don’t forget to restart the lpd daemon after making any changes to /etc/lpd.perms (or /etc/lpd.conf).
If the computer with an attached printer is using Fedora and you want to set up the system for print serving, again use the system-config-printer client. You can create a new printer, but the easiest approach is to edit settings for an existing queue and enable sharing of the printer.
To enable sharing, start system-config-printer, and then click the name of the printer to be shared over your network. Make sure the Shared check box is checked to allow that particular printer to be shared (see Figure 23.7).
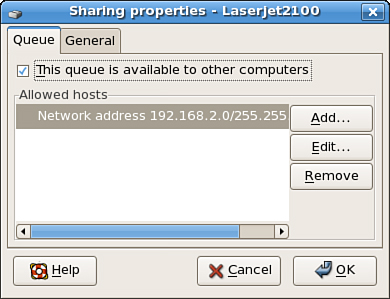
By default, all users are allowed access to the printer. You can change this setting by selecting the Access Control tab and adding users into the list.
Finally, you need to allow Fedora to publish your selected shared printers across the network. Click the Server Settings and make sure the Share Published Printers Connected to This System option is checked.
Tip
If you will share your CUPS-managed printer with other Linux hosts on a LAN using the Berkeley-type print spooling daemon, lpd, check the Enable LPD Protocol item under the Sharing dialog box’s General tab. Next, check that the file cups-lpd under the /etc/xinetd.d directory contains the setting disable = no and then restart xinetd. This enables CUPS to run the cups-lpd server and accept remote print jobs sent by lpd from remote hosts. Do not forget to save your changes and restart CUPS!
When finished, apply the Apply button and then select Quit from the Action menu to exit.
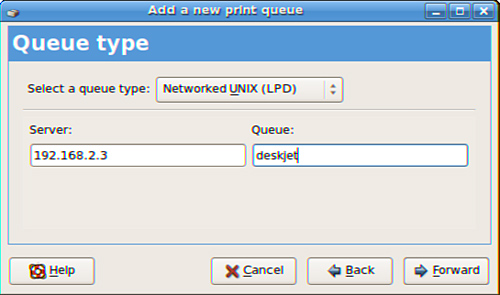
To create a printer queue to access a remote UNIX print server, use system-config-printer to create a printer, but select the Internet Printing Protocol (IPP) type. Click Forward and enter a printer name and description; you are then asked to enter the hostname (or IP address) of the remote computer with a printer, along with the printer name, as shown in Figure 23.8.
Note
Browse to http://www.faqs.org/rfcs/rfc1179.html to read more about using the Strict RFC1179 Compliance option when configuring Fedora to be able to print to a remote UNIX printer. This 13-year-old Request For Comments (RFC) document describes printing protocols for the BSD line-printer spooling system. The option is used to allow your documents to print to remote servers using the older print system or software conforming to the standard.
Click the Forward button after entering this information; then continue to configure the new entry as if the remote printer were attached locally (use the same print driver setting as the remote printer). When finished, do not forget to save the changes!
You can also test the new remote printer by clicking the Tests menu item and using one of the test page items, such as the ASCII or PostScript test pages. The ASCII test page prints a short amount of text to test the spacing and page width; the PostScript test page prints a page of text with some information about your printer, a set of radia lines one degree apart, and a color wheel (if you use a color printer).
Printing to an SMB printer requires Samba, along with its utilities such as the smbclient and associated smbprint printing filter. You can use the Samba software included with Fedora to print to a shared printer on a Windows network or set up a printer attached to your system as an SMB printer. This section describes how to create a local printer entry to print to a remote shared printer using SMB.
Setting up an SMB or shared printer is usually accomplished under Windows operating systems through configuration settings using the Control Panel’s Network device. After enabling print sharing, reboot the computer. In the My Computer, Printers folder, right-click the name or icon of the printer you want to share and select Sharing from the pop-up menu. Set the Shared As item, and then enter a descriptive shared name, such as HP2100, and a password.
You must enter a shared name and password to configure the printer when running Linux. You also need to know the printer’s workgroup name, IP address, and printer name and have the username and password on hand. To find this information, select Start, Settings, Printers; then right-click the shared printer’s listing in the Printers window and select Properties from the pop-up window.
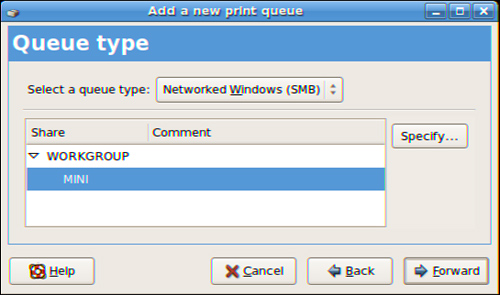
On your Fedora system, use system-config-printer to create a new local printer queue and assign it a name; then select the Networked Windows (SMB) type in the list on the right hand side. Enter the connection details in the field at the top (preceded by smb://) and type your authentication details at the bottom (mini in the example shown in Figure 23.9). SMB printers offered by the server appear in the list and can be selected for use.
Click Forward, and then create a printer with characteristics that match the remote printer. (For example, if the remote printer is an HP 2100 LaserJet, select the driver listed for that device in your configuration.)
Fedora supports other methods of remote printing, such as using a Novell NetWare–based print queue or using a printer attached directly to your network with an HP JetDirect adapter. Some manufacturers even offer Linux-specific drivers and help. For example, HP/Compaq provides graphical printer configuration tools and software drivers for other Linux distributions at http://h20000.www2.hp.com/bizsupport/TechSupport/Home.jsp.
You can set up network-attached printing quickly and easily using a variety of devices. For example, NETGEAR’s PS101 print server adapter works well with Linux. This tiny device (a self-hosted print server) is an adapter that directly attaches to a printer’s Centronics port, eliminates the use of a parallel-port cable, and enables the use of the printer over a network. The PS101 offers a single 10Mbps ethernet jack and, after initial configuration and assignment of a static IP address, can be used to print to any attached printer supported by Fedora.
A JetDirect- or UNIX-based configuration using system-config-printer can be used to allow you to print to the device from Fedora or other remote Linux hosts. To see any open ports or services on the device, use the nmap command with the print server adapter’s IP address like this:
 $ nmap 192.168.2.52
Starting nmap V. 2.54BETA22 ( www.insecure.org/nmap/ )
Interesting ports on (192.168.2.52):
(The 1536 ports scanned but not shown below are in state: closed)
Port       State       Service
21/tcp     open        ftp
23/tcp     open        telnet
80/tcp     open        http
139/tcp    open        netbios-ssn
515/tcp    open        printer
9100/tcp   open        jetdirect
Nmap run completed -- 1 IP address (1 host up) scanned in 10 seconds
To configure printing, select system-config-printer’s JetDirect option; then specify the device’s IP address (192.168.2.52 in the example) and port 9100 (as shown previously—you are clued that this is the right port by the Service entry, which states jetdirect in the example). Alternatively, you can configure the device and attached printer as a UNIX-based print server, but you need to use PS1 as the name of the remote printer queue. Note that the device hosts a built-in web server (HTTP on port 80); you can administer the device by browsing to its IP address (such as http://192.168.2.52 in the example). Other services, such as FTP and Telnet, are supported but undocumented:
$ telnet 192.168.2.52
Trying 192.168.2.52...
Connected to 192.168.2.52 (192.168.2.52).
Escape character is '^]'.

Welcome to Print Server

PS>monitor
(P1)STATE: Idle
TYPE: Parallel
PRINTER STATUS: On-Line

PS>exit
Connection closed by foreign host.
Tip
Curiously, NETGEAR does not promote the PS101 as Linux-supported hardware even though it works. Other types of network-attached print devices include Bluetooth-enabled printers and 802.11b wireless ethernet print servers such as TRENDnet’s TEW-PS3, HP/Compaq’s parallel-port-based WP 110, and the JetDirect 380x with USB. As always, research how well a product, such as a printer or print server, works with Linux before purchasing!
Older versions of Red Hat Linux used the 4.3BSD line-printer spooling system and its suite of text-based printing utilities. Newer versions of these utilities, with the same names, are included with your Fedora DVD, but are part of the CUPS package. The commands support the launching of print jobs in the background (as a background process), the printing of multiple documents, the capability to specify local and networked printers, control of the printers, and management of the queued documents waiting in the printer’s spool queue.
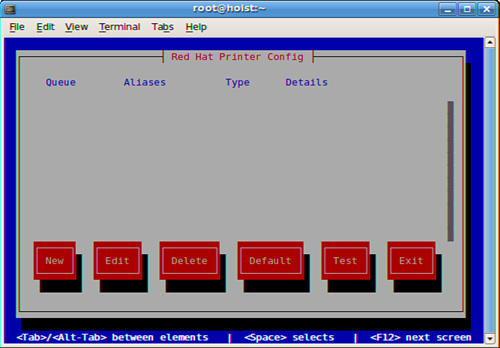
The system-config-printer-tui tool offers all the convenience and features of Fedora’s graphical printer configuration client without the need for a currently running X session.
As you learned earlier, you run this command as root:
# system-config-printer-tui
After you press Enter, the command’s main dialog box appears, as shown in Figure 23.10. You use the Tab and spacebar keys to navigate among and choose controls in this dialog box.
After configuring your printer, you can print from the desktop using any printer-capable graphical clients. If you do not use the desktop but prefer to use or access your Fedora system using a text-based interface, you can enter a number of print commands from the command line, as well. The main CUPS commands used to print and control printing from the command line are as follows:
lp—. The line-printer spooling command; used to print documents using a specific printerlpq—. The line-printer queue display command; used to view the existing list of documents waiting to be printedlpstat—. Displays server and printer status informationlprm—. The line-printer queue management command; used to remove print jobs from a printer’s queuelpc—. The line-printer control program; used by the root operator to manage print spooling, thelpddaemon, and printer activity
These commands offer a subset of the features provided by CUPS but can be used to start and control printers and print queues from the command line.
You print files (documents or images) using the lp command, along with a designated printer and filename. For example, to print the file mydoc.txt using the printer named lp, use the lp command, its -d command-line option, and the printer’s name, like this:
# lp -dlp mydoc.txt
You can also print multiple documents from the command line. For example, to simultaneously print a number of files to the lp printer, use lpr like so:
# lp -dlp *.txt
This approach uses the wildcard capabilities of the shell to feed the lpr command all files in the current directory with a name ending in .txt for printing. Use the lpq command to view the printer’s queue like so:
# lpq
lp is ready and printing
Rank    Owner   Job     File(s)               Total Size
active  root    7       classes.conf          3072 bytes
The lpq command reports on the job, owner, job number, file being printed, and size of job. The job number (7 in this example) is used by CUPS to keep track of documents printing or waiting to be printed. Each job has a unique job number. To stop the print job in this example, use the lprm command, followed by the job number, like this:
# lprm 7
The lprm command removes the spooled files from the printer’s queue and kills the job. Print job owners, such as regular users, can remove only spooled jobs that they own. As the root operator, you can kill any job.
Only the root operator can use the lpc command to administer printers and queues because the command is primarily used for printer and queue control. You, as a regular user, cannot use it to rearrange the order of your print jobs, but you can get a display of the status of any system printer. Start lpc on the command line like this:
# /usr/sbin/lpc
The lpc command has built-in help, but it consists of only five commands: exit, help, quit, status, and ?. The status command shows the status of a specified printer or all printers:
# lpc
lpc> ?
Commands may be abbreviated. Commands are:

exit    help    quit    status ?
lpc> status
lp:
        printer is on device 'parallel' speed -1
        queuing is enabled
        printing is enabled
        no entries
        daemon present
netlp:
        printer is on device 'parallel' speed -1
        queuing is enabled
        printing is enabled
        no entries
        daemon present
lpc> quit
The preceding sample session shows a status report for two printers: lp and netlp. Another helpful command is lpstat, which you use like this with its -t option:
# lpstat -t
scheduler is running
system default destination: lp
device for lp: parallel:/dev/lp0
device for netlp: parallel:/dev/lp0
lp accepting requests since Jan 01 00:00
netlp accepting requests since Jan 01 00:00
printer lp is idle. enabled since Jan 01 00:00
printer netlp is idle. enabled since Jan 01 00:00!)
This command lists all status information about printer queues on the local system.
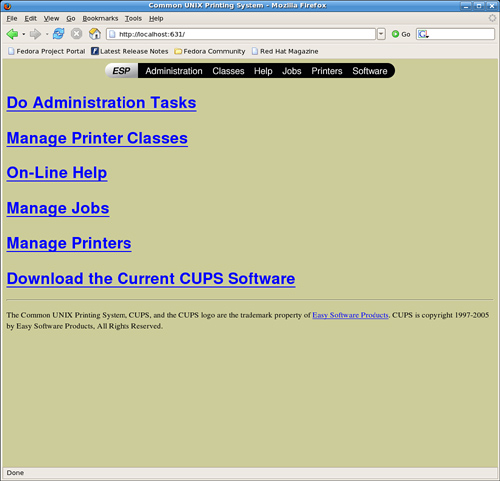
You can use CUPS to create printer queues, get print server information, and manage queues by launching a browser (such as Firefox) and browsing to http://localhost:631. CUPS provides a web-based administration interface, as shown in Figure 23.11.
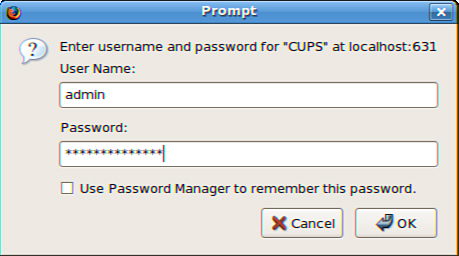
If you click the Do Administration Tasks item in the browser page, you are asked to enter the root password, as shown in Figure 23.12.
This section provides a short example of creating a Linux printer entry using CUPS’s web-based interface. Use the CUPS interface to create a printer and device queue type (such as local, remote, serial port, or Internet); then you enter a device uniform resource identifier (URI), such as lpd://192.168.2.35/lp, which represents the IP address of a remote UNIX print server, and the name of the remote print queue on the server. You also need to specify the model or make of printer and its driver. A Printers page link allows you to print a test page, stop the printing service, manage the local print queue, modify the printer entry, or add another printer.
In the Admin page, click the Add Printer button and then enter a printer name in the Name: field (such as lp), a physical location of the printer in the Location: field, and a short note about the printer (such as its type) in the Description: field. Figure 23.13 shows a sample entry for an HP 2100 LaserJet.

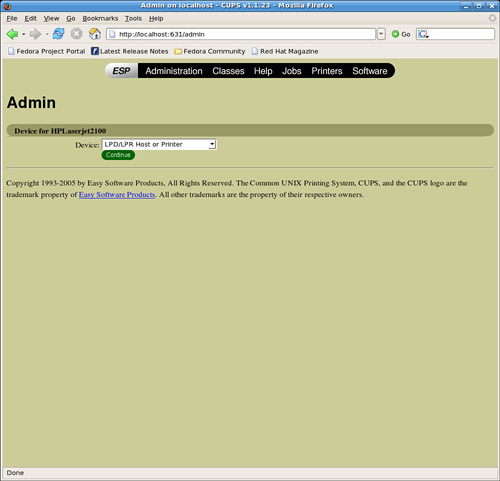
Click the Continue button. You can then select the type of printer access (local, remote, serial port, or Internet) in the Device page, as shown in Figure 23.14. For example, to configure printing to a local printer, select Parallel Port #1 or, for a remote printer, select the LPD/LPR Host or Printer entry.
Again click Continue and select a printer make as requested in the dialog box shown in Figure 23.15.

After you click Continue, you then select the driver. After creating the printer, you can then use the Printer page, as shown in Figure 23.16, to print a test page, stop printing service, manage the local print queue, modify the printer entry, or add another printer.

CUPS offers many additional features and after it is installed, configured, and running, provides transparent traditional UNIX printing support for Fedora.
Note
To learn more about CUPS and to get a basic overview of the system, browse to http://www.cups.org/.
Troubleshooting printer problems can be frustrating, especially if you find that your new printer is not working properly with Linux. First, keep in mind that nearly all printers on the market today work with Linux. However, some vendors have higher batting averages in the game of supporting Linux. If you care to see a scorecard, browse to http://www.linuxprinting.org/vendors.html.
Problematic printers, or printing devices that might or might not work with Fedora, include multifunction (or all-in-one) printers that combine scanning, faxing, and printing services. You should research any planned purchase, and avoid any vendor unwilling to support Linux with drivers or development information.
One shining star in the field of Linux support for multifunction printers is the HP support of the HP OfficeJet Linux driver project at http://hpoj.sourceforge.net/. Printing and scanning are supported on many models, with fax support in development.
Other problems can arise because of a lack of a printer’s USB vendor and device ID information—a problem shared by some USB scanners under Linux. For information regarding USB printer support, you can check with the Linux printing folks (at the URL in the start of this section) or with the Linux USB project at http://www.linux-usb.org/.
Although many newer printers require a universal serial bus (USB) port, excellent support still exists for legacy parallel-port (IEEE-1284) printers with Linux, enabling sites to continue to use older hardware. You can take advantage of Linux workarounds to set up printing even if the host computer does not have a traditional parallel printer port or if you want to use a newer USB printer on an older computer.
For example, to host a parallel-port-based printer on a USB-only computer, attach the printer to the computer using an inexpensive USB-to-parallel converter. USB-to-parallel converters typically provide a Centronics connector; one end of that connector is plugged in to the older printer, whereas the other end is plugged in to a USB connector. The USB connector is then plugged in to your hub, desktop, or notebook USB port. On the other hand, you can use an add-on PCI card to add USB support for printing (and other devices) if the legacy computer does not have a built-in USB port. Most PCI USB interface cards add at least two ports, and devices can be chained via a hub.
http://www.linuxprinting.org/—Browse here for specific drivers and information about USB and other types of printers.
http://www.hp.com/wwsolutions/linux/products/printing_imaging/index.html—Short but definitive information from HP regarding printing product support under Linux.
http://www.linuxdoc.org/HOWTO/Printing-HOWTO/—Grant Taylor’s Printing HOWTO, with information on using various print services under Linux.
http://www.cups.org/—A comprehensive repository of CUPS software, including versions for Red Hat Linux.
http://www.pwg.org/ipp/—Home page for the Internet Printing Protocol standards.
http://www.linuxprinting.org/cups-doc.html—Information about CUPS.
http://www.cs.wisc.edu/~ghost/—Home page for the Ghostscript interpreter.
http://www.samba.org/—Base entry point for getting more information about Samba and using the SMB protocol with Linux, UNIX, Mac OS, and other operating systems.
In addition, an excellent book on Samba to help you learn more is Samba Unleashed (Sams Publishing, ISBN: 0-672-31862-8).