
Computers on a network need to be useful, which means we need to be able to identify each computer so that we can connect to and communicate with it. Most of today’s networks use the Internet Protocol (IP), so each computer on this network has a unique IP address to identify it.
An IP address is a very large 32-bit number, but we have a shortcut method of displaying that number called the dotted quad address. The dotted quad form of the address is made of four 8-bit numbers separated by dots. For example, a computer with the address 3232250992 has the dotted quad form 192.168.60.112. It’s easier to use and remember the dotted quad form of an IP address, but even then remembering a lot of numbers becomes quite difficult. The domain name system (DNS) enables you to allocate hostnames that are much easier to remember to these IP addresses. These names, such as fedora.redhat.com, are translated by DNS into the dotted quad IP address, saving time—and memory!
This translation process is called name resolution and is performed by software known as a resolver. For the average user, local configuration involves the DNS client, which queries a remote DNS server to exchange information. The DNS servers are typically maintained by Internet service providers (ISPs) and large corporate networks, although anyone can configure and run his own DNS server. All computers on networks need to have a properly configured DNS client.
This chapter introduces DNS concepts and practice using Berkeley Internet Name Domain (BIND), the de facto standard DNS software for UNIX. In this chapter, you learn some of the concepts that are basic to DNS and its functions, including how DNS structure information is stored, how DNS serves name information to users, and how name resolution actually works. You learn how to use BIND to configure nameservers and how to provide DNS for a domain. This chapter also teaches you some important techniques for keeping DNS functions secure, as well as some of the most important troubleshooting techniques for tracking down potential problems related to your DNS functions.
If you are not going to be a DNS administrator, much of the information in this chapter will be of no practical use to you. That said, the knowledge of DNS that you can gain in this chapter might help you understand DNS problems that occur—so you will realize that it is not your computer that is broken! You will also see how, after you register a domain name, you can obtain third-party DNS service so that you do not have to maintain a DNS server. Also, the commonly used DNS-related tools are explained with a focus on how they can be used to troubleshoot domain name resolution problems that you’re likely to encounter.
DNS is essential for many types of network operations, and especially so when providing connectivity to the outside world via the Internet. DNS was designed to make the assignment and translation of hostnames fast and reliable and to provide a consistent, portable namespace for network resources. Its database is maintained in a distributed fashion to accommodate its size and the need for frequent updates. Performance and bandwidth utilization are improved by the extensive use of local caches. Authority over portions of the database is delegated to people who are able and willing to maintain the database in a timely manner, so updates are no longer constrained by the schedules of a central authority.
DNS is a simple—but easily misconfigured—system. Hostname resolution errors might manifest themselves in ways that are far from obvious, long after the changes that caused the errors were made. Such naming errors can lead to unacceptable and embarrassing service disruptions.
An understanding of the concepts and processes involved in working with BIND will help to make sure that your experiences as a DNS manager are pleasant ones.
Later in the chapter, we will focus on setup and configuration in order to provide DNS. In this section, we briefly examine the setup and configuration required for a computer to use DNS services. The important user setup and configuration processes for DNS is likely to have been accomplished during the initial installation of Fedora Core. After the initial installation, further DNS configuration can be accomplished by one or more of these methods:
Using Dynamic Host Control Protocol (DHCP), in which case some system settings are updated by the
dhclientcommand without intervention by a local or remote administrator or userUsing the
system-config-networkGUI configuration toolManually editing the system’s
/etc/host.confconfiguration file to specify the methods and order of name resolutionManually editing the system’s
/etc/nsswitch.confconfiguration file to specify the methods and order of name resolutionManually editing the system’s
/etc/hostsfile, which lists specific hostnames and IP addressesManually editing the system’s
/etc/resolv.confconfiguration file to add nameserver, domain, or search definition entries
Successful DNS lookups depend on the system’s networking being enabled and correctly configured. You can learn more about how to accomplish that in Chapter 18, “Network Connectivity.”
When an application needs to resolve a hostname, it calls system library functions to do the name resolution. If the GNU C library installed is version 2 or greater, the /etc/nsswitch.conf configuration file is used. Older versions of the library use /etc/host.conf. Fedora uses the newer GNU C library, but /etc/host.conf is still provided for applications that have been statically linked with other libraries. The two files should be kept in sync.
The /etc/host.conf file, known as the resolver configuration file, specifies which services to use for name resolution and the order in which they are to be used. This file has been superseded by /etc/nsswitch.conf, but is still provided for applications that use other libraries.
By default with Fedora, this file contains
order hosts, bind
The order shown here is to first consult /etc/hosts for a hostname. If the hostname is found in /etc/hosts, use the IP address specified there. If the hostname is not found in /etc/hosts, try to resolve the name using DNS (BIND).
One other option is available, although it is not set by default. This is NIS, which is Sun’s Network Information Service.
The file /etc/nsswitch.conf is the system databases and name service switch configuration file. It contains methods for many types of lookups, but here we are concerned with DNS resolution, so the line we are interested in is the hosts line. This line defines the methods to be used for resolving hostnames and the order in which to apply them. The methods used are
The default line with Fedora Core is
hosts: files dns
With this default, the same methods and order are specified as in the default /etc/host.conf. First /etc/hosts is searched, and then DNS is used.
Another example would be
hosts: files dns nisplus nis
In this example, name searches that fail in /etc/hosts and with DNS continue to the NIS services (nisplus and nis). NIS included with Fedora Core is the ypserv daemon.
When you are testing your configuration, you might want to halt name searching at a specific point. You can use the entry [NOTFOUND=return]. For example, to stop searching after looking in /etc/hosts, you would use the line
hosts: files [NOTFOUND=return] dns nisplus nis
The file /etc/hosts contains a table of local hosts (hostnames and IP addresses) used for local DNS-type lookups. The file is used if the keyword hosts is included in the order line of /etc/host.conf.
Using /etc/hosts to provide hostnames and hostname aliases can be effective when used on small networks. For example, a short /etc/hosts might look like this:
...
192.168.2.3   dogdog.hudson.com   dogdog webserver #always breaks
192.168.2.4   humphrey.hudson.com   humphrey mailserver
192.168.2.5   pluto.hudson.com   pluto music repository
192.168.2.6   mickey.hudson.com   fileserver
...
This example shows a short list of hosts. The format of the file is an IP address, a hostname/domain name, and aliases (such as dogdog and mickey). Using this approach, a system administrator would maintain and update a master hosts list, and then replicate the complete /etc/hosts file to every computer on the LAN. Users are then able to access other systems by simply using the hostname alias (such as dogdog). The format of /etc/hosts is easy to understand and easy to maintain, and can be used in conjunction with DNS, and in conjunction with a Dynamic Host Configuration Protocol (DHCP) server on the same network.
Two disadvantages of using /etc/hosts become readily apparent on a large network: maintenance and replication. Maintaining huge lists of IP addresses, hostnames, and aliases—along with ensuring that changes are regularly updated to every host on the network—can be a challenge.
The /etc/hosts file can be edited with a text editor or with the system-config-network GUI configuration tool, which can be launched from the Network menu item in the System Settings menu. The Hosts tab allows editing the file.
The file /etc/resolv.conf specifies how DNS searches are made. The file contains a list of nameservers (DNS servers to connect to) and some options. For example, a simple but usable /etc/resolv.conf generally contains at least two nameserver entries, specifying a primary and secondary nameserver. This example uses fictitious internal IP addresses:
nameserver 192.168.1.1
nameserver 192.168.1.2
search mydomain.com
The IP addresses listed in the /etc/resolv.conf file are usually assigned by an ISP and represent the remote nameservers. Other optional keywords, such as domain and search, are used to specify a local domain and search list for queries; the two terms are mutually exclusive, however (and we will explain these terms shortly). If you have both, the last term listed will be used.
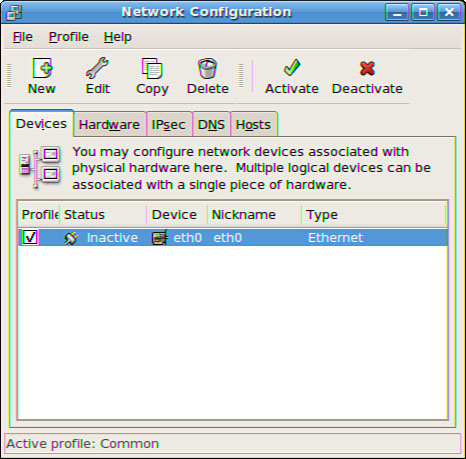
The information in /etc/resolv.conf can be configured from the system-config-network tool by launching the tool from the Network menu item in the System Settings menu. The Devices tab (see Figure 27.1) allows you to enter or edit device information.
If your system is set to use DHCP, any existing /etc/resolv.conf is saved as resolv.conf.predhclient and a new /etc/resolv.conf is created with the DNS information supplied by DHCP when the DHCP connection is made. When DHCP is released, the saved file is moved back as /etc/resolv.conf.
We begin with a look at the ideas behind DNS, prior to discussing the details of the software used to implement it. An understanding at this level is invaluable in avoiding the majority of problems that administrators commonly experience with DNS, as well as in diagnosing and quickly solving the ones that do occur. The following overview omits several small details in the protocol because they are not relevant to the everyday tasks of a DNS administrator. If you need more information about DNS, consult the DNS standards, especially RFC 1034. The RFCs related to DNS are distributed with BIND. Fedora installs them in /usr/share/doc/bind-*/rfc/.
The domain namespace is structured as a tree. Each domain is a node in the tree and has a name. For every node, there are resource records (RRs)—each of which stores a single fact about the domain. (Who owns it? What is its IP address?) Domains can have any number of children, or subdomains. The root of the tree is a domain named . (similar to the / root directory in a file system).
Each of the resource records belonging to a domain store a different type of information. For example,
A (Address) records store the IP address associated with a name.
NS (Nameserver) records name an authoritative nameserver for a domain.
SOA (Start of Authority) records contain basic properties of the domain and the domain’s zone.
PTR (Pointer) records contain the real name of the host to which the IP belongs.
MX (Mail Exchanger) records specify a mail server for the zone.
Each record type is discussed in detail later in this chapter.
Every node has a unique name that specifies its position in the tree, just as every file has a unique path that leads from the root directory to that file. That is, in the domain name, one starts with the root domain “.” and prepends to it each name in the path, using a dot to separate the names. The root domain has children named com., org., net., de., and so on. They, in turn, have children named ibm.com., wiw.org., and gmx.de..
In general, a fully qualified domain name (FQDN) is one that contains the machine name and the domain name, such as
foo.example.com.
This is similar to the following path:
/com/example/foo
Contrary to the example, the trailing dot in an FQDN is often omitted. This reverse order is the source of confusion to many people who first examine DNS.
Information about the structure of the tree and its associated resource records is stored by programs called nameservers. Every domain has an authoritative nameserver that holds a complete local copy of the data for the domain; the domain’s administrators are responsible for maintaining the data. A nameserver can also cache information about parts of the tree for which the server has no authority. For administrative convenience, nameservers can delegate authority over certain subdomains to other, independently maintained, nameservers.
The authoritative nameserver for a zone knows about the nameservers to which authority over subdomains has been delegated. The authoritative nameserver might refer queries about the delegated zones to those nameservers. So, we can always find authoritative data for a domain by following the chain of delegations of authority from . (the root domain) until we reach an authoritative nameserver for the domain. This is what gives DNS its distributed tree structure.
Users of DNS need not be aware of these details. To them, the namespace is just a single tree—any part of which they can request information about. The task of finding the requested RRs from the resource set for a domain is left to programs called resolvers. Resolvers are aware of the distributed structure of the database. They know how to contact the root nameservers (which are authoritative for the root domain) and how to follow the chain of delegations until they find an authoritative nameserver that can give them the information they are looking for.
At the risk of stretching the analogy too far, you can think of domains as directories in a file system and resource records as files in these directories. The delegation of authority over subdomains is similar to having an NFS file system mounted under a subdirectory: Requests for files under that directory would go to the NFS server, rather than this file system. The resolver’s job is to start from the root directory and walk down the directory tree (following mount points) until it reaches the directory that contains the files the user is interested in. For efficiency, the nameservers can then cache the information they find for some time. This is why things appear to be listed in reverse order. This process is examined in detail next.
In practice, there are several authoritative nameservers for a domain. One of them is the master (or primary) nameserver, where the domain’s data is held. The others are known as slave (or secondary) nameservers, and they hold automatically updated copies of the master data. Both the master and the slaves serve the same information, so it doesn’t matter which one a resolver asks. The distinction between master and slave is made purely for reasons of reliability—to ensure that the failure of a single nameserver does not result in the loss of authoritative data for the domain. As a bonus, this redundancy also distributes the network load between several hosts so that no one nameserver is overwhelmed with requests for authoritative information.
Note
As a DNS administrator, it is your responsibility to ensure that your nameservers provide sufficient redundancy for your zones. Your slaves should be far away from the master so that power failures, network outages, and other catastrophes do not affect your name service.
Despite these precautions, the load on DNS servers would be crushing without the extensive use of local caches. As mentioned before, nameservers are allowed to cache the results of queries and intermediate referrals for some time so that they can serve repeated requests for data without referring to the source each time. If they did not do this, root nameservers (and the nameservers for other popular zones) would be contacted by clients all over the world for every name lookup, wasting a huge amount of resources.
When a web browser issues a request for an IP address, the request is sent to a local nameserver, which resolves the name, stores the result in its cache, and returns the IP address. DNS can be a fascinating and extremely in-depth subject—see the Reference section at the end of this chapter for further reading.
Fedora includes a number of standard tools that allow you to work with DNS. These tools, found in the bind-utils and whois packages, have everyday uses that do not require DNS administrator skills. If you want to know what domain name belongs to an IP address, or vice versa, these are the tools to use to track down that information. Forward lookups are where you map a name to an IP address; reverse lookups are where you map an address to a name.
Here are tools you can use:
dig(Domain Information Groper)hostnslookupwhois
The following sections briefly describe these tools and provide examples of their use.
The Domain Information Groper is a command-line utility that queries DNS nameservers. By default, dig uses the nameservers listed in /etc/resolv.conf and performs an NS (Nameserver) query. Reverse lookups are accomplished with the -x argument with a default A (Address) query.
Here is an example of a forward lookup with dig:
dig www.pearson.com

; <<>> DiG 9.3.2 <<>> www.pearson.com
;; global options:  printcmd
;; Got answer:
;; ->>HEADER<<- opcode: QUERY, status: NOERROR, id: 40327
;; flags: qr rd ra; QUERY: 1, ANSWER: 1, AUTHORITY: 3, ADDITIONAL: 3

;; QUESTION SECTION:
;www.pearson.com.                 IN     A

;; ANSWER SECTION:
www.pearson.com.        86357     IN     A        195.69.212.200

;; AUTHORITY SECTION:
pearson.com.            45767     IN     NS       ns2.pearson.com.
pearson.com.            45767     IN     NS       oldtxdns2.pearsontc.com.
pearson.com.            45767     IN     NS       ns.pearson.com.

;; ADDITIONAL SECTION:
ns.pearson.com.         62353     IN     A        195.69.213.15
ns2.pearson.com.        62353     IN     A        195.69.215.15
oldtxdns2.pearsontc.com. 170165   IN     A        192.251.135.15
;; Query time: 48 msec
;; SERVER: 192.168.2.1#53(192.168.2.1)
;; WHEN: Fri Sep 22 21:19:53 2006
;; MSG SIZE rcvd: 166
dig 195.69.212.200

; <<>> DiG 9.3.2 <<>> 195.69.212.200
;; global options: printcmd
;; Got answer:
;; ->>HEADER<<- opcode: QUERY, status: NXDOMAIN, id: 61497
;; flags: qr rd ra; QUERY: 1, ANSWER: 0, AUTHORITY: 1, ADDITIONAL: 0

;; QUESTION SECTION:
;195.69.212.200.                       IN       A
;; AUTHORITY SECTION:
.                       10800   IN     SOA      a.root-servers.net. nstld.verisign-
grs.com. 2006092200 1800 900 604800 86400

;; Query time: 217 msec
;; SERVER: 192.168.2.1#53(192.168.2.1)
;; WHEN: Fri Sep 22 21:29:13 2006
;; MSG SIZE rcvd: 107
A command-line utility, host performs forward and reverse lookups by querying DNS nameservers, similar to dig.
Here’s an example of a forward lookup with host:
host www.pearson.comhost 195.69.212.200
200.212.69.195.in-addr.arpa domain name pointer booktime.pearson.com.
www.pearson.com has address 195.69.212.200
Here's a reverse lookup with host:
host 195.69.212.200
200.212.69.195.in-addr.arpa domain name
pointer booktime.pearson.com.
A command-line utility, nslookup can be used in an interactive or noninteractive manner to query DNS nameservers. Note that nslookup is outdated; try using dig instead.
Here’s an example of a forward lookup using nslookup:
nslookup www.pearson.com
Server:         192.168.2.1
Address:        192.168.2.1#53

Non-authoritative answer:
Name:   www.pearson.com
Address: 195.69.212.200
Here’s a reverse lookup using nslookup:
nslookup 195.69.212.200
Server:         192.168.2.1
Address:        192.168.2.1#53

Non-authoritative answer:
200.212.69.195.in-addr.arpa     name = booktime.pearson.com.

Authoritative answers can be found from:
212.69.195.in-addr.arpa nameserver = ns2.pearson.com.
212.69.195.in-addr.arpa nameserver = ns.pearson.com.
ns.pearson.com  internet address = 195.69.213.15
ns2.pearson.com internet address = 195.69.215.15
A command-line utility from the whois package, whois queries the database at whois.networksolutions.com.
For an IP lookup:
$ whois 165.193.130.83

OrgName:    Cable & Wireless
OrgID:      CWUS
Address:    3300 Regency Pkwy
City:       Cary
StateProv:  NC
PostalCode: 27511
Country:    US

NetRange:   165.193.0.0 - 165.193.255.255
CIDR:       165.193.0.0/16
NetName:    CWDI-BLK6
NetHandle:  NET-165-193-0-0-1
Parent:     NET-165-0-0-0-0
NetType:    Direct Allocation
NameServer: NS.DIGISLE.NET
NameServer: NS1.DIGISLE.NET
Comment:
RegDate:
Updated:    2002-08-23

TechHandle: ZC221-ARIN
TechName:   Cable & Wireless
TechPhone:  +1-919-465-4023
TechEmail:  [email protected]

OrgAbuseHandle: SPAMC-ARIN
OrgAbuseName:   SPAM COMPLAINTS
OrgAbusePhone:  +1-800-977-4662
OrgAbuseEmail:  [email protected]

OrgNOCHandle: NOC99-ARIN
OrgNOCName:   Network Operations Center
OrgNOCPhone:  +1-800-977-4662
OrgNOCEmail:  [email protected]

OrgTechHandle: UIAA-ARIN
OrgTechName:   US IP Address Administration
OrgTechPhone:  +1-800-977-4662
OrgTechEmail:  [email protected]

OrgTechHandle: GIAA-ARIN
OrgTechName:   Global IP Address Administration
OrgTechPhone:  +1-919-465-4096
OrgTechEmail:  [email protected]

# ARIN WHOIS database, last updated 2003-08-31 19:15
# Enter ? for additional hints on searching ARIN's WHOIS database.
And for a domain name lookup (which is not what whois is used for):
$ whois www.pearson.com

Whois Server Version 1.3
Domain names in the .com and .net domains can now be registered
with many different competing registrars. Go to http://www.internic.net
for detailed information.

No match for "WWW.PEARSON.COM".
A caching nameserver builds a local cache of resolved domain names and provides them to other hosts on your LAN. This speeds up DNS searches and saves bandwidth by reusing lookups for frequently accessed domains and is especially useful on a slow dial-up connection or when your ISP’s own nameservers malfunction.
If you have BIND and BIND-utils installed on your computer, you can configure a caching nameserver by installing the caching-nameserver package. This sets up the /etc/named.conf configuration file, the /var/named directory, and the configuration files in /var/named (localhost.zone, named.ca, and named.local).
To start the caching nameserver, you can start the named service manually (see Chapter 15, “Automating Tasks”) or use the system-config-services GUI configuration tool. This can be started by choosing the Services menu option in the Server Settings menu, which is in the System Settings menu, and then selecting named and clicking the Start button.
To get your local computer to use the caching nameserver, reconfigure the /etc/resolv.conf file to comment out any references to your ISP’s nameservers, and set the only nameserver to be the localhost (127.0.0.1). The /etc/resolv.conf for the caching nameserver host is
#/etc/resolv.conf
#nameserver 83.64.1.10
#nameserver 83.64.0.10
nameserver 127.0.0.1
Other machines on your network should have the IP of the local caching nameserver in their /etc/resolv.conf files. Assuming that the IP address for the computer running the caching nameserver is 192.168.1.5, the /etc/resolv.conf files on the other machines on your network should be
#/etc/resolv.conf
#nameserver 83.64.1.10
#nameserver 83.64.0.10
nameserver 192.168.1.5
It is possible to have your own domain name and provide third-party DNS service for it, meaning that you do not have to configure and administer a DNS nameserver for yourself. You can even have a mail address for your domain without having a mail server.
Here is a summary of the major tasks involved in providing a third-party DNS service to your own domain name:
Register and pay for a unique domain name—. Several companies now offer to register these names, so shop around for the most reasonable price and perform some Google background checks on the company before using it.
Use a third-party DNS provider to provide DNS services—. One popular provider is ZoneEdit, which provides detailed steps to use the service. ZoneEdit also provides mail-forwarding services, so mail addressed to [email protected] is forwarded to your regular ISP mail account. ZoneEdit also allows you to use Dynamic DNS, which enables you to run a server on a dynamically assigned IP (from a cable or dial-up provider), yet still have DNS servers locate you. ZoneEdit can also provide a startup web page space for you or forward requests to an already established page with a long, complicated address.
Return to your domain name registrar and tell it what nameservers are authoritative for your domain
After you have completed the preceding tasks, it takes about three days for the information to propagate around the Internet.
BIND is the de facto standard DNS software suite for UNIX. It contains a nameserver daemon (named) that answers DNS queries, a resolver library that enables programs to make such queries, and some utility programs. BIND is maintained by the ISC (Internet Software Consortium) at the website http://www.isc.org/bind/.
Three major versions of BIND are in common use today: 4, 8, and 9. The use of BIND 4 is now strongly discouraged because of numerous security vulnerabilities and other bugs, and is not discussed here. BIND 8, with many new features and bug fixes, is now quite widely deployed. It is actively maintained, but still vulnerable to a variety of attacks; its use is strongly discouraged as well. Fedora now provides BIND 9.
Note
If you are upgrading from BIND 8 to BIND 9, make sure to read the file /usr/share/doc/bind-9.2.3/misc/migration for any issues regarding configuration files (which will cause BIND not to run) and use of existing shell scripts. An HTML version of the BIND 9 manual is the Bv9ARM.html file under the /usr/share/doc/bind-9.2.3/arm directory.
In this chapter, we discuss the use of BIND 9, which ships with Fedora. BIND 9 was rewritten from scratch in an attempt to make the code more robust and leave behind the problems inherent in the old code. It is compliant with new DNS standards and represents a substantial improvement in features, performance, and security.
The bind RPM package contains the named daemon and a wealth of BIND documentation. The bind-utils RPM package contains, among other things, the invaluable dig(1) utility. If you choose to compile BIND yourself, you can download the source distribution from the ISC’s website and follow the build instructions therein.
Note
You can find build instructions in the README file under the /usr/share/doc/bind-9.2.3 directory as well.
After you install the RPMs, the following directories are of special interest because they contain the file used by BIND and contain the information shown in the listing:
----------

/etc/                            The rndc.conf, named.conf configuration files.
/usr/bin/                        dig, host, nslookup, nsupdate.
/usr/sbin/                       named, rndc, and various support programs.
/usr/share/doc/bind-9.2.3/       BIND documentation.
/usr/share/man/                  Manual pages.
/var/named/*                     Zone files.
----------
If you install from source, the files will be in the locations you specified at configure time, with the default directories under /usr/local/.
The following example uses BIND to configure a nameserver and then expand it as necessary to provide useful DNS service. To accomplish this, you must configure named (the nameserver daemon) and rndc components (a control utility that permits various interactions with a running instance of named). You also might need to configure the resolver software, as discussed later. Three configuration files are used:
rndc.keyto specify the key used to authenticate betweenrndcandnamedrndc.confto configurerndcnamed.confto configurenamed
When rndc communicates with named, it uses cryptographic keys to digitally sign commands before sending them over the network to named. The configuration file, /etc/rndc.key, specifies the key used for the authentication.
The only authentication mechanism currently supported by named is the use of a secret key, encrypted with the HMAC-MD5 algorithm and shared between rndc and named. The easiest way to generate a key is to use the dnssec-keygen utility. In the following example, the utility is asked to generate a 128-bit HMAC-MD5 user key named rndc:
$ dnssec-keygen -a hmac-md5 -b 128 -n user rndc
Krndc.+157+14529
$ cat Krndc.+157+14529.private
Private-key-format: v1.2
Algorithm: 157 (HMAC_MD5)
Key: mKKd2FiHMFe1JqXl/z4cfw==
The utility creates two files with .key and .private extensions, respectively. The Key: line in the .private file tells us the secret that rndc and named need to share (mKKd2FiHMFe1JqXl/z4cfw==). When we have this, we can set up the rndc.key configuration file, which is shared by both rndc.conf and named.conf.
key "rndc" { algorithm   hmac-md5;  secret   "mKKd2FiHMFe1JqXl/z4cfw=="; };
----------
rndc uses a TCP connection (on port 953) to communicate with named. The configuration file, /etc/rndc.conf by default, must specify a server to talk to as well as include the corresponding key (which must be recognized by named) to use while talking to it:
----------
# Use the key named "rndc" when talking to the nameserver "localhost."
server localhost {
    key                 "rndc";
};

# Defaults.
options {
    default-server      localhost;
    default-key         "rndc";
};

# Include the key to use
include "/etc/rndc.key;
----------
The file needs to have three sections:
Server section—. Defines a nameserver (
localhost) and specifies a key (rndc) to be used while communicating with itOptions section—. Sets up reasonable defaults because the file might list multiple servers and keys
Key section—. Includes the file we have already created,
/etc/rndc.key
Should you need it, the rndc(8) and rndc.conf(5) manual pages contain more information.
You next must configure named itself. Its single configuration file (/etc/named.conf) has syntax very similar to rndc.conf; this section describes only a small subset of the configuration directives essential to the configuration of a functional nameserver. For a more exhaustive reference, consult the BIND 9 ARM (Administrator Reference Manual); it is distributed with BIND, and Fedora Core installs it under /usr/share/doc/bind-*/arm/).
Only the options and named sections in the named.conf file are absolutely necessary. The options section must tell named where the zone files are kept, and named must know where to find the root zone (“.”). We also set up a controls section to enable suitably authenticated commands from rndc to be accepted. Because clients (notably nslookup) often depend on resolving the nameserver’s IP, we set up the 0.0.127.in-addr.arpa reverse zone as well.
We start with a configuration file similar to this:
----------options {    # This is where zone files are kept.      directory
           "/var/named"; };

# Allow rndc running on localhost to send us commands. controls {     inet
127.0.0.1          allow { localhost; }         keys { rndc; }; };""include
"/etc/rndc.key";

# Information about the root zone. zone "." {    type                 hint;
file                "root.hints"; }; # Lots of software depends on being
able to resolve 127.0.0.1 zone "0.0.127.in-addr.arpa" {     type
master;     file                "rev/127.0.0"; };
----------
The options section is where we specify the directory in which named should look for zone files (as named in other sections of the file). You learn about using other options in later examples in this chapter.
Next, we instruct named to accept commands from an authenticated rndc. We include the key file, /etc/rndc.key, and the controls section saying that rndc connects from localhost and uses the specified key. (You can specify more than one IP address in the allow list or use an access control list as described in the “Managing DNS Security” section, later in this chapter.)
The . zone tells named about the root nameservers with names and addresses in the root.hints file. This information determines which root nameserver is initially consulted, although this decision is frequently revised based on the server’s response time. Although the hints file can be obtained via FTP, the recommended, network-friendly way to keep it synchronized is to use dig. We ask a root nameserver (it doesn’t matter which one) for the NS records of . and use the dig output directly:
----------
|    # dig @j.root-servers.net. ns > /var/named/root.hints
|    # cat /var/named/root.hints
|    ; <<>> DiG 8.2 <<>> @j.root-servers.net . ns
|    ; (1 server found)
|    ;; res options: init recurs defnam dnsrch
|    ;; got answer:
|    ;; ->>HEADER<<- opcode: QUERY, status: NOERROR, id: 6
|    ;; flags: qr aa rd; QUERY: 1, ANSWER: 13, AUTHORITY: 0, ADDITIONAL: 13
|    ;; QUERY SECTION: | ;; ., type = NS, class = IN
|
|    ;; ANSWER SECTION:
|    .                 6D IN NS       H.ROOT-SERVERS.NET.
|    .                 6D IN NS       C.ROOT-SERVERS.NET.
|    .                 6D IN NS       G.ROOT-SERVERS.NET.
|    .                 6D IN NS       F.ROOT-SERVERS.NET.
|    .                 6D IN NS       B.ROOT-SERVERS.NET.
|    .                 6D IN NS       J.ROOT-SERVERS.NET.
|    .                 6D IN NS       K.ROOT-SERVERS.NET.
|    .                 6D IN NS       L.ROOT-SERVERS.NET.
|    .                 6D IN NS       M.ROOT-SERVERS.NET.
|    .                 6D IN NS       I.ROOT-SERVERS.NET.
|    .                 6D IN NS       E.ROOT-SERVERS.NET.
|    .                 6D IN NS       D.ROOT-SERVERS.NET.
|    .                 6D IN NS       A.ROOT-SERVERS.NET.
|
|    ;; ADDITIONAL SECTION:
|    H.ROOT-SERVERS.NET.      5w6d16h IN A   128.63.2.53
|    C.ROOT-SERVERS.NET.      5w6d16h IN A   192.33.4.12
|    G.ROOT-SERVERS.NET.      5w6d16h IN A   192.112.36.4
|    F.ROOT-SERVERS.NET.      5w6d16h IN A   192.5.5.241
|    B.ROOT-SERVERS.NET.      5w6d16h IN A   128.9.0.107
|    J.ROOT-SERVERS.NET.      5w6d16h IN A   198.41.0.10
|    K.ROOT-SERVERS.NET.      5w6d16h IN A   193.0.14.129
|    L.ROOT-SERVERS.NET.      5w6d16h IN A   198.32.64.12
|    M.ROOT-SERVERS.NET.      5w6d16h IN A   202.12.27.33
|    I.ROOT-SERVERS.NET.      5w6d16h IN A   192.36.148.17
|    E.ROOT-SERVERS.NET.      5w6d16h IN A   192.203.230.10
|    D.ROOT-SERVERS.NET.      5w6d16h IN A   128.8.10.90
|    A.ROOT-SERVERS.NET.      5w6d16h IN A   198.41.0.4
|
|    ;; Total query time: 4489 msec
|    ;; FROM: lustre to SERVER: j.root-servers.net 198.41.0.10
|    ;; WHEN: Mon Sep 10 04:18:26 2001
|    ;; MSG SIZE sent: 17 rcvd: 436
----------
The zone 0.0.127.in-addr.arpa section in named.conf says that we are a master nameserver for that zone and that the zone data is in the file 127.0.0. Before examining the first real zone file in detail, look at the general format of a resource record specification:
name TTL class type data
Here, name is the DNS name with which this record is associated. In a zone file, names ending with a “.” are fully qualified, whereas others are relative to the name of the zone. In the zone example.com, foo refers to the fully qualified name foo.example.com. The special name @ is a short form for the name of the zone itself. If the name is omitted, the last specified name is used again.
The TTL (Time To Live) field is a number that specifies the time for which the record can be cached. This is explained in greater detail in the discussion of the SOA record in the next section. If this field is omitted, the default TTL for the zone is assumed. TTL values are usually in seconds, but you can append an m for minutes, h for hours, or d for days.
BIND supports different record classes, but for all practical purposes, the only important class is IN, for Internet. If no class is explicitly specified, a default value of IN is assumed; to save a little typing, we do not mention the class in any of the zone files we write here.
The type field is mandatory and names the RR in use, such as A, NS, MX, or SOA. (We use only a few of the existing RRs here. Consult the DNS standards for a complete list.)
The data field (or fields) contains data specific to this type of record. The appropriate syntax will be introduced as we examine the use of each RR in turn.
Here is the zone file for the 0.0.127.in-addr.arpa zone:
----------
|    $TTL 2D
|    @         SOA      localhost. hostmaster.example.com. (
|                               2001090101 ; Serial
|                               24h ; Refresh
|                               2h ; Retry
|                               3600000 ; Expire (1000h)
|                               1h) ; Minimum TTL
|              NS       localhost.
|
1       PTR       localhost.
----------
The $TTL directive that should begin every zone file sets the default minimum time to live for the zone to two days. This is discussed further in the next section.
The second line in the zone file uses the special @ name that you saw earlier. Here, it stands for 0.0.127.in-addr.arpa, to which the SOA (Start of Authority) record belongs. The rest of the fields (continued until the closing parenthesis) contain SOA-specific data.
The first data field in the SOA record is the fully qualified name of the master nameserver for the domain. The second field is the email address of the contact person for the zone. It is written as a DNS name by replacing the @ sign with a “.”; [email protected] would be written as foo.example.com. (note the trailing .).
Do not use an address such as [email protected] because it is written as a.b.example.com and will later be misinterpreted as [email protected].
Tip
It is important to ensure that mail to the contact email address specified in the SOA field is frequently read because it is used to report DNS setup problems and other potentially useful information.
The next several numeric fields specify various characteristics of this zone. These values must be correctly configured, and to do so, you must understand each field. As shown in the comments (note that zone file comments are not the in the same syntax as named.conf comments), the fields are serial number, refresh interval, retry time, expire period, and minimum TTL.
Serial numbers are 32-bit quantities that can hold values between 0 and 4,294,967,295 (232–1). Every time the zone data is changed, the serial number must be incremented. This change serves as a signal to slaves that they need to transfer the contents of the zone again. It is conventional to assign serial numbers in the format YYYYMMDDnn; that is, the date of the change and a two-digit revision number (for example, 2001090101). For changes made on the same day, you increment only the revision. This reasonably assumes that you make no more than 99 changes to a zone in one day. For changes on the next day, the date is changed and the revision number starts from 01 again.
The refresh interval specifies how often a slave server should check whether the master data has been updated. It has been set to 24 hours here, but if the zone changes often, the value should be lower. Slaves can reload the zone much sooner if both they and the master support the DNS NOTIFY mechanism, and most DNS software does.
The retry time is relevant only when a slave fails to contact the master after the refresh time has elapsed. It specifies how long it should wait before trying again. (It is set to two hours here.) If the slave is consistently unable to contact the master for the length of the expire period (usually because of some catastrophic failure), it discards the zone data it already has and stops answering queries for the zone. Thus, the expire period should be long enough to allow for the recovery of the master nameserver. It has been repeatedly shown that a value of one or two weeks is too short. One thousand hours (about six weeks) is accepted as a good default.
As you read earlier, every RR has a TTL field that specifies how long it can be cached before the origin of the data must be consulted again. If the RR definition does not explicitly specify a TTL value, the default TTL (set by the $TTL directive) is used instead. This enables individual RRs to override the default TTL value as required.
The SOA TTL, the last numeric field in the SOA record, is used to determine how long negative responses (NXDOMAIN) should be cached. (That is, if a query results in an NXDOMAIN response, that fact is cached for as long as indicated by the SOA TTL.) Older versions of BIND used the SOA minimum TTL to set the default TTL, but BIND 9 no longer does so. The default TTL of 2 (two days) and SOA TTL of 1 (one hour) are recommended for cache friendliness.
The values used previously are good defaults for zones that do not change often. You might have to adjust them a bit for zones with very different requirements. In that case, the website at http://www.ripe.net/docs/ripe-203.html is recommended reading.
The next two lines in the zone file create NS and PTR records. The NS record has no explicit name specified, so it uses the last one, which is the @ of the SOA record. Thus, the nameserver for 0.0.127.in-addr.arpa is defined to be localhost.
The PTR record has the name 1, which becomes 1.0.0.127.in-addr.arpa (which is how you write the address 127.0.0.1 as a DNS name). When qualified, the PTR record name 1 becomes localhost. (You will see some of the numerous other RR types later when we configure our nameserver to be authoritative for a real domain.)
We now have all the elements of a minimal functioning DNS server, but before we experiment further, some extra logging will allow us to see exactly what named is doing. Log options are configured in a logging section in named.conf, and the various options are described in detail in the BIND 9 ARM.
All log messages go to one or more channels—each of which can write messages to the syslog, to an ordinary file, stderr, or null. (Log messages written to null are discarded.) Categories of messages exist, such as those generated while parsing configuration files, those caused by OS errors, and so on. Your logging statement must define some channels and associate them with the categories of messages that you want to see.
BIND logging is very flexible, but complicated, so we examine only a simple log configuration here. The following addition to named.conf sets up a channel called custom, which writes time-stamped messages to a file and sends messages in the listed categories to it:
----------

|    logging {
|        channel custom {
|            file "/tmp/named.log"; # Where to send messages.
|            print-time yes;        # Print timestamps?
|            print-category yes;    # Print message category?
|        };
|
|        category config       { custom; };    # Configuration files
|        category notify       { custom; };    # NOTIFY messages
|        category dnssec       { custom; };    # TSIG messages
|        category general      { custom; };    # Miscellaneous
|        category security     { custom; };    # Security messages
|        category xfer-out     { custom; };    # Zone transfers
|        category lame-servers { custom; };
|    };
|
----------
The last step before running BIND is to set up the local resolver software. This involves configuring the /etc/hosts, /etc/resolv.conf, and /etc/nsswitch.conf files.
To avoid gratuitous network traffic, most UNIX resolvers still use a hosts-like text file named /etc/hosts to store the names and addresses of commonly used hosts. Each line in this file contains an IP address and a list of names for the host. Add entries to this file for any hosts you want to be able to resolve independently from DNS. If the entry is found in /etc/hosts, the resolver does not have to contact a DNS server to resolve the name, which reduces network traffic.
/etc/resolv.conf specifies the addresses of preferred nameservers and a list of domains relative to which unqualified names are resolved. You specify a nameserver with a line of the form nameserver 1.2.3.4 (where 1.2.3.4 is the address of the nameserver). You can use multiple nameserver lines (usually up to three). You can use a search line to specify a list of domains to search for unqualified names.
A search line such as search example.com example.net causes the resolver to attempt to resolve the unqualified name xyz, first as xyz.example.com, and then, if that fails, as xyz.example.net. Do not use too many domains in the search list because it slows down resolution.
A hosts: files dns line in /etc/nsswitch.conf causes the resolver to consult /etc/hosts before using the DNS during the course of a name lookup. This allows you to override the DNS by making temporary changes to /etc/hosts, which is especially useful during network testing. (Older resolvers might require an order hosts, bind line in the /etc/host.conf file instead.)
Finally! You can now start named with /etc/rc.d/init.d/named start. You should see messages similar to the ones that follow in the syslog (or another location, according to the logging configuration you have set up). One way to do this is to monitor the log file with the tail command; that scrolls the changes in the file down the screen.
# tail -f /var/log/messages
----------
July 9 23:48:33 titan named[2605]: starting BIND 9.2.3 -u named
July 9 23:48:33 titan named[2605]: using 1 CPU
July 9 23:48:33 titan named[2608]: loading configuration from '/etc/named.conf'
July 9 23:48:33 titan named[2608]: no IPv6 interfaces found
July 9 23:48:33 titan named[2608]: listening on IPv4 interface lo, 127.0.0.1#53
July 9 23:48:33 titan named: named startup succeeded
July 9 23:48:33 titan named[2608]: listening on IPv4 interface
 eth0, 192.168.2.68#53
July 9 23:48:33 titan named[2608]: command channel listening on 127.0.0.1#953
October 9 23:48:33 titan named[2608]: zone 0.0.127.in-addr.arpa/IN:
loaded serial 1997022700
October 9 23:48:33 titan named[2608]: zone localhost/IN: loaded serial 42
October 9 23:48:33 titan named[2608]: running
----------
You can use rndc to interact with this instance of named. Running rndc without arguments displays a list of available commands, including the ability to reload or refresh zones, dump statistics and the database to disk, toggle query logging, and stop the server.
Unfortunately, rndc does not yet implement all the commands that were supported by ndc—the control program shipped with earlier versions of BIND.
You should now be able to resolve 1.0.0.127.in-addr.arpa locally (try dig @localhost 1.0.0.127.in-addr.arpa PTR +norec) and other names via recursive resolution. If you cannot accomplish this resolution, something is wrong, and you should read the “Troubleshooting DNS” section later in this chapter to diagnose and correct your problem before proceeding further. Remember to read the logs!
You can expand the minimal nameserver configuration you just created into one that performs useful name service for a real domain. Suppose that your ISP has assigned to you the IP addresses in the 192.0.2.0/29 range (which has six usable addresses: 192.0.2.1-6) and that you want to serve authoritative data for the domain example.com. A friend has agreed to configure her nameserver (192.0.2.96) to be a slave for the domain, as well as a backup mail server. In return, she wants the foo.example.com subdomain delegated to her own nameservers.
First, we must introduce the zone to named.conf:
----------

|    zone "example.com" {
|        type master;
|        file "example.com";
|    };
----------
and create the zone file:
----------

|    $TTL 2D
|    @         SOA     ns1.example.com. hostmaster.example.com. (
|                               2001090101  ; Serial
|                               24h         ; Refresh
|                               2h          ; Retry
|                               3600000     ; Expire (1000h)
|                               1h)         ; Minimum TTL
|              NS      ns1.example.com.
|              NS      ns2.example.com.
|              MX 5    mx1.example.com.
|              MX 10   mx2.example.com.
|              A       192.0.2.1
|
|    ; Addresses
|    ns1     A       192.0.2.1              ; Nameservers
|    ns2     A       192.0.2.96
|    mx1     A       192.0.2.2              ; Mail servers
|    mx2     A       192.0.2.96
|    www     A        192.0.2.3             ; Web servers
      dev     A        192.0.2.4
|    work    A        192.0.2.5             ; Workstations
|    play    A        192.0.2.6
|
|    ; Delegations
|    foo     NS       dns1.foo.example.com.
|    foo     NS       dns2.foo.example.com.
|    dns1.foo A       192.0.2.96
|    dns2.foo A       192.0.2.1
----------
The SOA record is similar to the one you saw before. Note that the next five records use the implicit name @, which is short for example.com.
The two NS records define ns1.example.com (our own server, 192.0.2.1) and ns2.example.com (our friend’s server, 192.0.2.96) as authoritative nameservers for example.com.
The MX (Mail Exchanger) records specify a mail server for the zone. An MX RR takes two arguments: a priority number and the name of a host. In delivering mail addressed to example.com, the listed MXes are tried in increasing order of priority. In this case, mx1.example.com (our own machine, 192.0.2.2) has the lowest priority and is always tried first. If the attempt to deliver mail to mx1 fails for some reason, the next listed MX, mx2.example.com (our friend’s server), is tried.
The A record says that the address of example.com is 192.0.2.1, and the next few lines specify addresses for other hosts in the zone: our nameservers ns1 and ns2, mail servers mx1 and mx2, two web servers, and two workstations.
Next we add NS records to delegate authority over the foo.example.com domain to dns1 and dns2.foo.example.com. The A records for dns1 and dns2 are known as glue records, and they enable resolvers to find the address of the authoritative nameservers so that they can continue the query. (If we were using dig, the NS records for dns1 and dns2 would be listed in the AUTHORITY section of the response, whereas the ADDITIONAL section would contain their addresses.)
Notice that dns2.foo.example.com is 192.0.2.1, our own nameserver. We are acting as a slave for the foo.example.com zone and must configure named accordingly. We introduce the zone as a slave in named.conf and specify the address of the master nameserver:
----------

|    zone "foo.example.com" {
|        type slave;
|        file "foo.example.com";
|        masters {
|            192.0.2.96;
|        };
|    };
----------
Similarly, our friend must configure 192.0.2.96, which is a master for foo.example.com and a slave for example.com. She must also configure her server to accept mail addressed to example.com. Usually, mx2 would just queue the mail until it could be delivered to mx1.
Let us pretend that we live in a perfect world: Our highly competent ISP has successfully delegated authority of our reverse zone to us, and we must set up named to handle reverse resolution as well. This process is very similar to what you used to set up the reverse zone for 0.0.127.in-addr.arpa. Now, however, you must determine your zone’s name.
DNS can only delegate authority at the “.” in domain names; as a result, you can set up reverse zones for the whole of a class A, B, or C network because they are divided at octet boundaries in the IP address. This approach is clearly unsuitable for classless subnets such as ours because the divisions are not at octet boundaries, but in the middle of an octet. In other words, our network cannot be described as x.* (class A), x.y.* (class B), or x.y.z.* (class C). The latter comes closest, but includes several addresses (such as 192.0.2.22) that do not belong to our tiny 192.0.2.0/29 network. To set up a reverse zone for our network, we must resort to the use of classless delegation (described in RFC 2317).
The ISP, which is authoritative for the 2.0.192.in-addr.arpa zone, must either maintain your reverse zone for you or add the following records into its zone file:
----------

|    1           CNAME    1.1-6
|    2           CNAME    2.1-6
|    3           CNAME    3.1-6
|    4           CNAME    4.1-6
|    5           CNAME    5.1-6
|    6           CNAME    6.1-6
|
|    1-6         NS       192.0.2.1
|    1-6         NS       192.0.2.96
----------
The first CNAME record says that 1.2.0.192.in-addr.arpa is an alias for 1.1-6.2.0.192._in-addr.arpa. (The others are similar. We do not have CNAME records for network and broadcast addresses 0 and 7 because they do not need to resolve.) Resolvers already know how to follow CNAME aliases while resolving names. When they ask about the 1-6 domains, they find the NS records defined previously and continue with their query by asking our nameserver about 1.1-6.2.0.192.in-addr.arpa.
So, we must set up a zone file for 1-6.2.0.192.in-addr.arpa. Apart from the peculiar name, this zone file is similar in every respect to the reverse zone we set up earlier, and should contain six PTR records (apart from the SOA and NS records). Note that we make 192.0.2.96 (ns2) a slave for the reverse zone as well, so the administrator must add a suitable zone statement to named.conf for it.
You now have a working DNS setup, but external resolvers cannot see it because there is no chain of delegations from the root nameservers to yours. You need to create this chain by registering the domain; that is, by paying the appropriate registration fees to an authority known as a registrar, which then delegates authority over the chosen zone to your nameservers.
Nothing is magical about what a registrar does. It has authority over a certain portion of the DNS database (say, the com. top-level domain [TLD]), and, for a fee, it delegates authority over a subdomain (example.com) to you. This delegation is accomplished by the same mechanisms that were explained earlier in our delegation of foo.example.com.
The site http://www.iana.org/domain-names.htm contains a list of all the TLDs and the corresponding registrars (of which there are now several). The procedure and fees for registering a domain vary wildly between them. Visit the website of the registrar in question and follow the procedures outlined there. After wading through the required amounts of red tape, your domain should be visible to the rest of the world.
Congratulations! Your job as a DNS administrator has just begun.
Several sources offer good information about finding and fixing DNS errors. The DNSRD Tricks and Tips page at http://www.dns.net/dnsrd/trick.html and the comp.protocols.tcp-ip.domains FAQ (an HTML version is located at http://www.intac.com/~cdp/cptd-faq/) are good places to start. This section discusses some of the more common errors and their cures.
Note
RFC 1912, “Common DNS Operational and Configuration Errors,” discusses several of the most common DNS problems at length. It is available at http://www.intac.com/~cdp/cptd-faq/.
Your zone must be delegated to the nameservers authoritative for them, either by the root nameservers or the parents of the zone in question. Improper delegation can cause the name service for your domain to become dysfunctional, prevent some networks from using the name service, and numerous other problems. These problems typically occur only in the initial stages of setting up a domain when the delegations have not propagated widely yet.
If you experience such problems, you can use dig to follow delegation chains and find the point at which problems occur. A tool such as dnswalk might also be useful (see “Tools for Troubleshooting,” later in this chapter).
Lame delegation is another common DNS delegation problem. Lame delegation occurs when a nameserver is listed as being authoritative for a zone, but in fact is not authoritative (it has not been configured to be a master for the zone); the nameserver in a lame delegation is called a lame server. Unfortunately, lame delegations are very common on the Internet. They can be the temporary result of domains being moved or (especially in the case of reverse zones) more permanent configuration errors that are never detected because of a lack of attention to detail.
If your registrar’s bills for your domain are not promptly paid, the registrar might discontinue the delegation of authority for your zone. If this happens (and the whois record for your domain usually mentions this), the best thing to do is quickly pay the registrar and ask for a renewal of the delegation. It is better not to let it happen, though, because such changes can take a relatively long time to make and propagate.
Reverse lookup problems are often very hard to diagnose because they manifest themselves as failures in systems other than DNS. Many security-sensitive services perform reverse lookups on the originating host for all incoming connections and deny the connection if the query fails.
Even if reverse resolution succeeds, many servers might reject connections from your host if your A and PTR records do not match. That is, the PTR record for a particular IP address refers to a name and the A record for that name refers to a different IP address. They perform a double lookup to verify that the PTR and A records match to eliminate spoofing attacks. Carefully maintain your reverse zones at all times.
Delegation problems are a frequent source of woe. Unfortunately, many ISPs appear unable to understand, configure, or delegate reverse zones. In such cases, you often have little choice but to try and tell your ISP what to do to fix the problem. If the ISP staff refuses to listen, find a new ISP (or live with broken DNS).
Another typical symptom of failing reverse lookups is an abnormally long delay on connection attempts. This happens when the server’s query for a PTR record is not answered and times out (often because of network problems or the nameserver being down). This can be baffling to diagnose, but you should suspect DNS problems whenever you hear questions such as “Hey! Why is my web browser taking so long to connect?”
Accurate serial numbers are very important to the correct operation of slave servers. An increase in the serial number of a zone causes slaves to reload the zone and update their local cache.
A common mistake that system administrators make is forgetting to increment the serial number after a change to the zone data. If you make this mistake, secondary nameservers won’t reload the zone, and continue to serve old data. If you suspect that the data on the master and slave servers is out of sync, you can use dig to view the SOA record for the zone on each server (dig @master domain SOA and dig @slave domain SOA) and compare the serial numbers in the responses.
Another common problem is setting the serial number to an incorrect value—either too small or too large. A too-small serial number causes slaves to think that they possess a more up-to-date copy of the zone data, but this is easily corrected by increasing the serial number as necessary. A too-large serial number is more problematic and requires more elaborate measures to repair.
Serial number comparisons are defined in such a way that if a serial number—when subtracted from another with no overflow correction—results in a positive number, the second number is newer than the first, and a zone transfer is required. (See RFC 1982 “Serial Number Arithmetic” for details.) You can exploit this property by temporarily setting the serial number to 232 (4,294,967,296), waiting for all the slaves to reload the zone, and then setting it to the correct number.
The most common error in zone data is to forget that names in a zone file are relative to the origin of the zone, not to the root. Writing www.example.com in the zone file for example.com and expecting it to be fully qualified causes names such as www.example.com.example.com to show up in the DNS. You should either write www, which is qualified to the correct www.example.com, or write www.example.com. (with the trailing period) to indicate that the name is fully qualified.
The SOA record should contain (as the first field) the domain name of the master server (not a CNAME) and a contact address (with the @ replaced by a “.”) to report problems to. Mail sent to this address should be read frequently. The other fields should contain sensible values for your zone, and the serial number should be correctly incremented after each change.
As discussed earlier, A and PTR records should always match; that is, the A record pointed to by a PTR record should point back to the address of the PTR record. Remember to quote the two arguments of HINFO records if they contain any whitespace. Avoid the use of CNAME records for MX, NS, and SOA records.
In general, after making changes to zone data, it is a good idea to reload named and examine the logs for any errors that cause named to complain or reject the zone. Even better, you could use one of the verification tools, such as dnswalk, discussed briefly next.
BIND includes the always useful dig program, as well as named-checkconf (to check /etc/named.conf for syntax errors) and named-checkzone (to do the same for zone files). We also especially recommend dnswalk and nslint. dnswalk is a Perl script that scans the DNS setup of a given domain for problems. It should be used in conjunction with RFC 1912, which explains most of the problems it detects. nslint, like the analogous lint utility for C programs, searches for common BIND and zone file configuration errors.
By occasionally using these programs to troubleshoot DNS problems (especially after nontrivial zone changes), you go far toward keeping your DNS configuration healthy and trouble free.
Fedora provides a dozen or more different graphical configuration tools system administrators can use to configure network (and system) services. One of these tools is system-config-bind, a deceptively simple BIND configuration tool that requires an active X session and must be run with root privileges.
You can launch this client by using the command system-config-bind from a terminal window or by selecting the Domain Name Service menu item from the Server Settings menu. system-config-bind is automatically installed if you select the Fedora configuration tools.
Note
Using system-config-bind and then saving any changes overwrites existing settings! If you prefer to manually edit your named configuration files, do not use system-config-bind. Always make a backup of the configuration files in any event—you’ll be glad you did.
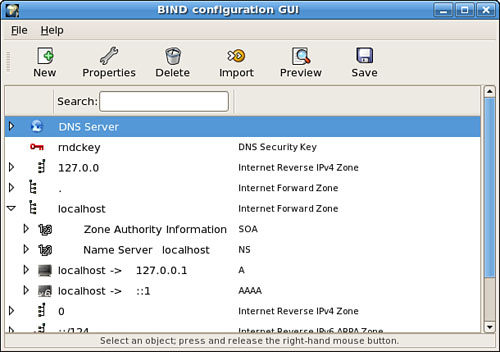
After you type the root password and press the Enter key, the client launches. You then see its main window, as shown in Figure 27.2.
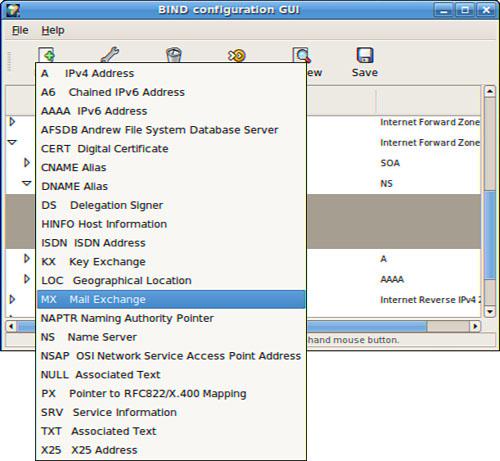
system-config-bind can be used to add a forward master zone, reverse master zone, MX records, or slave zone. Click the Add Record button to select an entry for configuration, as shown in Figure 27.3.
Existing settings can be edited or deleted by first selecting and then clicking the Edit or Delete button in the system-config-bind dialog. When you finish entering or editing your custom settings, select the Apply menu item from the File menu. Configuration files are saved in /etc/named.conf and under the /var/named directory.
Security considerations are of vital importance to DNS administrators because DNS was not originally designed to be a very secure protocol and a number of successful attacks against BIND have been found over the years. The most important defense is to keep abreast of developments in security circles and act on them promptly.
DNS is especially vulnerable to attacks known as poisoning and spoofing. Poisoning refers to placing incorrect data into the DNS database, which then spreads to clients and caches across the world, potentially causing hundreds of thousands of people to unwittingly use the bad data. Although DNS poisoning can occur because of carelessness, it has serious implications when performed deliberately. What if someone set up a clone of a common website, redirected users to it by DNS poisoning, and then asked them for their credit card numbers? Spoofing, the practice of forging network packets and making nameservers believe that they are receiving a valid answer to a query, is one of the ways malicious poisoning can be performed.
BIND has often been criticized as being very insecure, and although recent versions are greatly improved in this regard, DNS administrators today must take several precautions to ensure that its use is adequately protected from attacks. Of course, it is important to always run the latest recommended version of BIND.
Tip
One of your strongest defenses against DNS security risks is to keep abreast of developments in security circles and act on them promptly. The BugTraq mailing list, hosted at http://www.securityfocus.com/, and the SANS Institute at http://www.sans.org/ are good places to start.
The most important step in securing any UNIX system is to configure the environment BIND runs in to use all the security mechanisms available to it through the operating system to its advantage. In short, this means that you should apply general security measures to your computer.
Run named with as few privileges as it needs to function. Do not run named as root. Even if an attacker manages to exploit a security hole in BIND, the effects of the break-in can be minimized if named is running as user nobody rather than as root. Of course, named has to be started as root because it needs to bind to port 53, but it can be instructed to switch to a given user and group with the -u and -g command-line options.
Starting named with a command such as named -u nobody -g nogroup is highly recommended. Remember, however, that if you run multiple services as nobody, you increase the risks of a compromise. In such a situation, it is best to create separate accounts for each service and use them for nothing else. Fedora runs named as the user named.
You can also use the chroot feature of UNIX to isolate named into its own part of the file system. If correctly configured, such a file system “jail” restricts attackers—if they manage to break in—to a part of the file system that contains little of value. It is important to remember that a chroot jail is not a panacea, and it does not eliminate the need for other defensive measures.
Caution
Programs that use chroot but do not take other precautions as well have been shown to be insecure. BIND does take such additional precautions. See the chroot-BIND HOWTO at http://www.ibiblio.org/pub/Linux/docs/HOWTO/other-formats/html_single/Chroot-BIND-HOWTO.html.
For a chroot environment to work properly, you have to set up a directory that contains everything BIND needs to run. It is recommended that you start with a working configuration of BIND, create a directory—say /usr/local/bind—and copy over the files it needs into subdirectories under that one. For instance, you have to copy the binaries, some system libraries, the configuration files, and so on. Consult the BIND documentation for details about exactly which files you need.
When your chroot environment is set up, you can start named with the -t /usr/local/bind option (combined with the -u and -g options) to instruct it to chroot to the directory you have set up.
You might also want to check your logs and keep track of resource usage. named manages a cache of DNS data that can potentially grow very large; it happily hogs CPU and bandwidth also, making your server unusable. This is something that can be exploited by clever attackers, but you can configure BIND to set resource limits. Several such options in the named.conf file are available, including datasize, which limits the maximum size of the data segment and, therefore, the cache. One downside of this approach is that named might be killed by the kernel if it exceeds these limits, meaning that you have to run it in a loop that restarts it if it dies or run it from /etc/inittab.
Several configuration options exist for named that can make it more resistant to various potential attacks. The most common ones are briefly described next. For more detailed discussions of the syntax and use of these options, refer to the BIND 9 documentation.
Tip
The Security Level Configuration Tool (system-config-securitylevel) has been updated to make implementation of the firewall simpler. The new on/off choice (rather than levels as used before) allows you to employ a firewall without requiring any special configuration for your DNS server.
Specifying network and IP addresses multiple times in a configuration file is tedious and error prone. BIND allows you to define access control lists (ACLs), which are named collections of network and IP addresses. You use these collections to ease the task of assigning permissions. Four predefined ACLs exist:
In addition, you can define your own lists in named.conf, containing as many network and IP addresses as you prefer, using the acl command as shown:
----------

acl trusted {
    192.0.2.0/29;             // Our own network is OK.
    localhost;                // And so is localhost.
    !192.0.2.33/29;           // But not this range.
};
----------
Here you see that you can use an exclamation point (!) to negate members in an ACL. After they are defined, you can use these ACLs in allow-query, allow-transfer, allow-recursion, and similar options, as discussed next.
As mentioned before, most nameservers perform recursive resolution for any queries they receive unless specifically configured not to do so. (We suppressed this behavior by using dig +norec.) By repeatedly fetching data from a number of unknown and untrusted nameservers, recursion makes your installation vulnerable to DNS poisoning. (In other words, you get deliberately or inadvertently incorrect lists.) You can avoid this problem by explicitly denying recursion.
Recursive queries can be disabled by adding a recursion no statement to the options section of named.conf. It might still be desirable to allow recursive queries from some trusted hosts, however, and this can be accomplished by the use of an allow-recursion statement. This excerpt would configure named to disallow recursion for all but the listed hosts:
----------

options {
    ...

    recursion no;
    allow-recursion {
        192.0.2.0/29;
        localnets;          // Trust our local networks.
        localhost;          // And ourselves.
    };
};
----------
You can choose to be still more restrictive and allow only selected hosts to query your nameserver by using the allow-query statement (with syntax similar to allow-recursion, as described previously). Of course, this solution does not work if your server is authoritative for a zone. In that case, you have to explicitly allow-query { all; } in the configuration section of each zone for which you want to serve authoritative data.
You also can use queries to enable only known slave servers to perform zone transfers from your server. Not only do zone transfers consume a lot of resources (they require a named-xfer process to be forked each time) and provide an avenue for denial-of-service attacks, but also there have been remote exploits via buffer overflows in named-xfer that allow attackers to gain root privileges on the compromised system. To prevent this, add a section such as the following to all your zone definitions:
----------

zone "example.com" {
    ...
    allow-transfer {
        192.0.2.96;          // Known slave.
        localhost;           // Often required for testing.
    };
};
----------
Despite all this, it might be necessary to single out a few troublesome hosts for special treatment. The server and blackhole statements in named.conf can be used to tell named about known sources of poisoned information or attack attempts. For instance, if the host 203.122.154.1 is repeatedly trying to attack the server, the following addition to the options section of named.conf causes our server to ignore traffic from that address. Of course, you can specify multiple addresses and networks in the black hole list.
----------

options {     ...
blackhole {        203.122.154.1; };};
----------
For a known source of bad data, you can do something such as the following to cause your nameserver to stop asking the listed server any questions. This is different from adding a host to the black hole list. A server marked as bogus is never sent queries, but it can still ask us questions. A black-holed host is simply ignored altogether.
----------

server bogus.info.example.com {     bogus yes;};
----------
The AUS-CERT advisory AL-1999.004, which discusses denial-of-service attacks against DNS servers, also discusses various ways of restricting access to nameservers and is a highly recommended read. A copy is located at ftp://ftp.auscert.org.au/pub/auscert/_advisory/AL-1999.004.dns_dos. Among other things, it recommends the most restrictive configuration possible and the permanent black-holing of some addresses known to be popular sources of spoofed requests and answers. It is a good idea to add the following ACL to the black hole list of all your servers:
----------

/* These are known fake source addresses. */acl "bogon" {
    0.0.0.0/8; # Null address
    1.0.0.0/8; # IANA reserved, popular fakes
    2.0.0.0/8; 192.0.2.0/24; # Test address
    224.0.0.0/3; # Multicast addresses

    /* RFC 1918 addresses may be fake too. Don't list these if you
       use them internally. */
       10.0.0.0/8;
       172.16.0.0/12;
       192.168.0.0/16;
};
----------
DNS Security Extensions (DNSSEC), a set of security extensions to the DNS protocol, provides data integrity and authentication by using cryptographic digital signatures. It provides for the storage of public keys in the DNS and their use for verifying transactions. DNSSEC still isn’t widely deployed, but BIND 9 does support it for interserver transactions (zone transfers, NOTIFY, recursive queries, dynamic updates). It is worth configuring the transaction signature (TSIG) if your slaves also run BIND 9. We briefly discuss using TSIG for authenticated zone transfers here.
To begin, we use dnssec-keygen, as we did with rndc, to generate a shared secret key. This key is stored on both the master and slave servers. As before, we extract the Key: data from the .private file. The following command creates a 512-bit host key named transfer:
----------

$ dnssec-keygen -a hmac-md5 -b 512 -n host transfer
----------
Next we set up matching key statements in named.conf for both the master and slave servers (similar to the contents of the /etc/rndc.key file that we created earlier). Remember not to transfer the secret key from one machine to the other over an insecure channel. Use ssh, sftp (secure FTP), or something similar. Remember also that the shared secrets shouldn’t be stored in world-readable files. The statements, identical on both machines, would look something similar to this:
----------

key transfer {
    algorithm "hmac-md5";
    secret "...";          # Key from .private file
};

----------
Finally, we set up a server statement on the master to instruct it to use the key we just created when communicating with the slave, and to enable authenticated zone transfers with the appropriate allow-transfer directives:
----------
server 192.0.2.96 {
    key { transfer; };
};

----------
The BIND 9 ARM contains more information on TSIG configuration and DNSSEC support in BIND.
BIND is often run on firewalls—both to act as a proxy for resolvers inside the network and to serve authoritative data for some zones. In such situations, many people prefer to avoid exposing more details of their private network configuration via DNS than is unavoidable (although there is some debate about whether this is actually useful). Those accessing your system from outside the firewall should only see information they are explicitly allowed access to, whereas internal hosts are allowed access to other data. This kind of setup is called split DNS.
Suppose that you have a set of zones you want to expose to the outside world and another set you want to allow hosts on your network to see. You can accomplish that with a configuration such as the following:
----------
acl private {    localhost; 192.168.0.0/24;
     # Define your internal network suitably.
};
view private_zones {    match { private; };   recursion yes;
      # Recursive resolution for internal hosts.
zone internal.zone {        # Zone statements;  };
  # More internal zones.
};
view public_zones {    match { any; }      recursion no;
      zone external.zone { # Zone statements; };
     # More external zones.
};
----------
Further, you might want to configure internal hosts running named to forward all queries to the firewall and never try to resolve queries themselves. The forward only and forwarders options in named.conf do this. (forwarders specifies a list of IP addresses of the nameservers to forward queries to.)
The BIND 9 ARM discusses several details of running BIND in a secure split-DNS configuration.
http://www.dns.net/dnsrd/—The DNS resources database.
http://www.isc.org/products/BIND/—The ISC’s BIND web page.
http://archive.quadratic.net/docs/Bv9ARM.pdf—The BIND 9 Administrator Reference Manual.
The Concise Guide to DNS and BIND, by Nicolai Langfeldt (Que Publishing, 2000)—An in-depth discussion of both theoretical and operational aspects of DNS administration.
http://www.ibiblio.org/pub/Linux/docs/HOWTO/other-formats/html_single/Chroot-BIND-HOWTO.html—A guide to how chroot works with BIND 9.
http://langfeldt.net/DNS-HOWTO/—The home page of the DNS HOWTO for BIND versions 4, 8, and 9.
http://www.ibiblio.org/pub/Linux/docs/HOWTO/other-formats/html_single/DNS-HOWTO.html#s3—Setting up a resolving, caching nameserver. Note that the file referenced as /var/named/root.hints is called /var/named/named.ca in Fedora.
http://spf.pobox.com/—The home page of Sender Policy Framework, a method of preventing email address forgery.