
Data-oriented Silverlight applications are multitier by nature—they have a client, a server with services, and a data store. As you learned in chapter 14, the way Silverlight handles network calls requires setting up asynchronous proxies (or performing raw asynchronous network operations). Sometimes, sharing entities between the client and server is a simple task; sometimes it's not. In general, the amount of code that goes into what could be considered plumbing and standard CRUD methods ends up being a significant portion of the overall source code for the application.
In many organizations, the code that makes up those plumbing and standard operations, despite best efforts, ends up being duplicated in project after project. Reuse is rarely seen, and when it is, it's in relatively trivial things such as logging services or caching. When reuse is enforced, it can be overly cumbersome to use across the suite of applications and difficult to update.
When developing WCF RIA Services (also called just RIA Services for short), Microsoft realized that most applications built (again, despite best efforts) are actually mini silos from the client through to the database interface, and often through to the database tables themselves. I know from personal experience at many clients around the country that this is true—it's our industry's dirty little secret, despite all the talk about OOP reuse, SOA, and more. Applications have a silo of functionality they use and some minor integration points with other systems using web services. I bring this up to point out that a nongoal of RIA Services is the creation of robust service-oriented architecture (SOA) solutions, in the true sense of SOA, not the "we used a service" sense.
WCF RIA Services is a framework and set of tools that attempts to make building modern multitier applications as simple as building classic two-tier client/server applications. WCF RIA Services doesn't tie you to the single application model, but it's optimized to support it as the most prevalent application model. We're talking about building real, scalable, efficient, and easily coded multitier applications that work cleanly from front to back using a minimum amount of ceremonial code. This is accomplished through a framework and set of tools that provide the following benefits:
Automatic creation of common Create Read Update Delete (CRUD) methods for entities
Automatic generation and synchronization of service methods and their clientside proxies
Validation rules and arbitrary business logic methods that are shared between the client and server without duplication of effort
High-level client-side data source controls that make data manipulation simple
Integration with ASP.NET security
Through the project template, an overall application structure you can build on
In addition, when combined with the DataGrid and DataForm covered in chapter 12, you get automatic user-interface generation for entities, as well as simple UI wire-up for CRUD operations and validation.
This is all done in a way that allows you to maintain the level of control you want. There are enough extension points to let you hook into processes as well as manage client operations from code rather than the controls if you desire. Although optimized for the full application front-to-back scenario, it's flexible enough to incorporate other services and even other RIA Services servers into the overall solution. You can even expose your RIA Services service calls and data in a number of ways to allow interoperating with other systems.
Although RIA Services does support other clients such as ASP.NET, the functionality is at its strongest when used with Silverlight. Throughout its development, RIA Services was almost exclusively a Silverlight technology, giving back to the framework as techniques and code were developed. Almost 100 percent of the users of RIA Services, at the time of this writing, are building Silverlight applications. The reason is simple. RIA Services helps solve a problem that is strongest in Silverlight: how to build multitier data-oriented applications with different but mostly compatible frameworks on the client and server, without native database or ORM access from the client, and perform all requests asynchronously while keeping the footprint down.
Our tour of RIA Services will start with a look at the tooling and templates that make it easy to use in Visual Studio. You'll create a project that'll be used in the examples through the rest of the chapter. After that, we'll look at what it takes to expose data to external clients and to Silverlight, as well as how to filter, sort, group, and page that data. Of course, there's more to application development than read-only data, so we'll go through the update process to make sure the data can make a full round trip. Then, because I spent the last chapter telling you how important it is to decouple your layers, we'll look at how to support loose coupling in an otherwise tightly coupled system. We'll wrap up the chapter with a look at where to put business logic, followed by securing your applications
I'm excited about the efficiency that RIA Services brings to the table, so let's get building.
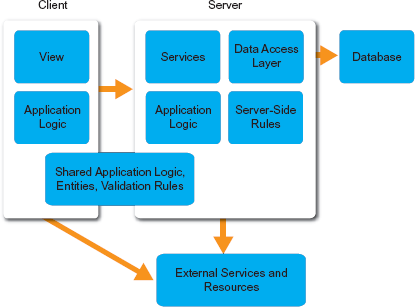
WCF RIA Services applications are similar to traditional Silverlight applications in that there's both a client application and a home server. The server serves up the Silverlight application and also contains the services the application is to use. RIA Services works with multiple-server and multiple-client scenarios; but as mentioned in the introduction, the typical scenario is one server per application domain. Figure 17.1 captures this typical architecture at a high level.
At first glance, the architecture looks like any other Silverlight application, except for that odd shared bit. That's one of the many things that make RIA Services worth the effort to learn.
RIA Services includes strong support for creating client-side proxies and entities that preserve, with high fidelity, the validation rules and logic written on the server. As a developer, you only need to write the code once, and RIA Services will take care of the rest. We'll cover this in depth later in the chapter.
In this section, we'll look at the tooling that makes RIA Services work. Then, we'll dive right in to creating a new project using the Silverlight Business Application template, a WCF RIA Services version of the navigation template we covered in chapter 15. You'll build on this project throughout the rest of the chapter.
Much of what makes WCF RIA Services tick is the magic that happens as part of the build process. When you first create a Silverlight application and select the option to Enable WCF RIA Services, you've set up a client-to-server project link. That option puts a single line in the Silverlight .csproj project file:
That one line of XML makes possible the auto-generation of the client proxies, types, and more. That also means a Silverlight application can be directly attached to at most one RIA Services server. To get around this limitation, you can create Silverlight class library projects and allow them to link to different servers, and then use the class libraries in your own project.
If you're curious, check out the obj/Debug folder in your Silverlight project. In it, you'll find a number of files generated by the RIA Services tooling, to keep track of server references, source files, and more. It's mostly unicorn and rainbow[1] magic, but it's fun for the curious and perhaps helpful during an odd debugging session.
The main body of code that is generated falls under the Generated_Code folder on the Silverlight application. This includes a single .g.cs file with all the context and proxy classes, and one or more subfolders with the additional model classes. Because this code is autogenerated, you won't want to change it. But having the source code available is useful when you're trying to understand exactly what RIA Services is doing in the client application, or when you're involved in complex debugging.
Throughout the remainder of the chapter, feel free to inspect the .g.cs file and the rest of the code in the Generated_Code folder as you add methods to various serverside classes.
Now that you understand the relationship between the web project and the client project, you can create the start of an application using the Silverlight Business Application template.
The Silverlight tools for Visual Studio 2010 include a WCF RIA Services solution template, based on the navigation template discussed in chapter 15. This template is called the Silverlight Business Application template. Although you don't need to use this template to create a RIA Services project (you need to select the Enable WCF RIA Services check box when creating a new Silverlight project as mentioned in the previous section), it does provide a good project structure to start with.
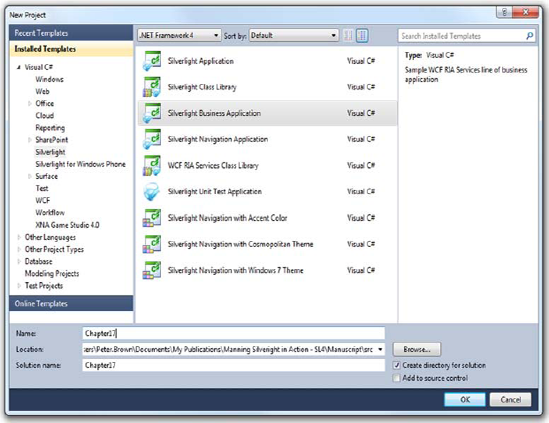
Figure 17.2. Creating a new WCF RIA Services application using the Silverlight Business Application template
Figure 17.2 shows the New Project dialog with this template selected. You'll use this project, Chapter17, throughout the rest of the chapter.
Note that when you create a new WCF RIA Services project, you're not prompted with the usual second New Project dialog, asking whether to create a web site or enable WCF RIA Services. In a RIA Services project, both are required.
Despite the fact that they're based on the same original template, the styling steps described in chapter 15 won't work exactly with this template. Instead, you'll need to install the Silverlight Business Application templates (they're just zip files) included in the download and use them as the basis for your new project. At the time of this writing, no .vsix installers exist for the templates, so you have to manually install them. In addition, the trick of copying the styles over wasn't working when I wrote this. The team is investigating, so the experience may be better by the time you try it.
When you run the application, you'll get something that looks similar to the chapter 15 template, but with a few additions. Figure 17.3 shows the bare application at runtime.
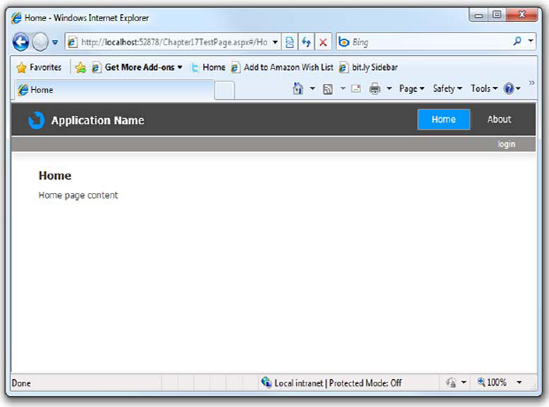
Figure 17.3. The application when first run. Note the addition of the Login button as compared to the navigation template shown in chapter 15.
At runtime, the main difference you'll notice is the addition of the Login button. If you click that, you'll get a ChildWindow login prompt. We'll discuss authentication later in this chapter.
The other changes, compared to the navigation application, require a little more digging.
The Silverlight Business Application template has good support for customization and localization of the strings presented to the user. If you crack open the AssetsResourcesApplicationStrings.resx file, you'll see that you can change key prompts, window titles, and more without altering the XAML.
Although not strictly required, when adding your own pages or prompts, a best practice is to place the text in one of the three resource files (ApplicationStrings, ErrorResources, or SecurityQuestions) rather than directly into XAML or code. Of course, you can create your own resource files if the text doesn't logically fit in one of these three.
To test the application resources approach, change the ApplicationName property to something different. I chose "Chapter 17 Example". Run it, and you'll see the changed name. It doesn't change in the designer right away; but after a build (or build and run), you'll see the title update in the designer as well. In this way, the resource files don't block your design-time experience.
How and why does this work? Open MainPage.xaml, and find the TextBlock named ApplicationNameTextBlock. Its definition looks like this:

The displayed Text value is bound to a property of the generated resource file class ApplicationStrings. The ResourceWrapper class provides a single location from which you can access all the resource classes. The resource property name is the same as that defined in the resource file. I've used traditional resource files before, and it was never this easy to get values into the UI. The power of binding in Silverlight makes using traditional resource files a no-brainer.
The client project file has a number of other differences compared to the straight navigation template. As you explore the project structure, you'll see a number of additional controls (such as the BusyIndicator), helper classes, additional views, and more. You'll run across many of them as you create your RIA Services application in the upcoming sections.
WCF RIA Services, especially through the use of the application template, makes it easy to structure a full business application, following best practices. The tooling in Visual Studio helps automatically synchronize the client and server, avoiding a cumbersome manual step.
The architecture of WCF RIA Services, although geared toward Silverlight applications, is usable by other application types as well through the server-side services. We'll leave the client project alone for a moment while we concentrate on the server (web) project in order to learn how to expose data to the application.
WCF RIA Services applications are typically used with a database back-end. It's possible to use something other than a database; RIA Services itself doesn't care what type of backing store you use, as long as a base domain service class exists for it.
Traditional Silverlight applications use a WCF, SOAP, or REST service server-side to access data. Those services, in the case of SOAP and WCF, expose methods for retrieving and updating data. They may expose domain methods to perform other functions or calculations as well. REST-based services typically expose a domain model in an entity-centric way.
In a RIA Services application, the service to use is a domain service. A domain service, which is built on WCF, provides LINQ-based access to domain objects or data, as well as traditional service access to additional domain functions. It sits between the database and your client code, combining many of the advantages of the other services with the added bonus that the wire-up with the client happens automatically. The domain services are the heart of a WCF RIA Services application.
In this section, you'll first create a domain service in the web project. We'll then look at what's required to expose the data and functionality in that service in a number of different ways, including OData, JSON, and SOAP. With the interoperability question out of the way, we'll dive into the primary scenario the service was built for: integration with the Silverlight client. We'll wrap up this section with an in-depth look at the common domain service methods and what it takes to add your own methods to the service.
For this project, you'll use the Entity Framework and the Adventure Works database. Follow the instructions in appendix A and set up the database, connection, and Entity Framework Model in the existing web project.
Build the project before adding the domain service. This will ensure that the appropriate metadata is available from the Entity Framework Model. When that's done, right-click the Services folder in the web project, and choose Add New Item. The item you want to add is the Domain Service Class, included in the top-level Visual C# template list in the New Item dialog. Figure 17.4 shows the correct template in use.
Name your domain service EmployeeService.cs, and click Add. You'll then be presented with the RIA Services-specific Add New Domain Service Class dialog shown in figure 17.5.
This dialog requires careful attention. First, you want to make sure the Enable Client Access option is checked. When checked, it allows the domain service to be used by clients such as Silverlight. If unchecked, the service will only be available server-side.
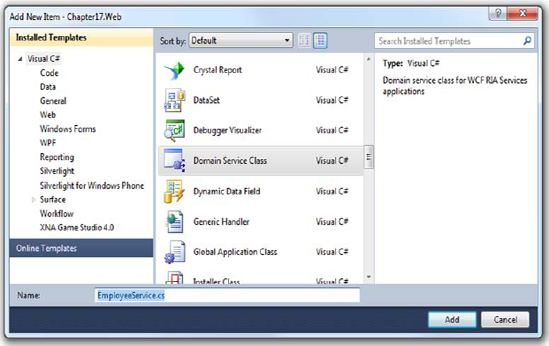
Figure 17.4. Creating the EmployeeService domain service. You can find the Domain Service Class template in the top-level Visual C# template list.
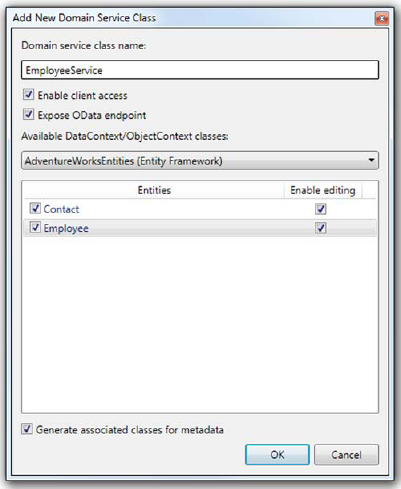
Figure 17.5. The Domain Service setup dialog. If your dialog entity list is empty, cancel out and build the project.
The next option is Expose OData Endpoint. OData is an XML-based data format. For most projects, this is entirely optional, but because we'll be discussing OData in a bit, it needs to be checked.
The middle of the dialog includes a list of entities from the Entity Framework Model. If this list is empty, you need to cancel the dialog and build the project. Select each entity that will be handled from this domain service; typically this is only one entity, or a small number of highly related entities, such as you have in this case. By default, the service handles retrieve operations only; if you want to allow create, update, and delete, ensure that the checkbox under Enable Editing is selected.
Finally, Generate Associated Classes for Metadata is an important option. When selected, this creates a class you can use to provide attribute-based validation and metadata for each of the entities. This class is named <domainservice>.metadata.cs
If all the correct options are selected, when you click OK, the two classes (service and metadata) will be created in the Services folder on the web project. The EmployeeService class automatically includes all the appropriate domain service methods to perform CRUD operations on both the selected Contact and the Employee types.
Silverlight applications rarely exist in a vacuum. Before we get in depth into using the domain service in the Silverlight application, it's important to discuss how you can use the domain service with other types of clients.
Every client-exposed domain service is also a WCF service. The full address of the WCF service is the web server plus the full namespace, with all dots replaced by dashes, plus svc. For example, for EmployeeService, in the Chapter17.Web.Services namespace,
the full URL is
http://localhost:<port>/Chapter17-Web-Services-EmployeeService.svc
If you start the project and then replace the URL with that, you'll get the normal WCF service page. Unlike an .asmx SOAP service, you can't run the service from this page (which is good for preventing curious end users from running services directly).
You can use the Add Service Reference menu option from any WCF-aware project type (WPF, Windows Forms, ASP.NET, or even console) and use the service directly. You won't get the rich metadata and client-side validation provided by a native RIA Services client, but you'll be able to access the data and queries, as well as any defined domain methods in the service.
In addition to this approach, which should be your first option if supported in your client, several other possible endpoints are supported.
RIA Services can expose a read-only OData endpoint for use by any application that can speak the OData/AtomPub protocol. When creating the domain service, you were offered the option to expose an OData endpoint. For this example, you did that. That did two things:
Added a system.serviceModeldomainServicesendpoints name of
ODatato the web.config fileAdded
IsDefaultQueryto the retrieve methods in the domain service class
Because the name added is OData, the service name has /OData appended to it. In this case, the service name is
http://localhost:<port>/Chapter17-Web-Services-EmployeeService.svc/OData
If you want to see metadata about the service (the OData rough equivalent of SOAP WSDL), you can append /$metadata to the endpoint name. For this service, it's as follows:
http://.../Chapter17-Web-Services-EmployeeService.svc/OData/$metadata
To access the root entities sets exposed by the domain service, you append Set to the name of the entity so Employee becomes EmployeeSet. Then, append that to the OData endpoint URL, as shown here:
http://.../Chapter17-Web-Services-EmployeeService.svc/OData/ContactSet
http://.../Chapter17-Web-Services-EmployeeService.svc/OData/EmployeeSet
Currently, accessing a single entity by ID isn't supported in the OData endpoint. With a full OData endpoint, you'd be able to do something like this:
http://.../Chapter17-Web-Services-EmployeeService.svc/OData/EmployeeSet(1)
(NOTE: this is not supported)
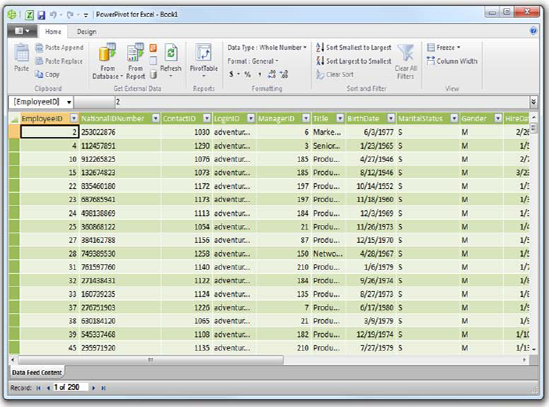
Figure 17.6. Data from the WCF RIA Services OData endpoint, loaded into PowerPivot for Excel 2010. PowerPivot is a C# .NET Office add-in application, by the way.
You can easily test the OData endpoint in Microsoft PowerPivot[2] for Excel 2010 by selecting the From Data Feeds option while the application is running, and providing the full EmployeeSet or ContactSet URL. When executed, the EmployeeSet query returns the results directly into PowerPivot, as seen in figure 17.6.
OData endpoints are good for querying data on the web or using tools such as PowerPivot. Although OData could be used for Ajax applications, you'll be better served using the native JSON endpoint.
Both the JSON and SOAP endpoints require the use of assemblies in the RIA Services Toolkit, which can be installed, like all other Silverlight tools, using the Microsoft Web Platform Installer.[3] If you performed a default Silverlight 4 tools installation with RIA Services, you have the toolkit installed. If you don't have a toolkit folder under the Program FilesMicrosoft SDKsRIA Services 1.0 folder, you can manually install the toolkit from http://silverlight.net/getstarted/riaservices/.
From the web project, you'll need to add an assembly reference to the Microsoft.ServiceModel.DomainServices.Hosting assembly in the RIA Services toolkit. Figure 17.7 shows the Add Reference dialog with the correct assembly selected.
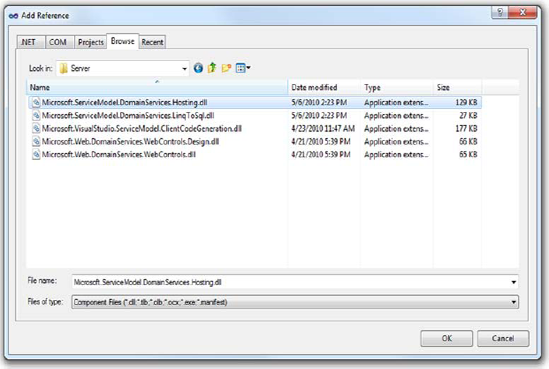
Figure 17.7. The Add Reference dialog with the correct assembly selected to allow exposing JSON and SOAP endpoints
When the project reference is set, you'll need to modify the web.config file to add the new JSON endpoint. In the domainServicesendpoints section, where the OData endpoint also lives, add the following XML:

That configuration entry sets up a WCF endpoint using the factory included in the RIA Services toolkit DLL. When it's configured, the root URL will be, as it was in the OData case, the service name with /<endpoint>:
http://localhost:<port>/Chapter17-Web-Services-EmployeeService.svc/JSON
You can call the endpoint anything you want, as long as you use the same endpoint name in the configuration file and in the URL. By convention, you use the return type—JSON. To perform a query, use Get as the format. For example:<EntityName>s
http://.../Chapter17-Web-Services-EmployeeService.svc/Json/GetEmployees
Note that if you call that URL using Internet Explorer 8, you'll get a download error. If you use Google Chrome, or another browser or JSON tool, you'll be able to see the text of the JSON content. If you have nothing handy, create this simple HTML file (see listing 17.1) in the web the project and select View in Browser. I called mine Test-JsonEndpoint.html and used a little jQuery to handle the Ajax call.
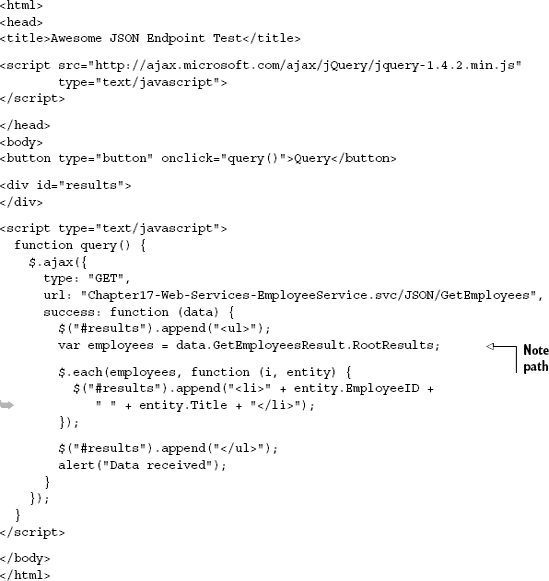
This example HTML page shows how to test the retrieve method of the JSON endpoint for your RIA Services domain service class. Using the EmployeeID and Title, it creates a single list item for each employee returned in the query and then displays an alert when the query returns. Note the path used to get to the root of the results: it's the name of the query with Result appended, plus the name .RootResults. This is consistent for any RIA Services JSON get call.
jQuery[4] makes the service call and processing simple. If you haven't yet been exposed to jQuery, definitely check it out. jQuery has been the one thing that makes JavaScript and DOM manipulation tolerable for me. It's a great library for handling on-page work, and it interacts nicely with Silverlight.
The JSON endpoint also supports updating data. For space and relevance reasons, I won't create a full update UI here, but the code is similar to any other JSON Ajax call using a POST.
JSON is great for Ajax applications, but the format itself can be limiting. Although not as rich as the WCF native formats, another widely understood format is SOAP.
Like JSON endpoints, SOAP endpoints are updatable services exposed using a service endpoint definition in the web.config. The entry to add for SOAP is

This requires the same assembly reference the JSON example required. Note that the public key token and other assembly information are identical as well.
Unlike the JSON approach, the SOAP endpoint ends up working right at the root service level. For example, to get the Web Services Description Language (WSDL) for the SOAP service in your solution, hit this URL with the browser:
http://.../Services/Chapter17-Web-Services-EmployeeService.svc?wsdl
You don't need to add /Soap to the URL.
To fully utilize the SOAP client, you'll need to add a service reference from another project and generate the client. As was the case in the JSON version, the service is read/write but doesn't expose the entity metadata to the client. To take advantage of WCF RIA Services, you'll want a full Silverlight application, aware of WCF RIA Services and aware of the metadata it uses.
The methods in the domain service have names starting with Get, Insert, Update, and Delete. This naming convention allows for automatic wire-up of the operations with the client. This convention-over-configuration approach is common outside the Microsoft developer ecosystem and is just starting to make its way into Microsoft products.
Conventions don't always work for everyone or in every situation, though. For instances where you'd rather not go with convention, you can use a series of attributes to make your choices explicit. Table 17.1 shows the attributes, conventions, and their descriptions.
Table 17.1. Naming conventions, equivalent attributes, and their purposes
Name prefix | Attribute | Purpose |
|---|---|---|
(Any) |
| A method that returns data without any side effects. The usual approach is to prefix with |
|
| An operation that inserts a single entity into the data store. The method takes the entity as a parameter. |
| An operation that updates a single entity in the data store. The method takes the entity as a parameter. | |
|
| An operation that deletes an entity in the data store. The method takes the entity as a parameter. |
(Any) |
| A business method that must be executed without tracking or deferred execution. It may or may not have side effects. Use only when one of the other method types can't be used. |
(Any) |
| A named update with |
In the remainder of this section, we'll go through each of the types of operations on the domain service.
Query methods are methods that return a single entity or a set of entities. The default query method generated by the template returns all instances of the entity in the data store. This allows you to further compose the query on the client with additional criteria to limit the result set.
Query methods may be indicated by convention or attribute, as shown previously. When using the attribute, you have a few options to set. These are shown in table 17.2.
Table 17.2. QueryAttribute members
Member | Description |
|---|---|
| Queries shouldn't typically have side effects that would alter data. If they do, set this property to true so clients can make decisions as to how to use the method. For example, an HTTP client may send a POST instead of a GET. |
| Set this to true if the query allows composing to add additional criteria. |
| Set this to true if this query is the default query for the entity type. |
| This is the maximum number of results the method should return. Defaults to 0, which indicated unlimited results. |
Creating a query method on the service is pretty simple if you follow the naming and method signature conventions. Here's an example of one that returns only salaried employees:
public IEnumerable<Employee> GetSalariedEmployees()
{
    return from Employee emp in ObjectContext.Employees
            where emp.SalariedFlag == true
            select emp;
}
When the solution is compiled, the method is turned into a client-side method named GetSalariedEmployeesQuery on the generated EmployeeContext domain context object.
Query methods fall into three primary buckets:
Methods returning a single concrete instance of an entity
Methods returning a collection or enumerable of zero or more entities
Methods returning an
IQueryableof the entity
The first two are easily understood, falling squarely into patterns you've used since functions were first conceptualized in computer science. The third option is a little different and provides real flexibility.
A function with an IQueryable return type returns an expression tree. This is a LINQ concept for a generic query that's to be executed by a query provider. The IQueryable interface inherits from IEnumerable, so it also represents the results of that expression tree. Even when you build the LINQ query on the client, the query itself is executed server-side, typically all the way back at the database for a provider such as the Entity Framework.
In effect, this means you can have this query method on the server
public IQueryable<Employee> GetEmployeesSorted()
{
    return from Employee emp in ObjectContext.Employees
            orderby emp.Title, emp.HireDate
            select emp;
}
and use it like this on the client:
EmployeeContext context = new EmployeeContext();

EntityQuery<Employee> query =
    from emp in context.GetEmployeesSortedQuery()
    where emp.SalariedFlag == true
    select emp;
Note that the query is composed—the server-side query and the client-side query are combined to return a set of results. That's a powerful way to provide prefiltered or presorted data to the client. For example, the query could've taken a parameter to use in the filter or used security to decide which records could be returned to the client. The query execution itself is deferred; it's not executed until the client code first accesses the result data.
We'll cover more about using the domain service query methods from the client later in this chapter. Another class of methods the service provides is for data manipulation: insert, update, and delete operations.
The generated code for the insert, update, and delete methods takes in a single entity and uses the backing data store to perform the appropriate operation. For example, the update code looks like this:
public void UpdateEmployee(Employee currentEmployee)
{
  this.ObjectContext.Employees.AttachAsModified(currentEmployee,
                    this.ChangeSet.GetOriginal(currentEmployee));
}
That tells the server-side object context to add this employee and mark it in the modified state, using the passed-in employee object as the current state and the original object as the last-known state from the data store. The Attach and AttachAsModified functions are all provided by the Entity Framework. The specific function used for your data provider may vary.
For a given entity, it's unusual to create alternate general insert, update, and delete methods. Doing so would confuse RIA services, not to mention your fellow programmers. There's one exception—the named update method.
Normally, the update methods are handled automatically based on the state of the data. But you may have situations where you need to provide a custom update method that you'll call directly rather than let Silverlight infer the update operation for a particular entity during the SubmitChanges call on the domain context.
To mark an update operation as a named update operation, it needs to have the usual update operation signature and the Update attribute with UsingCustomMethod = true. Here's an example:
[Update(UsingCustomMethod = true)]
public void SpecialCascadedUpdate(Employee emp)
{
   ...
}
This approach exists to allow you to handle special cases related to business logic or database complexities. It's still called as part of the batched SubmitChanges call. If you want to immediately execute a function, another approach is available.
CRUD methods are called as part of a batch—the entities have the CRUD operations performed on them but aren't sent to the server for the actual action until the call to SubmitChanges is made on the client.
Invoke methods are normal methods you can use to perform some sort of calculation or return a piece of data. They're operations that need to be executed without change tracking or deferred execution. Invoke methods shouldn't be used to load data; that's what query methods are intended for. Returning an entity from an Invoke method bypasses the pattern and won't cause the appropriate change tracking and entity generation to occur on the client.
Although the Invoke attribute is optional, to be considered an invoke method, a method shouldn't take entities as a parameter or return an entity, IEnumerable, or IQueryable of entities as a result.
A typical invoke method, if there could be such a thing, might look like this (example shamelessly stolen from chapter 16 on MVVM):
[Invoke()]
public int CalculateVacationBonus(DateTime hireDate)
{
  int vacationBonus;
  DateTime today = DateTime.Today;

  int yearsInService = today.Year - hireDate.Year;

  if (hireDate.AddYears(yearsInService) > today)
    yearsInService--;

  if (yearsInService < 5)
    vacationBonus = 10;
  else
    vacationBonus = 20;

  return vacationBonus;
}
It's a regular business method. Given that it's on the server, you probably have a reason— it may call another web service, or it may hit a database to do a lookup. In this case, it's on the server to illustrate the invoke type.
As mentioned, the Invoke attribute is optional. When in doubt, add the attribute to make your intentions clear. For normal CRUD methods where the name is sufficiently patterned using the naming conventions, this is usually unnecessary. But I find that Invoke methods can be ambiguous at first glance. Speaking of naming conventions, what happens when you want to avoid having them kick in?
Some of these operations require the use of attributes, but many are autogenerated via the naming conventions. If you don't want RIA Services to generate a domain method for your service method, apply the Ignore attribute to that method, as shown here:
[Ignore()]
public void UpdateEmployeeButNotReally(Employee emp)
{
...
}
With that attribute in place, despite the fact that the method uses the Update naming convention and method signature, it won't be generated as an update call on the client.
The domain service provides a number of standard method types, many of which are autogenerated from the tooling but may be modified or replaced. Domain services provide CRUD operations in the form of insert, update, delete, and query methods. In addition, arbitrary functionality may be included in invoke methods.
When discussing the IQueryable type, I sneaked an EmployeeContext object into the example. What's that, and what does it provide? That's the subject of the next section.
Domain services execute on the server, running under the full .NET 4 framework. The client-side equivalent of the domain service is the domain context object. Domain context objects provide a proxy for the service methods, as well as change tracking, operation batching, and more.
For each domain service on the server, RIA Services will generate one domain context object on the client. In the case of the EmployeeService domain service, the client domain context is named EmployeeContext.
The domain service may be wired up to Silverlight via RIA Services controls in the UI that go through the context object, or via explicit use of the context object in code. Both have advantages and disadvantages and will impact the overall architecture of your application. I'll cover both here, starting with the most involved approach: creating the connection from code.
One way to use the domain service is to reference the client context object from code and execute queries directly against it. Because this is the most traditional way when compared to the usual pattern of working with services and WCF service proxies, I'll start with it.
In the Home.xaml.cs file, replace the OnNavigatedTo method with the following short bit of code:
protected override void OnNavigatedTo(NavigationEventArgs e)
{
    EmployeeContext context = new EmployeeContext();

    EntityQuery<Employee> query = context.GetEmployeesQuery();

    context.Load<Employee>(query);
    EmployeeGrid.ItemsSource = context.Employees;
}
When the page is navigated to, this code automatically loads all the employees and assigns that collection to the ItemsSource of a DataGrid. The EmployeeContext object, in this instance, serves as the proxy for the domain service. Note that though you don't bother to hook up a method to the Load method asynchronous return, it's still executed asynchronously, and the results appear through binding.
The query system is flexible: you could change the query to add some criteria and a sort if you wanted to. (Be sure to add using System.Linq; to the top of the code before you try to compile.)
EntityQuery<Employee> query =
    from emp in context.GetEmployeesQuery()
    where emp.SalariedFlag == true
    orderby emp.HireDate
    select emp;
This example selects all the employees that are salaried and sorts them by hire date. The query itself is executed on the server, as you learned in the previous section. When using the Entity Framework with SQL Server as you are here, the query is executed all the way back at SQL Server, and only the items matching the query are returned.
You can't test the connection without having something to bind it to. So, time for a trusty DataGrid. Replace everything else in the LayoutRoot, starting with the ScrollViewer, with this XAML:
<Grid Margin="10">
  <Grid.ColumnDefinitions>
    <ColumnDefinition Width="*" />
    <ColumnDefinition Width="350" />
  </Grid.ColumnDefinitions>

  <my:DataGrid x:Name="EmployeeGrid"
               Grid.Column="0" Margin="5" />
</Grid>
It'll be easiest if you first drag the DataGrid onto the design surface in order to set up the correct namespaces and project references. Besides, "it's not a real demo unless someone drags a DataGrid."[5]
When you run the application, you'll get something that looks like figure 17.8.
Connecting via code allows you to better take advantage of advanced patterns such as MVVM and have complete control over the execution path. As you get more into advanced patterns, that can be a significant benefit.

Tip
I set the DataGrid ItemsSource property via code. There's no reason you couldn't set up a ViewModel (chapter 16) and bind the ItemsSource to an exposed Employees property. If you go with using the domain context object from code, follow the ViewModel/MVVM pattern when you do it; you'll thank yourself later.
I'll cover the domain context class in more detail in various parts of this chapter, primarily in section 17.3 when I discuss update functionality.
There's another approach that's easier to use and includes a ton of built-in functionality. Before making up your mind which approach you want to use, look at the DomainDataSource control.
The DomainDataSource control provides an all-XAML way to interface with the domain service. I've heard this described as a bad thing, akin to wiring your UI directly to your database. I strongly disagree with that assessment, but I do agree that despite the utter simplicity of using the control, there are some drawbacks when it comes to testing, mocking, and application structure.
Before making up your mind that the control is a Bad Thing, let's look at what it can do. After all, some applications may benefit from this approach. Despite how it looks, it's not like you're binding VB3 UI controls directly to tables in an access database;[6] there are a few layers of abstraction in between.
To use the DomainDataSource control, you'll need to add a Silverlight assembly reference to the RIA Services SDK assembly System.Windows.Controls.DomainServices. When that's done, inside the LayoutRoot Grid of /Views/Home.xaml, add the following markup:
<riaControls:DomainDataSource x:Name="DataSource"
                                AutoLoad="True"
                                QueryName="GetEmployees">
    <riaControls:DomainDataSource.DomainContext>
        <domain:EmployeeContext />
    </riaControls:DomainDataSource.DomainContext>
</riaControls:DomainDataSource>
This markup sets up a new DomainDataSource control, tells it to automatically call the query when loaded, and sets the query name to the one that loads the employee information from the domain service. For this to work, you'll also need to set up the riaControls and domain namespaces in the same XAML file. They are as follows:
The first namespace, riaControls, defines the location for the DomainDataSource control. The second defines the location for the generated domain context class: the client-side proxy for the domain service on the server.
Tip
If you're curious about where the client-side proxy is defined and what it looks like, select the Silverlight project and, from the Project menu, select Show All Files. Scroll down, and you'll see a Generated_Code folder. In that folder, you'll find a number of interesting files, but the one that contains the proxies and entity definitions is Chapter17.Web.g.cs.
The DataGrid then needs to be bound to the new data source. Because the data source has an assigned context object, the data itself is located in the Data property:
<my:DataGrid Grid.Column="0" Margin="5"
             ItemsSource="{Binding Data, ElementName=DataSource}" />
What you've changed on the grid is the ItemsSource. The markup here binds the DataGrid to the data property of the DomainDataSource. Because the DataGrid instance is set up by default to autogenerate columns and show all data, you'll end up with an application that looks like the previous example in figure 17.8 when run; the UI hasn't changed, just the way you get data on the client. Be sure to comment out or remove the code you previously added.
The DomainDataSource is easy to use. Although "Look ma, no code!" isn't the most important reason to pick one approach over another (and in some cases can be a reason not to pick an approach), the domain data source is powerful and flexible enough to make it a real contender for how you connect to your domain service.
One other reason I like the DomainDataSource control is because both the team and the community are working to come up with better approaches that allow using that control with a ViewModel directly. Yep, using your ViewModel while still taking advantage of most of the coolness of the DomainDataSource is on everyone's radar.
The DomainDataSource and the underlying domain context objects support updating as well as querying, of course. But before we look at that, it's worth exploring one of the more compelling reasons to use the DomainDataSource control: filtering, sorting, grouping, and paging.
User interfaces used to be simple to design because user expectations were so low. Character-mode terminals, difficult-to-memorize commands, and complex keystrokes that required keyboard function key overlays[7] were the norm at one point, with some approaches persisting even into the GUI era.
As applications gained more chrome functionality, things such as sorting and grouping became expected functionality. In the mid-'90s, I remember developing applications in Visual Basic, and the users assuming they could do things like sort grids using column headers, drag to rearrange, and so forth. Unfortunately, these assumptions didn't come out until user-acceptance testing.
These days, anything that helps meet the bar for base application functionality (for business applications, this is typically defined by what Microsoft Windows or Microsoft Office does in similar situations) is something I appreciate.
One reason I appreciate the DomainDataSource control is how well it integrates with other client-side controls to allow for filtering, sorting, grouping, and paging of the data. Any of those features, done right and done well, can amount to a fair bit of code and a testing burden.
Consider that you want to ensure they execute server-side for the best performance. You also have to handle the always-troublesome paging algorithms. What happens when users add a new item to a paged set? What happens when they sort? Fortunately, the RIA Services team has made intelligent decisions about behavior in each of these scenarios and implemented them into the code base.
You'll progressively add each of these capabilities—filtering, sorting, grouping, and paging—to the DomainDataSource-based version of your code, starting with filtering.
Microsoft Excel and Microsoft SharePoint have brought filtering of table- or grid-based data up to the level of basic functionality for most applications. Proper filtering that performs efficiently isn't a huge effort, but it's a chunk of code that has to be maintained and tested. Having filtering support built in, so that all you need to provide is a filtering UI, is a huge benefit to most applications.
The first step is to create a basic single-field filter UI. Modify the controls in the home page XAML so you have these three controls where the DataGrid alone used to be:
<TextBlock Height="23" Width="84" Margin="6,10,0,0"
HorizontalAlignment="Left" VerticalAlignment="Top"
Text="Title Contains"
<TextBox x:Name="FilterText" Height="23" Margin="96,6,5,0"
HorizontalAlignment="Stretch" VerticalAlignment="Top" />
<my:DataGrid x:Name="EmployeeGrid" Grid.Column="0" Margin="0 40 5 5"
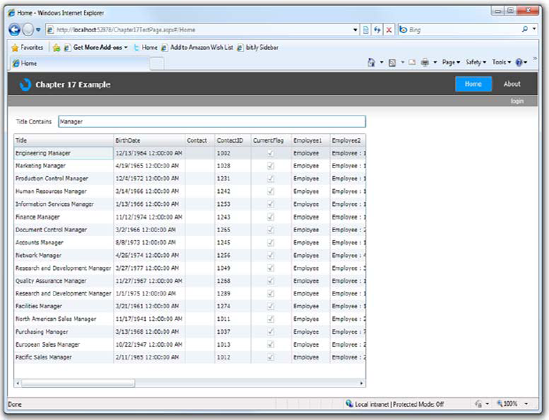
ItemsSource="{Binding Data, ElementName=DataSource}" />This markup creates some space (via the margins on the DataGrid) and fills it with a TextBlock and TextBox that you'll use to gather filter information from the user. Although the DomainDataSource controls are smart enough to be able to filter on any column using a number of different operators, you'll go with a straight contains filter on a single field to keep things simple.
The next step is to wire the filter TextBox, named FilterText, to the data source and specify what field it'll operate on. Before you do that, let's look at how filtering is implemented on the DomainDataSource class.
Filtering is implemented via two properties on the DomainDataSource. The first is the FilterOperator, which can be And or Or and controls how the filter descriptors are combined. The second is the collection of FilterDescriptor objects named, appropriately, FilterDescriptors.
Filter descriptors are discrete filter instructions that may be combined to produce an effective filter for a query. Conceptually, they're applied like a where clause in SQL, although the actual implementation is ultimately up to how the provider implements the composed where functionality in a LINQ query. Table 17.3 shows the properties of the FilterDescriptor class.
Table 17.3. Properties of the FilterDescriptor class
Property | Description |
|---|---|
| The value to be used for something like |
| If true, the filter is case-sensitive for string values. How this works depends on settings in the data store used by the domain service. |
| A |
| The path to the data item to be evaluated against the |
| The value to use for the filter condition. |
Of these properties, the relationship Property Operator Value is the most interesting and the most relevant to filtering. A number of operators are supported, each of which is described in table 17.4.
Table 17.4. Values for the Operator property of the FilterDescriptor
Value | Description |
|---|---|
| The data value must be smaller than the filter value. |
| The data value must be smaller than or equal to the filter value. |
| The data value must be equal to the filter value. |
| The data value must be different from the filter value. |
| The data value must be larger than or equal to the filter value. |
| The data value must be larger than the filter value. |
| The data value must start with the filter value (strings only). |
| The data value must end with the filter value (strings only). |
| The data value must contain the filter value (strings only). |
| The data value must be contained in the filter value (strings only). |
It may seem somewhat redundant to list the descriptions for each of these values given their names, but there are three important bits of information to get from this table:
A pretty comprehensive set of filter operators is available.
The order of the statement, read left to right, is
Property Operator Value.Some of the operators make sense only on strings, because they perform substring operations.
The reason for the lengthy member names is twofold: you can't have operators like >= in XAML without ugly and unreadable escaping like >=, and you need an enumeration to set the property in XAML or from code. Primarily, the list is optimized for using from XAML.
Because it's optimized for XAML, you'd think the properties would all support binding—and you'd be right. It's possible to build a complete filter expression using filters created using binding, meaning you can provide the user with a drop-down list of fields, a drop-down list of operators, and a TextBox for the value. All six properties of the FilterDescriptor class are dependency properties that support binding.
Despite the binding flexibility, you'll implement a simple filter where only the filter value itself is bound. You already have the TextBox for the value in place, so the next step is to add the associated FilterDescriptor to the DomainDataSource. This markup shows the updated filter including the descriptor and FilterOperator:
<riaControls:DomainDataSource x:Name="DataSource"
                              AutoLoad="True" FilterOperator="And"
                              QueryName="GetEmployees">
    <riaControls:DomainDataSource.DomainContext>
        <domain:EmployeeContext />
    </riaControls:DomainDataSource.DomainContext>
    <riaControls:DomainDataSource.FilterDescriptors>
        <riaControls:FilterDescriptor PropertyPath="Title"
                Operator="Contains"
                Value="{Binding Text, ElementName=FilterText}" />
    </riaControls:DomainDataSource.FilterDescriptors>
</riaControls:DomainDataSource>
This markup augments the DomainDataSource to add a FilterDescriptor. That FilterDescriptor targets the Title property of the Employee entity and checks to see that it contains (using the Contains operator) the current value in the Text property of the FilterText field on the same page.
When run, you'll have an experience like that shown in figure 17.9.
Type in the Title Contains field, and pause for a second or two. The pause will kick in the filter, executing the query on the server and displaying the results in the grid.
By adding just a few lines of XAML, you were able to add property-value filtering (which also works with sorting, grouping, and paging, as you'll see in the next sections) without having to wire up anything at the database level or even the service level. This makes sense. Like all the other features in this section, filtering should be a given for an application; there's little point in each of us implementing the same tired old filtering code again and again. The same goes for sorting, the next topic.
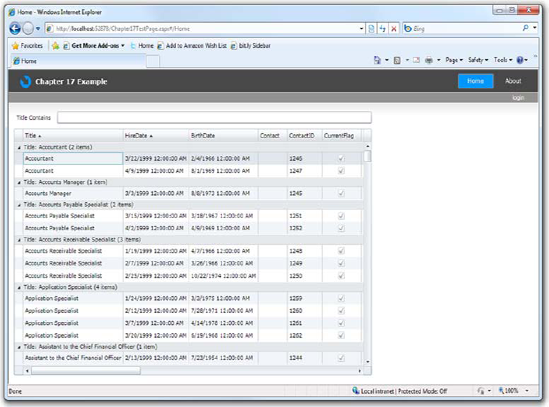
You may have already noticed that the DataGrid, when wired to the DomainDataSource (or any other ICollectionView or even IList), provides automatic sorting capabilities when you click column headers. The DomainDataSource also provides a way to perform a default sort on the data using SortDescriptor objects. For instance, to have the data sorted by Title and HireDate by default, you can add the following markup to the inside of the DomainDataSource markup:
<riaControls:DomainDataSource.SortDescriptors>
    <riaControls:SortDescriptor Direction="Ascending"
                                PropertyPath="Title" />
    <riaControls:SortDescriptor Direction="Ascending"
                                PropertyPath="HireDate" />
</riaControls:DomainDataSource.SortDescriptors>
When you run the application, you'll see that the DataGrid isn't ignorant of the sort. In most applications, when you sort queries in the database, the client has no idea the data was sorted. With the DomainDataSource, the DataGrid is aware. See figure 17.10 for the proof in the column headers.
Of course, you can also sort server-side as part of the query code, as you've seen earlier in this chapter. In either case, sorting is recommended for grouping and required for paging.

Supporting grouping is as easy as sorting. Following the trend we've shown so far, grouping is also accomplished through a collection of descriptors. In this case, the descriptors are GroupDescriptor objects. For example, if you want to group on Title, you add the following XAML to the DomainDataSource markup:
<riaControls:DomainDataSource.GroupDescriptors>
    <riaControls:GroupDescriptor PropertyPath="Title" />
</riaControls:DomainDataSource.GroupDescriptors>
This relies on the previous sort for the grouping to make any sense. As expected, this integrates nicely with the DataGrid. Figure 17.11 shows the DataGrid control with the new grouping in place.
With the grouping in place, you can still sort using the column headers, but the sort happens within the defined grouping.
The final and perhaps most interesting of the features is the support for paging.
There currently exist three main UI paradigms for dealing with a large number of records. You can preload everything and allow scrolling, you can implement an infinite scroll that performs lazy fetching of additional data (a good example is the Bing image search), or you can use data paging. When the web started to define how we built applications, data paging became the most common way to deal with large volumes of data. After all, if it's good enough for Google, it must be good enough for your application, right?
I've never been a fan of paging, but it certainly has some advantages when it comes to getting a lot of information in front of a user while reducing network traffic and database load.
When you're building RIA Services applications, paging is accomplished with a combination of two items:
The
PageSizeandLoadSizein theDomainDataSourceA
DataPagercontrol
The PageSize property of the DomainDataSource controls how many items appear on a single page. The LoadSize controls how many items the DomainDataSource loads into memory at one time. For example, if you have a PageSize of 15 and a LoadSize of 30, every other page will cause a network hit to the server to get the next 30 items. Because RIA Services doesn't know the usage pattern of your application, these two knobs are left entirely up to you.
For this example, you'll set the PageSize to 15 and the LoadSize to 30. The DomainDataSource opening tag with these two properties set looks like this:
<riaControls:DomainDataSource x:Name="DataSource"
                                PageSize="15"
                                LoadSize="30"
                                AutoLoad="True"
                                FilterOperator="And"
                                QueryName="GetEmployees">
The next thing to do is to add a DataPager control (easiest if dragged onto the surface or markup) and change the margins on the DataGrid to make room at the bottom. The updated DataGrid and new DataPager markup should read as follows:
<my:DataGrid x:Name="EmployeeGrid"
             Grid.Column="0"
             Margin="0 40 5 40"
             ItemsSource="{Binding Data, ElementName=DataSource}" />

<my:DataPager Grid.ColumnSpan="2"
              Source="{Binding Data, ElementName=DataSource}"
              HorizontalAlignment="Stretch"
              VerticalAlignment="Bottom" />
With this markup in place, run the application and navigate through the pages. The application, still with sorting and grouping in place, should look like figure 17.12.
In order to make the most of the DataPager, its source must be set to an IEnumerable that implements the IPagedCollectionView interface, an example of which is the DomainDataSource control. The data must also be sorted, either via the query on the server or via sorting specified in the DomainDataSource. If the data isn't presorted, you'll get an exception at runtime.
The DataPager is a fully templatable control, supporting the lookless model Silverlight and WPF are famous for. In addition, the DataPager has a number of properties that control its behavior and appearance.
In addition to helpful utility properties such as CanMoveToFirstPage and CanMoveToNextPage, the DataPager includes a DisplayMode property that is used to control which buttons and boxes are shown in the UI. Table 17.5 shows the different values this property can be set to.
As you can see, the control provides a number of different paging interfaces, covering the gamut typically seen in applications and on the Web. For the ones that show page numbers, you can use the NumericButtonCount property to control how many numbers are displayed. In addition, you can use the AutoEllipsis property to display an ellipsis, rather than a number, to indicate more pages.
Table 17.5. DisplayMode property values and their associated UI
Property | Runtime appearance |
|---|---|
|
|
|
|
|
|
|
|
|
|
|
|
The DomainDataSource control makes it easy to add common data-browsing capabilities— filtering, sorting, grouping, and paging—to your applications. Combined, these are high-value, high-effort development tasks in most applications. Having the functionality built in saves you from having to reinvent the wheel or tell your customer "no" when the feature is requested (or worse, assumed).
So far, everything you've done has been with read-only data. Real applications typically need to update data as well.
Most data-oriented applications have to do more than read data; they need to perform inserts, updates, and deletes as well. In the discussion about the domain service methods, I touched on the three data modification methods that begin with the prefixes Insert, Update, and Delete.
WCF RIA Services makes updating data as easy as retrieval. The domain service methods are trim, and autogenerated for the usual cases. The client-side domain context methods (which we'll cover in 17.4.2) that provide access to those services are also autogenerated.
In this section, you'll start with creating a user interface using the DataForm that allows you to update the data in the domain service. We'll then look at the client-side counterpart of the domain service: the domain context. Finally, we'll go through how the entity class and its buddy class with validation and display metadata work together to make it easier to have a robust and feature-rich data container on the client.
The DataForm, like the DataGrid, is extremely powerful when matched up with WCF RIA Services and the DomainDataSource control. The DataForm, in fact, was originally part of WCF RIA Services before it was pulled out and made part of the Silverlight Toolkit. The DataForm is covered in full in chapter 12, so I won't repeat that content here. But you'll use it to provide the update UI for the entities in this application.
The right side of the page has been empty so far. You've been leaving room for the DataForm in that space. This bit of XAML, to be placed right after the DataGrid element and before the DataPager element, will get you set up for a detail view of the selected item in the grid:

This sets up a DataForm that uses the same ItemsSource as the DataGrid, so it's also bound to the DomainDataSource control. The CurrentItem property is bound to the DataGrid's selected item, keeping the form in sync with what's shown in the DataGrid. Note that the binding is two-way, so the DataForm navigation controls can be used. Figure 17.13 shows the application with the new addition.
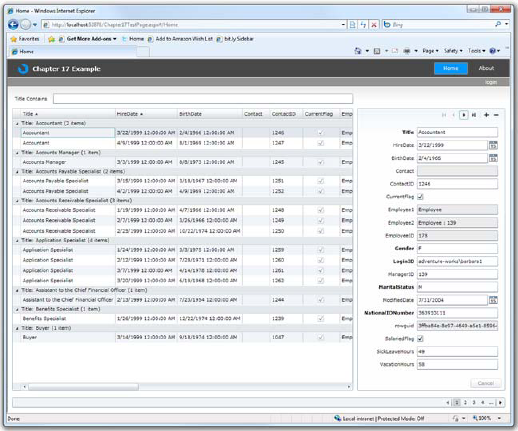
Figure 17.13. The application with the details DataForm on the right, populated from the selected grid item. Row navigation works from both the grid and the DataForm.
Navigate around using the grid and using the navigation buttons at upper right. When you're sure it's all working, you'll wire up the save functionality.
To submit the changes to the server, you need to have a button wired up to the SubmitChangesCommand of the DomainDataSource. That command does the equivalent of calling SubmitChanges on the domain context from code. Place this right below the DataForm markup:
<Button x:Name="SubmitChanges"
        Grid.Column="1" Margin="5"
        HorizontalAlignment="Right" VerticalAlignment="Top"
        Height="25" Width="120"
        Command="{Binding SubmitChangesCommand, ElementName=DataSource}"
        Content="Submit Changes" />
This adds a Submit Changes button at upper right on the screen. In theory, you have a fully working application at this point; you can perform CRUD[8] operations using the UI. Use the + button to add a new record and the - button to delete the current record. When you're finished, click the new Submit Changes button to call the SubmitChanges function behind the scenes. This function, like most everything else in the DomainDataSource control, relies on the generated domain context object. In this case, it's the EmployeeContext.
One of the types of classes that's generated based on the domain service is a client-side domain context. The domain context is 1:1 with the domain service. In your solution, for example, you have an EmployeeService domain service and an EmployeeContext domain context.
In addition to the previously seen query methods, the domain context has a number of properties and methods. The most commonly useful are shown in table 17.6, using Employee as the example.
Table 17.6. The properties and methods of the generated domain context class
Member | Description |
|---|---|
| The method generated from your server-side |
| Internal, but important for holding the actual entities and tracking insert and delete operations |
| True if the domain context is tracking any entities with changes (updates, inserts, deletes) |
| True if the domain context is loading data |
True if the domain context is submitting changes | |
| Rejects all pending changes and reverts objects back to their unedited state |
| Sends all pending change operations to the domain service for processing |
In this example, a client-side invoke operation was created for the CalculateVacationBonus function you added to the domain service. Because all network calls in Silverlight are asynchronous, you can't call the function and get the result. Instead, you need to set up a callback. For example, listing 17.2 includes the client-side code to call the CalculateVacationBonus function and do something useful with the results.
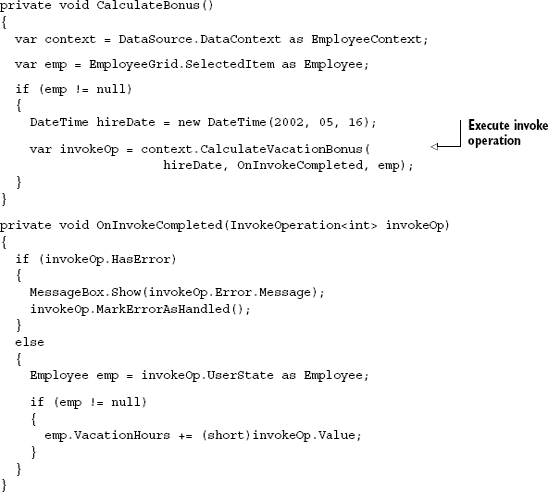
This code, from the code-behind for Home.xaml, shows how to call an invoke method. Note the parameters to the CalculateVacationBonus client-side method.
On the server, the method took only a single parameter. On the client, it takes that same parameter, plus a callback and a data item. In this case, the data item is the Employee you're working with. You use that because you need access to the Employee inside the callback method.
The callback method executes when the asynchronous call has completed. The single parameter for the callback is an InvokeOperation object with a number of properties, including the UserState and error information.
In this method, you check for an error. If there's no error, you cast the UserState back to an Employee object, check it for null, and then use the function return value (the calculated bonus) and add that to the existing vacation hours. That object is then marked as HasChanges = true on the entity. The entity is then eligible for the SubmitChanges call.
Referring back to table 17.6, you'll notice that no Insert, Update, or Delete methods were generated. Instead, those are called via SubmitChanges.
SubmitChanges is an asynchronous batching operation. It handles sending all method calls to the server, with the exception of Invoke and Query operations.
When you insert new items or delete existing items, those operations occur only on the client. When you call SubmitChanges, it loops through the entities on the client and sends to the server those entities that require a persistence operation, calling the appropriate operation for each entity.
To cancel all pending changes for the domain context, call the RejectChanges method. It reverts entities back to their previous state, removes any newly inserted items, and reinstates any deleted items.
The domain context is the client-side proxy for the domain service, as well as the container within which all instances of a given entity reside. It provides an interface for invoke operations and query operations, as well as an implicit interface to the insert, update, and delete operations through the SubmitChanges method.
The entity classes Employee and Contact both inherit from a common client-side base class that provides much of the required change-tracking and other plumbing functionality. This class is named, appropriately enough, Entity.
Each client-side entity you work with, Employee and Contact in this example, derives from the Entity base class. This class provides a number of important change-tracking properties and methods.
Table 17.7 shows the most important public members of the Entity base class
Your derivations of the Entity class (the Contact class and the Employee class) also include all the individual properties that correspond to the fields coming from the database. Because this code was generated by the tools and not shared with the server, the properties have INotifyPropertyChanged and several other events injected into them. In this way, your otherwise-plain classes on the server can support binding and events on the client. To give you an idea of the robustness of the properties set up, listing 17.3 shows the Gender property for the Employee.
Table 17.7. Important public members of the Entity class
Member | Description |
|---|---|
| The data state of this entity: |
| Indicates that this entity has changed since the last time it was saved |
| Indicates that this entity has failed validation |
| Returns a collection of validation errors |
| Returns an instance of the unchanged entity from cache |
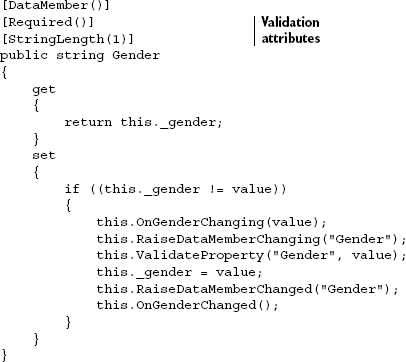
The setter for the property includes a number of calls to generated methods. Those methods perform validation and take care of INotifyPropertyChanged notification as well as raise information events, such as DataMemberChanging and DataMemberChanged.
In this example, the OnGenderChanging and OnGenderChanged methods are partial methods that you can implement in a buddy class on the client, should you wish. A buddy class is a partial class you create to augment an existing partial class. In this way, you can modify the behavior of the class without introducing an inherited class.
Note the use of attributes to tell the UI that this is a required field with a maximum length of 1. This information was automatically inferred from the entity model on the server at code-generation time. For that reason, changes to the database will require updates to the .edmx model and then automatic downstream updates here.
In addition to the validation and display attributes described in chapters 12 and 13 and shown in this example, a number of other attributes are used in the entity. Although we'll get to how to use the special validation and display metadata attributes in the next section, table 17.8 shows some of the helper attributes you'll likely run across.
Table 17.8. Interesting attributes on the Employee Entity
Attribute | Description |
|---|---|
| Indicates that this property should be serialized by WCF and is part of the data contract. |
| Specifies that the property is part of a relationship, such as a foreign key. You'll find this on the nested entities such as |
| Indicates that this property shouldn't be serialized. Useful on nested entities. |
| Sends the object back to the server with its original value when the object is updated, even though this property hasn't changed. |
| Indicates that this field is part of the primary key. |
Seeing the attributes in place provides a little insight into how Silverlight keeps track of various properties. For example, you now know how the client knows that a certain field is the primary key for the entity.
Although the Entity class provides extensibility points on the client, it's rare for an application to use them for validation or anything remotely like a business function. Extensions provided on the client can't be used back at the server and so can become a disconnect between the two models. In order to keep the two in sync, the RIA Services team provided a server-side model for extending the entity: metadata.
When you first created the domain service on the server, the wizard offered an option to generate the associated metadata class. This metadata class is a partial class that exists on the server and relates to a single entity. If you open the EmployeeService.metadata.cs file in the server project, you'll see both the Contact and Employee partial classes.
These partial classes include nested classes with the same public properties that are also defined in the entity classes. Those are just placeholders, providing a location on which you can define metadata to control the display and validation of the fields.
But wait—why am I covering metadata in this section? Because this metadata is useful only if the client understands it. Silverlight and parts of ASP.NET are currently the only clients that can make sense of attribute-based annotation metadata for validation and display.
The DataForm labels and the DataGrid column headers have that ugly PascalCase text formatting. It'd be nicer to introduce actual spaces to make the fields more human-readable. You may even want to provide some tooltip descriptive information for certain fields.
In the EmployeeService.metadata.cs class on the server, scroll down to the Employee partial class and the nested EmployeeMetadata class within it. Find the BirthDate field, and add this attribute:
[Display(Name="Birth Date",
         Description="The date this person was born.")]
public DateTime BirthDate { get; set; }
That says to use the string "Birth Date" for column headers and field labels; and if a tooltip or other description approach is available, use this description. Figure 17.14 shows how this looks at runtime.
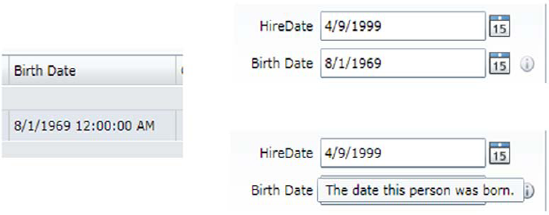
Figure 17.14. The Display annotation in use on the DataGrid on the left and the DataForm on the right. At lower right is the Description property in a tooltip.
As you learned in chapter 13, annotations can be used for more than display. One of the more powerful uses is for validation.
You get data type validation and the inferred validation (string length, required, and so forth) from the database for free. But you'll typically want to add your own validation to make the UI more bulletproof.
In the EmployeeService.metadata.cs class, scroll down to the Employee partial class and the nested EmployeeMetadata class within it. Find the Gender field, and add this attribute:
[RegularExpression("[MmFf]",
                   ErrorMessage="Specify (M)ale or (F)emale, please")]
public string Gender { get; set; }
Run the application, and attempt to type something else into the Gender field. The regular expression restricts the valid input choices to M, m, F, and f. The metadata entered on the server was automatically carried over to the client. If you open the Chapter17.Web.g.cs file on the client and navigate to the generated Gender property, you'll see the addition of the new attribute:
[DataMember()]
[RegularExpression("[MFmf]",
                   ErrorMessage="Specify (M)ale or (F)emale, please")]
[Required()]
[StringLength(1)]
public string Gender
...
The StringLength, Required, and DataMember attributes were previously there as part of the inferred metadata coming from the data model. [9]
Annotation for display and validation is a nice, easy way to add significant robustness to your classes. Because the information goes into metadata buddy classes, you don't have to worry about the autogeneration process stepping on them.
What you've seen so far is a model where the entity generated by the data access layer, typically based directly on tables or views on the database, makes its way from the database through the service to the client and into the UI. That's okay sometimes, especially when you have good mapping at the data access layer, but an additional layer of abstraction could help protect the UI from changes in the database. That layer is called a presentation model.
So far, you've created a tight coupling between your database and the UI due to bringing the data structure through from back to front. RIA Services enables you to create entities that combine data from multiple entities in the data access layer—for example, combining the Contact and Employee classes into a single logical entity.
When using a presentation model, you can respond to changes in the database or database model by changing only how the presentation model aggregates that data. Also, you can simplify the client code by designing a model that aggregates only those fields that are relevant to users of the client.
Although conceptually similar, the presentation model here shouldn't be confused with the Presentation Model pattern. The pattern shares some similar goals and approaches, but the RIA Services approach is more server-centric.
I consider the presentation model to be one of the most important additions to WCF RIA Services in terms of making it work with best practices and patterns such as MVVM. As great as RIA Services is without it, it always bothered me that the data model was logically coupling the UI to the services to the data access layer to the database. Change one, and they all have to change—not a good situation to be in.
Ideally, you'd have a good object-persistence mapper that would flatten objects and relationships and handle all this for you, along with the knowledge to use it. That alone would eliminate most uses of the presentation model approach, including the example I'll include in this chapter. In many cases, developers don't have this available to them, or don't have the knowledge required to set up an existing one, or perhaps are further constrained by other business or environmental factors.
The presentation model approach is also good for combining data from multiple sources. You can create a single entity that's composed of fields from multiple databases.
In all of these cases, the presentation model approach can be a huge help.
In this section, you'll take the employee service and model you've been working with and convert (more correctly, rewrite) it to introduce a presentation model. I'll show you how to query data, update data, and insert data using this new model.
You've been unable to perform insert and update operations on the Employee class so far because it's tied to the Contact class. This relationship is purely a database thing. It makes little or no sense from an end-user perspective; they're logically part of the same entity. This is a common scenario, because we tend to factor out things such as contact information, address information, and more in the database, and it always causes no end of annoyances at the UI level.
You have two goals in creating an employee presentation model:
Expose the contact information as first-class fields of a logical employee entity.
Limit the other fields that are returned to the client.
The first step in creating a presentation model is to create a class named EmployeePresentationModel on the server project. Create this class in the server-side Models folder. Listing 17.4 shows the code to use.
Example 17.4. The EmployeePresentationModel class
public class EmployeePresentationModel
{
  [Key]
  [Display(AutoGenerateField = false)]
  public int EmployeeID { get; set; }
  [Required]
  public string NationalIDNumber { get; set; }
  [Required]
  public string FirstName { get; set; }
  [Required]
  public string LastName { get; set; }
  [Required]
  public bool NameStyle { get; set; }
  [Display(AutoGenerateField=false)]
  public int ContactID { get; set; }
  [Display(Name="Email Address")]
  public string EmailAddress { get; set; }
  [Required]
  public int EmailPromotion { get; set; }
  public string Phone { get; set; }
  [Required]
  public string Title { get; set; }

  [Display(Name="Birth Date")]
  public DateTime BirthDate { get; set; }
  [Required]
  [Display(Name = "Hire Date")]
  public DateTime HireDate { get; set; }
  [Required]
  public string LoginID { get; set; }
  [Required]
  public string MaritalStatus { get; set; }
  [Required]
  [StringLength(1)]
  [RegularExpression("[MFmf]",
               ErrorMessage = "Specify (M)ale or (F)emale, please")]
  public string Gender { get; set; }
  [Required]
  public bool SalariedFlag { get; set; }
  [Required]
  public int VacationHours { get; set; }
  [Required]
  public int SickLeaveHours { get; set; }
  [Required]
  public bool CurrentFlag { get; set; }
}
In this listing, you create an aggregate Employee class that includes fields from both the Employee and Contact classes you've been using so far. Also, because the metadata is no longer inferred from the database or read using the metadata buddy class you previously created, you add a minimum amount of metadata to ensure that required fields are marked as such and to make a few of the names easier to read.
In your own classes, you'll need to make sure you account for required fields. If you can't infer them when performing an insert or update operation, you'll need to include them in the class so the user can input their values.
This new class now abstracts you from the database. If the structure of the database changes, you can change the query and update operations—the UI won't be affected (assuming it's a structural change, not a change in what defines an employee).
The next step is getting this information down to the client. To do that, you'll need to create at least one query operation and wire it through all the way to the DomainDataSource you've been using.
The presentation model approach requires a completely new domain service and new query and update operations. The new domain service class will no longer be directly based on the LinqToEntitiesDomainService base class, but will instead be based directly on the DomainService base class.
For lack of a better name, I called the domain service EmployeeContactService, because it aggregates both the Employee and Contact entities. Create a new class file with this name, and place it in the Services folder on the server project. Listing 17.5 contains the code for this service.
Example 17.5. The EmployeeContactService
[EnableClientAccess]
public class EmployeeContactService : DomainService
{
  private AdventureWorksEntities _context = new AdventureWorksEntities();

  public IQueryable<EmployeePresentationModel> GetEmployees()
  {
    return from e in _context.Employees
           orderby e.Title, e.HireDate
           select new EmployeePresentationModel()
           {
             BirthDate = e.BirthDate,
                ContactID = e.ContactID,
             CurrentFlag = e.CurrentFlag,
             EmailAddress = e.Contact.EmailAddress,
             EmailPromotion = e.Contact.EmailPromotion,
             EmployeeID = e.EmployeeID,
             FirstName = e.Contact.FirstName,
             LastName = e.Contact.LastName,
             NameStyle = e.Contact.NameStyle,
             NationalIDNumber = e.NationalIDNumber,
             Phone = e.Contact.Phone,
             SalariedFlag = e.SalariedFlag,
             SickLeaveHours = (int)e.SickLeaveHours,
             Title = e.Title,
             HireDate = e.HireDate,
             Gender = e.Gender,
             VacationHours = (int)e.VacationHours
            };
    }
}
The main code in this function performs a standard mapping of properties from two entities to one other. Note that even with the custom methods, you're still able to return IQueryable and to allow composition on the client.
Because you have the same query name as you used in the EmployeeService domain service, to use the new service from the UI, you need to make only one changechange the DomainContext property of the DomainDataSource to point to the EmployeeContactContext:
<riaControls:DomainDataSource.DomainContext>
    <!--<domain:EmployeeContext />-->
    <domain:EmployeeContactContext />
</riaControls:DomainDataSource.DomainContext>
Be sure to build before making this change; otherwise, the EmployeeContactContext class won't exist on the client. Note that you didn't have to update any service references or add a new service reference—the WCF RIA Services tooling took care of that for you. That alone is worth the price of admission.
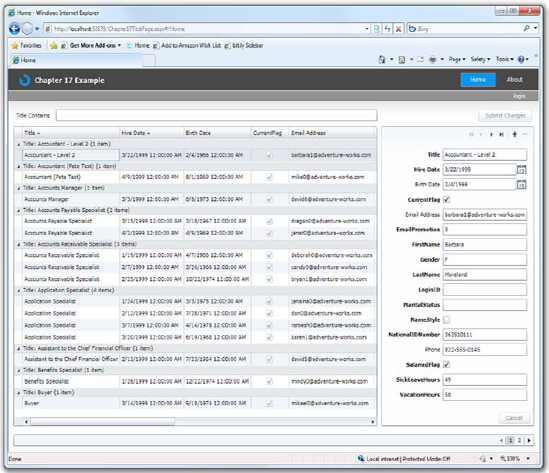
Figure 17.15. The UI using the new EmployeePresentationModel class. Note how you have fields from the contact object now available to the UI.
When you run the application, you'll see something like figure 17.15. The new UI has fewer fields and looks a lot better than what you had before.
You have a lot fewer fields in the UI now. Some, like Birth Date, which have had the Display attribute applied, have better labels and column headers. You could set the display name for the remaining ones, and the display order, as well using the same attribute. For space reasons, I didn't include the attributes in the listings here.
The presentation model approach certainly works in this situation. It's not meant just for flattening objects, although you can use it for that. It also shines in situations where you need to do joins in LINQ and combine the results into a single logical object.
Retrieval is fine for a demo, but the real test comes when you need to use this information in an update operation.
To perform an update using the presentation model approach, you'll need to map from the presentation model class to the back to the entities used in the backing store. Essentially, you're doing the reverse of what you did in the query operation.
Listing 17.6 shows how to map from the presentation model back to the database entities.
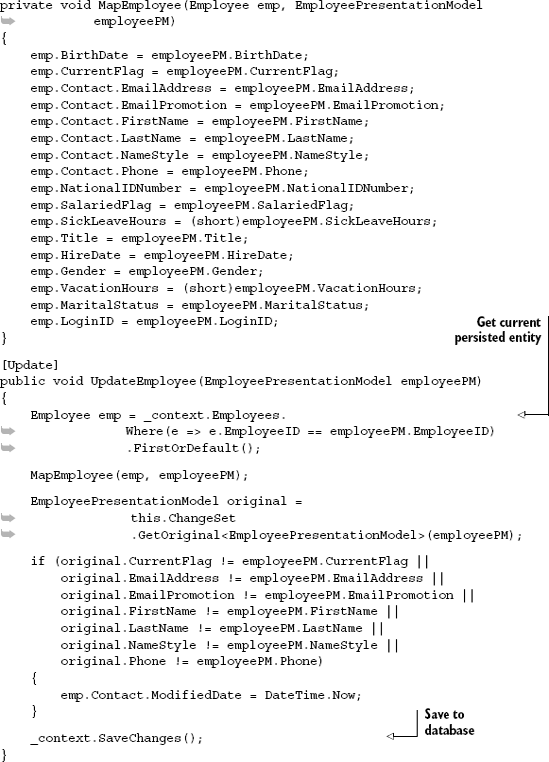
You're definitely in manual-plumbing land at this point. Of course, if you want to have separation between two layers, you'll have some mapping. Here, the mapping is in a reusable function so the Insert method can use it. Note how you check the original employee to see if there were any changes before setting the modified date for the Contact object. You'll want to do the same for the Employee object; I left that out for space considerations.
The code you write in this function will be pretty dependent on your choice of data access layer. The code here works well with the Entity Framework objects.
The next type of operation you'll need to support is the insertion of new objects. This one can get tricky due to the creation of dependent entities and the generation of keys.
Update operations are easy, because you often don't have to worry much about entity relationships or foreign keys. Insert operations usually have a few extra steps to perform in addition to the mapping.
Listing 17.7 shows the InsertEmployee function. This function makes use of the MapEmployee function from the previous listing.
Example 17.7. The InsertEmployee function
[Insert]
public void InsertEmployee(EmployeePresentationModel employeePM)
{
    Contact contact = _context.Contacts.CreateObject();
    Employee emp = _context.Employees.CreateObject();
    emp.Contact = contact;

    MapEmployee(emp, employeePM);

    contact.ModifiedDate = DateTime.Now;
    contact.rowguid = Guid.NewGuid();
    contact.PasswordHash = "Adventure";
    contact.PasswordSalt = "xyzzy";

    emp.ModifiedDate = DateTime.Now;
    emp.rowguid = Guid.NewGuid();

    _context.Contacts.AddObject(contact);
    _context.Employees.AddObject(emp);

    _context.SaveChanges();
}
This function creates the Contact and Employee data entities and sets the contact to be the contact for the Employee. It then calls the MapEmployee function from the previous listing to map the presentation model properties to the data entity properties. The next step is to set a few fields; the password-related fields here are dummies, but the modified date fields are correct. The last step before saving changes is to add the Contact and Employee to the entity sets. Finally, with a call to SaveChanges, the information all goes in the database.
I've included the query, update, and insert methods. For space reasons, I left out delete. This is a pretty simple function to build following the pattern established by the code included here.
The presentation model approach allows you to continue to benefit from WCF RIA Services while also benefitting from the increased decoupling of the layers. Although the database-through-UI coupling won't be a problem for many applications, for anything expected to survive into a maintenance mode, it can be a real pain.
The presentation model approach isn't without its issues. First, you have to write more CRUD operation code, including mapping. This code has a habit of getting out of sync; it's also a great place to find typos and copy-paste errors. When using this approach, I highly recommend building tests around your mapping functions and keeping them up to date.
So far, you've seen normal CRUD operations and simple validation. I threw in one business function for calculating a vacation bonus, but otherwise you haven't seen any real business logic. The next section covers how to include this critical code in a RIA Services application.
A business application without business logic is just a forms-over-data maintenance application. Although apps like that are easy to build using WCF RIA Services, they're not the usual case.
Business logic usually consists of discrete functions that implement discrete rules. Some may come in the form of validation, others may look like calculated fields, and still others may be helper methods that return a current piece of data from an external system.
There are several places where you can put logic in your code. I've tried to capture some general guidelines in table 17.9.
Table 17.9. Where to put your business logic
Type | Location |
|---|---|
Data validation | Attributes on metadata or entities. |
Field validation rule | Noncritical: custom validators. Critical: code in domain methods on the domain service. Prevent persistence if criteria aren't met. |
External data access | Domain methods on the server calling out to web services. Services classes on the client, if the result won't be required for server-side validation. Shared code services proxy or shared binary. |
Calculated field | If self-contained within the entity, as an additional property of the entity. If requires integration with other data or services, as a method on the domain service or shared code or a binary file. |
As a method on the domain service if a server round-trip is okay or required. As a method in shared code or a binary file if needed on the client and server with local calculation for speed. | |
On insert/update logic | In the Insert/Update method in the domain service. |
Reusable logic shared between projects | Domain service. Shared code or binary file. |
Anything else | Shared code or binary file. |
You've already seen how to write methods on the domain service. In the previous chapter, we also looked at how to write business services on the client. In this section, we'll look at how to place logic in entities as well as how to share logic or code between the client and server.
When a calculated field is part of the business logic for your application, one place you can place it is directly on the entity. This makes sense if the data required for the calculation exists on the entity itself. If the data is external, consider making the calculation a service that you call to get the results.
A reasonable type of calculation might be, for example, one to take into account your start date and how many vacation hours you have when deciding if you can go in the hole to take a longer vacation than you would've been allowed to take if going strictly by the book.
Going back to the original generated classes, add the function in listing 17.8 to the Employee class using a new file named Employee.shared.cs stored in the Shared folder on the web project.
Example 17.8. An example business method on the Entity class
using System;

namespace Chapter17.Web
{
  public partial class Employee
  {
    public int AllowedOverdraftVacationHours
    {
      get
      {
        DateTime today = DateTime.Today;

        int yearsInService = today.Year - HireDate.Year;

        if (HireDate.AddYears(yearsInService) > today)
          yearsInService--;

        if (yearsInService < 1)
          return 0;
        else if (yearsInService < 5)
          return 20;
        else
          return 40;
      }
    }
  }
}
The example in listing 17.8 performs a simple calculation. The key thing to note is that it's using information already available as part of the parent class. I don't recommend this approach if external information is required.
So far, you've put all the business logic into methods of the domain service or used it as a property of the entity. The domain service is a great place to put logic you want accessible to the client or server but executed on the server. For methods that match, including them on the entity class is a great idea. Sharing code and controlling where it executes is important.
In the previous example, you saw how the code went into a file with the .shared.cs extension. That naming is a convention understood by RIA Services. Anything with a .shared.cs name is copied to the client on build as part of the code-generation process. As long as you keep the namespaces clean, this provides an easy way to share classes between the tiers.
Visual Studio has long had the capability to link source files from one project to another. As long as the contained source code (including namespace-using statements) is compatible across both projects, it'll work fine.
This is source-level sharing. I've used it with WCF applications and also when dual-targeting Silverlight and WPF. Just consider one project the master, and add the file to it. Then, choose Add Existing Item in the other project, navigate to the source, and click the Add drop-down button so you can add a link. As my favorite black-helmeted villain would say, "All too easy."
Silverlight 4 along with .NET 4 introduced another option for sharing: .NET 4 applications can add references to a Silverlight class library, as long as that class library uses only certain namespaces. The allowable references and namespaces are strict but are likely to expand over time.
I've never been a big fan of this approach, because it feels a little dirty to me. But for this type of use, it should be perfectly acceptable.
Conceptually, one of the most important pieces of business logic for any given application is often its security model. Business applications must be able to secure data and functions in a way that integrates with existing web sites and systems without requiring yet another mechanism for maintaining security for the application.
Authentication is the process of identifying a user. Authorization is the process of granting the user access to parts of the system. Business applications almost always require some form or authentication and typically lock down critical functions using an authorization scheme. It's a rare system indeed where every user has complete access to every function. But until RIA Services came along to help with this, implementing security in Silverlight applications was a difficult process at best.
WCF RIA Services authentication is built on ASP.NET authentication and membership. I won't go into great detail on how to configure ASP.NET, but any tutorial on ASP.NET membership and authentication configuration will apply here.
The Silverlight Business Application template includes much of the authentication infrastructure built in. Normally, you'd have to add in the authentication domain service and the appropriate entity classes. Fortunately, those are all there, just waiting to be activated.
In this section, we'll look through the authentication and authorization capabilities of ASP.NET, surfaced through WCF RIA Services. We'll examine the UI and services that the template provides and that build on the RIA Services libraries. Throughout, we'll look at both forms-based authentication and Windows authentication.

Figure 17.16. The Login dialog in the Silverlight Business Application template. Note the registration link on the left.
Authenticating users usually involves getting their user name and some sort of secret password (or PIN or biometric data), and comparing the pair against data stored in the database. Figure 17.16 shows the built-in Login dialog that comes with the Silverlight Business Application template.
The dialog is wired up to the AuthenticationService on the web site, which in turn uses ASP. NET membership. It also includes an appropriate validation display for incorrect username and password combinations. Figure 17.17 shows this view.
There are two ways of validating this information in a RIA Services application: forms-based authentication and Windows authentication.
Forms-based authentication (FBA) is cookie-based authentication in ASP.NET. Almost any ASP.NET web site with an on-page login form is using a form of forms-based authentication. Rather than relying on system tokens and security credentials provided by the operating system, each site or application can store user information in a database. For the vast majority of applications running outside the firewall, this is the way security is handled.
To configure the users and roles for an application using FBA, you'll use the ASP.NET application configuration site. This site writes to the aspnetdb database (or other database if so configured) where the membership data is stored. More often than not, this database is located in the App_Data folder on the ASP.NET site.
To configure this application, select the web project and choose the ASP.NET Configuration option from the Project menu. Figure 17.18 shows the menu you'll see.
Figure 17.18. The Project menu showing the ASP.NET Configuration option selected. This is the option used to configure the authentication database. If you don't see it, make sure the right project is selected.
You can create new users through the administration site. In addition, the Silverlight Business Application template includes a self-service registration UI (which you can disable if you desire) for allowing self-registration of users. This form, shown in figure 17.19, is wired up through the UserRegistrationService on the server.
Figure 17.19. The Register dialog in the Silverlight Business Application template. For most business applications, you'll secure or eliminate this dialog.
Configuring the site and application to use FBA is a two-step process. The first step is to open the web.config file and ensure that the authentication mode is set to Forms:
<authentication mode="Forms">
  <forms name=".Chapter17_ASPXAUTH" />
</authentication>
The second step is to open App.xaml.cs and check the constructor to ensure the Authentication property of the web context is set to FormsAuthentication:
webContext.Authentication = new FormsAuthentication();
With those two options set and a user created, you're ready to try out the application. Try logging in via the link on the main page. You'll see the UI change to indicate your login name, and the credential information itself will be available throughout the application.
Although FBA is the most common form of authentication, we can't forget good old Windows authentication.
Windows authentication relies on the Windows operating system and security infrastructure to provide the appropriate authentication scheme and tokens. For behind-the-firewall systems, Windows authentication is usually the better approach because there's no separate login process. Instead, the Silverlight application participates in single sign-on (SSO) along with other applications on the client.
To configure the application to use Windows authentication, first set the authentication mode in web.config:
<authentication mode="Windows" />
Then, in the App.xaml.cs file, modify the constructor to set the authentication to Windows:
webContext.Authentication = new WindowsAuthentication();
The business application template has startup logic that attempts to automatically resolve the credentials of the signed-in user. You'll find with WindowsAuthentication that a second or two after the application launches, you're greeted with your credentials in the upper-right corner. No Login dialog required!
Regardless of which approach you use (forms or Windows), you can require authentication from code or via attributes. On a domain service, it's easy to mark a single method as requiring a valid user account by applying the RequiresAuthentication attribute:
[Insert]
[RequiresAuthentication]
public void InsertEmployee(EmployeePresentationModel employeePM)
Technically, this falls under authorization because you're granting access based on security. But the authorization system is even more powerful than this.
When you authorize users, you're granting them permission to perform an action. Authorization comes in many forms: client-side code can check to see whether users are authenticated, as well as whether they're members of a specific role; and server-side code or attributes can grant access to individual service methods.
The usual approach when working with authorization in ASP.NET and in RIA Services is to use role-based authorization. This is especially useful with forms-based authentication, because the roles can be configured using the same ASP.NET administration application.
Although you could enable access to individual features on a user-by-user basis, role-based authorization is by far the most common way to grant access. In this model, users belong to roles, such as Manager, Administrator, or HR, and individual permissions are granted to the roles.
To enable roles in the RIA Services application, ensure that the roleManager entry in web.config is set to true:
<roleManager enabled="true" />
When that setting is confirmed and you've created some users and added them to appropriate roles, you can start to modify the application to look for those roles. The easiest and most powerful check you can make is on the service methods on the domain service. This is done via the RequiresRole attribute:
[Insert]
[RequiresRole("Manager")]
public void InsertEmployee(EmployeePresentationModel employeePM)
The RequiresRole attribute takes in one or more role names as strings. When the client attempts to access the service method, the server consults the security tokens provided and checks to see whether the user has the correct role. If the user isn't a member of that role, the service call results in an exception, which you must trap on the client.
You must handle this exception and gracefully inform the user that access isn't allowed. When using the DomainDataSource control, you do this in the LoadedData event:
private void DataSource_LoadedData(object sender, LoadedDataEventArgs e)
{
  if (e.HasError)
  {
    if (e.Error is DomainOperationException &&
        e.Error.Message.Contains("denied"))
    {
      MessageBox.Show("Insufficient permissions for operation. Nyah!");
      e.MarkErrorAsHandled();
    }
  }
}
In the case of the EmployeeContactService, you require the Manager role for both the Insert and Update methods and RequiresAuthentication for the query method. For methods tagged with RequiresRole, you don't need to also add RequiresAuthentication; it's assumed in the role check.
The second way to check for authorization is to use the client-side WebContext object. This is useful to enable/disable menu options and buttons, as well as to perform client-side checks. Don't rely on this as your only security check, though, because you always want the server to be secured.
Here's a simple security check in the code-behind:
if (WebContext.Current.User.IsInRole("Manager"))
    SubmitChanges.Visibility = Visibility.Visible;
else
    SubmitChanges.Visibility = Visibility.Collapsed;
I put this in the OnNavigatedTo handler, but that's not the best place. Instead, you want to reevaluate any UI changes like this whenever the user logs in or logs out.
WCF RIA Services makes it easy to integrate authentication and authorization into your own application. Because it builds on ASP.NET membership and security, you know it's using a well-known and time-tested approach, which is already supported by the community.
I hope I've given you a taste of what WCF RIA Services can help you accomplish. Despite the depth of this chapter, we've just scratched the surface. RIA Services supports transactions and concurrency schemes with conflict resolution; and it supports composed entities where master-detail relationships can be saved in one chunk. There are many more attributes that can be used, and variations on the domain services.
RIA Services is big. Although associated with Silverlight, it's a product in and of itself. In this chapter we've looked at the business application template and used it as the basis for developing a RIA Services application. We then dove right into the WCF-based domain services both to expose the data via OData, JSON, and SOAP, as well as via the native approach with Silverlight. The domain service included all the usual CRUD (Create, Read, Update, Delete) operations, plus the ability to support arbitrary functions.
We also looked at the sometimes controversial DomainDataSource control, and its amazing support for filtering, sorting, grouping, and paging. This control saves a ton of time and a large amount of code.
The DomainDataSource and the domain service combined to help us update data. The natural UI counterpart to all this was the DataForm control. In fact, using the DataForm, the DomainDataSource, and the generated domain service, you had a complete CRUD UI with no code at all.
One unfortunate side effect of all that was a tight coupling of the entities from the database all the way through to the UI. Although it requires some extra effort, WCF RIA Services has an answer for this coupling in the presentation model approach. In that, you have to create entities and the domain service from scratch, but once done, everything else "just works."
What about business logic? You can put your business logic inside invoke methods on a domain service, as methods added to the partial class for the entity, and as shared code that can be downloaded to the client as part of the build process. Not to mention that you can use the standard Silverlight-supported approaches of shared source or shared binaries.
Finally, I've yet to see a serious business application that didn't include authentication and authorization of some sort. No one wants to leave data-oriented applications open for anyone to mess around with. Silverlight and WCF RIA Services can take advantage of the security models in ASP.NET, building on proven technologies and knowledge you may already possess.
All this combines to be an intense and robust platform for building business applications—and it's only at version 1!
These last few chapters have been interesting and hopefully useful, but pretty heads-down on the business side of things. In the next chapter, we'll take a break from virtual number crunching and dive into the vector graphics system and pixel shaders.
[1] If you're really and truly bored and need a break from reading, check out http://cornify.com/ to add unicorns and rainbows to any web site or photo. Warning: 5th grade girls' Trapper Keeper graphics overload.
[2] You can download Microsoft PowerPivot for Excel 2010 from http://powerpivot.com.
[3] You can download the Web Platform Installer from http://bit.ly/WebPI.
[4] I put this in as jQuery just so Rey Bango will stop picking on me about the ugly cabinets in my home office via the back channel chat in every team meeting. You can see them in the background in the webcam shots in chapter 20. If you want to pick on me yourself, I'll try not to cry, really. :)
[5] Scott Hanselman talking about a 2010 keynote demo for WCF RIA Services.
[6] I see the old VB3/4/5/6 VCR data-binding control in my nightmares from time to time. It's up there with the one about having a physics final today but having skipped the class all semester to spend time MUDding.
[7] During the '80s and '90s, there was a robust market for keyboard overlays for WordPerfect, WordStar, Lotus 123, and others. Most used the function keys in normal, shift, alt, and control modes, all for different commands.
[8] Note that due to the relationship with the Contact object and other relationships, deletes and inserts currently fail. Updates work fine. We'll take care of that later in this chapter.
[9] For more information on annotating your classes, look at chapters 12 and 13.