
Chapter 10
Ad Hoc Testing
In this chapter—
10.1 OVERVIEW OF AD HOC TESTING
We have seen in previous chapters that there are many techniques and types of tests that aid in unearthing a large number of defects, thereby improving the quality of the product and minimizing the risk of releasing a product. All the types of testing explained in the previous chapters are part of planned testing and are carried out using certain specific techniques (for example, boundary value analysis). In this chapter, we will look into a family of test types which are carried out in an unplanned manner (hence the name ad hoc testing). We will discuss the characteristics of ad hoc testing and their relative positioning vis-à-vis planned testing activities in the later part of this section. We will then cover other related types of ad hoc testing—buddy testing, exploratory testing, pair testing, iterative testing, agile and extreme testing, and defect seeding—in the subsequent sections. We conclude the chapter with a comparison of all these methods and the scenarios wherein each of these methods may (and may not) add value.
Planned testing, such as the ones we have discussed in the previous chapters, are driven by test engineers and their understanding of the product at a particular time frame. The product under test is assumed to be working in a particular pattern, as specified by the requirements document and other specifications. The validity of this assumption can be checked when the product is implemented and ready to test. The more the test engineers work with the product, the better their understanding becomes. By the time the implemented system is completely understood, it may be too late and there may not be adequate time for a detailed test documentation. Hence, there is a need for testing not only based on planned test cases but also based on better understanding gained with the product.
Some of the issues faced by planned testing are as follows.
- Lack of clarity in requirements and other specifications
- Lack of skills for doing the testing
- Lack of time for test design
Firstly, after some of the planned test cases are executed, the clarity on the requirements improves. However, the test cases written earlier may not reflect the better clarity gained in this process. Secondly, after going through a round of planned test execution, the skills of the test engineers become better but the test cases may not have been updated to reflect the improvement in skills. Lastly, the lack of time for test design affects the quality of testing, as there could be missing perspectives.
Planned testing enables catching certain types of defects. Though planned tests help in boosting the tester's confidence, it is the tester's “intuition” that often finds critical defects. This is because none of the specifications can be considered complete to provide all the perspectives that are needed for testing. As we saw in domain testing in Chapter 4, sometimes testing without the specifications and making a domain expert test the product can bring in new perspectives and help unearth new types of defects. These perspectives evolve dynamically when testers think “out of the box.” It is possible that some of the most critical perspectives may be missed in planned testing, which get identified by testers later. Hence, a tester's intuition plays a significant role. Furthermore, as mentioned earlier, the intuition and extra skills that a tester acquires as he or she gets better clarity of the product, is not reflected in the test cases that have already been designed.
Ad hoc testing attempts to bridge the above gaps. It is done to explore the undiscovered areas in the product by using intuition, previous experience in working with the product, expert knowledge of the platform or technology, and experience of testing a similar product. It is generally done to uncover defects that are not covered by planned testing.
Ad hoc testing does not make use of any of the test case design techniques like equivalence partitioning, boundary value analysis, and so on.
As we have seen in Chapter 1, the “pesticide paradox” explains the situation where the surviving pests in a farm create resistance to a particular pesticide. The situation required the farmer to use a different type of pesticide every time for the next crop cycle. Similarly, product defects get tuned to planned test cases and those test cases may not uncover defects in the next test cycle unless new perspectives are added. Therefore, planned test cases requires constant update, sometimes even on a daily basis, incorporating the new learnings. However, updating test cases very frequently may become (or be perceived as) a time consuming and tedious job. In such a situation ad hoc testing comes handy—to test those perspectives without requiring to formally and immediately update the test cases.
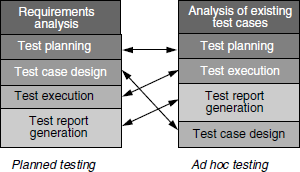
Figure 10.1 shows the various steps of ad hoc testing and illustrates the basic differences between ad hoc testing and planned testing. The coloured figure is available on Illustrations. One of the most fundamental differences between planned testing and ad hoc testing is that test execution and test report generation takes place before test case design in ad hoc testing. This testing gets its name by virtue of the fact that execution precedes design.
Since ad hoc testing brings in new perspectives, it is necessary to know what is already covered in the existing planned testing activities and also what changes in the product can cause changes in the testing functions.
Constant interaction with developers and other project team members may lead to a better understanding of the product from various perspectives. Since ad hoc tests require better understanding of the product, it is important to stay “connected.” Project review meetings can be another place for picking up information on the product.
Many times, due to lack of communication, changes in requirements may not be informed to the test team. When the test engineer does not know the requirements changes, it is possible to miss a few tests. This may result in a few undetected defects. It is possible to unintentionally miss some perspectives due to the changed requirements. By the time the changed requirements are noticed, it may be too late to include them in the planned test cases.
Interaction with developers and other team members may help in getting only a set of perspectives. Sometimes such an interaction may bias the people in the testing team. They may get carried away by what developers and other team members say. Hence, it is important to constantly question the test cases and also interact with people outside the organization (for example, customers), to find different ways of using the product and use them in ad hoc testing.
We have been referring to the earlier testing activities as “planned testing.” This does not mean ad hoc testing is an unplanned activity. Ad hoc testing is a planned activity; only the test cases are not documented to start with. Ad hoc testing can be performed on a product at any time, but the returns from ad hoc testing are more if they are run after running planned test cases. Ad hoc testing can be planned in one of two ways.
- After a certain number of planned test cases are executed. In this case, the product is likely to be in a better shape and thus newer perspectives and defects can be uncovered. Since ad hoc testing does not require all the test cases to be documented immediately, this provides an opportunity to catch multiple missing perspectives with minimal time delay.
- Prior to planned testing. This will enable gaining better clarity on requirements and assessing the quality of the product upfront.
The objective in either case should be to plan in such a way that ad hoc testing supplements and complements the other testing activities to uncover new perspectives with minimal time delay.
It has been mentioned that ad hoc testing does not require the test cases to be documented. This is applicable only for the test execution phase. After test execution, ad hoc testing requires all the perspectives that were tested to be documented as a set of test cases. These test cases will become part of the planned test execution for the next cycle. Following this method ensures two things: First, the perspectives gained in one round of ad hoc testing are formally captured and not lost. Second, the subsequent rounds of ad hoc testing bring in new perspectives, without repeating the same things. This ensures that ad hoc testing is intuitive every time. Obviously, if the same perspectives are covered again and again, then it is not ad hoc testing at all.
Ad hoc testing can be used to switch the context of software usage frequently to cover more functionality in less time. For example, instead of testing a given functionality end-to-end, ad hoc testing may cause a tester to jump across different functionalities and different screens. This is what is called “random sampling test.” This testing involves using the features of the software randomly in different components, without worrying about what features are to be tested and their coverage in each component. Since this technique simulates the behavior of monkeys jumping from one tree to another in search of (hopefully!) a better fruit, assuming that all the fruit on a given tree are similar, this is also called "monkey testing."
While it has been mentioned above that ad hoc testing is normally performed in conjunction with planned testing, it raises the question of what is the appropriate effort distribution between planned and ad hoc test efforts. Relying entirely on regular test cases or relying entirely on ad hoc testing is not a good idea. A judicious combination of the two (say, 95% effort in regular testing and 5% on ad hoc testing, if requirements are fairly stable and clear) usually proves more effective than relying exclusively on one or the other. In situations where the requirements are not clear and missing, the ad hoc testing effort increases correspondingly.
Ad hoc testing is done as a confidence measure just before the release, to ensure there are no areas that got missed out in testing. Ad hoc testing can involve looking at areas that were tested by regular testing and focus on areas that were missed in a planned way. It is still called ad hoc testing as the test cases are not documented.
Testing done without using any formal testing technique is called ad hoc testing.
Although there are many advantages in ad hoc testing, there are also a few drawbacks. Some of these disadvantages and their resolution are discussed in Table 10.1.
Table 10.1 Drawbacks of ad hoc testing and their resolution.
| Drawback | Possible resolution |
|---|---|
| Difficult to ensure that the learnings gleaned in ad hoc testing are used in future |
|
| Large number of defects found in ad hoc testing |
|
| Lack of comfort on coverage of ad hoc testing |
|
| Difficult to track the exact steps |
|
| Lack of data for metrics analysis |
|
Ad hoc testing is applicable for all testing phases. It is performed during unit testing to improve requirements clarity, identify missing code and to detect defects early. It is performed during component and integration test phases to uncover defects not caught earlier by planned test cases. During the system and acceptance test phases, ad hoc testing is performed to gain confidence in the product and to catch costly defects that may have been missed.
There are different variants and types of testing under ad hoc testing. They are described in the following sections.
10.2 BUDDY TESTING
This type of testing uses the “buddy system” practice wherein two team members are identified as buddies. The buddies mutually help each other, with a common goal of identifying defects early and correcting them.
A developer and a tester usually become buddies. It may be advantageous to team up people with good working relationship as buddies to overcome any apprehensions. On the other hand, if this is mapped to a complete agreement of views and approaches between the buddies, the diversity required between the two may not be achieved. This may make buddy testing less effective. Buddying people with good working relationships yet having diverse backgrounds is a kind of a safety measure that improves the chances of detecting errors in the program very early.
Buddies should not feel mutually threatened or get a feeling of insecurity during buddy testing. They are trained (if required) on the philosophy and objective of buddy training (that is, to find and correct defects in the product early). They also should be made to appreciate that they have a responsibility to one another. They also have to agree on the modalities and the terms of working before actually starting the testing work. They stay close together to be able to follow the agreed plan.
The code is unit tested to ensure what it is supposed to do before buddy testing starts. After the code is successfully tested through unit testing the developer approaches the testing buddy. Starting buddy testing before completing unit testing may result in a lengthy review session for the buddy on a code that may not meet specified requirements. This in turn may erode the confidence of the buddy and cause unnecessary rework.
The buddy can check for compliance to coding standards, appropriate variable definitions, missing code, sufficient inline code documentation, error checking, and so on. Buddy testing uses both white box and black box testing approaches. The buddy, after testing, generates specific review comments and points out specific defects. These are passed on to the developer. The more specific the feedback, the easier it is for the developer to fix the defects. The buddy may also suggest ideas to fix the code when pointing out an error in the work product.
The developer reviews the comments and, if the buddies agree, the appropriate changes are implemented. Or else both of them discuss the comments and come to a conclusion. While arriving at the conclusions and action items, it is necessary not to take an egoistic or personal view of the defects and review comments. That is why a good personal chemistry between the buddies is essential for the success of buddy testing.
A developer and tester working as buddies to help each other on testing and in understanding the specifications is called buddy testing.
A buddy test may help avoid errors of omission, misunderstanding, and miscommunication by providing varied perspectives or interactive exchanges between the buddies. Buddy testing not only helps in finding errors in the code but also helps the tester to understand how the code is written and provides clarity on specifications. It helps the tester, who worked as a buddy, to come out with a better testing strategy for a subsequent planned testing.
Buddy testing is normally done at the unit test phase, where there are both coding and testing activities. It is done for new or critical modules in the product where the specification is not clear to buddies who perform different roles as developer and tester.
10.3 PAIR TESTING
For this type of testing, two testers pair up to test a product's feature on the same machine. The objective of this exercise is to maximize the exchange of ideas between the two testers. When one person is executing the tests, the other person takes notes. The other person suggests an idea or helps in providing additional perspectives.
It may not be mandatory for one person to stick one role continuously for an entire session. They can swap roles of “tester” and “scribe” during a session. They can mutually decide on the modus operandi. One person can pair with multiple persons during a day at various points of time for testing. Pair testing is usually a focused session for about an hour or two. During this session, the pair is given a specific area to focus and test. It is up to the pair to decide on the different ways of testing this functionality.
Let us take an example of two people traveling in a car in a new area to find a place, with one person driving the car and another person navigating with the help of a map.
In the above example, finding the new place (like finding defects in the unexplored area of the product) becomes easier as there are two people putting their heads together with specific roles such as navagation and driving assigned between them.

Pair testing takes advantage of the concept as explained in the above example. The presence of one senior member can also help in pairing. This can cut down on the time spent on the learning curve of the product. Also, it enables better training to be given to the team member. The impact of the requirements can be fully understood and explained to the less experienced individual. As can be inferred from the above discussion, the objective of pair testing is to identify defects by exchange of ideas. It may prove effective when two members work very well together and share a good understanding.
Pair testing is testing done by two testers working simultaneously on the same machine to find defects in the product.
Pair testing can be done during any phase of testing. It encourages idea generation right from the requirements analysis phase, taking it forward to the design, coding, and testing phases. Testers can pair together during the coding phase to generate various ideas to test the code and various components. After completion of component testing, during integration, testers can be paired to test the interfaces together. Pair testing during system testing ensures that product level defects are found and addressed. Defect reproduction becomes easy in pair testing as both testers can discuss and produce the steps for reproduction.
When the product is in a new domain and not many people have the desired domain knowledge, pair testing is useful. Pair testing helps in getting feedback on their abilities from each other. This testing can be used to coach the inexperienced members in the team by pairing them with experienced testers. It may be difficult to provide training to all the members when the project schedules are very tight. Pair testing can resolve this issue by providing constant, continuous guidance to new members from the more experienced one.
Whenever planned testing does not uncover critical defects, the product is tested further to explore latent defects. Pair testing can track those elusive defects that are not caught by a single person testing. A defect found during such pair testing may be explained better by representation from two members. This may be better than a single member trying to justify the defect and its context.
Pair testing is an extension of the “pair programming” concept used as a technique in the extreme programming model. Pair testing was in practice much before pair programming but it gained momentum after the pair concept was proven for both coding and testing.
As we have seen earlier, pair testing requires interaction and exchange of ideas between two individuals. True to the dictum that two heads are better than one, there is a higher chance of significant defects getting reported early on. This enables fixing of such critical defects early in the project. Most often the pair finds a defect together. During such situations, an understanding of the requirements or product's functionality between the two helps in not reporting defects that are not important.
Since the team members pair with different persons during the project life cycle, the entire project team can have a good understanding of each other. In addition to making the knowledge of the different components more widespread across the team, this also fosters better teamwork. Project status meetings and team meetings may now have a new meaning since everyone is focused on the entire product delivery (as against attitudes such as “this is my module, my program, my test case/test plan”).
10.3.1 Situations When Pair Testing Becomes Ineffective
Having discussed the advantages, there are a few situations when it may not be advisable to do pair testing.
During pairing, teaming up individual high performers may lead to problems. It may be possible that during the course of the session, one person takes the lead and other has a laidback attitude. This may not produce the desired results. In case the pair of individuals in the team are ones who do not try to understand and respect each other, pair testing may lead to frustration and domination.
When one member is working on the computer and the other is playing the role of a scribe, if their speed of understanding and execution does not match, it may result in loss of attention. It may become difficult to catch up at a later stage. Pair testing may result in delays (if not properly planned) due to the time spent on interactions with the testers.
Sometimes pairing up juniors with experienced members may result in the former doing tasks that the senior may not want to do. At the end of the session, there is no accountability on who is responsible for steering the work, providing directions, and delivering of results.
10.4 EXPLORATORY TESTING
Another technique to find defects in ad hoc testing is to keep exploring the product, covering more depth and breadth. Exploratory testing tries to do that with specific objectives, tasks, and plans. Exploratory testing can be done during any phase of testing.
Exploratory testers may execute their tests based on their past experiences in testing a similar product, or a product of similar domain, or a product in a technology area. They also leverage their past experience of finding defects in the previous product release and check if the same problems persist in the current version.
A developer's knowledge of a similar technology can help in the unit testing phase to explore the limitations or the constraints imposed by that technology. Exploratory testing can be used to test software that is untested, unknown, or unstable. It is used when it is not obvious what the next test should be and/or when we want to go beyond the obvious tests. Exploring can happen not only for functionality but also for different environments, configuration parameters, test data, and so on.
Since there is large creative element to exploratory testing, similar test cases may result in different kinds of defects when done by two different individuals.
10.4.1 Exploratory Testing Techniques
There are many ways of doing exploratory testing. Often, some common techniques are used without realizing that such a technique is being used.
Let us take an example of someone driving a car to a place in a new area without a map. The person driving the car will use various common techniques to reach the place, such as
Getting a map of the area
Traveling in some random direction to figure out the place
Calling up and asking a friend for the route
Asking for directions by going to a nearby gas station

The same analogy can be extended to exploratory testing. As shown in the Figure 10.2, there are several ways to perform exploratory testing.
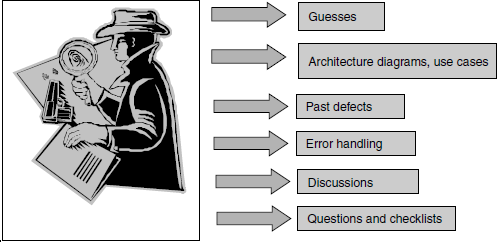
Guesses are used to find the part of the program that is likely to have more errors. Previous experience on working with a similar product or software or technology helps in guessing. This is because the tester would have already faced situations to test a similar product or software. Those tests from guesses are used on the product to check for similar defects.
A second technique for exploration is the usage of architecture diagrams and use cases. Architecture diagrams depict the interactions and relationships between different components and modules. Use cases give an insight of the product's usage from the end user's perspective. A use case explains a set of business events, the input required, people involved in those events and the expected output. Exploration technique may use these diagrams and use cases to test the product.
A third technique for exploring is based on the study of past defects. Studying the defects reported in the previous releases helps in understanding of the error prone functionality/modules in a product development environment. Defect reports of the previous releases act as a pointer to explore an area of the product further.
Error handling in the product is another technique to explore. Error handling is a portion of the code which prints appropriate messages or provides appropriate actions in case of failures. We can check using exploratory tests for various scenarios for graceful error handling. For example, in the case of a catastrophic error, termination should be with a meaningful error message. In case of an action by the user that is invalid or unexpected, the system may misbehave. Error handling provides a message or corrective action in such situations. Tests can be performed to simulate such situations to ensure that the product's code takes care of this aspect.
A fifth exploratory test technique is based on the understanding of the product from discussions. Exploration may be planned based on the understanding of the system during project discussions or meetings. Plenty of information can be picked up during these meetings regarding implementation of different requirements for the product. They can be noted and used while testing. Information can also be noted from various presentations of the product implementation such as architecture and design presentations, or even presentations made to customers.
The last technique uses questionnaires and checklists to perform the exploration. Questions like “what, when, how, who and why” can provide leads to explore areas in the product. To understand the implementation of functionality in a product, open-ended questions like “what does this module do,” “when is it being called or used,” “how is the input processed,” “who are the users of this module,” and so on can be asked. Such questions will provide insights to what more can be tested.
For exploratory testing, a detailed plan can be created specifying the areas to be tested, objectives, and time and effort to be spent. Focus could also be put on the test environment and system configuration parameters.
During test execution, areas are identified where there may be more problems and they are probed further. The exploration technique can consider various combinations of inputs, environments, or system configuration parameters.
Inviting subject matter experts for exploratory testing may yield good results. A group of project team members (developers, test engineers, business representatives, technical writers) may be teamed up to test a particular module or functionality. With their varied backgrounds, exploration may find more defects. Whenever there are non-documented behavior or unanswered questions regarding the functionality of the product, exploring as a team will be more effective.
10.5 ITERATIVE TESTING
As we have seen in Chapter 2, the iterative (or spiral) model is where the requirements keep coming and the product is developed iteratively for each requirement. The testing associated for this process is called iterative testing.
One of the biggest challenges in testing for this model is in ensuring that all the requirements that are tested continue to work when a new requirement is given. Hence, iterative testing requires repetitive testing. When a new requirement or a defect fix is done, it may have an impact on other requirements that have already been tested. As the new requirements may involve a large number of changes at the product level, the majority of these tests are executed manually because automation in this case is very difficult. Iterative testing aims at testing the product for all requirements, irrespective of the phase they belong to in the spiral model.
Unlike the waterfall model, schedules, efforts involved are dependent on the features introduced in that iteration. Customers have a usable product at the end of every iteration. It is possible to stop the product development at any particular iteration and market the product as an independent entity. Since a product undergoes all the phases of the life cycle each time, errors due to omission or misunderstanding can also be corrected at regular intervals.
Customers and the management can notice the impact of defects and the product functionality at the end of each iteration. They can take a call to proceed to the next level or not, based on the observations made in the last iteration.
A test plan is created at the beginning of the first iteration and updated for every subsequent iteration. This can broadly define the type and scope of testing to be done for each of the iterations. This is because the product goes through a series of iterations and the testing time for the later iterations increases substantially. Also, some type of tests that are performed in later iterations may not be possible to perform during earlier iterations. For example, performance or load testing may come under the scope of testing only during the last few iterations when the product becomes complete. Hence test plan preparation becomes an important activity during the beginning phase. It may help to get concurrence from the different groups on the test plan prepared so that everyone is in sync. This document gets updated after each iteration since the scope of testing, type of testing, and the effort involved vary (more details on test planning in Chapter 15 of the book).
Developers create unit test cases to ensure that the program developed goes through complete testing. Unit test cases are also generated from black box perspective to more completely test the product. After each iteration, unit test cases are added, edited, or deleted to keep up with the revised requirement for the current phase.
Regression tests may be repeated at least every alternate iteration (if not every iteration) so that the current functionality is preserved. Since iterative testing involves repetitive test execution of tests that were run for the previous iterations, it becomes a tiresome exercise for the testers. In order to avoid the monotony and to increase test efficiency, tests that need to be carried forward to all the iterations may be automated, wherever possible.
Let us take an example of a person driving without a route map, trying to count the number of restaurants in an area. When he reaches the multiway junction, he may take one road at a time and search for restaurants on that road. Then he can go back to the multiway junction and try a new road. He can continue doing this till all the roads have been explored for counting the restaurants.
The iterative model thus focuses on delivering the product in small increments in short, regular intervals. One issue that may crop up for the team is the co-ordination of defect fixes. A defect found in one iteration may be fixed in the same build or carried forward, based on the priority decided by the customer. Assume that a defect was found in the second iteration and was not fixed until the fifth. There is a possibility that the defect may no longer be valid or could have become void due to revised requirements during the third, fourth, and fifth iterations. Another possibility is that a functionality that worked during the third iteration may fail during the fifth iteration. Hence, testing efforts increase as the iterations increase.
In the above example, counting the number of restaurants starts from the first road visited. The results of the search can be published at the end of each iteration and released.
This is the same concept that is used in iterative testing to develop the product for each incoming requirement and delivering in small increments. Agile and extreme testing, the next section, makes use of some concepts of the iterative model. The overlap in the content between this model and agile is intentional.
10.6 AGILE AND EXTREME TESTING
Call attendant: Our process requires the person for whom the certificate is issued to come and sign the form.
Caller: I understand your process, but I am asking you for a death certificate of my grandfather.

Agile and extreme (XP) models take the processes to the extreme to ensure that customer requirements are met in a timely manner. In this model, customers partner with the project teams to go step by step in bringing the project to completion in a phased manner. The customer becomes part of the project team so as to clarify any doubts/questions.
Agile and XP methodology emphasizes the involvement of the entire team, and their interactions with each other, to produce a workable software that can satisfy a given set of features. As a result of such interactions, all ideas are exchanged. Software is delivered as small releases, with features being introduced in increments. As the changes are introduced incrementally, responding to the changes becomes very easy.
Agile testing has a rather radical change in the testing arena where the team no longer works as a “group of testers.” Test engineers no longer need to send test documents and defect reports and wait for inputs from the other members in the project. When testers pair with developers, they may concentrate on the program's functionality from a technology perspective. While when they pair with customers, they act like a subject matter expert on the product. Testers form a bridge between the customers (who know the business) and the developers (who know the technology) to explain their different perspectives. Testers thus become the essential glue that brings together the customer perspectives of product requirements and developer perspectives of technology and implementation.
A typical XP project day starts with a meeting called the stand up meeting. At the start of each day, the team meets to decide on the plan of action for the day. During this meeting, the team brings up any clarifications or concerns. These are discussed and resolved. The entire team gets a consistent view of what each team member is working on. Testers present to the project team the progress of the project based on the test results. Other points of discussion could be missing requirements or overshooting of estimates due to an issue or time spent on various activities the previous day. The stand up meetings being daily meetings enable quick reactions to changes.
Even though the roles of testers and developers are presented as though they are different, in the XP model there is no hard boundary between their roles. People cross boundaries and perform different roles in XP model. The high degree of communication and teamwork makes this transition possible.
10.6.1 XP Work Flow
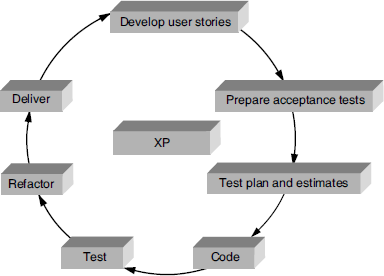
There are different steps involved in following the XP methodology. This section presents the process flow for a XP product release. The different activities involved in XP work flow are as follows.
- Develop user stories
- Prepare acceptance test cases
- Code
- Test
- Refactor
- Delivery
The XP work flow is depicted in Figure 10.3.
10.6.1.1 Develop and understand user story
Customer requirements in XP projects are given as story lines. These story lines are short sentences that describe a feature or a functionality to be developed. They are put up on small cards called as “index cards.”
During story line discussion, test engineers prepare a list of questions on the stories to make it complete and understood by all present. Notes are taken on the answers provided, they may be used while preparing acceptance test cases.
Whenever there are requests for performance or load testing, a separate story line might help in providing details of the requirements for those tests.
10.6.1.2 Prepare acceptance tests
The next step is to prepare acceptance tests, based on the user stories understood. Test engineers sit with customers and develop acceptance test cases. In some situations, customers can themselves prepare acceptance test cases. Test data for acceptance tests can be given by customers to match production data. Acceptance tests can include test scenarios to cover the system end-to-end. Test engineers may present their analysis of the requirements to the customer. They get added to the acceptance test cases. Testers can team up with customers to develop cases with negative scenarios also.
Developers can review these test cases so that their perspective on the implementation of these stories is known. Customers review and give their consent to the acceptance test cases. Based on their feedback, acceptance tests are fine-tuned. Once these cases are baselined, they act as a reference point for everyone regarding requirements for that release. These test cases are shared with everyone in the team.
During this exchange-of-ideas session, testers pick up a lot of information from the customers. The knowledge gained from interaction with various team members can be put to use while pairing with developers.
Another activity of this phase is to agree upon the acceptance criteria for the release. The criteria can be based on
- All defects fixed;
- Completion of all tests with x% pass rate, where x is a mutually agreed number; and
- All high-priority defects fixed.
Based on the acceptance criteria, a decision is taken whether to go for the next iteration in the release or stop the workflow.
10.6.1.3 Test plan and estimation
The next step is to prepare an estimated effort for the completion of this exercise. Efforts for the testing tasks are included into the entire project effort. In case of missed requirements or misunderstood requirements after the estimation, the situation is explained to the customer regarding additional efforts involved. The customer may decide either to pass on the missed requirements to the next iteration or release. Alternatively, he or she may approve including these requirements into the current iteration, while approving additional effort for the current release.
10.6.1.4 Code
The third step in this process is to start the coding. But before the start of coding, test engineers work with the developers to prepare unit test cases. Test plan and test cases are developed based on discussions and interactions with the different groups. Unit test cases are revisited after the completion of an iteration due to revised requirements. The code is written, based on unit test cases and not based on specifications alone.
10.6.1.5 Test
Once developers complete the coding, test cases are executed. Test results are documented and defects found in the iteration are tracked. Whenever defects are being fixed, testers pair up with developers to work on the defect fixes. Test status is discussed in the stand up meeting, where detailed findings on defect metrics are presented. Defect metrics are more oriented towards the functionality that works and the functionality that needs to be focused on rather than on the number of defects.
Test cases are updated based on the revised requirements after each iteration. They may be deleted, edited, or newly included. Test engineers can work on testing the performance, stress, installation, and load testing when required. Regression tests can be run to verify that the functionality of the previous iterations works in this iteration.
10.6.1.6 Refactor
During the different iterations within a small release, requirements and changing priorities are revised. In order to meet such changes, refactoring is required. Refactor is a method of correcting whatever work product exists to reflect the current changes. During this phase, test cases may need to be added, modified, or deleted. It may be helpful to involve the customer while refactoring test cases.
10.6.1.7 Automate
While the developers are working on code fixes for the changed requirements, or defects fixes, testers can focus on the tests that can be automated so that they can be run in the next iteration. This would reduce the test execution effort significantly. An appropriate automation strategy that works for the user story given for that release may need to be identified.
10.6.1.8 Accepted and delivered
The customer runs acceptance tests (with or without a tester) and notes down the results. Based on the test results, it may be decided to develop new stories for the next iteration or release.
As mentioned above, acceptance is decided on the basis of the acceptance criteria agreed upon at the beginning of the project. Defects that remain and if they are non-critical may get into the next iteration. There may be a few unresolved non-critical defects that can go to next iteration, based on the effort involved in fixing them. The customer approves all unresolved defects from the current iteration.
10.6.2 Summary with an Example
Let us take an example of automobile manufacturing. Traditionally, an automobile has four wheels, a steering wheel, brake, a pedal to accelerate the car, and a transmission system. These are the basic features of any automobile. Over the years, several new features have been introduced in an incremental way, but the basic features and purpose of those features do not change much. However, every manufacturer releases new models many times in a year with new features.
These frequent releases make the customers happy and they keep upgrading their cars. Thus the automobile industry is always growing and improving.
Technically, it may be easier to drive the car by using a joystick, but customers are used to driving the car using the steering wheel. Importance is given only to those requirements that the customers ask for.
The incremental requirements for the car are always obtained from the customers, using feedback mechanisms. Customers test them and they are involved in the development of new features.
Extreme programming and testing uses the concept from the above example to make releases frequently and in a controlled way by involving customers. Small adjustments are made in the requirements and in the software to reduce cost, time, and effort. The policies/concepts that are followed in extreme programming and testing are as follows.
- Cross boundaries—developers and testers cross boundaries to perform various roles.
- Make incremental changes—both product and process evolves in an incremental way.
- Travel light—least overhead possible for development and testing.
- Communicate—more focus on communication.
- Write tests before code—unit tests and acceptance tests are written before the coding and testing activities respectively. All unit tests should run 100% all the time. Write code from test cases.
- Make frequent small releases.
- Involve customers all the time.
10.7 DEFECT SEEDING
Error seeding is also known as bebugging. It acts as a reliability measure for the release of the product.
Usually one group of members in the project injects the defects while an other group tests to remove them. The purpose of this exercise is while finding the known seeded defects, the unseeded/unearthed defects may also be uncovered. Defects that are seeded are similar to real defects. Therefore, they are not very obvious and easy to detect.
Defects that can be seeded may vary from severe or critical defects to cosmetic errors. This is because this (defect seeding) may be used as a predictor of the percentage of defect types and to make it difficult for the inspecting team to distinguish seeded defects from the actual ones.
Defect seeding may act as a guide to check the efficiency of the inspection or testing process. It serves as a confidence measure to know the percentage of defect removal rates. It acts as a measure to estimate the number of defects yet to be discovered in the system.
Defect seeding is a method of intentionally introducing defects into a product to check the rate of its detection and residual defects.
For example, assume that 20 defects that range from critical to cosmetic errors are seeded on a product. Suppose when the test team completes testing, it has found 12 seeded defects and 25 original defects. The total number of defects that may be latent with the product is calculated as follows.
So, the number of estimated defects, based on the above example = (20/12)*25 = 41.67
Based on the above calculations, the number of estimated defects yet to be found is 42.
When a group knows that there are seeded defects in the system, it acts as a challenge for them to find as many of them as possible. It adds new energy into their testing. In case of manual testing, defects are seeded before the start of the testing process. When the tests are automated, defects can be seeded any time.
It may be useful to look at the following issues on defect seeding as well.
- Care should be taken during the defect seeding process to ensure that all the seeded defects are removed before the release of the product.
- The code should be written in such a way that the errors introduced can be identified easily. Minimum number of lines should be added to seed defects so that the effort involved in removal becomes reduced.
- It is necessary to estimate the efforts required to clean up the seeded defects along with the effort for identification. Effort may also be needed to fix the real defects found due to the injection of some defects.
It may be worthwhile to note injecting defects based on an existing defect may not yield the desired results. That is, the developers would have taken care of such defects and fixed them in earlier releases.
It may not be possible to inject requirements defects (such as incomplete or missing requirements). Whereas, we observe that many a times, requirements defects form a major category of defects. This defect seeding may not be effective for this type of defect.
10.8 CONCLUSION
In this chapter, we have seen different methods of ad hoc testing. Table 10.2 summarizes the scenarios under which each of these techniques will be useful.
Table 10.2 Methods and effectiveness of ad hoc testing techniques.
| When you want to… | The most effective ad hoc testing technique to follow |
|---|---|
| Randomly test the product after all planned test cases are done | Monkey testing |
| Capture the programmatic errors early by developers and testers working together | Buddy testing |
| Test the new product/domain/technology | Exploratory testing |
| Leverage on the experience of senior testers and to exploit the ideas of newcomers | Pair testing |
| Deal with changing requirements | Iterative testing |
| Make frequent releases with customer involvement in product development | Agile/extreme testing |
| Get an approximate idea of the effectiveness of the testing process | Defect seeding |
Ad hoc testing is widely performed but has only very less documentation available. Iterative programming model and agile methodologies follow good number of ad hoc testing approaches. [MARI-200l] is a good place to start with pair testing and [BACH-2003] explains the exploratory testing in detail.
- How do ad hoc test cases move into planned test cases over time?
- Can the ad hoc test cases be white box tests? If so, identify the conditions under which this will be useful
- At which phase of testing is buddy testing likely to capture most
- defects? Why?
- What skills are required to perform monkey testing?
- We described buddy testing and pair testing as two types of ad hoc tests. Describe how you could combine the two for even more effectiveness.
- In each of the following cases, which of the ad hoc testing methods discussed in the book will be most appropriate?
- A small organization where testers and developers work closely together
- Where you want to develop awareness of testing of given modules amongst multiple testers
- A product evolving in multiple releases, features being iteratively added from one release to another
- A new breakthrough product is being developed and tested