When learning to become a better digital sculptor, you will benefit from the same traditions and tenets that guided traditional sculptors for centuries. Just as in drawing and painting, all the fundamental artistic lessons applicable to sculpting are true on the computer as well. Whether we are sculpting an alien, a princess, a warrior, a horse, or an abstract form exploration, our primary concerns will always be the same (Figure 1-1).
Figure 1-1 Examples of traditional clay sculpture

Gesture
Gesture represents the dynamic curve of the figure. In life drawing, these lines are quickly laid down on paper and do not necessarily seek to describe the contour or form of the figure at all (Figure 1-2). The function of the gesture drawing is to capture the rhythm and motion of the pose, the thrust of the figure, and the action inherent in its posture (Figure 1-3). Keeping a sketchbook of quick, loose sketches you don’t intend to show is a great way to train yourself to find the gesture and rhythms in a figure. These kinds of exercises help sharpen your eye, and this translates into better figures when sculpting from the imagination.
Figure 1-2 A selection of gesture sketches

Figure 1-3 An example of gesture and action

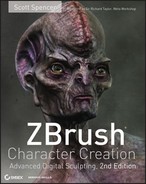
Gesture is the source of the life of a drawing or sculpture. It must be addressed from the outset—if the gesture is poor, it can be difficult to introduce it later into the process. If you start with a strong gesture, the sculpture will be appealing and alive from the start. A wooden, stiff pose with a poor gesture can have acceptable anatomical form and skin details while still being fundamentally unappealing (Figure 1-4).
Figure 1-4 This Hercules from the Piazza della Signoria in Florence, Italy, is an example of bad gesture in an otherwise good sculpture.
The rules of gesture apply to even a sculpture that is not a figure. Notice in the lion’s head how the gesture of the lines in the mane serve to create a sense of flowing action down toward the ring (Figure 1-5). These lines are more of a graphic consideration and can almost be considered in the abstract. Their presence serves to strengthen the visual impact.
Figure 1-5 Lion head sculpture

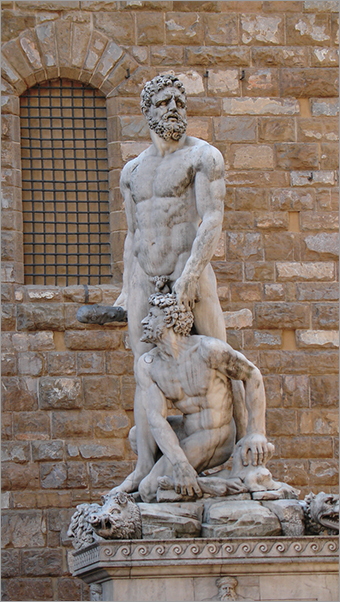
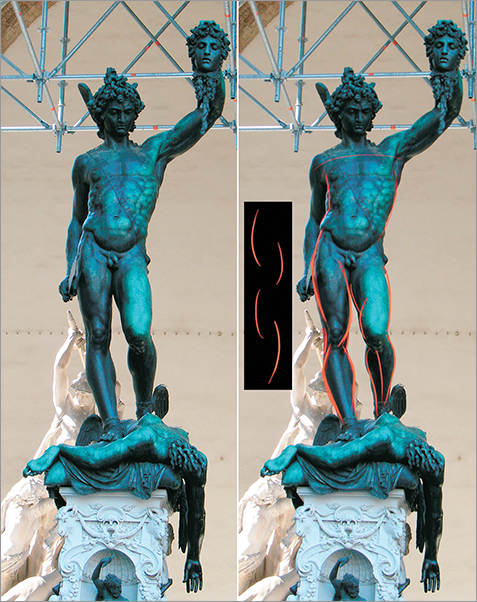
Closely linked to gesture is the concept of rhythm. Master draftsman George Bridgman describes rhythm as “in the balance of masses the subordination of the passive or inactive side to the more forceful and angular side in the action.” That is to say, the interplay between the active and passive curves in the body combines to create a sense of rhythm in your sculpture (Figure 1-6).
Figure 1-6 In this image of Cellini’s Perseus, I have indicated the alternating curves that establish a sense of rhythm down the length of the figure. Notice how they alternate, as in the inset image.
Gesture is an important consideration no matter what you may be sculpting. It is gesture that makes a sculpture exciting, whether it is a door knocker, a monster, or a human. Especially when dealing with figurative sculpture, a well-executed gesture with special attention to rhythm helps establish a sense of weight and balance in the figure.
Form
Although ZBrush excels at adding fine details to a model, form is always of primary concern when sculpting. Many sculptors rush to the detailing phase while overlooking the importance of developing the form, anatomy, and structure of the model. This makes for a weaker sculpture overall. Take Michelangelo’s David, for instance; it’s a perfect example of a masterful sculpture but there is not a single pore or wrinkle on the body. The figure lives and breathes because the interplay of forms of the surface gives the impression of skin, fat, and bone. David appears to be a living being in an inanimate material. This is true even when you are working on a completed 3D model from a third-party application. There is no replacement for the subtle variations in surface shadow and transitions you can add with ZBrush’s sculpting tools. Adding a more organic sense of the artist in the work will create a far more appealing character. It may not seem like much, but taking away the perfect parametric nature of a polygon model can push a character’s believability well into the next level before the first wrinkle or pore is applied.
Form in general refers to the external shape, appearance, and configuration of an object. In drawing and painting, you are describing form by directly applying light and shadow—from the highlight to the midtone to the core of the shadow. In sculpture, you are creating these halftones and value changes by altering the shadow-casting surface. By altering the underlying shape, you can model the way light plays on the surface. Without shadow, there is no form. You can see this if you turn on Flat Render in the ZBrush window, thus removing all the shadows and highlights. Only a flat silhouette remains (see Figure 1-7).
Figure 1-7 Notice how when light and shadow are removed, only a silhouette remains.

It can be helpful when sculpting to remember that the shapes you are making with your brush will affect how light and shadow interact on the surface. That is how the shapes are created. If the light is turned off, all form goes away. Creating good form as you sculpt requires an understanding of both the shape itself as well as the quality of the shadows created by that shape under different lighting conditions.
As a further example of how shadow describes form, we can take a lesson from painting and drawing. Figure 1-8 shows a photograph of a face next to the same photo posterized. With all the midtones removed so only the extreme highlights and shadows remain, you can still identify the fact that this is a face. When you’re reading a surface, the shadows tell you everything about what you are looking at.
Figure 1-8 Even with just the shapes of the shadows, this face is still recognizable.

This gradient between the lightest light and darkest dark is called value. Paintings and drawings have what’s called a key or value range—the set number of steps from lightest light to darkest dark found within the image. When you’re sculpting, it is good practice to be sensitive to these gradations on the surface of your own work. Even though you are not applying value directly, you are affecting the values the eye perceives by the height of the shape you are sculpting or the depth of the recess. Examine how the shadows interact on the surface; to darken a shadow, you may deepen the crevice or add to the mass of the adjacent shape. Moving the light often as you work can help you spot these value changes from different lighting conditions.
You can move the light interactively in ZBrush. Set your material to one of the standard materials and choose ZPlugin Misc Utilities Interactive Light from the main menu. Move the mouse to see the light moving around your sculpture as you work. See the DVD for a video showing this feature in action.
When you’re dealing with form, it also becomes important to address transitions that create space between forms and how one feeds into another. Figure 1-9 shows how deepening a crevice or raising a high point can darken your shadow and give it a harder edge. This will change the character of the transition.
Figure 1-9 By deepening the furrow next to the deltoid, the character of the shadow changes, changing the feeling of the transition.
Try to be sensitive to the transitions between your forms and the variation you create. If the transitions between all your shapes are the same hard-edged shadows, the figure will be visually bland.
An important concept to bear in mind while you sculpt is to reduce everything to its base form and work on big shapes first. Just as a painter will tackle the big shadows and big lights first, then work down to details, the same is true in sculpting. This is one of the most important aspects of this section to remember—by working on big shapes and then refining, not only do you ensure that you resolve the major shapes first, but it helps your mind organize the complex forms of the figure into easy-to-manage sections. The final result may appear complex and intricate, but you approached it in small portions one at a time (Figure 1-10).
Figure 1-10 These images show the progression of the lion head sculpture from the most basic, broad strokes down to the finer lines.

All forms can be broken down to their base shapes and planes. Complex shapes like the face mass in Figure 1-11 can be reduced to aggregate planes for easier study and execution. This is called planar analysis. While sculpting you will find it helpful to always be thinking of what the basic forms are in your character and how they relate to one another. The viewer will have different reactions to a character based on the relationships between its basic forms. This relationship between forms is called proportion.
Figure 1-11 When you reduce this creature to its most basic shapes, the form relationships and proportions become apparent.

The proportions between the basic forms have a visual impact on the viewer. The viewer’s reactions can change based on how the artist manipulates these relationships. For example, a character with a huge, bulbous head on a small body will create a different reaction than one with a tiny head and an oversized body.
Proportion
Proportion refers to the relationship between the overall size of an object and the relative sizes of its parts. Many books have been written on the balance of these measures, and the fundamental rules of proportion have been understood as far back as the ancient Egyptians.
When you’re sculpting a figure, it is important to understand proportion as it pertains to the human form. Proportional canons are sets of rules to help guide artists in creating a specific type of figure.
There are many systems, or canons, of proportion. Michelangelo often used a heroic eight heads to measure the figure, while a more ordinary human measure is 7½ heads high. No proportional system is “law,” and there are variations in all people. These are intended as an idealized system of measure. Straying too far will result in a figure that looks “off.” Figure 1-12 shows a human figure built on an eight-head canon. This means the figure can be broken into eight equal head measures. Based on these measuring lines, major features of the figure are placed.
Figure 1-12 An example of the eight-head figure proportion

By understanding the proportional canon you are working with, you can make educated decisions about the character you are creating by changing the proportion.
Best Practices for Digital Sculpting
In this section we will discuss a few points to help you make the most of your digital sculpting toolset. When I first started using ZBrush I slowly discovered various techniques and practices that helped me get better results from the digital tools. It is my hope these tips will help you bypass some of the trial and error I experienced when first trying to find the best way to interact with the digital sculpting environment.
Subdivision Levels
People often ask me how densely they should subdivide their model while working. The answer is never a set number. The subdivisions you can get on your machine will vary depending on how much RAM is installed. The polygon count of your level 1 mesh will also influence how densely you can subdivide. In addition, ZBrush includes an option that lets you work with High Definition (HD) subdivision levels, which we discuss in depth in Chapter 4, “ZBrush for Detailing.”
Artistically, the best approach may be to divide to the lowest level at which you can represent the shapes you are trying to sculpt. By avoiding detailing too early and refining the basic forms of the character, you will find that you can attain excellent results from lower polygon counts. Only then, when the form is resolved, are you ready to detail. The fine detail passes need to be done at the highest possible subdivision levels. In most cases this is 6 million or more polygons. Later in this book we will look at detailing characters and ways to get sharper details from lower polygon counts.
Guidelines for Digital Sculpting
Use the following notes as a guide to help you adopt the best habits and practices when digital sculpting. Many of these notes will save you from major headaches further down the line. You will also find that some tips, like smoothing as you work, will help you create better-looking sculptures faster.
Use these guidelines as you sculpt:
- Work from big to small; focus on the basic shapes first, then refine the details.
- Move the light often to check the shadows on your form.
- Don’t feel the need to outline every muscle or shape with a recess—some shapes can and should be subtler than others. This adds variety and interest to the surface.
- Smooth as you work—by building up form and then smoothing back, you can create a subtler surface and avoid the “lumpy” look.
- Try to use the largest sculpting brush size for a particular shape; this helps keep you focused on the big forms first and ensures you don’t get bogged down in details too soon.
- Work at the lowest subdivision that can support the form you are trying to make. This also keeps you focused on big shapes over details, and it helps avoid the lumpy look of some digital sculptures.
- Step up and down your subdivision levels often. Don’t work at the highest the whole time unless you are working with the Rake and Clay tools.
- Rotate the figure often and work on all areas at once. You shouldn’t finish the head before the arms; each part should always be at the same level of finish. This keeps you from having to match one area of the sculpture to another, creating disconnection between the shapes.