Moving and Posing Figures with Transpose
Transpose tools are accessible when you have a tool active in Edit mode on the canvas, but you leave Draw mode and enter Move, Rotate, or Scale by clicking the corresponding buttons at the top left of the screen (or using the Q, W, E, R hotkeys: Q is for Draw mode while W, E, and R are for Move, Scale, and Rotate, respectively). Simply press the key that corresponds to the function you want and you will enter Transpose mode ready to move, rotate, or scale. You may also select the Transpose brush directly from the Brush menu . While this functionality is useful, it is best to learn the hotkeys early since using them will facilitate quick movement between functions and allow you more freedom when working with the Transpose tools.
In previous chapters we have used Transpose for moving subtools in relation to one another. Here we’ll combine Transpose with masking and use it as an advanced posing tool. ZBrush allows you to create dynamic poses for your ZTools, store them in layers, and even maintain sculpting symmetry on an asymmetrically posed model. For a video demonstrating Transpose in action, please see the accompanying DVD.
The Action Line
The Transpose tool consists of a single modifier called the action line. When entering a Transpose mode, this line will be apparent on the model (Figure 7-1); you can redraw the line by clicking anywhere on the object, then dragging and releasing. The length of the stroke determines the length of the action line, and the places that you start and end the line determine the pivots for rotation and scale operations. When you’re drawing an action line, it will snap to the surface of the model underneath it and any previous action lines will be replaced. Note that by default the size of the endpoint circles will change to help illustrate how far one endpoint is from the viewer compared to another. This can help you spot when the transpose line is receding into space or on a plane perpendicular to the viewer.
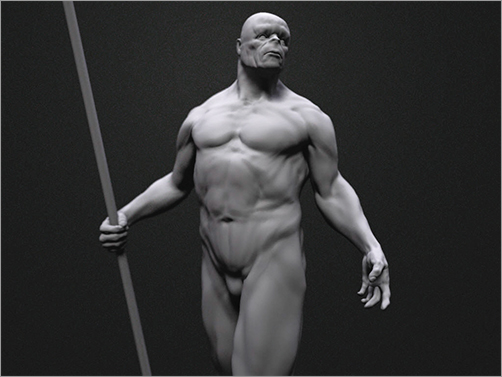
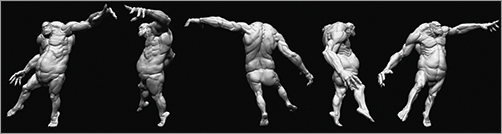
Figure 7-1: Transpose can be used to place your characters into interesting and dynamic poses.
Transpose can be used with Symmetry on or off; with Symmetry on, an action line will be drawn on both sides of the figure.
You can reposition the action line by clicking and dragging on the line itself or on the yellow rim of the center circle. The circle endpoints can be adjusted by clicking on the circle, not inside the circle, to move them in the plane of the screen (X and Y directions only).
To center an endpoint in a joint, Shift-click-rotate to snap the model to a front view and place the endpoint. Then, Shift-rotate-snap to an orthographic side view and pull the endpoints back to the desired placement (Figure 7-2).
Figure 7-2: To center a joint: (a) Draw an action line in the front view. (b) Snap to an orthographic side view. (c) Move the circles from the side to place them correctly in relation to the figure.
Giant by Jim McPherson courtesy of Gentle Giant Studios and Secret Level/Sega
To use the action line, click and drag from the center of one of the endpoints. You will know the endpoint is active when a red dot appears in the circle. With Move active![]() , clicking in the center point will move the entire object, while clicking and dragging from one of the endpoints will scale the object proportionately as if the opposite end of the line were the world space origin (Figure 7-3). Holding down the Shift key while you drag will constrain the movement to a single axis.
, clicking in the center point will move the entire object, while clicking and dragging from one of the endpoints will scale the object proportionately as if the opposite end of the line were the world space origin (Figure 7-3). Holding down the Shift key while you drag will constrain the movement to a single axis.
The transpose line can be used as a measuring tool in ZBrush. The distance between the start- and endpoints is shown in the upper-left corner of the screen while using Transpose. The units and display can be altered under Preferences Transpose Units.
Figure 7-3: Move with Transpose

To scale an object, make sure Scale is active at the top of the screen by clicking the Scale button or pressing the E hotkey. Click and drag an action line on the model. Place one endpoint where you want the center of the scale or the origin to be. The polygons under this endpoint will not move. By clicking and dragging in the other endpoint away from the origin, you will scale up the model. By dragging toward the opposite endpoint, you will scale it down (Figure 7-4). To scale in a plane perpendicular to the action line, click in the center point and drag toward one of the endpoints. Dragging to one end will thicken the figure; dragging to the other will thin it.
Figure 7-4: Scaling with Transpose

The Alt key will produce alternate effects in Transpose mode. Holding down the Alt key while scaling a figure will affect the parts of the model closest to that endpoint more. This could have the effect of lengthening the legs while leaving the rest of the figure relatively unchanged. Alt-dragging the midpoint will increase the scale effect between the midpoint and the last touched endpoint.
To rotate the model with Transpose active, enter Rotate mode by pressing the R hotkey or by clicking the Rotate button . Draw an action line and drag one of the endpoints. This will rotate the entire model around the opposite endpoint. If you click and drag in the center midpoint, the model will rotate around the axis of the action line itself.
When rotating in Transpose, it is sometimes important to keep the action line straight and perpendicular to the viewplane. To do this, start the action line on the model but drag off the model to release. This ensures the line snaps to a plane perpendicular to the viewplane, thus allowing you to make accurate rotations in X, Y, and Z (Figure 7-5).
Figure 7-5: Drawing an action line from the figure to the background will create the line in the current view orientation, ensuring it is a straight line. Clicking the endpoint will then let you place it where desired.

Topology Masking
Figure 7-6 shows a figure with an action line drawn down the arm. If we enter Rotate mode and drag the endpoint, the entire figure will rotate. This is where masking comes in handy. By masking everything but the arm, the unmasked areas will rotate around the opposite end of the action line. Masking can be accomplished with the same methods we have discussed so far (Ctrl-clicking to paint masks or using a marquee).
Figure 7-6: Rotating an unmasked figure is a global operation. With the body masked, only the arm rotates.

In Transpose mode, there is another powerful masking option called topology masking. Topology masking creates a mask on the model based on the underlying edge flow (Figure 7-7). In a base mesh with evenly dispersed quad geometry and edge loops that flow down the appendages, this makes masking limbs quick and easy. The topology generated by ZSphere models is especially effective with this masking technique.
Figure 7-7: Topology masking

To mask by topology, hold down the Ctrl key and drag the arm. Notice that the line produces a mask that dynamically grows with the stroke. With the entire arm masked, Ctrl-click off the model and invert the mask so the arm is now unmasked. The edge of the mask can be blurred or sharpened using the Ctrl and Alt keys (Figure 7-8). Ctrl-click the masked area to blur it and to create a more natural deformation; Ctrl+Alt-click to sharpen the masked area. This can also be accomplished with the blurMask and sharpenMask buttons under Tool Masking. You can adjust the amount of blur or sharpening that is applied when you Ctrl-click by choosing Preferences Transpose. Topology masking is only accessible when Move, Rotate, or Scale mode is active.
Figure 7-8: By Ctrl-clicking (left), you can blur a mask; using Ctrl+Alt-click (right), you can sharpen it.

Posing a Figure
When posing a character, keep in mind some fundamental concepts. Where is the character’s center of balance, where is the weight of the character placed in relation to the center, and how is the character’s anatomy changing over the pose (meaning the extension and compression of the muscles)?
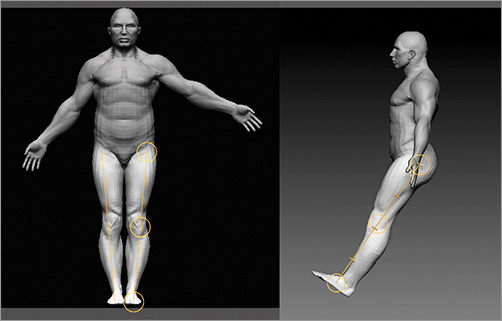
In Figure 7-9 I have labeled the skeleton, the center of balance, and the weight distribution on this character. The red lines represent the underlying skeleton. Notice that the left hip is raised with the weight placed on the left leg. This shifting of weight across the center line is called contrapposto. The blue line represents the center of gravity; this is always a straight plumb line and is not necessarily in the center of the figure. Notice that the line of the hips is at an angle opposite that of the shoulders.
Figure 7-9: Important points to note when posing a character

In this section you’ll use the information you have learned about Transpose and topology masking to pose a character ZTool. You’ll store this pose in a ZTool layer much like you stored detail passes in Chapter 4, “ZBrush for Detailing.” This allows you to always return to the neutral posed version of the character.
1. Start by loading the demosoldier.ztl file from the Lightbox Tool menu. This is one of the ZTools that comes installed with ZBrush. This particular mesh is well suited to topology masking because of the edge layout. Notice in Figure 7-10 how the arms and legs are all composed of repeated rings moving up the length of the limb.
Figure 7-10: Evenly spaced topology rings are best suited for the topology-based masking tool.

2. With the DemoSoldier open, delete all the subtools except the main body. Select Always OK from the pop-up box as you delete the subtools.
3. Divide up to the highest possible subdivision level and create a new layer. Name this layer pose. Remember that layers can only be created at one subdivision level, so always make them at the highest possible polygon count. Changes made at lower subdivision levels will still store in the active layer.
We will manually delete the subtools in this exercise to help illustrate a new delete option in ZBrush 4. An alternate approach to this step is to simply select the body subtool and click the Clone button. This will create a new copy of just the body subtool.
When you delete subtools, ZBrush will open a dialog box letting you know this is not an undoable action. ZBrush will offer you three options in this box:
- Cancel will stop the operation entirely.
- OK will delete the current tool.
- Always OK will delete the current tool and prevent ZBrush from warning you again for the remainder of this session. When you choose this option, you will be able to delete subtools with no pop-up window.
This setting will automatically reset the next time you start ZBrush. This is to help prevent you from deleting subtools unintentionally since this action cannot be undone.
4. Step down several subdivision levels. Transpose posing is more difficult when the mesh is dense. It is not necessary to have thousands of polygons when you are simply posing the model.
5. Ctrl-drag a mask from the arm to the chest. This is masking by topology. You may also enter Draw mode (the Q key) and paint the mask directly as you would normally. Once the arm is masked, invert the mask so that the body is masked and the arm unmasked by Ctrl-clicking the background.
6. With the arm unmasked, draw a transpose line from the shoulder to the wrist. Move to a side view and place the endpoint where the arm should pivot (Figure 7-11).
Figure 7-11: Placing the action line to rotate the arm

7. Rotate the arm using the endpoint on the action line.
8. Repeat this process for the legs, but this time turn on X Symmetry with the X hotkey. Notice how two action lines are created, and you can move the legs together (Figure 7-12).
Figure 7-12: The legs rotated with Symmetry on
9. Let’s add a forearm twist. Mask down to the elbow and draw an action line from the elbow to the wrist. Click in the wrist endpoint, then Alt-drag in the center point. Since we clicked in the wrist endpoint, the rotation will be concentrated in the forearm and give us a nice twist (Figure 7-13).
Figure 7-13: The forearm twist added

10. We’ll use bone posing for the elbow bend. Bone posing is a built-in skinning algorithm that stretches faces on one side of a pivot while compressing them on the other. This helps approximate the deformation of skin and muscle around a skeletal joint (Figure 7-14). Draw a transpose line from the shoulder to the elbow. Be sure there are no active masks. Alt-drag in the last endpoint, the one at the elbow. This will bend the arm, but it will have the effect of bulging the bicep and stretching the elbow skin. This kind of built-in skinning algorithm helps you quickly create natural poses.
Figure 7-14: Masking and rotating with Transpose can create unnatural bends (a, b). Bone posing used to bend an elbow creates a more natural effect (c).
11. When you have finished posing the character, step back to the highest subdivision level where you created the pose layer. Under Tool Layers, turn off the pose layer by clicking the eye icon. The figure will now return to its default pose. If you click the eye icon again, the figure will return to its pose.
Figure 7-15 shows a figure posed entirely with Transpose.
Figure 7-15: A character posed with Transpose
Adjusting the Intensity slider can have unexpected results since the blend is closer to a blend shape deformer than rigged animation. The figure will blend between its two positions by letting the vertices take the shortest path. The Intensity slider works exceptionally well when storing blend shapes for facial animation in layers (Figure 7-16). ZBrush can be used to sculpt facial animation targets; adjusting the intensity on the layer allows you to export different intensities of targets as well as blend target layers together.
Figure 7-16: Intensity to control facial targets

When posing your figures, keep in mind some artistic considerations. Most important is to maintain a sense of weight distribution over the center of balance. Make sure you know where the character is balanced; otherwise it will not appear to have weight and may look like it is simply floating in air. Also keep a sense of gesture while you pose. Gesture, as you recall, is the most important aspect of effective figure work.
Posable Symmetry
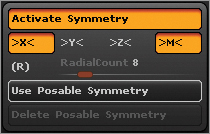
Although many parts of the body change during posing, for others you might find it ideal to sculpt with Symmetry turned on—such as the face or the bony masses of the body, like the pelvis and ribcage. ZBrush’s posable symmetry feature lets you keep Symmetry on when posing a model asymmetrically. This symmetry is calculated based on the topology, so your model must have symmetrical topology for it to function. To use posable symmetry, click Transform Activate Symmetry and click the Use Posable Symmetry button (Figure 7-17). Your cursor will turn green, alerting you to the fact you are in posable symmetry mode. This is a great tool for sculpting fingers, faces, or any other areas that maintain a level of structural symmetry when posed.
Figure 7-17: The posable symmetry feature is found in the main Transform menu.