Advanced Techniques: Sculpting the Demon Beast
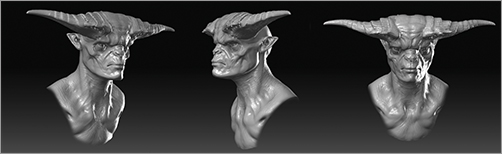
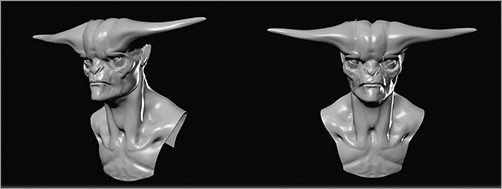
In this section, we’ll explore the steps used to sculpt the Horned character in Figure 3-50. I designed this character from the same generic head mesh used earlier in this chapter. When adding the long horns on the top of the head, I didn’t use Insert Mesh but chose a different technique: I added these parts by exporting the model to Maya to add new geometry and then reimporting the model into ZBrush, retaining all the sculpted levels of form. I did this using the GoZ plug-in. This is a valuable workflow in a production pipeline as it allows you to work free and unencumbered by concerns with the base mesh. If you ever need to adjust the topology or add new geometry to support new appendages, that’s possible. Let’s take a look at the process used to create the Demon Beast. Please see the DVD for a video of the process of creating this character.
Figure 3-50: The final Demon character

1. Polygroup the lower jaw as shown earlier. You’ll use this technique as well as Topological Masking to work the mouth and lip area. Using the Move brush, begin to pull at the mesh. Make sure that X Symmetry is turned on. At this point you are most concerned with the overall silhouette and the form of the creature. Pull at the forms of the back of the head, elongating the mesh to give the character a long spiked back to his head (Figure 3-51).
Figure 3-51: Use the Move brush to pull new shapes from the generic head mesh.
2. Using Transpose, lengthen the neck. You can use Transpose with masking to rotate and scale parts of a mesh rather than the mesh as a whole. Mask out the head, leaving the neck unmasked. Step up to level 3 and press the W key to enter Move mode. To soften the edges of the mask, Ctrl-click the mask a few times. This will feather the edge. Draw a Transpose line from the base of the skull to the shoulders. Select the lower ring center and pull to stretch the neck out (Figure 3-52). For more information on using Transpose for posing, see Chapter 7.
Figure 3-52: Use the Transpose tool to rotate and extend the neck.

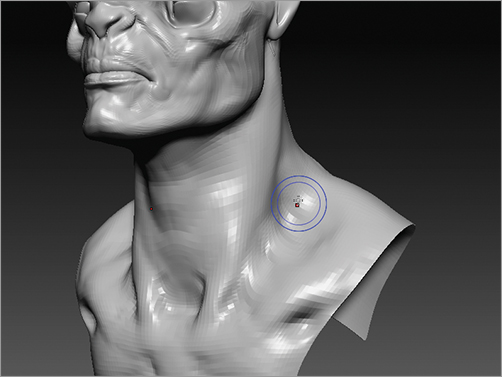
3. Begin to rough in the basic forms of the neck and shoulders using a custom brush I call flatInflate. This brush is available to you on the accompanying DVD. It is a variation of the Inflate brush that adds form in a flattened gradual buildup. I find it most useful when trying to subtly build up forms over the progress of a sculpture. In Figure 3-53 I am using this brush to rough in the shapes of the collarbones (clavicles) and the neck muscles (sternomastoids).
Figure 3-53: Starting to suggest the anatomy of the neck and collarbones

I created and saved this brush using the same steps detailed in Chapter 2. By altering the brush’s Edit curve, I was able to change the manner in which the Inflate brush affects the surface. See Figure 3-54 for a look at the Edit curve composition for the flatInflate brush.
Figure 3-54: The flatInflate brush’s Edit curve

You can also experiment with the Claytubes brush with no alpha for a similar effect. On the DVD is a custom Claytubes brush for you to experiment with. The brush will build up in a flattened manner, but it treats the surface slightly differently as it tends to fill in recessed areas. Experiment with both brushes to determine which you prefer.
Removing all surface shading and looking at just the silhouette allows you to concentrate on the overall silhouette of the character. The silhouette is an important aspect of design since it is the first read, meaning the first thing your mind processes when you look at a character. Figure 3-55 shows examples of character silhouettes and how they affect the read of the character.
Figure 3-55: Various silhouettes

A useful trick when trying to judge the overall proportions of the character is to switch from the current material to the Flat Color material. Doing so allows you to spot the silhouette of the character quickly as well as sculpt while looking just at the profiles (Figure 3-56). Reducing to the overall outline can help you see when a shape needs to be pushed to help communicate the feeling you are trying to inspire or depict in the anatomical form you want to represent.
Figure 3-56: The character bust with the Flat Color material applied

It is possible to snap to an orthographic view and move the mesh in Flat mode, manipulating just the overall outlines without being distracted by internal details. When you are ready to view the whole mesh again, simply select another material.
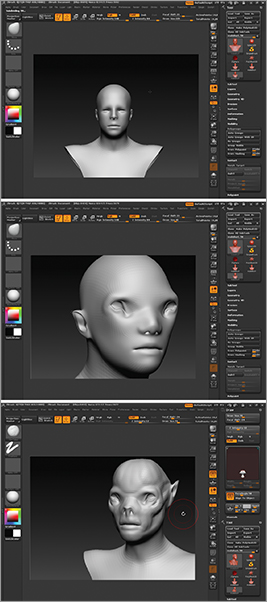
4. You may choose to add a subdivision level at this stage, but be careful not to divide too high. At this point I have only three subdivision levels. Using a combination of the Claytubes brush and flatInflate to build up anatomical forms, as well as the Standard brush with a low Draw Size and ZIntensity to etch in hollows and catch shadows between, further develop the shape the head. In Figure 3-57 you can see the cheekbone forms have been suggested as well as the forms of the forehead.
Figure 3-57: Further developing the forms of the head, including the forehead and cheekbones

Move the eyes farther apart using the Move brush (Figure 3-58). This helps break the standard proportion between the eyes and mouth that you see on a human face. Spreading the eyes is a great way to make a character feel less human while retaining points of interest where the viewer can make an emotional connection with the character. Try to find ways to make the head you sculpt be relatable to the viewer without being too humanoid in its proportions.
Figure 3-58: Use the Move brush to widen the space between the eyes. By creating an obtuse triangular relation between the eyes and mouth, you help push the head away from conventional human shapes while keeping your character relatable.

5. You add eyeballs to this head just as you did in Chapter 2. Simply select a polysphere from the Lightbox menu and append it to the ZTool (Figure 3-59). Use the Transpose tools to rotate and scale the eyeball into place. Be sure to use Transparency to help in placement. Use the Move brush to shape the eyelids to conform to the surface of the sphere (Figure 3-60). Mirror the eyeball using Subtool Master’s Mirror function as discussed earlier.
Figure 3-59: Placing a polysphere as the eyeball

Figure 3-60: Use the Move brush to conform the eyelids around the eyeball.

It is important to work over all views of the head at this stage and never take any one point to completion. This approach keeps the sculpture unified and vibrant. If you work one area too long, it becomes overworked and no longer “fits” with the rest of the sculpture. You will have to work harder trying to make it match the rest of the character.
6. Now add a subdivision level. Using the Claytubes brush, rough in the lips of the character (Figure 3-61). You may want to enable Topological Masking on the brush to help keep the effect of the brush separate on each lip. Or you can mask your polygroup for the lower jaw, and vice versa (Figure 3-61). Use the Standard brush to create the line of demarcation between the lips and the rest of the face. This line is sometimes called the shelf of the lips.
Figure 3-61: Rough in the lips with the Claytubes brush. The second image shows masking used to help isolate the lips.

7. Use the Standard brush to accentuate the edges of the skeletal anatomy. The crest of the eye socket, for example, where it meets the cheekbone and the jawline, is a great place to accentuate the sharpness and bony quality of the skull under the skin (Figure 3-62).
Figure 3-62: Use the Standard brush to accentuate the skeletal landmarks under the skin.

Adding Geometry for the Horns
In this section, you will use the GoZ plug-in to export the model from ZBrush, add geometry, and then reimport and maintain the sculpted levels. If you try to pull the horn from the existing volume of the head now, the faces stretch (Figure 3-63). This will cause problems when you sculpt and paint details on these areas later. For this reason, you want to extrude new faces to carry the detail of these new horns.
Figure 3-63: Pulling the horns from the head causes the faces to stretch and distort.

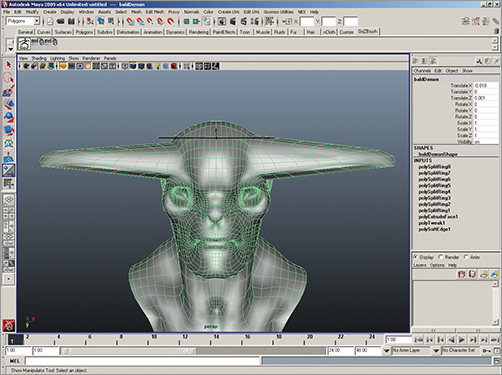
1. You will use the GoZ plug-in to extrude the new faces. Step to the lowest level and click GoZ (Figure 3-64). You may want to delete the lowest subdivision level if it is too light to judge the shape of the head. (I stepped to level 2.) Under Tool Geometry, click Delete Lower to remove the lower subdivision level.
Figure 3-64: Click the GoZ button to export the lowest subdivision level to Maya.

2. Clicking GoZ will load the mesh into Maya, ready to edit (Figure 3-65). Select the faces that you will extrude for the horns (Figure 3-66).
Figure 3-65: The mesh is ready to edit in Maya.

Figure 3-66: Faces selected for extrusion

3. Using the Extrude tool, extend these faces up and scale them down (Figure 3-67). Be sure to cut new edge loops around the length of the extrusion or the faces will not carry any detail once subdivided (Figure 3-68). You can cut these loops with the edge ring and the Split tool in Maya. Be sure you keep the number of edge loops symmetrical so X Symmetry will be maintained in ZBrush.
Figure 3-67: Horn faces extruded and scaled
Figure 3-68: Loops cut along the length of the extrusion help make sure this area will maintain detail once subdivided.
4. Click the GoZ button to export this mesh back to ZBrush. Doing so will update the geometry of the ZTool to include the new horns while maintaining the subdivision levels and sculpting you have already done. ZBrush will ask if you want to transfer the high-resolution details (Figure 3-69). Click Yes to update the mesh. The new geometry will be unmasked, as you can see in Figure 3-70.
Figure 3-69: Click Yes when prompted to transfer the high-resolution details to the modified mesh.

Figure 3-70: The new geometry imported into the tool and updated by the GoZ script

Refining the Character Bust
At this point, you have added the new geometry to support the horns on our sculpture. Using the Move brush, shift and reshape the horns. Smooth them to help increase the tapering ends (Figure 3-71).
Figure 3-71: Horns smoothed and positioned
We will now make some adjustments to the bust to help improve its sense of character. This includes making large changes of the length of the neck as well as smaller anatomical form details like folds of flesh and shaping the lips.
1. To introduce a sense of gracefulness in the figure, you’ll extend the neck. Doing so will also help echo the long horns. Be careful not to make the neck too thin or weak. Use Transpose masking to isolate the neck. Rotate and extend the neck using the Transpose tools (Figure 3-72).
Figure 3-72: Elongate and rotate the neck.

2. Mask the nasolabial fold next to the nose. Press the faces here in slightly to help create the sense of a fold of flesh. Using the Standard brush with a small Draw Size, sketch some crossing wrinkles radiating out from the lips. You’ll refine these wrinkles later at a higher subdivision level. Finish the ear using the same approach described in Chapter 2 (Figure 3-73).
Figure 3-73: Working the nasolabial fold with masking and the Standard brush
3. Using the Standard brush, create the shelf of the lower lip. Create the soft fleshy parts of the lip with the Claytubes brush (Figure 3-74). The lips can be further puckered together, giving the impression of pressure, by using the flatInflate brush (Figure 3-75). Sculpt the nodes of the lips from the side view (Figure 3-76).
Figure 3-74: With the Standard brush, refine the lower lip.
Figure 3-75: Further refine the mouth with the Claytubes and flatInflate brushes to make sure the lips overlap.
Figure 3-76: The mouth from the side view. Note the nodes of the lips.

4. A useful technique when sculpting mid-resolution details like striations in the skin or tendons is to sculpt the form you want at a higher subdivision level and then step down and smooth the lower levels. When you step back up, the form will still be there, only much more subtle. You can then accentuate the highlights and shadows as needed with the Standard brush (Figure 3-77).
Figure 3-77: Smoothing at a lower subdivision level helps make the forms appear more subtle when you return to the higher subdivision levels.
5. Build up the masseter muscle and the jawline with the Claytubes brush. This gives the creature an imposing silhouette from the front view (Figure 3-78). Using the Standard brush, start to detail the horns (Figure 3-79).
Figure 3-78: Building up the masseter

Figure 3-79: Detailing the horns
![]()
That completes this sculpting exercise. Figure 3-80 shows the final creature with primary and secondary forms sculpted in. Remember that the success of this sculpture is based solely on the anatomical form you create with the limited number of brushes demonstrated in this exercise. Keep in mind that primary and secondary forms like these are the most essential aspect of the sculpting process. The greatest sculptures work because the form is well resolved and realistic. See the accompanying DVD for videos of this character head process.
Figure 3-80: The final sculpt