While ZBrush includes a powerful renderer, when you combine it with Photoshop you can get even higher-quality images, especially when combining different materials as render passes and compositing them in Photoshop. The following technique is based on a workflow shown to me by Scott Patton of Legacy Effects. Figure 8-20 shows three character portraits created by exporting polypainted images from ZBrush to combine as layers in Photoshop. The following tutorial illustrates this workflow in detail.
Figure 8-20: These three images were created using the techniques in this section.

This technique is based on exporting a single render from ZBrush with various material types and then compositing them together in Photoshop using blending modes to create a deep, rich image. For this demonstration, we will use the Alien Head ZTool included on the accompanying DVD. On the disc you will also find the tutorial files for the Fat Demon from the previous edition of this book.
Setting Up the Canvas and Placing the Character
Because this is a portrait image, we’ll reconfigure the canvas from landscape to portrait:
1. Open the main document window and dock it to the side tray by clicking the radial button. Turn off the Pro button, which constrains proportions. Swap the Width and Height values so they read 840 wide by 1120 high. Now click the Double button to double this document size to 2986 × 2240. ZBrush will notify you that this is not an undoable operation. Click Yes.
2. If there were any active ZTools when you resized the canvas, they are now dropped to pixols. Clear the canvas by pressing Ctrl+N. Let’s now change the background from the default gradient to pure black. From the color picker, select black, and under Document, click the Back button. This action assigns the currently selected color to the background. Turn Range and Center down to 0 (Figure 8-21). Your document will now be too large to see on screen so you will need to zoom out. Click and drag the Zoom document button on the right sidebar to view the entire document. You can work in this view, but you will want to press the AAHalf button before you export images. This button will reduce the image by half size and antialias the pixels, giving you maximum image quality.
Figure 8-21: Setting the document background to pure black

3. Switch your active color swatch back to white and draw the character ZTool on the canvas. Turn on Perspective with the controls found under Draw (Figure 8-22). Click the Persp button to turn on Perspective (or press the P hotkey) and adjust the focal angle until the character looks good. Click the Align To Object button to disable to slight rotation that is sometimes apparent as the object moves to the edges of the screen.
Figure 8-22: The perspective controls under the Draw menu

Figure 8-23 illustrates the difference between perspective and orthographic views of a character. Perspective adds a natural sense of depth that more closely approximates the human eye’s view of the world.
Figure 8-23: Orthographic view as seen on the left appears flat and unnatural compared to perspective view on the right

Creating Render Passes
In this section we’ll create several versions of our character with different material settings. These various renders will be loaded into Photoshop and composited together. Since it is important to maintain the exact same positioning between each render pass, now is a good time to store the character’s position on the canvas. You could drop it to the canvas and create pixols, but this would prevent you from making separate subtool passes unless you dropped each to a different layer. Saving a project is the easiest way to ensure you can return to the same position if you accidentally move the character.
ZBrush projects will store many settings, including the object’s position on the canvas so you can always return to the exact same orientation. By storing a project, you can return to the exact same file at any time and render new layers if needed.
1. Click File Save As. Make sure you have your character positioned correctly, your document sized, and your perspective settings correct. ZBrush will save a single ZPR file that includes all this data. This file also contains your ZTool, so you will only need to keep track of a single file.
To make sure ZBrush loads your custom document settings each time the project is loaded, disable the WSize button under the document window. WSize will automatically resize the document to the window size, canceling out your stored document size. Turn off the WSize button and save this setting by pressing Ctrl+Shift+I or choosing Preferences Config Store Config.
2. The first render pass you’ll export is the Basic Material shader. This will give you a nice general color pass with some shading applied. Click the AAHalf button on the right side of the screen  to antialias the document. Under the document menu, click Export. Save this render pass as BasicMaterialColor.psd in PSD (Photoshop) format. You can also turn off polypaint by opening Tool Polypaint and deselecting the Colorize option. the Colorize button under Tool Polypaint. This will allow you to render a second basic material pass with no color information. This technique can sometimes be useful for helping to deepen the shadows in Photoshop. Export this image as BasicMatNoColor.psd.
3. The next pass will involve flat color—just the color as painted on the surface with no shading information. This render pass is often useful as an Overlay layer in Photoshop to help accentuate and deepen the color information. It can also be useful to help create translucent effects. Experimentation with different blending modes in conjunction with different render passes will open many possibilities. From the Material palette, select Flat Color  .
.
If you have filled an object with a material, the only way to change materials is to fill it with another. The default behavior of the ZTool displaying the currently selected material is overwritten. To revert back to this behavior, fill the object with the Flat Color material. From then on, whatever material is selected will be the one displaying on the character.
4. To fill the head with this material, select the Standard brush and turn on M at the top of the screen. Make sure RGB is off (Figure 8-24). Then open the main Color menu and click the FillObject button (Figure 8-25). Repeat this fill for each subtool and export the document as flatcolor.psd (Figure 8-26).
Figure 8-24: To fill an object with a material, make sure M is the only modifier on at the top of the screen.

Figure 8-25: Fill with a material by clicking the FillObject button.

Figure 8-26: The character head with the Flat Color material. All shading information is removed and only the painted color remains.

5. The next render will serve as an Ambient Occlusion pass. Ambient Occlusion renders are used to accentuate shadows, and most major rendering packages have the capacity to create an Ambient Occlusion render. We will use ZBrush’s Ambient Occlusion rendering tool to create this pass. Switch to the Flat Color material. Under Rendering, turn off Shadows and turn on AOcclusion. Click the BPR button at the top of the menu to create this particular render (Figure 8-27). The BPR button stands for Best Preview Render. The BPR rendering engine is new to ZBrush 4.0. It has the benefit of real-world shadows, fur, and subsurface scattering algorithms built in. Save the resulting render as occ.psd.
Figure 8-27: This Ambient Occlusion pass was created using the BPR mode under the Rendering menu.

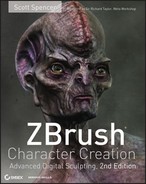
6. We also want to create a cavity pass to help darken the shading in the fine details. A cavity pass will render white for the high areas and dark into the pores and wrinkles. Make sure you are at the highest subdivision level and open the Masking menu.
7. We will create the cavity mask from the highest subdivision level to capture the fine details of the sculpture. Click the Cavity Profile curve to open it. Add points to the curve and change its shape to the one shown in Figure 8-28. Set Cavity Intensity to 100 and click the Mask By Cavity button.
Figure 8-28: The cavity map settings
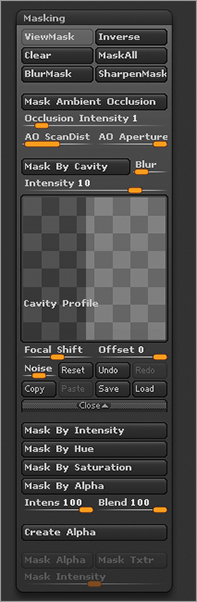
8. With the model now masked by Cavity, make sure you are on the Flat Color material and export an image as cavity.psd (Figure 8-29). This image will be used to help accentuate the details on the sculpture as we layer renders and paint in Photoshop.
Figure 8-29: The cavity map on the character will serve as a detail mask.

9. The final passes are utility renders for depth and masking. The first pass will be a depth grab of the canvas. Recall from Chapter 4, “ZBrush for Detailing,” that you can grab the depth information of the ZBrush canvas as an alpha. We’ll do this now and use the resulting image as a mask in Photoshop for various effects, including simulating depth of field. Open the main Alpha menu and click the GrabDoc button. This will grab a depth sample of the canvas with white values closest to the viewer and black farthest away.
A final version of this appears in Figure 8-30. This is sometimes called a ZDepth image. Be aware that the image will use the actual document resolution although you are displaying the document in antialiased half mode. When you use this image in Photoshop, you’ll have to manually resize it by half.
Figure 8-30: The resulting ZDepth image

The remaining images are to be used for knockout masks if you decide to change the background, or if you decide to isolate the eyes or mouth subtools from the head. To create these masks, turn on MRGB at the top of the screen. This will fill the subtool with color as well as material. Select a color from the color picker and fill each subtool with the chosen color and the Flat Color material by clicking the Fill Object button under the Color menu. Figure 8-31 illustrates this effect. Keep in mind that doing this will delete any polypainting you have applied to the surface!
Figure 8-31: A selection mask image created with the flat color material and different color selections

Finally we will create a specular pass. This will help us accentuate the fine details of the sculpture by creating the impression that they are catching small highlights along the surface of the sculpture. To create a specular pass, fill the sculpture with the color black. Select black and, with RGB on, click Color Fill Object. Now select the basic material and under the Material Modifiers menu, turn the Specular slider up to 50. Create a best render by clicking Render Best. The best render will give you a more refined edge to the highlight. Export the image as spec.psd (Figure 8-32).
Figure 8-32: The specular render pass
This concludes the process of creating our render passes. You are now ready to go to Photoshop and put everything together. Each of these images will be a separate layer in a Photoshop document. By combining them, you can create dynamic and compelling character renders.
The accompanying DVD contains many bonus videos for this chapter. Please be sure to see the Chapter 8 folder for videos on BPR render passes as well as subsurface scattering renders.