In this section we’ll generate a normal map in ZBrush. You have already seen how to generate normal maps in ZBrush. Now we will look at the process in a little more depth, including how to export the map alone. We’ll then move to Maya where we’ll set up shaders and render the normal map (Figure 9-55).
Figure 9-55: The normal map displaying on the character in Maya’s viewport

1. Open the werewolf ZTool in ZBrush. Draw it on the canvas and enter Edit mode. Step down to the lowest subdivision level. Assign PUV tiles by selecting Tool UV Map, set the resolution to 2048, and click the PUV Tiles button. For more information on UV mapping, see Chapter 5.
2. Select Tool Normal Map. In this menu turn on Tangent and SmoothUV. Then click the Create NormalMap button to create the map. When the map is completed, click Clone to move a copy of the map to the Texture menu.
3. From the Texture menu, flip the map in V by clicking the FlipV button. Export the normal map as a TIF file. You will also want to export level 1 as an OBJ file.
When exporting OBJ files from ZBrush, under the main Tool menu, click the Export menu and make sure Mrg is on and Scale is set to 1.
This will merge your UVs on export. These settings will maintain your object scale and orientation (Figure 9-56).
Figure 9-56: Import export and tool export options

Maya Normal Map Setup
Now that you are familiar with the process of generating the normal map in ZBrush, we are ready to move into Maya and render this character with a normal map applied.
1. Open Maya. Import the OBJ file of your level 1 mesh by choosing File Import and selecting OBJ as the file type. Always be sure to set Make Multiple Objects to False (Figure 9-57).
Figure 9-57: Import options in Maya

2. Select the mesh, and under the Polygons menu, click Normals Soften Edge. This will soften the edge normals and give the faceted model a smooth appearance (Figure 9-58). Right-click the model, and from the Marking menu, assign a new shader and select a Blinn (Figure 9-59). This creates and assigns a new Blinn shader to the object.
Figure 9-58 Softening the edge normals to give the impression of a smoother mesh

Figure 9-59: Creating a new Blinn shader

3. Press Ctrl+A to bring up the Attribute Editor. Select the Blinn shading node (Figure 9-60).
Figure 9-60: The Blinn shading node in the Attribute Editor

4. In Maya, normal maps are loaded into the bump channel. Click the check box next to the bump slot in the Blinn shader. In the Create Render Node window, select File (Figure 9-61) to attach a file node to the bump slot in the Blinn shader. This will open the bump 2D node shown in Figure 9-62. Change the Use As value to Tangent Space Normals (Figure 9-63). This tells the renderer to interpret the bump map as a normal map and not as a grayscale map.
Figure 9-61: Select File in the Create Render Node window.

Figure 9-62: The bump2D node
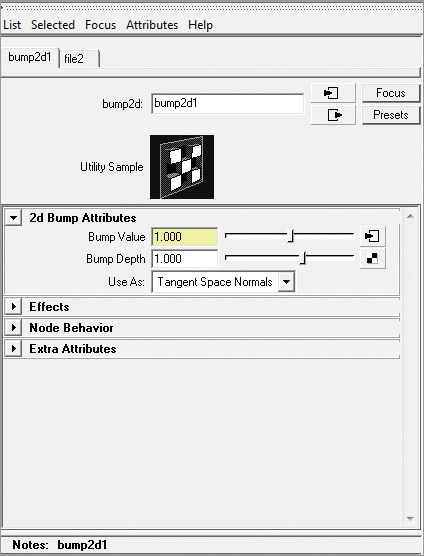
Figure 9-63: Set Use As to Tangent Space Normals.

5. Click the downstream arrow next to the Bump value. This will open the file node driving the bump map node (Figure 9-64). Here you can load the normal map. Click the file browser menu icon and select the normal map exported from ZBrush.
Figure 9-64: The file node window in the Attribute Editor

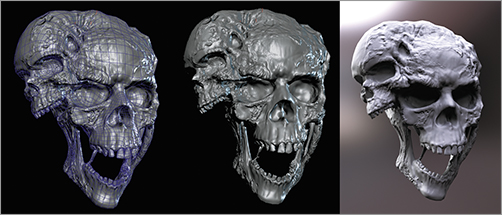
That completes shader setup. Now create a directional light by clicking Create Lights Directional. Rotate this light to illuminate the model. You can switch to lit view by pressing the 7 key on your keyboard. Maya is capable of displaying the normal map in the viewport. To turn on normal mapping, click Renderer in the Viewport menu and select High Quality Rendering. Select Shading and click Hardware Shading. The normal map will now display in the viewport. The map can be rendered like this using hardware shading or through the mental ray renderer. Figure 9-65 shows this character rendered in the viewport as well as in the software renderer using Final Gather and Image Based Lighting.
Figure 9-65: This character head is rendered with a normal map. The first image is the normal map with wireframe in the Maya viewport. The second image shows the normal map rendered in the Maya viewport. The third image is the normal mapped mesh rendered in mental ray with Final Gather and Image Based Lighting.
To render the normal map with mental ray, choose Window Rendering Editors Render View, and select mental ray as the renderer (Figure 9-66).
Figure 9-66: Selecting mental ray as the renderer

Congratulations! You have now created and applied a normal map in Maya.