The Brush menu contains all the real-time sculpting tools that you will use while working on an active tool in the document window. These brushes can be used on the model at multiple subdivision levels while you freely rotate in Edit mode.
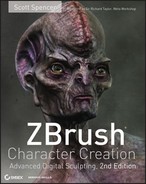
You may notice under the Tool menu there are several brushes listed, including the Simple brush. These are not sculpting brushes and we will not use them at all. We explore these in the bonus chapter on the DVD. They are 2.5D painting brushes and are not to be confused with 3D sculpting brushes, which can be found in the Brush palette. In this chapter, we’ll focus on the Brush palette tools, which can be used on a model that is in Edit mode. The Brush palette contains a versatile selection of brushes and brush modifiers (see Figure 2-2). It also allows artists to create and store their own custom brush variations that are loaded each time ZBrush starts. Several specialized masking options are also available, as well as control curves to facilitate altering the way the brushes interact with the surface.
Figure 2-2: The Brush window
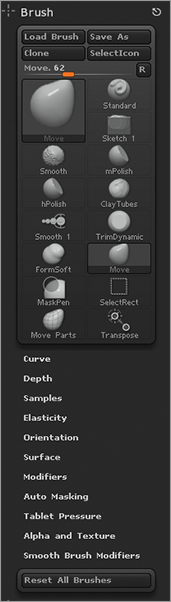
At the top of the Brush window, you will find a selection of brush icons. These represent the most recently used brushes and are not representative of the full brush set. To access the complete selection of brushes, click the active brush icon. The active brush icon is the large button in the upper left of the Brush menu as well as the upper left of the standard interface. This opens the brush fly-out menu (Figure 2-3).
Figure 2-3: Clicking the active brush icon expands the Brush menu fly-out.
Beneath the brush icons are several sliders, curves, and icons. These represent the many different modifiers you can apply to your brush. The most important is the BrushMod slider. The BrushMod slider affects each brush differently depending on the brush selected. For instance, when Pinch is selected BrushMod determines whether the brush pinches in or out (Figure 2-4); however, when you’re using the Smooth brush, BrushMod controls the height of the smoothing effect (Figure 2-5). We used this slider to affect the Pinch brush when working on the lion head in Chapter 1.
Figure 2-4: The BrushMod slider changes each brush differently. When using Pinch, the slider determines if faces pinch in or out.
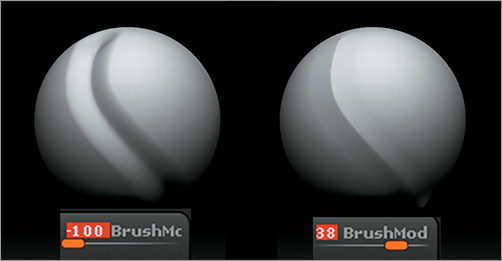
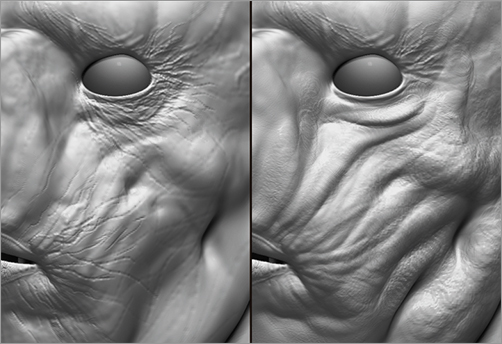
Figure 2-5: The BrushMod slider determines if the smooth brush affects the recesses or the high points of the sculpted detail. (The center image is the original, unmodified mesh.)
Table 2-1 describes the most frequently used ZBrush sculpting tools.
Table 2-1: Some basic ZBrush sculpting brushes
| Brush | Description |
| Standard brush | The default ZBrush sculpting brush. Pulls faces directly out in the direction of the surface normal under the center of the brush. |
| Move brush | Moves faces as a whole beneath the brush falloff. |
| Elastic brush | Similar to Inflate but the Elastic brush retains more of the underlying surface forms. |
| Displace brush | This brush works similarly to the Standard brush, but keeps the details intact in such a way as to suggest that the form underneath has swelled or been displaced. |
| Inflate brush | Pulls faces out along their surface normal direction as opposed to one normal direction as with the Standard brush. |
| Magnify brush | Magnifies the faces underneath. |
| Blob brush | This brush is particularly good at producing certain organic effects very quickly. In contrast to other brushes, the uniformity of its stroke is affected by irregularities in the surface under the stroke, which means that it typically produces short, irregular blobs (hence the name). This won’t be so apparent if it is used on smooth surfaces. The Blob slider determines whether the brush pulls the surface out or pushes it in. |
| Pinch brush | Pulls faces together. The BrushMod slider affects whether the faces are pulled in to a peak (100) or down in a valley (–100) or together in a flat (0). |
| Flatten brush | Pulls or pushes faces to a single plane depending on the BrushMod slider setting. |
| Clay brush | This is a general-purpose brush for sculpting with alphas. The Clay slider scales the alpha as a whole; this affects not only the intensity of the sculpt, but also the size (width and height) of the brush stroke. The standard ZIntensity control affects the magnitude of the alpha up/down displacement effect, but does not affect the size of the alpha. |
| Morph brush | Blends between the current mesh and a stored morph target. |
| Layer brush | Adds a single layer of depth. ZIntensity determines the amount the Layer brush displaces a surface outward (if ZAdd is selected) or inward (if ZSub is selected). |
| Nudge brush | Slides edges along the surface. |
| SnakeHook brush | Pulls faces out into a tapered horn-like shape. |
| ZProject brush | Projects depth or color onto the current mesh. |
| Smooth brush | Smoothes the underlying geometry. BrushMod 100 smoothes recesses; BrushMod –100 smooths high points. |
| Mesh Insert brush | Inserts other meshes into the current tool. |
| Clip brushes | Pushes all geometry to the line, circle, or rectangle that is being drawn out. |
| Masking Brushes | Will allow masking with a circle, curve, rectangle, lasso, or freeform. |
| Trim brushes | Will trim away the surface creating a hard surface along the stroke direction. |
| Planar brushes | Will create a plane to the surface based on the tilt and elevation of the stroke. |
| Polish brushes | Will smooth, flatten, and shine the surface to represent metal. |
| Select lasso brushes | Will select any mesh under the drawn out selection based on selection marquee. |
| Move Part | This will move a single geometry shell. |
| Move Topological | Will move the mesh geometry based on the topology. |
| Move Elastic | Will apply an elastic stretch to the geometry that will maintain topology. |
For more information on the brushes, visit the ZBrush wiki: www.zbrush.info/docs/index.php/Brush_Types.
Other brushes such as Mallet, Gouge, and Stitch are available. These are specialty brushes, which are created by combining existing brushes, strokes, and alphas. These specialty brushes are based on macros from ZBrush 3.0. Experiment with these brushes on a sphere or plane to see the effect they have.
Standard vs. Inflate Brush
The difference between the Standard and Inflate brushes lies in how the faces are pulled out from the surface. The Standard brush pulls all faces beneath the brush out or in a single direction. The Inflate brush pulls faces out along the normal of the face. The surface normal is the direction that points straight out from any four points. The following image illustrates this difference.
The Brush Menu
ZBrush 4 introduces many new options under the Brush menu. Here you will find some familiar options as well as some new additions. In this section I will briefly describe each submenu.
Curve Curve controls the edit curve for the currently selected brush. We will use this to create a custom brush later this chapter. There is no longer a smoothing curve option because this curve becomes the smoothing curve when you press Shift. Changes made while holding Shift will only affect the curve for the Smooth brush.
Depth The Depth menu allows you to control the depth into the surface that your current brush is active. Imagine it as a control for how deep your tool is being pressed into the clay.
Samples Samples control how often the brush samples the surface as it is in use. The ZBrush brushes function by sampling the depth underneath the brush to determine how to affect a rough surface or a surface that is curving toward or away from the viewer. Changes to these values can impact the effect your brushes give. Stabilize Orientation, for example, is useful when you’re using a brush on a rough textured surface. It helps reduce the inflating or artifacting that might occur when points intersect due to your brush strokes.
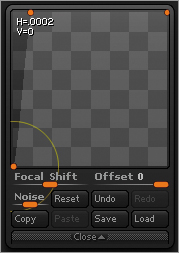
Surface Surface allows you to add noise to the brush. This menu also has a curve to exercise fine control over the noise options.
Modifiers The Modifiers submenu contains various modifiers to the brush stroke. Tilt gives the effect that the brush is tilted in space as it touches the surface. Auto Smooth automatically smooths the surface after each stroke. The Trails option is a very useful way to even out a brush stroke. It is similar to LazyMouse but without the significant delay to your stroke. Trails will create multiple copies of your stroke and average them together. Try it on a sphere to get a feel for the effect.
Auto Masking Auto Masking contains the brush masking options. Here you will find options such as Mask By Polygroup, Directional, Cavity, and Color Mask. If you set the Mask By Polygroup slider to 100, your brush will only affect the first polygroup it touches. This is very useful in conjunction with group loops and the Move brush.
Directional Masking Directional Masking will force the alpha to follow the direction of the stroke at all times. This works best with a dot’s stroke and roll enabled.
Cavity Masking Cavity Masking will isolate the high or low points of the mesh from your brush strokes. I find this very useful in polypaint to paint a color only into the wrinkles and then paint highlights just on the raised areas.
Color Masking Color Masking allows you to use the polypaint data as a mask while you sculpt. This can be useful for adding details on or between scales, for example. This technique also has many applications in hard-surface sculpting with ZBrush. You can create complex masks by simply projecting images on the model with ZAppLink and saving them as polypaint data.
Tablet Pressure Tablet Pressure offers settings that control how each brush behaves with the graphics tablet. When Use Global Settings is on, all brushes will conform to the settings in Preferences Tablet.
Alpha And Texture Alpha And Texture provide you with control over how alpha and textures are tiled and aligned to the brush. This option also allows you to access the polypaint blending mode options via the Polypaint mode slider.
Smooth Brush Modifiers The Smooth Brush Modifiers submenu gives you fine control over the Smooth brush. For example, Alt Brush Size allows you to set a different size for the Smooth brush that is automatically enabled when Shift is pressed. Weighted Smooth mode offers several options for the Smooth brush.
The Brush Modifiers
Table 2-2 describes a variety of additional options for modifying brush behavior.
Table 2-2: Additional brush menu options
| Brush menu option | Description |
| Curve | Contains the curve controls for the currently selected brush. The curve will automatically become the Smooth curve when Shift is pressed. |
| Depth | Contains brush depth and gravity controls. |
| Samples | Controls how the brush samples the surface as it sculpts, altering the effect of the strokes. |
| Elasticity | Modifies the elasticity settings for brushes. Elasticity alters the way the surface behaves as parts are pulled farther away. |
| Orientation | Controls for the orientation of the alpha as the brush is stroked on the surface. The alpha can be spun while stroking. |
| Surface | Contains noise controls. |
| Modifiers | Provides general brush modifier controls, including the BrushMod slider as well as Smooth, Pressure, Trails, Tilt, and others. |
| Auto Masking | Controls the automatic brush masking options. Masking by Polygroup, Direction, Cavity, Backface, Color, and Topology are available here. |
| Tablet Pressure | Controls the tablet pressure options. |
| Alpha And Texture | Offers alpha options as well as brush blending modes. The Polypaint mode slider will allow you to select from the color blending modes Standard, Colorize, Multiply, Lighten, and Darken. |
| Smooth Brush Modifiers | Provides fine-tuning control of the Smooth brush. |
Brushes are further modified by alphas and strokes. Alphas are grayscale images that are imported into ZBrush or selected from the default alpha set. They serve as the shape of the brush itself. Alphas can also serve as stencils or texture stamps, which we’ll cover in Chapter 4, “ZBrush for Detailing.” Figure 2-6 illustrates the effect of various alphas combined with different strokes.
Figure 2-6: The effects of various strokes with different alphas
Alphas are grayscale images that control the shape of the brush. Strokes control how the alpha is applied to the surface by the selected brush.
The Edit curve controls the strength of a brush over the course of its center to the outermost falloff ring. The point on the left of the curve represents the brush strength at its outer radius, whereas the point at the right represents the strength of the effect at the brush’s center. Manipulating the Edit curve can create many interesting brush effects, as you can see in Figure 2-7.
Figure 2-7: Examples of various Edit curve settings
One common edit I make to the Edit curve is what I call creating a “plateau” with the brush curve. By selecting the Inflate brush and changing its Edit curve to that shown in Figure 2-8, I can drastically alter the manner in which the brush adds form to the surface. By giving the brush a more subtle falloff, strokes build in a more gradual fashion, thus making it easier to create changes in the surface that are less pronounced. This is similar to the effect of the Claytubes brush but because it uses no alpha for its effect and is based on the Standard brush type, you will find subtle and valuable differences in how it affects the surface.
Backface masking is useful when you’re working on thin meshes such as clothes, wings, or other objects where the front and back faces are close together. If you are dragging a stroke on an object where the thickness is less than the size of the brush, often the stroke will carry over to the opposite side. Backface masking eliminates any faces other than the ones on the side on which you are working, thus reducing this problem.
The Gravity modifier is found under the Brush Depth menu. This modifier helps reproduce the effect of gravity or wind on a surface. Faces are shifted in the direction of the arrow in relation to the model’s current position on screen. To use this modifier, select the Gravity arrow and position it in the direction you want the force to pull. Then, adjust the slider for the correct strength. This works well for folds of skin with the Inflate or Elastic brush; it helps introduce the effect of weight on hanging folds of flesh. The Gravity modifier is also helpful when you’re sculpting drapery—positioning the arrow horizontally can create the impression of wind billowing in a fabric. In Figure 2-9, the Standard brush was used to create the stroke on the top. On the bottom, the same brush was used with the addition of a Gravity modifier. Notice how the weight of the stroke is along the bottom edge as if it is being pulled down. Keep in mind that this effect is relative to the model’s position on the canvas at the moment of the stroke, not its pivot point. You could easily sculpt the effects of wind by simply changing the direction of the Gravity modifier arrow.
Figure 2-9: The Gravity modifier mimics the effect of gravity on the stroke.
Cavity masking masks out the recessed areas of the sculpture, allowing you to paint and sculpt only on the high points. This effect can be tuned using the options under Brush Masking Cavity. This same mask is also available under Tool Masking Mask By Cavity. Figure 2-10 illustrates the effect of this button. The difference between the cavity masking in these two areas is that the Cavity Masking command in the Brush menu is controlled by the curve but there is no visual indication of what areas are masked. This brush-based cavity masking is a real-time masking function that updates and changes as you sculpt the mesh. The cavity masking available under Tool Masking does not change in real time. When using Tool Masking Mask By Cavity, you’ll see which areas are masked; however, the mask is set and will not update as the surface is changed. In many cases this may be desirable as it allows you to isolate the high or low points on a sculpture and modify only those areas in the confidence the masked areas will not be affected (Figure 2-11).
Figure 2-10: Cavity masking isolates the high or low points of the surface from editing.
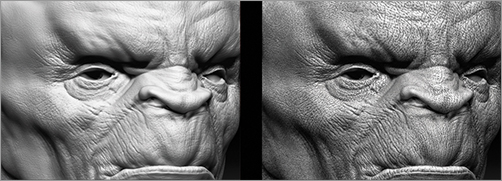
Figure 2-11: A cavity mask from Tool Masking Mask By Cavity
Saving Custom Brushes
The Brush Manager makes saving your own custom brushes simple. In this section, you will create a custom version of the Smooth brush. This brush will be saved in the default ZBrush brushes folder, where it will be loaded each time ZBrush starts.
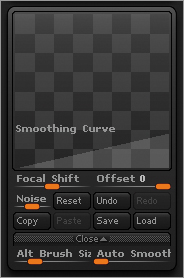
In Figure 2-12, notice how the Smooth brush can overpower the surface, removing much more form than you might intend. By adjusting the Smoothing Curve and Smooth brush settings, we’ll create a brush that does not have this effect. We can then save it as a custom brush for later use.
Figure 2-12: The Smooth brush with default settings can be destructive to surface forms.
On the book’s DVD you’ll find a selection of custom brushes, including this one, called softSmooth. Experiment with these brushes and make your own. After getting some experience with the ZBrush toolset and customizing some brushes, you can build a personal library of brushes. Follow these steps to create and save your own custom brush:
1. Select the Smooth brush from the Brush palette. Set BrushMod to 0 and click the Clone button. This creates a copy of the Smooth brush that we can alter rather than replacing the brush.
2. At the top of the Brush menu is the Curve submenu. Open this and while holding the Shift key alter the curve to look like Figure 2-13. When you press Shift, the Brush Curve will convert itself to the Smooth Curve.
Figure 2-13: Modify the Smooth Curve to look like this to create our custom softSmooth brush.
This ensures the brush will be weaker at its center of influence than the default Smooth. The far-left point represents the strength of the brush at the outermost ring; the right point represents the strength at the center of the brush. Try this brush on a surface. Notice how the effect is much softer and less destructive.
3. To save this brush, click Save As and name the new brush softSmooth. If you save in Zbrush4/Zstartup/brushPresets, the brush will be available each time you start ZBrush. The Brush Manager will also save any alpha and stroke settings when you save the brush.
If you want this brush in the Lightbox instead, save it to Pixologic ZBrush4 ZBrushes. This causes ZBrush to load the brush into the program without cluttering the brush menu with it. You can easily access it in Lightbox whenever needed.
The Clay Brushes
ZBrush 3 includes several brushes designed to take advantage of the ability to interactively sculpt millions of polygons. These brushes work on the highest subdivision levels of the ZTool; I call them the Clay brushes. They include Clay, Claytubes, Snakehook, and Rake, as well as several brushes that are variations, such as Mallet, Slash, and Gouge.
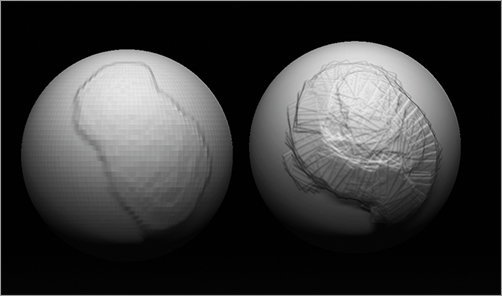
The Clay brushes are designed to take advantage of the capability to manipulate millions of polygons in real time. Unlike the Standard, Inflate, and Layer brushes, the Clay brushes function best when the mesh is at a higher subdivision level. These brushes add material in a loose organic stroke, which feels like actual clay. Figure 2-14 shows the difference in the same stroke on a low poly sphere and a higher subdivided one. The sphere on the left is 8,000 faces while the one on the right is 2 million. ZBrush will allow you to subdivide any mesh to a level that the current machine can handle based on how much physical RAM is installed. In Chapter 3, “Designing a Character Bust,” we’ll discuss base meshes and optimizing for ZBrush in more detail.
Figure 2-14: Claytubes and rakes on both a low-res and a high-res mesh. Notice the increased fidelity of the brush effect on the higher-resolution mesh.
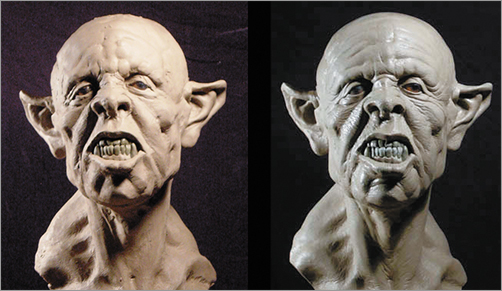
The Rake tools in ZBrush are based on a type of real-world sculpting tool. In clay sculpting, rakes are small, serrated blades that are used to scrape down clay at levels determined by how sharp and deep the teeth are (Figure 2-15). Rakes allow the sculptor to rough in forms in a loose manner, then refine them by using smaller and smaller rakes until the whole surface is smoothed. In Figure 2-16, I started the ogre bust with basic planes using rake strokes; as I work the surface, the rakes become smaller and the surface finer.
Figure 2-15: Real-world rakes
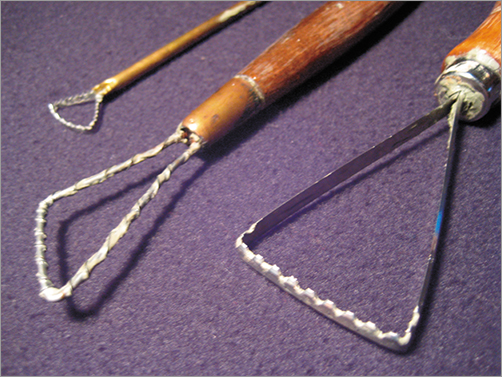
Figure 2-16: The ogre on the left consists of the basic forms with prominent rake marks; the right image shows the ogre bust after the rakes have been refined and the surface detailed.
The procedure for working with rakes is to crosshatch across the form you are trying to refine, using smaller draw sizes with each pass. Figure 2-17 shows how this is done in water-based clay. With a combination of crosshatching and stroking along the direction of the form, you can attain a pleasing surface and easy transitions between forms.
Figure 2-17: Close-up of rake strokes in water-based clay on the left and ZBrush on the right

Typically, forms are built up with any combination of the Claytubes, Standard, and Inflate brushes and then raked down into more specific forms with the Rake tool (Figure 2-18). This may be a difficult concept to fully grasp without seeing it in action. To see rakes in use, watch the video files included on the DVD for this chapter.
Figure 2-18: An example of Rake and Claybrush strokes at different levels of refinement
What Is a Rake?
Featured Artist: Cesar Dacol
A rake is a tool used by sculptors to remove excessive material, such as clay, from a sculpture. By employing the rake, you are able to shape and define the forms of our creation.
In sculpture, there two methods of creation. One is additive in the form of clays. The second is subtractive, as in marbles. Each method utilizes the rake in its sculptural process. With marble, you use various chisels with ever-refining teeth to form, shape, and polish the piece. You use clay rakes in a similar manner to define the silhouette and curvature of your forms, refining them to a smooth finish (if that is the desired effect).

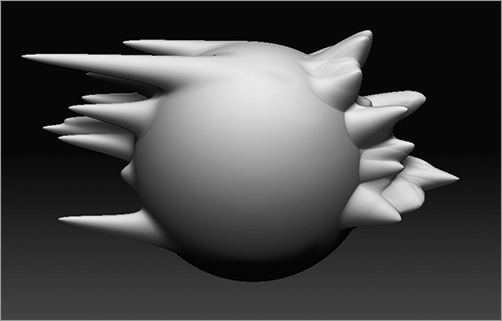
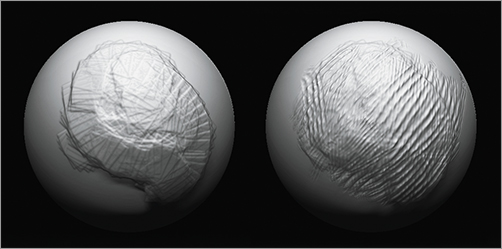
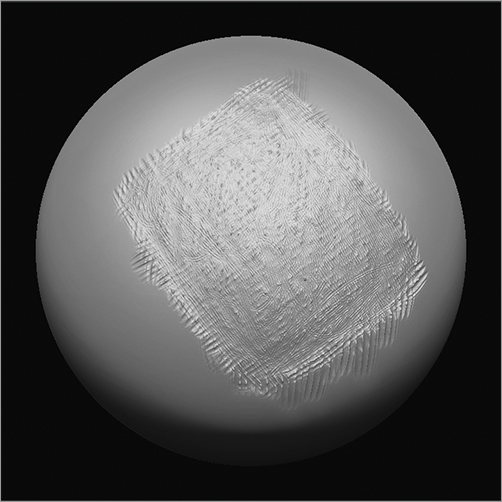
Here we have a sphere in which I have dragged two opposing strokes across the surface. It is where the two strokes meet that the most material is being removed:
By pulling the brush in the direction of the form we want to express and countering the stroke in the opposite direction, we’ll slowly shape the contour. As we repeat this technique over and over, we create the desired form or shape.
We continue this process with smaller and smaller diameters or brushes. The finer the teeth and density of our mesh, the closer the surface will resemble flesh.
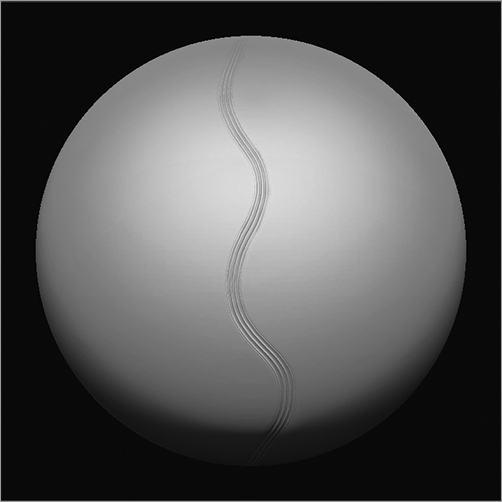
In the following image, we have a sphere with a wavy line down the center. Notice how the bounce of light is enhanced by the directionality of the rake groves. This effect creates a tidy path for light to travel down and within.
This idea of strokes and patterns manipulating light patterns is not a new one and in fact has been utilized by oil painters on their canvases for centuries. Strokes are an essential part of sculpture and drawing, and you should pay attention to them. Whether we intend it or not, we are sending a message with the quality of our strokes.
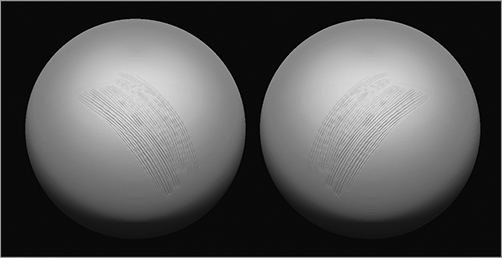
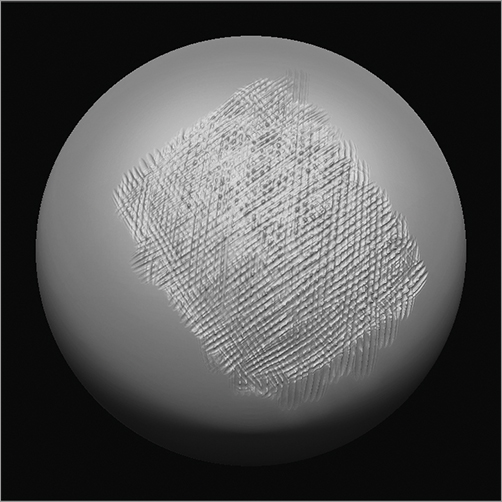
Here you see the same form with two different stroke patterns. Notice how the light is perceived differently. Also notice how your eye follows the direction of the strokes.
Directionality is obviously the goal here. Observe your face in the mirror. Notice how there is a natural tension to the surface of your skin as it is stretched over fat, muscles, and bones. There is a directionality to your pores, which in turn are affected by gravity and such.
If you are aware of these rules, you can employ them in your sculpture and have light travel over your forms.
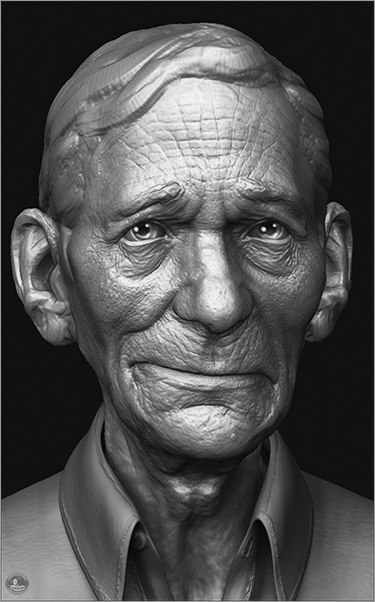
Of course, if you use this method, avoid smoothing your model completely or removing all the Rake tool markings. Such markings lend an energy to the sculpture. By utilizing finer rakes or smaller diameters, you can define the forms more precisely, eventually reaching a point where you’re defining the most minute surface patterns of the skin. Rakes were not the only tool and brush utilized to create our final image, but they were the foundation.
The Polish, Planar, and Trim Brushes
ZBrush now comes with a variety of tools for creating hard-surface models. While these brushes will not be used heavily until Chapter 10, “ZSketch and Hard-Surface Brushing,” I would like to introduce them here. These brushes are new developments for ZBrush that began in version 3.5 and have been in constant development through to version 4.
The Polish, Planar, and Trim brushes are exceptional for creating complex man-made shapes like armor and weapons. The brushes can also be useful for doing what is called planar analysis. Planar analysis is where a complex organic shape is broken into its most basic planes to help analyze and understand the surface and how to sculpt or draw it. It’s like taking away all the curves to help you see the underlying form and structure. One important part of making sculptures that feel and look natural is to retain the basic structural form of each part of the figure. This is best accomplished by understanding how to reduce objects into their basic shapes. Figure 2-19 shows a human figure with one kind of planar analysis applied.
Figure 2-19: This human figure is reduced to basic planes to help you understand the forms.
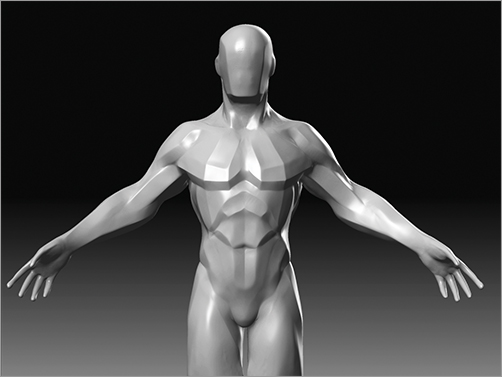
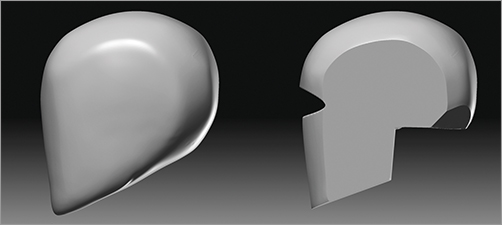
Figure 2-20 shows the basic head form sculpted with ZBrush standard sculpting tools as well as the same form sharpened and planed with the Polish, Trim, and Clip brushes.
Figure 2-20: Head planar analysis
While we work on the head in this section, I will point out some of the kinds of basic planes. A valuable exercise is to re-create a basic planed version of a head or even a full human body. This helps you grasp the most fundamental form of the shapes you are trying to create. See my book ZBrush Digital Sculpting Human Anatomy (Sybex, 2010) for a tutorial on sculpting a planed human body.