
Split Views on iPad
When the iPad was first introduced, Apple changed the name of the operating system from iPhone OS to iOS, and added some iPad-specific features to the SDK. The most distinctive is probably the split view. This is a UI metaphor that combines a narrow view on the left side of the screen with a wide view on the right. In portrait orientation, the left view usually can be shown or hidden, whereas in landscape view the left view is always present.
Several built-in apps on iOS use the split view. Mail shows message senders and subjects in the left view and the message content on the right. Settings has the master list of settings categories on the left and the UI for the selected topic on the right. The split view lends itself well to this sort of a “master-detail” metaphor: the main list of items is in a table on the left, and selections in this table populate the contents of a detail view on the right.
Conveniently, this is also how our Twitter app works. We have a list of tweets, and when we tap one of them, we bring up details on it in a new view. For starters, let’s adapt our app to use the split view like this.
Adding a Split View to the Storyboard
To adopt the split view, we need to go to the storyboard and zoom out for a view of our current view controllers. Right now, they’re in a left-to-right flow, starting with the navigation controller, and proceeding through the root view controller, the tweet detail view controller, and the user detail view controller. Go to the Object library, find the Split View Controller icon (shown in the figure), and drag it to the storyboard. The drag will put four scenes on the storyboard, so do the drop someplace where there’s lots of room to work with.
Post-drop, the default split view goes off in a couple of different directions, as seen in the following figure. On the left, the split view controller scene has one connection that goes up and right to a navigation controller, and from there to a table view controller. The split view controller also has another connection that goes down and right, to a plain and empty view controller.
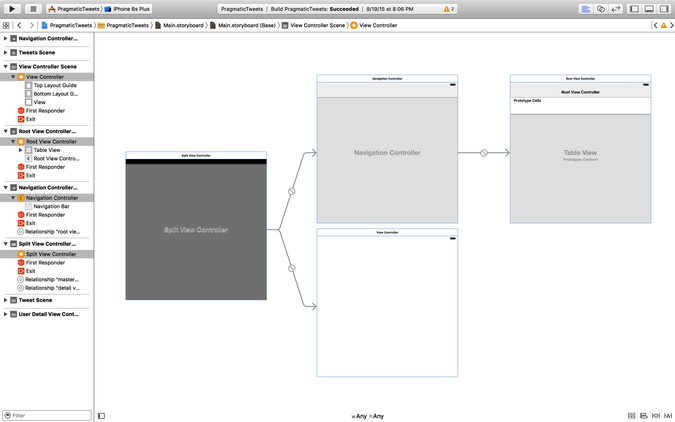
With the default arrangement of scenes, the navigation controller exists largely to provide a navigation bar for the master table view, since the table will often need to have add and edit buttons. Meanwhile, the default detail view is empty, since its contents will totally depend on the content presented by the table and which row is selected.
We already have suitable view controllers to play both of these roles, so rather than customizing the default scenes, we will delete them and replace them with our own. Our RootViewController, the scene currently labeled Tweets, will replace the default one, and our TweetDetailViewController will become the detail scene. Here’s how we’re going to do that:
-
Start by deleting the split view’s default table view controller, the one at the upper right that says Root View Controller. We do this by selecting the scene, or its view controller icon in the scene list, and pressing the Delete key (⌫).
-
The split view is going to control the relationship between the Tweets view controller and the various detail view controllers, so we need to let it move around the storyboard by breaking its existing connections. First, Control-click our old initial navigation controller to bring up its connections HUD, and click the X to break the connection to the root view controller. Next, select the segue—the circle in the arrow between the Tweets scene and the Tweet Details scene—and delete it as well.
-
Now that it’s free, we can connect our Tweets table to the master portion of the split view. Drag the Tweets scene up to the right of the split view’s navigation controller. Control-click on the navigation controller and find the connection called Root View Controller. Drag from this connection over to the Tweets scene to make the connection.
-
Now for the detail part of the split view controller. Delete the empty default detail scene that came with the split view controller. Drag our original navigation controller into the space that was just vacated. Control-click the split view controller to see its connections. The Detail View Controller connection is now empty; drag this to the Navigation Controller scene.
-
But where does this navigation controller go? After all, we broke its connection to the Tweets scene that it was originally connected to. Instead, Control-click the navigation controller to bring up its connections HUD, and connect the root view controller to the Tweet Detail View Controller scene. Now the bottom half—the “detail” flow—of our split view controller goes from Navigation Controller to Tweet Detail to User Detail.
-
Finally, select the split view controller, bring up its Attributes Inspector (⌥⌘4), and select the Is Initial View Controller check box so that the split view will get to do its thing when the app comes up.
Wow! That’s a lot of clicky-draggy! Well, if nothing else, this should allay any fears about deleting and reconnecting storyboard scenes. And if things ever go truly bad, there’s always the Undo command. At any rate, the storyboard should now look like the following figure, with the upper branch of the split view going to a navigation controller and our Tweets table, and the lower branch going to the Tweet Detail scene, and then on to User Detail.

Go ahead and run the app like this, with the scheme selector still set to some flavor of iPad. In portrait, all we’ll see is the unpopulated detail view with its empty labels for the username and tweet text. However, a left-to-right drag gesture will reveal the master view, the list of tweets, on the left. Rotating the Simulator to landscape (⌘← or ⌘→) will cause the master list to always be visible, as seen in the following figure.

So far, so good! The master view appears when it needs to in landscape and can be brought up in portrait, and everything we did to populate the list of tweets is still working as before.
There’s just one thing: tapping on the rows no longer does anything. Previously, we had created a segue to connect the table to the Tweet Detail scene, which gave us the navigation between scenes. But we deleted that segue, and now there’s no way to send data between the scenes. So what do we do now?
Connecting Scenes in a Split View Controller
When we built our navigation in the storyboard, creating the segue from the table to the detail scene took care of handling taps on the table for us, and telling us (in prepareForSegue) which destinationViewController was coming in, which is how we told the second view controller which tweet to show in detail. With that gone, we will have to handle things on our own.
First we go to RootViewController.swift, where we’ll write an implementation of tableView(didSelectRowAtIndexPath:). The trick is going to be getting information to the TweetDetailViewController, which we don’t have a reference to: it’s not a property, and we don’t get told about it via a prepareForSegue method anymore.
The only thing these two view controllers have in common anymore is that they’re both connected to the same UISplitViewController. As it turns out, that’s exactly the key we need. The UIViewController class has an optional property, splitViewController, defined as “the nearest ancestor in the view controller hierarchy that is a split view controller.”
Now let’s think about what we can do with that. The UISplitViewController has an array property, viewControllers, that represents the child view controllers it manages. So there should be two: a navigation controller in front of our RootViewController, and another navigation controller in front of the TweetDetailViewController.
| 1: | override func tableView(tableView: UITableView, |
| - | didSelectRowAtIndexPath indexPath: NSIndexPath) { |
| - | let parsedTweet = parsedTweets[indexPath.row] |
| - | if let splitViewController = splitViewController |
| 5: | where splitViewController.viewControllers.count > 1 { |
| - | if let tweetDetailNav = splitViewController.viewControllers[1] |
| - | as? UINavigationController, |
| - | tweetDetailVC = tweetDetailNav.viewControllers[0] |
| - | as? TweetDetailViewController { |
| 10: | tweetDetailVC.tweetIdString = parsedTweet.tweetIdString |
| - | } |
| - | } |
| - | tableView.deselectRowAtIndexPath(indexPath, animated: false) |
| - | } |
This short method starts on line 3 by getting the ParsedTweet from our model that corresponds to the clicked row, just like in the navigation segue case.
Next, we make sure the structure of the scenes is what we expect. Lines 4--5 test to see if the splitViewController property is non-nil (since we don’t need to do any of this if we’re in a split-view scenario) and if the splitViewController has at least two child view controllers, since we will need to work with the second one. Lines 6--7 check that the first VC in the detail flow—the bottom half of the split in the storyboard—is a navigation controller, and that its root VC is a TweetDetailViewController (lines 8--9).
If all of this works out, then line 10 assigns the tweetIdString property. As a handy side effect, this kicks off the reloadTweetDetails method called by the didSet property setter that we wrote back in Sending Data to the Second View Controller. In fact, this is the reason we needed to write that setter: in the navigation case, we could always count on viewWillAppear to call reloadTweetData, but in the split view scenario, the detail view will appear at launch and just stay there, so we need to make sure that setting tweetIdString will update the display.
Finally, outside all our storyboard-hierarchy logic, line 13 always runs at the end of the method and deselects the tapped row so it doesn’t stay highlighted.
Run again and our selecting a tweet populates the detail view as expected. With all the space afforded by the iPad, tweets that have images make particularly good use of the screen, as seen in the following figure.

Actually, though, the images introduce a small bug. Now that the detail view is always visible, once we set an image in the image view, nothing ever un-sets it. That wasn’t a problem in our navigation flow, which was creating and populating a new detail view every time, but now if we click a tweet without an image, the old one hangs around. We need to fix this in TweetDetailViewController, in the part of handleTwitterData(urlResponse: error:) that sets the image:
| 1: | if let entities = tweetDict["entities"] as? [String : AnyObject], |
| 2: | media = entities["media"] as? [[String : AnyObject]], |
| 3: | mediaString = media[0]["media_url_https"] as? String, |
| 4: | mediaURL = NSURL (string: mediaString), |
| 5: | mediaData = NSData (contentsOfURL: mediaURL) { |
| 6: | tweetImageView.image = UIImage(data: mediaData) |
| 7: | } else { |
| 8: | tweetImageView.image = nil |
| 9: | } |
The only thing that’s new here is the trivial else block from lines 7--9. It says, “if the tweet doesn’t have an image URL, nil out the image in the UIImageView.”